
Allied Warships
HMS Cornwall (56)
Heavy cruiser of the Kent class
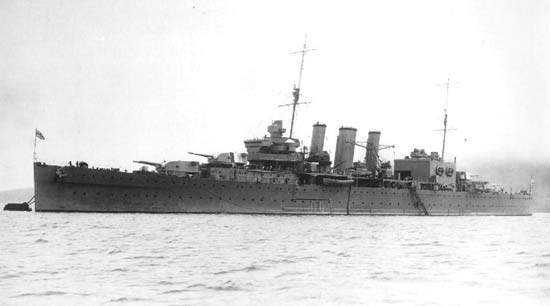
HMS Cornwall in 1938 after reconstruction
| Navy | The Royal Navy |
| Type | Heavy cruiser |
| Class | Kent |
| Pennant | 56 |
| Built by | Devonport Dockyard (Plymouth, U.K.): William Beardmore & Co. (Dalmuir, Scotland) |
| Ordered | 2 Jun 1924 |
| Laid down | 9 Oct 1924 |
| Launched | 11 Mar 1926 |
| Commissioned | 8 May 1928 |
| Lost | 5 Apr 1942 |
| Loss position | 1° 54'N, 77° 45'E |
| History | On 4 April 1942, the heavy cruisers HMS Cornwall (Capt. P.C.W. Manwaring, RN) and HMS Dorsetshire (Capt. A.W.S. Agar, VC, DSO, RN) left the Colombo as enemy air attacks on that place were expected. After a hurried refuelling at sea, set out for Addu Atoll shortly after midnight. At midday on the 5th, a spotter plane from the Japanese cruiser Tone sighted the two British cruisers in the Bay of Bengal. Bombers were immediately flown off the carriers to attack the two vessels. HMS Cornwall was sunk in position 01°54'N, 77°45'E in 12 minutes by nine 250 to 550 pound bombs, and six near misses. All boiler and engine rooms were out of action within minutes, thereby resulting in a lack of power to the pumps and fire fighting equipment. HMS Dorsetshire was also lost in this engagement. In all 1120 men from the crews of both ships were rescued by the light cruiser HMS Enterprise and the destroyers HMS Paladin and HMS Panther. |
Commands listed for HMS Cornwall (56)
Please note that we're still working on this section
and that we only list Commanding Officers for the duration of the Second World War.
| Commander | From | To | |
| 1 | Capt. Charles Ford Hammill, RN | 9 Jan 1939 | 14 Jan 1941 |
| 2 | Capt. Percival Clive Wickham Manwaring, RN | 14 Jan 1941 | 5 Apr 1942 |
You can help improve our commands section
Click here to Submit events/comments/updates for this vessel.
Please use this if you spot mistakes or want to improve this ships page.
Notable events involving Cornwall include:
The page for this heavy cruiser was last updated in December 2020.
29 Aug 1939
HMS Cornwall (Capt. C.F. Hammill, RN, flying the flag of Rear-Admiral A.J.L. Murray, DSO, OBE, RN) departed Hong Kong for Singapore. (1)
1 Sep 1939
HMS Cornwall (Capt. C.F. Hammill, RN, flying the flag of Rear-Admiral A.J.L. Murray, DSO, OBE, RN) arrived at Singapore. (2)
3 Sep 1939
HMS Cornwall (Capt. C.F. Hammill, RN, flying the flag of Rear-Admiral A.J.L. Murray, DSO, OBE, RN) departed Singapore for a patrol off the Andaman Islands. (3)
5 Sep 1939
HMS Cornwall (Capt. C.F. Hammill, RN, flying the flag of Rear-Admiral A.J.L. Murray, DSO, OBE, RN) arrived at Port Blair. (2)
6 Sep 1939
HMS Cornwall (Capt. C.F. Hammill, RN, flying the flag of Rear-Admiral A.J.L. Murray, DSO, OBE, RN) departed Port Blair to patrol off Padang, Sumatra, Netherlands East Indies. (2)
13 Sep 1939
HMS Cornwall (Capt. C.F. Hammill, RN, flying the flag of Rear-Admiral A.J.L. Murray, DSO, OBE, RN) oiled at sea from the Royal Fleet Auxiliary tanker Appleleaf (5892 GRT, built 1917) about 20 nautical miles to the east of the Siberut Islands, Netherlands East Indies. (4)
18 Sep 1939
HMS Cornwall (Capt. C.F. Hammill, RN, flying the flag of Rear-Admiral A.J.L. Murray, DSO, OBE, RN) arrived off Nancowry Island where she dropped anchor. (2)
19 Sep 1939
HMS Cornwall (Capt. C.F. Hammill, RN, flying the flag of Rear-Admiral A.J.L. Murray, DSO, OBE, RN) departed Nancowry Island for patrol after which she is to proceed to Colombo to join the East Indies Station. (2)
26 Sep 1939
HMS Cornwall (Capt. C.F. Hammill, RN, flying the flag of Rear-Admiral A.J.L. Murray, DSO, OBE, RN) arrived at Colombo. (2)
28 Sep 1939
HMS Cornwall (Capt. C.F. Hammill, RN, flying the flag of Rear-Admiral A.J.L. Murray, DSO, OBE, RN) departed Colombo for Calcutta. She was escorting the liner Reina del Pacifico (17702 GRT, built 1931). (5)
1 Oct 1939
HMS Cornwall (Capt. C.F. Hammill, RN, flying the flag of Rear-Admiral A.J.L. Murray, DSO, OBE, RN) and the liner Reina del Pacifico (17702 GRT, built 1931) arrived at Calcutta. (6)
1 Oct 1939
1 October 1939, an enemy raider reported in the South Atlantic and Indian Ocean. The chase of the German ‘pocket battleship’ Admiral Graf Spee
Movements of the German ‘pocket battleship’ Admiral Graf Spee 21 August 1939 – 13 December 1939.
Before the Second World War had started, on 21 August 1939, the German ‘pocked battleship’ Admiral Graf Spee departed Wilhelmshaven bound for the South Atlantic. On 1 September the Admiral Graf Spee was off the Canary Islands where she made rendes-vous with the supply ship Altmark and supplies were transferred.
On 11 September another rendes-vous was made with the Altmark in the South Atlantic. The Admiral Graf Spee had launched her Arado floatplane to scout in the area as supplies were transferred. The aircraft spotted the British heavy cruiser HMS Cumberland (Capt. W.H.G. Fallowfield, RN). The German ships then immediately parted company and cleared the area at high speed. Two days later, on the 13th, the ships again met and fueling was completed. The Admiral Graf Spee was still under orders to remain unseen.
On 20 September 1939 the Admiral Graf Spee and Altmark met again to fuel. On the 26th the Admiral Graf Spee was ordered to start raiding the British trade lanes. She then proceeded towards the Pernambuco area.
On 30 September 1939 the Admiral Graf Spee found her first victim, the British merchant vessel Clement (5050 GRT, built 1934) that was en-route from New York, U.S.A. to Bahia, Brasil. She then sank the ship in position 09°05’S, 34°05’W. The Admiral Graf Spee then proceeded eastwards and found three more victims between 5 and 10 October. On the 5th she captured the British merchant Newton Beech (4644 GRT, built 1925) in position 09°35’S, 06°30’W. This ship was en-route from Capetown to the U.K. via Freetown. On the 7th she sank the British merchant Ashlea (4222 GRT, built 1929) in position 09°52’S, 03°28’W. This ship was en-route from Durban to Falmouth. The crew of the Ashlea was transferred to the Newton Beech. The next day both crew were transferred to the Admiral Graf Spee and the Newton Beech was scuttled. On 10 October the Admiral Graf Spee captured the British merchant Huntsman (8196 GRT, built 1921) in position 08°30’S, 05°15’W. This ship was en-route from Calcutta to the U.K. On 15 October 1939 the Admiral Graf Spee met the Altmark again to receive supplies and fuel. On the 17th the crew of the Huntsman was transferred to the Altmark and the ship was scuttled in approximate position 16°S, 17°W. The next day the crews of the Newton Beech and Ashlea were also transferred to the Altmark and the German ships then parted company.
On 22 October 1939, the Admiral Graf Spee sank her next victim, the British merchant Trevanion (5299 GRT, built 1937) which was en-route from Port Pirie (Australia) to Swansea. This ship was sunk in position 19°40’S, 04°02’E. On 28 October 1939, near Tristan da Cunha, the Admiral Graf Spee once more refuelled from the Altmark. The Admiral Graf Spee then set course for the Indian Ocean.
On 15 November 1939 she sank the small British tanker Africa Shell (706 GRT, built 1939) in position 24°45’S, 35°00’E. This ship was in ballast and en-route from Quelimane (Portugese East Africa now called Mozambique) to Lourenco Marques (now Maputo, also in Portugese East Africa / Mozambique). Next day the Admiral Graf Spee stopped the Dutch merchant Mapia (7188 GRT, built 1923) but had to let her go as she was a neutral ship. The Admiral Graf Spee then set course to return to the South Atlantic where she met once more with the Altmark on 27 November 1939 and the next day she fuelled from her about 300 miles from Tristan da Cunha.
On 2 December 1939, the Admiral Graf Spee sank her largest victim, the British merchant Doric Star (10086 GRT, built 1921),in position 19°15’S, 05°05’E. This ship was en-route from Auckland, New Zealand to the U.K. The next morning the Admiral Graf Spee sank the British merchant Tairoa (7983 GRT, built 1920) in position 19°40’S, 04°02’E. This ship was en-route from Brisbane, Australia to London. On 6 December 1939 the Admiral Graf Spee refuelled once more from the Altmark. She then set course to the River Plate area where the British merchant traffic was the thickest. She was to sink more ships there and disrupt British shipping movements in that area before returning to Germany.
On 7 December 1939 the Admiral Graf Spee sank what was to be her last victim, the British merchant Streonshalh (3895 GRT, built 1928) in position 25°01’S, 27°50’W. This ship was en-route from Montevideo to Freetown and then onwards to the U.K.
Then in the morning of 13 December 1939, her smoke was sighted by three cruisers from the South America Division. More on this in the article ‘The Battle of the River Plate, 13 December 1939’.
British Dispositions in the South Atlantic / South America area
Shortly before the outbreak of the war the South America Division of the America and West Indies Station was transferred to the newly formed South Atlantic Station. The South America Division at that moment consisted of the heavy cruiser HMS Exeter (Capt. F.S. Bell, RN, flying the flag of Commodore H.H. Harwood, OBE, RN) and the light cruiser HMS Ajax (Capt. C.H.L. Woodhouse, RN). In late August 1939 HMS Exeter was at Devonport with her crew on foreign leave when she was recalled to South American waters. On 25 August 1939 she sailed from Devonport. HMS Exeter arrived at Freetown on 1 September 1939. Commodore Harwood then met the Commander-in-Chief South Atlantic Station, Vice-Admiral G. D’Oyly Lyon, CB, RN. Later the same day HMS Exeter sailed for Rio de Janeiro.
Meanwhile four destroyers from the 4th Destroyer Division, Mediterranean Fleet, the HMS Hotspur (Cdr. H.F.H. Layman, RN), HMS Havock (Lt.Cdr. R.E. Courage, RN), HMS Hyperion (Cdr. H.St.L. Nicholson, RN) and HMS Hunter (Lt.Cdr. L. de Villiers, RN) had left Gibraltar on 31 August 1939 for Freetown.
HMS Ajax was already on station off the coast of South America. Shortly after noon on 3 September she intercepted the German merchant vessel Olinda (4576 GRT, built 1927) in position 34°58’S, 53°32’W. This ship was en-route from Montivideo to Germany. As HMS Ajax had no prize crew available the ship was sunk by gunfire a few hours later. In the afternoon of the next day, the 4th, HMS Ajax intercepted another German ship, the Carl Fritzen (6594 GRT, built 1920) in position 33°22’S, 48°50’W. This ship was en-route from Rotterdam to Buenos Aires. This ship was also sunk with gunfire.
On 5 September two of the destroyers from the 4th Destroyer Division, HMS Hotspur and HMS Havock departed Freetown to join the South America Division. They were ordered to examine Trinidade Island on the way. On 8 September 1939 the heavy cruiser HMS Cumberland (Capt. W.H.G. Fallowfield, RN) departed Freetown to join the South America Division as well. This cruiser came from the Home Fleet and had arrived at Freetown on the 7th.
On 7 September 1939, HMS Exeter entered Rio de Janeiro where Commodore Harwood had a meeting with the Brazilian Secretary-General of Foreign Affairs and H.M. Ambassadors to Brazil and Argentine. HMS Exeter departed Rio de Janeiro the next day. Later that day Commodore Harwood was informed by the Admiralty that the German merchant ships General Artigas (11343 GRT, built 1923), Gloria (5896 GRT, built 1917) and Monte Pascoal (13870 GRT, built 1931) were assembling off the Patagonian coast. He decided to move both HMS Exeter and HMS Ajax south, and ordered the Ajax to meet him at 0800/9. They actually made rendezvous at 0700 hours. The Commodore considered it possible that the German merchant ships might embark German reservists and raid the Falkland Islands therefore he decided to sent HMS Ajax there. HMS Exeter proceeded to the Plate area to cover that important area.
On the evening of the 10th, Commodore Harwood was informed that the transportation of German reservists by the three German merchant ships was very unlikely but as it appeared probable that the German ships were converting themselves into armed raiders the Commodore decided to start short distance convoys from the Santos-Rio and Plate areas. He therefore ordered HMS Cumberland to refuel at Rio de Janeiro on her arrival there and to organize and run ‘out’ convoys in that area with HMS Havock as A/S escort. The convoys were to leave at dawn and be protected against submarines and surface raiders until dusk. The ships were then to be dispersed so that they would be far apart by dawn the next day. At the same time the Commodore ordered HMS Hotspur to join him in the Plate area after refuelling at Rio de Janeiro, so that similar convoys could be started from Montevideo. If one of the German ‘pocket battleships’ was to arrive of South America, HMS Cumberland was to abandon the convoy sheme and join HMS Exeter in the Plate area. Also on the 10th, Commodore Harwood was informed by the Admiralty that the German merchant Montevideo (6075 GRT, built 1936) was leaving Rio Grande do Sul for Florianopolis but decided not to intercept her as this would divert HMS Exeter 500 nautical miles from the Plate area.
On the night of 12 September 1939 the Commodore was informed by the British Naval Attaché, Buenos Aires, that a concentration of German reservists was taking place in southern Argentina with the Falklands as a possible objective. He therefore ordered HMS Ajax to remain in the Falklands till the situation cleared, and the Commodore then proceeded south of the Plate area to be closer to the Falklands himself and yet remain in easy reach of the Plate area. During the next few days HMS Exeter intercepted several British and neutral vessels.
In view of a report that the German merchant vessels Porto Alegré (6105 GRT, built 1936) and Monte Olivia (13750 GRT, built 1925) were leaving Santos on 15 September 1939 Commodore Harwood decided to start the short distance convoys from Montevideo as soon as possible. HMS Cumberland had meanwhile arranged a twelve-hour convoy system from Santos. Ships from Rio de Janeiro for Freetown would sail at dawn on odd numbered days, and ships for the south on even numbered days with HMS Havock as anti-submarine escort and HMS Cumberland in distant support. HMS Cumberland left Rio de Janeiro on 16 September and during the next eight days sighted 15 British and neutral ships while on patrol.
On 17 September 1939, HMS Hotspur joined HMS Exeter in the Plate area. HMS Exeter then made a visit to Montevideo and resumed her patrol off the Plate area on the 20th. Fuelling was done from the oiler RFA Olwen (6470 GRT, built 1917, Master B. Tunnard) in the mouth of the River Plate. Soon after leaving Montevideo on 20 September Commodore Harwood learned from the British Naval Attaché, Buenos Aires, that the local German authorities were endeavoring to inform German ships at sea that the British merchant Lafonia (1872 GRT, built 1911) was on her way to the Falklands with British reservists for the Falkland Islands defence force. It was also reported that on 17 September an unknown warship had passed Punta Arenas eastwards. In view of these reports and of other pointing out that German merchant ships in southern waters were being outfitted as armed raiders the Commodore ordered HMS Hotsput to escort the Laofona to Port Stanley. As the volume of trade in the Plate area was greater than in the Rio de Janeiro – Santos area, HMS Havock was ordered to proceed southwards to the Plate area.
The first local convoy outward from Montevideo sailed on 22 September 1939. It consisted of the British merchant ships Sussex (11062 GRT, built 1937), Roxby (4252 GRT, built 1923), El Ciervo (5841 GRT, built 1923) in addition to the earlier mentioned Lafonia, and was escorted by HMS Hotspur. HMS Exeter met this convoy during the forenoon and covered it throughout the day. At dusk the merchant ships were dispersed on prearranged courses while HMS Exeter remained within supporting distance and HMS Hotspur escorted the Lafonia to Port Stanley.
On 24 September 1939, Vice-Admiral Lyon (C-in-C, South Atlantic) and Commodore Harwood learned from the Naval Attaché, Buenos Aires, that ‘according to a reliable source’ arrangements had been made for a number of German ships and a submarine to meet near Ascension on 28 September 1939. HMS Cumberland was ordered to proceed there and HMS Ajax was ordered to leave the Falklands and take up her place in the Rio de Janeiro area. HMS Neptune (Capt. J.A.V. Morse, DSO, RN) was also ordered to proceed to the area off Ascension with the destroyers HMS Hyperion and HMS Hunter which departed Freetown on the 25th. No German ships were however encountered off Ascension and all ships then proceeded to Freetown where they arrived on 2 October 1939 with HMS Cumberland low on fuel.
While HMS Cumberland left the station to search for the German ships, HMS Exeter and HMS Ajax were sweeping of the Plate and Rio de Janeiro – Santos area respectively. On 27 September 1939, HMS Havock escorted a convoy made up of the British merchants Miguel de Larrinaga (5231 GRT, built 1924), Pilar de Larringa (7352 GRT, built 1918) and Sarthe (5271 GRT, built 1920) out of the Plate area. The next day another convoy, made up of the British merchants Adellen (7984 GRT, built 1930), Cressdene (4270 GRT, built 1936), Holmbury (4566 GRT, built 1925), Lord Byron (4118 GRT, built 1934), Ramillies (4553 GRT, built 1927) and Waynegate (4260 GRT, built 1931) left the Plate area escorted by HMS Havock and with cover from HMS Exeter.
At daylight on 29 September 1939 HMS Ajax was off Rio de Janeiro ready to escort ships sailing northward. She sighted none until the early afternoon when she met the Almeda Star (12848 GRT, built 1926) and a few hours later the tanker San Ubaldo (5999 GRT, built 1921). That night several neutral steamers were sighted off Rio de Janeiro and the next day the British La Pampa (4149 GRT, built 1938) was met and escorted during daylight on her way to Santos. So far on the work of the South American Division during September 1939. The ships assigned to Commodore Harwood had been busy patrolling and escorting ships near the focal areas.
A surface raider reported, 1 October 1939.
When a report that the British merchant Clement had been sunk on 30 September 1939 by a surface raider off Pernambuco was received by the Admiralty in the afternoon of October 1st, the C-in-C, South Atlantic was informed that he should retain the 4th Destroyer Division and that his command would be reinforced by the cruisers HMS Norfolk (Capt. A.G.B. Wilson, DSO, RN), HMS Capetown (Capt. T.H. Back, RN), HMS Effingham (Capt. J.M. Howson, RN), HMS Emerald (Capt. A.W.S. Agar, VC, DSO, RN) and HMS Enterprise (Capt. H.J. Egerton, RN). Also the battleships HMS Resolution (Capt. C.H. Knox-Little, RN), HMS Revenge (Capt. E.R. Archer, RN) and the aircraft carrier HMS Hermes (Capt. F.E.P. Hutton, RN) were to proceed to either Jamaica or Freetown. These dispositions however never materialised being superseded on 5 October 1939 by a more general policy (the institution of hunting groups) which cancelled them.
The institution of hunting groups, 5 October 1939.
On 5 October 1939 the Admiralty formed five hunting groups in the Atlantic and Indian Ocean of sufficient strength to destroy any ‘pocket battleship’ or Hipper-class cruiser. These were; Force F; area: North America and West Indies. HMS Berwick (Capt. I.M. Palmer, DSC, RN), HMS York (Capt. R.H. Portal, DSC, RN), Force G; area: S.E. coast of South America. HMS Cumberland, HMS Exeter Force H; area: Cape of Good Hope, South Africa. HMS Sussex (Capt. A.R. Hammick, RN), HMS Shropshire (Capt. A.W.LaT. Bisset, RN), Force I; area: Ceylon. HMS Cornwall (Capt. C.F. Hamill, RN), HMS Dorsetshire (Capt. B.S.C. Martin, RN), HMS Eagle (Capt. A.R.M. Bridge, RN), Force K; area: Pernambuco, Brazil. HMS Renown (Capt. C.E.B. Simeon, RN), HMS Ark Royal (Capt. A.J. Power, RN), Force L; area: Brest, France. Dunkerque (Capt. J.L. Nagadelle, replaced by Capt. M.J.M. Seguin on 16 October), Bearn (Capt. M.M.A. Lafargue, replaced by Capt. Y.E. Aubert on 7 October), Georges Leygues (Capt. R.L. Perot), Gloire (Capt. F.H.R. de Belot), Montcalm (Capt. P.J. Ronarc’h), Force M; area: Dakar, Senegal. Dupleix (Capt. L.L.M. Hameury), Foch (Capt. J. Mathieu), and Force N; area: West Indies. Strasbourg (Capt. J.F.E. Bouxin), HMS Hermes.
The institution of the hunting groups were not the only measures taken. The battleships HMS Resolution, HMS Revenge and the light cruisers HMS Emerald and HMS Enterprise were ordered to proceed to Halifax, Nova Scotia to escort homeward bound convoys. Light cruiser HMS Effingham was to join them later. The battleship HMS Ramillies (Capt. H.T. Baillie-Grohman, DSO, RN) left Gibraltar on 5 October for the same duty but was recalled the next day when the battleship HMS Malaya (Capt. I.B.B. Tower, DSC, RN) and the aircraft carrier HMS Glorious (Capt. G. D’Oyly-Hughes, DSO and Bar, DSC, RN) were ordered to leave the Mediterranean and proceed to the Indian Ocean where they formed an addition hunting group, Force J which was to operate in the Socotra area off the entrance to the Gulf of Aden.
Now back to the South Atlantic, on 9 October 1939 the C-in-C, South Atlantic had informed the Admiralty and Commodore Harwood that he intended to co-ordinate the movements of ‘Force G’, ‘Force H’ and ‘Force K’. As this would entail long periods of wireless silence in ‘Force G’ he proposed that Commodore Harwood should transfer his flag to HMS Ajax, leaving Capt. Fallowfield of HMS Cumberland in command of Force G. The Admiralty approved of this. Commodore Harwood stated that it was his intention to transfer his flag from HMS Exeter to HMS Ajax in the River Plate area on 27 October. He also stated that the endurance of HMS Exeter was only half the endurance of HMS Cumberland and that this would prove problematic when they were to operate together and he proposed that the Exeter would be relieved by another 10000 ton cruiser but for the moment no suitable cruiser was available to relieve her.
On 12 October 1939 the first of the hunting forces arrived on their station when HMS Renown and HMS Ark Royal reached Freetown that morning coming from the U.K. They were soon followed by three more destroyers of the H-class coming from the Mediterranean; HMS Hardy (Capt. B.A. Warburton-Lee, RN), HMS Hasty (Lt.Cdr. L.R.K. Tyrwhitt, RN) and HMS Hostile (Cdr. J.P. Wright, RN). On 13 October 1939 the cruisers HMS Sussex and HMS Shropshire arrived at Simonstown from the Mediterranean and one day later HMS Hermes arrived at Dakar from Plymouth.
The South America Division during the first half of October 1939.
When the news of an enemy raider in the South Atlantic reached the C-in-C at Freetown on 1 October 1939 he immediately suspended sailings from Pernambuco and Natal and he ordered HMS Havock and HMS Hotspur to escort British ships clear of the area. But next morning he cancelled these dispositions and ordered Commodore Harwood to concentrate HMS Exeter, HMS Ajax and the two destroyers off Rio de Janeiro. By this time, however, the raider was far away from the South American coast. On 3 October 1939 the Commodore signalled the C-in-C that he intened to concentrate the Exeter and Ajax off Rio and have the Hotspur to cover the Rio – Santos area and keep the Havock off the Plate but upon receiving the orders from the C-in-C to concentrate he ordered to destroyers to join the cruisers after fuelling but not later then 0800 hours on 4 October. Reports that the enemy raider was not a ‘pocket battleship’ however kept coming in and the Commodore decided that he could not leave the heavy traffic in the Plate area without some form of protection and he ordered HMS Havock to return there but when a report coming in from Bahia, Brazil confirmed that the Clement had been sunk by the ‘pocket battleship’ Admiral Scheer the Commodore once more ordered HMS Havock to join him. In the end HMS Ajax joined HMS Exeter at 1700/3, HMS Hotspur at 0500/4 and finally HMS Havock at 1300/4.
The Commodore was also informed by the Admiralty that the New Zealand cruiser HMS Achilles (New Zealand Division) (Capt. W.E. Parry, RN) would join his station coming from the west coast of South America. HMS Cumberland left Freetown at 1900/3 to join the Commodore in the Rio de Janeiro area as well.
Commodore Harwood’s policy against enemy raiders and a new raider report coming on on 5 October 1939.
Commodore Harwood had decided to keep his forces concentrated and as no new raider reports had come in to patrol the Rio de Janeiro area in accordance with the C-in-C, South Atlantic’s order. If he met a ‘pocket battleship’ he intended to shadow it until dusk. He would then close and attack in the dark hours. If, on the other hand, he made contact at night, his destroyers would at once close the enemy’s beam and attack her with torpedoes.
On 5 October 1939, the British merchant Martand (7967 GRT, built 1939) informed HMS Cumberland that a German armed raider had attacked an unknown ship, this unknown ship was in fact the Newton Beech that was attacked about 900 nautical miles away. This information was not acted upon by the Commanding Officer of the Cumberland. The Captain of the Cumberland assumed the raider report would have been intercepted by other ships and passed on to the C-in-C, South Atlantic. He considered it was important to keep radio silence and decided against breaking it. The Admiralty however later was of the opinion that the report should have been passed on to the Commander-in-Chief.
By 5 October 1939, the Exeter, Ajax, Havock and Hotspur were concentrated in the Rio de Janeiro area ready to engage the raider if she came south from the Pernambuco area. HMS Achilles was on her way round Cape Horn.
When HMS Ajax visited Rio de Janeiro on 7 October 1939, Commodore Harwood directed her to suggest to the Consular Shipping Advisers there, and at Santos, that, owning to the small volume of shipping leaving these ports, the local convoy systems, which had been instituted on 22 September against armed merchant raiders, should be suspended, and Allied merchant ships be routed independently.
The Commodore intended to meet HMS Cumberland at 1700/8, but at 1600/7 he received a message from the Consular Shipping Adviser at Rio de Janeiro in which he desired an escort for a 13 knot convoy that was to sail at 0430/8 and that had received much local publicity. The Commodore thought that this publicity might draw the enemy raider to the area and he therefore took his entire force back towards Rio de Janeiro and sent HMS Hotspur ahead to make contact with the convoy, while keeping his other ships in support. The convoy consisted of the British merchants Highland Chieftain (14131 GRT, built 1929), Nariva (8723 GRT, built 1920) and the French merchant Alsina (8404 GRT, built 1922).
Meanwhile the Commodore had directed HMS Cumberland to meet him at dawn on October 9th. When the convoy was dispersed at 1800/8 the Exeter and Ajax steered to meet her while the Havock was detached to fuel at Rio de Janeiro. At 2200/8 HMS Ajax was detached. HMS Cumberland made rendezvous with HMS Exeter at 0500/9. They were ordered by the C-in-C, South Atlantic to make a sweep northwards but this could not be carried out as HMS Exeter was short of fuel. The Commodore therefore decided to make a sweep southwards towards the Plate area where HMS Exeter could refuel. He also decided to keep HMS Hotspur with the two cruisers as long as possible.
On 12 October 1939, Rio Grande do Sul reported that the German merchant Rio Grande (6062 GRT, built 1939) was about to sail. The Commodore at once ordered HMS Cumberland to proceed there and intercept. She arrived off Rio Grande do Sul at 1600/13 but on finding it all quiet in the harbour she shaped course for the Plate area at nightfall. Meanwhile the Commodore had ordered HMS Hotspur to fuel at Montevideo when HMS Havock left that port early on the 14th.
about this time RFA Olwen informed the Commodore the the German merchant Bahia Laura (8611 GRT, built 1918) was leaving Montevideo at 1000 next morning and might protest if HMS Havock sailed the same day. Instead, therefore, of entering Montevideo HMS Hotspur at once fueled from the Olwen and then remained out on patrol. The Bahia Laura however, showed no signs of leaving and at 0800/14, HMS Havock put to sea. At 1200 hours HMS Hotspur entered Montevideo. Later that day HMS Exeter and HMS Cumberland fueled from the Olwen in San Borombon Bay at the southern entrance to the Plate estuary. At 1430 hours they were joined by HMS Havock. Commodore Harwood then ordered her to patrol off Montevideo to watch the Bahia Laura. When HMS Exeter finished fueling she immediately put to sea. HMS Cumberland rejoined him next morning at 0700 hours. HMS Havock was then ordered to join the cruisers. On 16 October the commodore learned that the Bahia Laura had sailed at 1015 hours the previous day. By the time the signal reached him the German ship was far out at sea well past his patrol line. But as the whole area was enveloped in dense fog the Commodore decided against trying to catch her.
The South America Division during the second half of October 1939.
Meanwhile Commodore Harwood had informed the Commander-in-Chief, South Atlantic on 13 October that as HMS Exeter required certain minor repairs he proposed to proceed to the Falklands on the17th and then return to the Plate area on the 27th. The Commander-in-Chief replied that he preferred that HMS Exeter would stay in the Plate area till the Commodore would transfer his Broad Pendant to HMS Ajax on the 27th. As HMS Achilles was due in the Plate area on this day also, she and HMS Cumberland could then operate as ‘Force G’ during the Exeter’s absence. This would mean that there would be no cruiser in the Rio de Janeiro area until HMS Exeter would return from her repairs at the Falklands. The Commodore therefore ordered HMS Havock to sail on 21 October for a four day patrol in the Rio – Santos Area, where HMS Hotspur, which could remain at sea until 2 November, would relieve her. From that date until the relief of HMS Achilles there would be no warship in this area. The Commodore therefore asked the Commander-in-Chief to allow ‘Force G’ to operate in that area from 2 to 10 November. When HMS Hotspur joined the Exeter and Cumberland from Montevideo on 17 October the Commodore ordered her to patrol off Rio Grande do Sul to intercept the German ships Rio Grande and Montevideo if they would come out, and sent HMS Havock to patrol inshore with orders to anchor the night clear of the shipping route.
This proved to be the last duty of these two destroyers with the South America Division. On 20 October the Admiralty ordered their transfer to the West Indies. Three days later the Commodore sent them into Buenos Aires to refuel, and as the distance to Trinidad, 4000 miles, was at the limit of their endurance, also obtained permission to refuel them at Pernambuco. They both left Buenos Aires on the 25th and, bidding the Commodore farewell, proceeded northwards. They sailed from Pernambuco on 1 November but on the 3rd HMS Havock was diverted to Freetown with engine trouble. The two remaining destroyers of the 4th Division, HMS Hyperion and HMS Hunter, had left Freetown with convoy SL 6 on 23 October. Off Daker their escort duty was taken over by the French light cruiser Duguay-Trouin (Capt. J.M.C. Trolley de Prevaux). The destroyers then fueled at Dakar on the 27th and sailed for Trinidad early on the 28th.
Meanwhile HMS Cumberland had entered Montevideo at 0800/26. At 0900/26 HMS Achilles joined HMS Exeter in the Plate area and after fueling from RFA Olwen sailed to meet HMS Cumberland off Lobos the next day and then patrol with her as ‘Force G’ in the Rio – Santos area. The Olwen was now nearly out of fuel and filled up HMS Ajax ,which had arrived from the Rio area on the 26th, with her remaining fuel minus 500 tons for her passage to Trinidad. In the morning of 27 October, Commodore Harwood transferred his Broad Pendant to HMS Ajax and HMS Exeter then parted company to proceed to the Falklands for repairs.
Meanwhile the newly formed ‘Force H’ and ‘Force K’ were busy on the other side of the South Atlantic. ‘Force H’, made up of HMS Sussex and HMS Shropshire had reached the Cape on 13 October. As HMS Cumberland had not passed on the report of the Martland, no news on the raider had reached the Admiralty or the Commander-in-Chief since October 1st. On 14 October ‘Force H’ sailed to search for her along the Cape – Freetown route as far as the latitude of St. Helena. That day ’Force K’ (HMS Ark Royal and HMS Renown) left Freetown with HMS Neptune, HMS Hardy, HMS Hero (Cdr. C.F. Tower, MVO, RN) and HMS Hereward (Lt.Cdr. C.W. Greening, RN) to search westwards towards St. Paul Rocks, the direction of their sweep being determined by the complete lack of any further raider information.
Finally a raider report on 22 October 1939, Sweeps by ‘Force H’ and ‘Force K’.
The three weeks old ‘mystery’ of the raiders whereabouts was partially solved on 22 October when the British merchant vessel Llanstephan Castle (11293 GRT, built 1914) intercepted a message from an unknown ship ‘Gunned in 16°S, 04°03’E’ at 1400 G.M.T. There was however no immediate confirmation of her report and the Commander-in-Chief ordered ‘Force H’ to sail after dark on the 27th to sail for the latitude of St. Helena. At noon on 31 October this Force was in 15°S, 02°51’E, the north-eastern limit of it’s patrol, when a Walrus aircraft failed to return to HMS Sussex from a reconnaissance flight. It was never found, though the two cruisers spend over three days searching for it. Being short of fuel they then returned to the Cape by the same route they had used outwards.
Sweep by ‘Force K’, 28 October – 6 November 1939.
To cover the northern end of the route from St. Helena onward, HMS Neptune and the destroyers HMS Hardy, HMS Hasty, HMS Hero and HMS Hereward had left Freetown on 28 October. HMS Neptune was to sweep independently from position 03°20’S, 01°10’W and then through 14°30’S, 16°50’W back to Freetown. On 30 October a report from Dakar stated that the German merchant Togo (5042 GRT, built 1938) had left the Congo on 26 October, that the German merchant Pionier (3254 GRT, built 1934) had sailed from Fernando Po (now called Bioko Island) on 28 October and that five German ships had left Lobito (Angola) the same day. When the Vice-Admiral, Aircraft Carriers, received this information her detached HMS Hardy and HMS Hasty to sweep north-westward for the Pioneer, while ‘Force K’ and the remaining two destroyers searched for her to the south-westward. Both searches were unsuccessful. Meanwhile a message from Lobito had stated that the five German ships that were stated to have left the harbour were still there. On 5 November the German merchant vessel Uhenfels (7603 GRT, built 1931), that had left Laurenco Marques (now called Maputo, Mozambique) on 16 October was sighted by an aircraft from HMS Ark Royal. Only energetic action from HMS Hereward saved her from being scuttled in position 06°02’N, 17°25’W. She was brought into Freetown on 7 November by HMS Herward, a few hours behind ‘Force K’.
’Force H’ and ‘Force G’, first half of November 1939.
The first half of November was relatively quiet on both sides of the South Atlantic At the start of the month ‘Force H’ and ‘Force K’ were still on the shipping lane between Sierra Leone and the Cape. On 3 November 1939 the Admiralty informed the Commander-in-Chief, South Atlantic that all German capital ships and cruisers were apparently in home waters. It appeared therefore that the pocket battleship, which was still thought to be the Admiral Scheer, had returned home and that the raider reported by the Llangstephan Castle on 22 October was nothing but an armed merchantman. Here was a good opportunity for resting the hunting groups and on 4 November the Admiralty issued orders that ‘Force G’ and ‘Force H’ should exchange areas. This exchange would not only give ‘Force G’ an opportunity of resting and refitting at the Cape, but would also provide Commodore Harwood with the hunting group of long endurance that he desired.
The Commander-in-Chief had planned that ‘Force H’ which had returned to the Cape on 7 November would then sweep towards Durban, arriving there on 16 November. However on the 11th they were ordered to sail for patrol in the Atlantic and on the evening of the 17th, while west of St. Helena, exchange patrol areas with ‘Force G’. The exchange of areas however did not take place as ‘Force G’ was delayed due to HMS Exeter being damaged while casting off from the oiler in heavy seas. Before the exchange now could take place it was cancelled.
South America Division, first half of November 1939.
After hoisting Commodore Harwood’s Broad on 27 October the HMS Ajax had swept the Plate focal area. When the Commodore received the signal of the Commander-in-Chief on the 5th regarding the changeover over patrol areas between ‘Force G’ and ‘Force H’, he ordered HMS Cumberland to proceed to the Plate at 20 knots to refuel. About this time a message reached him from Buenos Aires that the Argentinian Foreign Minister had drawn attention to cases of fueling in the Plate by HMS Exeter and HMS Ajax. Although the Argentinian Government had no apparent intention of raising the issue he decided to cut down the fuellings in the inshore waters of the Plate as much as possible. He therefore cancelled the fuelling of HMS Exeter, due to take place on 7 November from the oiler RFA Olynthus (6888 GRT, built 1918, Master L.N. Hill), which had relieved RFA Olwen. He ordered HMS Cumberland to fuel at Buenos Aires on 9 November. HMS Exeter which had arrived at the Falklands on 31 October for repairs, sailed again on 4 November to meet up with HMS Cumberland off the Plate on 10 November, but the Commodore ordered her to enter Mar del Plata for a 24-hour visit on the 9th. As this gave her some time at hand, he ordered her to cover the Plate while HMS Ajax visited Buenos Aires from 6 to 8 November during which the Commodore discussed the question of fuelling his ships in the River Plate Estuary with the Argentine naval authorities. During his visit to Buenos Aires, the Commodore discussed the matter of fuelling his ships of English Bank with the Argentinian Minister of Marine and his Chief of Naval Staff they both suggested that he should use San Borombon Bay which was most acceptable. He had in fact been using it for some time.
When HMS Ajax left Buenos Aires on 8 November she patrolled the Plate area. HMS Exeter arrived at Mar del Plata the next day but fuel could not be obtained there. She was ordered to fuel from RFA Olynthus in San Borombon Bay on the 10th and then meet up with HMS Cumberland off Lobos Island at 0600/11. On the 10th HMS Ajax also fueled from RFA Olynthus as did HMS Exeter after her while HMS Ajax was at anchor close by. However weather quickly deteriorated and the Olynthus was forced to cast off, damaging the Exeter in doing so. Besides that she was still 600 tons short of fuel. As she could not reach the Cape without a full supply the sailing of ‘Force G’ to exchange areas with ‘Force H’ was delayed. The Exeter finally finished fuelling on the 13th and sailed with HMS Cumberland for Simonstown. Before the exchange of areas could be effected, however, a raider was reported in the Indian Ocean and the order was cancelled.
Another raider report, 16 November 1939.
On 16 November 1939 the Naval Officer-in-Charge, Simonstown, reported that the small British tanker Africa Shell ( GRT, built ) had been sunk off Lourenco Marques the previous day by a raider identified as a pocket battleship. After the usual conflicting reports from eye-widnesses during the next few days, however, it was doubtful how many raiders there were or whether they were pocket battleships or heavy cruisers.
The presence of an enemy heavy ship in the Mozambique Channel called for new dispositions. When the raider report reached the Admiralty on 17 November they immediately cancelled the exchange of areas between ‘Force G’ an ‘Force H’. ‘Force H’ was ordered to return to the Cape and ‘Force G’ was ordered to return to the east coast of South America. They also ordered the dispatch of ‘Force K’ towards the Cape with instructions to go on to Diego Suarez in Madagascar. That morning a report reached the Commander-in-Chief, South Atlantic that the German merchant vessels Windhuk (16662 GRT, built 1937) and Adolph Woermann (8577 GRT, built 1922) had left Lobito. He at once ordered ‘Force H’, which was at that moment west of St. Helena in the approximate latitute of Lobito to spend three days searching for them.
Next day, 18 November 1939, ‘Force K’ left Freetown together with HMS Neptune, HMS Hardy, HMS Hero and HMS Hostile to sweep west of St. Helena through position 16°30’S, 10°W and thence on to Diego Suarez. The destroyers parted company at 2300/18 to search for the German ships. On 20 November 1939, the Commander-in-Chief ordered ‘Force H’ to return to the Cape of nothing of the German merchant vessels had been sighted. HMS Sussex and HMS Shropshire did so on 23 November.
The Adolph Woermann had not escaped. Early on 21 November 1939, the British merchant Waimarama (12843 GRT, built 1938) reported her in position 12°24’S, 03°31’W. At 1127/21, ‘Force K’ (HMS Ark Royal and HMS Renown) was in position 05°55’S, 12°26’W, altered course to close, and HMS Neptune, which was still with them, went ahead at high speed. Shortly after 0800/22 she made contact with the Adolf Woermann in position 10°37’S, 05°11’W and went alongside. Despite efforts to save her the German vessel was scuttled and when HMS Neptune returned to Freetown on 25 November 1939 she had 162 German survivors on board.
’Force H’ and ‘Force K’, second half of November 1939.
As the search for the Adolf Woermann had taken ‘Force K’ nearly 200 miles to the eastward, the Vice-Admiral, Aircraft Carriers decided to proceed to the Cape by the route east of St. Helena to save fuel. In hindsight this might have saved Altmark for being intercepted as she was waiting for the Admiral Graf Spee in the area ‘Force K’ would have otherwise passed through. On 23 November 1939, the Commander-in-Chief, South Atlantic, ordered ‘Force H’ to sail from the Cape the next day and patrol the ‘diverse routes’ as far as 33°E until 28 November.
At the northern end of the South Atlantic station HMS Neptune, HMS Hardy, HMS Hero, HMS Hostile, HMS Hasty and the submarine HMS Clyde (Cdr. W.E. Banks, RN) had established a patrol between 22 and 25 November 1939 to intercept escaping German merchant ships or raiders. No ships were however sighted and they were recalled to Freetown on 30 November.
In the meantime the Admiralty had ordered, ‘Force H’ and ‘Force K’ to conducted a combined patrol on the meridian of 20°E. The two forces met early on 1 December. The plan, according to the Commander-in-Chief, appeared to be a good one in theory but was found unsuitable in practice that on account of local weather conditions. These permitted flying off aircraft from HMS Ark Royal only once in five or six days, so that the patrol could not be extended far enough to the south to intercept a raider bent on evasion. In fact, only once, on 2 December weather was suitable for flying off aircraft.
South America Division, second half of November 1939.
After HMS Cumberland and HMS Exeter (‘Force G’) had sailed from San Borombon Bay for Simonstown on 13 November 1939, HMS Ajax patrolled the Plate area and escorted the French Massilia ( GRT, built ) that was bound for Europe from Buenos Aeres with French reservists. After parting from the Massilia she closed Rio Grande do Sul and ascertained that the German merchant vessels Rio Grande and Montevideo were still there. For the next two days she patrolled the normal peace time shipping routes.
When the Admiralty cancelled the exchange of ereas between ‘Force G’ and ‘Force H’ on 17 November, Commodore Harwood sent ‘Force G’ to cover Rio de Janeiro. He ordered HMS Achilles to fuel off the Olynthus in the Plate area on 22 November and then relieve ‘Force G’ in the Rio area as HMS Exeter would need to refuel in the Plate area again on 26 November. HMS Cumberland was to remain with the Exeter to keep ‘Force G’ together so she could refuel from the Olynthus as well. They were then to patrol the Plate area so that HMS Ajax could visit the Falklands.
On 18 November the Commodore was informed that the German merchant Ussukuma ( GRT, built ) might sail from Bahia Blanca for Montevideo at any time. He at once ordered the Olynthus to watch for her between Manos and Cape San Antonio and took the Ajax south to the same vicinity.
On 22 November 1939 HMS Achilles heard the German merchant Lahn (8498 GRT, built 1927) calling Cerrito by wireless, and when HMS Ajax arrived half an hour later a search was carried out. It was insuccessful for both cruisers but both the Lahn and another German merchant the Tacoma (8268 GRT, built 1930) reached Montevideo safely during the forenoon.
HMS Ajax and HMS Achilles then both fuelled from the Olynthus at San Borombon Bay during the next afternoon. The Achilles the sailed for the Rio de Janeiro area. She had orders to move up to Pernambuco and show herself off Cabadello and Bahia as a number of German ships in Pernambuco were reported ready to sail to Cabadello to load cotton for Germany. She was to return at once to the Rio area if any raiders were reported in the South Atlantic.
HMS Ajax left the Plate area on 25 November 1939 and sent up a seaplane to reconnoitre Bahia Blanca. The Ussukuma showed no signs of sailing so HMS Ajax proceeded to the Falklands, arriving there on the 27th. By this time HMS Cumberland and HMS Exeter were in urgent need of refits after long periods at sea, and Commodore Harwood ordered the Exeter to proceed to the Falklands forthwith. She arrived at Port Stanley on 29 November 1939 and her defects were immediately taken in hand as far as local resources permitted.
8 December 1939 was the twenty-fifth anniversary of the Battle of the Falklands, and thinking the enemy might attempt to avenge the defeat, the Commodore ordered HMS Cumberland to patrol off the Falklands as of 7 December for two days after which she too was to enter Port Stanley for rest and refit.
French Forces at Dakar in November 1939.
During November them most important event at Dakar, where the French were maintaining a number of more or less regular patrols, was the reorganisation of ‘Force X’. On 1 November 1939 the large destroyer L’Audacieux (Cdr. L.M. Clatin) sailed from Dakar to the westward to 26°W and thence south-west to search for the German merchant Togo. She returned to Dakar on 4 November having sighted nothing. That day the French light cruiser Duguay-Trouin sailed to sweep round the Cape Verde Islands and then on to St. Paul Rocks. She returned to Dakar on 10 November. The old ‘Force X’, the Strasbourg (Capt. J.F.E. Bouxin), Algerie (Capt. L.H.M. Nouvel de la Fleche) and Dupleix (Capt. L.L.M. Hameury) sailed on 7 November to sweep west of the Cape Verde Islands. It returned to Dakar on 13 November 1939. Meanwhile French submarines based at Casablanca were maintaining a continuous patrol round the Canary Islands between 25°N and 30°N.
On 18 November a new ‘Force X’ was formed, now made up of the Dupleix and her sister ship Foch (Capt. J. Mathieu) and the British aircraft carrier HMS Hermes. On 21 November the Strasbourg, Algerie and the destroyers Le Terrible (Cdr. A.E.R. Bonneau) and Le Fantasque (Capt. P.A.B. Still) left Dakar to return to France. The next day the new ‘Force X’ sailed with the destroyers Milan (Cdr. M.A.H. Favier) and Cassard (Cdr. R.A.A. Braxmeyer) to cruiser towards 08°N, 30°W. That day L’Audacieux departed Dakar with a convoy for Casablanca.
On 25 November, the Duguay-Trouin sailed to patrol the parallel of 19°N, between 25° and 30°W. Two days later the British submarine HMS Severn (Lt.Cdr. B.W. Taylor, RN) docked at Dakar. On the 30th the Dupleix and Foch returned from patrol being followed the next day by HMS Hermes and her escorts Milan and Cassard.
Dispositions of South Atlantic Forces at the beginning of December 1939.
At the beginning of December 1939, HMS Ark Royal, still flying the flag of Vice-Admiral Aircraft Carriers, and HMS Renown (‘Force K’), were patrolling the meridian of 20°E, south of the Cape together with HMS Sussex and HMS Shropshire (‘Force H’) to intercept the raider reported in the Mozambique Channel on 15 November 1939.
In the north the light cruiser HMS Neptune with the destroyers HMS Hardy, HMS Hero, HMS Hostile and HMS Hasty and the submarine HMS Clyde were returning to Freetown after patrolling between there and Cape San Roque for escaping German merchant ships or raiders. The French cruiers Dupleix and Foch and the British carrier HMS Hermes (‘Force X’) and their two escorting destroyers Milan and Cassard were approaching Dakar. The French cruiser Duguay-Trouin was patrolling the parallel of 19°N, between 25° and 30°W. The British submarine Severn was refitting at Dakar. Across the South Atlantic, Commodore Harwood, in HMS Ajax was at Port Stanley as was HMS Exeter. HMS Cumberland was patrolling of the Plate area and HMS Achilles was off Rio de Janeiro.
Forces ‘H’ and ‘K’, 1 – 13 December 1939.
No further reports have been received of the raider which had sunk the Africa Shell off Laurenco Marques on 15 November and it seemed clear that she had either gone further into the Indian Ocean or doubled back into the South Atlantic by going well south of the Cape. On 2 December 1939 the Admiralty ordered ‘Force K’ and ‘Force H’ to their patrol line south of the Cape after refueling, and the Commander-in-Chief, South Atlantic at once ordered them to proceed for the Cape ports to fuel. That day a reconnaissance aircraft of the South African Air Force reported a suspicious ship south of Cape Point at noon. HMS Sussex intercepted her but her crew set her on fire. She proved to be the German merchant Watussi (9521 GRT, built 1928). She was eventually be HMS Renown. Her survivors were taken on board HMS Sussex and were landed at Simonstown.
No news of the missing raider had been coming in since 16 November but then the mistery shrouding her whereabouts was again partially solved. At 1530/2 a raidar signal ‘R.R.R., 19°15’S, 05°05’E, gunned battleship) reached the Commander-in-Chief, South Atlantic. It came from the British merchant Doric Star. As this signal placed the raider in the South Atlantic he immediately ordered to abandon the patrol south of the Cape and ordered ‘Force H’ to cover the trade routes between the Cape and the latitude of St. Helena at 20 knots on completion of fuelling. As it was too late for ‘Force K’ to reach the Freetown-Pernambuco area in time to intercept the rainder if she was to proceed to the North Atlantic he proposed the Admiralty that ‘Force K’, after fuelling should sweep direct from the Cape to position 20°S, 15°W. This was changed at the request of the Vice-Admiral, Aircraft Carriers to place his force in a more central position for proceeding to Freetown, to the Falklands or to Rio de Janeiro. At 1030/3 a report reached the Commander-in-Chief that the pocket battleship Admiral Scheer had been in 21°20’S, 03°10’E at 0500 hours, clearly indicating that the raider was moving westwards, clear of the Cape-Sierra Leone trade route. ‘Force H’ left Simonstown at 1700 that afternoon and ‘Force K’ sailed from Capetown at 0915/4.
The Commander-in-Chief estimated that if the enemy was proceeding northwards to the North Atlantic she would cross the Freetown-Pernambuco line between 9 and 10 December. He therefore arranged that ‘Force X’ should take HMS Neptune and her destroyers under her orders and patrol the parallel of 3°N between 31° and 38°W from 10 to 13 December. ‘Force K’ would meet HMS Neptune and the destroyers on the 14th and then return with them to Freetown to refuel. The destroyers of the 3rd Division of the 2nd Destroyer Flotilla (HMS Hardy, HMS Hostile and HMS Hero) left Freetown on 6 December with the oiler RFA Cherryleaf (5896 GRT, built 1917). They had orders to meet the Dupleix, Foch, HMS Hermes and their escorting destroyers Milan and Cassard and HMS Neptune in position 03°N, 31°W on 10 December. On 7 December ‘Force X’ left Dakar for the rendez-vous. That day the submarine HMS Clyde left Freetown to patrol between 03°N, 23°W and 03°N, 28°W and thence to 05°15’N, 23°W between 9 (PM) and 13 (AM) December.
On the evening of 8 December 1939 the German merchant ship Adolf Leonhardt (2989 GRT, built 1925) sailed from Lobito for South America. ‘Force H’ which was by then between St. Helena and the west coast of Africa, was at once ordered to intercept her. The Walrus from HMS Shropshire made contact at 0952 hours next morning and alighted alongside in position 13°S, 11°44’E. At 1250 hours HMS Shropshire arrived at that position but the German ship was scuttled by her crew and could not be saved. ‘Force H’ then returned to the Cape to refuel where they arrived on 14 December.
At 0800/11 the submarine HMS Severn left Freetown for Port Stanley. She was to protect the whaling industry in South Georgio and was to intercept hostile raiders or supply ships. The cruiser HMS Dorsetshire, which arrived at Simonstown from Colombo on the 9th to finally relieve HMS Exeter in the South America Division left Simonstown on 13 December for Port Stanley. She was to call at Tristan da Cunha on the way. On that day, 13 December 1939, was fought the action between the British South America Division and the German pocket battleship Admiral Graf Spee, known as the Battle of the River Plate.
The South America Division, 1 to 13 December 1939.
At the beginning of December 1939, HMS Ajax and HMS Exeter were at Port Stanley in the Falkland Islands. HMS Cumberland was off the River Plate and HMS Achilles was patrolling the Rio de Janeiro area. On 2 December HMS Ajax left Port Stanley for the Plate area. That evening the Commodore learned that the Doric Star had been sunk by a raider to the south-east of St. Helena. Two days later the Commander-in-Chief, South Atlantic informed him that HMS Dorsetshire would arrive at Port Stanley on 23 December to relieve HMS Exeter which was then to proceed to Simonstown for a much needed refit.
Early on 5 December the British Naval Attaché at Buenos Aires reported that the German merchant Ussukuma had left Bahia Blanca at 1900 hours the previous evening. The Commodore immediately ordered HMS Cumberland which was on the way south to the Falkland Islands to search for her. Meanwhile HMS Ajax turned south and closed the Argentinian coast in case the Ussukuma, which was known to be short of fuel, should attempt to reach Montevideo inside territorial waters. At 1910/5, HMS Ajax sighted her smoke to the north-north-east but the Germans managed to scuttle their ship and despite the efforts to save her she sank during the night. At 0615/6, HMS Cumberland came up and embarked the German survivors and made off for the Falklands. HMS Ajax then refuelled at San Borombon Bay from the Olynthus.
About the same time the Brazilian authorities asked that HMS Achilles should not refuel in any Brazilian port at an interval less then three months. The Commodore, therefore, ordered her to return south and refuel at Montevideo on 8 December. HMS Achilles then joined HMS Ajax at 1000/10 in position 35°11’S, 51°13’W, 230 miles west of English Bank. At 0600/12 they were joined by HMS Exeter in position 36°54’S, 53°39’W.
Ever since the beginning of the war Commodore Harwood’s cruisers had worked off the east coast of South America either single or in pairs. The concentration of these three cruisers off the River Plate on 12 December 1939 was, however, no mere matter of chance.
Concentration of British Force in the River Plate area, 12 December 1939.
When a pocket battleship was located in position 19°15’S, 05°05’E on 2 December by the sinking of the Doris Star, her position was over 3000 miles from any of the South America focal areas. The Commodore however recognised that her next objective might be the valuable shipping off the east coast of South America. He estimated that at a cruising speed of 15 knots the enemy could reach the Rio area on 12 December the Plate area on 13 December and the Falklands on 14 December. As the Plate area was by far the most important of these three focal areas he decided to concentrate all his available ships off the Plate on 12 December.
The three cruisers then proceeded together towards position 32°N, 47°W. That evening the Commodore informed the Captains of his cruisers that it was intention that if they met a pocket battleship to attack immediately, by day or by night. By they they would act as two units, the light cruisers were to operate together and HMS Exeter was to operate diverged to permit flank marking. By night the ships were to remain in company in open order.
At 0614/13 HMS Ajax sighted smoke bearing 324° in position 34°28’S, 49°05’W and Commodore Harwood then ordered HMS Exeter to investigate it.
What then followed can be read in the article ‘The battle of the River Plate, 13 December 1939’ which can be found on the pages of HMS Ajax, HMS Exeter and HMS Achilles. (7)
2 Oct 1939
HMS Cornwall (Capt. C.F. Hammill, RN, flying the flag of Rear-Admiral A.J.L. Murray, DSO, OBE, RN) and the liner Reina del Pacifico (17702 GRT, built 1931) departed Calcutta for Singapore. (8)
4 Oct 1939
In the mid-afternoon, while in the Andaman Sea, HMS Cornwall (Capt. C.F. Hammill, RN, flying the flag of Rear-Admiral A.J.L. Murray, DSO, OBE, RN), and the liner Reina del Pacifico (17702 GRT, built 1931) parted company. The liner proceeded to Singapore unescorted while HMS Cornwall set course for Colombo. (8)
6 Oct 1939
HMS Cornwall (Capt. C.F. Hammill, RN, flying the flag of Rear-Admiral A.J.L. Murray, DSO, OBE, RN) arrived at Colombo. (8)
7 Oct 1939
HMS Cornwall (Capt. C.F. Hammill, RN, flying the flag of Rear-Admiral A.J.L. Murray, DSO, OBE, RN) is docked at Colombo. (9)
11 Oct 1939
HMS Cornwall (Capt. C.F. Hammill, RN, flying the flag of Rear-Admiral A.J.L. Murray, DSO, OBE, RN) is undocked.
HMS Cornwall then departed Colombo around 1730EF/11 for Trincomalee.
At sea she joined HMS Eagle (Capt. A.R.M. Bridge, RN) which had departed Colombo two hours before. They then carried out night exercises while proceeding on their passage to Trincomalee. (9)
12 Oct 1939
Around 1730EF/12, HMS Cornwall (Capt. C.F. Hammill, RN, flying the flag of Rear-Admiral A.J.L. Murray, DSO, OBE, RN) arrived at Trincomalee.
HMS Eagle (Capt. A.R.M. Bridge, RN) remained at sea, presumably for exercises. She only entered Trincomalee harbour around 0745EF/13. (9)
13 Oct 1939
Between 1200EF/13 and 1330EF/13, HMS Cornwall (Capt. C.F. Hammill, RN, flying the flag of Rear-Admiral A.J.L. Murray, DSO, OBE, RN) and HMS Eagle (Capt. A.R.M. Bridge, RN) departed Trincomalee for Colombo. (9)
15 Oct 1939
Around 0700EF/15, HMS Cornwall (Capt. C.F. Hammill, RN, flying the flag of Rear-Admiral A.J.L. Murray, DSO, OBE, RN) and HMS Eagle (Capt. A.R.M. Bridge, RN) arrived at Colombo from Trincomalee. En-route exercises had been carried out.
They departed again in the evening, around 2030EF/15, for patrol. They were joined at sea the next morning, around 0600EF/16, by HMS Gloucester (Capt. F.R. Garside, CBE, RN). (9)
23 Oct 1939
Around 1430EF/23, HMS Cornwall (Capt. C.F. Hammill, RN, flying the flag of Rear-Admiral A.J.L. Murray, DSO, OBE, RN), HMS Gloucester (Capt. F.R. Garside, CBE, RN) and HMS Eagle (Capt. A.R.M. Bridge, RN) arrived at Colombo from patrol to the east / south-east of Ceylon. (9)
25 Oct 1939
HMS Gloucester (Capt. F.R. Garside, CBE, RN) departed Colombo to patrol in the Indian Ocean, Maldives area.
Before proceeding on patrol night encouter exercises were carried out with HMS Dorsetshire (Capt. B.C.S. Martin, RN) and HMS Cornwall (Capt. C.F. Hammill, RN) which also departed Colombo at the same time to patrol in the Indian Ocean, also near the Maldives.
3 Nov 1939
HMS Cornwall (Capt. C.F. Hammill, RN, flying the flag of Rear-Admiral A.J.L. Murray, DSO, OBE, RN) and HMS Dorsetshire (Capt. B.C.S. Martin, RN) returned to Colombo from their patrol in the Indian Ocean. (10)
10 Nov 1939
HMS Cornwall (Capt. C.F. Hammill, RN, flying the flag of Rear-Admiral A.J.L. Murray, DSO, OBE, RN) and HMS Dorsetshire (Capt. B.C.S. Martin, RN) departed Colombo to patrol in the Indian Ocean between Colombo and the Maldives. (10)
13 Nov 1939
Around 1400EF/13, HMS Cornwall (Capt. C.F. Hammill, RN, flying the flag of Rear-Admiral A.J.L. Murray, DSO, OBE, RN) and HMS Dorsetshire (Capt. B.C.S. Martin, RN) made rendezvous to the west of Colombo with the aircraft carrier HMS Eagle (Capt. A.R.M. Bridge, RN) which then joined the two cruisers on their patrol.
HMS Eagle had departed Colombo around 0930EF/13. (10)
18 Nov 1939
Around 0745EF/18, HMS Cornwall (Capt. C.F. Hammill, RN, flying the flag of Rear-Admiral A.J.L. Murray, DSO, OBE, RN), HMS Dorsetshire (Capt. B.C.S. Martin, RN) and HMS Eagle (Capt. A.R.M. Bridge, RN) arrived at Colombo from patrol. (10)
25 Nov 1939
Around 0900EF/25, HMS Cornwall (Capt. C.F. Hammill, RN, flying the flag of Rear-Admiral A.J.L. Murray, DSO, OBE, RN), HMS Dorsetshire (Capt. B.C.S. Martin, RN) and HMS Eagle (Capt. A.R.M. Bridge, RN) departed Colombo for patrol. They were joined at sea by the destroyer HMAS Waterhen (Lt.Cdr. J.H. Swain, RN) which had already been out on exercises.
They returned to Colombo around 0715EF/28. HMAS Waterhen had been detached around noon on the 27th arriving at Colombo later the same day. (11)
28 Nov 1939
Around 1830A/28, HMS Cornwall (Capt. C.F. Hammill, RN, flying the flag of Rear-Admiral A.J.L. Murray, DSO, OBE, RN), HMS Dorsetshire (Capt. B.C.S. Martin, RN) and HMS Eagle (Capt. A.R.M. Bridge, RN) departed Colombo to resume their patrol in the Indian Ocean. (10)
3 Dec 1939
HMS Dorsetshire (Capt. B.C.S. Martin, RN) was ordered to proceed to the South Atlantic Station. She split off around 1300EF/3 from the other two ships of Force I; HMS Eagle (Capt. A.R.M. Bridge, RN) and HMS Cornwall (Capt. C.F. Hammill, RN, flying the flag of Rear-Admiral A.J.L. Murray, DSO, OBE, RN) to proceed to Simonstown, South Africa via Mauritius.
HMS Dorsetshire was ordered to the South Atlantic Station to enable ships from 'Force G' and 'Force H' to refit. HMS Gloucester (Capt. F.R. Garside, CBE, RN) was to take her place in 'Force I'. (12)
7 Dec 1939
Around 0915D/7, HMS Cornwall (Capt. C.F. Hammill, RN, flying the flag of Rear-Admiral A.J.L. Murray, DSO, OBE, RN) and HMS Eagle (Capt. A.R.M. Bridge, RN) arrived at Diego Suarez from patrol. (13)
8 Dec 1939
Around noon, HMS Cornwall (Capt. C.F. Hammill, RN, flying the flag of Rear-Admiral A.J.L. Murray, DSO, OBE, RN), HMS Gloucester (Capt. F.R. Garside, CBE, RN) and HMS Eagle (Capt. A.R.M. Bridge, RN) departed Diego Suarez for Simonstown, South Africa. Their destination was later changed to Durban.
12 Dec 1939
Around 1100B/12, HMS Cornwall (Capt. C.F. Hammill, RN, flying the flag of Rear-Admiral A.J.L. Murray, DSO, OBE, RN), HMS Gloucester (Capt. F.R. Garside, CBE, RN) and HMS Eagle (Capt. A.R.M. Bridge, RN) arrived at Durban, South Africa.
14 Dec 1939
Around 0800B/14, HMS Cornwall (Capt. C.F. Hammill, RN, flying the flag of Rear-Admiral A.J.L. Murray, DSO, OBE, RN), HMS Gloucester (Capt. F.R. Garside, CBE, RN) and HMS Eagle (Capt. A.R.M. Bridge, RN) put to sea from Durban for the South Atlantic when it was reported that the German pocket battleship Admiral Graf Spee was in Montivideo harbour. They were recalled early the next day and they returned to Durban where they arrived around 2000B/15.
22 Dec 1939
Around 0700B/22, HMS Cornwall (Capt. C.F. Hammill, RN, flying the flag of Rear-Admiral A.J.L. Murray, DSO, OBE, RN), HMS Gloucester (Capt. F.R. Garside, CBE, RN) and HMS Eagle (Capt. A.R.M. Bridge, RN) departed Durban for Mauritius.
23 Dec 1939
Late in the afternoon, HMS Cornwall (Capt. C.F. Hammill, RN, flying the flag of Rear-Admiral A.J.L. Murray, DSO, OBE, RN) is ordered to proceed to Simonstown with despatch so she then parted company around 1800C/23, with HMS Gloucester (Capt. F.R. Garside, CBE, RN) and HMS Eagle (Capt. A.R.M. Bridge, RN). (14)
26 Dec 1939
HMS Cornwall (Capt. C.F. Hammill, RN, flying the flag of Rear-Admiral A.J.L. Murray, DSO, OBE, RN) arrived at Simonstown.
Rear-Admiral Murray struck his flag the following day. (13)
2 Jan 1940
HMS Cornwall (Capt. C.F. Hammill, RN) departed Simonstown for a patrol in the South Atlantic. (15)
11 Jan 1940
HMS Cornwall (Capt. C.F. Hammill, RN) arrived at Capetown from patrol. (15)
25 Jan 1940
HMS Cornwall (Capt. C.F. Hammill, RN) departed Capetown to escort the liner / troopship Dominion Monarch (British, 27155 GRT, built 1939) eastwards until about noon the following day.
HMS Cornwall then patrolled the the South of South Africa. (15)
30 Jan 1940
HMS Cornwall (Capt. C.F. Hammill, RN) arrived at Capetown from patrol. (15)
3 Feb 1940
HMS Cornwall (Capt. C.F. Hammill, RN) departed Capetown at 0218/3 to intercept the Portugese passenger/cargo ship Nyassa (9028 GRT, built 1906). This ship had been sighted by shore based aircraft in position 34°40'S, 18°54'E at 1740/2. (16)
4 Feb 1940
HMS Cornwall (Capt. C.F. Hammill, RN) is ordered to return to Capetown as a search for the Portugese passenger / cargo ship Nyassa (9028 GRT, built 1906) could not take place due to fog. Cornwall arrived at Capetown around 1400 hours. (16)
8 Feb 1940
HMS Cornwall (Capt. C.F. Hammill, RN) shifted from Capetown to Simonstown where she was immediately docked for intermediate docking and to repair urgent defects. (16)
14 Feb 1940
HMS Cornwall (Capt. C.F. Hammill, RN) in undocked. (17)
18 Feb 1940
HMS Cornwall (Capt. C.F. Hammill, RN) and HMS Cumberland (Capt W.H.G. Fallowfield, RN) departed Simonstown for patrol and then to proceed to Freetown afterwards. (16)
28 Feb 1940
HMS Dainty (Cdr. M.S. Thomas, RN) and HMS Diamond (Lt.Cdr. P.A. Cartwright, RN) departed Freetown to make rendez-vous the next morning with HMS Cornwall (Capt. C.F. Hammill, RN) and HMS Cumberland (Capt W.H.G. Fallowfield, RN) and then escort them to Freetown. (16)
29 Feb 1940
HMS Cornwall (Capt. C.F. Hammill, RN) and HMS Cumberland (Capt W.H.G. Fallowfield, RN), HMS Dainty (Cdr. M.S. Thomas, RN) and HMS Diamond (Lt.Cdr. P.A. Cartwright, RN) arrived at Freetown. (16)
4 Mar 1940
HMS Cornwall (Capt. C.F. Hammill, RN) and HMS Cumberland (Capt. G.H.E. Russell, RN) departed Freetown to conduct exercises before proceeding on patrol in the South Atlantic. During these exercises they were escorted by HMS Dainty (Cdr. M.S. Thomas, RN). During the exercises Dainty obtained an A/S contact after which the cruisers immediately made off from the area and proceeding on patrol. Dainty's A/S contact turned out to be 'non-sub' and she then returned to harbour. (16)
20 Mar 1940
At 0600 hours HMS Dainty (Cdr. M.S. Thomas, RN) and HMS Diamond (Lt.Cdr. P.A. Cartwright, RN) made rendez-vous with HMS Cornwall (Capt. C.F. Hammill, RN) and HMS Cumberland (Capt. G.H.E. Russell, RN) and then escorted them to Freetown where they arrived later the same day. (16)
25 Mar 1940
HMS Cornwall (Capt. C.F. Hammill, RN), HMS Cumberland (Capt. G.H.E. Russell, RN), HMS Decoy (Cdr. E.G. McGregor, RN) and HMS Defender (Lt.Cdr. St.J.R.J. Tyrwhitt, RN) departed Freetown for a patrol in the South Atlantic during which they were to provide cover for the whale factory ships Salvestria (British, 11938 GRT, built 1913) and Sourabaya (British, 10107 GRT, built 1915) during their passage to Freetown from the South Atlantic. (16)
27 Mar 1940
HMS Decoy (Cdr. E.G. McGregor, RN) and HMS Defender (Lt.Cdr. St.J.R.J. Tyrwhitt, RN) parted company with HMS Cornwall (Capt. C.F. Hammill, RN) and HMS Cumberland (Capt. G.H.E. Russell, RN) and set course to return to Freetown where they arrived later the same day. The cruisers then continued their patrol. (16)
6 Apr 1940
HMS Cornwall (Capt. C.F. Hammill, RN) and HMS Cumberland (Capt. G.H.E. Russell, RN) arrived at Freetown from patrol. (16)
12 Apr 1940
HMS Cornwall (Capt. C.F. Hammill, RN), HMS Cumberland (Capt. G.H.E. Russell, RN) departed Freetown to patrol near position 05°00'S, 25°00'W with to object of intercepting Norwegian and Danish merchant vessels and direct them to Freetown. (16)
15 Apr 1940
Late in the evening, HMS Cornwall (Capt. C.F. Hammill, RN), HMS Cumberland (Capt. G.H.E. Russell, RN), parted company. HMS Cornwall was to continue the patrol while HMS Cumberland was to proceed to the Rio de Janeiro - Santos area to prevent German merchant ships escaping from that area. (16)
28 Apr 1940
HMS Cornwall (Capt. C.F. Hammill, RN) returned to Freetown from patrol. (16)
7 May 1940
HMS Cornwall (Capt. C.F. Hammill, RN) and HMS Dorsetshire (Capt. B.C.S. Martin, RN) conducted exercises off Freetown. (18)
15 May 1940
HMS Cornwall (Capt. C.F. Hammill, RN) and HMS Dorsetshire (Capt. B.C.S. Martin, RN) departed Freetown for Gibraltar. (19)
18 May 1940
HMS Cornwall (Capt. C.F. Hammill, RN) and HMS Dorsetshire (Capt. B.C.S. Martin, RN) arrived at Gibraltar around 2000 hours (zone 0, GMT). Around 0830 hours the cruisers had been joined by the destroyers HMS Keppel (Lt.Cdr.(Emgy.) E.G. Heywood-Lonsdale, RN) and HMS Vortigern (Lt.Cdr. R.S. Howlett, RN) for A/S escort in the approaches to Gibraltar. (19)
22 May 1940
HMS Cornwall (Capt. C.F. Hammill, RN) and HMS Dorsetshire (Capt. B.C.S. Martin, RN) departed Gibraltar for Freetown and Plymouth respectively. In the approaches to Gibraltar they were escorted by the destroyers HMS Keppel (Lt.Cdr.(Emgy.) E.G. Heywood-Lonsdale, RN) and HMS Wrestler (Lt.Cdr. E.N.V. Currey, RN) until 2345 hours. Both cruisers then set course for their destinations. (19)
26 May 1940
HMS Cornwall (Capt. C.F. Hammill, RN) arrived at Freetown. (18)
27 May 1940
The troopships / transports Devonshire (British, 11275 GRT, built 1939), Lancashire (British, 9445 GRT, built 1917), Orion (British, 23371 GRT, built 1935) and Reina del Pacifico (British, 17702 GRT, built 1931) departed Freetown for Takoradi and Lagos. Here they were to embark troops which they were to transport to Mombasa.
They were escorted by the heavy cruiser HMS Cornwall (Capt. C.F. Hammill, RN). (16)
30 May 1940
The troopships / transports Devonshire (British, 11275 GRT, built 1939), Lancashire (British, 9445 GRT, built 1917), Orion (British, 23371 GRT, built 1935) and Reina del Pacifico (British, 17702 GRT, built 1931) and their escort, the heavy cruiser HMS Cornwall (Capt. C.F. Hammill, RN) arrived off Takoradi.
HMS Cornwall then patrolled off Takoradi while Orion and Reina del Pacifico entered the harbour.
Devonshire and Lancashire continued on to Lagos with Dilwara (British, 11080 GRT, built 1936) which joined off Takoradi. They arrived at Lagos the next day. (16)
31 May 1940
While patrolling off Takoradi, HMS Cornwall (Capt. C.F. Hammill, RN) conducted HA gunnery exercises. (18)
4 Jun 1940
The troopships Orion (British, 23371 GRT, built 1935) and Reina del Pacifico (British, 17702 GRT, built 1931) departed Takoradi. At sea they joined their escort, the heavy cruiser HMS Cornwall (Capt. C.F. Hammill, RN).
The transports Devonshire (British, 11275 GRT, built 1939), Dilwara (British, 11080 GRT, built 1936) and Lancashire (British, 9445 GRT, built 1917) and their escort, the armed merchant cruiser HMS Pretoria Castle (Capt.(Retd.) E.J. Shelly, RN), departed Lagos.
Both groups were to proceed to position 00°50'N, 03°30'E where they were to rendez-vous at 0800/5 after which HMS Cornwall with the troopships and transports would set course to Capetown while HMS Pretoria Castle was to proceed to Dakar. (16)
13 Jun 1940
The troopships / transports Devonshire (British, 11275 GRT, built 1939), Dilwara (British, 11080 GRT, built 1936), Lancashire (British, 9445 GRT, built 1917), Orion (British, 23371 GRT, built 1935) and Reina del Pacifico (British, 17702 GRT, built 1931) and their escort, the heavy cruiser HMS Cornwall (Capt. C.F. Hammill, RN) arrived off Capetown.
Due to a gale they could not enter the port and they were ordered to continue on to Durban but as Lancashire was running low on fuel they could not make it where so they were diverted to Simonstown where they arrived on the 14th. They departed for Durban later on the 14th after Lancashire had fuelled. (20)
18 Jun 1940
The troopships / transports Devonshire (British, 11275 GRT, built 1939), Dilwara (British, 11080 GRT, built 1936), Lancashire (British, 9445 GRT, built 1917), Orion (British, 23371 GRT, built 1935) and Reina del Pacifico (British, 17702 GRT, built 1931) and their escort, the heavy cruiser HMS Cornwall (Capt. C.F. Hammill, RN) arrived at Durban. (20)
20 Jun 1940
The transports Aska (British, 8323 GRT, built 1939), Karanja (British, 9891 GRT, built 1931) and Kenya (British, 9890 GRT, built 1930) departed Durban for Capetown. They were escorted by the heavy cruiser HMS Cornwall (Capt. C.F. Hammill, RN). (20)
23 Jun 1940
The transports Aska (British, 8323 GRT, built 1939), Karanja (British, 9891 GRT, built 1931) and Kenya (British, 9890 GRT, built 1930) and their escort, the heavy cruiser HMS Cornwall (Capt. C.F. Hammill, RN), arrived at Capetown. HMS Cornwall then proceeded to Simonstown. (20)
24 Jun 1940
HMS Cornwall (Capt. C.F. Hammill, RN) departed Simonstown for Capetown where she picked up the transports Aska (British, 8323 GRT, built 1939), Karanja (British, 9891 GRT, built 1931) and Kenya (British, 9890 GRT, built 1930). They then set course for Freetown. (20)
5 Jul 1940
The transports Aska (British, 8323 GRT, built 1939), Karanja (British, 9891 GRT, built 1931) and Kenya (British, 9890 GRT, built 1930) and their escort, the heavy cruiser HMS Cornwall (Capt. C.F. Hammill, RN), arrived at Freetown. (21)
6 Jul 1940
The troop transports and transports Aska (British, 8323 GRT, built 1939), Karanja (British, 9891 GRT, built 1931) and Kenya (British, 9890 GRT, built 1930), Orion (British, 23371 GRT, built 1935) and Reina del Pacifico (British, 17702 GRT, built 1931) departed Freetown for the U.K. They were escorted by the heavy cruiser HMS Cornwall (Capt. C.F. Hammill, RN). (21)
11 Jul 1940
The troop transports and transports Aska (British, 8323 GRT, built 1939), Karanja (British, 9891 GRT, built 1931) and Kenya (British, 9890 GRT, built 1930), Orion (British, 23371 GRT, built 1935) and Reina del Pacifico (British, 17702 GRT, built 1931) and their escort, the heavy cruiser HMS Cornwall (Capt. C.F. Hammill, RN), were joined by the heavy cruiser HMAS Australia (Capt. R.R. Stewart, RN). (21)
15 Jul 1940
The troop transports and transports Aska (British, 8323 GRT, built 1939), Karanja (British, 9891 GRT, built 1931) and Kenya (British, 9890 GRT, built 1930), Orion (British, 23371 GRT, built 1935) and Reina del Pacifico (British, 17702 GRT, built 1931) and their escorts, the heavy cruisers HMS Cornwall (Capt. C.F. Hammill, RN) and HMAS Australia (Capt. R.R. Stewart, RN) were joined by a local A/S escort made up of the destroyers HMS Havelock (Capt. E.B.K. Stevens, DSC, RN), HMS Harvester (Lt.Cdr. M. Thornton, RN), HMCS St. Laurent (Lt. H.S. Rayner, RCN), HMS Walker (Lt.Cdr. A.A. Tait, RN) and HMS Westcott (Lt.Cdr. W.F.R. Segrave, RN).
The convoy arrived at Liverpool on the 16th minus HMAS Australia which had gone to the Clyde. (21)
18 Jul 1940
HMS Cornwall (Capt. C.F. Hammill, RN) is taken in hand for refit at the Cammell Laird Shipyard at Birkenhead. (22)
20 Jul 1940
HMS Cornwall (Capt. C.F. Hammill, RN) is docked at Birkenhead. (22)
5 Aug 1940
HMS Cornwall (Capt. C.F. Hammill, RN) is undocked and completed her refit at Birkenhead. (23)
6 Aug 1940
Convoy WS 2.
This convoy departed Liverpool / the Clyde on 6 August 1940 for the far east.
The Liverpool section of the convoy was made up of the following troopships / transports; Aska (British, 8323 GRT, built 1939), Batory (Polish, 14287 GRT, built 1936), Clan Macaulay (British, 10492 GRT, built 1936), Empress of Britain (British, 42348 GRT, built 1931), Monarch of Bermuda (British, 22424 GRT, built 1931), Orion (British, 23371 GRT, built 1935), Ormonde (British, 14982 GRT, built 1917), Otranto (British, 20026 GRT, built 1925), Strathaird (British, 22281 GRT, built 1932), Stratheden (British, 23722 GRT, built 1937) and Waiwera (British, 12435 GRT, built 1934).
They were escorted by the heavy cruiser HMS Cornwall (Capt. C.F. Hammill, RN), HMS Havelock (Capt. E.B.K. Stevens, DSC, RN), HMS Harvester (Lt.Cdr. M. Thornton, RN), HMS Highlander (Cdr. W.A. Dallmeyer, RN) and HMS Hurricane (Lt.Cdr. H.C. Simms, RN).
The Clyde section of the convoy was made up of the following troopships / transports; Andes (British, 25689 GRT, built 1939), Empress of Canada (British, 21517 GRT, built 1922), Franconia (British, 20175 GRT, built 1923), Lanarkshire (British, 9816 GRT, built 1940), Memnon (British, 7506 GRT, built 1931) and Suffolk (British, 11063 GRT, built 1939).
They were escorted by the heavy cruiser HMS Shropshire (Capt. J.H. Edelsten, RN), light cruiser HMS Emerald (Capt. F.C. Flynn, RN) and the destroyers HMS Fortune (Cdr. E.A. Gibbs, DSO, RN), HMS Fury (Lt.Cdr. T.C. Robinson, RN), HMS Vortigern (Lt.Cdr. R.S. Howlett, RN) and HMS Watchman (Lt.Cdr. E.C.L. Day, RN).
Both sections made rendezvous around 1200A/6 and then the convoy was formed in position 55°30'N, 06°00'W.
Around 1430A/6, the troopship Orion, was ordered to proceed to the Clyde as she had developed engine defects.
At 2118A/7, the destroyers HMS Vortigern and HMS Watchman were detached in response to an SOS signal. [This was from the torpedoed Mohamed Ali El-Kebir.]
At 2359A/7, HMS Emerald and the remaining destroyers parted company with the convoy.
Around dawn on the 8th the convoy split up in a 'fast' and a 'slow' section. The fast section was made up of the Andes, Batory, Empress of Britain, Empress of Canada, Monarch of Bermuda, Strathaird and Stratheden. They were escorted by HMS Cornwall. The other ships formed the 'slow' section escorted by HMS Shropshire.
The 'fast' section arrived at Freetown on 15 August 1940. The 'slow' section arrived at Freetown on 16 August 1940.
----------------------------------------------------
On 16 August 1940 the 'fast' section departed Freetown for Capetown. It was now made up of the troopships / transports Andes, Batory, Empress of Britain, Empress of Canada, Strathaird and Stratheden under the escort of HMS Cornwall.
The 'slow' section, now made up of the troopships / transports Clan Macaulay, Franconia, Lanarkshire, Memnon, Ormonde, Otranto, Suffolk and Waiwera under the escort of HMS Shropshire.
The fast section arrived at Capetown on 25 August 1940, the slow section on 28 August 1940.
Both cruisers proceeded to Simonstown after delivering the convoy at Capetown, HMS Cornwall arriving there on 25 August and HMS Shropshire on 28 August.
----------------------------------------------------
On 30 August 1940 the troopships / transports Andes, Clan Macaulay, Empress of Britain, Empress of Canada, Lanarkshire, Memnon, Otranto, Strathaird, Suffolk and Waiwera departed Capetown for Aden / Suez. They were escorted by HMS Shropshire. This convoy was now known as WS 2A.
On 2 September 1940, while off Durban, this convoy was joined by the troopships / transport Franconia and Llangibby Castle (British, 11951 GRT, built 1929) which had been escorted out of Durban by the HMS Kanimbla (A/Capt. F.E. Getting, RAN). These ships had departed Durban the day before.
The Llangibby Castle was detached from the convoy around noon on 7 September for Mombasa where she arrived on 8 September being escorted from them moment she had been detached by the light cruiser HMS Ceres (Capt. E.G. Abbott, AM, RN).
The convoy arrived near Aden on 12 September 1940 where it split into two sections around 2145C/12. The 'fast' section was escorted by light cruiser HMAS Hobart (Capt. H.L. Howden, RAN), AA cruiser HMS Coventry (Capt. D. Gilmour, RN) and the destroyers HMS Kandahar (Cdr. W.G.A. Robson, RN) and HMS Kingston (Lt.Cdr. P. Somerville, DSO, RN). HMS Shropshire remained with the 'slow' section but was reinforced by the destroyer HMS Kimberley (Lt.Cdr. J.S.M. Richardson, RN) and sloop HMS Flamingo (Cdr. J.H. Huntley, RN).
Around 2310C/13, HMS Kandahar parted company with the fast section to proceed to Port Sudan to fuel.
Around 0130C/14, HMS Coventry and HMS Kingston were detached from the fast section, they were also to proceed to Port Sudan to fuel.
Around 0600C/14, HMAS Hobart parted company with the fast section which then continued its passage to Suez unescorted.
Around 1300C/14, HMS Kimberley parted company with the slow section.
Around 1930C/14, HMS Shropshire and HMS Flamingo parted company with the slow section which then continued its passage to Suez unescorted.
----------------------------------------------------
One day later, 31 August 1940, the troopships / transports Batory, Orion (which by now had also arrived at Capetown, Ormonde and Stratheden departed Capetown for Bombay. They were escorted by HMS Cornwall. This convoy was now known as WS 2B.
The escort of convoy WS 2B was taken over by the armed merchant cruiser HMS Kanimbla (A/Capt. F.E. Getting, RAN) in position 35°08'S, 34°27'E at 1200/3. Half an hour later HMS Cornwall parted company with the convoy.
Convoy WS 2B arrived at Bombay in the morning of September 15th. (24)
27 Aug 1940
HMS Cornwall (Capt. C.F. Hammill, RN) conducted exercises off Simonstown, South Africa. (23)
28 Aug 1940
HMS Cornwall (Capt. C.F. Hammill, RN) conducted exercises off Simonstown, South Africa. (23)
28 Aug 1940
Operation Menace, the attack on Dakar, 23-24 September 1940.
Part I, initial movements of the Allied naval forces
The actual attack on Dakar took place on 23 and 24 September 1940 but preparations off course started earlier.
28 August 1940.
The battleship HMS Barham (Capt G.C. Cooke, RN) departed Scapa Flow for Gibraltar. She was escorted by HMS Inglefield (Capt. P. Todd, DSO, RN), HMS Eclipse (Lt.Cdr. I.T. Clark, RN) and HMS Escapade (Cdr. H.R. Graham, DSO, RN). They were joined at sea by HMS Echo (Cdr. S.H.K. Spurgeon, DSO, RAN) which sailed later.
29 August 1940.
The transports Anadyr (British, 5321 GRT, built 1930), Casamance (French, 5817 GRT, built 1921), Fort Lamy (British, 5242 GRT, built 1919), Nevada (French, 5693 GRT, built 1918) and the tanker Ocean Coast (British, 1173 GRT, built 1935) split off in position 54’N, 18’W from convoy OB 204 (which had departed from the British east coast on 26/27 August) to proceed to Dakar. When they split off their escort towards Dakar were the Free French sloop Savorgnan de Brazza and the Free French A/S trawler President Houduce.
31 August 1940.
On this day three groups of ships departed from British ports.
From Scapa Flow the following ships sailed; troopships Ettrick (British, 11279 GRT, built 1938), Kenya (British, 9890 GRT, built 1938) and Sobieski (Polish, 11030 GRT, built 1939). These were escorted by the light cruiser HMS Fiji (Capt. W.G. Benn, RN) and the destroyers HMS Ambuscade (Lt.Cdr. R.A. Fell, RN), HMS Antelope (Lt.Cdr. R.T. White, DSO, RN), HMS Volunteer (Lt.Cdr. N. Lanyon, RN) and HMS Wanderer.
From Liverpool the following ships sailed; troopships Karanja (British, 9891 GRT, built 1931), Pennland (Dutch, 16082 GRT, built 1922) and Westernland (Dutch, 16313 GRT, built 1918) and the transport Belgravian (British, 3136 GRT, built 1937). These were escorted by the destroyers HMS Mackay (Cdr. G.H. Stokes, RN), HMS Vanoc (Lt.Cdr. J.G.W. Deneys, RN) and the corvette HMS Erica (Lt.Cdr. W.C. Riley, RNR).
From the Clyde the following warships sailed; HMS Devonshire (Capt. J.M. Mansfield, DSC, RN, flying the flag of Vice-Admiral J.H.D. Cunningham, CB, MVO, RN, the Commander of the upcoming operation), the destroyer HMS Harvester (Lt.Cdr. M. Thornton, RN) and the French sloops (minesweepers) Commandant Dominé and Commandant Duboc.
All these ships were expected to arrive at Freetown on 13 September where they would be joined by ships coming from Gibraltar and ships that were based at Freetown.
1 September 1940.
The outward passage was initially uneventful and Vice-Admiral Cunningham’s group joined up with the group that came from Liverpool at 0600/1 (zone -1). But that evening misfortune occurred when HMS Fiji was torpedoed by the German submarine U-32 when about 40 nautical miles north-northeast of Rockall in position 58°10’N, 12°55’W. She then returned to the Clyde. Her convoy then continued on escorted by the four destroyers until they met Vice-Admiral Cunningham’s force at 0900/2. The convoy was now known as ‘Convoy MP’. The place of HMS Fiji in the operation was subsequently taken over by the Australian heavy cruiser HMAS Australia (Capt. R.R. Stewart, RN).
2 September 1940.
HMS Barham (Capt G.C. Cooke, RN), HMS Inglefield (Capt. P. Todd, DSO, RN), HMS Echo (Cdr. S.H.K. Spurgeon, DSO, RAN), HMS Eclipse (Lt.Cdr. I.T. Clark, RN) and HMS Escapade (Cdr. H.R. Graham, DSO, RN) arrived at Gibraltar from Scapa Flow.
The destroyer escort for the MP convoy parted company at 1400/2 and was ordered to join HMS Revenge (Capt. E.R. Archer, RN) which was escorting Canadian troop convoy TC 7 to the Clyde.
Passage of the MP convoy southwards was relatively uneventful except for some submarine alarms and also some engine defects during which speed had to be reduced a bit.
6 September 1940.
HMS Barham (Capt G.C. Cooke, RN), HMS Inglefield (Capt. P. Todd, DSO, RN), HMS Echo (Cdr. S.H.K. Spurgeon, DSO, RAN), HMS Eclipse (Lt.Cdr. I.T. Clark, RN) and HMS Escapade (Cdr. H.R. Graham, DSO, RN) departed Gibraltar for Freetown in the evening but now accompanied by ships from Force H; the aircraft carrier HMS Ark Royal (Capt. C.S. Holland, RN), battleship HMS Resolution (Capt. O. Bevir, RN) and the destroyers HMS Faulknor (Capt. A.F. de Salis, RN), HMS Forester (Lt.Cdr. E.B. Tancock, RN), HMS Foresight (Lt.Cdr. G.T. Lambert, RN), HMS Fortune (Cdr. E.A. Gibbs, DSO, RN), HMS Fury (Lt.Cdr. T.C. Robinson, RN) and HMS Greyhound (Cdr. W.R. Marshall A'Deane, DSO, DSC, RN).
After passing between Madeira and the Canary Islands on the 8th this force, which constituted the major part of the warships involved in the upcoming operation, turned south at 0900/9. By 0800/11 the force was in position 20°18’N, 19°54’W about 1000 nautical miles south of Casablanca.
Vice-Admiral Cunningham in HMS Devonshire was then in position 16°50’N, 22°00’W, about 240 nautical miles to the south-west ward of the main force. He had just sighted the MS convoy (the five transports), escorted by Savorgnan de Brazza, some 300 nautical miles north-west of Dakar. Vice-Admiral Cunningham ordered the convoy Commodore to take the convoy into Freetown.
A signal was then received that Vichy-French warships had passed the Straits of Gibraltar and had turned south. Three light cruisers and three large destroyers were reported to have made up this force. It was not known where they were bound for but possibly Casablanca. Their appearance seriously affected the whole operation.
The Vichy-French cruiser force.
At 1850 hours on 9 September 1940, H.M. Consul General, Tangier, had informed Admiral Sir Dudley North, Flag Officer commanding North Atlantic, and repeated to the Foreign Office, that a French Squadron in the Mediterranean might try to pass through the Strait of Gibraltar within the next 72 hours. This report received confirmation the next day when the French Admiralty requested the British Naval Attaché, Madrid, to advise the Naval authorities at Gibraltar of the departure from Toulon on the 9th of three light cruisers of the Georges Leygues class and three large destroyers of the Fantasque class. They would pass through the Straits of Gibraltar on the morning of the 11th, no mention was made of their destination. This information reached the Admiralty at 2350/10 and Admiral North at 0008/11.
The Government policy with regards to Vichy warships at that time had been defined in a signal sent to all Commanders-in-Chief and Flag Officers commanding shortly after the attack on the battleship Richelieu at Dakar in July. This message, after stressing the importance of terminating the state of tension then existing between the French navy and ourselves, stated that His Majesty’s Government had decided to take no further action in regard to French ships in French colonial and North African ports, and went on to say ‘ We shall, of course, however, reserve the right to take action in regard to French warships proceeding to enemy controlled ports.’ Recent intelligence had indicated that it was highly improbable that any warships would make for the German occupied Biscay ports, and a Admiral North had not been informed of the Dakar project, he saw no reason to take any steps to interfere with the movements of the French warships.
Early on September 11th, the destroyers HMS Hotspur (Cdr. H.F.H. Layman, DSO, RN), HMS Griffin (Lt.Cdr. J. Lee-Barber, DSO, RN) and HMS Encounter (Lt.Cdr. E.V.St J. Morgan, RN), which were hunting a reported submarine to the eastward of the Strait of Gibraltar. At 0445 they sighted six French warships steaming fast to the westward and reported them. At 0617/11, Admiral North informed the Admiralty that the lights of six ships, probably warships, steering west at high speed, had been reported by HMS Hotspur at 0515 hours in position 36°03'N, 04°14'W (60 miles east of Gibraltar) and that he had ordered the destroyers to take no further action. At 0711 hours he added that he intended to keep in touch with this force by air and that he would report probable destination.
Meanwhile, Vice-Admiral Somerville, commanding Force H, on receiving the signal from HMS Hotspur had brought HMS Renown (Capt C.E.B. Simeon, RN) and the only destroyer available, HMS Vidette (Lt. E.N. Walmsley, RN), to one hour’s notice for full speed. He did not put to sea because he too, believed the Government’s policy was to avoid interference with French warships as stated in the signal of 12 July.
The French squadron passed Gibraltar to the westward shortly after 0830/11 having given it’s composition in reply to the demand as the light cruisers Georges Leygues, Gloire, Montcalm and the destroyers Le Malin, Le Fantasque and L’Audacieux. This information reached the Admiralty at 1043/11 in a signal sent by Admiral North at 0917/11.
No further action was taken during the forenoon and the situation at noon was that the French Squadron was in position 35°00'N, 06°40'W (about 75 nautical miles south-south-west of Gibraltar) steering 213° at 20 knots. They were being observed by reconnaissance aircraft from RAF 200 Sq. based at Gibraltar. The Admiralty and Air Ministery were being kept informed.
Here was a complication that might well effect the Dakar operation should Dakar be the destination of the French Squadron. It does not seem to have been viewed in this light at the Admiralty, until the 1st Sea Lord himself, who was attending a meeting in the Cabinet Offices that forenoon, telephoned orders for HMS Renown and all available destroyers to raise steam for full speed. A signal to this end was then sent to Admiral Somerville at 1239/11. This was over twelve hours after the original message from Madrid had reached the Admiralty.
Movements of Force H, 11 to 14 September 1940.
The noon position and their course indicated Casablanca as the most probable destination of the French Squadron and at 1347/11 the Admiralty ordered Admiral Somerville to sea to intercept them. Further instructions followed at 1429 hours. These was no objection with them going to Casablanca but they could not be allowed to proceed to Dakar. Shortly after 1600 hours aircraft reported that the French Squadron had entered Casablanca.
Admiral Somerville left Gibraltar at 1630 hours in the Renown escorted by the destroyers HMS Griffin, HMS Velox (Cdr.(Retd.) J.C. Colvill, RN) and HMS Vidette. At 2006 hours he was ordered by the Admiralty to establish a patrol to intercept the French Squadron if they sailed southwards from Casablanca. In the early morning hours of the 12th at 0235 hours, HMS Vidette, encountered a four-funneled French destroyer (this was Milan) in position 33°55'N, 08°31'W (west-north-west of Casablanca). She sighted a darkened ship some 6 miles on her port bow. She challenged but got no reply. A searchlight was turned on and revealed a four-funneled French destroyer. Vidette then fired two salvoes and the French destroyer, ignoring a signal to stop, then retired at high speed behind a smoke screen. Shortly afterwards Vidette was recalled from her patrol and ordered to rejoin Renown.
The French squadron was still at Casablanca at 0923/12 according to an aircraft report. At 0934 hours, Admiral Somerville turned north to meet three more destroyers coming from Gibraltar. These were; HMS Hotspur, HMS Encounter and HMS Wishart (Cdr. E.T. Cooper, RN). These were met at 1300 hours, in position 33°05'N, 09°40'W. They then turned to the south-west again. HMS Hotspur was stationed to patrol closer inshore.
At 0405/13, HMS Renown sighted three darkened ships in position 31°25'N, 11°30'W. These were thought to be the three Fantasque class destroyers. They were steaming north at 20 knots and were allowed to proceed. Admiral Somerville continued his patrol but fuel began to become an issue. The weather was to rough for the destroyers to fill up at sea and two of them will have to be detached that evening to refuel. This would much reduce the chance to intercept the French Squadron and Admiral Somerville informed the Admiralty of this. Adding tat he considered a patrol should be established off Dakar. His signal crossed one from the Admiralty stating that according to French sources the Squadron would remain only shortly at Casablanca before proceeding to Dakar.
This forecast proved correct. At 1530/13 aircraft reported that the light cruisers were no longer at Casablanca. Due to his fuel situation Admiral Somerville signalled that he would leave his patrol area for Gibraltar at 2000 hours that evening. But at 1916 hours the Admiralty ordered him to steer for Dakar at 18 knots. This was being done but Vidette and Velox were detached to Gibraltar to fuel.
At 2335/19 the Admiralty cancelled the order so at 0121/14, Renown and the four remaining destroyers set course to return to Gibraltar which they reached at 2000/14.
Patrol of Dakar by Vice-Admiral Cunningham’s forces.
To return to Vice-Admiral Cunningham. He knew that the French Squadron had left the Mediterranean at 1542/11 and that Vice-Admiral Somerville had been ordered to intercept them. Within a couple of hours he learnt that the French Squadron had entered Casablanca. The next forenoon (0947/12) he was informed that Vice-Admiral Somerville had been ordered to establish a patrol and to prevent them from proceeding to the south.
Vice-Admiral Cunningham’s forces were then approaching Freetown. At 1145/12, an aircraft from HMS Ark Royal approached HMS Devonshire to report that the Ark Royal would be in position 13°59'N, 20°08'W at 1300 hours and expected to arrive at Freetown with HMS Barham, HMS Resolution and ten destroyers at 0700/14. The next morning, 13 September, at 0820 hours an aircraft again closed HMS Devonshire. An order was then passed that four destroyers were to be detached to join HMS Devonshire and the convoy before dark. At 1008 hours HMS Devonshire left the convoy to close Ark Royal’s force, sighing it an hour later 20 nautical miles to the north-north-east. Devonshire remained in visual touch until 1700 hours when course was set to return to the convoy taking the destroyers HMS Faulknor, HMS Foresight, HMS Forester and HMS Fury with him.
Shortly after 1800/13, Vice-Admiral Cunningham was informed that the French cruisers had left Casablanca and that Vice-Admiral Somerville in the Renown had been ordered to proceed to the Dakar area.
Shortly after midnight 13th/14th, a signal came in from the Admiralty ordering Vice-Admiral Cunningham to establish a patrol immediately to prevent the French cruisers from reaching Dakar, employing every available ship. The same orders went to the Commander-in-Chief, South Atlantic. HMS Cumberland (Capt. G.H.E. Russell, RN), which had departed Freetown for the U.K. at 2000/13 was placed under Vice-Admiral Cunninham’s orders and HMS Cornwall (Capt. C.F. Hammill, RN), on her way from Simonstown to Freetown, was ordered to increase speed.
The original operation was now swallowed up in the task of intercepting the French ships. Time had become a factor of the utmost importance and without waiting for daylight, Vice-Admiral Cunningham and General Irwin, went over to see General de Gaulle on board the Westernland at 0120/14, who immediately roused Capitaine Thierry d’Argenlieu and armed him with a letter forbidding any French warship to proceed to Dakar. Within twenty minutes they were on their way back to the Dorsetshire with Capt. D’Argenlieu and the following measures were taken;
HMAS Australia which was coming from the Clyde to take the place of HMS Fiji was ordered to close HMS Devonshire, which would be steering for Dakar, then 400 nautical miles distant.
The Ark Royal was ordered to sent her six remaining destroyers; HMS Inglefield, HMS Greyhoud, HMS Fortune, HMS Echo, HMS Eclipse and HMS Escapade to Freetown to fuel and herself proceed with despatch to position 16’N, 17°40’W.
HMS Barham and HMS Resolution and the other four destroyers; HMS Faulknor, HMS Foresight, HMS Forester and HMS Fury, were to fuel at Freetown and leave for the Dakar area as soon as fuelling had been completed.
Convoy’s MP and MS were to proceed to Freetown with their French escorts.
HMS Devonshire meanwhile had altered course to the northward for Dakar at 0230/14, speed 18 knots. It was not possible to transfer General Irwin and his staff and the General thus found himself speeding northward with the orders for the landing while his troops went on to Freetown. HMAS Australia joined HMS Devonshire at 0300 hours and half an hour later the cruisers had worked up to 27 knots. HMS Cumberland and HMS Ark Royal were approaching from the south.
At 1000/14, HMS Devonshire and HMAS Australia were 200 nautical miles south of Dakar in position 11°23’N, 17°42’W, with HMS Cumberland and HMS Ark Royal respectively 45 and 100 miles astern of them. Aircraft from Ark Royal carried out reconnaissance ahead of Devonshire and Australia from this time onwards. Also flights over Dakar were carried out. That afternoon a large amount of shipping was reported in the harbour and also a submarine was sighted on the surface at 1533 in position 260°, Cape Manuel, 10 nautical miles, steering 260°. It could not be seen if the French cruisers had arrived at Dakar.
At 1900/14 the Devonshire and Australia, reduced to 17 knots on reaching the latitude of Dakar and then turned back to join Cumberland. She was met at 1940 hours and then the cruisers turned northward once more. They established a patrol line at 2320 hours, 4 miles apart, courses 270°-090°, between the meridians 17°30’W and 18°00W in latitude 16°00’N.
But they were too late. Just before midnight 14/15 September a message was received from the Admiralty that a Vichy report had announced that the cruisers had arrived safely at Dakar. The Vichy cruisers actually had arrived at Dakar at 1600/14.
Dawn air reconnaissance on the 15th failed to spot the cruisers at Dakar and by this time the three heavy cruisers were running low on fuel and at 1001 hours Vice-Admiral Cunningham sent a signal to the Admiralty to ask if he should withdraw to Freetown to refuel and prepare for operation ‘Menace’, leaving HMS Cumberland to patrol off Dakar, or to report the patrol about 0001/17 and accept indefinite delay of operation ‘Menace’. He recommended the first alternative.
At 1027 hours, however, the Ark Royal signalled that the cruisers had been located at Dakar. All ships then set course for Freetown to refuel except HMS Cumberland which was left to patrol off Dakar. The next day, the 16th, she met the Vichy French merchant vessel Poitiers (4185 GRT, built 1921) 100 miles south of Dakar and fired a salvo across her bows. Her crew then set her on fire and abandoned her. She was then sunk by gunfire from the cruiser.
Cancellation of Operation ‘Menace’.
By the evening of 15 September, Vice-Admiral Cunningham’s forces were all making once again for Freetown. A destroyer had been sent on ahead with the operation orders and two staff officers. The escape of the French cruisers, however, called for a drastic re-consideration of the original plan.
In London the War Cabinet met at 1000/16 to consider the new situation. The Prime Minister pointed out that in his view the operation had to be cancelled and at 1346/16, Vice-Admiral Cunningham received a signal that the landing of troops at Dakar in ‘Operation Menace’ was impracticable. It was proposed that General de Gaulle’s force should land at Duala with the object of consolidating his influence in the Cameroons, Equatorial Africa and the Chads. The British portion of the force was to remain at Freetown. Unless de Gaulle had any strong objection, this plan had to be put into operation forthwith.
Vice-Admiral Cunningham and General Irwin were reluctant to take this view. They replied at 1642 hours suggesting that if HMS Cornwall and HMS Cumberland would be added to their force they should be enough to deal with the French cruisers. The answer came at 2245 hours; they were left a liberty to consider the whole situation and discuss it with de Gaulle, whom they informed of the new proposal.
HMS Devonshire arrived at Freetown at 0630/17. The Vice-Admiral and the General proceeded to consult with General de Gaulle. The latter was much perturbed at the possible cancellation of the original plan and that very morning he sent a telegram to the Prime Minister desiring ‘to insist’ that the plan should be carried out and emphasising the vital importance to the Allies of gaining control of the basis in French Africa. He now urged on the Force Commanders that if the unopposed landing failed the Free French troops should attempt a landing at Rufisque. They decided to support this proposal and shortly after midnight they forwarded their recommendations to the Admiralty for consideration. The reply from H.M. Government came at 1159/18; ‘ We cannot judge relative advantages of alternative schemes from here. We give you full authority to go ahead and do what you think is best, in order to give effect to the original purpose of the expedition. Keep us informed.’
With a free hand such as is seldom enjoyed in these days of rapid communication by the leaders of an overseas expedition in unbroken touch with their Government, the Joint Commanders decided to proceed with ‘Menace’ on 22 September.
The French cruisers again, 19 to 26 September 1940.
The naval and military staffs were working hard at preparations for the landing when the next day, 19 September, French cruiser appeared again on the scene. HMAS Australia, which had left Freetown the day before to relieve HMS Cumberland on patrol, at 1019/19 in position 10°23’N, 16°54’W, north-west of Freetown, sighted the three La Galissonniere class cruisers 14 nautical miles off steering south-east. Once more the naval forces had to raise steam with all despatch. HMAS Australia and HMS Cumberland were already had on the trial. General de Gaulle again arranged for Captain Thierry d’Angenlieu to carry a message requisting the French cruisers to return to Casablanca.
General Irwin and his staff, with Admiral Cunningham’s Chief Staff Officer, Capt. P.N. Walter, were transferred to the troopship Karanja, and at 1400 hours HMS Devonshire left Freetown at 27 knots with the destroyers HMS Inglefield, HMS Greyhound and HMS Escapade. It was hoped to sight the French cruisers before dark. HMS Barham with HMS Fortune and HMS Fury made for a position to the south-east of the French. HMS Ark Royal, which had engine trouble to repair first, was to follow at 0500/20. A message came from the Admiralty that the French cruisers were not to return to Dakar.
The French cruisers turned back to the north-west and increased speed to 29 knots. Torrential rain was falling, hiding everything from view, but HMAS Australia and HMS Cumberland were able to keep in touch and at 1830/19 HMAS Australia managed to pass directions not to return to Dakar. She was then in position 09°02’N, 15°14’W, just keeping in touch while doing 31 knots. Then the French cruiser Gloire broke down and separated from the other two cruisers. The British then lost touch with these two cruisers. HMS Devonshire meanwhile was steaming to a position to cut off the way to Conakri in French Guinea. HMS Cumberland then regained touch with the two French cruisers (Georges Leygues (flag) and Montcalm) who were speeding north while HMAS Australia picked up the Gloire which was steering eastwards at reduced speed. Night had fallen when HMS Devonshire with HMS Inglefield still in company showed up. HMS Inglefield took Captain d’Argenlieu on board of the Gloire. The French captain refused to accede to his representations, but when Vice-Admiral Cunningham intervened he agreed to proceed to Casablanca. HMAS Australia escorted her until 21 September, leaving her then, on Admiralty instructions, to proceed unescorted.
HMS Cumberland meanwhile managed to keep in touch with the other two cruisers. Her attempts at parley failed, but the French signalled that ‘under no circumstances shall my cruisers pass under German control’. HMS Cumberland followed them all the way to Dakar but was unable to prevent them from entering, which they did at 0550/20.
Meanwhile, on 18 September, far away to the southward, a fourth French cruiser had been sighted escorting a naval tanker. This was the Primaguet escorting the Tarn. HMS Cornwall had departed Freetown on 16 September to meet HMS Delhi (Capt. A.S. Russell, RN) and HMS Dragon (Capt. R.J. Shaw, MBE, RN) off Cape Formosa (south Nigeria). They swept towards Fernando Po [now called Bioko] to intercept any French forces bound for the Cameroons with instructions to direct them back to Casablanca. On 17 September at 2000 hours information came that a French warship and an oiler had been in position 07°25’N, 14°40’W at 1500/15. The Cornwall proceeded to search and on the 18th her aircraft picked up the cruiser Primaguet and oiler Tarn 35 nautical miles ahead. The Commander-in-Chief, South Atlantic ordered her to be shadowed.
Her lights were sighted at 2142/18 but disappeared at 0425/19. When dawn broke the horizon was clear. She was picked up again at 1009/19. A boarding party from HMS Delhi went on board. The Captain, after making a formal protest, asked to be allowed to remain stopped until 1700/19 after which she proceeded, first westward, then northward, being shadowed by HMS Cornwall and HMS Delhi until 1830/21 when HMS Delhi had to proceed to Freetown to refuel. HMS Cornwall shadowed her alone untul the 23rd when she was rejoined by HMS Delhi. For two days they followed her close, still steaming north. On the 25th Primaguet fuelled from the Tarn. They were then off the Cape Verde Island. The next day the Admiralty approved the cruisers to return to Freetown. The Primaguet gave a promise that she would proceed to Casablanca with the Tarn where they indeed arrived in due course. The British cruisers then turned south. They had kept the Primaguet and Tarn in sight for five days. Thus two out of the four cruisers in the area had been diverted to Casablanca without the use of force. (25)
5 Sep 1940
HMS Cornwall (Capt. C.F. Hammill, RN) returned to Simonstown having parted company near Durban with convoy WS 2B on 3 September. (26)
8 Sep 1940
HMS Cornwall (Capt. C.F. Hammill, RN) departed Simonstown for Freetown. On departure gunnery exercises were carried out on a target that was being towed by HMS St. Dogmael. (26)
15 Sep 1940
HMS Cornwall (Capt. C.F. Hammill, RN) arrived at Freetown. (26)
16 Sep 1940
HMS Cornwall (Capt. C.F. Hammill, RN) departed Freetown for patrol.
[See the event 'Operation Menace, the attack on Dakar, 23-24 September 1940, Part I, initial movements of the Allied naval forces' dated 28 August 1940, for more information.] (26)
23 Sep 1940
Operations Menace, the attack on Dakar, 23-24 September 1940.
Part II, the actual attack.
General intentions.
By 20 September the attack force was assembled at Freetown. It was made up of the following warships; battleships HMS Barham (Capt G.C. Cooke, RN, flying the flag of Vice-Admiral J.H.D. Cunningham, CB, MVO, RN), HMS Resolution (Capt. O. Bevir, RN), aircraft carrier HMS Ark Royal (Capt. C.S. Holland, RN), heavy cruisers HMS Cumberland (Capt. G.H.E. Russell, RN), HMS Cornwall (Capt. C.F. Hammill, RN) (detached), HMAS Australia (Capt. R.R. Stewart, RN), HMS Devonshire (Capt. J.M. Mansfield, DSC, RN), light cruisers HMS Delhi (Capt. A.S. Russell, RN) (detached) and HMS Dragon (Capt. R.J. Shaw, MBE, RN), destroyers HMS Echo (Cdr. S.H.K. Spurgeon, DSO, RAN), HMS Eclipse (Lt.Cdr. I.T. Clark, RN) and HMS Escapade (Cdr. H.R. Graham, DSO, RN), HMS Faulknor (Capt. A.F. de Salis, RN), HMS Forester (Lt.Cdr. E.B. Tancock, RN), HMS Foresight (Lt.Cdr. G.T. Lambert, RN), HMS Fortune (Cdr. E.A. Gibbs, DSO, RN), HMS Fury (Lt.Cdr. T.C. Robinson, RN) and HMS Greyhound (Cdr. W.R. Marshall A'Deane, DSO, DSC, RN) and HMS Inglefield (Capt. P. Todd, DSO, RN), sloops HMS Bridgewater (A/Cdr.(Retd.) H.F.G. Leftwich, RN), HMS Milford, Savorgnan de Brazza (Free French, Lt.Cdr. A. Roux), Commandant Dominé (Free French, Lt. J.P.Y. de la Porte des Vaux) and Commandant Duboc (Free French, Lt.Cdr. M.A.F. Bourgine) , auxiliary patrol vessel Président Houduce (Free French, Lt. L. Deschatres) and the net tender HMS Quannet (T/Lt. C.E. Richardson, RNR).
Vice-Admiral Cunningham then transferred his flag from HMS Devonshire to HMS Barham accompanied by General Irwin and his staff. All was ready for the passage to Dakar but at General de Gaulle request the opening day was deferred to 23 September.
The task force would arrive off Dakar at dawn on 23 September. It would patrol in groups while French airmen would take off in aircraft from HMS Ark Royal and land at Ouakam airfield to endeavour to win over the French air force. British aircraft meanwhile would drop proclamations and announcements of the arrival of de Gaulle on the town of Dakar and the forts.
An hour later, Captain d’Argenlieu would land in a motor boat with a communication from General de Gaulle to the Governor requiring a reply within two hours. The Free French sloops carrying de Gaulle’s troops would approach and, if necessary, force the anti-submarine boom. Meanwhile Vice-Admiral Cunningham’s Force with fighter and anti-submarine patrols would lie off the harbour as follows.
Group A) The two French troopships, Pennland and Westernland, ten miles to the south of Cape Manuel.
Group B) HMS Barham, HMS Resolution and the cruisers, two miles to the seaward of group A.
Group C) The four British troopships, two miles to the seaward of Group B.
Group D) The other transports, six miles to the seaward of Group C.
Group E) HMS Ark Royal further to the seaward.
If there appeared to be a good chance of a favourable reception the Free French sloops would land their troops at one of the wharves while the French troopships made for the harbour.
It was hoped that the forts would be reluctant to fire on French ships and as soon as de Gaulle was firmly established the British Force would withdraw. If the forts offered serious resistance General de Gaulle would call on Vice-Admiral Cunningham to quell it with a minimum of force. If it was clear that an organised and continuous resistance would be offered and local authorities refused to parley, the Free French ships would withdraw out of range while the British force broke down resistance and landed troops to capture the town and its defences.
The possible contingencies would be referred to as situation ‘Happy’, ‘Sticky’ or ‘Nasty’ according to events. ‘Happy’ would mean a favourable reception and unopposed landing. ‘Sticky’ would mean resistance of a formal or sporadic nature. ‘Nasty’ would mean serious resistance. HM ships then would move in to engage the forts, and British troops would prepare to land.
Commencement of operations.
The forces left Freetown in three groups;
Group I consisted of the five transports escorted by HMS Bridgewater, HMS Quannet and President Houduce. It had already left Freetown on the 19th of September.
Group II consisted of the French troopships Pennland and Westernland, the food ship Belgravian and the three Free French sloops and also of the British troopships Ettrick, Karanja, Kenya and Sobieski escorted by HMS Devonshire, HMS Faulknor, HMS Forester, HMS Fury and HMS Milford (Capt.(Retd.) S.K. Smyth, RN). This group departed Freetown at 0600/21.
Group III consisted of HMS Barham, HMS Resolution, HMS Ark Royal, HMS Inglefield, HMS Greyhound, HMS Foresight, HMS Fortune, HMS Echo and HMS Escapade. This group departed Freetown at 0900/21. Early the next day this group was joined by HMS Cumberland, HMAS Australia and HMS Dragon.
The weather was fine and the sea was calm. Passage north to Dakar was uneventful. Aircraft from the Ark Royal conducted photographic reconnaissance on the 22nd.
At Dakar there were the following French warships; the uncompleted battleship Richelieu, the light cruisers Georges Leygues and Montcalm, the destroyers Le Fantasque, Le Malin, L’Audacieux and Le Hardi, three submarines Ajax, Perseé and Bévéziers (this last one was in dock) and some smaller vessels.
Zero hour for the commencement of the attack was set at 0550/23 and all ships managed to get into their assigned positions at that time. Visibility was however very poor due to mist, and was no more then 3 to 5 nautical miles. The fog was expected to clear during the day but in fact the opposite happened and visibility decreased steadily during the day. The shore was rarely sighted.
During the forenoon, the warships and transports patrolled up and down. Punctually at daybreak (0505 hours), HMS Ark Royal, then some 25 nautical miles from Dakar, flew off five aircraft most of which were manned by Free French flying officers. Two of these aircraft landed safely at Ouakam airfield at 0554 hours. Within 10 minutes a signal was displayed indicating ‘success’. This however proved to be premature. At 0608 hours a third aircraft landed on the airfield. Disembarked her three passengers and then took off without much interference. Two minutes later the ‘success’ signal was removed and a fourth aircraft broke off her attempt to land. Nothing more was heard from the Free French officers that had been landed. Two fighters were then seen to take off and they chased away the three remaining aircraft together with AA fire from the Richelieu and from the battery on Gorée Island. The attempt to win over the airfield had failed.
HMS Barham had sighted the Westernland at 0600 hours and Vice-Admiral Cunningham had sent a message of goodwill to General de Gaulle. The Free French sloop Savorgnan de Brazza was of the boom at 0555 hours and her two motor boats, with Captain d’Argenlieu and the Generals other emissaries were on their way to the boom gate at 0605 hours. The gate was open and at 0640 hours they were entering the harbour.
Visibility was poor, and the Savorgnan de Brazza took station of the boom to keep the boats in sight. The emissaries landed and encountered a hot reception. They were fired on and wounded in resisting an attempt to arrest them, but managed to re-embark and withdraw under fire. A blank round was fired at the Savorgnan de Brazza at 0745 hours followed by three salvoes, which fell astern. Just then the motor boats were sighted and at 0750 hours Captain d’Argenlieu sent a signal that he had met serious resistance. This reached Vice-Admiral Cunningham at 0807 hours. The other French sloops were to be at the boom at 0905 hours to pass it (or force it if needed) and land their troops. If the reception had been favourable the French troopships were then to enter the harbour to disembark the main body of troops. The Commandant Dominé and Commandant Duboc were actually at the boom at 0805 hours, one hour early. They encountered no opposition until they approached the mole. They were taken under fire with heavy machine guns and were ordered to stop. The Richelieu fired a blank round and then opened fire with small guns. Both sloops then turned for the gate under the cover of a smoke screen. Also the guns from the Gorée Island battery were joining in. At 0820 hours the Commandant Dominé and Commandant Duboc were sighted by the Savorgnan de Brazza which was intended to lead them in at 0905 hours. The sloops had not expected such a hostile reception and retired on the British Fleet which was sighted a 0900 hours.
Meanwhile HMS Barham at 0706 hours had turned north-north-west towards the land, and at 0740 hours Cape Manuel was in sight some 5 nautical miles away. At 0827 hours, with the land still just visible from HMS Barham Vice-Admiral Cunningham asked General de Gaulle whether he wished the British ships to close the shore and show themselves at the risk of being fired on. Five minutes later came the signal ‘proposals rejected’. At 0840 hours General de Gaulle signalled that the Richelieu and Gorée Island guns had been firing and that he had ordered his own ships to make a determined effort; if they failed he suggested that the Vice-Admiral should show himself of Dakar. Just then, one minute later, came the signal from the Savorgnan de Brazza confirming the emissary’s proposals had been rejected.
Situation deteriorates.
It was clear by this time an unfavourable situation was rapidly developing. General de Gaulle’s proposals to the Governor had been rejected and two of his emissaries had been seriously wounded, his sloops had been fired upon and the Vichy French ships in the harbour were raising steam. In spite of these manifest tokens of hostility the General apparently still hoped for a peaceful solution. At 0905 hours, however, Vice-Admiral Cunningham warned his force that the situation was developing towards ‘Sticky’.
Valuable and comprehensive reports were coming in from the British aircraft reconnoitring Dakar. Although these aircraft were fired on by all the French ships in the harbour and by machine guns on the jetty, Vice-Admiral Cunningham gave orders that a French flying boat over the fleet should not be attaked, for there still seemed to be hopeful signs that the French air force might join de Gaulle. At 0948 hours a signal arrived from HMS Ark Royal to say that one of the Gloire class cruisers had slipped. The Vice-Admiral at once instructed HMS Foresight, the northern destroyer of the anti-submarine screen, to order any French cruiser sighted to return to harbour. At 1005 hours, however, the shore batteries opened fire on HMS Foresight and the Vice-Admiral ordered her to withdraw following this with a signal to HMS Ark Royal to stand by with six aircraft to bomb Gorée Island. He also warned the French Admiral that if the fire were continued he would regretfully be compelled to return it. The French Admiral replied that if Vice-Admiral Cunningham did not wish him to fire he should remove himself more then 20 nautical miles from Dakar. Meanwhile the force had turned westwards at 1016 hours. Two minutes later Vice-Admiral Cunningham detached HMAS Australia to examine a ship reported to the north. At 1025 hours, HMAS Australia, identified two Le Fantasque class destroyers steering westwards and ordered them to return to harbour, backing up this order with a warning shot. They at once turned back and the Australia then resumed her place in line after having been fired upon by shore guns.
At 1030 hours, two La Galissonnière class cruisers were reported leaving Dakar and Vice-Admiral Cunningham at once informed the French that if their ships left the harbour he would use force to compel their return. Two French submarines were also reported to be underway and at 1050 hours Vice-Admiral Cunningham warned the French Admiral that if they left Dakar harbour he would attack them. One minute later a report came in that the submarines were passing the entrance and when a torpedo missed HMS Foresight Vice-Admiral Cunningham cancelled the order for HMS Ark Royal to bomb Gorée Island but to bomb the submarines instead. At the same time he detached HMS Inglefield and HMS Foresight to attack them and he also turned the remained of the force to close Gorée Island to support them. Almost immediately HMS Foresight came under fire and at 1051 hours she was hit forward by a shell. Thus the actual first hit was made by the French.
By 1100 hours the whole force was under fire from the guns at Cape Manuel. HMS Inglefield reported also being missed by a torpedo. Two minutes later HMS Inglefield and HMS Foresight were were engaging one of the submarines (the Perseé) on the surface to the north-westward. Events followed rapidly. HMS Inglefield was hit by a shore battery. By 1104 hours the submarine was sighted on the Barham’s port bow. She was engaged by the 6” guns from HMS Barham, HMS Resolution and HMS Dragon. She was badly hit and soon abandoned by her crew, finally sinking at 1137 hours in position 065°, Cape Manuel lighthouse, 2740 yards. Simultaneously HMS Barham fired five 15” gun salvoes at the Cape Manuel battery but accordingly to a subsequent French broadcast they caused heavy civilian casualties ashore.
When the force turned back to the south-westwards at 1107 hours, HMS Inglefield was again hit aft by a shore battery. With HMS Foresight she engaged the second submarine (the Ajax) which at once made for the harbour entrance, and Vice-Admiral Cunningham, still hoping for a peaceful solution, and in accordance with the agreement to use no more force then necessary to overcome sporadic resistance, ordered the force to cease fire.
At 1119 hours however, HMS Dragon, ordered to attack the second submarine, came under fire from the guns at Cape Manuel. The whole force at once turned west but though the land was barely visible through the mist, HMS Foresight and HMS Cumberland, which were close to HMS Barham were hit almost immediately by the shore guns. The damage to HMS Cumberland was serious. She was struck by what was thought to be an 11.2” shell (actually it was a 9.4” shell) just above the armour belt on the port side. The engine rooms became temporary untendable and she was forced to withdraw to Bathurst, taking no further part in the operation. Nothing further was to be gained by remaining close inshore and at 1135 hours the force turned to the southward.
At 1154 hours a signal from the High Commissioner, French West Africa was received stating ‘We confirm that we will oppose all landings, you have taken the initiative in causing French blood to flow’. The situation at noon was thus far from hopeful but it was decided a final attempt to land the Free French troops at Rufisque would be undertaken (operation ‘Charles’).
Situation ‘Sticky’.
Operation ‘Charles’ was to be a final attempt for a peaceful landing of the Free French troops at Rufisque Bay before beginning a systematic reduction of the Dakar defences as a preliminary to a British landing.
It was considered essential in this plan to maintain the French character of the landing as far as possible; the Free French transports were to be accompanied as far as possible by their own warships, and by two British destroyers only, HMS Inglefield and HMS Forester, which would lead them in and, if necessary, provide flanking fire.
At 1158 hours, Vice-Admiral Cunningham signalled to de Gaulle, ‘what about operation ‘Charles’ now ?’. The General replied at 1212 hours that he desired to to ahead with operation ‘Charles’ but that he required the latest reports. He was then given the latest aircraft reports, which showed no surface ships outside the boom. A zero hour for ‘Charles’ was then set at 1530 hours if the Generals ships could reach Rufisque Bay in time. A signal was sent to the entire force that the situation was now ‘Sticky’.
General de Gaulle then asked Vice-Admiral Cunningham what opposition might be expected from shore batteries and the Vice-Admiral replied that the bad visibility would help the forces taking part in ‘Operation Charles’. At 1335 hours HMS Barham proceeded westwards to endeavour to locate the General’s flagship the Westernland but she could not be found. HMS Barham then spent three hours searching for her in the mist.
A baffling phase of uncertainty followed. In the thick weather which precluded visual signalling between Barham and Westernland radio telephony and wireless communication between Vice-Admiral Cunningham and General de Gaulle, though at first satisfactory, deteriorated progressively during the afternoon. This was due to jamming of radio telephony by a heavy traffic of military signals between the Westernland herself and the Free French sloops. At the root of the trouble was the fact that General de Gaulle was in a separate ship. Everything possible had been done to improvise additional lines of communication, but these proved inadequate to meet the situation. For some three hours that afternoon all contact was lost with General de Gaulle and the French transports.
At 1358 hours Vice-Admiral Cunningham informed the Admiralty that de Gaulle was attempting a landing but at 1445 hours a signal was received from de Gaulle to say that he was awaiting instructions to which the Vice-Admiral replied at 1504 hours ‘carry out Charles, report zero hour’.
But to carry out ‘Charles’, however, HMS Inglefield and HMS Forester had to get in touch with the French transports, and despite repeated calls for their positions no one knew where they were.
An ultimatum was made ready to be sent to the authorities and people of Dakar informing them that failing to accept General de Gaulle proposals, the British fleet would open fire on the fortifications of Dakar. This was misunderstood by General de Gaulle and he thought that the ultimatum had already been delivered so he suspended ‘Operation Charles’. Troops would not be landed by the transports but only a smaller number would be landed by the French sloops. Vice-Admiral Cunningham was only informed about this after two hours.
Meanwhile further complications had arisen. Aircraft reported a French destroyer off Gorée Island (this was the L’Audacieux), threatening the approach to Rufisque Bay. HMAS Australia, HMS Fury and HMS Greyhound were detached at 1608 hours to ward her off. The French destroyer was engaged and set on fire after she had fired two torpedoes at HMAS Australia.
Around 1630 hours HMS Devonshire finally sighted the French transports some 20 nautical miles from Rufisque Bay. This meant that ‘Charles’ could not be completed before dark. These was at least one enemy submarine (possibly two) in the area. In these weather conditions it was not though possible to give sufficient protection to the transports in Rufisque Bay. On these grounds Vice-Admiral Cunningham cancelled ‘Operation Charles’ at 1642 hours.
Two minutes later an air report reached him reporting two La Galissonniere class cruisers three nautical miles north-north-east of Gorée Island which were steering towards Rufisque Bay at 17 knots. Vice-Admiral Cunningham at once turned the battleships towards Rufisque to cover the Westernland and Pennland in case they were still making for it. He held this course until 1710 hours and then altered to the southward to regain contact with the British transports. A signal timed 1635 hours from General de Gaulle that he expected to arrive at 1650 hours, which would be zero hour, reached Vice-Admiral Cunningham at 1720 hours. Actually at that moment the Free French sloops, having parted from the French transports at 1648 hours reached Rufisque Bay. It is not clear how they were missed by the Vichy cruisers, which and air report placed, together with a large destroyer, two nautical miles were of Rufisque at 1740 hours. This was the last air report, for at 1745 hours weather conditions obliged HMS Ark Royal to withdraw all reconnaissance aircraft. It did not reach Vice-Admiral Cunningham until 1835 hours.
Meanwhile at 1805 hours, General de Gaulle’s signal timed 1620 hours had at last arrived and the Vice-Admiral knew that the Free French sloops would probably be attempting a landing. He immediately sent off HMS Inglefield and HMS Forester, which found the Westernland in position 155°, Rufisque Bay, 10 nautical miles at 1835 hours.
Free French sloops at Rufisque, 23 September 1940.
As mentioned previously the Free French sloops parted company with the Westernland and Pennland at 1648 hours some 7.5 nautical miles from Rufisque to carry out ‘their mission’. There seemed to be considerable doubt as to what this mission was. It certainly was not ‘Operation Charles’ as had been intended. The landing party in each sloop consisted of about 60 ‘fusilier marines’, making it about 180 in total. They arrived off Rusfisque at 1720 hours. The Savornan de Brazza, whose draught was greater then the other two, anchored about 500 yards from the shore. The Commandant Dominé and Commandant Duboc pushed in right towards the jetty, and all three lowered their boats. Fire was almost immediately opened on the Commandant Duboc by a 4” gun in a blockhouse at Cap de Biches. She was hit and one officer was killed and three men seriously wounded. Fire was opened by the sloops and the battery was knocked out. The Commandant Duboc then retired behind a smoke screen. Two of the Savorgnan de Brazza’s motor boats towing whalers were making for the beach to the right of the jetty. When within 300 yards from the shore they met with heavy machine gun fire and stopped, while the Commandant Dominé, covering them, opened fire on the shore emplacements, but could not locate them in the failing light and mist. But then at 1758 hours a signal was received from the Westernland cancelling ‘Operation Charles’. The landing parties were then re-embarked and at 1838 hours the three Free French sloops left for their patrol line.
Situation ‘Nasty’.
The day was drawing to a close. All hopes of a friendly reception had been scattered. The ships were lying in a fog off a hostile coast with submarines in the vicinity. Vice-Admiral Cunningham and General Irwin considered landing British forces at Rufisque, but decided against it.
At 1910/23, while the Free French sloops were closing the Westernland and Pennland, Vice-Admiral Cunningham with the ‘battlefleet’; HMS Barham, HMS Resolution and HMS Devonshire, turned west to cover the transports (which were still to the southward) for the night.
Ten minutes before, at 1900 hours, the Vichy French Governor General, M. Pierre Boisson, had in a broadcast stated emphatically that Dakar would not submit. There could be no further hope of a peaceful settlement and at 2052 hours General de Gaulle was asked whether he agreed that the situation was now ‘Nasty’ and to the issue of the ultimatum. The Admiralty had been kept fully informed of the situation and at 2105 hours a personal message from the Prime Minister arrived ‘Having begun we must go on to the end, stop at nothing’.
General de Gaulle reply arrived at 22235 hours, he agreed that the situation was now ‘Nasty’ and that the ultimatum should go out. It was broadcast at 2345 hours in French and English to the Admiral, Governor General and people of Dakar. They had prevented General de Gaulle from landing. Dakar might be seized by the Germans / Italians and the Allies were bound to prevent this. Their forces were approaching. The conditions offered must be accepted by 0600/24 or the guns of the Allies would open fire.
The Governor General’s answer reached Vice-Admiral Cunningham at 0400/24. It was an unqualified refusal; ‘I shall defend Dakar to the end’. There was nothing more to be said. At dawn the battlefleet was approaching the coast to take up their bombardment stations.
The attack on Dakar, the attack opens, 24 September 1940.
HMS Ark Royal had orders to carry out a reconnaissance as early as possible backed up by bombing attacks on the Richelieu, Forts Manual and Gorée, and the two light cruisers lying off Dakar.
Visibility had greatly improved since the previous day and was six nautical miles at 0625 hours when the first striking force of six Skua’s of No. 800 Squadron, loaded with 500 lb. S.A.P. bombs, took off from HMS Ark Royal to attack the cruisers and other suitable targets.
At 0703 hours aircraft reported a destroyer damaged off Rufisque, two cruisers in the roads and three destroyers coming slowly out. It was seven minutes later when the Skuas carried out a high level bombing attack on the Richelieu and one of the destroyers. By this time the battlefleet was on its bombardment course and the Barham’s spotting aircraft was in the air. They were followed by six Swordfish of No. 820 Squadron loaded with G.P. bombs for an attack on the town of Dakar, which was to synchronise with the ships bombardment.
It had been calculated that at 0725 hours the battlefleet would be within 16000 yards of the forts and fire could be opened, but unfortunately when the moment arrived nothing could be seen of them in the prevailing mist. A long range bombardment was clearly impractical, and the fleet turned away temporarily in order to re-dispose the cruisers and destroyers for a short range attack. At the same time HMS Fortune was detached to obtain a shore fix, but she came under accurate fire from the forts and her fix proved unreliable.
The Ark Royal’s first Swordfish striking force was diverted to bomb Cape Manuel. At 0800 hours she despatched another striking force of six Swordfish of No. 810 Squadron loaded with S.A.P. bombs to attack the Richelieu. It was hoped that by the time it attacked the Richelieu the opening of the naval bombardment would provide a diversion, but this did not occur; one Swordfish was shot down and two others failed to return.
A diversion was also provided on the enemy’s side. At 0805 hours HMS Fortune, which had rejoined the battlefleet, reported a submarine contact inside the screen and dropped three depth charges. At 0831 hours the Vichy French submarine Ajax surfaced. She was unable to dive or move and surrendered. Her whole crew was rescued before she sank. The Fortune’s boarding party found six ‘tube ready’ light burning, and it was evidently only the destroyers depth charges that saved the fleet from attack.
The incident still further delayed the bombardment and it was not till 0920 hours, forty minutes after the first Swordfish striking force had attacked the Richelieu with S.A.P. bombs, that Gorée Island was sighted. At 0935 hours the shore batteries opened fire and one minute later the Barham and Resolution replied with their 15” guns, firing on the Richelieu at ranges of 13600 to 15000 yards respectively, while the cruisers HMAS Australia and HMS Devonshire engaged a destroyer of the Le Fantasque class.
The first bombardment.
As soon as the British ships opened fire a French destroyer of the Le Fantasque class steamed south laying a smoke screen to the eastward of the anchorage and Gorée Island. The French cruisers inside the boom to the northward, sheltering amongst the many merchant vessels, also made a smoke screen, which drifted slowly south and, combining with the mist and heavy smoke from the vicinity of the Richelieu, eventually obscured all targets.
Shooting became extreme difficult, for range taking was nearly impossible. There were other serious handicaps. HMS Barham, which was newly commissioned after repairs, had never carried out any bombardment practice. Neither battleship had done any concentration firing, and neither had its customary observer in the air.
After engaging the Richelieu for nine minutes the Resolution’s director training gear failed and she shifted fire to the Cape Manuel battery, on which she probably obtained a hit. The Barham’s aircraft reported several straddles across the Richelieu, which was thought to have been hit. The smoke-laying cruiser was still active, and at 0942 hours the Barham’s 6” guns engaged her without success.
Meanwhile the Devonshire and Australia had engaged and damaged a large destroyer of Rufisque which was subsequently engaged by the Inglefield, Foresight and Forester, and left burning.
The fire encountered by the fleet consisted of occasional one- and two-gun salvoes (yellow splash) from the Richelieu’s 15” guns, salvoes of 9.4” from Cape Manuel (white splash), Gorée Island, and an unseen battery, and a number of smaller rounds from the Richelieu and various shore batteries. The French fire was slow but accurate. By 1010 hours the targets were wholly obscured by smoke, and shortly afterward the fleet withdrew to the southward, leaving the Ark Royal to report the result of the bombardment.
As the fleet made to the south, Vichy Glenn-Martin bombers made high level attacks on it without success, though three bombs fell close to HMAS Australia.
At 1141 hours the Ark Royal reported the results of the bombardment; several near misses with bombs on the Richelieu; one near miss with a bomb on a destroyers; one 15” hit on the Cape Manual battery, which had ceased fire; one 15” hit and repeated straddles on the Richelieu; straddles across the cruisers in Hahn Bay, one of which was set on fire aft. No hits had been obtained on the Gorée Island battery.
The second bombardment.
At 1146 hours relief spotting aircraft for the battleships were ordered and targets for a further bombardment at 1315 hours were allocated as follows; the Barham on Richelieu; the Resolution on Goréé Island; the Devonshire on Cape Manuel; the Australia on the cruisers inside the boom. The spotting aircraft took off from HMS Ark Royal at 1220 hours and as a report reached her about this time that Vichy cruisers and destroyers were proceeding towards Rufisque, a torpedo striking force was got ready to attack them immediately after the second bombardment.
French aircraft were still busy. At 1217 hours a French bomber dropped six bombs close to HMS Barham. It was driven off by Skuas. Shortly afterwards a shadowing cruiser was sighted while the fleet was approaching Gorée Island. She was engaged from 14500 yards by the main armament from HMS Barham and HMS Resolution. She then turned away under a smoke screen. Fire was then checked. At 1248 hours, Vice-Admiral Cunningham ordered the Devonshire and Australia to engage her, but cancelled this order five minutes later when his destroyers, which were coming under an accurate fire from shore batteries, were told to take station on his disengaged side. By an unfortunate mischance the first order – to engage the cruiser – never reached the Devonshire and she interpreted Vice-Admiral Cunningham’s second signal ‘cruisers negative engage’, which referred only to the hostile cruiser, as an order to take no further part in the bombardment. Accordingly at 1300 hours she turned away to the east with HMAS Australia and neither ship took part in the subsequent bombardment.
The bombardment was reopened in the afternoon, at 1300 hours HMS Barham obtained a shore fix and turned north-west on her bombardment course. Five minutes later she engaged the Richelieu bearing 330°, range 17000 yards. HMS Resolution opened fire on Gorée Island from 16000 yards. The batteries at Cape Manuel, which had been reported hit, Gorée Island and Dakar Point at once replied. The Richelieu also opened fire with her 15” guns firing two gun salvoes with fair accuracy. She continued firing until her fire was blanked by the mole.
The French gunfire concentrated on the Barham and was heaviest between 1312 and 1320 hours. At 1315 hours an 9.4” projectile hit the Barham. At 1320 hours she was hit again and two minutes later she was hit twice.
The smoke screen tactics of the forenoon were repeated as soon as the British ships were sighted, and by 1311 hours the targets again became obscured. Although spotting aircraft reported that the Barham was straddling the Richelieu, the salvos appeared to be out for line, and apparently the Vichy French battleship was not being hit. The Resolution did not succeed in silencing the main Gorée Island battery and it is doubtful whether she was being spotted on the correct target. She was straddled by several salvoes of 5.4” and 6” shells from the shore batteries. At 1323 hours the Richelieu ceased fire. A minute later HMS Barham and HMS Resolution broke off the attack and at at 1326 hours the shore batteries also ceased firing.
The results of the bombardment were not encouraging. Despite the expenditure of nearly 400 rounds of 15” ammunition, none of the larger shore batteries had been silenced. The Richelieu was still in action, and the position of several 5.4” batteries, whose fire had proven effective against the destroyers, and would be still more so against the transports, had not even been located.
In spite of the poor visibility the fire of the shore batteries had been remarkably accurate and indicated that their fire was directed by listening devices rather then from forward observation posts, from which the battlefleet would generally had been out of sight. French air action had increased considerably since the previous day and the French will to resist appeared unimpaired. A report from HMS Ark Royal stated that the hostile attitude of the French fighters had made it hazardous for her aircraft to operate in the Dakar harbour area.
The question of a landing in force still remained. In these circumstances Vice-Admiral Cunningham decided to consult General de Gaulle and at 1400 hours the Barham withdrew to the southward to meet the Westernland before dark.
Swordfish aircraft attack the French cruisers.
Then minutes later, at 1410 hours, HMS Ark Royal’s striking force of nine Swordfish aircraft of No. 820 and 810 Squadrons took off while a fighter escort of three Skuas to attack the Vichy-French cruisers proceeding towards Rufisque. At 1440 hours the leader was forced down with engine trouble, his crew being picked up by the destroyer HMS Escapade. At 1500 hours the eight remaining Swordfish Swordfish attacked the two La Galissonnière class cruisers and a destroyer in the bay. In the prevailing haze the attack, which was made from an east-south-easterly direction, took the French by surprise. When the first sub-flight came down just outside the anti-submarine nets the three vessels were barely moving, but they immediately put their helms hard over and turned to port at full speed. The Swordfish claimed hits on one of the cruisers and the destroyer but this seemed to be doubtful. One Swordfish was forced down by AA fire on her way back to the Ark Royal. The crew was rescued by the destroyer HMS Echo.
Conference with General de Gaulle.
HMS Barham stopped at 1615 hours. General de Gaulle then came on board to confer with Vice-Admiral Cunningham and General Irwin. General de Gaulle, though deeply distressed and surprised about the nature of the defences, was still confident that the situation in French West Africa would improve as the power of his movement grew stronger. He explained that in view of the determined opposition encountered, and the probable destructive effects of the bombardment, it was imperative, from the point of view from the French opinion, that he should not be closely connected with the destruction and loss of French life, which had presumably taken place, lest his further utility to the common cause should be hopelessly compromised.
Though he would prefer not to use his troops he was prepared, if really needed, to support a British landing regardless of consequences. He considered, however, that a British landing was no longer feasible, and emphasised that a reverse would be a most serious check to the Allied cause.
He blamed himself for undue optimism in underestimating the possibility of a resolute defence, and suggested that the bombardment should be suspended at his direct request and Dakar so informed; that his forces should go to Bathurst for exercises, with a view of a possible advance upon Dakar over land; that British naval action should be taken to cover his passage and prevent the reinforcement and revictualling of Dakar.
General de Gaulle returned to the Westernland at 1800 hours. The situation was considered by Vice-Admiral Cunningham and General Irwin in the light of these proposals. A Swordfish, which had crashed near the Barham at 1830 hours, reported that one cruiser was beached and burning east of Rufisque, one buring in Gorée Bay, and two detroyers were beached in Hann Bay (this information was subsequently found to be incorrect). It was essential to immobilise the Vichy French cruisers and neutralise the main armament of the French forts before attempting a landing. It was decided that the attack on the defences must be renewed the next day if weather conditions were favourable. General de Gaulle and the Admiralty were informed accordingly and dispositions were made for a landing of British troops at Rufisque, to follow up any success obtained by the bombardment.
Final bombardment. HMS Resolution torpedoed.
The next day, 25 September 1940, broke fine and clear with extreme visibility. The Ark Royal at 1531/24 had proposed bombing Ouakam and Gorée at dawn and at 2348/24 was ordered to do so, but owning to wireless congestion, this was not received until 0200/25 when Captain Holland considered it too late. The targets allocated to the battleships and cruisers were the same as for the second bombardment; spotting aircraft, with fighter protection, were to be in position at 0900/25. At 0530 hours three reconnaissance aircraft took off from the Ark Royal, but by 0700 hours, two had been driven back by French fighter patrols. At 0754 hours, HMS Devonshire sighted a submarine submerging some eight nautical miles to the east of the battlefleet, which was then some 25 nautical miles to the south of Dakar. HMS Forester was at once detached to hunt it, leaving only two destroyers to screen the battlefleet.
At 0803 hours they were ordered to withdraw to the disengaged flank as soon as the shore batteries opened fire. The battleships were then steaming towards Gorée Island ready to open fire, with the cruisers three miles away to the east. HMS Resolution had orders to take independent avoiding action if necessary during the bombardment. At 0857 hours a circular buoy was sighted which HMS Barham fired on, suspecting it to be a sound locating device. One minute later the Richelieu opened fire on HMS Barham from a range of 23000 yards.
At 0901 hours the signal to turn to the bombarding course (050°) was hauled down in HMS Barham. It was not only the British which acted on this signal. Captain Lancelot of the Vichy submarine Bévézièrs was watching the approaching battleships though the periscope. Experience with the Royal Navy before the fall of France had taught him our manoeuvring signals. On seeing ‘Blue 7’ hoised, he waited for it to be hauled down; then fired his torpedoes at the turning point. Thus it came about that as the Resolution was turning, five torpedoes were seen approaching her port beam. Already committed to the turn she could only apply full helm in the hope of turning short and combing the tracks. In this she almost succeeded, for three torpedoes passed ahead and another narrowly missed her astern. The fifth, however, struck her on the port side amidships causing serious flooding, but fortunately no loss of life. HMS Barham avoided the three torpedoes that had missed the Resolution ahead and they passed astern, exploding harmlessly on the bottom.
HMS Resolution, which had developed a list of 12° to port, was still able to steam. At 0905 hours HMS Barham opened fire on the Richelieu from 21000 yards and also the cruisers engaged their targets, HMS Devonshire firing on Cape Manuel and HMAS Australia on the French cruisers inside the boom. Fire from the Richelieu and shore batteries was deliberate and accurate; it was concentrated on HMS Barham and frequently straddled her. The British cruisers were also under heavy fire. HMS Barham was hit once and HMAS Australia twice. HMS Resolution was badly damaged and it was necessary for her to withdraw and at 0912 hours HMS Barham turned to cover her. About this time HMS Foresight reported that she had sunk the French submarine with depth charges (but this was not the case). She and HMS Inglefield were then ordered to cover HMS Resolution with a smoke screen. The two cruisers were recalled. About 0918 hours Vichy French fighters shot down the Australia’s Walrus aircraft. HMS Forester was ordered to try to rescue the crew but she came under heavy fire from shore batteries and had to retire.
At 0921 hours, HMS Barham ceased fire and took station close astern of HMS Resolution with HMS Devonshire and HMAS Australia on each quarter. The Ark Royal was ordered to provide maximum fighter protection, and the battlefleet withdrew to the southward.
HMS Resolution was steaming at 10 knots and between 0940 and 0950 hours two high level bombing attacks were made on her, both of them were unsuccessful. The whole force now steered south-west at the best possible speed and by 1134 hours the flagship, HMS Barham had the whole force in sight.
The Vice-Admiral now had to decide whether to continue the attack on Dakar or to withdraw his force. The chance of capturing Dakar was clearly remote and in the end it was decided to discontinue the attack and to withdraw his force to Freetown without further delay. A signal to this effect was made at 1152 hours.
Withdrawal to Freetown.
Before a signal could be passed to the Admiralty a signal was received from the Prime Minister who was aware of the damage to HMS Resolution. Vice-Admiral Cunningham was ordered to abandon the enterprise against Dakar.
By 2000/25, HMS Barham was about 100 nautical miles south of Dakar steering south at 7 knots. The next day the sea was smooth as the weather was fine. HMS Resolution was taken in tow by HMS Barham. On the 27th the tow parted but was quickly secured again and the battleships were able to continue southwards at 6 knots.
HMS Cumberland rejoined the force having effected temporary repairs at Bathurst. HMS Cornwall and HMS Delhi had also joined after having chased the French cruiser Primaguet and the tanker Tarn.
At 0550/29, HMS Barham passed the boom at Freetown followed by the rest of the force. So ended a difficult operation. No British warship had been sunk but several had been damaged. HMS Cumberland was out of action for 13 days and HMS Fiji for six months. HMS Resolution was temporarily patched up at Freetown but was not fully operational. She returned to England six months later but was then sent on to the U.S.A. for full repairs. It was a full year later before she was again ready for active service. Five more ships HMS Barham, HMAS Australia, HMS Dragon, HMS Inglefield and HMS Foresight were also damaged but their fighting efficiency was not seriously impaired. (25)
27 Sep 1940
HMS Cornwall (Capt. C.F. Hammill, RN) returned to Freetown from operations.
[See the events 'Operation Menace, the attack on Dakar, 23-24 September 1940'
Part I, initial movements of the Allied naval forces. (for 28 August 1940) and Part II, the actual attack. (for 23 September 1940) for more information.] (26)
28 Sep 1940
HMS Cornwall (Capt. C.F. Hammill, RN) departed Freetown for Manoka Bay, Cameroon. (27)
1 Oct 1940
HMS Cornwall (Capt. C.F. Hammill, RN) arrived at Manoka Bay, Cameroon. (28)
2 Oct 1940
Landing of Free French troops in the French Cameroons.
Around 1740N/2, the troopships Pennland (Dutch, 16082 GRT, built 1922) and Westernland (Dutch, 16313 GRT, built 1918) departed Freetown for either Ambas Bay or the Cameroons River estuary. They were escorted by the heavy cruiser HMS Devonshire (Capt. J.M. Mansfield, DSC, RN, flying the flag of Vice-Admiral J.H.D. Cunningham, CB, MVO, RN), destroyers HMS Faulknor (Capt. A.F. de Salis, RN), HMS Foresight (Lt.Cdr. G.T. Lambert, RN), HMS Fury (Lt.Cdr. T.C. Robinson, RN) and the sloops FFS Commandant Dominé and FFS Commandant Duboc.
Around 0001N/3, the sloop Savorgnan de Brazza departed Freetown to join the troop transport convoy. She had been delayed with engine defects. She only joined after the convoy arrival at Ambas Bay, arriving there at 1130A/7. She arrived with defects, which also required the ship to be docked for repairs.
Around 1100N/3, the destroyer HMS Forester (Lt.Cdr. E.B. Tancock, RN) departed Freetown to joined the troop transport convoy. She joined around 1200Z/5. HMS Foresight was detached at 1430Z/5 to return to Freetown with correspondence.
At 0910N/4, FFS Commandant Duboc was detached to Lagos to embark General De Gaulle and then rejoin the convoy. She rejoined the convoy after its arrival at Ambas Bay arriving there at 1300A/7.
At 2100Z/5, HMS Forester was detached to fuel at Lagos and to proceed to Ambas Bay on completion where she arrived at 1000A/7.
The troop transport convoy arrived off Victoria (now Limbe) and anchored in Ambas Bay around 0800A/7. Two of the destroyers were kept outside the bay for A/S patrol as was the A/S trawler HMS Kelt (Skr. W.McK. Smith, RNR). At Ambas Bay troops were then transferred to smaller vessels and stores to lighters. This was completed by 1800A/9.
The heavy cruiser HMS Cornwall (Capt. C.F. Hammill, RN) was also patrolling in the area.
------------------------------------------------------------------------------------------------------
At 0930N/3, a convoy of French transports [identity currently not known to us] departed Freetown for the Cameroons. The British transport Ocean Coast (1173 GRT, built 1935) was also with this convoy.
This convoy was escorted by the light cruisers HMS Delhi (Capt. A.S. Russell, RN), HMS Dragon (Capt. R.J. Shaw, MBE, RN), sloop HMS Milford (Capt.(Retd.) S.K. Smyth, RN) and the A/S trawlers HMS Turcoman (Skr. A.G. Day, RNR) and FFS President Houduce.
HMS Turcoman later had to be detached to Lagos due to engine trouble. HMS Kelt departed Ambas Bay at 1200A/8 to take over from her.
------------------------------------------------------------------------------------------------------
At 0900A/8, the sloops FFS Commandant Dominé and FFS Commandant Duboc departed Ambas Bay for Douala with General De Gaulle and 200 troops on board.
At 1300A/8, the transports Warrien (?) and Eketien (?) departed Ambas Bay with 500 troops for Douala. They were escorted by HMS Forester.
At 2100A/8, the Pennland departed Ambas Bay to return to Freetown unescorted.
At 2200A/8, the Westernland departed Ambas Bay for Pointe Noire. She had still about 400 Free French soldiers on board. She was escorted by HMS Cornwall.
At 0715A/9, the transports Dayspring (British, 1102 GRT, built 1928), Ajaza (?) and the tanker Glarona (Norwegian, 9912 GRT, built 1928) departed Ambas Bay for Douala. They were escorted by the destroyers HMS Forester and HMS Fury.
At 0815A/9, HMS Devonshire and HMS Faulknor departed Ambas Bay to provide cover for the transport convoy proceeding towards the Cameroon River estuary.
At 1105A/9, HMS Faulknor, HMS Forester and HMS Fury were ordered to proceed with despatch to Freetown, their services being urgently required in the Mediterranean.
All transports and HMS Devonshire anchored in the Cameroons River estuary in the afternoon. HMS Milford and HMS Kelt then conducted A/S patrols.
On the 10th HMS Delhi and HMS Dragon were ordered to proceed to Lagos to fuel. They arrived there on the 11th. HMS Milford also went to Lagos to dock and refit. She arrived there on the 12th.
HMS Devonshire for the moment remained at anchor off Monoka.
(29)
5 Oct 1940
HMS Cornwall (Capt. C.F. Hammill, RN) departed Manoka Bay, Cameroon for Libreville, French Equatorial Africa. (28)
7 Oct 1940
HMS Cornwall (Capt. C.F. Hammill, RN) arrived at Libreville, French Equatorial Africa. (28)
8 Oct 1940
HMS Cornwall (Capt. C.F. Hammill, RN) departed Libreville, French Equatorial Africa for patrol. She was to proceed to Pointe Noire, French Equatorial Africa afterwards. (28)
11 Oct 1940
HMS Cornwall (Capt. C.F. Hammill, RN) arrived at Pointe Noire, French Equatorial Africa.
She departed Pointe Noire for patrol later the same day. On completion of her patrol she was to proceed to Freetown. (28)
18 Oct 1940
Around 1900A/18, the heavy cruiser HMS Cornwall (Capt. C.F. Hammill, RN), intercepted the Vichy French merchant vessel Indochinois (6966 GRT, built 1939), that was en route from Casablanca to Conakry, French Guinea, in position 05°46'N, 13°43'W. Course was then set to proceed to Freetown with the Vichy ship.
Around dawn the following morning the Vichy ship tried to scuttle herself but this failed.
The light cruiser HMS Dragon (Capt. R.J. Shaw, MBE, RN) then departed Freetown to go to the assistance of HMS Cornwall.
All ships arrived at Freetown in the afternoon of the 19th. (30)
19 Oct 1940
HMS Cornwall (Capt. C.F. Hammill, RN) arrived at Freetown from patrol. (28)
21 Oct 1940
HMS Cornwall (Capt. C.F. Hammill, RN) departe Freetown for the Clyde. (28)
21 Oct 1940
HMS Cornwall (Capt. C.F. Hammill, RN) departed Freetown for the Clyde. (28)
31 Oct 1940
HMS Cornwall (Capt. C.F. Hammill, RN) arrived at Greenock. (28)
1 Nov 1940
Convoy WS 4A.
This convoy departed Liverpool / the Clyde on 1 / 2 November 1940 for the far east.
The Liverpool section of the convoy departed Liverpool on 1 November and was made up of the following troopships / transports; Abosso (British, 11330 GRT, built 1935), Akaroa (British, 15130 GRT, built 1914), City of Manchester (British, 8917 GRT, built 1935), Duchess of Richmond (British, 22022 GRT, built 1928), Dunedin Star (British, 11168 GRT, built 1936), Malancha (British, 8124 GRT, built 1937), Scythia (British, 19761 GRT, built 1920) and Stirling Castle (British, 25550 GRT, built 1936).
From the Bristol Channel three ships joined this convoy, these were; Delius (British, 6065 GRT, built 1937), Martand (British, 7967 GRT, built 1939) and Port Wyndham (British, 11005 GRT, built 1937).
It was being escorted by the destroyers HMS Harvester (Lt.Cdr. M. Thornton, DSC, RN), HMS Hurricane (Lt.Cdr. H.C. Simms, RN) and ORP Garland (Lt.Cdr. K.F. Namiesniowski). This last destroyer had been escorting the three ships that came from the Bristol Channel.
The Clyde section of the convoy departed the Clyde on 2 November was made up of the following troopships / transports;
Almanzora (British, 15551 GRT, built 1914), Clan Chattan (British, 7262 GRT, built 1937), Clan Lamont (British, 7250 GRT, built 1935), Highland Monarch (British, 14139 GRT, built 1928) and Warwick Castle (British, 20107 GRT, built 1930).
They were escort by the heavy cruiser HMS Cornwall (Capt. C.F. Hammill, RN), AA cruiser HMS Cairo (Capt. P.V. McLaughlin, RN) and the destroyers HMCS Ottawa (Cdr. E.R. Mainguy, RCN), HMCS Saguenay (Cdr. G.R. Miles, RCN), HMCS Skeena (Lt.Cdr. J.C. Hibbard, RCN), HMS Hesperus (Lt.Cdr. D.G.F.W. MacIntyre, RN), HMS Beagle (Lt.Cdr. R.H. Wright, RN) and HMS Bulldog (Lt.Cdr. F.J.G. Hewitt, RN).
The convoy merged around 1000/2 in position 55°45'N, 07°21'W.
HMS Bulldog and ORP Garland left the convoy around 1200/3 in position 54°25'N, 14°39'W to go to the aid of the troopship Windsor Castle which had been damaged by German aircraft bombs in position 54°12'N, 13°18'W.
HMS Cairo left the convoy at 1830/3 in position 54°12'N, 16°13'W.
HMS Hesperus and HMS Hurricane left the convoy around 1900/3 to go to the aid of the torpedoed armed merchant cruiser HMS Laurentic.
HMS Beagle, HMCS Saguenay and HMCS Skeena parted company with the convoy at 0300/4 in position 52°30'N, 19°00'W.
HMCS Ottawa and HMS Harvester parted company with the convoy at 1600/4 in position 52°30'N, 22°25'W.
At 0310/5 the Duchess of Richmond parted company with the convoy in position 52°10'N, 26°05'E to proceed to her destination independently.
At 0630/9 the Akaroa parted company with the convoy in position 32°44'N, 22°58'W to proceed to Trinidad.
At 0855/11 the Almanzora, Abosso, City of Manchester, Darius, Malancha and Martland were detached ('slow' group) were detached in position 23°47'N, 22°15'W under the escort of the armed merchant cruiser HMS Pretoria Castle (Capt.(Retd.) E.J. Shelly, RN) which had just joined the convoy.
The 'fast' section of the convoy arrived at Freetown on 14 November escorted by HMS Cornwall.
The 'slow' section of the convoy arrived at Freetown on 15 November escorted by HMS Pretoria Castle.
----------------------------------------------------
The convoy, now made up of troopships / transports Almanzora, City of Manchester, Clan Chattan, Clan Lamont, Delius, Dunedin Star, Highland Monarch, Malancha, Martand, Port Wyndham, Scythia, Stirling Castle and Warwick Castle, departed Freetown for South Africa around 1630 hours on 17 November 1940.
They were escorted by HMS Cornwall and HMS Pretoria Castle.
At 0805 hours on 26 November the Scythia and Warwick Castle parted company with the convoy in position 22°55'S, 09°03'E to proceed to Capetown. They were escorted by HMS Pretoria Castle.
These ships arrived off Capetown on 29 October. The troopships both entered the harbour but Scythia only briefly to take on board water.
HMS Pretoria Castle rejoined to convoy around 1200 hours on 29 November. Scythia rejoined about 45 minutes later.
At 1500 hours on 2 December, while in position 32°15'S, 29°35'E, the Almanzora, City of Manchester, Delius, Malancha and Martand were left astern to enable to other ships to arrive at Durban early the next day. HMS Pretoria Castle remained with these five ships while HMS Cornwall went ahead with the others.
Pretoria Castle arrived with the five ships that had split off at Durban some hours after the others. The convoy then entered harbour while HMS Pretoria Castle set course for Capetown.
----------------------------------------------------
The convoy, now made up of troopships / transports City of Manchester, Clan Chattan, Clan Lamont, Delius, Dunedin Star, Highland Monarch, Malancha, Martand, Port Wyndham and Stirling Castle, departed Durban for Aden around 1030 hours on 5 December 1940.
There was one more ships in the convoy, this was the troopship Dunera (11162 GRT, built 1937) who had taken over the troops of the Scythia and took her place in the convoy.
Escort was once again HMS Cornwall but she was now with the armed merchant cruiser HMS Kanimbla (A/Capt. F.E. Getting, RAN).
----------------------------------------------------
In the morning of 18 December 1940 the convoy arrived near Aden and was transferred to the Red Sea escort. HMS Cornwall and HMS Kanimbla parted company with the convoy at 0925/18 in position 11°53'N, 45°08'E. The then proceeded to Aden where they arrived around 1300/18.
The Red Sea escort joined the convoy as follows; sloops HMIS Indus (Cdr. E.G.G. Hunt, RIN) and HMAS Yarra (Lt.Cdr. W.H. Harrington, RAN) joined the convoy at 0730/18 in position 11°53'N, 45°34'E.
Light cruiser HMAS Perth (Capt. P.W. Bowyer-Smith, RN) and AA cruiser HMS Carlisle (Capt. G.M.B. Langley, OBE, RN) joined at 0945/18 in position 11°55'N, 45°03'E.
And the last ship to join, the destroyer HMS Kingston (Lt.Cdr. P. Somerville, DSO, RN) joined at 1023/18 in position 11°57'N, 44°56'E.
Two more troopships / transports joined the convoy at 1130/18 in position 12°02'N, 44°45'E. These were the City of Agra (British, 6361 GRT, built 1936) and Melbourne Star (British, 11076 GRT, built 1936).
HMS Carlisle parted company with the convoy at 1650/20 in position 20°33'N, 38°45'E.
HMIS Indus and HMAS Yarra parted company with the convoy at 1730/20 in position 20°42'N, 38°41'E.
At 1200/21, the Dunedin Star, Melbourne Star and Stirling Castle, escorted by HMS Kingston proceeded ahead. They arrived at Suez at 1500/22.
The remaineder of the convoy arrived at Suez at 0700/23 escorted by HMAS Perth. (31)
18 Dec 1940
HMS Cornwall (Capt. C.F. Hammill, RN) and HMS Kanimbla (A/Capt. F.E. Getting, RAN) arrived at Aden from escort duties. (31)
19 Dec 1940
HMS Cornwall (Capt. C.F. Hammill, RN) departed Aden for Durban. (32)
26 Dec 1940
HMS Cornwall (Capt. C.F. Hammill, RN) arrived at Durban. She departed for Simonstown later the same day. (32)
28 Dec 1940
HMS Cornwall (Capt. C.F. Hammill, RN) arrived at Simonstown where she is taken in hand for a refit at the Simonstown Dockyard. (32)
8 Jan 1941
HMS Cornwall (Capt. C.F. Hammill, RN) is docked at Simonstown. (33)
12 Feb 1941
HMS Cornwall (Capt. P.C.W. Manwaring, RN) is undocked. (34)
25 Feb 1941
HMS Cornwall (Capt. P.C.W. Manwaring, RN) conducted exercises in False Bay. (34)
26 Feb 1941
HMS Cornwall (Capt. P.C.W. Manwaring, RN) conducted exercises in False Bay. (34)
28 Feb 1941
HMS Cornwall (Capt. P.C.W. Manwaring, RN) departed Simonstown for patrol. She was to proceed to St. Helena on completion of this patrol. (34)
7 Mar 1941
HMS Cornwall (Capt. P.C.W. Manwaring, RN) arrived at St. Helena. She took on board fuel from oiler Laurelwood (British, 7347 GRT, built 1929). (35)
8 Mar 1941
HMS Cornwall (Capt. P.C.W. Manwaring, RN) departed St. Helena for patrol and escort duties.
She joined convoy WS 6 on 11 March.
[See the event 'Convoy WS 6' for 8 March 1941 for more information on this convoy.] (35)
8 Mar 1941
Convoy WS 6.
This convoy departed Freetown on 8 March 1941 for South / Africa (Capetown / Durban).
It was a combined convoy made up with ships from convoy's WS 6A and WS 6B which had come to Freetown from the U.K.
The convoy was made up with the following troopships / transports; Almanzora (British, 15551 GRT, built 1914), Ascanius (British, 10048 GRT, built 1910), Bellerophon (British, 9019 GRT, built 1906), Bergensfjord (Norwegian, 11015 GRT, built 1913), Burdwan (British, 6069 GRT, built 1928), Cape Horn (British, 5643 GRT, built 1929), City of Athens (British, 6558 GRT, built 1923), City of Corinth (British, 5318 GRT, built 1918), City of Hankow (British, 7360 GRT, built 1915), City of London (British, 8956 GRT, built 1907), City of Pittsburg (British, 7377 GRT, built 1922), Consuelo (British, 4847 GRT, built 1937), Dalesman (British, 6343 GRT, built 1940), Kina II (British, 9823 GRT, built 1939), Leopoldville (Belgian, 11509 GRT, built 1929), Llandaff Castle (British, 10799 GRT, built 1926), Llanstephan Castle (British, 11348 GRT, built 1914), Logician (British, 5993 GRT, built 1928), Mahseer (British, 7911 GRT, built 1925), Manchester Citizen (British, 5343 GRT, built 1925), Mataroa (British, 12390 GRT, built 1922), Northumberland (British, 11558 GRT, built 1915), Nova Scotia (British, 6796 GRT, built 1926), Opawa (British, 10354 GRT, built 1931), Port Alma (British, 8400 GRT, built 1928), Rangitata (British, 16737 GRT, built 1929), Ruahine (British, 10832 GRT, built 1909), Salween (British, 7063 GRT, built 1937), Scythia (British, 19761 GRT, built 1920) and Thysville (Belgian, 8351 GRT, built 1922).
The convoy was escorted by the light cruisers HMS Birmingham (Capt. A.C.G. Madden, RN), HMS Phoebe (Capt. G. Grantham, RN) and the armed merchant cruiser HMS Cathay (A/Capt.(Retd.) C.M. Merewether, RN).
Heavy cruiser HMS Cornwall (Capt. P.C.W. Manwaring, RN) joined the convoy at 1126Z/11 in position 00°50'N, 06°48'W. HMS Cathay was then detached with orders to proceed direct to Capetown at her best speed.
At 0600Z/20 the Almanzora, Bergenfjord, Llanstephan Castle, Ruahine and Scythia parted company for Capetown. These ships were to take on board water at Capetown. They were escorted by HMS Birmingham.
At 1600Z/21 the Capetown section of the convoy was detached. It was made up of Ascanius, Burdwan, Cape Horn, City of Athens, Consuelo, Kina II, Leopoldville, Llandaff Castle, Nova Scotia and Opewa. They were being escorted by HMS Phoebe. These ships were to arrive at Capetown at 0700Z/22. HMS Phoebe then proceeded to Simonstown where she arrived around 1000B/22. She departed again around 1620B/22 to join the Almanzora, Bergenfjord, Llanstephan Castle, Ruahine and Scythia coming from Capetown.
At 2055Z/22 the Port Alma was detached to proceed independently to Capetown.
At 1300Z/25, HMS Phoebe with Almanzora, Bergenfjord, Llanstephan Castle, Ruahine and Scythia rejoined the convoy. Consuelo, from the Capetown section, was also present.
At dusk on the 25th, HMS Phoebe, was sent ahead to Durban with six of the faster ships to arrive two to three hours ahead of the remainder on the 26th.
The whole convoy had arrived at Durban well before noon on the 26th.
----------------------------------------------------
On 27 March 1941 the following troopships / transports sailed from Capetown; Ascanius, Burdwan, Cape Horn, City of Athens, Kina II, LLandaff Castle, Nova Scotia, Opawa and Port Alma. These was one new addition to the convoy; Leopoldville (Belgian, 11509 GRT, built 1926). They were being escorted by the heavy cruiser HMS Dorsetshire (Capt. B.C.S. Martin, RN).
On 1 April 1941 the following troopships / transports sailed from Durban; Bellerophon, Bergensfjord, City of Corinth, City of Hankow, City of London, City of Pittsburg, Consuelo, Dalesman, Llanstephan Castle, Logician, Masheer, Manchester Citizen, Salween and Thysville. There were also five new additions to the convoy, these were; City of Canterbury (British, 8331 GRT, built 1922), Costa Rica (Dutch, 8055 GRT, built 1910), Dilwara (British, 11080 GRT, built 1936), Elizabethville (Belgian, 8351 GRT, built 1922) and Yoma (British, 8131 GRT, built 1928). The Durban section was escorted by the heavy cruiser HMS Cornwall and light cruiser HMS Phoebe.
The Capetown section and Durban section made rendez-vous late in the morning of April 2nd.
HMS Phoebe parted company with the convoy in the evening of April 3rd. She arrived at Aden on 10 April.
HMS Dorsetshire parted company with the convoy in the evening of April 7th. She arrived at Durban on 10 April.
Around noon on the 10th the convoy was joined by the transport Talamba (British, 8018 GRT, built 1924) which came from the Seychelles and was escorted by HMS Glasgow (Capt. H. Hickling, RN). They had departed the Seychelles on 8 April. HMS Glasgow parted company with the convoy on 13 April when near Socotra and arrived back in the Seychelles on 16 April.
The convoy was disbanded in the morning of April 17th near Perim. Most of the ships in the convoy proceeded to Suez independently at their best speed. HMS Cornwall arrived at Aden very late in the afternoon of 17 April. (31)
11 Mar 1941
Around noon, HMS Cornwall (Capt. P.C.W. Manwaring, RN), made rendez-vous with convoy WS 6 which she was to escort.
[See the event 'Convoy WS 6' for 8 March 1941 for more info on this convoy.] (35)
17 Apr 1941
Very late in the afternoon, HMS Cornwall (Capt. P.C.W. Manwaring, RN), arrived at Aden from convoy escort duty. (36)
21 Apr 1941
Around 1600C/21, the aircraft carrier HMS Eagle (Capt. A.R.M. Bridge, CBE, RN) and the heavy cruiser HMS Cornwall (Capt. P.C.W. Manwaring, RN) departed Aden for Kilindini / Mombasa. (37)
26 Apr 1941
Around 1000C/26, the aircraft carrier HMS Eagle (Capt. A.R.M. Bridge, CBE, RN) and the heavy cruiser HMS Cornwall (Capt. P.C.W. Manwaring, RN) arrived at Kilindini / Mombasa from Aden. (38)
29 Apr 1941
The aircraft carrier HMS Eagle (Capt. A.R.M. Bridge, CBE, RN) and the heavy cruisers HMS Cornwall (Capt. P.C.W. Manwaring, RN) and HMS Hawkins (Capt. H.P.K. Oram, RN) departed Kilindini / Mombasaon this day, to search for a German raider after a report had been received that a ship was being attacked in position 05°24'N, 62°46'E. This was the merchant vessel Clan Buchanan (British, 7266 GRT, built 1938) which had been intercepted and subsequently scuttled by the German armed merchant cruiser Schiff 33 / Pinguin.
HMS Eagle and HMS Hawkins remained in company while HMS Cornwall went ahead. Eagle and Hawkins were however ordered to return to Mombasa on 2 May 1941 and they returned there on the 4th.
HMS Cornwall remained on patrol in the Seychelles area. (38)
8 May 1941
HMS Cornwall (Capt. P.C.W. Manwaring, RN) intercepts and sinks the German armed merchant cruiser Schiff 33 / Pinguin (7767 GRT, built 1937) north of the Seychelles in position 03°30'N, 57°48'E.
----------------------------------------------------
On 7 May 1941 at 0555 hours (zone -5), HMS Cornwall was near the equator in position 00°02'S, 56°55'E, steering 160°, with orders to refuel at the Seychelles, when a raider report reached her from the British tanker British Emperor. Cornwall then altered course to 340° and increased speed to 20 knots to close the enemy's position without an unduly heavy consumption of fuel. As the position of the British Emperor was over 500 nautical miles away (08°30'N, 56°25'E) Capt. Manwaring anticipated a prolonged search.
At 0756/7 speed was increased to 24 knots and later, at 0815/7, to 25.5 knots. This was after a signal of the C-in-C. East Indies had been received ordering Cornwall to cover the gap between the Seychelles and the Chagos Archipelago. A search plan also involving the aircraft was drawn up.
Between 1600 and 1615/7 , Cornwall launched both her aircraft. They were recovered shortly after 1900 hours. Cornwall then proceeded to search for the enemy during the night. The direction of her search was correct although the enemy was not spotted it turned out that at 0330/8 Cornwall was close to the enemy which sighted her against the setting moon. It would however take several more hours for Cornwall to see the enemy herself.
At dawn, between 0600 and 0630/8, HMS Cornwall launched both her aircraft. At 0707/8 one of the aircrraft sighted a merchant vessel of the suspected type steaming at 13 knots, bearing 228°, some 65 nautical miles to the westward of the Cornwall. The aircraft however made no report until returning to Cornwall at 0800/8. At 0825/8 Cornwall altered course to 255° to close the suspect at 18 knots, later increased to 20 knots and finally to 23 knots. By 0930/8 she had recovered both her aircraft.
At 1015/8, Cornwall catapulted one of her aircraft again with instructions to close the still unidentified ship and to discover, if possible, whether she was a raider or not. When the aircraft returned at 1223/8 it reported that the unidentified merchant vessel was doing at least 15 knots and had hoisted signal letters. These were identified as those of the Norwegian merchant vessel Tamerlane, which she closely resembled. The Tamerlane was however not in the list of 'expected ships'.
It was then past noon and it was clear that HMS Cornwall must increase speed to get within striking distance of the suspect with plenty of daylight in hand. She accordingly increased to 26 knots and later to 28 knots.
At 1345/8 an aircraft was catapulted with orders to keep her informed of the bearing, course and speed of the unidentified vessel. She estimated the suspect to be within 32 nautical miles unless it had altered course. When the aircrft returned it reported the bearing of the unknown ship which was in sight from the air and a few minutes later, at 1607/8 the ship was sighted from the bridge of HMS Cornwall, bearing 282°.
At 1614/8, HMS Cornwall altered course to close. The stranger turned away, stern on, steering 300°. At 1619/8, therefore, Cornwall altered course to bring her fine on the starboard bow in order to close as quickly as possible to 12000 yards without crossing the merchant vessels track.
At 1630/8 the stranger was heard making 'raider reports' stating that she was the Norwegian Tamerlane. The aircraft was therefore ordered to inform her that the ship chasing her was a British cruiser and that she should stop engines. HMS Cornwall at the same time turned to give her a full broadside view and then turned again to resume the chase.
At 1649/8, when the range was down to 19000 yards, HMS Cornwall signalled three times 'Heave to or i fire' and backed this up by one warning shot of 8" over a and to the left. The stranger disobeyed the order, but HMS Cornwall refrained from opening direct fire, still thinking that the ships master was gallantly determined not to stop. An order was therefore given for the second aircraft to take off and drop a 250lb bomb close to the suspect, and if that did not stop her, to drop the second bomb on her forecastle. It took some time however before this order reached the aircraft which was waiting on the catapult.
At 1710/8 HMS Cornwall again signalled 'Heave to or i fire' and followed this with another warning shot of 8". As the range was row within 12000 yards Cornwall turned to port to open it. This however convinced the stranger that the Cornwall was about to open fire in earnest for when the 8" shell fell near her she turned to starboard followed by a large alteration to port and then opened fire with five guns just before 1715/8.
The enemy could hardly have chosen a better moment for starting the action. Just as HMS Cornwall turned after firing her second warning shot, her training circuit failed. Realising that she was dangerously close to the raider she immediately turned away to port to the limit of 'A' arcs to avoid danger from torpedoes and to open the range which had closed to 10500 yards. The range opened quickly but for a while HMS Cornwall was in great danger. She was frequently straddled by rapid and fairly accurate gunfire while her own armamant was pointing everywhere but at the enemy. In these cicumstances she turned further away, and an officer was sent from the bridge to 'B' turret with an order for it to train on the enemy, and if necessary, also take control of 'A' turret. The nescessary orders had by now already been passed from the fore control, and as the turrets trained, the Cornwall turned back to starboard to open 'A' arcs.
As soon as they would bear 'A' and 'B' turrets fired two salvoes. However a 5.9" hit then put Cornwall's fore steering gear out of action and she swung away, closing her 'A' arcs once again for a short time. The breakdown was furtunately only temporary. The after steering gear was rapidly brought into use and the ship was out of control only for a few seconds. Meanwhile communication between the bridge and the waiting aircraft had also failed with the result that the aircraft was still on the catapult but now out of action with splinter damage.
By 1718/8 all of Cornwall's 8" gun turrets were firing an her salvoes were straddling the enemy. The range was again outside the 12000 yards and she was reasonably safe from torpedo attack. The enemy's fire was falling off in accuracy and volume. At 1719/8 it was nearly 1000 yards short so Cornwall turned to bring both ships on rougly parralel courses. By this time Cornwall had recieved two direct hits but although the raider straddled Cornwall once more around 1722 hours she was not hit again. The action was virtually at an end.
At 1726/8 a salvo hit the enemy and she blew up in a cloud of white vapour which rose about 2000 feet into the air. It hung over the scene many minutes. As the raider sank she fired an ineffective salvo which straddled HMS Cornwall about 20 seconds after the raider was lost out of sight.
Although HMS Cornwall had sunk the enemy her own troubles were not yet at an end. With one of her two aircraft out of action she was naturally anxious to recover the other before dark. It was therefore decided to hoist the aircraft in first and then start to search for survivors as there was a lot of debris and the area and that would be dangerous for the aircraft. As Cornwall was recovering the aircraft all electric power failed. This also resulted in the fans of the engine room being stopped and as the tempurature rose to almost 200 Fahrenheit (over 90 Celcius) the engine room had to be evacuated.
About this time the starboard engines suddenly went half speed astern, possibly in accordance with an order given some time before. This brought Cornwall into themiddle of the wreckage and before darkness fell she was able to pick up a number of British and Germans survivors clinging to it in the water. Cornwall remained without electric power from 1815 to 1850 hours. At 1850 hours power was restored but she remained more or less stopped in the wreckage until 2140 hours. She then made off towards the Seychelles.
Although HMS Cornwall had found and sunk the enemy, the Admiralty considered that the conduct of the operation left much to be desired. They regarded the search scheme as well designed but when at 0707/8 the aircraft sighted a merchant ship of the type she was searching for it should have reported this fact at once and not upon returning to Cornwall around 0800/8 which in the meantime was steaming away from the enemy. The result was also that the other aircraft was kept unnecessarily in the air.
It was considered too that HMS Cornwall should have kept the Commander-in-Chief, East Indies, informed of the events and her intentions. With the information at his disposal he could then have informed her that no friendly merchant ship was anywhere near. She appears, however, to have been undly concerned with the possibility of her wireless being intercepted by the raiders direction finder.
The Cornwall was engaged on a definite raider hunt and employing, quite correctly, both her aircraft for the search. When the suspicious ship was sighted by one of them it could have shadowed her while to other was recalled and refuelled in readiness to relieve the shadower, thus ensuring that the suspect would be almost contantly under observation. As it was the advantage of having two aircraft was lost and the enemy was left unwatched from 0725 to 1125 hours and again from 1150 to 1410 hours. If the enemy had made a big alteration of course, or if the visibility had decreased the chance of finding him again would have been slender.
The Admiralty considered that during this phase the rigid adherence to wireless silence resulted in essential reports not being made from the aircraft to Cornwall and from Cornwall to the Commander-in-Chief, East Indies.
The Admiralty also considered that HMS Cornwall should have brought all her boilers to immediate notice at 0800/8 when the first aircrft report was received and not to have waited until 1250/8 when the second aircraft report was received.
Throughout the period between the surface sighting of the raider and the time when she opened fire on HMS Cornwall, Capt. Manwairing held on to the idea that the suspect might still prove to be a friendly ship although in view of her suspicious behaviour all the evidence was very much against it. The Admiralty considered that the Cornwall, by allowing herself to close to a range of under 12000 yards contrary to her expressed intentions, showed a lack of attention to the changing situation. It was quite clear from her report that this was fully appreciated at the time. The error of closing a very suspecious ship was intensified by her temporaty inability to open fire, which left no alternative but to turn away and close 'A' arcs at a critical moment, which might have easily resulted in the raider's escape and in much more serious damage to herself than she actually suffered. (39)
10 May 1941
HMS Cornwall (Capt. P.C.W. Manwaring, RN) arrived at Port Victoria, Seychelles. (40)
11 May 1941
Around 1900D/11, HMS Cornwall (Capt. P.C.W. Manwaring, RN) and HMS Glasgow (Capt. H. Hickling, RN) departed Port Victoria, Seychelles for Mauritius. (38)
17 May 1941
Around 0645D/17, HMS Cornwall (Capt. P.C.W. Manwaring, RN) and HMS Glasgow (Capt. H. Hickling, RN) arrived at Mauritius from the Seychelles.
They departed again around 0215D/18 as D/F bearings indicated a German ship within 200 nautical miles from position 06°50'S, 73°40'E.
They parted company around noon on the 18th.
On 19 May, HMS Cornwall searched the area between 10°S and 12°S and 67°E and 71°E while HMS Glasgow steered towards Peros Banhos to carry out an air search of islands to the west side of the Chagos Archipelago.
Both cruisers sighted nothing and no further indications of a German surface unit were picked up. (38)
22 May 1941
HMS Cornwall (Capt. P.C.W. Manwaring, RN) arrived at Mauritius in the morning. She departed for Durban in the afternoon. (40)
25 May 1941
HMS Cornwall (Capt. P.C.W. Manwaring, RN) arrived at Durban. Here she was to make repairs during the damage sustained during the action of 18 May. (40)
10 Jun 1941
HMS Cornwall (Capt. P.C.W. Manwaring, RN) departed Durban. She was escorting convoy CM 12 which was made up of the large troopships Ile de France (British, 43450 GRT, built 1926), Mauretania (British, 35739 GRT, built 1939) and Nieuw Amsterdam (Dutch, 36287 GRT, built 1938). (41)
18 Jun 1941
HMS Cornwall (Capt. P.C.W. Manwaring, RN) arrived at Aden in the afternoon. She was had parted company with the convoy which she was escorting (Convoy CM 12, which was made up of the large troopships Ile de France (British, 43450 GRT, built 1926), Mauretania (British, 35739 GRT, built 1939) and Nieuw Amsterdam (Dutch, 36287 GRT, built 1938) near Perim in the early hours of the day. (41)
20 Jun 1941
HMS Cornwall (Capt. P.C.W. Manwaring, RN) departed Aden for a patrol off the Seychelles. (41)
24 Jun 1941
HMS Cornwall (Capt. P.C.W. Manwaring, RN) arrived at Port Victoria, Seychelles. (41)
26 Jun 1941
HMS Cornwall (Capt. P.C.W. Manwaring, RN) departed Port Victoria, Seychelles for patrol which was to end at Durban. (41)
29 Jun 1941
HMS Cornwall (Capt. P.C.W. Manwaring, RN) is ordered to make rendez-vous with the troopship Nieuw Amsterdam (Dutch, 36287 GRT, built 1938) which had departed Suez on this day for Durban and which had the King of Greece, the Greek Royal party and other important personages on board.
Rendez-vous was made in the afternoon of July 3rd south-east of Kismayo. (38)
7 Jul 1941
HMS Cornwall (Capt. P.C.W. Manwaring, RN) arrived at Durban escorting the troopship Nieuw Amsterdam (Dutch, 36287 GRT, built 1938). (42)
11 Jul 1941
HMS Cornwall (Capt. P.C.W. Manwaring, RN) departed Durban. She was escorting convoy WS 9A2 which was made up of the large troopships Ile de France (British, 43450 GRT, built 1926), Mauretania (British, 35739 GRT, built 1939) and Nieuw Amsterdam (Dutch, 36287 GRT, built 1938). (42)
18 Jul 1941
In the evening, HMS Cornwall (Capt. P.C.W. Manwaring, RN), parted company near Perim with convoy WS 9A2 which was made up of the large troopships Ile de France (British, 43450 GRT, built 1926), Mauretania (British, 35739 GRT, built 1939) and Nieuw Amsterdam (Dutch, 36287 GRT, built 1938). (42)
19 Jul 1941
HMS Cornwall (Capt. P.C.W. Manwaring, RN) arrived at Aden. (42)
20 Jul 1941
HMS Cornwall (Capt. P.C.W. Manwaring, RN) departed Aden for Mombasa. She was escorting the British transport Salween (British, 7063 GRT, built 1937). (42)
27 Jul 1941
HMS Cornwall (Capt. P.C.W. Manwaring, RN) and the British transport Salween (British, 7063 GRT, built 1937) arrived at Mombasa. (42)
1 Aug 1941
HMS Cornwall (Capt. P.C.W. Manwaring, RN) departed Mombasa for a patrol which was to end at Durban. The patrol took her along the east side of Madagascar. (43)
9 Aug 1941
HMS Cornwall (Capt. P.C.W. Manwaring, RN) arrived at Durban from patrol. (43)
11 Aug 1941
HMS Cornwall (Capt. P.C.W. Manwaring, RN) departed Durban. She was escorting convoy CM 15 which was made up of the large troopships Ile de France (British, 43450 GRT, built 1926), Mauretania (British, 35739 GRT, built 1939) and Nieuw Amsterdam (Dutch, 36287 GRT, built 1938). (43)
19 Aug 1941
Around 2000 hours, HMS Cornwall (Capt. P.C.W. Manwaring, RN), arrived at Aden after escorting convoy CM 15 which was made up of the large troopships Ile de France (British, 43450 GRT, built 1926), Mauretania (British, 35739 GRT, built 1939) and Nieuw Amsterdam (Dutch, 36287 GRT, built 1938). She had parted company with the convoy around 1400 hours that day. (43)
21 Aug 1941
HMS Cornwall (Capt. P.C.W. Manwaring, RN) departed Aden for patrol upon completion of which she was to proceed to Colombo.
On departure from Aden, HMS Cornwall was towing the sloop HMIS Clive (Lt.Cdr.(emgy.) R.R. Caws, RIN) to about 50'E in order for the sloop to be able to make it to Karachi. (43)
23 Aug 1941
In the morning, HMS Cornwall (Capt. P.C.W. Manwaring, RN) and HMIS Clive (Lt.Cdr.(emgy.) R.R. Caws, RIN), parted company.
HMIS Clive then proceeded to Karachi where she arrived on 28 August 1941.
HMS Cornwall then made rendez-vous in the afternoon with the transport Tilawa (British, 10006 GRT, built 1924) to escort this ship to the vicinity of Bombay. (43)
30 Aug 1941
HMS Cornwall (Capt. P.C.W. Manwaring, RN) arrived at Colombo where she was to dock and have her 8" gun barrels exchanged. (43)
1 Sep 1941
HMS Cornwall (Capt. P.C.W. Manwaring, RN) is docked at Colombo. (44)
3 Sep 1941
Convoy US 12A.
This convoy departed Sydney on 3 September 1941 for Suez where it arrived on 23 September 1941.
The convoy was made up of the following troopships; Queen Elizabeth (British, 83673 GRT, built 1939) and Queen Mary (British, 81235 GRT, built 1936).
HMS Queen Mary departed Sydney on 3 September escorted by the light cruiser HMAS Sydney (Capt. J. Burnett, RAN).
They were joined off Jervis Bay around 2200K/3 by the Queen Elizabeth which had arrived there from Sydney on 2 September 1941 and had stayed overnight in the bay protected by the light cruiser HMAS Adelaide (Capt. H.A. Showers, RAN). On the Queen Elizabeth joining HMAS Adelaide parted company and returned to Sydney.
Around 0700K/6, the heavy cruiser HMAS Canberra (Capt. H.B. Farncomb, RAN) took over the escort duties from HMAS Sydney which then proceeded to Williamstown.
The convoy arrived at Fremantle on 8 September.
The convoy departed Fremantle for Colombo on 9 September still escorted by HMAS Canberra.
The convoy arrived at Trincomalee on 15 September 1941 and departed from there on 16 September 1941.
From Trincomalee to Perim the convoy was escorted by the heavy cruiser HMS Cornwall (Capt. P.C.W. Manwaring, RN).
The convoy arrived off Perim on 21 September 1941 and from there on the ships proceeded independently to Suez while HMS Cornwall proceeded to Aden where she arrived later that day. (38)
5 Sep 1941
HMS Cornwall (Capt. P.C.W. Manwaring, RN) is undocked. (44)
9 Sep 1941
HMS Cornwall (Capt. P.C.W. Manwaring, RN) departed Colombo for Trincomalee. (44)
10 Sep 1941
In the morning, HMS Cornwall (Capt. P.C.W. Manwaring, RN), arrived at Trincomalee.
In the afternoon she conducted gunnery exercises off Trincomalee. (44)
11 Sep 1941
HMS Cornwall (Capt. P.C.W. Manwaring, RN) conducted exercises off Trincomalee. (44)
12 Sep 1941
In the morning, HMS Cornwall (Capt. P.C.W. Manwaring, RN), conducted gunnery exercises off Trincomalee. (44)
16 Sep 1941
HMS Cornwall (Capt. P.C.W. Manwaring, RN) departed Trincomalee for escort duty.
[See the event ' Convoy US 12A ' for 9 September 1941 for more information.] (45)
21 Sep 1941
HMS Cornwall (Capt. P.C.W. Manwaring, RN) arrived at Aden from escort duty.
[See the event ' Convoy US 12A ' for 9 September 1941 for more information.] (45)
24 Sep 1941
HMS Cornwall (Capt. P.C.W. Manwaring, RN) departed Colombo for Addu Atoll (Port T). She is escorting HMS Glenroy (Capt.(Retd.) Sir J.F. Paget, RN) and the transport Clan Forbes (British, 7529 GRT, built 1938). (45)
30 Sep 1941
HMS Glenroy (Capt.(Retd.) Sir J.F. Paget, RN), transport Clan Forbes (British, 7529 GRT, built 1938) and their escort , heavy cruiser HMS Cornwall (Capt. P.C.W. Manwaring, RN), arrived at Addu Atoll (Port T). (45)
9 Oct 1941
HMS Cornwall (Capt. P.C.W. Manwaring, RN) departed Addu Atoll (Port T) for patrol. (46)
20 Oct 1941
HMS Cornwall (Capt. P.C.W. Manwaring, RN) arrived at Port Victoria, Seychelles from patrol. (46)
21 Oct 1941
HMS Cornwall (Capt. P.C.W. Manwaring, RN) departed Port Victoria, Seychelles for a patrol which was to end at Colombo. (46)
26 Oct 1941
HMS Cornwall (Capt. P.C.W. Manwaring, RN) arrived at Colombo from patrol. (46)
3 Nov 1941
HMS Cornwall (Capt. P.C.W. Manwaring, RN) departed Colombo for Addu Atoll (Port T). (47)
3 Nov 1941
Convoy US 13.
This convoy departed Sydney on 3 November 1941 for Suez.
The convoy was made up of the troopship Queen Elizabeth (British, 83673 GRT, built 1939).
Off Jervis Bay the Queen Elizabeth was joined by the Queen Mary (British, 81235 GRT, built 1936) and the heavy cruiser HMAS Canberra (Capt. H.B. Farncomb, RAN).
The convoy arrived at Fremantle on 7 November 1941.
The convoy departed Fremantle for Trincomalee on 8 November 1941 still escorted by HMAS Canberra.
The convoy was escorted until late morning of November 11th by HMAS Canberra (Capt. H.B. Farncomb, RAN) when the heavy cruiser HMS Cornwall (Capt. P.C.W. Manwaring, RN) took over in approximate position 11°30'S, 99°30'E.
The convoy arrived at Trincomalee on 14 November 1941 and departed from there to continue it's passage the following day.
The convoy arrived off Perim on 20 November 1941 and from there on the troopships proceeded independently to Suez while HMS Cornwall proceeded to Aden where she arrived later that day. (48)
5 Nov 1941
HMS Cornwall (Capt. P.C.W. Manwaring, RN) arrived at Addu Atoll (Port T). (47)
6 Nov 1941
HMS Cornwall (Capt. P.C.W. Manwaring, RN) departed Addu Atoll (Port T) to rendez-vous with convoy US 13 and then escort it to Trincomalee. (47)
11 Nov 1941
In late morning HMS Cornwall (Capt. P.C.W. Manwaring, RN) made rendez-vous with convoy US 13 in approximate position 11°30'S, 99°30'E. She then took over the escort duties from HMAS Canberra (Capt. H.B. Farncomb, RAN).
[For more info on this convoy see the event ' Convoy US 13 ' for 8 September 1941.] (47)
14 Nov 1941
HMS Cornwall (Capt. P.C.W. Manwaring, RN) arrived at Trincomalee with convoy US 13.
[See the event ' Convoy US 13 ' for 8 November 1941 for more information.] (47)
15 Nov 1941
HMS Cornwall (Capt. P.C.W. Manwaring, RN) departed Trincomalee with convoy US 13.
[See the event ' Convoy US 13 ' for 8 November 1941 for more information.] (47)
20 Nov 1941
HMS Cornwall (Capt. P.C.W. Manwaring, RN) arrived at Aden from escort duty.
[See the event ' Convoy US 13 ' for 8 November 1941 for more information.] (48)
23 Nov 1941
HMS Cornwall (Capt. P.C.W. Manwaring, RN) departed Aden for patrol towards the Seychelles. En-route she was to provide cover for important indepenently routed merchant ships. (48)
25 Nov 1941
Around 1000 hours, HMS Cornwall (Capt. P.C.W. Manwaring, RN), intercepted the Vichy-French merchant Surcouf (1129 GRT, built 1899) of the east coast of Somalia in position 07°17'N, 52°06'E. Shortly after noon a prize crew was put on board which brought her to Aden. The Surcouf was en route from Madagascar to Djibouti with food.
From Aden the Indian sloop HMIS Hindustan (A/Cdr. I.B.W Heanly, RIN) was sent out to join HMS Cornwall and the Surcouf to provide A/S protection as it was feared that a Vichy French submarine which had recently been at Djibouti would intervene.
HMIS Hindustan joined the Surcouf in the afternoon of 27 November 1941. (48)
28 Nov 1941
HMS Cornwall (Capt. P.C.W. Manwaring, RN) arrived at Aden from patrol. (48)
1 Dec 1941
HMS Cornwall (Capt. P.C.W. Manwaring, RN) departed Aden for Durban. (49)
11 Dec 1941
HMS Cornwall (Capt. P.C.W. Manwaring, RN) arrived at Durban. (49)
16 Dec 1941
HMS Cornwall (Capt. P.C.W. Manwaring, RN) departed Durban. She was escorting convoy CM 24 which was made up of the large troopships Ile de France (British, 43450 GRT, built 1926) and Mauretania (British, 35739 GRT, built 1939). (49)
23 Dec 1941
HMS Cornwall (Capt. P.C.W. Manwaring, RN) with convoy CM 24, which was made up of the large troopships Ile de France (British, 43450 GRT, built 1926) and Mauretania (British, 35739 GRT, built 1939), arrived off Aden. Ile de France continued independently to Suez while HMS Cornwall and the Mauretania entered Aden. (49)
24 Dec 1941
Convoy WS 12Z-A (Aden), WS 12Z-B (Bombay) and WS 12Z-M (Malaya)
[Depart from Durban to their final destinations.]
This convoy departed Durban on 24 December 1941 and was split into three sections near Mombasa on 30 December 1941. WS12Z-A & WS12Z-B split into two sections 31 December 1941..
On departure from Durban the convoy was made up of the following troopships / transports; Abbekerk (Dutch, 7906 GRT, built 1939), Adrastus (British, 7905 GRT, built 1923), Aorangi (British, 17491 GRT, built 1924), Aronda (British, 8328 GRT, built 1941), Capetown Castle (British, 27002 GRT, built 1938), Deucalion (British, 7516 GRT, built 1930), Duchess of Bedford (British, 20123 GRT, built 1928), Eastern Prince (British, 10926 GRT, built 1929), Empire Star (British, 13479 GRT, built 1935), Empress of Japan (British, 16909 GRT, built 1913), Indrapoera (Dutch, 10825 GRT, built 1925), Narkunda (British, 16632 GRT, built 1920), Nieuw Amsterdam (Dutch, 36287 GRT, built 1938), Orduna (British, 15507 GRT, built 1914) and Sussex (British, 11062 GRT, built 1937).
The convoy was escorted by the battleship HMS Royal Sovereign (Capt. R.H. Portal, DSC, RN) until it was split up on 30 / 31 December 1941. HMS Royal Sovereign then proceeded to Port Victoria, Seychelles where she arrived on 2 January 1942.
----------------------------------------------------
Convoy WS 12ZA was formed on 24 Dec 1941 and was made up of troopships / transports; Aronda, Eastern Prince, Nieuw Amsterdam and Orduna. They were escorted by the light cruiser HMS Colombo (Capt. C.C.A. Allen, RN) which had brought out the US troop transport USS Oziraba (6937 GRT, built 1918) from Mombasa.
Convoy WS 12ZA was dispersed off Aden on 4 January 1942.
----------------------------------------------------
Convoy WS 12ZB was formed on 24 Dec 1941 and was made up of troopships / transports; Adrastus, Capetown Castle, Deucalion, Duchess of Bedford, Empire Star, Empress of Japan, Empress of Japan, Indrapoera and USS Oziraba. They were escorted by the heavy cruiser HMS Cornwall (Capt. P.C.W. Manwaring, RN).
Convoy WS 12ZA arrived at Bombay on 6 January 1942.
----------------------------------------------------
Convoy DM 1 detached from convoys WS 12Z-A and WS12Z-B on 30 Dec 1941 and was made up of troopships / transports; Abbekerk, Aorangi, USS Mount Vernon, Narkunda and Sussex. They were escorted by the light cruiser HMS Emerald (Capt. F.C. Flynn, RN) which had brought out the US troop transport Mount Vernon (24289 GRT, built 1932) from Mombasa.
Convoy DM 1 arrived at Addu Atoll (Port T) on 4 January 1942. It departed from there, with a strengthened escort, for Singapore on 5 January 1942.
Convoy DM 1 arrived at Singapore on 13 January 1942. (38)
26 Dec 1941
HMS Cornwall (Capt. P.C.W. Manwaring, RN) departed Aden to escort the troopship Dilwara (British, 11080 GRT, built 1936) to the vicinity of Mombasa. (49)
30 Dec 1941
Around 0900C/30, the heavy cruiser HMS Cornwall (Capt. P.C.W. Manwaring, RN) (Capt. P.C.W. Manwaring, RN), parted company with the troopship Dilwara (British, 11080 GRT, built 1936). The troopship then continued on to Mombasa where she arrived on 1 January 1942. To take over the escort of the troopship the HMS Corfu (Capt.(Retd.) J.P. Landon, RN) had joined around 0600C/30.
HMS Cornwall then proceeded to make rendez-vous with convoy WS 12Z the following day. [See the event ' Convoy WS 12Z ' for 24 December 1941 for more information.] (50)
6 Jan 1942
HMS Cornwall (Capt. P.C.W. Manwaring, RN) arrived at Bombay with convoy WS 12ZB. (51)
17 Jan 1942
HMS Cornwall (Capt. P.C.W. Manwaring, RN) departed Bombay for Aden. (51)
21 Jan 1942
HMS Cornwall (Capt. P.C.W. Manwaring, RN) arrived at Aden. (51)
23 Jan 1942
Convoy AJ 1.
This convoy departed Aden on 23 January 1942 and arrived at Colombo on 1 February 1942.
This convoy was made up of the following troopships / transports; City of Paris (British, 10902 GRT, built 1922), Eastern Prince (British, 10926 GRT, built 1929) and Yoma (British, 8131 GRT, built 1928).
The convoy was escorted by the British heavy cruiser HMS Cornwall (Capt. P.C.W. Manwaring, RN).
In the evening of January 27th the Eastern Prince was detached to Bombay where she arrived on 30 January 1942.
The remainder of the convoy arrived at Colombo on 1 February 1942. (52)
3 Feb 1942
Convoy JS 1.
This convoy departed Colombo on 3 February 1942 and arrived at Batavia, Netherlands East Indies on 14 February 1942.
This convoy was made up of the following ships; British transports; Adastrus (7905 GRT, built 1923), Alice Moller (4986 GRT, built 1914), Filleigh (4856 GRT, built 1928), Lulworth Hill (7628 GRT, built 1940), Modasa (9070 GRT, built 1921), Prominent (2232 GRT, built 1918) and Yoma (8131 GRT, built 1928).
Norwegian transports Hai Lee (3616 GRT, built 1934) and Hermion (5202 GRT, built 1937).
The Alice Moller had to return to Colombo with defects.
The convoy sailed from Colombo on 3 February 1942 and was escorted initially by the British heavy cruiser HMS Cornwall (Capt. P.C.W. Manwaring, RN) and the Australian minesweepers HMAS Bathurst (Lt.Cdr. A.V. Bunyan, RANR(S)) and HMAS Lismore (Lt.Cdr. S.H. Crawford, RANR(S)).
The Australian minesweepers parted company with the convoy on 5 February. HMS Cornwall was relieved by HMAS Hobart (Capt. H.L. Howden, CBE, RAN) around 1350GH/10 in position 05°40'S, 93°00'E.
Around 2000GH/11, the British heavy cruiser HMS Exeter (Capt. O.L. Gordon, MVO, RN) joined the escort and remained with it until 13 February.
Around 1100GH/12, the British destroyer HMS Electra (Cdr. C.W. May, RN) joined the convoy followed around 1500GH/12 by the Indian sloop HMIS Jumna (Cdr. W.R. Shewring, RIN).
At 1530GH/13, the convoy was split up and the Filleigh Lulworth Hill, Yoma, Hai Lee and Hermion arrived at Oosthaven, Sumatra. They were escorted by HMAS Hobart and HMIS Jumna. HMIS Jumna remained at Oosthaven to provide A/S protection for that port together with the Australian minesweepers HMAS Goulburn (Lt. B. Paul, RANR(S)) and HMAS Burnie (T/A/Lt.Cdr. G.E. Gough, RANR(S)).
The other ships of the convoy, the Adastrus, Modasa, and Prominent arrived at Batavia on 14 February 1942 escorted by HMS Electra.
HMAS Hobart later also went on to Batavia but while en-route she was ordered to return to Oosthaven. (53)
13 Feb 1942
HMS Cornwall (Capt. P.C.W. Manwaring, RN) arrived at Colombo from escort duty. (53)
14 Feb 1942
Convoy JS 2X.
This convoy departed Colombo on 14 February 1942 and arrived at Rangoon on 23 February 1942.
This convoy was made up of the troopships / transports; African Prince (British, 4653 GRT, built 1939), Ascanius (British, 10048 GRT, built 1910), Birchbank (British, 5151 GRT, built 1924), Mariso (Dutch, 7659 GRT, built 1930), Tingsang (British, 2256 GRT, built 1922) and Troja (Norwegian, 8814 GRT, built 1930).
The convoy was escorted by the British heavy cruiser HMS Cornwall (Capt. P.C.W. Manwaring, RN), the Australian destroyer HMAS Vampire (Cdr. W.T.A. Moran, RAN), the Indian sloop HMIS Hindustan (A/Cdr. I.B.W Heanly, RIN), the Australian minesweeper HMAS Lismore (Lt.Cdr. S.H. Crawford, RANR(S)) and the Indian auxiliary patrol vessel HMIS Ramdas (Lt. G.M. Hart, RINR).
The merchant vessel Tingsang was detached south-east of Ceylon to proceed to Madras escorted by HMIS Ramsdas.
HMAS Vampire, having been detached, returned to Colombo on 18 February.
HMS Cornwall returned to Colombo on 24 February.
The remainder of the convoy meanwhile had arrived at Rangoon on 23 February 1942. (53)
24 Feb 1942
HMS Cornwall (Capt. P.C.W. Manwaring, RN) arrived at Colombo from escort duty. (53)
28 Feb 1942
Convoy SU 1.
This convoy departed Colombo on 28 February 1942 and arrived at Fremantle on 15 March 1942.
This convoy was made up of the troopships / transports; City of London (British, 8956 GRT, built 1907), City of Paris (British, 10902 GRT, built 1922), Eastern Prince (British, 10926 GRT, built 1929), Egra (British, 5108 GRT, built 1911), Empire Glade (British, 7006 GRT, built 1941), Esperance Bay (British, 13837 GRT, built 1922), Gorgon (British, 3533 GRT, built 1933), Industria (British, 4850 GRT, built 1940), Kosciuszko (Polish, 6852 GRT, built 1915), Madras City (British, 5080 GRT, built 1940), Mathura (British, 8890 GRT, built 1920), Norden (Norwegian (tanker), 8440 GRT, built 1931), Penrith Castle (British, 6369 GRT, built 1929), Pundit (British, 5305 GRT, built 1919), Silverteak (British, 6770 GRT, built 1930), Silverwillow (British, 6373 GRT, built 1930) and Trevilley (British, 5296 GRT, built 1940).
The convoy was escorted by the British heavy cruiser HMS Cornwall (Capt. P.C.W. Manwaring, RN, the British destroyer HMS Express (Lt.Cdr. F.J. Cartwright, RN) and the British corvette HMS Hollyhock (Lt. T.E. Davies, OBE, RNR). On 1 March the battleship HMS Royal Sovereign (Capt. R.H. Portal, DSC, RN), armed merchant cruisers HMAS Manoora (A/Capt. A.H. Spurgeon, RAN) and the destroyers HMAS Nizam (Lt.Cdr. M.J. Clark, DSC, RAN) and HMAS Vampire (Cdr. W.T.A. Moran, RAN) joined in approximate position 05.00'N, 79.00'E coming from Trincomalee.
HMS Express and HMS Holyhock returned to Colombo on 3 March 1942. They most likely had parted company with the convoy when the ships coming from Trincomalee joined the convoy escort.
At 1800F/4, HMS Royal Sovereign, HMAS Nizam and HMAS Vampire parted company with the convoy to return to Trincomalee.
The convoy arrived at Fremantle on 15 March 1942 except for HMAS Manoora which was detached escorting the merchant vessels Empire Glade, Madras City, Mathura and Silver Widow to Adelaide where they arrived on 22 March 1942. (53)
18 Mar 1942
HMS Cornwall (Capt. P.C.W. Manwaring, RN) departed Fremantle for Colombo. (54)
27 Mar 1942
HMS Cornwall (Capt. P.C.W. Manwaring, RN) arrived at Colombo from Fremantle. (53)
29 Mar 1942
Operations by the Eastern Fleet from 29 March to 13 April 1942. Enemy air attacks on Colombo and later Trincomalee and the loss of HMS Dorsetshire and HMS Cornwall on 5 April 1942 and HMS Hermes, HMAS Vampire on 9 April 1942.
Dispositions of the Eastern Fleet on 29 March 1942.
On 29 March 1942 the disposition of the Eastern Fleet was as follows; At Colombo: Aircraft carrier HMS Formidable (Capt. A.W.LaT. Bisset, RN), heavy cruisers HMS Dorsetshire (Capt. A.W.S. Agar, VC, DSO, RN) (refitting) and HMS Cornwall (Capt. P.C.W. Manwaring, RN), light cruisers HMS Enterprise (Capt. J.C.A. Annesley, DSO, RN), HMS Dragon (Capt. R.J. Shaw, MBE, RN) and HMS Caledon (A/Capt. H.J. Haynes, DSO, DSC, RN), the destroyers HMS Paladin (Cdr. A.D. Pugsley, RN), HMS Panther (Lt.Cdr. R.W. Jocelyn, RN), HMAS Nestor (Cdr. A.S. Rosenthal, DSO and Bar, RAN), HMS Hotspur (Lt. T.D. Herrick, DSC, RN), HMS Arrow (Cdr. A.M. McKillop, RN) and HMS Express (Lt.Cdr. F.J. Cartwright, RN).
At Trincomalee: The flagship of the Eastern Fleet, the battleship HMS Warspite (Capt. F.E.P. Hutton, RN, flying the flag of Vice-Admiral J.F. Somerville, KCB, KBE, DSO, RN), the aircraft carrier HMS Hermes (Capt. R.F.J. Onslow, DSC, MVO, RN), light cruisers HMS Emerald (Capt. F.C. Flynn, RN) and HrMs Jacob van Heemskerck (Cdr. E.J. van Holte, RNN), the destroyer HMAS Vampire (Cdr. W.T.A. Moran, RAN). HMS Warspite departed Trincomalee this day and arrived at Colombo in the evening. HMS Hermes and HMAS Vampire also departed Trincomalee on the 29th.
At Addu Atoll; The battleships HMS Resolution (Capt. A.R. Halfhide, CBE, RN , flying the flag of A/Vice-Admiral A.U. Willis, DSO, RN, second in command Eastern Fleet), HMS Ramillies (Capt. D.N.C. Tufnell, DSC, RN), HMS Royal Sovereign (Capt. R.H. Portal, DSC, RN), HMS Revenge (Capt. L.V. Morgan, CBE, MVO, DSC, RN) the aircraft carrier HMS Indomitable (Capt. T.H. Troubridge, RN, flying the flag of Rear-Admiral D.W. Boyd, CBE, DSC, RN) and the destroyers HMAS Napier (Capt. S.H.T. Arliss, DSO, RN), HMAS Norman (Cdr. H.M. Burrell, RAN), HMAS Nizam (Lt.Cdr. M.J. Clark, DSC, RAN), HMS Fortune (Lt.Cdr. R.D.H.S. Pankhurst, RN), HMS Foxhound (Cdr. G.H. Peters, DSC, RN), HMS Griffin (Capt. H.St.L. Nicolson, DSO, RN), HMS Decoy (Lt.Cdr. G.I.M. Balfour, RN) and HrMs Isaac Sweers (Cdr. W. Harmsen, RNN).
The Japanese had been operating in the Indian Ocean in early March and more attacks were expected in this area by the Allies. The most likely target would be the island of Ceylon and the harbours of Colombo and Trincomalee.
30 and 31 March 1942.
Planning
Admiral Somerville therefore planned to concentrate the Eastern Fleet on the late afternoon / early evening of 31 March 1942 in position 04°40’N, 81°00’E. The fleet would then be divided in two groups; Force A (the fast division) was made up of the flagships, battleship HMS Warspite, both fleet carriers, HMS Indomitable and HMS Formidable. They were escorted by the cruisers HMS Cornwall, HMS Enterprise, HMS Emerald and six destroyers; HMAS Napier, HMAS Nestor, HMS Paladin, HMS Panther, HMS Hotspur and HMS Foxhound. This force would try to intercept the enemy and deliver a night air attack on the enemy with their carriers as the main target.
Force A would be covered by the slower Force B which was made up of the battleships HMS Resolution, HMS Ramillies, HMS Royal Sovereign and the light carrier HMS Hermes. Escort to these ships was proviced by the cruisers HMS Dragon, HMS Caledon, HrMs Jacob van Heemskerck and a total of eight destroyers HMS Griffin, HMS Decoy, HMAS Norman, HMS Fortune, HrMs Isaac Sweers, HMS Arrow and one of the old destroyers that had managed to escape from the China station also joined, this was HMS Scout (Lt.Cdr.(Retd.) H. Lambton, RN). They were to remain about 20 nautical miles to the west of Force A. If Force A encountered a superior enemy force the would withdraw towards Force B.
At 1400/30 the ships mentioned earlier at the top of this article departed Colombo. HMS Hotspur and HMAS Nestor carried out an A/S sweep of the searched channel before Force A sailed.
By 1600/31 the fleet had made the pre-arranged rendez-vous and formed up. It then proceeded northwards. After dark, to avoid detection from the air by the enemy, Force A altered course to 080° and proceeded at 15 knots until about 0230 hours when it was thought they would be in the estimated position from where the enemy would fly off their aircraft for the expected attack on Ceylon. If nothing was sighted or located by 0230/1, Force A was to turn back to the south-west and to withdraw outside the enemy’s air search area. Force B was to act as a supporting force for Force A, keeping 20 miles to the west of it and confirming to the movements of Force A through the night. This procedure was carried out as planned during the night of 31 March / 1 April but nothing was seen or located.
In the late afternoon / early evening of 31 March HMS Indomitable briefly separated from the fleet for flying operations during which she was escorted by HMS Emerald. From 2100/31 to 0600/1 a search was carried out, to a depth of 120 miles from 050° to 110°, by three A.S.V. fitted Albacores from HMS Formidable. Also two Albacores fitted with long-range tanks were kept standing by for shadowing purposes if required. One of the Albacores crash landed on HMS Formidable upon return at 0340/1.
1 April 1942.
At 0940 hours HMS Decoy reported the breakdown of her main feed pumps. She was detached to Colombo to effect repairs.
Around noon several of the destroyers reported submerged contacts. HMS Scout reported sighting a periscope. The fleet took avoiding action in each case, but nothing further transpired from these contact which are now considered to be non-sub.
At 1400 hours, HMS Scout, one of the oldest destroyers of the Royal Navy with a short enducance, was detached to oil at sea from RFA Appleleaf (5892 GRT, built 1917, Master E. Mills) in position 04°00’N, 80°00’E. Upon completion of oiling HMS Scout was to proceed to position 05°40’N, 81°08’E by 0800/2. RFA Appleleaf and her escort, HMS Shoreham (Cdr. E. Hewitt, RD, RNR), were to proceed towards a new waiting position 05°00’N, 80°30’E.
In the afternoon, around 1420 hours, HMS Dorsetshire joined Force A. This cruiser had been refitting at Colombo but this refit was cut short to enable her to take part in this operation. Air searches were carried out from Ceylon as the days before but they sighted nothing of the enemy. Also from 1430/1800 hours a search was carried out by aircraft from HMS Indomitable between 142° to 207° to a depth of 215 miles. Admiral Somerville decided to carry out the same sweep to the north-east as had been done the previous night. Again nothing was seen and Force A made rendez-vous with Force B at daybreak on 2 April 1942.
2 April 1942.
At 0800 hours the destroyers HMS Fortune and HMAS Vampire were detached to fuel from RFA Appleleaf in position 05°00’N, 80°30’E. and an Albacore was ordered to search for HMS Scout and order her to rejoin the fleet. Shortly after noon the fleet sighted RFA Appleleaf, HMS Shoreham, HMS Fortune and HMAS Vampire. The last two ships then rejoined the fleet while the tanker and it’s escort were ordered to proceed towards Colombo at 1200/3.
During the day the Eastern Fleet cruised in an area about 50 miles further to the west then the previous day to avoid being detected by enemy submarines that had been reported. Throughout the day several of the escorting destroyers obtained unconfirmed echoes. Two more destroyers fuelled during the afternoon, HMAS Napier and HMS Arrow took in fuel from HMS Dorsetshire and HMS Cornwall.
As the enemy had not shown herself by 2100 hours, Admiral Somerville decided to proceed to Addu Atoll to fuel and to take on fresh water as the R-class battleships were running out of this as they had been unable to top up at Addu Atoll before they sailed.
3 April 1942.
At 0520 hours, the destroyer HMS Fortune was detached to search for survivors from the merchant vessel Glensheil (9415 GRT, built 1924) that had been torpedoed by the Japanese submarine I-7 in position 00°48’S, 78°35’E at 0230 hours. HMS Fortune picked up 88 survivors and then proceeded to Addu Atoll where she arrived at 1130/4.
As at this time Admiral Somerville felt confident that something must have held up the Japanese or that their intentions were incorrectly appreciated. At 0940 hours, he sent HMS Dorsetshire and HMS Cornwall to Colombo. The former to continue her refit and the latter to act as escort for the Australian troop convoy SU 4. HMS Hermes and the destroyer HMAS Vampire were also detached but to Trincomalee as HMS Hermes was to prepare for the upcoming operation ‘Ironclad’, the attack on Madagascar. HMS Hermes and HMAS Vampire arrived at Trincomalee on the 4th.
Late in the morning three of the destroyers of the screen oiled from the battleships; HMAS Norman from HMS Warspite, HMS Griffin from HMS Revenge and HMS Foxhound from HMS Royal Sovereign.
At 1820 hours Force A proceeded ahead to Addu Atoll at 19 knots followed by Force B at 15 knots. Force A arrived at Addu Atoll at 1200/4. Force B at 1500/4.
4 April 1942.
In the early morning hours, and while approaching Addu Atoll, a simulated air strike was carried out on Force B by aircraft from HMS Indomitable and HMS Formidable. One aircraft crashed into the sea, it’s crew was picked up by the Dutch AA-cruiser Jacob van Heemskerck. A second simulated air attack was made on Force A later in the morning.
At 1630 hours, Admiral Somerville received a report that a large enemy force was in position 00°40’N, 83°10’E at 1605/F. Enemy course was 315°. Shortly afterwards this report was confirmed by another report in which they gave an enemy course of 330°. This positioned the enemy in a position 155° from Dondra Head, 360 miles, the distance from Addu Atoll being 085°, 600 miles. There was no indication about the composition of this force.
The condition of the Eastern Fleet at Addu Atoll at that time was as follows; Owning to the limited number of oilers available, the vessels comprising Force A had taken about half their fuel and Force B had not yet commenced fuelling. In addition the ‘R’-class battleships were very short of water which had to be taken in before they could sail. This meant that Force A could sail immediately, minus HMS Emerald and HMS Enterprise. These cruisers could sail shortly after midnight. Force B could not leave until 0700 hours the following morning at the earliest.
It appeared that the enemy’s probable plan was as follows. All the evidence supported Admiral Somerville’s original appreciation that the enemy would attack Colombo (and possibly Trincomalee) with carrier borne aircraft either before dawn or shortly afterwards and would return to the carriers in a position about 150 miles south-east of Ceylon. On completion the whole force would then withdraw to the east. The enemy’s reported position made it apparent that this attack was to be made on the morning of 5 April 1942.
Admiral Somerville considered his possible courses of action were as follows: 1) Force A, less HMS Emerald and HMS Enterprise to proceed immediately at best speed to the area to the south of Ceylon and to be joined there by HMS Dorsetshire and HMS Cornwall coming from Colombo and attack any enemy force located. 2) Delay the sailing of Force A until HMS Emerald and HMS Enterprise, valuable units with their strong torpedo armament, had completed refuelling and sail about midnight. Force B could sail in the morning of the 5th and follow astern to act as a supporting force. 3) Delay the sailing of Force A until both force could leave together on the morning of the 5th. 4) Force A and Force B would remain at Addu Atoll and leave the RAF to deal with the enemy attack.
The choise Admiral Somerville made was governed by the following considerations: 1) First and foremost the total defence of the Indian Ocean and it’s vital lines of communication depend on the existence of the Eastern Fleet. The longer this fleet remained ‘in being’ the longer it would limit and check the enemy’s advances against Ceylon and further west. This major policy of retaining ‘a fleet in being’, already approved by Their Lordships, was, in Admiral Somerville’s opinion, paramount. 2) The only hope of dealing the enemy an affective blow was by means of a carrier borne air striking force preferably at night. To operate both carriers escorted by HMS Warspite out of supporting distance of the ‘R’-class battleships would offer the enemy an opportunity to cripple our only offensive weapon. Admiral Somerville considered it a cardinal point in any operation the Force A should not proceed out of the supporting distance from Force B unless it could be presumed that that enemy capital ships would not be encountered. 3) No matter what course of action Admiral Somerville would take the enemy force could not be intercepted either before or during the attack on Ceylon on the morning of the 5th. The only hope was that the air striking force from Ceylon might inflict damage to the enemy so that the Eastern Fleet could ‘finish them off’, or that the enemy attack on Ceylon would be delayed 24 hours.
Admiral Somerville therefore decided to adopt ‘plan 2’. So he sailed Force A including both E-class cruisers at midnight and ordered Force B to proceed as early as possible the following morning.
Admiral Somerville therefore instructed HMS Dorsetshire and HMS Cornwall to sail from Colombo and to make rendez-vous with Force A at 1600/5 in position 00°58’N, 77°36’E. The position of this rendez-vous was based on their expected time of departure from Colombo and estimated as being the earliest possible time at which they could cross the track of Force A, taking into consideration that HMS Dorsetshire had resumed her refit and was at extended notice. Admiral Somerville considered that the course to be steered should take them well clear of any enemy forces operating in the vicinity. Actually these instructions had been anticipated by the Deputy Commander-in-Chief, Eastern Fleet and these two cruisers, at his discretion, sailed at 2300/4 for Addu Atoll. On receipt of the signal from Admiral Somerville the Deputy Commander-in-Chief amended his instructions accordingly at 0409/5.
5 April 1942.
Force A sailed from Addu Atoll at 0015 hours and proceeded 070° at 18 knots towards a position which would bring it 250 miles south of Ceylon by dawn on the 6th. Shortly before departure the destroyer HMS Hotspur conducted an A/S search of the entrance to Addu Atoll.
During the night Admiral Somerville received reports from the Catalina reconnaissance aircraft on patrol from Ceylon of an enemy destroyer in position 01°59’N, 82°20’E, course 315°, speed 20 knots; six enemy destroyers in position 02°54’N, 82°10’E, course 325°, speed 21 knots; and at 0701 hours a report of one battleship, two cruisers an four other ships in position 195°, Dondra Head, 110 miles. Later this message was subsequently amplified to the effect that the vessels previously reported were definitely hostile and consisted of two battleships, two cruisers and destroyers.
At about 0825 hours an air raid on shipping and harbour facilities at Colombo was commenced in which some 75 aircraft were taking part. These were later reported to be mainly Navy ‘O’ fighters, armed with one bomb each. This enemy force withdrew from Colombo before 0900 hours and was seen by several merchant ships to the south-west of Ceylon probably returning to the carriers. In several cases these merchant were machine gunned.
From 0645 hours an air A/S patrol was maintained ahead of the fleet. HMS Indomitable also sent four Fulmars to commence a search to the eastward. This search covered the area between the arcs 055° to 105° to a depth of 215 miles. It proved negative except for the sighting of an enemy seaplane at 0855 hours, 076°, 150 miles from Force A. This suggested that the enemy was carrying out reconnaissance in a south-westerly direction by means of cruiser aircraft, or a seaplane carrier, in a position 70 miles of the main enemy force. There was no indication that this aircraft sighted any of our surface forces or our air search.
Between 0702 and 1145 hours, Admiral Somerville received reports of battleships in approximate positions 03°55’N, 80°40’E, steering 290° at 0648 hours, steering 120° at 0730 hours, and at 1004 hours in position 04°00’N, 80°25’E steering 282°. This suggested that the battleships were making time while the carriers recovered their aircraft. The estimated position of HMS Dorsetshire and HMS Cornwall at this time was 150 miles from the enemy and opening.
At 1327 hours a mutilated ‘Shad’ signal was received from what was thought to be Colombo but was identified half an hour later as coming from HMS Dorsetshire whose position was estimated as being 037°, 90 miles from Force A at 1400 hours. No contact could be established.
At 1344 hours an enemy air formation was detected by RD/F, 030°, 84 miles from Force A. This had faded after five minutes and it later it became clear that this was the enemy attacking the Dorsetshire and Cornwall. At 1552 hours, a reconnaissance aircraft from Force A, reported wreckage in position 02°08’N, 78°08’E.
The destroyer HMS Panther was then detached to search but was recalled about one hour later when a reconnaissance aircraft from Force A reported a force of 5 ‘unknown’ ships in position 03°38’N, 78°18’E at 100 hours. There was no indication of the course or speed of the enemy but it could be either a force previously unreported or the force previously and last reported 1004 hours.
No relief shadowers were however sent off by the Rear-Admiral aircraft carriers as soon s the report was received and Admiral Somerville omitted to obtain confirmation that this had been done. At 1700 hours, Admiral Somerville, received a report from Ceylon that there were indications of enemy aircraft carriers steering 230° at 24 knots from an unknown position at 1400 hours. This was thought to be subsequent to the attack on our 8” cruisers and Admiral Somerville’s deductions from this enemy moves were as follows. If the enemy held on this course they would at 0400 be in a position to deliver a night attack on Addu Atoll. This seemed quite a possible course of action. In any case it was necessary for Force A to keep clear to the southward and for Force B (estimated to be 135 miles astern of Force A) to steer to the southward so that Force A and B could close for supporting action at daylight the following morning (April 6th). It was also necessary for Force B to steer to the southward to keep clear of the enemy carrier force should it be proceeding to attack Addu Atoll.
At 1726 hours, therefore, Force A altered course to 210° at 18 knots and a signal was made to Vice-Admiral second-in-Command and to HMS Dorsetshire to steer south, although at this time Admiral Somerville feared about the fate of the two heavy cruisers. As he had received no signal from them that they had been attacked he thought it possible they had escaped and maintained W/T silence.
At 1800 hours Admiral Somerville received a signal from the Rear-Admiral Aircraft Carriers, stating that a reconnaissance aircraft reported the estimated enemy position as 020°, 120 miles at 1710 hours. This position was very close to the previous position reported at 1600 hours. The course of the enemy had not been given in either of these reports but the positions fitted in well with the course received earlier (230°).
At 1817 hours, a further signal was received from the Rear-Admiral Aircraft Carriers, adjusting the 1600 hours position of the enemy’s force, amplifying it to include two carriers and three unknown vessels and giving the course north-west. This was the first indication Admiral Somerville had of the enemy now proceeding to the north-west. He immediately ordered force A to alter course to 315° and instructed the Vice-Admiral, second-in-Command to conform. These movements had to object of keeping Force A within night air striking distance of the enemy force, trusting to an A.S.V. (airborne surface vessel radar) search to locate the enemy and to bring Force B within supporting distance should it be necessary to retire in that direction. A dawn rendez-vous was arranged with Force B in approximate position 03°00’N, 75°00’E.
As no news had been received of HMS Dorsetshire and HMS Cornwall it was assumed they had been sunk.
At 1930 hours a night search with A.S.V. aircraft was commenced to cover the sector 345° to 030° to a depth of 180 nautical miles. Northing was located on this search.
6 April 1942.
From 2100/5 to 0600/6 further A.S.V. searches were carried out to cover the sector 020° to 080° to a depth of 200 miles. These searches also failed to make any contact with the enemy but reported that Force B was 220°, 25 miles from Force A at 0400 hours.
At 0615 hours, Force A altered course to 135° and sighted Force B ten minutes later. By 0720 hours the Fleet was formed up and course was altered to 090°.
Whilst no furher information had been received regarding the enemy’s movements nothing had occurred to diminish the possibility of the enemy’s being in the vicinity of Addu Atoll, either to attack it by air this morning or to await the return of the Eastern Fleet.
Admiral Somerville intended to keep clear of the superior enemy forces by day. It was still his intention to get into a position to attack them with a night air striking force on their possible return from at Addu Atoll area, and also rescue the possible survivors from HMS Dorsetshire and HMS Cornwall. He therefore steered east and at 1115 hours course was altered to south-east in the direction of the wreckage that had been reported the previous evening. During the morning reports came in from merchant ships being attacked in the Bay of Bengal. There must be a second Japanese force operating there.
At 1300 hours HMS Enterprise, HMS Paladin and HMS Panther were detached to search for survivors in the vicinity of the wreckage position. Air search was provided to assist and fighter escort was sent to cover the operation. These ships were successful in picking up a total of 1122 survivors from both heavy cruisers. They rejoined the fleet at noon the following day. At 1800/6, when about 50 miles from the wreckage position course was reversed and the fleet retired to the north-west. All-round air searches were carried out to a depth of 200 miles but again nothing was seen.
At about 1400 hours a signal was received from the C-in-C, Ceylon estimating that a strong Japanese force was still somewhere between Addu Atoll and Colombo. Admiral Somerville therefore decided to keep clear of the Addu area until daylight on the 7th.
7 April 1942.
At 0200 hours the Eastern Fleet altered course to the west, 270°.
At 0427 hours, an A.S.V. aircraft located two submarines in position 02°08’N, 75°16’E and 02°46’N, 75°10’E, to the southward of the course of the Eastern Fleet. This indicated that the possibility of an enemy submarine patrol having been established to cover the eastern approaches to Addu Atoll. Admiral Somerville therefore decided to pass through Veimandu Channel to the west of the Maldives and make an unexpected approach to Addu Atoll from the west. At 0700 hours the course of the fleet was altered to 210°.
At 1335 hours, HMS Fortune was detached to investigate a ship contact made by HMS Emerald but no ship was sighted. Fortune only rejoined the fleet at about 0600/8.
At 1600 hours, HMS Enterprise, HMS Paladin and HMS Panther rejoined with the survivors they had picked up and medical stores were transferred from HMS Warspite to HMS Paladin for treatment of the wounded. Enterprise and Paladin were then detached to proceed immediately to Addu Atoll.
At 2100 hours, the Eastern Fleet altered course to 160°.
8 April 1942.
At 0700 hours aircraft were flown off from the carriers to carry out an all-round search to a depth of 175 miles. Again nothing was seen and at 1100 hours the Eastern Fleet entered Addu Atoll. Refuelling commenced immediately, Force B being refuelled first.
Admiral Somerville held a conference on board HMS Warspite with Flag and Commanding Officers in the afternoon.
Having discussed the situation Admiral Somerville decided to sent Force B to Kilindini and to proceed to Bombay with Force A. This later decision coincided with Their Lordships views as later in the day he received Their Lordships instructions that Force A was not to be sent to Colombo for the time being. Further by proceeding to Bombay the could arrange a meeting with the Commander-in-Chief, India and discuss the situation in the Far East with him.
At 1800 hours HMAS Nestor departed Addu Atoll to maintain an A/S patrol in the sector between 090° to 150° to a depth of 35 miles from the Port War Signal Station. One hour earlier HMS Resolution launched her Walrus aircraft for a ‘round the island’ A/S patrol. It returned at dusk.
9 April 1942.
Force B (less HMS Dragon sailed for Kilindini at 0200 hours where it was due to arrive on April 15th. Force A sailed at 0600 hours for Bombay shaping course to pass to the westward of the Maldives.
During the morning Admiral Somerville was informed of further Japanese attacks in the Bay of Bengal and on Trincomalee and the sinking of several ships, including HMS Hermes and HMAS Vampire but nothing could be done about this.
10 April 1942.
At 1000 hours HMS Paladin closed HMS Warspite to transfer Staff Officers for passage to Colombo where they were to inform the Deputy Commander-in-Chief, Eastern Fleet of Admiral Somerville’s views and make preliminary arrangements to transfer Admiral Somerville’s administrative staff and secretariat to Kilindini.
11 April 1942.
At 0705 hours, HMS Paladin rejoined Force A bringing back the Staff Officers who had been transferred to her on 10 April and also Rear-Admiral Danckwerts, Admiral Somerville’s Chief of Staff ashore.
Force A arrived at Bombay in the morning of the 13th (1040 hours) and commenced oiling.
Japanese operation in the Indian Ocean in late March 1942 and April 1942.
On 26 March 1942, the 1st Japanese Carrier Fleet departed Staring Bay, Celebes, Netherlands East Indies for a raid on Ceylon. This Fleet was made up of the aircraft carriers Akagi, Hiryu, Soryu, Zuikaku, Shokaku, battlecruisers Kongo, Haruna, Hiei, Kirishima, heavy cruisers Tone, Chikuma and the destroyers Urakaze, Tanikaze, Isokaze, Hamakaze, Kasumi, Arare, Kagero, Shiranuhi and Akigumo. This force then proceeded west of Timor and to a position to the south of Java where they fuelled from oilers on April 1st.
On 27 March the Japanese submarines I-2, I-3, I-4, I-5, I-6 and I-7 departed Penang to take up positions in the Indian Ocean for the upcoming operation.
On 1 April the Japanese Mayala Force departed Mergui for operations in the Bay of Bengal. This force was made up of the heavy cruisers Chokai, Kumano, Mikuma, Mogami, Suzuya, aircraft carrier Ryujo, light cruiser Yura, and the destroyers Fubuki, Shirayuki, Hatsuyuki and Murakumo. On 4 April the estroyers were substituted for four other destroyers; Amagiri, Asagiri, Shirakumo and Yugiri.
On 5 April the Japanse 1st Carrier Fleet launched their air attack on Colombo. 53 bombers, 38 dive bombers and 36 fighters were launched. They destroyed 19 Hurricane fighters, 1 Fulmar fighter and 6 Swordfish torpedo bombers. At Colombo the harbour facilities were heavily damaged and the armed merchant cruiser HMS Hector and destroyer HMS Tenedos were sunk.
Then around noon a reconnaissance aircraft from the Tone sighted the heavy cruisers HMS Dorsetshire and HMS Cornwall. The 1st Carrier Fleet immediately launched an attack force of 53 dive bombers that sank both cruisers with the loss of 424 members of their crews (Dorsetshire 234 and Cornwall 190). The Japanese then retired to the south-east.
In the evening of 5 April the Japanese Malaya-Force was ordered to commence attacking Allied shipping along the Indian east coast. On 6 April the northern group (Kumano, Suzuya and Shirakumo destroyed 9 ships off Puri (Orissa). The central group (Chokai, Yura, Asagiri and Yugiri) sank 4 ships. The southern group (Mikuma, Mogami and Amagiri sank 3 ships and damaged 2 more. Meanwhile aircraft from the carrier Ryuju, which operated with the central group, sank 4 more ships and damaged 1 more. In all about 92000 GRT of shipping was sunk.
On 8 April 1942 a Catalina aircraft spotted the Japanese 1st Carrier Fleet proceeding for an attack on Trincomalee but the Eastern Fleet was approaching Addu Atoll to refuel and could do nothing. Shipping at Trincomalee was ordered to leave port and proceed to the southward. In the morning of the following day 91 Japanese bombers and 41 fighters attacked Trincomalee. They destoyed 9 Hurricane and Fulmar fighters and 14 aircraft on the ground. The harbour most mostly empty but they sank a merchant vessel and 4 aircraft it had on board and not unloaded yet. Also the British monitor HMS Erebus (Capt. H.F. Nalder, RN) was damged. The Japanese 1st Carrier Fleet was then attacked by 9 Blenheim bombers but they inflicted no damage for 5 of their own lost to Japanese fighter cover. Then Japanese reconnaissance aircraft from the Haruna sighted ships escaping southwards. 85 Dive bombers and 3 fighters were then launched which sank HMS Hermes and HMAS Vampire as well as the corvette HMS Hollyhock (Lt.Cdr. T.E. Davies, OBE, RNR), two tankers and a merchant ship.
By mid-April 1942 all Japanese forces had returned to their bases. (55)
3 Apr 1942
In the morning, HMS Dorsetshire (Capt. A.W.S. Agar, VC, DSO, RN) and HMS Cornwall (Capt. P.C.W. Manwaring, RN), parted company with Force A and proceeded towards Colombo. (55)
4 Apr 1942
At 1000/F, HMS Dorsetshire (Capt. A.W.S. Agar, VC, DSO, RN) and HMS Cornwall (Capt. P.C.W. Manwaring, RN) arrived at Colombo. HMS Cornwall was to be used for upcoming escort duties, HMS Dorsetshire continued her refit. She had three major engine room defects. It was very desirable, although not essential, to correct these. She was therefore ordered to be on long notice to have these defects corrected.
However soon after the arrival of the heavy cruisers a Catalina reconnaissance aircraft reported an enemy force. Nothing further was heard of this aircraft and it was thought to have been shot down before further reports could be sent. As a Japanese air attack on Colombo was now expected for the following morning. It was then decided to sent the cruisers back to sea where they were to join Force A again.
Both cruisers then departed Colombo in company at 1600/F. The next morning, at 0657 hours on the 5th, HMS Dorsetshire reported that they were being shadowed by an enemy reconnaissance aircraft. A large Japanese air group then sank both cruisers before they could join Force A. (53)
Sources
- ADM 53/108097
- ADM 53/108098
- ADM 199/374 + ADM 53/108098
- ADM 199/382
- ADM 53/108098 + ADM 199/382
- ADM 53/10899 + ADM 199/382
- ADM 186/794
- ADM 53/108099 + ADM 199/382
- ADM 53/108099
- ADM 53/108349
- ADM 53/108100 + ADM 53/108349 + ADM 53/108443 + Report of proceedings of HMAS Waterhen for November 1939
- ADM 53/108350
- ADM 53/108101
- ADM 53/108101 + ADM 199/382
- ADM 53/111854
- ADM 199/380
- ADM 53/111855
- ADM 53/111858
- ADM 53/112035
- ADM 53/111859 + ADM 199/380
- ADM 53/111860 + ADM 199/381
- ADM 53/111860
- ADM 53/111861
- ADM 199/1136 (+ ADM 199/381)
- ADM 234/318
- ADM 53/111862
- ADM 53/111862 + ADM 199/382
- ADM 53/111863
- ADM 199/388
- ADM 53/111863 + ADM 53/112053
- ADM 199/1136
- ADM 53/111865
- ADM 53/113977
- ADM 53/113978
- ADM 53/113979
- ADM 53/113980
- ADM 53/114441 + ADM 199/408
- ADM 199/408
- ADM 234/324
- ADM 53/113981
- ADM 53/113982 + ADM 199/408
- ADM 53/113983 + ADM 199/408
- ADM 53/113984
- ADM 53/113985
- ADM 53/113985 + ADM 199/408
- ADM 53/113986
- ADM 53/113987
- ADM 53/113987 + ADM 199/408
- ADM 53/113988 + ADM 199/408
- ADM 53/113988
- ADM 53/115669
- ADM 53/115669 + ADM 199/426
- ADM 199/426
- ADM 199/2551
- ADM 199/1389
ADM numbers indicate documents at the British National Archives at Kew, London.