
Allied Warships
HMS Dorsetshire (40)
Heavy cruiser of the Dorsetshire class
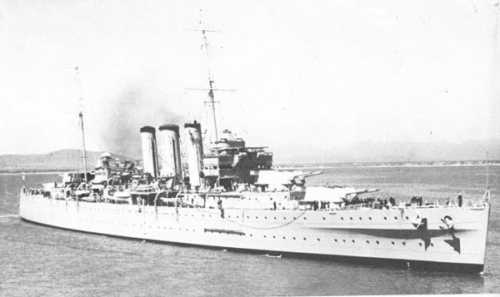
HMS Dorsetshire at Aden in 1939
| Navy | The Royal Navy |
| Type | Heavy cruiser |
| Class | Dorsetshire |
| Pennant | 40 |
| Built by | Portsmouth Dockyard (Porstsmouth, U.K.): Cammell Laird Shipyard (Birkenhead, U.K.) |
| Ordered | 3 Dec 1926 |
| Laid down | 21 Sep 1927 |
| Launched | 29 Jan 1929 |
| Commissioned | 30 Sep 1930 |
| Lost | 5 Apr 1942 |
| Loss position | 1° 54'N, 77° 45'E |
| History | On 5 April 1942, a Japanese reconnaissance aircraft sighted two British heavy cruisers. A total of 53 dive bombers from the carriers took off and sank the two ships.
HMS Dorsetshire (Capt. Augustus Willington Shelton Agar, VC, DSO, RN) was sunk in position 01º54'N, 77º45'E in about 8 minutes by 10 hits from 250 - 550 pound bombs, and several near misses. The HA magazine exploded, which doubtless counted in part for her rapid sinking. 1122 men from a total of 1546 on board both heavy cruisers were later rescued by the cruiser HMS Enterprise and the British destroyers HMS Paladin and HMS Panther. |
Commands listed for HMS Dorsetshire (40)
Please note that we're still working on this section
and that we only list Commanding Officers for the duration of the Second World War.
| Commander | From | To | |
| 1 | Capt. Benjamin Charles Stanley Martin, RN | 31 Jul 1939 | 8 Aug 1941 |
| 2 | Capt. Augustus Willington Shelton Agar, VC, DSO, RN | 18 Aug 1941 | 5 Apr 1942 |
You can help improve our commands section
Click here to Submit events/comments/updates for this vessel.
Please use this if you spot mistakes or want to improve this ships page.
Notable events involving Dorsetshire include:
The page for this heavy cruiser was last updated in March 2018.
2 Sep 1939
For the daily positions of HMS Dorsetshire during the period of 2 to 18 September 1939 see the map below.
(1)
2 Sep 1939
At the start of the Second World War, HMS Dorsetshire (Capt. B.C.S. Martin, RN) was part of the 5th Cruiser Squadron of the China Fleet with HMS Cornwall (Capt. C.F. Hammill, RN, flying the flag of Rear-Admiral A.J.L. Murray, DSO, OBE, RN), HMS Kent (Capt. L.H. Ashmore, RN) and HMS Birmingham (Capt. E.J.P. Brind, RN).
On 2 September 1939, HMS Dorsetshire departed Shanghai to patrol in the Yellow Sea. (1)
5 Sep 1939
HMS Dorsetshire (Capt. B.C.S. Martin, RN) was ordered to proceed southwards to patrol the Yangtse approaches. (2)
7 Sep 1939
HMS Dorsetshire (Capt. B.C.S. Martin, RN) arrived at Woosung (Shanghai). (1)
9 Sep 1939
HMS Dorsetshire (Capt. B.C.S. Martin, RN) departed Woosung to patrol south of Japan to search for German merchant shipping. (1)
16 Sep 1939
HMS Dorsetshire (Capt. B.C.S. Martin, RN) departed the area to the south of Japan for Hong Kong after being relieved by HMS Kent (Capt. D. Young-Jamieson, RN). (3)
18 Sep 1939
HMS Dorsetshire (Capt. B.C.S. Martin, RN) arrived at Hong Kong. (1)
22 Sep 1939
HMS Dorsetshire (Capt. B.C.S. Martin, RN) departed Hong Kong to patrol south of Japan.
For the daily positions of HMS Dorsetshire during the period of 22 September to 13 October 1939 see the map below.
(4)
25 Sep 1939
HMS Dorsetshire (Capt. B.C.S. Martin, RN) arrived in the area south of Japan relieving HMS Kent (Capt. D. Young-Jamieson, RN) which then set course to return to Hong Kong. (3)
28 Sep 1939
HMS Dorsetshire (Capt. B.C.S. Martin, RN) is ordered to patrol in the Tsushima Strait together with HMS Bideford (Cdr. R.F. Elkins, RN). (2)
1 Oct 1939
1 October 1939, an enemy raider reported in the South Atlantic and Indian Ocean. The chase of the German ‘pocket battleship’ Admiral Graf Spee
Movements of the German ‘pocket battleship’ Admiral Graf Spee 21 August 1939 – 13 December 1939.
Before the Second World War had started, on 21 August 1939, the German ‘pocked battleship’ Admiral Graf Spee departed Wilhelmshaven bound for the South Atlantic. On 1 September the Admiral Graf Spee was off the Canary Islands where she made rendes-vous with the supply ship Altmark and supplies were transferred.
On 11 September another rendes-vous was made with the Altmark in the South Atlantic. The Admiral Graf Spee had launched her Arado floatplane to scout in the area as supplies were transferred. The aircraft spotted the British heavy cruiser HMS Cumberland (Capt. W.H.G. Fallowfield, RN). The German ships then immediately parted company and cleared the area at high speed. Two days later, on the 13th, the ships again met and fueling was completed. The Admiral Graf Spee was still under orders to remain unseen.
On 20 September 1939 the Admiral Graf Spee and Altmark met again to fuel. On the 26th the Admiral Graf Spee was ordered to start raiding the British trade lanes. She then proceeded towards the Pernambuco area.
On 30 September 1939 the Admiral Graf Spee found her first victim, the British merchant vessel Clement (5050 GRT, built 1934) that was en-route from New York, U.S.A. to Bahia, Brasil. She then sank the ship in position 09°05’S, 34°05’W. The Admiral Graf Spee then proceeded eastwards and found three more victims between 5 and 10 October. On the 5th she captured the British merchant Newton Beech (4644 GRT, built 1925) in position 09°35’S, 06°30’W. This ship was en-route from Capetown to the U.K. via Freetown. On the 7th she sank the British merchant Ashlea (4222 GRT, built 1929) in position 09°52’S, 03°28’W. This ship was en-route from Durban to Falmouth. The crew of the Ashlea was transferred to the Newton Beech. The next day both crew were transferred to the Admiral Graf Spee and the Newton Beech was scuttled. On 10 October the Admiral Graf Spee captured the British merchant Huntsman (8196 GRT, built 1921) in position 08°30’S, 05°15’W. This ship was en-route from Calcutta to the U.K. On 15 October 1939 the Admiral Graf Spee met the Altmark again to receive supplies and fuel. On the 17th the crew of the Huntsman was transferred to the Altmark and the ship was scuttled in approximate position 16°S, 17°W. The next day the crews of the Newton Beech and Ashlea were also transferred to the Altmark and the German ships then parted company.
On 22 October 1939, the Admiral Graf Spee sank her next victim, the British merchant Trevanion (5299 GRT, built 1937) which was en-route from Port Pirie (Australia) to Swansea. This ship was sunk in position 19°40’S, 04°02’E. On 28 October 1939, near Tristan da Cunha, the Admiral Graf Spee once more refuelled from the Altmark. The Admiral Graf Spee then set course for the Indian Ocean.
On 15 November 1939 she sank the small British tanker Africa Shell (706 GRT, built 1939) in position 24°45’S, 35°00’E. This ship was in ballast and en-route from Quelimane (Portugese East Africa now called Mozambique) to Lourenco Marques (now Maputo, also in Portugese East Africa / Mozambique). Next day the Admiral Graf Spee stopped the Dutch merchant Mapia (7188 GRT, built 1923) but had to let her go as she was a neutral ship. The Admiral Graf Spee then set course to return to the South Atlantic where she met once more with the Altmark on 27 November 1939 and the next day she fuelled from her about 300 miles from Tristan da Cunha.
On 2 December 1939, the Admiral Graf Spee sank her largest victim, the British merchant Doric Star (10086 GRT, built 1921),in position 19°15’S, 05°05’E. This ship was en-route from Auckland, New Zealand to the U.K. The next morning the Admiral Graf Spee sank the British merchant Tairoa (7983 GRT, built 1920) in position 19°40’S, 04°02’E. This ship was en-route from Brisbane, Australia to London. On 6 December 1939 the Admiral Graf Spee refuelled once more from the Altmark. She then set course to the River Plate area where the British merchant traffic was the thickest. She was to sink more ships there and disrupt British shipping movements in that area before returning to Germany.
On 7 December 1939 the Admiral Graf Spee sank what was to be her last victim, the British merchant Streonshalh (3895 GRT, built 1928) in position 25°01’S, 27°50’W. This ship was en-route from Montevideo to Freetown and then onwards to the U.K.
Then in the morning of 13 December 1939, her smoke was sighted by three cruisers from the South America Division. More on this in the article ‘The Battle of the River Plate, 13 December 1939’.
British Dispositions in the South Atlantic / South America area
Shortly before the outbreak of the war the South America Division of the America and West Indies Station was transferred to the newly formed South Atlantic Station. The South America Division at that moment consisted of the heavy cruiser HMS Exeter (Capt. F.S. Bell, RN, flying the flag of Commodore H.H. Harwood, OBE, RN) and the light cruiser HMS Ajax (Capt. C.H.L. Woodhouse, RN). In late August 1939 HMS Exeter was at Devonport with her crew on foreign leave when she was recalled to South American waters. On 25 August 1939 she sailed from Devonport. HMS Exeter arrived at Freetown on 1 September 1939. Commodore Harwood then met the Commander-in-Chief South Atlantic Station, Vice-Admiral G. D’Oyly Lyon, CB, RN. Later the same day HMS Exeter sailed for Rio de Janeiro.
Meanwhile four destroyers from the 4th Destroyer Division, Mediterranean Fleet, the HMS Hotspur (Cdr. H.F.H. Layman, RN), HMS Havock (Lt.Cdr. R.E. Courage, RN), HMS Hyperion (Cdr. H.St.L. Nicholson, RN) and HMS Hunter (Lt.Cdr. L. de Villiers, RN) had left Gibraltar on 31 August 1939 for Freetown.
HMS Ajax was already on station off the coast of South America. Shortly after noon on 3 September she intercepted the German merchant vessel Olinda (4576 GRT, built 1927) in position 34°58’S, 53°32’W. This ship was en-route from Montivideo to Germany. As HMS Ajax had no prize crew available the ship was sunk by gunfire a few hours later. In the afternoon of the next day, the 4th, HMS Ajax intercepted another German ship, the Carl Fritzen (6594 GRT, built 1920) in position 33°22’S, 48°50’W. This ship was en-route from Rotterdam to Buenos Aires. This ship was also sunk with gunfire.
On 5 September two of the destroyers from the 4th Destroyer Division, HMS Hotspur and HMS Havock departed Freetown to join the South America Division. They were ordered to examine Trinidade Island on the way. On 8 September 1939 the heavy cruiser HMS Cumberland (Capt. W.H.G. Fallowfield, RN) departed Freetown to join the South America Division as well. This cruiser came from the Home Fleet and had arrived at Freetown on the 7th.
On 7 September 1939, HMS Exeter entered Rio de Janeiro where Commodore Harwood had a meeting with the Brazilian Secretary-General of Foreign Affairs and H.M. Ambassadors to Brazil and Argentine. HMS Exeter departed Rio de Janeiro the next day. Later that day Commodore Harwood was informed by the Admiralty that the German merchant ships General Artigas (11343 GRT, built 1923), Gloria (5896 GRT, built 1917) and Monte Pascoal (13870 GRT, built 1931) were assembling off the Patagonian coast. He decided to move both HMS Exeter and HMS Ajax south, and ordered the Ajax to meet him at 0800/9. They actually made rendezvous at 0700 hours. The Commodore considered it possible that the German merchant ships might embark German reservists and raid the Falkland Islands therefore he decided to sent HMS Ajax there. HMS Exeter proceeded to the Plate area to cover that important area.
On the evening of the 10th, Commodore Harwood was informed that the transportation of German reservists by the three German merchant ships was very unlikely but as it appeared probable that the German ships were converting themselves into armed raiders the Commodore decided to start short distance convoys from the Santos-Rio and Plate areas. He therefore ordered HMS Cumberland to refuel at Rio de Janeiro on her arrival there and to organize and run ‘out’ convoys in that area with HMS Havock as A/S escort. The convoys were to leave at dawn and be protected against submarines and surface raiders until dusk. The ships were then to be dispersed so that they would be far apart by dawn the next day. At the same time the Commodore ordered HMS Hotspur to join him in the Plate area after refuelling at Rio de Janeiro, so that similar convoys could be started from Montevideo. If one of the German ‘pocket battleships’ was to arrive of South America, HMS Cumberland was to abandon the convoy sheme and join HMS Exeter in the Plate area. Also on the 10th, Commodore Harwood was informed by the Admiralty that the German merchant Montevideo (6075 GRT, built 1936) was leaving Rio Grande do Sul for Florianopolis but decided not to intercept her as this would divert HMS Exeter 500 nautical miles from the Plate area.
On the night of 12 September 1939 the Commodore was informed by the British Naval Attaché, Buenos Aires, that a concentration of German reservists was taking place in southern Argentina with the Falklands as a possible objective. He therefore ordered HMS Ajax to remain in the Falklands till the situation cleared, and the Commodore then proceeded south of the Plate area to be closer to the Falklands himself and yet remain in easy reach of the Plate area. During the next few days HMS Exeter intercepted several British and neutral vessels.
In view of a report that the German merchant vessels Porto Alegré (6105 GRT, built 1936) and Monte Olivia (13750 GRT, built 1925) were leaving Santos on 15 September 1939 Commodore Harwood decided to start the short distance convoys from Montevideo as soon as possible. HMS Cumberland had meanwhile arranged a twelve-hour convoy system from Santos. Ships from Rio de Janeiro for Freetown would sail at dawn on odd numbered days, and ships for the south on even numbered days with HMS Havock as anti-submarine escort and HMS Cumberland in distant support. HMS Cumberland left Rio de Janeiro on 16 September and during the next eight days sighted 15 British and neutral ships while on patrol.
On 17 September 1939, HMS Hotspur joined HMS Exeter in the Plate area. HMS Exeter then made a visit to Montevideo and resumed her patrol off the Plate area on the 20th. Fuelling was done from the oiler RFA Olwen (6470 GRT, built 1917, Master B. Tunnard) in the mouth of the River Plate. Soon after leaving Montevideo on 20 September Commodore Harwood learned from the British Naval Attaché, Buenos Aires, that the local German authorities were endeavoring to inform German ships at sea that the British merchant Lafonia (1872 GRT, built 1911) was on her way to the Falklands with British reservists for the Falkland Islands defence force. It was also reported that on 17 September an unknown warship had passed Punta Arenas eastwards. In view of these reports and of other pointing out that German merchant ships in southern waters were being outfitted as armed raiders the Commodore ordered HMS Hotsput to escort the Laofona to Port Stanley. As the volume of trade in the Plate area was greater than in the Rio de Janeiro – Santos area, HMS Havock was ordered to proceed southwards to the Plate area.
The first local convoy outward from Montevideo sailed on 22 September 1939. It consisted of the British merchant ships Sussex (11062 GRT, built 1937), Roxby (4252 GRT, built 1923), El Ciervo (5841 GRT, built 1923) in addition to the earlier mentioned Lafonia, and was escorted by HMS Hotspur. HMS Exeter met this convoy during the forenoon and covered it throughout the day. At dusk the merchant ships were dispersed on prearranged courses while HMS Exeter remained within supporting distance and HMS Hotspur escorted the Lafonia to Port Stanley.
On 24 September 1939, Vice-Admiral Lyon (C-in-C, South Atlantic) and Commodore Harwood learned from the Naval Attaché, Buenos Aires, that ‘according to a reliable source’ arrangements had been made for a number of German ships and a submarine to meet near Ascension on 28 September 1939. HMS Cumberland was ordered to proceed there and HMS Ajax was ordered to leave the Falklands and take up her place in the Rio de Janeiro area. HMS Neptune (Capt. J.A.V. Morse, DSO, RN) was also ordered to proceed to the area off Ascension with the destroyers HMS Hyperion and HMS Hunter which departed Freetown on the 25th. No German ships were however encountered off Ascension and all ships then proceeded to Freetown where they arrived on 2 October 1939 with HMS Cumberland low on fuel.
While HMS Cumberland left the station to search for the German ships, HMS Exeter and HMS Ajax were sweeping of the Plate and Rio de Janeiro – Santos area respectively. On 27 September 1939, HMS Havock escorted a convoy made up of the British merchants Miguel de Larrinaga (5231 GRT, built 1924), Pilar de Larringa (7352 GRT, built 1918) and Sarthe (5271 GRT, built 1920) out of the Plate area. The next day another convoy, made up of the British merchants Adellen (7984 GRT, built 1930), Cressdene (4270 GRT, built 1936), Holmbury (4566 GRT, built 1925), Lord Byron (4118 GRT, built 1934), Ramillies (4553 GRT, built 1927) and Waynegate (4260 GRT, built 1931) left the Plate area escorted by HMS Havock and with cover from HMS Exeter.
At daylight on 29 September 1939 HMS Ajax was off Rio de Janeiro ready to escort ships sailing northward. She sighted none until the early afternoon when she met the Almeda Star (12848 GRT, built 1926) and a few hours later the tanker San Ubaldo (5999 GRT, built 1921). That night several neutral steamers were sighted off Rio de Janeiro and the next day the British La Pampa (4149 GRT, built 1938) was met and escorted during daylight on her way to Santos. So far on the work of the South American Division during September 1939. The ships assigned to Commodore Harwood had been busy patrolling and escorting ships near the focal areas.
A surface raider reported, 1 October 1939.
When a report that the British merchant Clement had been sunk on 30 September 1939 by a surface raider off Pernambuco was received by the Admiralty in the afternoon of October 1st, the C-in-C, South Atlantic was informed that he should retain the 4th Destroyer Division and that his command would be reinforced by the cruisers HMS Norfolk (Capt. A.G.B. Wilson, DSO, RN), HMS Capetown (Capt. T.H. Back, RN), HMS Effingham (Capt. J.M. Howson, RN), HMS Emerald (Capt. A.W.S. Agar, VC, DSO, RN) and HMS Enterprise (Capt. H.J. Egerton, RN). Also the battleships HMS Resolution (Capt. C.H. Knox-Little, RN), HMS Revenge (Capt. E.R. Archer, RN) and the aircraft carrier HMS Hermes (Capt. F.E.P. Hutton, RN) were to proceed to either Jamaica or Freetown. These dispositions however never materialised being superseded on 5 October 1939 by a more general policy (the institution of hunting groups) which cancelled them.
The institution of hunting groups, 5 October 1939.
On 5 October 1939 the Admiralty formed five hunting groups in the Atlantic and Indian Ocean of sufficient strength to destroy any ‘pocket battleship’ or Hipper-class cruiser. These were; Force F; area: North America and West Indies. HMS Berwick (Capt. I.M. Palmer, DSC, RN), HMS York (Capt. R.H. Portal, DSC, RN), Force G; area: S.E. coast of South America. HMS Cumberland, HMS Exeter Force H; area: Cape of Good Hope, South Africa. HMS Sussex (Capt. A.R. Hammick, RN), HMS Shropshire (Capt. A.W.LaT. Bisset, RN), Force I; area: Ceylon. HMS Cornwall (Capt. C.F. Hamill, RN), HMS Dorsetshire (Capt. B.S.C. Martin, RN), HMS Eagle (Capt. A.R.M. Bridge, RN), Force K; area: Pernambuco, Brazil. HMS Renown (Capt. C.E.B. Simeon, RN), HMS Ark Royal (Capt. A.J. Power, RN), Force L; area: Brest, France. Dunkerque (Capt. J.L. Nagadelle, replaced by Capt. M.J.M. Seguin on 16 October), Bearn (Capt. M.M.A. Lafargue, replaced by Capt. Y.E. Aubert on 7 October), Georges Leygues (Capt. R.L. Perot), Gloire (Capt. F.H.R. de Belot), Montcalm (Capt. P.J. Ronarc’h), Force M; area: Dakar, Senegal. Dupleix (Capt. L.L.M. Hameury), Foch (Capt. J. Mathieu), and Force N; area: West Indies. Strasbourg (Capt. J.F.E. Bouxin), HMS Hermes.
The institution of the hunting groups were not the only measures taken. The battleships HMS Resolution, HMS Revenge and the light cruisers HMS Emerald and HMS Enterprise were ordered to proceed to Halifax, Nova Scotia to escort homeward bound convoys. Light cruiser HMS Effingham was to join them later. The battleship HMS Ramillies (Capt. H.T. Baillie-Grohman, DSO, RN) left Gibraltar on 5 October for the same duty but was recalled the next day when the battleship HMS Malaya (Capt. I.B.B. Tower, DSC, RN) and the aircraft carrier HMS Glorious (Capt. G. D’Oyly-Hughes, DSO and Bar, DSC, RN) were ordered to leave the Mediterranean and proceed to the Indian Ocean where they formed an addition hunting group, Force J which was to operate in the Socotra area off the entrance to the Gulf of Aden.
Now back to the South Atlantic, on 9 October 1939 the C-in-C, South Atlantic had informed the Admiralty and Commodore Harwood that he intended to co-ordinate the movements of ‘Force G’, ‘Force H’ and ‘Force K’. As this would entail long periods of wireless silence in ‘Force G’ he proposed that Commodore Harwood should transfer his flag to HMS Ajax, leaving Capt. Fallowfield of HMS Cumberland in command of Force G. The Admiralty approved of this. Commodore Harwood stated that it was his intention to transfer his flag from HMS Exeter to HMS Ajax in the River Plate area on 27 October. He also stated that the endurance of HMS Exeter was only half the endurance of HMS Cumberland and that this would prove problematic when they were to operate together and he proposed that the Exeter would be relieved by another 10000 ton cruiser but for the moment no suitable cruiser was available to relieve her.
On 12 October 1939 the first of the hunting forces arrived on their station when HMS Renown and HMS Ark Royal reached Freetown that morning coming from the U.K. They were soon followed by three more destroyers of the H-class coming from the Mediterranean; HMS Hardy (Capt. B.A. Warburton-Lee, RN), HMS Hasty (Lt.Cdr. L.R.K. Tyrwhitt, RN) and HMS Hostile (Cdr. J.P. Wright, RN). On 13 October 1939 the cruisers HMS Sussex and HMS Shropshire arrived at Simonstown from the Mediterranean and one day later HMS Hermes arrived at Dakar from Plymouth.
The South America Division during the first half of October 1939.
When the news of an enemy raider in the South Atlantic reached the C-in-C at Freetown on 1 October 1939 he immediately suspended sailings from Pernambuco and Natal and he ordered HMS Havock and HMS Hotspur to escort British ships clear of the area. But next morning he cancelled these dispositions and ordered Commodore Harwood to concentrate HMS Exeter, HMS Ajax and the two destroyers off Rio de Janeiro. By this time, however, the raider was far away from the South American coast. On 3 October 1939 the Commodore signalled the C-in-C that he intened to concentrate the Exeter and Ajax off Rio and have the Hotspur to cover the Rio – Santos area and keep the Havock off the Plate but upon receiving the orders from the C-in-C to concentrate he ordered to destroyers to join the cruisers after fuelling but not later then 0800 hours on 4 October. Reports that the enemy raider was not a ‘pocket battleship’ however kept coming in and the Commodore decided that he could not leave the heavy traffic in the Plate area without some form of protection and he ordered HMS Havock to return there but when a report coming in from Bahia, Brazil confirmed that the Clement had been sunk by the ‘pocket battleship’ Admiral Scheer the Commodore once more ordered HMS Havock to join him. In the end HMS Ajax joined HMS Exeter at 1700/3, HMS Hotspur at 0500/4 and finally HMS Havock at 1300/4.
The Commodore was also informed by the Admiralty that the New Zealand cruiser HMS Achilles (New Zealand Division) (Capt. W.E. Parry, RN) would join his station coming from the west coast of South America. HMS Cumberland left Freetown at 1900/3 to join the Commodore in the Rio de Janeiro area as well.
Commodore Harwood’s policy against enemy raiders and a new raider report coming on on 5 October 1939.
Commodore Harwood had decided to keep his forces concentrated and as no new raider reports had come in to patrol the Rio de Janeiro area in accordance with the C-in-C, South Atlantic’s order. If he met a ‘pocket battleship’ he intended to shadow it until dusk. He would then close and attack in the dark hours. If, on the other hand, he made contact at night, his destroyers would at once close the enemy’s beam and attack her with torpedoes.
On 5 October 1939, the British merchant Martand (7967 GRT, built 1939) informed HMS Cumberland that a German armed raider had attacked an unknown ship, this unknown ship was in fact the Newton Beech that was attacked about 900 nautical miles away. This information was not acted upon by the Commanding Officer of the Cumberland. The Captain of the Cumberland assumed the raider report would have been intercepted by other ships and passed on to the C-in-C, South Atlantic. He considered it was important to keep radio silence and decided against breaking it. The Admiralty however later was of the opinion that the report should have been passed on to the Commander-in-Chief.
By 5 October 1939, the Exeter, Ajax, Havock and Hotspur were concentrated in the Rio de Janeiro area ready to engage the raider if she came south from the Pernambuco area. HMS Achilles was on her way round Cape Horn.
When HMS Ajax visited Rio de Janeiro on 7 October 1939, Commodore Harwood directed her to suggest to the Consular Shipping Advisers there, and at Santos, that, owning to the small volume of shipping leaving these ports, the local convoy systems, which had been instituted on 22 September against armed merchant raiders, should be suspended, and Allied merchant ships be routed independently.
The Commodore intended to meet HMS Cumberland at 1700/8, but at 1600/7 he received a message from the Consular Shipping Adviser at Rio de Janeiro in which he desired an escort for a 13 knot convoy that was to sail at 0430/8 and that had received much local publicity. The Commodore thought that this publicity might draw the enemy raider to the area and he therefore took his entire force back towards Rio de Janeiro and sent HMS Hotspur ahead to make contact with the convoy, while keeping his other ships in support. The convoy consisted of the British merchants Highland Chieftain (14131 GRT, built 1929), Nariva (8723 GRT, built 1920) and the French merchant Alsina (8404 GRT, built 1922).
Meanwhile the Commodore had directed HMS Cumberland to meet him at dawn on October 9th. When the convoy was dispersed at 1800/8 the Exeter and Ajax steered to meet her while the Havock was detached to fuel at Rio de Janeiro. At 2200/8 HMS Ajax was detached. HMS Cumberland made rendezvous with HMS Exeter at 0500/9. They were ordered by the C-in-C, South Atlantic to make a sweep northwards but this could not be carried out as HMS Exeter was short of fuel. The Commodore therefore decided to make a sweep southwards towards the Plate area where HMS Exeter could refuel. He also decided to keep HMS Hotspur with the two cruisers as long as possible.
On 12 October 1939, Rio Grande do Sul reported that the German merchant Rio Grande (6062 GRT, built 1939) was about to sail. The Commodore at once ordered HMS Cumberland to proceed there and intercept. She arrived off Rio Grande do Sul at 1600/13 but on finding it all quiet in the harbour she shaped course for the Plate area at nightfall. Meanwhile the Commodore had ordered HMS Hotspur to fuel at Montevideo when HMS Havock left that port early on the 14th.
about this time RFA Olwen informed the Commodore the the German merchant Bahia Laura (8611 GRT, built 1918) was leaving Montevideo at 1000 next morning and might protest if HMS Havock sailed the same day. Instead, therefore, of entering Montevideo HMS Hotspur at once fueled from the Olwen and then remained out on patrol. The Bahia Laura however, showed no signs of leaving and at 0800/14, HMS Havock put to sea. At 1200 hours HMS Hotspur entered Montevideo. Later that day HMS Exeter and HMS Cumberland fueled from the Olwen in San Borombon Bay at the southern entrance to the Plate estuary. At 1430 hours they were joined by HMS Havock. Commodore Harwood then ordered her to patrol off Montevideo to watch the Bahia Laura. When HMS Exeter finished fueling she immediately put to sea. HMS Cumberland rejoined him next morning at 0700 hours. HMS Havock was then ordered to join the cruisers. On 16 October the commodore learned that the Bahia Laura had sailed at 1015 hours the previous day. By the time the signal reached him the German ship was far out at sea well past his patrol line. But as the whole area was enveloped in dense fog the Commodore decided against trying to catch her.
The South America Division during the second half of October 1939.
Meanwhile Commodore Harwood had informed the Commander-in-Chief, South Atlantic on 13 October that as HMS Exeter required certain minor repairs he proposed to proceed to the Falklands on the17th and then return to the Plate area on the 27th. The Commander-in-Chief replied that he preferred that HMS Exeter would stay in the Plate area till the Commodore would transfer his Broad Pendant to HMS Ajax on the 27th. As HMS Achilles was due in the Plate area on this day also, she and HMS Cumberland could then operate as ‘Force G’ during the Exeter’s absence. This would mean that there would be no cruiser in the Rio de Janeiro area until HMS Exeter would return from her repairs at the Falklands. The Commodore therefore ordered HMS Havock to sail on 21 October for a four day patrol in the Rio – Santos Area, where HMS Hotspur, which could remain at sea until 2 November, would relieve her. From that date until the relief of HMS Achilles there would be no warship in this area. The Commodore therefore asked the Commander-in-Chief to allow ‘Force G’ to operate in that area from 2 to 10 November. When HMS Hotspur joined the Exeter and Cumberland from Montevideo on 17 October the Commodore ordered her to patrol off Rio Grande do Sul to intercept the German ships Rio Grande and Montevideo if they would come out, and sent HMS Havock to patrol inshore with orders to anchor the night clear of the shipping route.
This proved to be the last duty of these two destroyers with the South America Division. On 20 October the Admiralty ordered their transfer to the West Indies. Three days later the Commodore sent them into Buenos Aires to refuel, and as the distance to Trinidad, 4000 miles, was at the limit of their endurance, also obtained permission to refuel them at Pernambuco. They both left Buenos Aires on the 25th and, bidding the Commodore farewell, proceeded northwards. They sailed from Pernambuco on 1 November but on the 3rd HMS Havock was diverted to Freetown with engine trouble. The two remaining destroyers of the 4th Division, HMS Hyperion and HMS Hunter, had left Freetown with convoy SL 6 on 23 October. Off Daker their escort duty was taken over by the French light cruiser Duguay-Trouin (Capt. J.M.C. Trolley de Prevaux). The destroyers then fueled at Dakar on the 27th and sailed for Trinidad early on the 28th.
Meanwhile HMS Cumberland had entered Montevideo at 0800/26. At 0900/26 HMS Achilles joined HMS Exeter in the Plate area and after fueling from RFA Olwen sailed to meet HMS Cumberland off Lobos the next day and then patrol with her as ‘Force G’ in the Rio – Santos area. The Olwen was now nearly out of fuel and filled up HMS Ajax ,which had arrived from the Rio area on the 26th, with her remaining fuel minus 500 tons for her passage to Trinidad. In the morning of 27 October, Commodore Harwood transferred his Broad Pendant to HMS Ajax and HMS Exeter then parted company to proceed to the Falklands for repairs.
Meanwhile the newly formed ‘Force H’ and ‘Force K’ were busy on the other side of the South Atlantic. ‘Force H’, made up of HMS Sussex and HMS Shropshire had reached the Cape on 13 October. As HMS Cumberland had not passed on the report of the Martland, no news on the raider had reached the Admiralty or the Commander-in-Chief since October 1st. On 14 October ‘Force H’ sailed to search for her along the Cape – Freetown route as far as the latitude of St. Helena. That day ’Force K’ (HMS Ark Royal and HMS Renown) left Freetown with HMS Neptune, HMS Hardy, HMS Hero (Cdr. C.F. Tower, MVO, RN) and HMS Hereward (Lt.Cdr. C.W. Greening, RN) to search westwards towards St. Paul Rocks, the direction of their sweep being determined by the complete lack of any further raider information.
Finally a raider report on 22 October 1939, Sweeps by ‘Force H’ and ‘Force K’.
The three weeks old ‘mystery’ of the raiders whereabouts was partially solved on 22 October when the British merchant vessel Llanstephan Castle (11293 GRT, built 1914) intercepted a message from an unknown ship ‘Gunned in 16°S, 04°03’E’ at 1400 G.M.T. There was however no immediate confirmation of her report and the Commander-in-Chief ordered ‘Force H’ to sail after dark on the 27th to sail for the latitude of St. Helena. At noon on 31 October this Force was in 15°S, 02°51’E, the north-eastern limit of it’s patrol, when a Walrus aircraft failed to return to HMS Sussex from a reconnaissance flight. It was never found, though the two cruisers spend over three days searching for it. Being short of fuel they then returned to the Cape by the same route they had used outwards.
Sweep by ‘Force K’, 28 October – 6 November 1939.
To cover the northern end of the route from St. Helena onward, HMS Neptune and the destroyers HMS Hardy, HMS Hasty, HMS Hero and HMS Hereward had left Freetown on 28 October. HMS Neptune was to sweep independently from position 03°20’S, 01°10’W and then through 14°30’S, 16°50’W back to Freetown. On 30 October a report from Dakar stated that the German merchant Togo (5042 GRT, built 1938) had left the Congo on 26 October, that the German merchant Pionier (3254 GRT, built 1934) had sailed from Fernando Po (now called Bioko Island) on 28 October and that five German ships had left Lobito (Angola) the same day. When the Vice-Admiral, Aircraft Carriers, received this information her detached HMS Hardy and HMS Hasty to sweep north-westward for the Pioneer, while ‘Force K’ and the remaining two destroyers searched for her to the south-westward. Both searches were unsuccessful. Meanwhile a message from Lobito had stated that the five German ships that were stated to have left the harbour were still there. On 5 November the German merchant vessel Uhenfels (7603 GRT, built 1931), that had left Laurenco Marques (now called Maputo, Mozambique) on 16 October was sighted by an aircraft from HMS Ark Royal. Only energetic action from HMS Hereward saved her from being scuttled in position 06°02’N, 17°25’W. She was brought into Freetown on 7 November by HMS Herward, a few hours behind ‘Force K’.
’Force H’ and ‘Force G’, first half of November 1939.
The first half of November was relatively quiet on both sides of the South Atlantic At the start of the month ‘Force H’ and ‘Force K’ were still on the shipping lane between Sierra Leone and the Cape. On 3 November 1939 the Admiralty informed the Commander-in-Chief, South Atlantic that all German capital ships and cruisers were apparently in home waters. It appeared therefore that the pocket battleship, which was still thought to be the Admiral Scheer, had returned home and that the raider reported by the Llangstephan Castle on 22 October was nothing but an armed merchantman. Here was a good opportunity for resting the hunting groups and on 4 November the Admiralty issued orders that ‘Force G’ and ‘Force H’ should exchange areas. This exchange would not only give ‘Force G’ an opportunity of resting and refitting at the Cape, but would also provide Commodore Harwood with the hunting group of long endurance that he desired.
The Commander-in-Chief had planned that ‘Force H’ which had returned to the Cape on 7 November would then sweep towards Durban, arriving there on 16 November. However on the 11th they were ordered to sail for patrol in the Atlantic and on the evening of the 17th, while west of St. Helena, exchange patrol areas with ‘Force G’. The exchange of areas however did not take place as ‘Force G’ was delayed due to HMS Exeter being damaged while casting off from the oiler in heavy seas. Before the exchange now could take place it was cancelled.
South America Division, first half of November 1939.
After hoisting Commodore Harwood’s Broad on 27 October the HMS Ajax had swept the Plate focal area. When the Commodore received the signal of the Commander-in-Chief on the 5th regarding the changeover over patrol areas between ‘Force G’ and ‘Force H’, he ordered HMS Cumberland to proceed to the Plate at 20 knots to refuel. About this time a message reached him from Buenos Aires that the Argentinian Foreign Minister had drawn attention to cases of fueling in the Plate by HMS Exeter and HMS Ajax. Although the Argentinian Government had no apparent intention of raising the issue he decided to cut down the fuellings in the inshore waters of the Plate as much as possible. He therefore cancelled the fuelling of HMS Exeter, due to take place on 7 November from the oiler RFA Olynthus (6888 GRT, built 1918, Master L.N. Hill), which had relieved RFA Olwen. He ordered HMS Cumberland to fuel at Buenos Aires on 9 November. HMS Exeter which had arrived at the Falklands on 31 October for repairs, sailed again on 4 November to meet up with HMS Cumberland off the Plate on 10 November, but the Commodore ordered her to enter Mar del Plata for a 24-hour visit on the 9th. As this gave her some time at hand, he ordered her to cover the Plate while HMS Ajax visited Buenos Aires from 6 to 8 November during which the Commodore discussed the question of fuelling his ships in the River Plate Estuary with the Argentine naval authorities. During his visit to Buenos Aires, the Commodore discussed the matter of fuelling his ships of English Bank with the Argentinian Minister of Marine and his Chief of Naval Staff they both suggested that he should use San Borombon Bay which was most acceptable. He had in fact been using it for some time.
When HMS Ajax left Buenos Aires on 8 November she patrolled the Plate area. HMS Exeter arrived at Mar del Plata the next day but fuel could not be obtained there. She was ordered to fuel from RFA Olynthus in San Borombon Bay on the 10th and then meet up with HMS Cumberland off Lobos Island at 0600/11. On the 10th HMS Ajax also fueled from RFA Olynthus as did HMS Exeter after her while HMS Ajax was at anchor close by. However weather quickly deteriorated and the Olynthus was forced to cast off, damaging the Exeter in doing so. Besides that she was still 600 tons short of fuel. As she could not reach the Cape without a full supply the sailing of ‘Force G’ to exchange areas with ‘Force H’ was delayed. The Exeter finally finished fuelling on the 13th and sailed with HMS Cumberland for Simonstown. Before the exchange of areas could be effected, however, a raider was reported in the Indian Ocean and the order was cancelled.
Another raider report, 16 November 1939.
On 16 November 1939 the Naval Officer-in-Charge, Simonstown, reported that the small British tanker Africa Shell ( GRT, built ) had been sunk off Lourenco Marques the previous day by a raider identified as a pocket battleship. After the usual conflicting reports from eye-widnesses during the next few days, however, it was doubtful how many raiders there were or whether they were pocket battleships or heavy cruisers.
The presence of an enemy heavy ship in the Mozambique Channel called for new dispositions. When the raider report reached the Admiralty on 17 November they immediately cancelled the exchange of areas between ‘Force G’ an ‘Force H’. ‘Force H’ was ordered to return to the Cape and ‘Force G’ was ordered to return to the east coast of South America. They also ordered the dispatch of ‘Force K’ towards the Cape with instructions to go on to Diego Suarez in Madagascar. That morning a report reached the Commander-in-Chief, South Atlantic that the German merchant vessels Windhuk (16662 GRT, built 1937) and Adolph Woermann (8577 GRT, built 1922) had left Lobito. He at once ordered ‘Force H’, which was at that moment west of St. Helena in the approximate latitute of Lobito to spend three days searching for them.
Next day, 18 November 1939, ‘Force K’ left Freetown together with HMS Neptune, HMS Hardy, HMS Hero and HMS Hostile to sweep west of St. Helena through position 16°30’S, 10°W and thence on to Diego Suarez. The destroyers parted company at 2300/18 to search for the German ships. On 20 November 1939, the Commander-in-Chief ordered ‘Force H’ to return to the Cape of nothing of the German merchant vessels had been sighted. HMS Sussex and HMS Shropshire did so on 23 November.
The Adolph Woermann had not escaped. Early on 21 November 1939, the British merchant Waimarama (12843 GRT, built 1938) reported her in position 12°24’S, 03°31’W. At 1127/21, ‘Force K’ (HMS Ark Royal and HMS Renown) was in position 05°55’S, 12°26’W, altered course to close, and HMS Neptune, which was still with them, went ahead at high speed. Shortly after 0800/22 she made contact with the Adolf Woermann in position 10°37’S, 05°11’W and went alongside. Despite efforts to save her the German vessel was scuttled and when HMS Neptune returned to Freetown on 25 November 1939 she had 162 German survivors on board.
’Force H’ and ‘Force K’, second half of November 1939.
As the search for the Adolf Woermann had taken ‘Force K’ nearly 200 miles to the eastward, the Vice-Admiral, Aircraft Carriers decided to proceed to the Cape by the route east of St. Helena to save fuel. In hindsight this might have saved Altmark for being intercepted as she was waiting for the Admiral Graf Spee in the area ‘Force K’ would have otherwise passed through. On 23 November 1939, the Commander-in-Chief, South Atlantic, ordered ‘Force H’ to sail from the Cape the next day and patrol the ‘diverse routes’ as far as 33°E until 28 November.
At the northern end of the South Atlantic station HMS Neptune, HMS Hardy, HMS Hero, HMS Hostile, HMS Hasty and the submarine HMS Clyde (Cdr. W.E. Banks, RN) had established a patrol between 22 and 25 November 1939 to intercept escaping German merchant ships or raiders. No ships were however sighted and they were recalled to Freetown on 30 November.
In the meantime the Admiralty had ordered, ‘Force H’ and ‘Force K’ to conducted a combined patrol on the meridian of 20°E. The two forces met early on 1 December. The plan, according to the Commander-in-Chief, appeared to be a good one in theory but was found unsuitable in practice that on account of local weather conditions. These permitted flying off aircraft from HMS Ark Royal only once in five or six days, so that the patrol could not be extended far enough to the south to intercept a raider bent on evasion. In fact, only once, on 2 December weather was suitable for flying off aircraft.
South America Division, second half of November 1939.
After HMS Cumberland and HMS Exeter (‘Force G’) had sailed from San Borombon Bay for Simonstown on 13 November 1939, HMS Ajax patrolled the Plate area and escorted the French Massilia ( GRT, built ) that was bound for Europe from Buenos Aeres with French reservists. After parting from the Massilia she closed Rio Grande do Sul and ascertained that the German merchant vessels Rio Grande and Montevideo were still there. For the next two days she patrolled the normal peace time shipping routes.
When the Admiralty cancelled the exchange of ereas between ‘Force G’ and ‘Force H’ on 17 November, Commodore Harwood sent ‘Force G’ to cover Rio de Janeiro. He ordered HMS Achilles to fuel off the Olynthus in the Plate area on 22 November and then relieve ‘Force G’ in the Rio area as HMS Exeter would need to refuel in the Plate area again on 26 November. HMS Cumberland was to remain with the Exeter to keep ‘Force G’ together so she could refuel from the Olynthus as well. They were then to patrol the Plate area so that HMS Ajax could visit the Falklands.
On 18 November the Commodore was informed that the German merchant Ussukuma ( GRT, built ) might sail from Bahia Blanca for Montevideo at any time. He at once ordered the Olynthus to watch for her between Manos and Cape San Antonio and took the Ajax south to the same vicinity.
On 22 November 1939 HMS Achilles heard the German merchant Lahn (8498 GRT, built 1927) calling Cerrito by wireless, and when HMS Ajax arrived half an hour later a search was carried out. It was insuccessful for both cruisers but both the Lahn and another German merchant the Tacoma (8268 GRT, built 1930) reached Montevideo safely during the forenoon.
HMS Ajax and HMS Achilles then both fuelled from the Olynthus at San Borombon Bay during the next afternoon. The Achilles the sailed for the Rio de Janeiro area. She had orders to move up to Pernambuco and show herself off Cabadello and Bahia as a number of German ships in Pernambuco were reported ready to sail to Cabadello to load cotton for Germany. She was to return at once to the Rio area if any raiders were reported in the South Atlantic.
HMS Ajax left the Plate area on 25 November 1939 and sent up a seaplane to reconnoitre Bahia Blanca. The Ussukuma showed no signs of sailing so HMS Ajax proceeded to the Falklands, arriving there on the 27th. By this time HMS Cumberland and HMS Exeter were in urgent need of refits after long periods at sea, and Commodore Harwood ordered the Exeter to proceed to the Falklands forthwith. She arrived at Port Stanley on 29 November 1939 and her defects were immediately taken in hand as far as local resources permitted.
8 December 1939 was the twenty-fifth anniversary of the Battle of the Falklands, and thinking the enemy might attempt to avenge the defeat, the Commodore ordered HMS Cumberland to patrol off the Falklands as of 7 December for two days after which she too was to enter Port Stanley for rest and refit.
French Forces at Dakar in November 1939.
During November them most important event at Dakar, where the French were maintaining a number of more or less regular patrols, was the reorganisation of ‘Force X’. On 1 November 1939 the large destroyer L’Audacieux (Cdr. L.M. Clatin) sailed from Dakar to the westward to 26°W and thence south-west to search for the German merchant Togo. She returned to Dakar on 4 November having sighted nothing. That day the French light cruiser Duguay-Trouin sailed to sweep round the Cape Verde Islands and then on to St. Paul Rocks. She returned to Dakar on 10 November. The old ‘Force X’, the Strasbourg (Capt. J.F.E. Bouxin), Algerie (Capt. L.H.M. Nouvel de la Fleche) and Dupleix (Capt. L.L.M. Hameury) sailed on 7 November to sweep west of the Cape Verde Islands. It returned to Dakar on 13 November 1939. Meanwhile French submarines based at Casablanca were maintaining a continuous patrol round the Canary Islands between 25°N and 30°N.
On 18 November a new ‘Force X’ was formed, now made up of the Dupleix and her sister ship Foch (Capt. J. Mathieu) and the British aircraft carrier HMS Hermes. On 21 November the Strasbourg, Algerie and the destroyers Le Terrible (Cdr. A.E.R. Bonneau) and Le Fantasque (Capt. P.A.B. Still) left Dakar to return to France. The next day the new ‘Force X’ sailed with the destroyers Milan (Cdr. M.A.H. Favier) and Cassard (Cdr. R.A.A. Braxmeyer) to cruiser towards 08°N, 30°W. That day L’Audacieux departed Dakar with a convoy for Casablanca.
On 25 November, the Duguay-Trouin sailed to patrol the parallel of 19°N, between 25° and 30°W. Two days later the British submarine HMS Severn (Lt.Cdr. B.W. Taylor, RN) docked at Dakar. On the 30th the Dupleix and Foch returned from patrol being followed the next day by HMS Hermes and her escorts Milan and Cassard.
Dispositions of South Atlantic Forces at the beginning of December 1939.
At the beginning of December 1939, HMS Ark Royal, still flying the flag of Vice-Admiral Aircraft Carriers, and HMS Renown (‘Force K’), were patrolling the meridian of 20°E, south of the Cape together with HMS Sussex and HMS Shropshire (‘Force H’) to intercept the raider reported in the Mozambique Channel on 15 November 1939.
In the north the light cruiser HMS Neptune with the destroyers HMS Hardy, HMS Hero, HMS Hostile and HMS Hasty and the submarine HMS Clyde were returning to Freetown after patrolling between there and Cape San Roque for escaping German merchant ships or raiders. The French cruiers Dupleix and Foch and the British carrier HMS Hermes (‘Force X’) and their two escorting destroyers Milan and Cassard were approaching Dakar. The French cruiser Duguay-Trouin was patrolling the parallel of 19°N, between 25° and 30°W. The British submarine Severn was refitting at Dakar. Across the South Atlantic, Commodore Harwood, in HMS Ajax was at Port Stanley as was HMS Exeter. HMS Cumberland was patrolling of the Plate area and HMS Achilles was off Rio de Janeiro.
Forces ‘H’ and ‘K’, 1 – 13 December 1939.
No further reports have been received of the raider which had sunk the Africa Shell off Laurenco Marques on 15 November and it seemed clear that she had either gone further into the Indian Ocean or doubled back into the South Atlantic by going well south of the Cape. On 2 December 1939 the Admiralty ordered ‘Force K’ and ‘Force H’ to their patrol line south of the Cape after refueling, and the Commander-in-Chief, South Atlantic at once ordered them to proceed for the Cape ports to fuel. That day a reconnaissance aircraft of the South African Air Force reported a suspicious ship south of Cape Point at noon. HMS Sussex intercepted her but her crew set her on fire. She proved to be the German merchant Watussi (9521 GRT, built 1928). She was eventually be HMS Renown. Her survivors were taken on board HMS Sussex and were landed at Simonstown.
No news of the missing raider had been coming in since 16 November but then the mistery shrouding her whereabouts was again partially solved. At 1530/2 a raidar signal ‘R.R.R., 19°15’S, 05°05’E, gunned battleship) reached the Commander-in-Chief, South Atlantic. It came from the British merchant Doric Star. As this signal placed the raider in the South Atlantic he immediately ordered to abandon the patrol south of the Cape and ordered ‘Force H’ to cover the trade routes between the Cape and the latitude of St. Helena at 20 knots on completion of fuelling. As it was too late for ‘Force K’ to reach the Freetown-Pernambuco area in time to intercept the rainder if she was to proceed to the North Atlantic he proposed the Admiralty that ‘Force K’, after fuelling should sweep direct from the Cape to position 20°S, 15°W. This was changed at the request of the Vice-Admiral, Aircraft Carriers to place his force in a more central position for proceeding to Freetown, to the Falklands or to Rio de Janeiro. At 1030/3 a report reached the Commander-in-Chief that the pocket battleship Admiral Scheer had been in 21°20’S, 03°10’E at 0500 hours, clearly indicating that the raider was moving westwards, clear of the Cape-Sierra Leone trade route. ‘Force H’ left Simonstown at 1700 that afternoon and ‘Force K’ sailed from Capetown at 0915/4.
The Commander-in-Chief estimated that if the enemy was proceeding northwards to the North Atlantic she would cross the Freetown-Pernambuco line between 9 and 10 December. He therefore arranged that ‘Force X’ should take HMS Neptune and her destroyers under her orders and patrol the parallel of 3°N between 31° and 38°W from 10 to 13 December. ‘Force K’ would meet HMS Neptune and the destroyers on the 14th and then return with them to Freetown to refuel. The destroyers of the 3rd Division of the 2nd Destroyer Flotilla (HMS Hardy, HMS Hostile and HMS Hero) left Freetown on 6 December with the oiler RFA Cherryleaf (5896 GRT, built 1917). They had orders to meet the Dupleix, Foch, HMS Hermes and their escorting destroyers Milan and Cassard and HMS Neptune in position 03°N, 31°W on 10 December. On 7 December ‘Force X’ left Dakar for the rendez-vous. That day the submarine HMS Clyde left Freetown to patrol between 03°N, 23°W and 03°N, 28°W and thence to 05°15’N, 23°W between 9 (PM) and 13 (AM) December.
On the evening of 8 December 1939 the German merchant ship Adolf Leonhardt (2989 GRT, built 1925) sailed from Lobito for South America. ‘Force H’ which was by then between St. Helena and the west coast of Africa, was at once ordered to intercept her. The Walrus from HMS Shropshire made contact at 0952 hours next morning and alighted alongside in position 13°S, 11°44’E. At 1250 hours HMS Shropshire arrived at that position but the German ship was scuttled by her crew and could not be saved. ‘Force H’ then returned to the Cape to refuel where they arrived on 14 December.
At 0800/11 the submarine HMS Severn left Freetown for Port Stanley. She was to protect the whaling industry in South Georgio and was to intercept hostile raiders or supply ships. The cruiser HMS Dorsetshire, which arrived at Simonstown from Colombo on the 9th to finally relieve HMS Exeter in the South America Division left Simonstown on 13 December for Port Stanley. She was to call at Tristan da Cunha on the way. On that day, 13 December 1939, was fought the action between the British South America Division and the German pocket battleship Admiral Graf Spee, known as the Battle of the River Plate.
The South America Division, 1 to 13 December 1939.
At the beginning of December 1939, HMS Ajax and HMS Exeter were at Port Stanley in the Falkland Islands. HMS Cumberland was off the River Plate and HMS Achilles was patrolling the Rio de Janeiro area. On 2 December HMS Ajax left Port Stanley for the Plate area. That evening the Commodore learned that the Doric Star had been sunk by a raider to the south-east of St. Helena. Two days later the Commander-in-Chief, South Atlantic informed him that HMS Dorsetshire would arrive at Port Stanley on 23 December to relieve HMS Exeter which was then to proceed to Simonstown for a much needed refit.
Early on 5 December the British Naval Attaché at Buenos Aires reported that the German merchant Ussukuma had left Bahia Blanca at 1900 hours the previous evening. The Commodore immediately ordered HMS Cumberland which was on the way south to the Falkland Islands to search for her. Meanwhile HMS Ajax turned south and closed the Argentinian coast in case the Ussukuma, which was known to be short of fuel, should attempt to reach Montevideo inside territorial waters. At 1910/5, HMS Ajax sighted her smoke to the north-north-east but the Germans managed to scuttle their ship and despite the efforts to save her she sank during the night. At 0615/6, HMS Cumberland came up and embarked the German survivors and made off for the Falklands. HMS Ajax then refuelled at San Borombon Bay from the Olynthus.
About the same time the Brazilian authorities asked that HMS Achilles should not refuel in any Brazilian port at an interval less then three months. The Commodore, therefore, ordered her to return south and refuel at Montevideo on 8 December. HMS Achilles then joined HMS Ajax at 1000/10 in position 35°11’S, 51°13’W, 230 miles west of English Bank. At 0600/12 they were joined by HMS Exeter in position 36°54’S, 53°39’W.
Ever since the beginning of the war Commodore Harwood’s cruisers had worked off the east coast of South America either single or in pairs. The concentration of these three cruisers off the River Plate on 12 December 1939 was, however, no mere matter of chance.
Concentration of British Force in the River Plate area, 12 December 1939.
When a pocket battleship was located in position 19°15’S, 05°05’E on 2 December by the sinking of the Doris Star, her position was over 3000 miles from any of the South America focal areas. The Commodore however recognised that her next objective might be the valuable shipping off the east coast of South America. He estimated that at a cruising speed of 15 knots the enemy could reach the Rio area on 12 December the Plate area on 13 December and the Falklands on 14 December. As the Plate area was by far the most important of these three focal areas he decided to concentrate all his available ships off the Plate on 12 December.
The three cruisers then proceeded together towards position 32°N, 47°W. That evening the Commodore informed the Captains of his cruisers that it was intention that if they met a pocket battleship to attack immediately, by day or by night. By they they would act as two units, the light cruisers were to operate together and HMS Exeter was to operate diverged to permit flank marking. By night the ships were to remain in company in open order.
At 0614/13 HMS Ajax sighted smoke bearing 324° in position 34°28’S, 49°05’W and Commodore Harwood then ordered HMS Exeter to investigate it.
What then followed can be read in the article ‘The battle of the River Plate, 13 December 1939’ which can be found on the pages of HMS Ajax, HMS Exeter and HMS Achilles. (5)
5 Oct 1939
HMS Dorsetshire (Capt. B.C.S. Martin, RN) anchored off Shanghai where she was fuelled by RFA Pearleaf (Master A. Spencer). (6)
6 Oct 1939
HMS Dorsetshire (Capt. B.C.S. Martin, RN) departed Shanghai to resume her patrol off Japan. (6)
11 Oct 1939
HMS Dorsetshire (Capt. B.C.S. Martin, RN) departed her patrol area to return to Hong Kong. She is to proceed to the Indian Ocean to be part of a 'hunting group' to combat German raiders. (6)
13 Oct 1939
HMS Dorsetshire (Capt. B.C.S. Martin, RN) arrived at Hong Kong. (6)
14 Oct 1939
HMS Dorsetshire (Capt. B.C.S. Martin, RN) is docked at Hong Kong. (6)
18 Oct 1939
HMS Dorsetshire (Capt. B.C.S. Martin, RN) is undocked. (6)
19 Oct 1939
HMS Dorsetshire (Capt. B.C.S. Martin, RN) departed Hong Kong for Colombo where she was to join the East Indies Station.
For the daily positions of HMS Dorsetshire from 19 to 25 October 1939 see the map below.
(6)
22 Oct 1939
HMS Dorsetshire (Capt. B.C.S. Martin, RN) made a short stop at Singapore before continuing her passage to Colombo later the same day. (6)
25 Oct 1939
For the daily positions of HMS Dorsetshire during the period of 25 October 1939 to 3 November 1939 see the map below.
(7)
25 Oct 1939
HMS Dorsetshire (Capt. B.C.S. Martin, RN) arrived at Colombo.
She departed later the same day to patrol in the Indian Ocean with HMS Cornwall (Capt. C.F. Hammill, RN). On departure night encouter exercises were carried out between the two heavy cruisers and the light cruiser HMS Gloucester (Capt. F.R. Garside, CBE, RN) which also departared Colombo at the same time to patrol in the Indian Ocean.
These cruisers formed 'Hunting Group I'. (6)
25 Oct 1939
HMS Gloucester (Capt. F.R. Garside, CBE, RN) departed Colombo to patrol in the Indian Ocean, Maldives area.
Before proceeding on patrol night encouter exercises were carried out with HMS Dorsetshire (Capt. B.C.S. Martin, RN) and HMS Cornwall (Capt. C.F. Hammill, RN) which also departed Colombo at the same time to patrol in the Indian Ocean, also near the Maldives.
3 Nov 1939
HMS Cornwall (Capt. C.F. Hammill, RN, flying the flag of Rear-Admiral A.J.L. Murray, DSO, OBE, RN) and HMS Dorsetshire (Capt. B.C.S. Martin, RN) returned to Colombo from their patrol in the Indian Ocean. (8)
10 Nov 1939
For the daily positions of HMS Dorsetshire during the period of 10 to 18 November 1939 see the map below.
(8)
10 Nov 1939
HMS Cornwall (Capt. C.F. Hammill, RN, flying the flag of Rear-Admiral A.J.L. Murray, DSO, OBE, RN) and HMS Dorsetshire (Capt. B.C.S. Martin, RN) departed Colombo to patrol in the Indian Ocean between Colombo and the Maldives. (8)
13 Nov 1939
Around 1400EF/13, HMS Cornwall (Capt. C.F. Hammill, RN, flying the flag of Rear-Admiral A.J.L. Murray, DSO, OBE, RN) and HMS Dorsetshire (Capt. B.C.S. Martin, RN) made rendezvous to the west of Colombo with the aircraft carrier HMS Eagle (Capt. A.R.M. Bridge, RN) which then joined the two cruisers on their patrol.
HMS Eagle had departed Colombo around 0930EF/13. (8)
18 Nov 1939
Around 0745EF/18, HMS Cornwall (Capt. C.F. Hammill, RN, flying the flag of Rear-Admiral A.J.L. Murray, DSO, OBE, RN), HMS Dorsetshire (Capt. B.C.S. Martin, RN) and HMS Eagle (Capt. A.R.M. Bridge, RN) arrived at Colombo from patrol. (8)
25 Nov 1939
For the daily positions of HMS Dorsetshire during the period of 25 November to 10 December 1939 see the map below.
(9)
25 Nov 1939
HMS Dorsetshire (Capt. B.C.S. Martin, RN) departed Colombo to patrol in the Indian Ocean. (8)
25 Nov 1939
Around 0900EF/25, HMS Cornwall (Capt. C.F. Hammill, RN, flying the flag of Rear-Admiral A.J.L. Murray, DSO, OBE, RN), HMS Dorsetshire (Capt. B.C.S. Martin, RN) and HMS Eagle (Capt. A.R.M. Bridge, RN) departed Colombo for patrol. They were joined at sea by the destroyer HMAS Waterhen (Lt.Cdr. J.H. Swain, RN) which had already been out on exercises.
They returned to Colombo around 0715EF/28. HMAS Waterhen had been detached around noon on the 27th arriving at Colombo later the same day. (10)
28 Nov 1939
Around 1830A/28, HMS Cornwall (Capt. C.F. Hammill, RN, flying the flag of Rear-Admiral A.J.L. Murray, DSO, OBE, RN), HMS Dorsetshire (Capt. B.C.S. Martin, RN) and HMS Eagle (Capt. A.R.M. Bridge, RN) departed Colombo to resume their patrol in the Indian Ocean. (8)
3 Dec 1939
HMS Dorsetshire (Capt. B.C.S. Martin, RN) was ordered to proceed to the South Atlantic Station. She split off around 1300EF/3 from the other two ships of Force I; HMS Eagle (Capt. A.R.M. Bridge, RN) and HMS Cornwall (Capt. C.F. Hammill, RN, flying the flag of Rear-Admiral A.J.L. Murray, DSO, OBE, RN) to proceed to Simonstown, South Africa via Mauritius.
HMS Dorsetshire was ordered to the South Atlantic Station to enable ships from 'Force G' and 'Force H' to refit. HMS Gloucester (Capt. F.R. Garside, CBE, RN) was to take her place in 'Force I'. (11)
5 Dec 1939
HMS Dorsetshire (Capt. B.C.S. Martin, RN) anchored off Mauritius where she was fuelled by RFA Olcades (Master R.H.P. Mayhew) before departing for South-Africa later the same day. (11)
10 Dec 1939
HMS Dorsetshire (Capt. B.C.S. Martin, RN) arrived at Simonstown, South Africa. (11)
13 Dec 1939
HMS Dorsetshire (Capt. B.C.S. Martin, RN) departed Simonstown for Montivideo / Falkland Islands via Tristan da Cunha.
It had originally been intended that HMS Dorsetshire would replace HMS Exeter (Capt. F.S. Bell, RN) in the South American Division.
For the daily positions of HMS Dorsetshire from 13 to 24 December 1939 see the map below.
(11)
22 Dec 1939
HMS Dorsetshire (Capt. B.C.S. Martin, RN) arrived at Samborombón Bay in the River Plate area where she fuelled from RFA Olynthus (Master L.N. Hill). She sailed later the same day for the Falkland Islands. (11)
24 Dec 1939
HMS Dorsetshire (Capt. B.C.S. Martin, RN) arrived at Port Stanley, Falkland Islands. (11)
29 Dec 1939
After fuelling from oiler San Casto, HMS Dorsetshire (Capt. B.C.S. Martin, RN), departed the Falkland Islands for the Plate area.
For the daily positions of HMS Dorsetshire from 29 December 1939 to 18 January 1940 see the map below.
(11)
3 Jan 1940
Around 1200P/3, HMS Dorsetshire (Capt. B.C.S. Martin, RN) joined forces with HMS Shropshire (Capt. A.W.la T. Bisset, RN) in position 27°30'S, 44°45'W. they then set course for the Plate focal area. (12)
5 Jan 1940
Around 1000P/5, HMS Dorsetshire (Capt. B.C.S. Martin, RN) and HMS Shropshire (Capt. A.W.la T. Bisset, RN) made rendez-vous in the Plate area with HMS Ajax (Capt. C.H.L. Woodhouse, CB, RN, flagship of Rear-Admiral Sir H. Harwood, KCB, OBE, RN) and HMS Achilles (New Zealand Division) (Capt. W.E. Parry, CB, RN) which had departed Monevideo and Buenos Aires respectively earlier in the day after having fuelled there. HMS Achilles then took over as flagship of the South America division as HMS Ajax was to return to the U.K. to refit soon. [Rear-Admiral Harwood transferred his flag around 1430P/5.] (13)
6 Jan 1940
HMS Dorsetshire (Capt. B.C.S. Martin, RN) and HMS Shropshire (Capt. A.W.la T. Bisset, RN) arrived at Samborombón Bay in the River Plate area where they fuelled from the RFA tanker Olwen (6470 GRT, built 1917, Master B. Tunnard). After fuelling was completed they went out to sea again to resume their patrol in the South Atlantic (towards the Rio the Janeiro focal area). (14)
9 Jan 1940
In the early evening, HMS Dorsetshire (Capt. B.C.S. Martin, RN) and HMS Shropshire (Capt. A.W.la T. Bisset, RN), made rendez-vous with HMS Ajax (Capt. C.H.L. Woodhouse, CB, RN). They then continued their patrol in the Rio de Janeiro focal area. (13)
12 Jan 1940
After gunnery exercises, in the early evening, HMS Ajax (Capt. C.H.L. Woodhouse, CB, RN) parted company with HMS Dorsetshire (Capt. B.C.S. Martin, RN) and HMS Shropshire (Capt. A.W.la T. Bisset, RN). HMS Ajax set course to proceed to Freetown and eventually the U.K. where she was to refit. HMS Dorsetshire and HMS Shropshire continued their patrol. (13)
18 Jan 1940
Around 0930P/18, HMS Dorsetshire (Capt. B.C.S. Martin, RN) and HMS Shropshire (Capt. A.W.la T. Bisset, RN) arrived at Port Stanley, Falkland Islands from patrol. (14)
19 Jan 1940
HMS Dorsetshire (Capt. B.C.S. Martin, RN) fuelled from oiler San Casto. (12)
21 Jan 1940
Around 0700P/21, HMS Dorsetshire (Capt. B.C.S. Martin, RN) and HMS Shropshire (Capt. A.W.la T. Bisset, RN) departed Port Stanley with the damaged heavy cruiser HMS Exeter (Capt. F.S. Bell, CB, RN) which they were to escort to a rendez-vous position where other RN ships would take over the escort of HMS Exeter during her passage back to the U.K. for extensive repairs for the damage she had sustained during the Battle of the River Plate on 13 December 1939. (12)
29 Jan 1940
For the daily positions of HMS Dorsetshire from 29 January to 8 February 1940 see the map below.
(15)
29 Jan 1940
Around noon HMS Dorsetshire (Capt. B.C.S. Martin, RN) and HMS Shropshire (Capt. A.W.la T. Bisset, RN) turned over the damaged heavy cruiser HMS Exeter (Capt. F.S. Bell, CB, RN) to ships of 'Force K'; HMS Renown (Capt. C.E.B. Simeon, RN), HMS Ark Royal (Capt. A.J. Power, RN, flying the flag of Vice-Admiral L.V. Wells, CB, DSO, RN), HMS Dainty (Cdr. F.M. Walton, RN) and HMS Diamond (Lt.Cdr. P.A. Cartwright, RN) in approximate position 17°21'S, 24°56'W.
HMS Dorstershire and HMS Shropshire then proceeded on patrol in the South Atlantic still in company with each other. (12)
3 Feb 1940
Around 0800O/3, HMS Dorsetshire (Capt. B.C.S. Martin, RN) and HMS Shropshire (Capt. A.W.la T. Bisset, RN), made rendez-vous in position 29°23'S, 41°49'W with HMS Hawkins (Capt. E. Rotherham, RN, flying the flag of Rear-Admiral Sir H. Harwood, KCB, OBE, RN). They then proceeded to patrol and conduct exercises in company with each other until around noon of the 5th when HMS Hawkins parted company with the two heavy cruisers which then set course for the River Plate area. (16)
8 Feb 1940
Around 0545P/8, HMS Dorsetshire (Capt. B.C.S. Martin, RN) and HMS Shropshire (Capt. A.W.la T. Bisset, RN) parted company. HMS Dorsetshire then proceeded to Buenos Aires and HMS Shropshire proceeded to Montivideo for official port visits. Both ships also refuelled at their ports of destination where both arrived later on the 8th. (16)
9 Feb 1940
HMS Dorsetshire (Capt. B.C.S. Martin, RN) departed Buenos Aires to patrol in the 'Rio de Janeiro area'.
For the daily positions of HMS Dorsetshire during the period of 9 to 29 February 1940 see the map below.
(16)
13 Feb 1940
HMS Dorsetshire (Capt. B.C.S. Martin, RN) intercepts the German merchant Wakama (3771 GRT, built 1922) in the South Atlantic near Cape Frio, Brazil in position 22°42'S, 41°38'W. However before the German ship can be captured she is scuttled by her own crew. 46 crew from the German ship were then picked up by Dorsetshire.
14 Feb 1940
In the evening, HMS Dorsetshire (Capt. B.C.S. Martin, RN), while of Rio de Janeiro, was joined by HMS Hawkins (Capt. E. Rotherham, RN, flying the flag of Rear-Admiral Sir H. Harwood, KCB, OBE, RN) which had just left that port. Both cruisers then remained in company. (16)
20 Feb 1940
At 0610P/20, the heavy cruisers HMS Hawkins (Capt. E. Rotherham, RN, flying the flag of Rear-Admiral Sir H. Harwood, KCB, OBE, RN) and HMS Dorsetshire (Capt. B.C.S. Martin, RN), which were still on patrol in the 'Rio de Janeiro focal area' were briefly joined by the armed merchant cruiser HMS Alcantara (Capt.(Retd.) J.G.P. Ingham, DSO, RN). The armed merchant cruiser parted company to resume her patrol around 1010P/20. (16)
22 Feb 1940
Around 2135P/22, HMS Queen of Bermuda (Capt. G.A.B. Hawkins, MVO, DSC, RN) made rendezvous with HMS Hawkins (Capt. E. Rotherham, RN, flying the flag of Rear-Admiral Sir H. Harwood, KCB, OBE, RN) and HMS Dorsetshire (Capt. B.C.S. Martin, RN) in approximate position 23°15'S, 42°00'W.
The specialist surgeon was then transferred from HMS Queen of Bermuda to HMS Dorsetshire for onward passage to Port Stanley.
Shortly after midnight HMS Queen of Bermuda then parted company with the other two ships which remained on patrol but now set course for the River Plate focal area. HMS Queen of Bermuda set course for Rio de Janeiro where she was to fuel. (17)
27 Feb 1940
While now in the 'River Plate area', HMS Dorsetshire (Capt. B.C.S. Martin, RN) parted company around 0810N/27, with HMS Hawkins (Capt. E. Rotherham, RN, flying the flag of Rear-Admiral Sir H. Harwood, KCB, OBE, RN). HMS Dorsetshire then set course to proceed to the Falkland Island. (16)
29 Feb 1940
HMS Dorsetshire (Capt. B.C.S. Martin, RN) arrived at Port Stanley where she fuelled from oiler San Casto. (16)
2 Mar 1940
HMS Dorsetshire (Capt. B.C.S. Martin, RN) departed Port Stanley, Falkland Islands for Simonstown, South Africa via Tristan da Cunha. Dorsetshire had 10 wounded crew on board from HMS Exeter, HMS Ajax and HMNZS Achilles which up until now had been on hospital at Port Stanley but were to be taken to South Africa.
For the daily positions of HMS Dorsetshire during the period from 2 to 11 March 1940 see the map below.
(18)
6 Mar 1940
HMS Dorsetshire (Capt. B.C.S. Martin, RN) landed supplies at Tristan da Cunha before continuing her passage to Simonstown. (18)
11 Mar 1940
HMS Dorsetshire (Capt. B.C.S. Martin, RN) arrived at Simonstown, South Africa. (18)
16 Mar 1940
HMS Dorsetshire (Capt. B.C.S. Martin, RN) is docked in the Selborne dry dock at the Simonstown Dockyard. (18)
18 Apr 1940
HMS Dorsetshire (Capt. B.C.S. Martin, RN) was undocked. (19)
24 Apr 1940
HMS Dorsetshire (Capt. B.C.S. Martin, RN) departed Simonstown for Freetown.
For the daily positions of HMS Dorsetshire during the period from 24 April to 1 May 1940 see the map below.
(19)
27 Apr 1940
Early in the morning, HMS Dorsetshire (Capt. B.C.S. Martin, RN), took over the escort of the whale factory ship Tafelberg (13640 GRT, built 1930) from HMS Gloucester (Capt. F.R. Garside, CBE, RN). These ships had departed Capetown on 21 April and HMS Dorsetshire had been ordered to overtake them. HMS Gloucester then returned to South Africa. (19)
28 Apr 1940
Shortly before midnight, HMS Dorsetshire (Capt. B.C.S. Martin, RN), parted company with the whale factory ship Tafelberg as ordered by the Admiralty. She was ordered to proceed to Freetown at best possible speed. (20)
1 May 1940
HMS Dorsetshire (Capt. B.C.S. Martin, RN) arrived at Freetown. (21)
1 May 1940
Convoy US 3.
The troopship Andes (British, 25689 GRT, built 1939, 1508 troops) departed Lyttelton Harbour, New Zealand (near Christchurch) on 1 May 1940. She was escorted by the heavy cruiser HMAS Canberra (Capt. W.R. Patterson, RN).
Around noon on May, 2nd, in Cook Strait they were joined by the troopships Aquitania (British, 44786 GRT, built 1914, 3627 troops), Empress of Britain (British, 42348 GRT, built 1931, 2047 troops) and Empress of Japan (British, 26032 GRT, built 1930, 1554 troops) and their escorts, the heavy cruiser HMAS Australia (Capt. R.R. Stewart, RN) and light cruiser HMS Leander (from the New Zealand Division) (Capt. H.E. Horan, RN). They came from Wellington.
Early on May, 5th, HMS Leander parted company and proceeded to Sydney. During the forenoon the troopship Queen Mary (British, 81235 GRT, built 1936, 5059 troops) came out escorted by the light cruiser HMAS Perth (Capt. H.B. Farncomb, RAN). Shortly afterwards HMAS Canberra also entered Sydney harbour to pick up correspondence. Around 1600K/5, HMAS Canberra and HMS Leander came out together with the troopship Mauretania (British, 35739 GRT, built 1939, 2616 troops). The convoy then set course for Fremantle.
At 2045K/5, HMAS Perth parted company to return to Sydney where she arrived around 0330K/6.
At 1600K/6, off Melbourne, the troopship Empress of Canada (British, 21517 GRT, built 1922, 1615 troops) joined the convoy.
At 0630H/10, when 70 nautical miles from Rottness Island, HMS Leander parted company with the convoy to proceed ahead of it to Fremantle.
At 0800H/10, the light cruiser HMAS Adelaide (Capt. H.A. Showers, RAN), joined the convoy and guided into Gage Roads. The transports berthed alongside Fremantle Harbour as arranged except for the Aquitania and Queen Mary. The other transports fuelled and took in water. All ships of the escort berther alongside except for HMAS Adelaide which patrolled in Gage Roads.
At 1200H/12, the convoy started to leave the harbour. On forming up course was set for Colombo.
At 2214G/15, the convoy altered course towards the Cape of Good Hope. It had been decided that the convoy was not to pass through the Mediterranean as the situation with Italy was deteriorating. During the night HMS Leander parted company to proceed to Colombo.
At 1529D/20, the heavy cruiser HMS Shropshire (Capt. J.H. Edelsten, RN) joined in position 28°13'S, 60°50'E. HMAS Canberra then parted company to return to Australia.
At dawn on May, 26th, the convoy started to pass down the searched channel and entered Table Bay, Capetown.
At 0743B/26, HMS Shropshire set course to proceed to Simonstown.
The Queen Mary and Aquitania anchored in Table Bay while the other troopships berthed alongside the harbour.
At 1350B/26, the heavy cruiser HMS Cumberland (Capt. G.H.E. Russell, RN) arrived from Simonstown.
At 0300B/28, the Queen Mary and Aquitania departed Table Bay to proceed to False Bay escorted by HMS Cumberland.
At 1000B/31, the ships at Capetown, less the Empress of Japan commenced to leave the Bay led by HMAS Australia. At sea they were joined by the Queen Mary and Aquitania and their escorts HMS Shropshire and HMS Cumberland. They had departed from False Bay around 0815B/31. At the rendezvous HMAS Australia then parted company and proceeded to Simonstown.
Course was set for Freetown where the convoy arrived in the morning of June, 7th.
The convoy departed Freetown in the morning of the June, 8th. Still escorted by HMS Shropshire and HMS Cumberland but now joined by the aircraft carrier HMS Hermes (Capt R.F.J. Onslow, DSC, MVO, RN).
At 0035N/10, HMS Hermes parted company with the convoy and proceeded to Dakar.
Around 0900N/12, the heavy cruiser HMS Dorsetshire (Capt. B.C.S. Martin, RN) joined the convoy.
Around 0800N/14, the aircraft carrier Argus joined the convoy coming from Gibraltar.
Around 1000/14, the battlecruiser HMS Hood (Capt. I.G. Glennie, RN) and the destroyers HMCS Fraser (Cdr. W.B. Creery, RCN), HMCS Restigouche (Lt.Cdr. H.N. Lay, RN), HMCS St. Laurent (Lt.Cdr. H.G. De Wolf, RCN) and HMCS Skeena (Lt.Cdr. J.C. Hibbard, RCN) joined the convoy coming from the U.K. HMS Dorsetshire then parted company.
around 1500N/14, the destroyer HMS Wanderer (Cdr. J.H. Ruck-Keene, RN) joined followed around 1600N/14 by the destroyers HMS Broke (Cdr. B.G. Scurfield, RN) and HMS Westcott (Lt.Cdr. W.F.R. Segrave, RN).
The convoy arrived in the Clyde in the afternoon of the 16th.
7 May 1940
HMS Cornwall (Capt. C.F. Hammill, RN) and HMS Dorsetshire (Capt. B.C.S. Martin, RN) conducted exercises off Freetown. (22)
8 May 1940
HMS Dorsetshire (Capt. B.C.S. Martin, RN) conducted D/F calibration trials off Freetown. (21)
15 May 1940
For the daily positions of HMS Dorsetshire during the period of 15 to 25 May 1940 see the map below.
15 May 1940
HMS Cornwall (Capt. C.F. Hammill, RN) and HMS Dorsetshire (Capt. B.C.S. Martin, RN) departed Freetown for Gibraltar. (21)
18 May 1940
HMS Cornwall (Capt. C.F. Hammill, RN) and HMS Dorsetshire (Capt. B.C.S. Martin, RN) arrived at Gibraltar around 2000 hours (zone 0, GMT). Around 0830 hours the cruisers had been joined by the destroyers HMS Keppel (Lt.Cdr.(Emgy.) E.G. Heywood-Lonsdale, RN) and HMS Vortigern (Lt.Cdr. R.S. Howlett, RN) for A/S escort in the approaches to Gibraltar. (21)
22 May 1940
HMS Cornwall (Capt. C.F. Hammill, RN) and HMS Dorsetshire (Capt. B.C.S. Martin, RN) departed Gibraltar for Freetown and Plymouth respectively. In the approaches to Gibraltar they were escorted by the destroyers HMS Keppel (Lt.Cdr.(Emgy.) E.G. Heywood-Lonsdale, RN) and HMS Wrestler (Lt.Cdr. E.N.V. Currey, RN) until 2345 hours. Both cruisers then set course for their destinations. (21)
25 May 1940
HMS Dorsetshire (Capt. B.C.S. Martin, RN) arrived at Plymouth where she was taken in hand at the Devonport Dockyard to complete the refit that had been started at the Simonstown Dockyard in South-Africa. (21)
9 Jun 1940
HMS Dorsetshire (Capt. B.C.S. Martin, RN) conducted post-refit trials off Plymouth. (23)
10 Jun 1940
HMS Dorsetshire (Capt. B.C.S. Martin, RN) departed Plymouth to make rendez-vous with convoy US 3 and escort it towards the U.K.
For the daily positions of HMS Dorsetshire from 10 to 16 June 1940 see the map below.
(23)
12 Jun 1940
HMS Dorsetshire (Capt. B.C.S. Martin, RN) made rendez-vous with convoy US 3 to the west of Madeira. She then joined the escort force of the convoy which at that moment was made up of HMS Shropshire (Capt. J.H. Edelsten, RN) and HMS Cumberland (Capt. the Hon. G.H.E. Russell, RN).
The convoy itself was made up of the troopships (liners) Andes (25689 GRT, built 1939), Aquitania (44786 GRT, built 1914), Empress of Britain (42348 GRT, built 1931), Empress of Canada (21517 GRT, built 1922), Mauretania (35739 GRT, built 1939) and Queen Mary (81235 GRT, built 1936). These had on board troops from New Zealand and Australia. (23)
14 Jun 1940
Convoy US 3, made up of the troopships (liners) Andes (25689 GRT, built 1939), Aquitania (44786 GRT, built 1914), Empress of Britain (42348 GRT, built 1931), Empress of Canada (21517 GRT, built 1922), Mauretania (35739 GRT, built 1939) and Queen Mary (81235 GRT, built 1936) with troop from New Zealand and Australia on board and escorted by the British heavy cruisers HMS Shropshire (Capt. J.H. Edelsten, RN), HMS Cumberland (Capt. G.H.E. Russell, RN) and HMS Dorsetshire (Capt. B.C.S. Martin, RN) was joined around 0800 hours by HMS Argus (Capt. H.C. Bovell, RN), which came from Gibraltar, and joined around 1000 hours by the battlecruiser HMS Hood (Capt. I.G. Glennie, RN) escorted by the Canadian destroyers HMCS Restigouche (Lt.Cdr. H.N. Lay, RN), HMCS St. Laurent (Lt.Cdr. H.G. De Wolf, RCN), HMCS Fraser (Cdr. W.B. Creery, RCN) and HMCS Skeena (Lt.Cdr. J.C. Hibbard, RCN) which came from the U.K. Shortly afterwards HMS Dorsetshire left the convoy to proceed to Gibraltar.
Later that day, around 1500 hours, the convoy was joined by the destroyer HMS Wanderer (Cdr. J.H. Ruck-Keene, RN) and around 1600 hours by two more destroyers HMS Broke (Cdr. B.G. Scurfield, RN) and HMS Westcott (Lt.Cdr. W.F.R. Segrave, RN). (24)
16 Jun 1940
HMS Dorsetshire (Capt. B.C.S. Martin, RN) arrived at Gibraltar. (23)
16 Jun 1940
Dakar, the French battleship Richelieu and the fall of France Timespan; 16 June to 7 July 1940.
The fall of France, 16 June 1940.
On 16 June 1940, less then six weeks after the invasion of France and the low countries had started on May 10th, all military resitance in France came to an end. The question of control of the French fleet had thus become, almost overnight, one of vital importance, for if it passed into the hands of the enemy the whole balance of sea power would be most seriously disturbed. It was therefore policy of H.M. Government to prevent, at all costs, the French warships based on British and French harbours overseas from falling into the hands of Germany.
The bulk of the French fleet was at this time based in the Mediterranean. There drastic steps were taken to implement this policy. Elsewhere the most important units were the two new battleships completing, the Jean Bart at St. Nazaire and more importantly as she was almost complete, the Richelieu, at Brest.
Events during the Franco-German negotiations 17-25 June 1940 and politics.
It was on the 17th of June 1940, when the newly-formed Pétain Cabinet asked the Germans to consider ‘honourable’ peace terms in order to stop the fighting in France. At 1516 (B.S.T.) hours that day the Admiralty issued orders that British ships were not to proceed to French ports. On receipt of these orders Vice-Admiral George D’Oyly Lyon, Commander-in-Chief South Atlantic, ordered the aircraft carrier HMS Hermes (Capt R.F.J. Onslow, DSC, MVO, RN) then on her way to Dakar after a patrol off the Canary Islands to proceed to Freetown instead at her best speed. At the same time he recalled the British SS Accra which had sailed from Freetown for Dakar at 1730 hours (zone +1) with 850 French troops on board. She returned to Freetown at 0800/18. The British transport City of Paris with 600 French troops on board from Cotonou was ordered to put into Takoradi. On the 18th the Commander-in-Chief was also informed by Commander Jermyn Rushbrooke, RN, the British Naval Liaison Officer at Dakar that the Commander-in-Chief of the French Navy, Admiral Darlan had ordered Admiral Plancon at Dakar to continue fighting and also that the shore batteries and AA personnel there had declared for the British. At 0245/18 Vice-Admiral Lyon passed this information to the Admiralty, cancelled his orders to HMS Hermes to proceed to Freetown and directed her with the armed merchant cruisers HMS Carnarvon Castle (Capt. M.J.C. de Meric, RN) and HMS Mooltan (Capt.(Retd.) G.E. Sutcliff, RN), which were on passage to Freetown from the Western Approaches, to proceed to Dakar at full speed in order to strengthen the French morale. That afternoon the Admiralty ordered HMS Delhi (Capt. A.S. Russell, RN) to leave Gibraltar and proceed to Dakar and join the South Atlantic Station. She left Gibraltar on the 19th with an arrival date of the 23rd. In the morning of the 18th the French troopship Banfora reached Freetown, from Port Bouet, Ivory Coast with 1000 troops on board, and sailed for Dakar without delay. The French armed merchant cruiser Charles Plumier, which had been on patrol south of the Cape Verde Islands reached Dakar at 1015/18.
Meanwhile the British Naval Liaison Officer, Dakar’s signal had been followed by a report from the Naval Control Service Officer at Duala that an overwhelming spirit existed amongst the military and civilian population of the French Cameroons to continue fighting on the British side, but that they required lead, as the Governer was not a forceful character; but that morning the Governor of Nigeria informed the Commander-in-Chief that he considered steps to be taken to prevent a hostile move from Fernando Po (off the entrance to the Cameroon River). Accordingly, at 1845/18, the armed merchant cruiser HMS Bulolo (A/Capt. C.H. Petrie, RN) sailed from Freetown at 14 knots to show herself off San Carlos on the morning of the 23rd, and thence to anchor of Manoka in the Cameroon River the next day (her draught prevented her from reaching Duala). A/Capt. Petrie was then to proceed to Duala and call a conference.
It was difficult to arrive at a clear appreciation of the situation in French West-Africa but on the morning of the 19th June the Commander-in-Chief informed the Admiralty that, as the evidence pointed to an established resolve on the part of the West-African Colonies to join Great Britain whatever happened, he intended to allow French troop movements to continue. This he anticipated would avoid French exasperation and mistrust. During the early afternoon he heard from the Governors of Nigeria and the Gold Coast that French officers and non-commissioned officers were planning to leave the Cameroons and to join the British forces in Nigeria. At 1900/19 the Commander-in-Chief held a conference with the Governor of Sierra Leone at which it was decided that the Governor should cable home urging immediate action to persuade the French colonial troops and authorities to remain in their territories and hold their colonies against all attacks. In the evening the Commander-in-Chief reported to the Admiralty that French Guinea was determined to keep fighting on the British side. Meanwhile the Governor-General of French Equatorial Africa at Brazzaville was wavering and suggested leading his troops to the nearest British Colony. Late that night, still on the 19th, the Commander-in-Chief informed him that it was essential that he should remain at his post and that it was the expressed intention of French West Africa to fight on to victory.
Next morning, on the 20th, the Admiralty informed the Commander-in-Chief that the new French battleship Richelieu (about 95% complete) had departed Brest for Dakar on the 18th. Her sister ship, Jean Bart (about 77% complete) had left St. Nazaire for Casablanca on the 19th. During the afternoon of the 20th the British Liaison Officer at Dakar reported that according to the French Admiral at Dakar the French Government had refused the German armistice terms and would continue the fight in France. This was entirely misleading. For nearly two days the Commander-in-Chief had no definite information till at noon on 22 June when a BB C broadcast announced the signing of a armistice between France and Germany, which was to followed by one between France and Italy. Still there was much uncertainty, and the rest of the day was apparently spent in waiting for news. Early next morning, the 23rd June, the Admiralty informed the Commander-in-Chief that the French Bordeaux Government had signed an armistice with Germany. As the terms were not fully known the attitude of the French Navy remained uncertain. Shortly after 0200/23 the Admiralty gave orders that HMS Hermes was to remain at Dakar, and gave the Commander-in-Chief the text of the British Government’s appeal to the French Empire and to Frenchmen overseas to continue the war on the British side. The final collapse of France naturally exercised an important influence on the dispositions and movements of the South Atlantic forces. Also on the 23rd the cruiser HMS Dorsetshire (Capt. B.C.S. Martin, RN) and the destroyer HMS Watchman (Lt.Cdr. E.C.L. Day, RN) departed Gibraltar for Dakar and Casablanca respectively, and the same morning HMS Bulolo arrived off Fernando Po and showed herself of San Carlos and Santa Isabel. At noon she anchored off Manoka, in the Cameroon River, in the hope of restoring morale at Duala. Meanwhile HMS Mooltan had arrived at Freetown from Dakar and the United Kingdom, and during the afternoon (1500/23) the armed merchant cruiser HMS Maloja (A/Capt. V. Hammersley-Heenan, RN) reached Dakar from the Northern Patrol to join the Freetown escort force. Half an hour later the Richelieu and escorting destroyer Fleuret arrived at Dakar.
For a time the attitude of the French Governor-General at Dakar, the French North African colonies and the French Mediterranean Fleet, and the battleship Richelieu remained in doubt. Then owning to the anticipated difficulty of maintaining French salaries and supplies if the French did not accept the British offer, the situation at Dakar rapidly deteriorated, and by the evening of the 23rd reached a critical state. Early on the 24th, therefore, the Admiralty ordered the Commander-in-Chief to proceed there as soon as possible. The Commander-in-Chief replied that he intended to proceed there in the ex-Australian seaplane carrier HMS Albatross (Cdr. W.G. Brittain, RN), which was the only available ship, and expected to reach Dakar around noon on the 25th. At 1015/24 he left Freetown and reached Dakar around 1600/25. Meanwhile the Richelieu had put to sea. From then on the naval operations centred mainly on the battleship.
The problem of the Richelieu, 25-26 June 1940.
The Richelieu which had been landing cadets at Dakar, had sailed with the Fleuret at 1315/25 for an unknown destination. She was shadowed by an aircraft from HMS Hermes until 1700 hours. She was reported to be steering 320° at 18 knots. At 1700 hours the Admiralty ordered HMS Dorsetshire to shadow her, and at 2200 hours HMS Dorsetshire reported herself as being in position 16°40’N, 18°35’W steering 225° at 25 knots, and that she expected to make contact with the Richelieu at midnight. At 2126 hours, the Admiralty ordered the Vice-Admiral aircraft carriers (Vice-Admiral L.V. Wells, CB, DSO, RN) in HMS Ark Royal (Capt. C.S. Holland, RN) to proceed with dispatch to the Canary Islands with HMS Hood (Capt. I.G. Glennie, RN) and five destroyers (actually only four sailed with them; HMS Faulknor (Capt. A.F. de Salis, RN), HMS Fearless (Cdr. K.L. Harkness, RN), HMS Foxhound (Lt.Cdr. G.H. Peters, RN) and HMS Escapade (Cdr. H.R. Graham, RN)). They departed Gibraltar in the morning of the 26th.
Early on the 26th, the Admiralty informed the Commander-in-Chief, South Atlantic, and the Vice-Admiral, aircraft carriers, that His Majesty’s Government had decided that the Richelieu was to be captured and taken into a British port. They were to take every step to avoid bloodshed and to use no more force then was absolutely necessary. It was understood that the French battleship had H.A. ammunition on board but no main armament ammunition, that forenoon however, the British Liaison Officer Brest reported that she had embarked 15” ammunition before leaving there. HMS Hood was to perform this task if possible but that there were a risk that the Richelieu might get away before her arrival, or if she tried to enter a neutral port such as La Luz in the Canaries, HMS Dorsetshire was to take action. After the capture she was to be taken to Gibraltar. The battleship HMS Resolution (Capt. O. Bevir, RN), which was at Gibraltar, was detailed to intercept the Jean Bart in case she would depart Casablanca and deal with her in the same way.
Vice-Admiral Wells reported that HMS Ark Royal, HMS Hood and their escorting destroyers would pass through position 36°00’N, 06°35’W at 0300/26, steering 225° at 20 knots. HMS Dorsetshire, meanwhile, having seen nothing of the Richelieu by 0015/26, had proceeded to the northwestward, and then at 0230/26 turned to course 030°. At 0530/26 she catapulted her Walrus aircraft to search to the northward, and at 0730 hours it sighted the Richelieu in position 19°27’N, 18°52’W on course 010°, speed 18.5 knots. Eleven minutes later she altered course to 195°. The aircraft proceeded to shadow, but missed HMS Dorsetshire when it tried to return and in the end was forced to land on the sea at 0930 hours about 50 nautical miles to the southward of her. The Dorsetshire which had turned to 190° at 0905 hours was then in position 18°55’N, 17°52’W. She turned to search for her aircraft. Around noon she abandoned the search and steered 245° at 25 knots to intercept the Richelieu, which she correctly assumed to be continuing to the southward. She made contact soon after 1430 hours and at 1456 hours reported that she was shadowing the battleship from astern.
In the meantime the French Admiral at Dakar had informed Vice-Admiral Lyon that the ‘Admiral Afrique’ had ordered the Richelieu and the Fleuret to return to Dakar. At 1512 hours the Commander-in-Chief, South Atlantic asked the Admiralty whether, under these circumstances, HMS Dorsetshire was to attempt to capture the Richelieu. He was confident that any interference would antagonise all the local authorities and the French people in general. He also pointed out that His Majesty’s ships at Dakar would be placed in a most difficult position.
At 1630/26, HMS Dorsetshire, reported that she was in position 17°21’N, 18°22’W with the Richelieu within easy visual distance. Relations between the two ships remained cordial. The French ship had not trained her guns when she sighted the Dorsetshire, and she expressed regret that, having no aircraft embarked, she was unable to co-operate in the search for her missing Walrus aircraft but she signalled to Dakar for a French plane to assist. In view of her declared intention to return to Dakar, Capt. Martin took no steps to capture her and at 1700 hours he was ordered by the Admiralty to only shadow the Richelieu. At the same time HMS Hermes left Dakar to search for HMS Dorsetshire’s Walrus.
Shortly after 1900/26, the Admiralty ordered Ark Royal, HMS Hood and their four escorting destroyers to return to Gibraltar. At 2015 hours, the Admiralty ordered HMS Dorsetshire to cease shadowing the Richelieu and to search for her missing Walrus. On receipt of these orders she parted company with the Richelieu and Fleuret at 2300/26, being then some 70 nautical miles from Dakar. HMS Dorsetshire then proceeded to the north-north-eastward at 23 knots.
At first light on the 27th, HMS Hermes, then some 30 nautical miles to the southward, flew off seven aircraft to assist in the search. It was however HMS Dorsetshire herself which eventually found and recovered her aircraft at 1107/27. Meanwhile the Richelieu had arrived off Dakar at 0900/27 but did not enter the port. Shortly afterwards she made off the the north yet again. HMS Hermes then steered to the northward to be in a position to intercept if needed. Nothing was seen of the Richelieu until she was again located off Dakar at 0500/28. HMS Hermes, by that time about 400 nautical miles north of Dakar, was ordered to proceed southwards and return to Dakar.
The Commander-in-Chief, South Atlantic, at Dakar 26-29 June 1940.
While these movements were going on at sea, the position at Dakar was steadily deteriorating. At about 1830/26, the Commander-in-Chief had reported to the Admiralty that the French Admiral at Dakar had informed him, on Admiral Darlan’s instructions, that the presence of British warships at Dakar was in contrary to the terms of the Franco-German armistice. At 1700/26 (zone -1) however, the Admiralty had signalled to the Commander-in-Chief that, as the French codes were compromised, that French authorities could no longer be sure that orders came from Admiral Darlan but Admiral Plancon refused to question the authenticity of any signal he received. During the night the appointment of the British Liaison Officer at Dakar was terminated.
At 0500/27 the Richelieu was seen approaching Dakar, but 25 minutes later she turned to seaward again and the Commander-in-Chief ordered a Walrus aircraft from HMS Albatros to shadow her. That afternoon he informed the Admiralty that the Richelieu had put to sea to escort five French armed merchant cruisers [according to another source these were the armed merchant cruisers (four in number and not five) El D’Jezair, El Kantara, El Mansour, Ville d’Oran and the large destroyers Milan and Epervier which came from Brest] to Dakar. The Admiralty was clearly anxious that the Richelieu should not escape and at 0021/28, they ordered Vice-Admiral Wells with HMS Ark Royal, HMS Hood escorted by four destroyers (HMS Faulknor, HMS Fearless, HMS Foxhound and HMS Vidette (Cdr.(Retd.) D.R. Brocklebank, RN) to proceed to the Canaries to intercept her if she continued to steam to the northward. These ships (with HMS Escapade instead of HMS Vidette) had only returned to Gibraltar late the previous evening from their first sortie to intercept the Richelieu. Now they left again around 0600/28 but were quickly ordered to return to Gibraltar and were back in port around noon.
Around 0500/28 HMS Dorsetshire, proceeding back towards Dakar after having picked up her lost aircraft encountered the Richelieu about 10 nautical miles north of Dakar. Admiral Wells was then ordered by the Admiralty to return to Gibraltar. The rapid deterioration of the situation in West Africa is clearly shown in a series of signals which passed between the Commander-in-Chief South Atlantic and the Admiralty on 28 June. At 1100 hours, the Commander-in-Chief signalled that the French had refused HMS Dorsetshire permission to enter Dakar and that she was therefore proceeding to Freetown with all dispatch to fuel and return to the Dakar area as soon as possible. HMS Dorsetshire arrived at Freetown at 0545/29. At 1415/28 the Commander-in-Chief informed the Admiralty that the French Admiral at Dakar had issued orders to prevent H.M. ships from communicating with, or receiving stores, from the shore. In reply he had told the French Admiral that HMS Hermes would enter Dakar on the 29th to embark aircraft stores and fuel, and that he himself would sail from there in HMS Albatros after seeing the commanding officer of HMS Hermes. At 1515/28 the Commander-in-Chief informed the Admiralty of the steps he would take in case the Richelieu would proceed to sea again. The Admiralty then issued orders that Dakar was to be watched by an 8” cruiser within sight of the French port by dayand within three miles by night. HMS Hermes was to remain off Dakar until relieved by HMS Dorsetshire after this ship had returned from fueling at Freetown.
HMS Hermes arrived at Dakar at 0900/29. During the day she embarked Fleet Air Arm personnel and stores which had been landed there earlier. She then completed with fuel and sailed at 1800/29. She then patrolled off Dakar until she was relieved by HMS Dorsetshire at 1800/30. The Commander-in-Chief had sailed from Dakar in HMS Albatros at 1030/29. He arrived at Freetown at 1800/30 and transferred his flag to the accommodation ship Edinburgh Castle.
Deterioration of Franco-British relations, 1 – 3 July 1940.
The first few days of July saw a swift deterioration of Franco-British relations everywhere. The paramount importance of keeping the French fleet out of the hands of the enemy forced the British Government to take steps. According to the armistice terms the French fleet had to assemble at ports under German or Italian control and be demilitarized. To the Government it was clear that this would mean that the French ships would be brought into action against us. The Government therefore decided to offer the French naval commanders the following options; - to continue the fight against the Axis, to completely immobilization in certain ports or to demilitarize or sink their ships.
Already a powerful squadron, known as ‘Force H’ had been assembled at Gibraltar, in order to fill the strategic naval vacuum in the Western Mediterranean caused by the defection of the French fleet, and on 30 June Vice-Admiral J.F. Somerville hoisted his flag in HMS Hood. His first task was to present the British alternatives to the Admiral commanding the French ships at Oran, failing the acceptance of one of them, he was to use force.
To return to West-Africa, HMS Hermes reached Freetown with the Fleet Air Arm passengers and stores from Dakar on 2 July. Early that afternoon the Commander-in-Chief asked the Consul General at Dakar to obtain, if possible, assurance from the French Admiral there that if British warships were not allowed to use Dakar, enemy men-of-war should also be forbidden to use it. At 1915/2, the ex-British Liaison Officer, who had not yet left Dakar, reported the arrival of a British merchant ship which had not been diverted. He also reported that the French ships Katiola and Potiers might be sailing for Casablanca, escorted by armed merchant cruisers and destroyers. The Admiralty however ordered HMS Dorsetshire, which was maintaining the watch on Dakar, to take no action. At 2310/2 the Commander-in-Chief asked the Consul-General whether there was any chance of the Polish and Belgian bullion which was in the armed merchant cruiser Victor Schoelcher being transferred to either the Katiola or Potiers. He received no reply, and the continued silence of the British Consul led him to believe that the Consul’s signals were either being held up or mutilated.
Next forenoon, 3 July, the Commander-in-Chief informed the Admiralty that he intended to divert all British shipping in the South Atlantic from all French ports. Early that morning Vice-Admiral Somerville’s Force H had arrived off Oran. For the next ten hours strenuous efforts were made to persuade the French Admiral to accept one of the British alternatives, but without success. At 1554 hours (zone -1) Force H sadly opened fire on the ships of their former ally at Mers-el-Kebir, inflicting heavy damage and grievous loss of life. None could predict the result of these measures on the Franco-British relations, but it was sure they would not be improved.
During the afternoon of July 3rd the Commander-in-Chief, South Atlantic, on Admiralty instructions, directed all British Naval Control Officers and Consular Shipping Advisers to order all Biritsh and Allied ships to leave French ports as soon as possible, if necessary disregarding French instructions. All British warships in French ports were to remain at short notice and to prepared for every eventuality. The only warship in a French port within the limits of the South Atlantic Station at the time was HMS Bulolo, which was at Manoka in the Cameroons. At 2048 hours (B.S.T.) the Admiralty ordered all British warships in French ports to proceed to sea and at 2223 hours the Commander-in-Chief, South Atlantic ordered HMS Bulolo to proceed to Lagos, where she was to remain with HMS Dragon (Capt. R.G. Bowes-Lyon, MVO, RN) until further orders.
HMS Dorsetshire off Dakar, 3-7 July 1940.
Meanwhile HMS Dorsetshire had continued her watch off Dakar. On 3 July 1940 there were sixteen French warships and seven auxiliaries in the harbour. This number included the battleship Richelieu, the large destroyers Fleuret, Milan, Epervier, the armed merchant cruisers El D’Jezair, El Kantara, El Mansour, Ville d’Oran, Ville d’Alger, Victor Schoelcher and Charles Plumier, the colonial sloop Bougainville, the submarines Le Heros and Le Glorieux. At 0917/3 the Admiralty asked the Commander-in-Chief for the Richelieu’s berth at Dakar. HMS Dorsetshire informed him that at 1125/3 she was in position 045°, Cape Manuel lighthouse, 2.6 nautical miles, ships head 230°. Captain Martin seems to have drawn his own conclusions from this question and at 1350 hours he signalled to the the Commander-in-Chief his opinion that the Richelieu’s propellers could be severely damaged by depth charges dropped from a fast motor dinghy, and he asked permission to carry out such an attack about 2300 hours that night. Vice-Admiral Lyon replied that he had no instructions from the Admiralty to take offensive action against the Richelieu. At 1625 hours, however, the Admiralty ordered HMS Dorsetshire to get ready, but to await approval before actually carrying out an attack. This was followed at 1745 hours by a signal that the proposed attack was not approved as it was feared to be ineffective and for the time being the idea was ‘shelved’. [More on this idea later on.]
At 1904/3, the Admiralty ordered HMS Hermes to leave Freetown with all despatch to join HMS Dorsetshire off Dakar at 0500/5. At 2112/3 the Admiralty ordered HMS Dorsetshire to shadow the Richelieu if she sailed and proceeded northwards. If the vessel however made for the French West Indies, the Dorsetshire was to make every effort to destroy her by torpedo attack, and, if that failed, by ramming [ !!! ]. Late that evening the French Government decreed that all British ships and aircraft were forbidden, under penalty of being fired upon without warning, to approach within 20 nautical miles of French territory at home or overseas. Just before midnight the Admiralty gave orders that HMAS Australia (Capt. R.R. Stewart, RN), after refueling at Freetown, was to join HMS Dorsetshire off Dakar. At 0926/4, the Commander-in-Chief, South Atlantic ordered HMS Hermes and HMAS Australia to rendez-vous with HMS Dorsetshire 21 nautical miles from Dakar instead of the 15 nautical miles previously arranged and at 1037 hours he informed all three ships that as the French Air Force and submarines had orders to attack British ships off Casablanca and Dakar. He therefore issued orders that French aircraft and submarines were to be attacked and destroyed on sight. During that afternoon the Prime Minister announced in the House of Commons that, as an alternative to the German demands, French warships might proceed to the West Indies. At 2041 hours the Commander-in-Chief, South Atlantic asked whether, in view of this, the Admiralty intended that the Richelieu should be attacked if she was to proceed to the West Indies. Before this message was received, a signal was sent at 2050 hours cancelling the orders for the Richelieu’s destruction and at about midnight the Admiralty directed that she should be shadowed only.
Early on the 5th the Consul-General at Dakar reported that the merchant vessel Argyll with Commander J. Rushbrooke, RN, the ex-British Naval Liaison Officer, Dakar and his staff onboard, had, in accordance with instructions from the French authorities left Dakar the previous day but that she was recalled on reaching the outer boom, an order which had led the Consul-General to make a protest. Soon after midnight 4/5 July orders were received from the Admiralty that the sloop HMS Milford (Capt. R.J. Shaw, MBE, RN) should be sent to join the patrol off Dakar to provide A/S protection. She left Freetown for Dakar at 1000/5.
At 0723/5, in view of the French order forbidding the approach of British vessels and aircraft within 20 nautical miles from French territory at home and overseas, the Commander-in-Chief ordered his ships off Dakar not to approach within 20 nautical miles of the shore and replied in the affirmative when HMS Dorsetshire asked whether this rule also applied by night. During the afternoon he informed his command that French warships was orders not to attack the British unless they were within these 20 nautical miles. He later added that also submarines had the same orders.
At 1853/5, the Commander-in-Chief ordered HMS Dorsetshire, HMAS Australia, HMS Hermes and HMS Milford not to attack French submarines outside the 20 mile zone unless they were obviously hostile. An Admiralty report then came in the the Richelieu was reported to have put to sea but HMS Dorsetshire quickly contradicted that report.
Dispositions off Dakar at 0300 on 7 July 1940.
At 0300/7, two of the British warships off Dakar which were under the command of Capt. Martin (being the senior officer) were patrolling of Dakar (HMS Dorsetshire and HMS Hermes). The third ship (HMAS Australia) was patrolling about 35 to 40 nautical miles further to the north. The fourth ship HMS Milford was approaching Dakar from the south. At 0307 hours a signal from the Admiralty was received which gave a completely different complexion to their operations.
More on this in the event for 7 July 1940, The attack on the Richelieu.. This event can be found on the pages of the ships involved; HMS Hermes, HMS Dorsetshire, HMAS Australia and HMS Milford. (25)
23 Jun 1940
HMS Dorsetshire (Capt. B.C.S. Martin, RN) departed Gibraltar for the 'Dakar area' to monitor the French battleship Richelieu which had arrived there from Brest on that day. She was briefly escorted by HMS Watchman (Lt.Cdr. E.C.L. Day, RN) which was to proceed to Casablanca. (23)
23 Jun 1940
For the daily positions of HMS Dorsetshire from 23 June to 29 June 1940 see the map below.
(23)
26 Jun 1940
At 1430 hours, HMS Dorsetshire (Capt. B.C.S. Martin, RN), sighted the French battleship Richelieu which had departed Dakar the previous day for Casablanca with the destroyer Fleuret. About two hours later Richelieu and Fleuret reversed course and returned to Dakar where they arrived early on the 28th still shadowed by Dorsetshire. (23)
29 Jun 1940
HMS Dorsetshire (Capt. B.C.S. Martin, RN) arrived at Freetown. After fuelling from the oiler RFA Cedardale (Master W. Frost) she immediately left Freetown again for the 'Dakar area'.
For the daily positions of HMS Dorsetshire during the period of 29 June 1940 to 12 July 1940 see the map below.
(23)
3 Jul 1940
Around 2330N/3, HMS Hermes (Capt R.F.J. Onslow, DSC, MVO, RN) departed Dakar to join HMS Dorsetshire (Capt. B.C.S. Martin, RN) patrolling off Dakar.
Around 0100N/4, HMAS Australia (Capt. R.R. Stewart, RN) also departed Freetown to join the other ships on patrol off Dakar.
Around 0530N/5, HMS Hermes and HMAS Australia joined HMS Dorsetshire and commenced patrolling near Dakar. (26)
7 Jul 1940
The attack on the French battleship Richelieu, 7 / 8 July 1940.
The Admiralty orders operations against the Richelieu.
The Admiralty had originally intended that the Richelieu should be dealt with by Vice-Admiral Somerville’s Force H from Gibraltar but later they decided to employ Force H in the Mediterranean and that the Richelieu was to be put out of action by aircraft from HMS Hermes (Capt. R.F.J. Onslow, RN). Both on account of his up-to-date local knowledge and his air experience Captain Onslow was chosen to take charge of this operation, with the temporary rank of Acting Rear-Admiral. The Admiralty orders to him were contained in a signal sent at 0144/7 (zone -1), which read as follows; ‘H.M. Government have decided question of Richelieu and other French warships at Dakar must be settled without delay. 1) You have been selected to take charge of the operations on account of your recent local and air knowledge, and are hereby promoted to Acting Rear-Admiral until further orders. 2) You are to take HMS Dorsetshire (Capt. B.C.S. Martin, RN), HMAS Australia (Capt. R.R. Stewart, RN) and HMS Milford (Capt. R.J. Shaw, MBE, RN) under your command. 3) You should communicate with the French Naval Authorities at Dakar in manner you think best and transmit text of message which will follow in another signal soon. A decision must be asked within four hours so as to give the Richelieu no time to get underway. 4) Shoud alternative 3 be accepted you take such measures of demilitarization to ensure that ships could not be brought into service for at least a year even at a fully equipped dockyard port. [Seven suggestions to archive this were then given] 5) If all alternatives are refused you should as soon as possible carry out an attack on Richelieu with torpedo aircraft and maintain this attack until it is certain she is sufficiently disabled. Approximately half your torpedoes should have Duplex pistols and half contact pistols and endeavor should be made to obtain a hit in the vicinity of the propellers with a contact pistol. All attacks should be from one side if possible. 6) Bombardment by 8” cruisers should not be carried out in view of the small damage to be expected on the Richelieu and streght of defences. 7) HMS Dorsetshire and HMAS Australia should show themselves at intervals during the operation, but no unnecessary risk of submarine attacks should be accepted by any ship. French naval authorities should be informed your forces are kept at a distance until this decision on account of their submarines. 8) Should it be possible after Richelieu have been dealt with, the two light cruisers should also be attacked. Armed merchant cruisers should not be attacked. 9) Any ship endeavours to put to sea should be brought into action. Whether Richelieu can be attacked under these circumstances by the 8” cruisers should depend on her 15” main battery being operative and effective. 10) H.M. Government desires operation to be carried out as soon as possible subject to your plan as being as proposed. 11) Should Richelieu have left Dakar before receipt of these orders she is to be called upon to stop. If she obeys this order the procedure outlined above is to be carried out. If she refuses to stop she is to be attacked with torpedo aircraft. 12) Inform Admiralty in due course whether operation will take place and of various phases of operations as they occur.
This signal was followed almost immediately by another which gave the terms of communication which Acting Rear-Admiral Onslow was to make to the French authorities at Dakar. Four alternatives were to be offererd; 1) To sail their ships with reduced crews and without ammunition, under British control, to a British port. The crews would be repatriated as soon as possible, and the ships restored to France at the end of the war, or compensation paid if damaged meanwhile 2) To sail with us with reduced crews and without ammunition to some French port in the West Indies, where the ships are to be demilitarized or perhaps entrusted to the United States. Crews to be repatriated. 3) To demilitarize the ships at Dakar to Acting Rear-Admiral Onslow’s satisfaction within 12 hours, to such an extent that they would be incapable of taking part further in the present war. 4) To sink their ships within 6 hours. A reply was required within 4 hours, failing the adoption of one of the alternatives, force will be resorted to.
Acting Rear-Admiral Onslow’s proceedings, 7 July 1940.
After these clear and unequivocal signals had been deciphered Acting Rear-Admiral Onslow’s first concern was the delivery of the British ultimatum to the French authorities. He decided to concentrate HMS Hermes, HMS Dorsetshire, HMAS Australia and meet up with HMS Milford as soon as possible. HMS Milford would then proceed into Dakar with the full text of H.M. Governments terms. By 0800 hours that morning the three ships were steaming south in company, but there was some delay in meeting HMS Milford, as owning to pressure of work in the wireless office of HMS Hermes, Acting Rear-Admiral Onslow had told HMAS Australia to pass a signal to HMS Milford to join his flag, and the Australia used a cypher not held by the Milford. Meanwhile, at 0900 hours the Commander-in-Chief, South Atlantic had asked Acting Rear-Admiral Onslow whether he wished any signal to be made to the Consul-General at Dakar. He replied with a request that the Consul-General to be informed that HMS Milford was being sent into Dakar with an important message for the French Admiral.
It was not until 1155 hours that HMS Milford joined. No time was then lost, and havig embarked Paymaster-Lieutenant R.S. Flynn, RN as interpreter, she left for Dakar at 1214 hours, with a copy of the British ultimatum on board. At 1300 hours, Acting Rear-Admiral Onslow informed the Admiralty that she was on her way and that she should arrive around 1400 hours. On her arrival off Dakar however, the French Admiral declined to accept the British communication and threatened to open fire unless she retired. A request that he should reconsider his decision was met with a blank refusal and at 1448 hours HMS Milford reported that she was returned towards HMS Hermes. Acting Rear-Admiral Onslow then reported this information to the Admiralty without delay, adding that he intended to attack at dusk.
From the first appearance of HMS Milford off Dakar the French kept the British force under aerial observation. Aircraft from HMS Hermes have been keeping Dakar under observation during daylight hours as of 0600/5. At 1700/7 a special reconnaissance was carried out by the Squadron Commander with the senior observer in view of the attack that had to be carried out soon. Shortly afterwards Admiralty approval for the dusk attack was received.
Meanwhile the French authorities seem to have thought better of their abrupt refusal to receive the Milford’s communication, and at about 1615 hours a signal was made to her to the effect that the Governor-General approved of her message being passed by W/T. A further signal seemed to indicate that Admiral Plancon was now prepared to receive it. These signals were interpreted by HMAS Australia and passed on to Acting Rear-Admiral Onslow, who decided to deal with the matter himself, and on receipt of the second message started to pass H.M. Government’s full terms in English by wireless; but in order to allow time to prepare for offensive action during the night he reduced the time limit for a reply from four hours to two. These developments he reported to the Admiralty and the Commander-in-Chief, South Atlantic at 1700 hours. Dakar W/T station acknowledged the receipt of the message at 1805 hours and the ultimatum was thus due to expire at 2005/7. This however was over an hour after sunset and the Commander-in-Chief, South Atlantic therefore suggested that the attack with torpedo planes should therefore be carried out at dawn the next day. The possibility that the Richelieu might put to sea during the night could not be overlooked and Acting Rear-Admiral Onslow deployed his ships in such a manner and closer inshore then 20 miles that the most likely routes were covered.
Disposition of Dakar during the night of 7/8 July 1940.
Air reconnaissance had shown that a definite lane leading from the Richelieu in a north-easterly direction had been purposely made through the large number of merchant ships anchored in the Outer Roads, and it seemed that a passage through the outer boom might have been made between Gorée Island and R’solue Shoal to facilitate her escape in that direction. To guard against this HMS Milford was ordered to patrol further eastward then originally intended.
At 1914/7 the Acting Rear-Admiral detached HMS Dorsetshire and HMAS Australia to take up their patrol lines, while HMS Hermes and HMS Milford in company proceeded towards the west end of the latter’s patrol line. No reply to the ultimatum had been received from the French authorities, and at 2003 hours (two minutes before it’s expiration) Acting Rear-Admiral Onslow made a polite signal asking for an answer. There was no response and at 2020 hours he decided to take offensive action. This was to consist of a depth charge attack by the Hermes’s fast twin-engine motor-boat on the Richelieu during the night, followed by a torpedo attack with aircraft at dawn. At 2050 hours HMS Hermes and HMS Milford stopped, being then 17 nautical miles due south of Cape Manuel, the motor-boat was lowered, and started on the first stage of its adventurous trip.
Depth charge attack on the Richelieu.
The motor-boat, which was manned by a volunteer crew of nine with blackened faces, commanded by Lt.Cdr. R.H. Bristowe, RN, had been painted matt black all over during the afternoon (much to the distress of the Boat Officer) and had been armed with a Vickers machine-gun. It carried four depth charges, a portable wireless set, which would prove to be much useful, and extra petrol, oil and provisions. Lt.Cdr. Bristowe’s orders were to proceed with HMS Milford to the western end of her new patrol line within 10 nautical miles of Dakar harbour and thence to go on alone into the outer harbour, passing over and around booms as he thought best. He was to drop the four depth charges under the Richelieu’s stern if he discovered her at anchor, or across her bows if he found her under way. If he failed to find her he was to report that by wireless at once. After the operation he was to endeavor to get in tow of the Milford on her patrol line by 0300/8 but if he found this impossible he was to make a rendezvous with Acting Rear-Admiral Onslow’s force at 0530/8.
At 2100/7 the crew manned the boat and proceeded with two depth charges from the Hermes to pick up two more from the Milford. A considerable swell was running and when the first depth charge was being hoisted in from the Milford it struck one of the crew of the motor-boat and struck him out. It also wrecked the port engine. Fortunately the new starboard engine which had been fitted during the afternoon, but which had not been tested due to lack of time, was running beautifully.
When HMS Milford got under way at 2145/7, she ordered to motor-boat to follow her at 12 knots if possible. The depth charges slung outboard upset the boat’s stability and it had a perilous trip. Near its point of departure from the Milford a large ship hove into sight which, at first, looked like the Richelieu but it answered the Milford’s challenge correctly and proved to be HMAS Australia.
The motor-boat then parted company and, when out of sight, stopped while the crew lifted the last depth charge into position. When this task was completed, all hands, except the two Royal Marines, which were manning the Vickers machine-gun in the bows carried out a drill with the depth charge throwers. Then they continued their was towards Dakar. Gorée Islands hove into sight after what appeared to have been hours. Actually it was now 0015/8. Shortly afterwards the boat almost collided with a destroyer that was patrolling outside the boom but remained unseen. It then proceeded slowly at only three knots until off the outer boom. The engine was then stopped and it slid over safely. It then went ahead at dead slow speed with engine muffled until it encountered a colonial sloop (must have been the Bougainville), which it at first mistook for the Richelieu and had nearly attacked. Again the motor-boat remained unseen and it now steered for the merchant ships which formed two straight lines running in a north-easterly direction from the Richelieu as she lay about three quarters of a mile due east of the inner harbour entrance. Then passing round the north-eastern end of the inner boom, it steered towards the reported position of the Richelieu, keeping close to the nearest line of merchant ships until the battleship with a merchant vessel laying almost dead astern of her, came into sight. Lt.Cdr. Bristowe steered for the merchant ship which afforded an excellent position from which to attack. As he approached her, however, he sighted a harbour launch under way just astern of the battleship, and decided to attack at once from the quarter instead of from astern. Events followed quickly. The motor-boat was challenged but before the challenge was completed Lt.Cdr. Bristowe had given orders to attack at full speed. As he approached the Richelieu he was challenged again six times, but although he could not reply the French held their fire.
The coxswain’s orders were to go alongside the stern of the battleship, to graze their port side steering towards her bow, and then, as soon as Lt.Cdr. Bristowe gave the order ‘over’ to dash cover amongst the merchant ships. At the last moment a lighter lying right aft along the battleship’s port side, and her port quarter boom with a boat made fast to it, came into sight in the light of the half moon. These the coxswain avoided most skillfully and at 0210 hours put the motor-boat alongside about 30 yards from the battleships stern over what Lt.Cdr. Bristowe hoped was the vital spot for which he was looking. The depth charges then went over. Frenchmen on the quarterdeck of the Richelieu stood looking over the side, apparently at first wondering about what was happening below. When they finally discovered they beat a hurried retreat. Meanwhile the motor-boat dashed for safety amongst the mechant ships. The complete absence of any explosions came as an anti-climax.
Although the Richelieu very quickly sent a general signal which was acknowledged quickly by the shore batteries and the ships in the harbour but no searchlights were switched on. Lt.Cdr. Bristowe decided to get away as soon as possible at full speed to take full advantage of the remaining two hours of darkness. He made a dash for the outer boom. As he approached the boom, however, an auxiliary vessel sighted the motor-boat and gave chase, and, being unable to shake of this pursuer, Lt.Cdr. Bristowe steered at full speed towards the boom with the French vessel only 50 yards behind. The motor-boat passed safely over the nets around 0300 hours but its pursuer got caught in the nets. Another patrol vessel then came into sight and took up the chase, but with steering a zig-zag course the moto-boat managed to escape. Neither French vessel had opened fire. It was already too late to make rendezvous with HMS Milford so Lt.Cdr. Bristowe set course to make rendezvous with the main force. At 0355 hours he informed HMS Hermes by wireless that he had dropped his four depth charges under the stern of the Richelieu at 0210 hours.
At about 0505 hours there were a number of explosions coming from the direction of the French battleship followed by heavy gunfire. A few minutes later a Swordfish aircraft passed overhead, flying to seaward. The Fleet Air Arm attack had taken place. As dawn broke the Richelieu came into sight, shrouded by a pall of yellow smoke, some two to three miles away. There was a heavy barrage of French AA fire and Lt.Cdr. Bristowe turned south to avoid it. A French bomber appeared overhead and for 15 minutes the motor-boat zigzagged to throw it off, but it dropped no bombs.
At 0545 hours, Lt.Cdr. Bristowe decided that he could not reach HMS Hermes so he set course for Bathurst, over 70 nautical miles away. Soon however, a signal was received from the Hermes to stop engines. About noon HMS Hermes picked up the motor-boat 13 nautical miles south of Cape Manuel, after it had been away from the ship for 15 hours.
Acting Rear-Admiral Onslow considered the conduct of Lt.Cdr. Bristowe and the remaining crew of the motor-boat in the highest degree of praiseworthy. It was just said that the depth charges did not explode in the shallow water. The venture clearly deserved better success.
The Fleet Air Arm torpedo attack on the Richelieu at dawn on 8 July 1940.
At 2300/7, Acting Rear-Admiral Onslow had ordered Lt.Cdr. Luard, the leader of 814 Squadron to carry out a torpedo attack with the greatest possible number of aircraft on the Richelieu at dawn the next day. As only three of the available pilots had previously taken off at night Lt.Cdr. Luard decided that the six crews should consist of one pilot and one observer only and that no air gunners were to be part of the crews (to their disappointment). They were to form up in two sub flights in line ahead at a height of 2000 feet, one mile ahead of the Hermes. The pistols carried by the first, second and fourth Swordfish were fitted with Duplex pistols and were set to run under the Richelieu at 38 feet. Those carried by the other three Swordfish were contact pistols set to run at 24 feet. All six were set to run at 40 knots.
The attack was only possible from one side owning to nets, shipping and depth of the water. From this direction, the north-east, the six aircraft were to attack in line ahead, and were then to return to HMS Hermes independently. At 0415/8 they all took off successfully from HMS Hermes which was then in position 14°37’N, 17°46’W about 20 nautical miles west of Cape Manuel, and at 0445 hours took departure about 2000 feet over her. At 0452 hours they sighted the Cape Verde peninsula and at 0500 hours when they were approaching Gorée Island they formed a single line ahead. At 0502 hours, Lt.Cdr. Luard went into a shallow dive from the south to keep a good background as long as possible, turning south-west at 0505 hours. Fortunately the Richelieu was swung heading south-east broadside on. He aimed his torpedo at her port side, two-thirds of the way aft from a range of 800 yards. When he had completed his attack he turned to port and made a rapid get-away to the south before turning west to rejoin HMS Hermes. The other five Swordfish dropped their torpedoes in quick succession. As Lt.Cdr. Luard made his attack a large number of AA guns opened fire and engaged all six Swordfish. The third aircraft to attack saw the two previous torpedo tracks running straight for the Richelieu and the last aircraft reported seeing four tracks proceeding towards her. Two of the aircraft saw a large column of smoke rising from the Richelieu and all the pilots considered that they had made good drops. Owning to the lack of light and the necessity of getting away quickly they found it imposible to observe the effect of their torpedoes but Lt.Cdr. Luard estimated that at least four or five of them had run correctly towards the target. He landed without mishap on board HMS Hermes at 0526/8 and all the other Swordfish did the same afterwards. One had been hit twice and another one once by AA fire but they had received only minor damage.
Conclusion
The exact amount of damage done to the Richelieu was not easy to determine. Lt.Cdr. Luard estimated that four or five of the torpedoes dropped by the six aircraft had run correctly towards their target and that HMS Dorsetshire reported hearing five distinct explosions between 0500 and 0515 hours. A pall of smoke shrouding the Richelieu was reported by one of the pilots and his observer. As the day wore on, further evidence convinced Acting Rear-Admiral Onslow that she had been disabled. Air reconnaissance reported her as being down by the stern, with large quantities of oil all around her. Of this he informed the Admiralty at 0930/8.
On the recovery of the motor-boat at noon Lt.Cdr. Bristowe reported hearing explosions while his motor-boat lay broken down off the end of the inner boom at 0230 hours, which he naturally attributed to his depth charges exploding underneath her stern. Like the Dorsetshire he had heard a number of explosions around 0510 hours and had noticed the pall of smoke reported by the airmen.
Between 0930 and 1235 hours, French aircraft made intermittent attacks on the British force. They failed to press these attacks home but after picking up the motor-boat Acting Rear-Admiral Onslow ordered his ships to the south and south-west to avoid the French aircraft whilst still keeping the Richelieu under observation from the air. Photographs showed her down by the stern and slightly listing to port.
At 1314/8 the Admiralty replied to the report of 0930 hours. ‘Good, but further attacks should be made and report made’. But it was too late. During the afternoon the Richelieu was moved to the inner harbour and berthed alongside the detached mole where she rested on the bottom at low tide. At this position she was immune from further torpedo attack. This information was passed to the Admiralty at 1710 hours, together with the opinion that the Richelieu was definitely disabled. It was suggested that the British force should proceed to Freetown to fuel. HMS Milford was detached after dark. The other ships took up night patrolling positions but just after midnight Admiralty approval to proceed to Freetown was received. HMS Hermes and HMS Dorsetshire indeed did so but HMAS Australia proceeded to the U.K. The passage to Freetown by HMS Hermes and HMS Dorsetshire was not without incident. In a sudden dense tropical storm during the middle watch on 10 July HMS Hermes collided with the armed merchant cruiser HMS Corfu (Capt. W.G. Agnew, RN) which was escorting convoy SL 39 coming from Freetown. HMS Corfu was badly holed, while HMS Hermes suffered severe damage to her bow and the forward end of her flight deck but was able to proceed under her own steam to Freetown where she arrived at 1800/10. On 11 July 1940 Temporary Acting Rear-Admiral Onslow reverted to his rank of Captain.
Damage to the Richelieu.
The Admiralty tried to find out if Richelieu was indeed ‘definitely disabled’ as Acting Rear-Admiral Onslow had claimed. Before the end of the month further reports became available. Commander Rushbrooke, the former British Naval Liaison Officer at Dakar was at Dakar in the merchant vessel Argyll during the attacks which was moored only 3 cables away from the Richelieu on her port beam. Commander Rushbrooke had had a ringside seat. On his arrival at Freetown he reported that at 0230/8 funnel explosions were heard from the direction of the Richelieu which gave the impression that the fuel supply to her furnaces was not normal. These explosions had occurred before and one must take into account that the Richelieu was brand new and not fully completed at that time let alone be fully worked up and possibly suffering from small defects which had not fully be remedied during her trial period. Following these explosions, two officers, which were on the bridge of the Argyll did not see any special activity on board the Richelieu nor in the harbour. These funnel explosions were probably the explosions heard by Lt.Cdr. Bristowe around 0230 hours.
Shortly after 0500/8, Commander Rushbrooke and the same two officers witnessed the air attack and at 0507 hours heard two dull thuds. When full daylight broke they saw a patch of oil round the Richelieu’s stern, which also appeared to be slightly down in the water. Later she lowered her main aerials but soon rehoisted them.
After pursuing all available reports, the Admiralty considered that the attack had been well conceived and executed, but that certain technical aspects required comment. The depth of the water at the time was 42 feet and the Richelieu’s draught was 26 feet 10 inches. In those conditions the setting of the torpedoes intended to run under the ship would have been about 3 feet more then the expected draught, or at most 33 feet (instead of 38 feet) and the setting of the contact torpedoes should have been at least 6 feet less the the draught, 21 feet at most (instead of 24 feet). In view of the shallowness of the water and the fact that the target was at anchor, too, the high speed setting of 40 knots should not have been used, as it was known that these torpedoes were liable to have an excessive initial dive on the 40 knot setting, and a much reduced one on the 29 knot setting.
It was also pointed out in the Admiralty that 18” torpedoes containing about 440 lbs. of T.N.T. hitting the ships side within the length of the citadel would not defeat the main protection. They would cause little flooding but would allow oil to escape into the sea. Torpedoes fitted with Duplex pistols exploding under the ships bottom would not produce damage visible from outside the ship. Broken aerials are a feature of underwater explosions and new aerials may have been hoisted to replace broken ones, but from Commander Rushbrooke’s report it would appear that not more then one torpedo could have exploded under the Richelieu’s main machinery compartments. It was considered, therefore, that she could not be regarded as out of action, but still as seaworthy and able to steam at at least three-quarters speed with all her main armament capable of use.
Actually the damage was more serious then this assessment. According to French sources which later became available, only one torpedo hit. It blew a hole 25 x 20 feet, fractured stern post, distorted the starboard inner shaft and flooded three compartments. She was rendered incapable of steaming more than half power, and repairs to restore seaworthiness took a year. But her main armament was intact which would be shown a few months later. (25)
10 Jul 1940
At 0302N/10, in bad weather, HMS Hermes (A/Rear-Admiral R.F.J. Onslow, DSC, MVO, RN) and HMS Corfu (Capt. W.G. Agnew, RN) collided with each other. The ships got stuck together and only came loose around 0520 hours. Most of the crew of the heavily damaged Corfu had evacuated to the Hermes but later the engine room staff returned. HMS Hermes then proceeded to Freetown while HMS Corfu got underway for Freetown also at dead slow speed and proceeding astern under escort by HMS Dorsetshire (Capt. B.C.S. Martin, RN).
At 1830A/10 HMS Dorsetshire commenced towing HMS Corfu but after two minutes the bollard was carried away and the tow parted. At 1845 hours Corfu again proceeded astern at dead slow speed.
At 0520A/11 HMS Milford (Capt. R.J. Shaw, MBE, RN) arrived on the scene for A/S protection and at 0600/11 the Dutch tug Donau arrived on the scene as well. She took HMS Corfu in tow shortly after 0800 hours.
HMS Hermes arrived at Freetown around 1800N/10 with a badly damage bow (above the waterline) and damage to the fore end of her flight deck. HMS Corfu, HMS Dorsetshire and HMS Milford arrived at/off Freetown on the 12th. HMS Corfu dropped anchor at 1900N/12. (27)
12 Jul 1940
HMS Dorsetshire (Capt. B.C.S. Martin, RN) arrived at Freetown. (28)
16 Jul 1940
HMS Dorsetshire (Capt. B.C.S. Martin, RN) departed Freetown for an anti-raider patrol in the mid-Atlantic.
A signal had been received from the Admiralty that D/F bearings indicated that an enemy raider was most likely in an area bounded by lines joining (a) 15°N, 35W (b) 22°N, 32°W (c) 20°N, 30°W (d) 15°N, 32°W.
For the daily positions of HMS Dorsetshire from 16 to 29 July 1940 see the map below.
(29)
24 Jul 1940
By now, HMS Dorsetshire (Capt. B.C.S. Martin, RN), had been ordered to patrol further south. She searched the Portugese passenger/cargo vessel Colonial (7988 GRT, built 1908) in approximate position 02°00'N, 30°20'W and took off an Italian Consul (Bianchi) coming from south America. (29)
29 Jul 1940
HMS Dorsetshire (Capt. B.C.S. Martin, RN) arrived at Freetown. (28)
30 Jul 1940
HMS Dorsetshire (Capt. B.C.S. Martin, RN) departed Freetown to patrol in the South Atlantic to search for the German raider Thor.
For the daily positions of HMS Dorsetshire from 30 July to 11 August 1940 see the map below.
(28)
11 Aug 1940
HMS Dorsetshire (Capt. B.C.S. Martin, RN) arrived at Freetown. (30)
13 Aug 1940
HMS Dorsetshire (Capt. B.C.S. Martin, RN) departed Freetown for patrol in the South Atlantic.
For the daily positions of HMS Dorsetshire from 13 to 29 August 1940 see the map below.
(30)
22 Aug 1940
HMS Dorsetshire (Capt. B.C.S. Martin, RN) arrived at St. Helena. (30)
23 Aug 1940
HMS Dorsetshire (Capt. B.C.S. Martin, RN) conducted exercises off St. Helena. (30)
24 Aug 1940
HMS Dorsetshire (Capt. B.C.S. Martin, RN) departed St.Helena to make rendez-vous at sea with the troopship Orion (23371 GRT, built 1935) and her escort the Dutch light cruiser HrMs Sumatra (Capt. C.H. Brouwer, RNN). The next day, August 25th, around 170 hours (zone -1), HMS Dorsetshire took over the escort of the Orion toward Capetown while HrMs Sumatra proceeded independently to Lobito, Portugese Africa (now Angola) before she continued on to Capetown as well. (30)
29 Aug 1940
HMS Dorsetshire (Capt. B.C.S. Martin, RN) and the troopship Orion arrived at False Bay. HMS Devonshire anchored near Simonstown. (30)
31 Aug 1940
HMS Dorsetshire (Capt. B.C.S. Martin, RN) proceeded to the Simonstown Naval Dockyard where she was taken in hand for repairs. (30)
3 Sep 1940
HMS Dorsetshire (Capt. B.C.S. Martin, RN) departed Simonstown for Durban where she was to dock. (31)
5 Sep 1940
HMS Dorsetshire (Capt. B.C.S. Martin, RN) arrived at Durban where she was immediately docked. (31)
12 Sep 1940
HMS Dorsetshire (Capt. B.C.S. Martin, RN) is undocked. (31)
18 Sep 1940
HMS Dorsetshire (Capt. B.C.S. Martin, RN) departed Durban for Simonstown. (31)
20 Sep 1940
HMS Dorsetshire (Capt. B.C.S. Martin, RN) arrived at Simonstown. (31)
21 Sep 1940
HMS Dorsetshire (Capt. B.C.S. Martin, RN) departed Simonstown for Freetown.
For the daily positions of HMS Dorsetshire during the period of 21 to 29 September 1940 see the map below.
(31)
29 Sep 1940
HMS Dorsetshire (Capt. B.C.S. Martin, RN) arrived at Freetown. (31)
1 Oct 1940
HMS Dorsetshire (Capt. B.C.S. Martin, RN) conducted gunnery exercises off Freetown. (32)
7 Oct 1940
HMS Dorsetshire (Capt. B.C.S. Martin, RN) departed Freetown to patrol in the South Atlantic.
For the daily positions of HMS Dorsetshire during the period of 7 to 18 October 1940 see the map below.
(32)
7 Oct 1940
Convoy WS 3 (Fast).
This convoy departed Liverpool and the Clyde on 7 October 1940. The convoy arrived at Suez on 16 November 1940.
The Liverpool section was made up of the troop transports; Duchess of York (British, 20021 GRT, built 1929), Monarch of Bermuda (British, 22424 GRT, built 1931) and Orontes (British, 20097 GRT, built 1929).
It was escorted by the destroyers HMS Douglas (Cdr.(Retd.) J.G. Crossley, RN) and HMCS St. Laurent (Lt. H.S. Rayner, RCN). HMCS St. Laurent however collided with a small merchant vessel very early on the 8th and had to return to Liverpool for repairs.
The Clyde section was made up of the transports; Capetown Castle (British, 27000 GRT, built 1938), Georgic (British, 27759 GRT, built 1932), Oronsay (British, 20043 GRT, built 1925) and Winchester Castle (British, 20012 GRT, built 1930).
It was escorted by the destroyers HMCS Ottawa (Cdr. E.R. Mainguy, RCN) and HMS Active (Lt.Cdr. E.C.L. Turner, RN).
At 0700/8, the Clyde section was joined by the destroyers HMS Arrow (Cdr. H.W. Williams, RN), HMS Achates (Lt.Cdr. Viscount Jocelyn, RN) and HMS Whitehall (Lt.Cdr. A.B. Russell, RN) which came from Londonderry.
At 1012/8, a large enemy bomber was seen to approach the Capetown Castle off the Clyde section and dropped a bomb which missed.
At 1050/8, HMCS Ottawa and HMS Active were ordered to close the Oronsay which had been damaged by air attack and needed assistance. HMS Active however misunderstood the order and remained with the convoy. Meanwhile the Oronsay had dropped out of the convoy.
At 1152/8, HMS Arrow joined the damaged Oronsay as well.
Around 1400/8, the armed merchant cruisers HMS Cheshire (Capt.(Retd.) M.R. Bernard, RN) and HMS Salopian (Capt.(Retd.) J.M. Alleyne, DSO, DSC, RN) also arrived on the scene. HMS Salopian later departed to continue her patrol. HMS Cheshire remained with Oronsay and the two destroyers.
At 1440/8, Oronsay got underway at slow speed and was able to increase speed to 9 knots.
At 1520/8, the ships that were with the Oronsay sighted the Liverpool section of the convoy which apparently had been delayed by bad weather conditions and therefore unable to have joined up with the Clyde section as had been intended. HMS Douglas, one of the escorting destroyers of the Liverpool section had been unable to keep up with it due to the weather conditions now joined the Oronsay group.
At 1900/8, the destroyers HMS Verity (Cdr. R.H. Mills, RN) and HMS Sabre (Cdr.(Retd.) B. Dean, RN) joined.
The destroyer HMS Viscount (Lt.Cdr. M.S. Townsend, OBE, DSC, RN) also joined but it is unknown when.
At 2115/8, the AA cruiser HMS Cairo (Capt. P.V. McLaughlin, RN) joined.
At 0205/9, HMS Arrow and HMCS Ottawa parted company with Oromsay and the other escorts to proceed to Londonderry.
Around 1030/9, the damaged Oronsay escorted by HMS Cairo, HMS Cheshire, HMS Douglas, HMS Verity, HMS Viscount and HMS Sabre arrived at Greenock.
Meanwhile the Clyde section had continued on escorted by HMS Whitehall, HMS Achates and HMS Active. As did the Liverpool section but apparently unescorted. They had failed to make rendezvous with each other in the heavy weather.
Around 1215/9, the Clyde section was joined by the light cruiser HMS Kenya (Capt. M.M. Denny, CB, RN). It seems that at this time the destroyers were no longer present.
At noon on the 12th the Clyde section, with HMS Kenya was finally joined by the Liverpool section of the convoy.
The convoy arrived at Freetown in the afternoon of October 18th.
------------------------------------------------------------------------------------------------------
The convoy departed Freetown on 20 October 1940 and was made up of the Capetown Castle, Duchess of York, Georgic, Monarch of Bermuda, Orontes and Winchester Castle.
The convoy was escorted by the heavy cruiser HMS Dorsetshire (Capt. B.C.S. Martin, RN).
The convoy arrived at Capetown on 28 October 1940. HMS Dorsetshire then proceeded to Simonstown where she arrived also on the same day.
------------------------------------------------------------------------------------------------------
On 30 October the convoy, now made up of the Duchess of York, Georgic, Monarch of Bermuda and Orontes departed Capetown for Suez. They were escorted by HMS Dorsetshire.
In the morning of 3 November the convoy overtook and then merged with the slow section of convoy WS 3 which was made up of the transports Dorset (British, 10624 GRT, built 1934), Erinpura (British, 5143 GRT, built 1911), Highland Brigade (British, 14134 GRT, built 1929), Khedive Ismael (British, 7290 GRT, built 1922), Oropesa (British, 14118 GRT, built 1920), Perthshire (British, 10496 GRT, built 1936) and Port Chalmers (British, 8535 GRT, built 1933) and their escort the armed merchant cruiser HMS Carthage (Capt.(Retd.) B.O. Bell-Salter, RN).
Shortly before noon the Erinpura and Khedive Ismael split off from the convoy and set course for Mombasa escorted by HMS Carthage. HMS Dorsetshire continued on with the remainder of the convoy towards Suez.
In the morning of November 11th, the light cruiser HMS Caledon (Capt. C.P. Clarke, RN) joined the convoy at the entrance to the Gulf of Aden.
The transport City of Lille (British, 6588 GRT, built 1928) and several more escort vessels, the AA cruiser HMS Carlisle (Capt. G.M.B. Langley, OBE, RN), destroyer HMS Kimberley (Lt.Cdr. J.S.M. Richardson, RN), sloops HMS Auckland (Cdr. J.G. Hewitt, DSO, RN) and HMAS Parramatta (Lt.Cdr. J.H. Walker, MVO, RAN) joined on 12 November 1940 for the passage through the Red Sea in which the Italian Navy was still active at this time.
The troopships Duchess of York and Georgic also re-joined the convoy after a brief visit to Aden. HMS Caledon also briefly left the convoy to oil at Aden before re-joining it.
Around 2130/12, the convoy entered the Perim Strait.
HMS Dorsetshire parted company with the convoy at 0915/14.
The convoy arrived at Suez on 16 November 1940. (33)
10 Oct 1940
HMS Dorsetshire (Capt. B.C.S. Martin, RN) arrived off Takoradi. She departed later the same day escorting the captured Vichy-French passenger/cargo ship Touareg (5135 GRT, built 1924). (32)
11 Oct 1940
HMS Dorsetshire (Capt. B.C.S. Martin, RN) and the captured Vichy-French passenger/cargo ship Touareg briefly anchored off Keta to land a female passenger of the Touareg which needed medical attention. The ships continued their passage later the same day. (32)
12 Oct 1940
At 0645 hours (zone -1,5 hours), HMS Dorsetshire (Capt. B.C.S. Martin, RN), transferred the escort of the captured Vichy-French passenger/cargo ship Touareg to her relief, the light cruiser HMS Delhi (Capt. A.S. Russell, RN). (32)
18 Oct 1940
HMS Dorsetshire (Capt. B.C.S. Martin, RN) arrived at Freetown. (32)
20 Oct 1940
For the daily positions of HMS Dorsetshire for the period of 20 October 1940 to 15 November 1940 see the map below.
(34)
20 Oct 1940
HMS Dorsetshire (Capt. B.C.S. Martin, RN) departed Freetown for convoy escort duty.
[For more information on this convoy see the event ' Convoy WS 3 (Fast) ' for 7 October 1940.] (32)
14 Nov 1940
At 0915 hours, HMS Dorsetshire (Capt. B.C.S. Martin, RN), parted company with convoy WS 3 and set course for Aden. (35)
15 Nov 1940
HMS Dorsetshire (Capt. B.C.S. Martin, RN) arrived at Aden from convoy escort duty. (35)
17 Nov 1940
HMS Dorsetshire (Capt. B.C.S. Martin, RN) departed Aden for Durban.
For the daily positions of HMS Dorsetshire from 17 November 1940 to 18 December 1940 see the map below.
(35)
18 Nov 1940
In the afternoon, HMS Dorsetshire (Capt. B.C.S. Martin, RN), bombarded Dante in Italian Somaliland (now Ras Hafun, Somalia). About 200 rounds were fired and a torpedo was fired which hit and destroyed a jetty. Also the ships Walrus aircraft bombarded oil storage tanks. (35)
26 Nov 1940
HMS Dorsetshire (Capt. B.C.S. Martin, RN) arrived at Durban. (35)
2 Dec 1940
HMS Dorsetshire (Capt. B.C.S. Martin, RN) departed Durban for Simonstown. (36)
4 Dec 1940
HMS Dorsetshire (Capt. B.C.S. Martin, RN) arrived at Simonstown. (36)
7 Dec 1940
HMS Dorsetshire (Capt. B.C.S. Martin, RN) is docked at Simonstown. (36)
9 Dec 1940
HMS Dorsetshire (Capt. B.C.S. Martin, RN) is undocked. (36)
10 Dec 1940
HMS Dorsetshire (Capt. B.C.S. Martin, RN) departed Simonstown for Freetown. (36)
18 Dec 1940
For the daily positions of HMS Dorsetshire during the period of 18 to 26 December 1940 see the map below.
(36)
18 Dec 1940
HMS Dorsetshire (Capt. B.C.S. Martin, RN) arrived at Freetown from Simonstown. After fuelling, she and the light cruiser HMS Neptune (Capt. R.C. O'Conor, RN, flying the flag of Vice-Admiral J.H.D. Cunningham, CB, MVO, RN, the Vice-Admiral commanding ' Force M ') departed Freetown to patrol together in the mid-Atlantic near position 08°00'N, 21°00'W and then north and north-eastward to search for the German pocket battleship Admiral Scheer. (37)
18 Dec 1940
Convoy WS 5A and the attack by the German heavy cruiser Admiral Hipper
This convoy departed U.K. ports on 18/19 December 1940. Destination for the majority of the convoy was Suez where the convoy arrived on 16 February 1941.
On 17 December 1940 the transport Rangitiki (British, 16698 GRT, built 1929) departed Avonmouth. She was escorted by HMS Kipling (Cdr. A. St. Clair-Ford, RN) towards the rendezvous position.
On 18 December 1940 the following troop transports / transports departed Liverpool, they formed WS 5A slow; Anselm (British, 5954 GRT, built 1935), Atreus (British, 6547 GRT, built 1911), Bhutan (British, 6104 GRT, built 1929), City of Canterbury (British, 8331 GRT, built 1922), City of London (British, 8956 GRT, built 1907), Delane (British, 6054 GRT, built 1938), Elizabethville (Belgian, 8351 GRT, built 1922), Menelaus (British, 10307 GRT, built 1923), Orbita (British, 15495 GRT, built 1915), Settler (British, 6202 GRT, built 1939) and Tamaroa (British, 12405 GRT, built 1922). They were escorted by the destroyers HMS Witherington (Lt.Cdr. J.B. Palmer, RN), HMS Witch (Lt.Cdr. J.R. Barnes, RN), sloop HMS Wellington (Cdr. I.H. Bockett-Pugh, RN) and the corvettes HMS Clematis (Cdr. Y.M. Cleeves, DSO, DSC, RD, RNR), HMS Jonquil (Lt.Cdr. R.E.H. Partington, RNR), HMS Cyclamen (Lt. H.N. Lawson, RNR) and HMS Geranium (T/Lt. A. Foxall, RNR).
On 18 December 1940 the following troop transports / transports departed from the Clyde; Costa Rica (Dutch, 8055 GRT, built 1910), Ernebank (British, 5388 GRT, built 1937), Leopoldville (Belgian, 11509 GRT, built 1929) and Neuralia (British, 9182 GRT, built 1912). Ernebank was however forced to return around 1800 hours on the 21st escorted by HMS Witch and HMS St. Mary’s. On the 22nd, HMS Wellington, was detached to take over the escort of the Ernebank. They were escorted by the anti-aircraft cruiser HMS Cairo (Capt. P.V. McLaughlin, RN) and the destroyers HMS Bath (Cdr.(Retd.) A.V. Hemming, RN), HMS St. Marys (Lt. K.H.J.L. Phibbs, RN), HMS St. Albans (Lt.Cdr.(Emgy.) S.G.C. Rawson, RN), HMS Worcester (Lt.Cdr. E.C. Coats, RN).
On 18 December 1940 the following troop transports / transports departed from Lough Foyle (Belfast); City of Derby (British, 6616 GRT, built 1921) and Stentor (British, 6148 GRT, built 1926). They were escorted by the destroyer HMS Venomous (Lt.Cdr. J.E.H. McBeath, RN).
The slow part of the convoy was met around dawn on the 19th by the light cruiser HMS Bonaventure (Capt. H.G. Egerton, RN) and the destroyers HMS Vesper (Lt.Cdr. W.F.E. Hussey, DSC, RN), HMS Harvester (Lt.Cdr. M. Thornton, RN) and HMS Highlander (Cdr. W.A. Dallmeyer, RN).
Around 2300/21 all destroyers parted company with the slow part of the convoy.
On 19 December 1940 the following troop transports / transports departed Liverpool, they formed WS 5A fast; Clan MacDonald (British, 9653 GRT, built 1939), Essex (British, 13655 GRT, built 1936) and Northern Prince (British, 10917 GRT, built 1929).
On 19 December 1940 the following troop transports / transports departed from the Clyde; Adviser (British, 6348 GRT, built 1939), Arabistan (British, 5874 GRT, built 1929), Barrister (British, 6348 GRT, built 1939), Benrinnes (5410 GRT, built 1921), Clan Cumming (British, 7264 GRT, built 1938), Empire Song (British, 9228 GRT, built 1940) and Empire Trooper (British, 14106 GRT, built 1922).
Escort for the fast section of convoy WS 5A joined around dawn on the 20th and was provided by the aircraft carrier HMS Argus (Capt. E.G.N. Rushbrooke, DSC, RN), light cruiser HMS Naiad (Capt. M.H.A. Kelsey, DSC, RN, flying the flag of Rear-Admiral E.L.S. King, CB, MVO, RNRN), destroyers HMCS Ottawa (Cdr. E.R. Mainguy, RCN), HMCS St. Laurent (Lt. H.S. Rayner, RCN) and Piorun (Cdr. E.J.S. Plawski) which came from the Clyde. And also by the destroyers HMS Highlander, HMS Harvester and FSS Le Triomphant (Cdr. P.M.J.R. Auboyneau) which came from Londonderry. The first two of these destroyers had fuelled there after escorting the slow part of the convoy for a while. Also the aircraft carrier HMS Furious (Capt. A.G. Talbot, DSO, RN) (with fighters embarked for Takoradi) and the destroyers HMS Beverley (Cdr.(Retd.) E.F. Fitzgerald, RN), HMS Kelvin (Cdr. J.H. Allison, DSO, RN) and HMS Kipling joined from Liverpool.
The destroyers of the fast portion of the convoy were detached during the night of 21/22 December 1940.
At dawn on 23 December 1940 the slow and fast part of the convoy made rendez-vous and proceeded in company.
On the 24th, HMS Naiad parted company to return to the U.K. The heavy cruiser HMS Berwick (Capt. G.L. Warren, RN) and the light cruiser HMS Dunedin (Capt. R.S. Lovatt, RN) both joined the escort of the convoy.
At dawn on the 25th the convoy was attacked by the German heavy cruiser Admiral Hipper. She had made contact with the convoy with radar the previous day and had already made a torpedo attack shortly before 0400/25 but no hits had been obtained nor had the attack been noticed by the British.
Then shortly after 0800/25 she made visual contact with the convoy and it came as a surprise to the Germans to sight HMS Berwick.
Around 0830 hours the Germans opened fire on HMS Berwick but due to the bad visibility she soon shifted target to the troopship Empire Trooper which was not in her assigned station. The troopship was slightly damaged as was the merchant vessel Arabistan.
The convoy was ordered to scatter and HMS Berwick and HMS Bonaventure both engaged the German cruiser as did the corvette Cyclamen briefly.
Meanwhile HMS Dunedin laid a smokescreen to cover the ships of the convoy. HMS Furious flew off a few aircraft but these failed to find the German cruiser in the bad visibility.
HMS Berwick was damaged by gunfire from the German cruiser but she forced, together with HMS Bonaventure, the enemy to break off the action around 0915 hours.
In the evening HMS Boneventure was detached to search for the damaged Empire Trooper.
On the 28th the convoy was reassembled at sea (minus Empire Trooper which was ordered to proceed to Gibraltar via the Azores) and continued on to Freetown where it arrived on 5 January 1941.
------------------------------------------------------------------------------------------------------
The convoy departed Freetown for South Africa on 8 January.
The convoy was now made up of the (troop) transports; Adviser, Anselm, Arabistan, Atreus, Barrister, Benrinnes, Bhutan, City of Canterbury, City of Derby, City of London, Costa Rica, Delane, Elisabethville, Empire Ability (British, 7603 GRT, built 1931), Menelaus, Neuralia, Orbita, Rangitiki, Settler, Stentor and Tamaroa.
On departure from Freetown the convoy was escorted by the aircraft carrier HMS Formidable (Capt. A.W.La T. Bisset, RN, flying the flag of Rear-Admiral W.F. Wake-Walker CB, OBE, RN), heavy cruisers HMS Dorsetshire (Capt. B.C.S. Martin, RN), HMS Hawkins (Capt. H.P.K. Oram, RN), destroyers HMS Velox (Lt.Cdr. E.G. Roper, DSC, RN), HMS Vidette (Lt. E.N. Walmsley, RN), sloops HMS Milford (Cdr. (Retd.) the Hon. V.M. Wyndham-Quin, RN), HMS Bridgewater (A/Cdr. (Retd.) H.F.G. Leftwich, RN) and the corvettes HMS Asphodel (Lt.Cdr.(Retd.) K.W. Stewart, RN) and HMS Calendula (Lt.Cdr. A.D. Bruford, RNVR).
At 0700N/9, the heavy cruiser HMS Norfolk (Capt. A.J.L. Phillips, RN) joined the convoy. She had also departed Freetown around the same time as the convoy but apparently acted independently until the time she joined the convoy.
At 0600N/10, HMS Formidable, HMS Dorsetshire, HMS Norfolk, HMS Velox and HMS Vidette parted company with the convoy. At the same time the heavy cruiser HMS Devonshire (Capt. R.D. Oliver, DSC, RN) joined.
It appears that HMS Bridgewater, HMS Milford, HMS Asphodel and HMS Calendula parted company on 12 January.
At 1000B/21, the heavy cruiser HMS Shropshire (Capt. J.H. Edelsten, RN) joined the convoy and HMS Devonshire parted company.
At 1600B/22, HMS Hawkins parted company with the convoy taking the transports Anselm and City of Canterbury to Capetown where they arrived on 23 January.
The remainder of the convoy arrived at Durban on 25 January 1941 escorted by HMS Shropshire.
------------------------------------------------------------------------------------------------------
The convoy departed Durban for Suez on 29 January 1941. It was now made up of the transports, Adviser, Anselm, Arabistan, Atreus, Barrister, Benrinnes, Bhutan, City of Canterbury, City of Derby, City of London, Costa Rica, Delane, Elisabethville, Empire Ability, Menelaus, Neuralia, Nieuw Holland (Dutch, 11066 GRT, built 1927), Orbita, Rangitiki, Settler, Stentor, Talamba (British, 8018 GRT, built 1924) and Tamaroa.
They were escorted by the heavy cruiser HMS Shropshire and the light cruiser HMS Ceres (Capt. E.G. Abbott, AM, RN).
Around 0800B/30, HMS Shropshire was relieved by the light cruiser HMS Enterprise (Capt. J.C. Annesley, DSO, RN).
In the morning of 31 January the transport Delane parted company with the convoy to return to Durban due to engine defects.
At 1000CD(-3.5)/4, HMS Ceres parted company taking the transports Nieuw Holland and Orbita with her to Kilindini / Mombasa where they arrived on 5 February.
At 1440CD/5, the armed merchant cruiser HMS Hector (Capt.(Retd.) F. Howard, DSC, RN) joined.
At 1500CD/5, the light cruiser HMS Capetown (Capt. P.H.G. James, RN) joined.
At 0430CD/6, HMS Capetown parted company with the convoy having been ordered to do so.
At 1730CD/10, HMS Enterprise parted company with the convoy to fuel at Aden. She rejoined the convoy around 2130C/11.
Around 0630C/11, the convoy was joined by the light cruiser HMS Caledon (Capt. C.P. Clarke, RN) and the sloops HMS Flamingo (Cdr. J.H. Huntley, RN) and HMIS Indus (Cdr. E.G.G. Hunt, RIN). HMS Hector then parted company with the convoy.
At 2300C/11, HMIS Indus parted company with the convoy upon being relieved by the sloop HMS Grimsby (Cdr. K.J. D'Arcy, RN).
At 1830C/13, HMS Flamingo parted company with the convoy to return to Aden and HMS Grimsby parted company with the convoy taking the transport Neuralia with her to Port Sudan.
At 0400C/14, HMS Enterprise parted company with the convoy.
The convoy escorted by HMS Caledon arrived at Suez on 16 February 1941. (38)
26 Dec 1940
HMS Neptune (Capt. R.C. O'Conor, RN, flying the flag of Vice-Admiral J.H.D. Cunningham, CB, MVO, RN, the Vice-Admiral commanding ' Force M ') and HMS Dorsetshire (Capt. B.C.S. Martin, RN) arrived at Freetown from their anti-raider patrol in the mid-Atlantic. (39)
27 Dec 1940
HMS Dorsetshire (Capt. B.C.S. Martin, RN) departed Freetown to reinforce the escort of convoy WS 5A that is on passage from the U.K. to the Middle-East via the Cape.
For the daily positions of HMS Dorsetshire from 27 December 1940 to 5 January 1941 see the map below.
(36)
30 Dec 1940
In the afternoon, HMS Dorsetshire (Capt. B.C.S. Martin, RN), sighted two of the troopships from the dipersed convoy WS 5A, the troopships (passenger/cargo ships) Costa Rica (8055 GRT, built 1910) and Menelaus (10307 GRT, built 1923). She then started escorting these two ships southwards. (36)
31 Dec 1940
Around 0800 hours (zone +1), HMS Dorsetshire (Capt. B.C.S. Martin, RN), and the two ships under her protection, the troopships (passenger/cargo ships) Costa Rica (8055 GRT, built 1910) and Menelaus (10307 GRT, built 1923), joined the bulk of convoy WS 5A. (36)
5 Jan 1941
The aircraft carriers HMS Formidable (Capt. A.W.La T. Bisset, RN, flying the flag of Rear-Admiral W.F. Wake-Walker CB, OBE, RN), HMS Furious (Capt. A.G. Talbot, DSO, RN), heavy cruisers HMS Norfolk (Capt. A.J.L. Phillips, RN), HMS Dorsetshire (Capt. B.C.S. Martin, RN), light cruisers HMS Dunedin (Capt. R.S. Lovatt, RN), destroyers HMS Isis (Cdr. C.S.B. Swinley, DSC, RN), HMS Encounter (Lt.Cdr. E.V.St.J. Morgan, RN), sloop HMS Bridgewater (A/Cdr. (Retd.) H.F.G. Leftwich, RN) and corvette HMS Calendula (Lt.Cdr. A.D. Bruford, RNVR) all arrived at Freetown with convoy WS 5A. (40)
8 Jan 1941
HMS Dorsetshire (Capt. B.C.S. Martin, RN) departed Freetown as part of the escort of convoy WS 5A.
For the daily positions of HMS Dorsetshire during the period from 8 January to 29 January 1941 see the map below.
(41)
8 Jan 1941
The aircraft carrier HMS Formidable (Capt. A.W.La T. Bisset, RN, flying the flag of Rear-Admiral W.F. Wake-Walker CB, OBE, RN), heavy cruisers HMS Dorsetshire (Capt. B.C.S. Martin, RN), HMS Norfolk (Capt. A.J.L. Phillips, RN), HMS Hawkins (Capt. H.P.K. Oram, RN), destroyers HMS Velox (Lt.Cdr. E.G. Roper, DSC, RN), HMS Vidette (Lt. E.N. Walmsley, RN), sloops HMS Milford (Cdr. (Retd.) the Hon. V.M. Wyndham-Quin, RN), HMS Bridgewater (A/Cdr. (Retd.) H.F.G. Leftwich, RN) and the corvettes HMS Asphodel (Lt.Cdr.(Retd.) K.W. Stewart, RN) and HMS Calendula (Lt.Cdr. A.D. Bruford, RNVR) departed Freetown for escort duty with convoy WS 5A.
For more info on this convoy see the event ' Convoy WS 5A and the attack by the German heavy cruiser Admiral Hipper ' for 18 December 1940.]
10 Jan 1941
Around 0600N/10, HMS Formidable (Capt. A.W.La T. Bisset, RN, flying the flag of Rear-Admiral W.F. Wake-Walker CB, OBE, RN), HMS Norfolk (Capt. A.J.L. Phillips, RN), HMS Dorsetshire (Capt. B.C.S. Martin, RN), HMS Velox (Lt.Cdr. E.G. Roper, DSC, RN) and HMS Vidette (Lt. E.N. Walmsley, RN) split off from convoy WS 5A and proceeded to cover this convoy from a distance.
Both destroyers parted company, the next day, around 1715N/11 to return to Freetown. (42)
15 Jan 1941
Early in the evening HMS Dorsetshire (Capt. B.C.S. Martin, RN) split off from the other two ships, HMS Formidable (Capt. A.W.La T. Bisset, RN, flying the flag of Rear-Admiral W.F. Wake-Walker CB, OBE, RN) and HMS Norfolk (Capt. A.J.L. Phillips, RN).
HMS Dorsetshire then proceeded on an anti-raider patrol in the South Atlantic and HMS Formidable and HMS Norfolk continued to provide cover for convoy WS 5A from a distance. (41)
21 Jan 1941
As ordered on 19 January, HMS Dorsetshire (Capt. B.C.S. Martin, RN), made rendezvous around 1200P/21, in position 23°35'S, 34°19'W, with the armed merchant cruiser HMS Asturias (Capt.(Retd.) H. Ardill, RN) and the captured Vichy-French passenger/cargo ship Mendoza (8199 GRT, built 1920) she had captured on the 18th. The boarding party of the Asturias was now replaced by one of the Dorsetshire. The Mendoza then proceeded to Freetown independently. (43)
25 Jan 1941
HMS Dorsetshire (Capt. B.C.S. Martin, RN) dropped anchor off St. Helena. The oiler Laurelwood then came alongside to supply fuel to the Dorsetshire. (41)
26 Jan 1941
HMS Dorsetshire (Capt. B.C.S. Martin, RN) departed St. Helena for Freetown. (41)
29 Jan 1941
HMS Dorsetshire (Capt. B.C.S. Martin, RN) arrived at Freetown. (41)
31 Jan 1941
Around 2330A/31, ' Z Force ' departed Lamlash for Freetown. ' Z Force ' was made up of the infantery landing ships HMS Glenearn (Capt.(Retd.) L.B. Hill, OBE, RN), HMS Glengyle (A/Capt.(Retd.) C.H. Petrie, RN) and HMS Glenroy (Capt.(Retd.) Sir J.F. Paget, RN). On passing the boom at Lamlash they were joined by the destroyers HMCS Ottawa (Cdr. E.R. Mainguy, RCN), HMCS Restigouche (Cdr. H.N. Lay, OBE, RN), HMCS St. Laurent (Lt. H.S. Rayner, RCN) and HMCS Skeena (Lt.Cdr. J.C. Hibbard, RCN).
Around 0830A/1, they were joined by the light cruiser HMS Kenya (Capt. M.M. Denny, CB, RN, flying the flag of Rear-Admiral H.M. Burrough, CB, RN) which had departed Greenock at 0001A/1.
Around 0900A/1, the troopship Georgic (British, 27759 GRT, built 1932) joined.
At 0530Z/3, the Georgic and the destroyers parted company.
At 0955N/7, the heavy cruiser HMS Dorsetshire (Capt. B.C.S. Martin, RN) joined.
At 0655N/9, the destroyers HMS Faulknor (Capt. A.F. de Salis, RN) and HMS Forester (Lt.Cdr. E.B. Tancock, DSC and Bar, RN) joined.
At 1030N/10, ' Z Force ', HMS Kenya and HMS Dorsetshire arrived at Freetown.
(44)
1 Feb 1941
HMS Dorsetshire (Capt. B.C.S. Martin, RN) departed Freetown to patrol in the Mid-Atlantic to provide cover for convoys. (45)
2 Feb 1941
HMS Dorsetshire (Capt. B.C.S. Martin, RN) is ordered to return to Freetown. (45)
3 Feb 1941
HMS Norfolk (Capt. A.J.L. Phillips, RN, flying the flag of Rear-Admiral W.F. Wake-Walker CB, OBE, RN), HMS Devonshire (Capt. R.D. Oliver, DSC, RN) and HMS Dorsetshire (Capt. B.C.S. Martin, RN) all arrived at Freetown from patrol
After fuelling they all departed Freetown for a anti-raider patrols in the mid-Atlantic. They were also to join 'Z Force' which was on passage from the U.K. to Freetown and ultimately the Middle-East.
On 7 February HMS Norfolk and HMS Devonshire were ordered to proceed to the U.K. after they had made contact with 'Z Force'. HMS Dorsetshire was to remain with 'Z Force'.
At 1330Z/12, HMS Devonshire parted company to proceed to Liverpool where she arrived around 1900A/13.
HMS Norfolk proceeded to Scapa Flow where she arrived around 1600A/13. (46)
3 Feb 1941
For the daily positions of HMS Dorsetshire during the period of 3 February 1941 to 12 March 1941 see he map below.
(47)
7 Feb 1941
HMS Dorsetshire (Capt. B.C.S. Martin, RN) was detached and joined HMS Kenya (Capt. M.M. Denny, CB, RN) which was escorting the infantery landing ships HMS Glenearn (Capt.(Retd.) L.B. Hill, OBE, RN), HMS Glengyle (A/Capt.(Retd.) C.H. Petrie, RN) and HMS Glenroy (Capt.(Retd.) Sir J.F. Paget, RN). (45)
10 Feb 1941
HMS Dorsetshire (Capt. B.C.S. Martin, RN) and her convoy arrived at Freetown to refuel. (45)
11 Feb 1941
HMS Dorsetshire (Capt. B.C.S. Martin, RN) departed Freetown for Capetown, South Africa, She was escorting the infantery landing ships HMS Glenearn (Capt.(Retd.) L.B. Hill, OBE, RN), HMS Glengyle (A/Capt.(Retd.) C.H. Petrie, RN) and HMS Glenroy (Capt.(Retd.) Sir J.F. Paget, RN) that were to proceed to the Middle East. Two destroyers, HMS Faulknor (Capt. A.F. de Salis, RN) and HMS Forester (Lt.Cdr. E.B. Tancock, DSC and Bar, RN), were present as A/S screen until shortly after noon on the 12th. (45)
19 Feb 1941
HMS Dorsetshire (Capt. B.C.S. Martin, RN) and her convoy arrived at Capetown. (45)
21 Feb 1941
HMS Dorsetshire (Capt. B.C.S. Martin, RN) departed Capetown, South Africa still escorting the infantery landing ships HMS Glenearn (Capt.(Retd.) L.B. Hill, OBE, RN), HMS Glengyle (A/Capt.(Retd.) C.H. Petrie, RN) and HMS Glenroy (Capt.(Retd.) Sir J.F. Paget, RN) on their passage to the Middle East. (45)
22 Feb 1941
At 0515Z/22, the Dutch merchant vessel Rantaupandjang (2542 GRT, built 1922) sent out a raider signal from position 08°24'S, 51°35'E.
Then at 0818Z/22, a Walrus aircraft from the light cruiser HMS Glasgow (Capt. H. Hickling, RN) reported a German pocket battleship in position 08°30'S, 51°35'E. This was the Admiral Scheer. Later that afternoon after the aircraft had been launched again it failed to make contact with the enemy.
In response the aircraft carrier HMS Hermes (Capt. R.F.J. Onslow, DSC, MVO, RN) and light cruiser HMS Emerald (Capt. F.C. Flynn, RN) were sailed from Kilindini / Mombasa for the area the raider was spotted. The light cruiser HMS Capetown (Capt. P.H.G. James, RN) was sent to the Seychelles.
The heavy cruiser HMS Shropshire (Capt. J.H. Edelsten, RN) was operating off Somaliland. She was ordered to joined HMS Hermes and HMS Emerald.
The heavy cruiser HMAS Australia (Capt. R.R. Stewart, RN) was sent to the area the raider was spotted from escort duty with convoy WS 5B. HMS Hawkins (Capt. H.P.K. Oram, RN) remained with this convoy.
Heavy cruiser HMAS Canberra (Capt. H.B. Farncomb, RAN), which was en-route to the Maledive Islands from Colombo was ordered to proceed towards position 06°00'S, 60°00'E.
Heavy cruiser HMS Dorsetshire (Capt. B.C.S. Martin, RN) was with ' Z Force ' near Durban. She was ordered to join the East Indies command to search for the enemy. She was ordered to return to Durban the following day to continue escorting ' Z Force '.
Light cruiser HMS Leander (from the New Zealand Division) (Capt. R.H. Bevan, RN) was ordered to proceed southwards from Bombay. (48)
28 Feb 1941
Around 0800C/28, in approximate position 04°55'S, 45°00'E, the convoy (Force Z) made up of the infantery landing ships HMS Glenearn (Capt.(Retd.) L.B. Hill, OBE, RN), HMS Glengyle (A/Capt.(Retd.) C.H. Petrie, RN) and HMS Glenroy (Capt.(Retd.) Sir J.F. Paget, RN) and their escort the heavy cruiser HMS Dorsetshire (Capt. B.C.S. Martin, RN) is joined by the light cruiser HMS Glasgow (Capt. H. Hickling, RN). (45)
2 Mar 1941
Around 2200D/2, near Socotra, HMS Dorsetshire (Capt. B.C.S. Martin, RN), parted company with the convoy made up of the infantery landing ships HMS Glenearn (Capt.(Retd.) L.B. Hill, OBE, RN), HMS Glengyle (A/Capt.(Retd.) C.H. Petrie, RN) and HMS Glenroy (Capt.(Retd.) Sir J.F. Paget, RN). From now on they were escorted only by the light cruiser HMS Glasgow (Capt. H. Hickling, RN). (49)
5 Mar 1941
HMS Dorsetshire (Capt. B.C.S. Martin, RN) arrived at Port Victoria, Seychelles to refuel. Shortly after arriving the Walrus aircraft was put into the water and then took off but crashed almost immediately into a hillside. Three of the crew of the Dorsetshire were killed in the crash. (49)
6 Mar 1941
HMS Dorsetshire (Capt. B.C.S. Martin, RN) departed Port Victoria, Seychelles for Simonstown. (49)
8 Mar 1941
Convoy WS 6.
This convoy departed Freetown on 8 March 1941 for South / Africa (Capetown / Durban).
It was a combined convoy made up with ships from convoy's WS 6A and WS 6B which had come to Freetown from the U.K.
The convoy was made up with the following troopships / transports; Almanzora (British, 15551 GRT, built 1914), Ascanius (British, 10048 GRT, built 1910), Bellerophon (British, 9019 GRT, built 1906), Bergensfjord (Norwegian, 11015 GRT, built 1913), Burdwan (British, 6069 GRT, built 1928), Cape Horn (British, 5643 GRT, built 1929), City of Athens (British, 6558 GRT, built 1923), City of Corinth (British, 5318 GRT, built 1918), City of Hankow (British, 7360 GRT, built 1915), City of London (British, 8956 GRT, built 1907), City of Pittsburg (British, 7377 GRT, built 1922), Consuelo (British, 4847 GRT, built 1937), Dalesman (British, 6343 GRT, built 1940), Kina II (British, 9823 GRT, built 1939), Leopoldville (Belgian, 11509 GRT, built 1929), Llandaff Castle (British, 10799 GRT, built 1926), Llanstephan Castle (British, 11348 GRT, built 1914), Logician (British, 5993 GRT, built 1928), Mahseer (British, 7911 GRT, built 1925), Manchester Citizen (British, 5343 GRT, built 1925), Mataroa (British, 12390 GRT, built 1922), Northumberland (British, 11558 GRT, built 1915), Nova Scotia (British, 6796 GRT, built 1926), Opawa (British, 10354 GRT, built 1931), Port Alma (British, 8400 GRT, built 1928), Rangitata (British, 16737 GRT, built 1929), Ruahine (British, 10832 GRT, built 1909), Salween (British, 7063 GRT, built 1937), Scythia (British, 19761 GRT, built 1920) and Thysville (Belgian, 8351 GRT, built 1922).
The convoy was escorted by the light cruisers HMS Birmingham (Capt. A.C.G. Madden, RN), HMS Phoebe (Capt. G. Grantham, RN) and the armed merchant cruiser HMS Cathay (A/Capt.(Retd.) C.M. Merewether, RN).
Heavy cruiser HMS Cornwall (Capt. P.C.W. Manwaring, RN) joined the convoy at 1126Z/11 in position 00°50'N, 06°48'W. HMS Cathay was then detached with orders to proceed direct to Capetown at her best speed.
At 0600Z/20 the Almanzora, Bergenfjord, Llanstephan Castle, Ruahine and Scythia parted company for Capetown. These ships were to take on board water at Capetown. They were escorted by HMS Birmingham.
At 1600Z/21 the Capetown section of the convoy was detached. It was made up of Ascanius, Burdwan, Cape Horn, City of Athens, Consuelo, Kina II, Leopoldville, Llandaff Castle, Nova Scotia and Opewa. They were being escorted by HMS Phoebe. These ships were to arrive at Capetown at 0700Z/22. HMS Phoebe then proceeded to Simonstown where she arrived around 1000B/22. She departed again around 1620B/22 to join the Almanzora, Bergenfjord, Llanstephan Castle, Ruahine and Scythia coming from Capetown.
At 2055Z/22 the Port Alma was detached to proceed independently to Capetown.
At 1300Z/25, HMS Phoebe with Almanzora, Bergenfjord, Llanstephan Castle, Ruahine and Scythia rejoined the convoy. Consuelo, from the Capetown section, was also present.
At dusk on the 25th, HMS Phoebe, was sent ahead to Durban with six of the faster ships to arrive two to three hours ahead of the remainder on the 26th.
The whole convoy had arrived at Durban well before noon on the 26th.
----------------------------------------------------
On 27 March 1941 the following troopships / transports sailed from Capetown; Ascanius, Burdwan, Cape Horn, City of Athens, Kina II, LLandaff Castle, Nova Scotia, Opawa and Port Alma. These was one new addition to the convoy; Leopoldville (Belgian, 11509 GRT, built 1926). They were being escorted by the heavy cruiser HMS Dorsetshire (Capt. B.C.S. Martin, RN).
On 1 April 1941 the following troopships / transports sailed from Durban; Bellerophon, Bergensfjord, City of Corinth, City of Hankow, City of London, City of Pittsburg, Consuelo, Dalesman, Llanstephan Castle, Logician, Masheer, Manchester Citizen, Salween and Thysville. There were also five new additions to the convoy, these were; City of Canterbury (British, 8331 GRT, built 1922), Costa Rica (Dutch, 8055 GRT, built 1910), Dilwara (British, 11080 GRT, built 1936), Elizabethville (Belgian, 8351 GRT, built 1922) and Yoma (British, 8131 GRT, built 1928). The Durban section was escorted by the heavy cruiser HMS Cornwall and light cruiser HMS Phoebe.
The Capetown section and Durban section made rendez-vous late in the morning of April 2nd.
HMS Phoebe parted company with the convoy in the evening of April 3rd. She arrived at Aden on 10 April.
HMS Dorsetshire parted company with the convoy in the evening of April 7th. She arrived at Durban on 10 April.
Around noon on the 10th the convoy was joined by the transport Talamba (British, 8018 GRT, built 1924) which came from the Seychelles and was escorted by HMS Glasgow (Capt. H. Hickling, RN). They had departed the Seychelles on 8 April. HMS Glasgow parted company with the convoy on 13 April when near Socotra and arrived back in the Seychelles on 16 April.
The convoy was disbanded in the morning of April 17th near Perim. Most of the ships in the convoy proceeded to Suez independently at their best speed. HMS Cornwall arrived at Aden very late in the afternoon of 17 April. (38)
12 Mar 1941
HMS Dorsetshire (Capt. B.C.S. Martin, RN) arrived at Simonstown. (49)
16 Mar 1941
HMS Dorsetshire (Capt. B.C.S. Martin, RN) is docked at Simonstown. (49)
20 Mar 1941
HMS Dorsetshire (Capt. B.C.S. Martin, RN) is undocked. (49)
23 Mar 1941
HMS Dorsetshire (Capt. B.C.S. Martin, RN) conducted gunnery exercises in False Bay. (49)
27 Mar 1941
HMS Dorsetshire (Capt. B.C.S. Martin, RN) departed False Bay escorting the Capetown section of convoy WS 6.
[See the event 'Convoy WS 6' for 8 March 1941 for more info on this convoy.] (49)
7 Apr 1941
HMS Dorsetshire (Capt. B.C.S. Martin, RN) parted company with convoy WS 6 and set course for Durban, South Africa. (50)
10 Apr 1941
HMS Dorsetshire (Capt. B.C.S. Martin, RN) arrived at Durban from convoy escort duty. (50)
15 Apr 1941
HMS Dorsetshire (Capt. B.C.S. Martin, RN) departed Durban to rendez-vous at sea with the troopships Empress of Japan (26032 GRT, built 1930) and Monarch of Bermuda (22424 GRT, built 1931) and escort them towards Capetown.
For the daily positions of HMS Dorsetshire during the period of 15 April 1941 to 21 April 1941 see the map below.
(50)
17 Apr 1941
In the morning, near Capetown, HMS Dorsetshire (Capt. B.C.S. Martin, RN), parted company with the troopships Empress of Japan (26032 GRT, built 1930) and Monarch of Bermuda (22424 GRT, built 1931) she had been escorting. HMS Dorsetshire then set course to return to Durban. (50)
19 Apr 1941
Around noon, near East London, South Africa, HMS Dorsetshire (Capt. B.C.S. Martin, RN), made rendez-vous with HMS Illustrious (Cdr. G.S. Tuck, RN) and took over the escort of the damaged aircraft carrier from the armed merchant cruiser HMS Carthage (Capt.(Retd.) H.L.I. Kirkpatrick, OBE, RN). Course was then set for Capetown. HMS Carthage set course to patrol her way back to Durban searching from the (troop) transport Ceramic (British, 18713 GRT, built 1913) which was overdue at Durban from Fremantle. Ceramic however arrived at Durban the following day. (51)
21 Apr 1941
HMS Dorsetshire (Capt. B.C.S. Martin, RN) and HMS Illustrious (Cdr. G.S. Tuck, RN) arrived at Capetown. (50)
23 Apr 1941
For the daily positions of HMS Dorsetshire during the period from 23 April 1941 to 8 May 1941 see the map below.
(52)
23 Apr 1941
Convoy CF 1.
This convoy departed Capetown on 23 April 1941.
It was made up of the troopships; Empress of Japan (British, 26032 GRT, built 1930) and Monarch of Bermuda (British, 22424 GRT, built 1931).
The (damaged) aircraft carrier HMS Illustrious (Cdr. G.S. Tuck, RN) was also part of the convoy.
The convoy was escorted by the heavy cruiser HMS Dorsetshire (Capt. B.C.S. Martin, RN).
On 27 April 1941, the convoy made a short stop at St. Helena where both warships fuelled.
Around 1030Z/29, the light cruiser HMS Dunedin (Capt. R.S. Lovatt, RN) joined. HMS Dorsetshire and HMS Illustrious then parted company.
The convoy arrived at Freetown on 1 May 1941.
------------------------------------------------------------------------------------------------------------------------------------------
The convoy departed Freetown on 2 May 1941.
Escort was provided by the light cruiser HMS Dunedin and the destroyers HMS Highlander (Cdr. S. Boucher, RN) and HMS Boreas (Lt.Cdr. D.H. Maitland-Makgill Crichton, DSC, RN).
At 1310Z/4, HMS Highlander and HMS Boreas parted company to proceed to Bathurst.
At 1645A/7, the destroyers HMS Velox (Lt.Cdr. E.G. Roper, DSC, RN) and HMS Wrestler (Lt. E.L. Jones, DSC, RN) joined coming from Gibraltar.
The convoy arrived at Gibraltar in the morning of the 8th.
------------------------------------------------------------------------------------------------------------------------------------------
The convoy departed Gibraltar on 8 May 1941.
The convoy was now escorted by the battlecruiser HMS Repulse (Capt. W.G. Tennant, CB, MVO, RN) and the aircraft carrier HMS Argus (Capt. T.O. Bulteel, RN). No A/S escort could be provided.
Around 1400B/13, the AA cruiser HMS Cairo (A/Capt. I.R.H. Black, RN) and the destroyers HMCS Ottawa (Cdr. E.R. Mainguy, RCN), HMCS Restigouche (Cdr. H.N. Lay, OBE, RN), HMCS Saguenay (Lt. P.E. Haddon, RCN), HMS Beagle, (Lt.Cdr. R.T. White, DSO and Bar, RN), HMS Wanderer (Cdr. A.F.St.G. Orpen, RN) and HMS Ripley (Lt.Cdr. J.A. Agnew, RN) joined.
At 0730B/15, HMS Beagle was detached.
At 1115B/15, the Monarch of Bermuda, HMS Cairo, HMCS Saguenay and HMS Ripley were detached to Liverpool where they arrived on 15 May 1941.
The remainder of the convoy arrived in the Clyde on 15 May 1941.
4 May 1941
Around 1100P/4, in approximate position 05°04'N, 45°10'W, HMS Dorsetshire (Capt. B.C.S. Martin, RN), turned over the escort of HMS Illustrious (Cdr. G.S. Tuck, RN) over to HMS Caradoc (Capt. J.S. Bethell, RN).
HMS Caradoc and HMS Illustrious then continued on to Trinidad. HMS Dorsetshire set course for Freetown. (53)
6 May 1941
The British merchant Oakdene is torpedoed and sunk by German U-boat U-105 northwest of St. Paul Rocks in position 06°19'N, 27°55'W. HMS Dorsetshire (Capt. B.C.S. Martin, RN) picked up the 35 survivors (all crew survived) late in the afternoon. (53)
8 May 1941
HMS Dorsetshire (Capt. B.C.S. Martin, RN) arrived at Freetown. (53)
10 May 1941
Convoy SL 74
This convoy departed Freetown on 10 May 1941 for the U.K. where it was dissolved on 4 June 1941.
It was made up of the following merchant ships; Afghanistan (British, 6992 GRT, built 1940), Aliakmon (Greek, 4521 GRT, built 1913) retuned 11-04 after collision with Zephyros, Amstelkerk (Dutch, 4457 GRT, built 1929), Anselm (British, 5954 GRT, built 1935), Arosa (Norwegian, 5043 GRT, built 1924), Benalder (British, 5161 GRT, built 1919), Bonita (Panamanian, 4929 GRT, built 1918), City of Lyons (British, 7063 GRT, built 1926), Clan MacNair (British, 6096 GRT, built 1921), Corvus (Norwegian, 1317 GRT, built 1921), Empire Success (British, 5988 GRT, built 1921), Empire Trader (British, 9957 GRT, built 1908), Evros (Greek, 5283 GRT, built 1918), Gamaria (British, 5255 GRT, built 1918), Glenstrae (British, 9460 GRT, built 1922), Holmside (British, 3433 GRT, built 1930), Koumoundouros (Greek, 3598 GRT, built 1925), Liberian (British, 5129 GRT, built 1936), Llandaff (British, 4825 GRT, built 1937), Linge (Dutch, 2114 GRT, built 1928), Marsa (British, 4405 GRT, built 1928), Melpomene (French, 7011 GRT, built 1923), Nagara (British, 8791 GRT, built 1919), Nicolas Pateras (Greek, 4362 GRT, built 1910), Norita (Swedish, 1516 GRT, built 1924), Olivebank (British, 5154 GRT, built 1926), Olympos (Greek, 5216 GRT, built 1918), P.L.M. 17 (French, 4008 GRT, built 1922) left the convoy on 20 May with engine trouble, Pendeen (British, 4174 GRT, built 1923), Queensbury (British, 3911 GRT, built 1931), Rosenberg (Dutch, 2068 GRT, built 1918), Saturnus (Dutch, 2741 GRT, built 1909), Scotia (Swedish, 1874 GRT, built 1918), Shahristan (British, 6935 GRT, built 1938), Southern Empress (British, 12398 GRT, built 1914), Taurus (Norwegian, 4767 GRT, built 1925), Tombouctou (French, 5636 GRT, built 1919), Tovelil (Danish, 2225 GRT, built 1925), Trentbank (British, 5060 GRT, built 1929), Tudor Star (British, 7199 GRT, built 1919), Vassilios A. Polemis (Greek, 3429 GRT, built 1907), Viking Star (British, 6445 GRT, built 1920), Waterland (Dutch, 6847 GRT, built 1922), Wentworth (British, 5212 GRT, built 1919) and Zephyros (Greek, 4796 GRT, built 1909).
Escort was initially provided by the British armed merchant cruiser HMS Bulolo (Capt.(Retd.) R.L. Hamer, RN) (10 May 1941 to 3 June 1941) and the corvettes HMS Amaranthus (Lt. N.B.J. Stapleton, RNR), HMS Anchusa (T/Lt. P. Everett-Price, DSC, RNR), HMS Asphodel (Lt.Cdr.(Retd.) K.W. Stewart, RN) and HMS Calendula (Lt.Cdr. A.D. Bruford, RNVR). (All from 10 May 1941 to 19 May 1941).
They were joined on 12 May 1941 by the heavy cruiser HMS Dorsetshire (Capt. B.C.S. Martin, RN).
At 1300N/13, in approximate position 13°07'N, 19°22'W, HMS Bulolo sighted a ship which turned out to be the Vichy-French transport Bourbonnais (4484 GRT, built 1914). The ship was ordered to stop but she refused to do so initially. A shot was fired across her bow which resulted in the ship to stop. She was then boarded. It turned out that she was en-route from Dakar to Tamatave with stores and 400 native troops. HMS Bulolo and the Vichy ship then remained in the general area while the light cruiser HMS Dragon (Capt. R.J. Shaw, MBE, RN) was sent out from Freetown to take her over and then escort her to Freetown so that HMS Bulolo could rejoin the convoy. HMS Dragon joined around 0930N/14 and the Vichy ship was then turned over to her custody.
On 26 May 1941, HMS Dorsetshire parted company with the convoy to join the pursuit of the German battleship Bismarck. She succeeded in making contact on the next day he delivered the coup de grace to her and torpedoed the heavily damaged German battleship from both sides and she sank soon afterwards. HMS Dorsetshire picked up German survivors until she was forced to leave the scene after a U-Boat alarm. More survivors had to be left in the water.
The convoy was joined by more escorts for the passage through the Western Approaces, these were; Destroyer HMS Reading (Lt.Cdr. D.V. Clift, RN) and the corvettes HMS Gentian (Lt.Cdr. R.O. Yeomans, RD, RNR), HMS Hibiscus (Lt. H. Roach, RNR), HMS Pimpernel (Lt. F.H. Thornton, RNR). These ships all joined on 30 May 1941 and remained with the convoy until it was dissolved on 4 June 1941. The destroyers HMS Vanquisher (Cdr. N.V. Dickinson, DSC, RN) and HMS Winchelsea (Lt.Cdr. W.A.F. Hawkins, DSC, RN) also joined on 30 May but left the convoy on 2 June 1941. Finally the corvette HMS Freesia (Lt.Cdr. T.P.G. Crick, RN) joined the convoy on 31 May and remained with it until dissolved on 4 June 1941.
11 May 1941
HMS Dorsetshire (Capt. B.C.S. Martin, RN) departed Freetown to overtake and join convoy SL 74 at sea which she did shortly before noon the next day.
More on convoy SL 74 see the event for 10 May 1941, Convoy SL 74, 10 May 1941 - 4 June 1941.
For the daily positions of HMS Dorsetshire during the period from 11 May 1941 to 29 May 1941 see the map below.
(53)
18 May 1941
Chase and sinking of the German battleship Bismarck, 18 to 27 May 1941.
Part I.
Departure of the Bismarck from the Baltic.
At 2130B/18 the German battleship Bismarck and the German heavy cruiser Prinz Eugen departed Gotenhafen for an anti-shipping raid in the North Atlantic. The following morning they were joined off Cape Arkona by the German destroyers Z 16 / Friedrich Eckhold and Z 23. They then proceeded through the Great Belt. The four ships were joined by a third destroyer, Z 10 / Hans Lody shortly before midnight on 19 May.
First reports of Bismarck and British dispositions 20-21 May 1941.
On 20 May 1941 two large warships with a strong escort were seen at 1500 hours northward out of the Kattegat. This information originated from the Swedish cruiser Gotland which had passed the Germans off the Swedish coast in the morning. The Naval Attaché at Stockholm received the news at 2100/20 and forwarded it to the Admiralty. At 0900/21 the Bismarck and her consorts entered Kors Fjord, near Bergen, Norway and anchored in nearby fiords. A reconnaissance aircraft flying over Bergen at 1330/21 reported having seen two Hipper class heavy cruisers there. One of these ships was later identified on a photograph as being the Bismarck. This intelligence went out at once to the Home Fleet.
The ships of the Home Fleet were at this time widely dispersed on convoy duties, patrols, etc. Some of the units were ranging as far as Gibraltar and Freetown. The Commander-in-Chief, A/Admiral Sir John Tovey, was at Scapa Flow in his flagship, HMS King George V (Capt. W.R. Patterson, CVO, RN). With him were her newly commissioned sister ship HMS Prince of Wales (Capt. J.C. Leach, MVO, RN), the battlecruiser HMS Hood (Capt. R. Kerr, CBE, RN, with Vice-Admiral L.E. Holland, CB, RN, onboard), the aircraft carrier HMS Victorious (Capt. H.C. Bovell, RN), the light cruisers HMS Galatea (Capt. E.W.B. Sim, RN, flying the flag of Rear-Admiral K.T.B. Curteis, CB, RN), HMS Aurora (Capt. W.G. Agnew, RN), HMS Kenya (Capt. M.M. Denny, CB, RN), HMS Neptune (Capt. R.C. O'Conor, RN) and the destroyers HMS Achates (Lt.Cdr. Viscount Jocelyn, RN), HMS Active (Lt.Cdr. M.W. Tomkinson, RN), HMS Antelope (Lt.Cdr. R.B.N. Hicks, DSO, RN), HMS Anthony (Lt.Cdr. J.M. Hodges, RN), HMS Echo (Lt.Cdr. C.H.deB. Newby, RN), HMS Electra (Cdr. C.W. May, RN), HMS Icarus (Lt.Cdr. C.D. Maud, DSO, RN), HMS Punjabi (Cdr. S.A. Buss, MVO, RN) and HMAS Nestor (Cdr. A.S. Rosenthal, RAN). HMS Victorious was under orders to escort troop convoy WS 8B from the Clyde to the Middle East. HMS Neptune was working up for service with the Mediterranean Fleet and was to escort convoy WS 8X from the Clyde to the Middle East on completion. She did not sail to operate against the Bismarck having only just began her post-refit work-up programme.
Rear-Admiral W.F. Wake-Walker (commanding the first Cruiser Squadron), with the heavy cruisers HMS Norfolk (Capt. A.J.L. Phillips, RN) (flag) and HMS Suffolk (Capt. R.M. Ellis, RN) was on patrol in the Denmark Straight. The light cruisers HMS Manchester (Capt. H.A. Packer, RN) and HMS Birmingham (Capt. A.C.G. Madden, RN) were patrolling between Iceland and the Faeroes. The battlecruiser HMS Repulse (Capt. W.G. Tennant, CB, MVO, RN) was at the Clyde to escort troop convoy WS 8B.
Action taken by the Commander-in-Chief, Home Fleet
Admiral Tovey took the following action when he received the news the Bismarck had been spotted at Bergen. Vice-Admiral Holland with the Hood, Prince of Wales, Achates, Antelope, Anthony, Echo, Electra and Icarus was ordered to cover Rear Admiral Wake-Walker's cruisers in the Denmark Straight. His force departed Scapa Flow around 0100/22.
HMS Arethusa (Capt. A.C. Chapman, RN), which was taking the Vice-Admiral, Orkneys and Shetlands, to Reykjavik on a visit of inspection, was ordered to remain at Hvalfiord and placed at Rear-Admiral Wake-Walkers disposal. HMS Manchester and HMS Birmingham were ordered to top off with fuel at Skaalefiord and them to resume their patrol. The other ships that remained at Scapa Flow were brought to short notice for steam.
The Free French submarine FFS Minerve (Lt. P.M. Sonneville), which was on patrol off south-west Norway was ordered to proceed to position 61°53'N, 03°15'E and HMS P 31 (Lt. J.B.de B. Kershaw, RN) was ordered to proceed to position 62°08'N, 05°08'E which is to the west of Stadtlandet.
The sailing of HMS Repulse and HMS Victorious with troop convoy WS 8B was cancelled and the ships were placed at the disposal of Admiral Tovey.
A reconnaissance aircraft flying over Bergen reported that the German ships were gone. This information reached Admiral Tovey at 2000/22. HMS Suffolk which had been fuelling at Hvalfiord was ordered to rejoin HMS Norfolk in the Denmark Strait. HMS Arethusa was ordered to join HMS Manchester and HMS Birmingham to form a patrol line between Iceland and the Faeroes. Vice-Admiral Holland, on his way to Iceland was told to cover the patrols in Denmark Strait north of 62°N. Admiral Tovey would cover the patrols south of 62°N.
Commander-in-Chief leaves Scapa Flow on 22 May 1941
The King George V, with Admiral Tovey on board, departed Scapa Flow at 2245/22. With the King George V sailed, HMS Victorious, HMS Galatea, HMS Aurora, HMS Kenya, HMS Hermione (Capt. G.N. Oliver, RN), HMS Windsor (Lt.Cdr. J.M.G. Waldegrave, DSC, RN), HMS Active, HMS Inglefield (Capt. P. Todd, DSO, RN), HMS Intrepid (Cdr. R.C. Gordon, DSO, RN), HMS Punjabi, HMS Lance (Lt.Cdr. R.W.F. Northcott, RN) and HMAS Nestor. HMS Lance however had to return to Scapa Flow due to defects.
At A.M. 23 May they were joined off the Butt of Lewis by HMS Repulse escorted by HMS Legion (Cdr. R.F. Jessel, RN), HMCS Assiniboine (A/Lt.Cdr. J.H. Stubbs, RCN) and HMCS Saguenay (Lt. P.E. Haddon, RCN) coming from the Clyde area which they departed on 22 May.
The Commander-in-Chief was 230 miles north-west of the Butt of Lewis in approximate position 60°20'N, 12°30'W when at 2032/23 a signal came in from HMS Norfolk that she had sighted the Bismarck in the Denmark Strait.
HMS Suffolk and HMS Norfolk made contact with the Bismarck in the Denmark Strait on 23 May 1941.
At 1922/23 HMS Suffolk sighted the Bismarck and Prinz Eugen in position 67°06'N, 24°50'W. They were proceeding to the south-west skirting the edge of the ice in Denmark Strait. HMS Suffolk immediately sent out an enemy report and made for the mist to the south-east. HMS Norfolk then commenced closing and sighted the enemy at 2030 hours. They were only some six nautical miles off and the Bismarck opened fire. HMS Norfolk immediately turned away, was not hit and also sent out an enemy report.
Although HMS Suffolk had sighted the enemy first and also sent the first contact report this was not received by the Commander-in-Chief. The enemy was 600 miles away to the north-westward.
Vice-Admiral Holland had picked up the signal from the Suffolk. He was at that moment about 300 nautical miles away. Course was changed to intercept and speed was increased by his force to 27 knots.
Dispositions, 23 May 1941.
At the Admiralty, when the Norfolk's signal came in, one of the first considerations was to safeguard the convoys at sea. At this time there were eleven crossing the North-Atlantic, six homeward and five outward bound. The most important convoy was troop convoy WS 8B of five ships which had left the Clyde the previous day for the Middle East. She was at this moment escorted by the heavy cruiser HMS Exeter (Capt. O.L. Gordon, MVO, RN), light cruiser (AA cruiser) HMS Cairo (A/Capt. I.R.H. Black, RN) and the destroyers HMS Cossack (Capt. P.L. Vian, DSO, RN), HMS Maori (Cdr. G.H. Stokes, DSC, RN), HMS Zulu (Cdr. H.R. Graham, DSO, RN), ORP Piorun (Kmdr.por. (Cdr.) E.J.S. Plawski), HMCS Ottawa (Cdr. E.R. Mainguy, RCN), HMCS Restigouche (Cdr. H.N. Lay, RCN) and the escort destroyer HMS Eridge (Lt.Cdr. W.F.N. Gregory-Smith, RN). HMS Repulse was also intended to have sailed with this convoy but she had joined the Commander-in-Chief instead.
Force H was sailed around 0200/24 from Gibraltar to protect this important convoy on the passage southwards. Force H was made up of the battlecruiser HMS Renown (Capt Sir R.R. McGrigor, RN), aircraft carrier HMS Ark Royal (Capt. L.E.H. Maund, RN), light cruiser HMS Sheffield (Capt. C.A.A. Larcom, RN) and the destroyers HMS Faulknor (Capt. A.F. de Salis, RN), HMS Foresight (Cdr. J.S.C. Salter, RN), HMS Forester (Lt.Cdr. E.B. Tancock, RN), HMS Foxhound (Cdr. G.H. Peters, DSC, RN), HMS Fury (Lt.Cdr. T.C. Robinson, RN) and HMS Hesperus (Lt.Cdr. A.A. Tait, RN).
HMS Norfolk and HMS Suffolk shadowing Bismarck 23 / 24 May 1941.
During the night of 23 / 24 May 1941 HMS Norfolk and HMS Suffolk hung on to the enemy, The Norfolk on their port quarter, Suffolk on their starboard quarter. All through the night they sent signals with updates on the position, course and speed of the enemy. At 0516 hours HMS Norfolk sighted smoke on her port bow and soon HMS Hood and HMS Prince of Wales came in sight.
HMS Hood and HMS Prince of Wales 23 / 24 May 1941.
At 2054/23 the four remaining escorting destroyers were ordered to follow at best speed in the heavy seas if they were unable to keep up with the capital ships which were proceeding at 27 knots. Two destroyers, HMS Antelope and HMS Anthony had been ordered to proceed to Iceland to refuel at 1400/23. The destroyers all managed to keep up for now and at 2318 hours they were ordered to form a screen ahead of both capital ships. At 0008/24 speed was reduced to 25 knots and course was altered to due north at 0017 hours. It was expected that contact with the enemy would be made at any time after 0140/24. It was just now that the cruisers lost contact with the enemy in a snowstorm and for some time no reports were coming in. At 0031 hours the Vice-Admiral signalled to the Prince of Wales that if the enemy was not in sight by 0210 hours he would probably alter course to 180° until the cruisers regained touch. He also signalled that he intended to engage the Bismarck with both capital ships and leave the Prinz Eugen to Norfolk and Suffolk.
The Prince of Wales' Walrus aircraft was ready for catapulting and it was intended to fly it off, but visibility deteriorated and in the end it was defuelled and stowed away at 0140 hours. A signal was then passed to the destroyers that when the capital ships would turn to the south they were to continue northwards searching for the enemy. Course was altered to 200° at 0203/24. As there was now little chance of engaging the enemy before daylight the crews were allowed to rest.
At 0247/24 HMS Suffolk regained touch with the enemy and by 0300 hours reports were coming in again. At 0353 hours HMS Hood increased speed to 28 knots and at 0400/24 the enemy was estimated to be 20 nautical miles to the north-west. By 0430 hours visibility had increased to 12 nautical miles. At 0440 hours orders were given to refuel the Walrus of HMS Prince of Wales but due to delays due to water in the fuel it was not ready when the action began and it was damaged by splinters and eventuelly jettisoned into the sea.
At 0535/24 hours a vessel was seen looming on the horizon to the north-west, it was the Bismarck. She was some 17 nautical miles away bearing 330°. Prinz Eugen was ahead of her but this was not immediately realised and as the silhoutte of the German ships was almost similar the leading ship was most likely thought to be the Bismarck on board HMS Hood.
Battle of the Denmark Strait, action with the Bismarck and Prinz Eugen. Loss of HMS Hood.
At 0537/24 HMS Hood and HMS Prince of Wales were turned together 40° to starboard towards the enemy. At 0549 hours course was altered to 300° and the left hand ship was designated as the target. This was a mistake as this was the Prinz Eugen and not the Bismarck. This was changed to the Bismarck just before fire was opened at 0552 hours. At 0554 hours the Bismarck and Prinz Eugen also opened fire. In the meantime Prince of Wales had also opened fire at 0053 hours. Her first salvo was over. The sixth salvo was a straddle. The Norfolk and Suffolk were too far astern of the enemy to take part in the action.
At 0555 hours Hood and Prince of Wales turned two points to port. This opened up Prince of Wales' A arcs as her ninth salvo was fired.
Shortly before 0605 hours Hood signalled that another turn of two points to port had to be executed. Bismarck had just fired her fifth salvo when the Hood was rent in two by a huge explosion rising apparently between the after funnel and the mainmast. The fore part began to sink seperately, bows up, whilst the after part remained shrouded in a pall of smoke. Three or four minutes later, the Hood had vanished between the waves leaving a vast cloud of smoke drifting away to the leeward. She sank in position 63°20'N, 31°50'W (the wreck was found in 2001 in approximate position 63°22'N, 32°17'W, the exact position has not been released to the public.)
The Prince of Wales altered course to starboard to avoid the wreckage of the Hood. The Bismarck now shifted fire from her main and secondary armament to her. Range was now 18000 yards. Within a very short time she was hit by four 15" and three 6" shells. At 0602 hours a large projectile wrecked the bridge, killing or wounding most of the personnel and about the same time the ship was holed underwater aft. It was decided temporarily to discontinue the action and at 0613 hours HMS Prince of Wales turned away behind a smoke screen. The after turret continued to fire but it soon malfunctioned and was out of action until 0825 hours. When the Prince of Wales ceased firing the range was 14500 yards. She had fired 18 salvos from the main armament and five from the secondary. The Bismarck made no attempt to follow or continue the action. She had also not escaped unscatched and had sustained two severe hits.
Such was the end of the brief engagement. The loss by an unlucky hit of HMS Hood with Vice-Admiral Holland, Captain Kerr and almost her entire ships company was a grievous blow, but a great concentration of forces was gathering behind the Commander-in-Chief, and Admiral Somerville with Force H was speeding towards him from the south.
The chase
When the Hood blew up, HMS Norfolk was 15 nautical miles to the northward coming up at 28 knots. By 0630/24 she was approaching HMS Prince of Wales and Rear-Admiral Wake-Walker, signalling his intention to keep in touch, told her to follow at best speed. The destroyers that had been with HMS Hood and HMS Prince of Wales were still to the northward. They were ordered to search for survivors but only HMS Electra found three. The Prince of Wales reported that she could do 27 knots and she was told to open out to 10 nautical miles on a bearing of 110° so that HMS Norfolk could fall back on her if she was attacked. Far off the Prinz Eugen could be seen working out to starboard of the Bismarck while the chase continued to the southward.
At 0757 hours, HMS Suffolk reported that the Bismarck had reduced speed and that she appeared to be damaged. Shortly afterwards a Sunderland that had taken off from Iceland reported that the Bismarck was leaving behind a broad track of oil. The Commander-in-Chief with HMS King George V was still a long way off, about 360 nautical miles to the eastward, and Rear-Admiral Wake-Walker on the bridge of HMS Norfolk had to make an important decision, was he to renew the action with the help of the Prince of Wales or was he to make it his business to ensure that the enemy could be intercepted and brought to action by the Commander-in-Chief. A dominant consideration in the matter was the state of the Prince of Wales. Her bridge had been wrecked, she had 400 tons of water in her stern compartments and two of her guns were unserverable and she could go no more then 27 knots. She had only been commissioned recently and barely a week had passed since Captain Leach had reported her ready for service. Her turrets were of a new and an untried model, liable for 'teething' problems and evidently suffering from them, for at the end of the morning her salvoes were falling short and wide. It was doubted if she was a match for the Bismarck in her current state and it was on these grounds that Rear-Admiral Wake-Walker decided that he would confine himself to shadowing and that he would not attempt to force on an action. Soon after 1100/24 visibility decreased and the Bismarck was lost out of sight in mist and rain.
Measures taken by the Admiralty, 24 May 1941.
After the loss of HMS Hood the following measures were taken by the Admiralty. To watch for an attempt by the enemy to return to Germany, HMS Manchester, HMS Birmingham and HMS Arethusa had been ordered at 0120/24 to patrol off the north-east point of Iceland. They were told to proceed to this location with all despatch.
HMS Rodney (Capt. F.H.G. Dalrymple-Hamilton, RN), which with four destroyers was escorting the troopship Britannic (26943 GRT, built 1930) westward, was ordered at 1022/24 to steer west on a closing course and if the Britannic could not keep up she was to leave her with one of the destroyers. Rodney was about 550 nautical miles south-east of the Bismarck. At 1200/24 she left the Britannic in position 55°15'N, 22°25'W and left HMS Eskimo (Lt.Cdr. E.G. Le Geyt, RN) with her. HMS Rodney then proceeded with HMS Somali (Capt. C. Caslon, RN), HMS Tartar (Cdr. L.P. Skipwith, RN) and HMS Mashona (Cdr. W.H. Selby, RN) westwards on a closing course.
Two other capital ships were in the Atlantic; HMS Ramillies (Capt. A.D. Read, RN) and HMS Revenge (Capt. E.R. Archer, RN). The Ramillies was escorting convoy HX 127 from Halifax and was some 900 nautical miles south of the Bismarck. She was ordered at 1144/24 to place herself to the westward of the enemy and leaving her convoy at 1212/24 in position 46°25'N, 35°24'W, she set course to the north. HMS Revenge was ordered to leave Halifax and close the enemy.
Light cruiser HMS Edinburgh (Capt. C.M. Blackman, DSO, RN) was patrolling in the Atlantic between 44°N and 46°N for German merchant shipping and was ordered at 1250/24 to close the enemy and take on relief shadower. At 1430/24 she reported her position as 44°17'N, 23°56'W and she was proceeding on course 320° at 25 knots.
Rear-Admiral Wake-Walker was ordered to continue shadowing even if he ran short of fuel so to bring the Commander-in-Chief into action.
The Bismack turns due south at 1320 hours on 24 May 1941.
In the low state of visibility, HMS Norfolk and HMS Suffolk had to be constantly on the alert against the enemy falling back and attacking them. At 1320/24 the Bismarck and Prinz Eugen altered course to the south and reduced speed. HMS Norfolk sighted them through the rain at a range of only 8 nautical miles. Norfolk had to quickly turn away under the cover of a smoke screen.
It was at 1530/24 when HMS Norfolk received a signal made by the Commander-in-Chief at 0800/24 from which it was estimated that the Commander-in-Chief would be near the enemy at 0100/25. This was later changed to 0900/25.
At 1545/24, Rear-Admiral Wake-Walker was asked by the Admiralty to answer four questions; 1) State the remaining percentage of the Bismarck's fighting efficiency. 2) What amout of ammunition had the Bismarck expended. 3) What are the reasons for the frequent alterations of course by the Bismarck. 4) What are your intentions as regards to the Prince of Wales' re-engaging the Bismarck.
The answers by Rear-Admiral Wake-Walker were as follows. 1) Uncertain but high. 2) About 100 rounds. 3) Unaccountable except as an effort to shake off HMS Norfolk and HMS Suffolk. 4) Consider it wisely for HMS Prince of Wales to not re-engage the Bismarck until other capital ships are in contact, unless interception failed. Doubtful if she has the speed to force an action.
The afternoon drew on towards evening. Still the Bismarck and Prinz Eugen held on to the south while the Norfolk, Suffolk and Prince of Wales were still keeping her in sight.
At 1711/24 in order to delay the enemy if possible, by attacking him from astern, the Prince of Wales was stationed ahead of the Norfolk. The enemy was not in sight from the Norfolk at that time, but the Suffolk was still in contact.
At 1841/24 the Bismarck opened fire on the Suffolk. Her salvoes fell short, but one or two shorts came near enough to cause some minor damage to her hull plating aft. HMS Suffolk replied with nine broadsides before turning away behind a smoke screen.
On seeing the Suffolk being attacked, HMS Norfolk turned towards and she and HMS Prince of Wales opened fire, the latter firing 12 salvoes. By 1856 hours the action was over. Two of the guns on the Prince of Wales malfuntioned again. After the action the cruisers started to zig-zag due to fear for German submarines.
British dispositions at 1800 hours on 24 May 1941.
From the Admiralty at 2025/24, there went out a signal summarising the situation at 1800/24. The position, course and speed of the Bismarck was given as 59°10'N, 36°00'W, 180°, 24 knots with HMS Norfolk, HMS Suffolk and HMS Prince of Wales still in touch. The Commander-in-Chiefs estimated position at 1800/24 was 58°N, 30°W, with HMS King George V and HMS Repulse. HMS Victorious was with the 2nd Cruiser Squadron (HMS Galatea, HMS Aurora, HMS Kenya). They had parted company with the Commander-in-Chief at 1509/24. Heavy cruiser HMS London (Capt. R.M. Servaes, CBE, RN) was in position 42°45'N, 20°10'W and had been ordered to leave her convoy and close the enemy. HMS Ramillies was in estimated position 45°45'N, 35°40'W. She had been ordered to place herself to the west of the enemy. HMS Manchester, HMS Birmingham and HMS Arethusa were returning from their position off the north-east of Iceland to refuel. HMS Revenge had left Halifax and was closing convoy HX 128. HMS Edinburgh was in approximate position 45°15'N, 25°10'W. She had been ordered to close and take over stand by shadower.
Evening of 24 May 1941.
At 2031/24 HMS Norfolk received a signal sent by the Commander-in-Chief at 1455/24 stating that aircraft from HMS Victorious might make an attack at 2200/24 and Rear-Admiral Wake-Walker now waited for an air attack which he expected at 2300 hours. By that time Bismarck had been lost from sight but at 2330/24 HMS Norfolk briefly sighted her at a distance of 13 nautical miles. At 2343/24 aircraft from HMS Victorious were seen approaching. They circled round HMS Prince of Wales and HMS Norfolk and the latter was able to direct them to the enemy. At 0009/25 heavy anti-aircraft gunfire was seen and the Bismarck was just visible as the aircraft attacked.
HMS Victorious and the 2nd Cruiser Squadron detached by the Commander-in-Chief.
At 1440/24 the Commander-in-Chief ordered the 2nd Cruiser Squadron (HMS Galatea, HMS Aurora, HMS Kenya, HMS Hermione) and HMS Victorious to a position within 100 nautical miles from Bismarck and to launch a torpedo bombing attack and maintain contact as long as possible. The object of the torpedo bombing attack was to slow the enemy down. On board the Victorious were only 12 Swordfish torpedo bombers and 6 Fulmar fighters. Victorious was only recently commissioned and her crew was still rather green. She had on board a large consignment of crated Hurricane fighters for Malta which were to be delivered to Gibraltar.
At 2208/24 HMS Victorious commenced launching 9 Swordfish in position 58°58'N, 33°17'E. Two minutes later al were on their way to find the Bismarck. The Squadron was led by Lt.Cdr.(A) E. Esmonde, RN.
HMS Victorious aircraft attack the Bismarck.
When the Swordfish took off from HMS Victorious the Bismarck was estimated to be in position 57°09'N, 36°44'W and was steering 180°, speed 24 knots. At 2330/24 they sighted the Bismarck but contact was lost in the bad weater. Shortly afterwards the Swordfish sighted HMS Prince of Wales, HMS Norfolk and HMS Suffolk. HMS Norfolk guided them to the enemy which was 14 nautical miles on her starboard bow. At 2350 hours a vessel was detected ahead and the squadron broke cloud to deliver an attack. To their surprise they found themselves over a United States Coastguard cutter. The Bismarck was 6 nautical miles to the southward and on sighting the aircraft opened up a heavy barrage fire. Lt.Cdr. Esmonde pressed home his attack, 8 of the Swordfish were able to attack, the other had lost contact in the clouds.
The 8 planes attacked with 18" torpedoes, fitted with Duplex pistols set for 31 feet. At midnight three Swordfish attacked simultaneously on the port beam. Three others made a longer approach low down attacking on the port bow a minute later. One took a longer course, attacking on the port quarter. One went round and attacked on the starboard bow a couple of minutes after midnight. At least one hit was claimed on the starboard side abreast the bridge. The Germans however state that no hit was scored but that the violent maneuvering of the ship to avoid the attack, together with the heavy firing by the Bismarck caused the leak in no.2 boiler room to open up. No.2 boiler room was already partially flooded and now had to be abandoned.
All Swordfish from the striking had returned to HMS Victorious by 0201/25. Two Fulmars launched at 2300/24 for shadowing failed to find their ship in the darkness due to the failure of Victorious' homing beacon. Their crews were in the end picked up from the chilly water.
HMS Norfolk and HMS Suffolk loose contact at 0306/25.
While the aircraft from HMS Victorious were making their attack, HMS Norfolk sighted a ship to the south-west and gave the order to open fire. HMS Prince of Wales was able to identify it in time as an American coast guard cutter, but in the movements prepartory to opening fire HMS Norfolk lost touch with the enemy for a time and it was not until 0116/25 that she suddenly sighted the Bismarck only 8 nautical miles away. There followed a brief exchange of fire. HMS Norfolk and HMS Prince of Wales turned to port to bring their guns to bear and the latter was ordered to engage. It was then 0130/25. The Prince of Wales fired two salvoes at 20000 yards by radar. The Bismarck answered with two salvoes which fell a long way short. The light was failing and the enemy was again lost to sight. HMS Suffolk, which had to most reliable RDF set was told to act independently so as to keep in touch.
Around 0306/25 the Suffolk lost touch with the Bismarck. At 0552/25 Rear-Admiral Wake-Walker asked if HMS Victorious could launch aircraft for a search at dawn.
Search measures, 25 May 1941.
With the disappearance of the Bismarck at 0306/25 the first phase of the pursuit ended. The Commander-in-Chief, in HMS King George V with HMS Repulse in company was then about 115 nautical miles to the south-east. At 0616/25, Rear-Admiral Wake-Walker signalled that it was most probable that Bismarck and Prinz Eugen made a 90° turn to the west or turned back and 'cut away' to the eastward astern of the cruisers. Suffolk was already searching to the south-west and Norfolk was waiting for daylight to do the same. Prince of Wales was ordered to join the King George V and Repulse.
Force H was still on a course to intercept the Bismarck while steaming on at 24 knots. The Rear-Admiral commanding the 2nd Cruiser Squadron in HMS Galatea had altered course at 0558/25 to 180° for the position where the enemy was last seen and the Victorious was getting 8 aircraft ready to fly off at 0730/25 for a search to the eastward. This plan however was altered on orders being recieved from the Commander-in-Chief to take the cruisers and Victorious and carry out a search to the north-west of the Bismarck's last reported position. Five Fulmars had already been up during the night, two of them had not returned to the ship. The search therefore had to be undertaken by Swordfish, the only aircraft available. At 0810/25, seven Swordfish were flown off from position 56°18'N, 36°28'W to search between 280° and 040° up to 100 nautical miles. The search was supplemented by Victorious herself as well as the cruisers from the 2nd Cruiser Squadron (Galatea, Aurora, Kenya and Hermione) which were spread some miles apart.
DF position of the Bismarck of 0852/25.
HMS King George V was still proceeding to the south-west when at 1030/25 the Commander-in-Chief recieved a signal from the Admiralty that the Bismarck's position had been obtained by DF (direction finding) and that it indicated that the Bismarck was on a course for the North Sea by the Faeroes-Iceland passage. To counter this move by the enemy the Commander-in-Chief turned round at 1047/25 and made for the Faeroes-Iceland passage at 27 knots. HMS Repulse was no longer in company with HMS King George V, she had been detached at 0906/25 for Newfoundland to refuel. Suffolk also turned to the eastward to search, her search to the south-west had been fruitless. The search by HMS Victorious, her aircraft and the 2nd Cruiser Squadron to the north-west also had no result. Six Swordfish were landed on by 1107/25, one failed to return. HMS Galatea, HMS Aurora and HMS Kenya now turned towards the DF position of the Bismarck to search in that direction. HMS Hermione had to be detached to Hvalfiord, Iceland to refuel as she was by now down to 40%. The other cruisers slowed down to 20 knots to economise their remaining fuel supply wich was also getting low. At this moment HMS King George V had about 60% remaining.
Events during 25 May 1941.
At 1100/25, HMS King George V, HMS Suffolk and HMS Prince of Wales were proceeding to the north-east in the direction of the enemy's DF signal. HMS Rodney was in position 52°34'N, 29°23'W some 280 nautical miles to the south-eastward on the route towards the Bay of Biscay. On receiving the Commander-in-Chiefs signal of 1047/25 she too proceeded to the north-east.
Meanwhile to Admiralty had come to the conclusion that the Bismarck most likely was making for Brest, France. This was signalled to the Commander-in-Chief at 1023/25 to proceed together with Force H and the 1st Cruiser Squadron on that assumption.
In the absence however of definite reports it was difficult to be certain of the position of the enemy. The DF bearings in the morning had not been very definite. At 1100/25, HMS Renown (Force H), was in position 41°30'N, 17°10'W was ordered to act on the assumption the enemy was making for Brest, France. She shaped course accordingly and prepared a comprehensive sheme of air search. At 1108/25, HMS Rodney, was told to act on the assumption that the enemy was making for the Bay of Biscay. At 1244/25 the Flag Officer Submarines ordered six submarines to take up intercepting positions about 120 nautical miles west of Brest. The submarines involved were HMS Sealion (Cdr. B. Bryant, DSC, RN), HMS Seawolf (Lt. P.L. Field, RN), HMS Sturgeon (Lt.Cdr. D. St. Clair-Ford, RN) from the 5th Submarine Flottilla at Portsmouth, HMS Pandora (Lt.Cdr. J.W. Linton, DSC, RN), which was on passage to the U.K. from the Mediterranean to refit, HMS Tigris (Lt.Cdr. H.F. Bone, DSO, DSC, RN), from the 3rd Submarine Flottilla at Holy Loch and HMS H 44 (Lt. W.N.R. Knox, DSC, RN), a training boat from the 7th Submarine Flotilla at Rothesay which happened to be at Holyhead. Seawolf, Sturgeon and Tigris were already on patrol in the Bay of Biscay, Sealion departed Portsmouth on the 25th as did H 44 but she sailed from Holyhead. Pandora was on passage to the U.K. to refit and was diverted.
At 1320/25 a good DF fix located an enemy unit within a 50 mile radius from position 55°15'N, 32°00'W. This was sent by the Admiralty to the Commander-in-Chief at 1419/25 and it was received at 1530/25. It was only in the evening that it was finally clear to all involved that Bismarck was indeed making for a French port. Air searches had failed to find her during the day. (54)
18 May 1941
Chase and sinking of the German battleship Bismarck, 18 to 27 May 1941.
Part II.
26 May 1941.
By now the question of fuel was becoming acute. For four days ships had been steaming at high speeds and the Commander-in-Chief was faced with the reality of fuel limits. HMS Repulse had already left for Newfoundland, HMS Prince of Wales had by now been sent to Iceland to refuel. HMS Victorious and HMS Suffolk had been forced to reduce speed to economise their fuel.
Coastal Command started air searches along the route towards the Bay of Biscay by long range Catalina flying boats. Lack of fuel was effecting the destroyer screens of the capital ships. There was no screen available for HMS Victorious. The 4th Destroyer Flotilla, escorting troop convoy WS 8B, was ordered at 0159/26 to join the Commander-in-Chief in HMS King George V and HMS Rodney as was HMS Jupiter (Lt.Cdr. N.V.J.P. Thew, RN) which sailed from Londonderry. Leaving the convoy the 4th D.F. proceeded to the north-east. Force H in the meantime was also approaching the immediate area of operations. These forces were to play an important part in the final stages of the chase of the Bismarck.
Force H, 26 May 1941.
HMS Renown, HMS Ark Royal and HMS Sheffield were having a rough passage north in heavy seas, high wind, rain and mist. Their escorting destroyers had already turned back towards Gibraltar at 0900/25. At dawn on the 26th there was half a gale blowing from the north-west. At 0716/26 HMS Ark Royal launched a security patrol in position 48°26'N, 19°13'W to search to the north and to the west just in case the Scharnhorst and Gneisenau had departed Brest to come to the aid of the Bismarck. At 0835/26 there followed an A/S patrol of ten Swordfish. All planes had returned by 0930. None had seen anything.
Bismarck sighted at 1030/26.
It was at 1030/26 that one of the long range Catalina's of the Coastal Command sighted the Bismarck in position 49°30'N, 21°55'W. It was received in HMS King George V at 1043 hours and in HMS Renown in 1038 hours. It placed the enemy well to the westward of the Renown. It was confirmed within the hour when two Swordfish from the Ark Royal which reported the Bismarck in position 49°19'N, 20°52'W some 25 miles east of the position given by the Catalina. The Commander-in-Chief was at that moment about 130 miles to the north of the Bismarck but it was soon clear that the Bismarck had too great a lead to permit her being overtaken unless her speed could be reduced. Nor was the question one merely of distance and speed. The Bismarck was approaching a friendly coast and could run her fuel tanks nearly dry and was sure of air protection, while the British ships would have a long journey back to base in the face of air and submarine attack. HMS Renown was ahead of the Bismarck but it was important that she did not engage the Bismarck unless the latter was already heavily engaged by the better armoured HMS King George V and HMS Rodney.
When the Catalina found the Bismarck at 1030 hours, the 4th Destroyer Flotilla was steering east to join the Commander-in-Chief. They seem to have crossed astern of the enemy's track about 0800/26. The Catalina's report reached Capt. Vian in HMS Cossack at 1054/26 and 'knowing that the Commander-in-Chief would order him to intercept the enemy' Capt. Vian altered course to the south-east.
First attack by aircraft from the Ark Royal.
At 1315/26 HMS Sheffield was detached to the southward with orders to close and shadow the enemy, who was estimated to be 40 nautical miles south-west of the Renown. The visual signal ordering this movement was not repeated to HMS Ark Royal, an omission which had serious consequenses for the aircraft that were to take off did not know that HMS Sheffield had parted company.
At 1450/26 HMS Ark Royal launched a striking force of 14 Swordfish aircraft with the orders to proceed to the south and attack the Bismarck with torpedoes. Weather and cloud conditions were bad and a radar contact was obtained on a ship some 20 nautical miles from the estimated position of the enemy that had been given to the leader shortly before takeoff. At 1550 hours they broke through the clouds and fired 11 torpedoes. Unfortunately the supposed enemy was HMS Sheffield which managed to avoid all torpedoes. The Bismarck at that time was some 15 nautical miles to the southward. The striking force then returned an all aircraft had landed on by 1720/26.
At 1740/26, HMS Sheffield, sighted the Bismarck in position 48°30'N, 17°20'W and took station about 10 nautical miles astern and commenced shadowing the enemy.
Ark Royal's second attack, 2047/26.
The first striking force on its way back sighted the 4th Destroyer Flotilla 20 nautical miles west of Force H. As soon as the aircraft from the first strike had landed they were refuelled and rearmed as fast as possible. Take off started at 1910/26, a total of 15 Swordfish were launched. Reports coming in from HMS Sheffield placed the Bismarck at 167°, 38 nautical miles from the Ark Royal. The striking force was ordered to contact HMS Sheffield who was told to use DF to guide them in.
At 1955/26 HMS Sheffield was sighted but soon lost in the bad weather conditions. She was found again at 2035 hours, she guided the Swordfish in and directed them by visual signal on the enemy bearing 110°, 12 nautical miles. The force took departure for the target in subflights in line astern at 2040/26.
At 2047/26 no.1 subflight of three Swordfish dived through the clouds and sighted the Bismarck 4 nautical miles off to the south-east. One Swordfish of no.3 subflight was with them. Approaching again just inside the cloud they made their final dive at 2053/26 on the port beam under a very intense and accurate fire from the enemy. They dropped four torpedoes of which one was seen to hit. No.2 subflight, made up of two Swordfish, lost touch with no.1 subflight in the clouds, climed to 9000 feet, then dived on a bearing obtained by radar and then attacked from the starboard beam, again under heavy and intense fire. They dropped two torpedoes for one possible hit. The third plane of this subflight had lost touch with the other two and had returned to HMS Sheffield to obtained another range and bearing to the enemy. It then flew ahead of the enemy and carried out a determined attack from his port bow under heavy fire and obtained a torpedo hit on the port side amidships.
Subflight no.4 followed subflight no.3 into the clouds but got iced up at 6600 feet. It then dived through the clouds and was joined by no.2 aircraft from subflight no.3. The Bismarck was then sighted engaging subflight no.2 to starboard. The four aircraft then went into the clouds and cicled the German battleships stern and then dived out of the clouds again and attack simultaneously from the port side firing four torpedoes. All however missed the Bismarck. They came under a very heavy and fierce fire from the enemy and one of the aircraft was heavily damaged, the pilot and air gunner being wounded.
The two aircraft of subflight no.5 lost contact with the other subflights and then with each other in the cloud. They climbed to 7000 feet where ice began to form. When coming out of the cloud at 1000 feet aircraft 4K sighted the Bismarck down wind, she then went back into the cloud under fire from the enemy. She saw a torpedo hit on the enemy's starboard side, reached a position on the starboard bow, withdrew to 5 miles, then came in just above the sea and just outside 1000 yards fired a torpedo which did not hit. The second plane of this flight lost his leader diving through the cloud, found himself on the starboard quarter and after two attempts to attack under heavy fire was forced to jettison his torpedo.
Of the two Swordfish of subflight no.6 one attacked the Bismarck on the starboard beam and dropped his torpedo at 2000 yards without success. The second plane lost the enemy, returned to the Sheffield for a new range and bearing and after searching at sea level attacked on the starboard beam but was driven off by intense fire. The attack was over by 2125/26. Thirteen torpedoes had been fired and it was thought two hits and one probable hit had been obtained. Two torpedoes were jettisoned. The severe nature and full effect of the damage done was at first not fully realised. Actually the Bismarck had received a deadly blow. The last of the shadowing aircraft to return had seen her make two complete circles. One torpedo had struck her on the port side amidships doing little damage but th other torpedo that hit was on the starboard quarter damaging her propellors, wrecking her steering gear and jambing her rudders, it was this torpedo hit that sealed her fate.
HMS Sheffield was still shadowing astern when at 2140/26 the Bismarck turned to port and fired six accurate salvoes of 15". None actually hit Sheffield but a near miss killed three men and seriously injured two. HMS Sheffield turned away and while doing so she sighted HMS Cossack and the other destroyers from the 4th DF approaching from the westward. She then gave them the approximate position of the Bismarck. At 2155/26, HMS Sheffield lost touch with the Bismarck. The destroyers continued to shadow and eventually attack. Meanwhile HMS Renown and HMS Ark Royal shaped course for the southward to keep the road clear for the Commander-in-Chief in HMS King George V and for HMS Rodney. Also in the Ark Royal aircraft were being got ready for an attack on the Bismarck at dawn.
Bismarck, 26 May 1941.
The Bismarck could no longer steer after the torpedo hit aft. The steering motor room was flooded up to the main deck and the rudders were jambed. Divers went down to the steering room and managed to centre one rudder but the other remained immovable. She was by this time urgently in need of fuel. It was hoped by the Germans that while she was nearing the French coast strong forces of aircraft and submarines would come to her assistance.
At 2242/26, Bismarck sighted the British destroyers. A heavy fire was opened on them. Their appearence greatly complicated the situation. Before their arrival however, Admiral Lütjens seems to have made up his mind as one hour earlier he had signalled to Berlin 'ship out of control. We shall fight to the last shell. Long live the Führer.'
The fourth Destroyer Flotilla makes contact, 26 May 1941.
Just as the sun was setting, Captain Vian (D.4) in HMS Cossack with HMS Maori, HMS Sikh, HMS Zulu and the Polish destroyer ORP Piorun arrived on the scene.
Shortly after 1900/26 HMS Renown and HMS Ark Royal were sighted to the northward. Ark Royal was just about to fly off the second striking force. The destroyers continued on the the south-east. At 2152/26 HMS Sheffield was sighted and from her Captain Vian obtained the approximate position of the enemy.
The destroyers were spread 2.5 nautical miles apart on a line bearing 250° - 070° in the order from north-east to south-west, Piorun, Maori, Cossack, Sikh, Zulu. During the latter stages of the approach speed was reduced and the flotilla manoeuvred so as to avoid making a high speed end-on contact.
At 2238/26, ORP Piorun on the port wing reported the Bismarck 9 nautical miles distant, bearing 145° and steering to the south-eastward.
Destroyers shadowing, late on 26 May 1941.
At the time the Piorun reported being in contact with the Bismarck the destroyers were steering 120°. All were at once ordered to take up shadowing positions. Four minutes later the Bismarck opened a heavy fire with her main and secondary armaments on the Piorun and Maori. Two attempts were made by these ships to work round to the northward of the enemy but they were silhouetted against the north-western horizon making them easy to spot. The Bismarck's fire was unpleasantly accurate, through neither destroyer was actually hit. The Commanding Officer of the Maori then decided to work round to the southward and altered course accordingly.
The Piorun closed the range and herself opened fire from 13500 yards but after firing three salvoes, she was straddled by a salvo which fell about 20 yards from the ships side. She then ceased fire and turned away to port while making smoke. During this engagement she lost touch with the other destroyers and later also with the Bismarck. She remained under fire for about one hour but was not hit. She worked round to the north-east of the Bismarck but eventually lost touch with her prey at 2355/26.
The other destroyers, meanwhile, had been working round to the southward of the enemy to take up shadowing positions to the eastward of him. Soon after the initial contact it was evident the the Bismarck's speed had been so seriously reduced that interception by the battlefleet was certain, provided that contact could be held. In these circumstances Captain Vian defined his object at firstly, to deliver the enemy to the Commander-in-Chief at the time he desired, and secondly, to sink or immoblise her with torpedoes during the night but not with to great a risk for the destroyers. Accordingly at 2248/26 as signal was made to all ordering them to shadow and this operation was carried out through the night, though torpedo attacks were carried out later under the cover of darkness.
As darkness came on, the weather deteriorated and heavy rain squalls became frequent. Visibility varied between 2.5 nautical miles and half a mile but the Bismarck, presumably using radar, frequently opened up accurate fire outside these ranges.
About half an hour after sunset, the destroyers were ordered at 2324/26 to take up stations prepartory to carrying out a synchronised torpedo attack. This was subsequently cancelled on account of the adverse weather conditions and they were ordered to attack independently as opportunity offered. At about 2300 hours the Bismarck altered course to the north-westward.
At this time HMS Zulu was in touch with her and kept her under observation from the southward. At 2342 hours the Bismarck opened fire on HMS Cossack, then about 4 miles to the south-south-west and shot away her aerials. The Cossack turned away under the cover of smoke, shortly afterwards resuming her course to the eastward.
A few minutes later, at 2350 hours, HMS Zulu came under heavy fire from the Bismarck's 15" guns. The first three salvoes straddled wounding an officer and two ratings. Drastic avoiding action was taken as a result of which Zulu lost touch. HMS Sikh, however, who had lost sight of the enemy half an hour previously, had observed her firing at HMS Cossack and now succeeded in shadowing from astern until 0020/27 when the enemy made a large alteration to port and commenced firing at her. HMS Sikh altered course to port, intending to fire torpedoes, but the view of the Torpedo Control Officer was obscured by shell splashes and Sikh then withdrew to the southward.
Destroyer night torpedo attacks, 26/27 May 1941.
HMS Zulu, after her escape at 2345/26, had steered to the northward and at 0030/27 fell in with HMS Cossack. Shortly afterwards she sighted ORP Piorun. On receipt of a signal from Captain Vian, timed 0040/27, to take any opporunity to fire torpedoes, HMS Zulu altered course to the westward,and at 0100/27 sighted the Bismarck steering 340°.
Positions of the destroyers was now as follows; to the north-eastward of the enemy, HMS Cossack was working round to the north and west. HMS Maori, since losing touch, had been making to the westward. She was now to the south-west of the Bismarck. HMS Sikh was some distance to the southward, not having received any information regarding the position of the Bismarck since 0025/27. HMS Zulu was astern of the enemy and in contact. Range was only 5000 yards. Bismarck finally spotted Zulu and at once opened fire with her main and secondary armament and straddled Zulu. She fired four torpedoes at 0121/27 but no hits were observed and they are believed to have missed ahead. Zulu then ran out to the northward in order to be clear of the other destroyers. Shortly afterwards they widnessed a successful attack by HMS Maori.
HMS Maori had seen the Bismarck opening fire on the Zulu at 0107/27. Maori then closed to 4000 yards on Bismarck's port quarter apparently undetected. When abeam of the enemy, who then appeared to be altering course to starboard Maori fired a star shell to see what he was about. Two minutes later, at 0137/27, two torpedoes were fired and course was altered towards the Bismarck with the intention of attacking again from her starboard bow once the enemy had steadied on her new course. Whilst Maori was turning a torpedo hit was observed on the enemy. A bright glow illuminated the waterline of the enemy battleship from stem to stern. Shortly afterwards there appeared between the bridge and the stem a glare that might have been a second hit. The enemy immediately opened up a very heavy fire with both main and secondairy armaments and quick firing guns. As the Maori was being straddled, she turned away, and increased to full speed. Shots continued to fall on both sides of the ship until the range had been opened up to 10000 yards. Maori was not actually hit. Meanwhile HMS Cossack had been creeping up from the north-eastward and at 0140/27, only three minutes after Maori had fired two torpedoes, Cossack launched three torpedoes from 6000 yards. Bismarck stood out plainly, silhoutted by the broadsides she was firing at the Maori. One torpedo was seen to hit. Flames blazed on the forecastle of the Bismarck after this hit but they were quickly extinguished. Probably as a consequence of the torpedo hits the Bismarck stopped dead in the water, this was reported by HMS Zulu at 0148/27. After about one hour the Bismarck got underway again. On receipt of this report, HMS Sikh, who was closing the scene of the action from the southward, made an attack. Four torpedoes were fired at 0218/27 at the stopped battleship. It is believed that one hit was obtained. After this attack Sikh remained in radar contact with the enemy until 0359/27 when contact was lost.
Around 0240/27 the Bismarck was underway again, proceeding very slowly to the north-westward. At 0335/27, HMS Cossack made another attack firing her last remaining torpedo from a range of 4000 yards. It missed. HMS Cossack then came under a heavy fire. She withdrew to the northward under the cover of smoke, altering to a westerly course shortly afterwards.
At 0400/27 all destroyers had lost touch with the enemy. HMS Cossack was then to the north-west and HMS Sikh, HMS Zulu and HMS Maori were between the south-west and south-east of the Bismarck. All destroyers now endeavoured to regain contact.
Touch with the enemy was not regained until shortly before 0600 hours. By that time ORP Piorun, which was running short of fuel, had been ordered to proceed to Plymouth.
Destroyers shadowing, morning twilight, 27 May 1941, final attack.
Touch was regained by HMS Maori at 0550/27 when she sighted the Bismarck zigzagging slowly on a base course of 340° at about 7 knots. Maori commenced shadowing until daylight. At 0625 hours, HMS Sikh was also in contact when the Bismarck emerged from a rain squal 7000 yards on her starboard bow. By then it was nearly full daylight but to the surprise of the crew of the Sikh she got away with it without being fired at.
Shortly before sunrise a final torpedo attack was carried out by HMS Maori, which fired two torpedoes at 0656/27 from 9000 yards. Both missed. The Bismarck opened fire and straddled Maori which escaped at 28 knots.
At daylight the destroyers were stationed in four sectors from which they were able to keep the enemy under continuous observation until the arrival of the Battle Fleet at 0845 hours.
Force H, 26/27 May 1941.
While the destroyers were shadowing the Bismarck, the pursuing forces were drawing steadily closer. To the north was the Commander-in-Chief with the King George V and the Rodney with the Norfolk closing on them. In the south HMS Dorsetshire (Capt. B.C.S. Martin, RN) was coming up, while Force H was waiting for the dawn. When Captain Vian's destroyers got in touch at 2251/26 the Renown and Ark Royal were north-west of the enemy. It was not possible to attack with aircraft during the night but all preparations were made to attack at dawn with 12 Swordfish. Course was shaped to the northward and then to the west for a time and at 0115/27 Force H turned south. Shortly afterwards instructions were received from the Commander-in-Chief to keep not less then 20 miles to the southward of the Bismarck so as to leave a clear approach for the Battle Fleet. Force H accordingly continued to the southward during the night. Bursts of starshell and gunfire could be seen during the night while the destroyers attacked. At 0509/27 an aircraft was flown off from HMS Ark Royal to act as a spotter for HMS King George V but it failed to find the Bismarck in the bad weather. The striking of force of 12 Swordfish was ready but due to the bad weather to strike was cancelled.
At 0810/27, HMS Maori was sighted. She reported the Bismarck 11 miles to the north of her. The made the enemy 17 miles to the north of HMS Renown so course was shaped to the south-west. At 0915/27 heavy gunfire could be heard and the striking force was flown off. They found the Bismarck at 1016/27. By then the battle was almost over, her guns were silenced and she was on fire. They saw her sink. At 1115/27 they had all landed back on HMS Ark Royal. A German Heinkel aircraft dropped a couple of bombs near HMS Ark Royal when they were landing on.
HMS Norfolk, 26/27 May 1941.
When the Catalina report (1030/26) came in, HMS Norfolk altered course to the south-west and increased speed to 27 knots. At 2130/26 the Bismarck was still some 160 nautical miles to the southward and speed was increased to 30 knots. At 2228/26 the report on the torpedo hit by the aircraft from Ark Royal came in and the Norfolk turned to the southward, continuing to close the enemy. At 0753/27 Norfolk sighted the Bismarck. She did not open fire and was lost to sight after ten minutes. At 0821/27, HMS King George V, was sighted to the westward, 12 nautical miles away. The position of the enemy was passed to the Commander-in-Chief. The action opened at 0847/27 at which time HMS Norfolk was then some 10 nautical miles from the Commander-in-Chief and due north of the Bismarck. HMS Norfolk had seen the beginning and was now to see the end.
HMS Dorsetshire, 26/27 May 1941.
On 26 May 1941, HMS Dorsetshire, was with convoy SL 74 proceeding from Freetown to the U.K. When she received the sighting report from the Catalina at 1056/26 she was some 360 nautical miles to the south of the Bismarck. She then left the protection of the convoy to the Armed Merchant Cruiser HMS Bulolo (Capt.(Retd.) R.L. Hamer, RN) and set course for the northward to take up the possible task of shadowing. By 2343/26 it became clear from reports that the Bismarck was making no ground to the eastward and that at 0230/27 she appeared to be laying stopped. Due to the heavy seas HMS Dorsetshire was forced to reduce speed to 25 knots and later even to 20 knots. At 0833/27 a destroyer was sighted ahead at a range of 8 nautical miles, it was HMS Cossack which reported the enemy at a range of 6 nautical miles. At 0850/27 the flashes of the Bismarck's guns could be seen to the westward. HMS Dorsetshire arrived at the scene of the action in the nick of time.
HMS King George V and HMS Rodney, 26/27 May 1941.
During 26 May 1941 the Commander-in-Chief in HMS King George V had been making hard to the south-east at 25 knots. He had been joined by HMS Rodney at 1806/26. They were then some 90 nautical miles north of the Bismarck. Fuel was a matter of grave anxiety. At noon on the 26th, HMS King George V, had only 32% remaining and HMS Rodney reported that she had to return at 0800/27. Speed had to be reduced on this account to 22 knots at 1705/26. In these circumstances it was no longer possible to hope to intercept the enemy, and the Commander-in-Chief decided that unless the enemy's speed had been reduced by 2400/26, he must turn at that hour. The only hope lay in the Bismarck being slowed up by the Swordfish attacking from HMS Ark Royal. A report came in that the striking force had left. Then at 2132/26, HMS Sheffield, reported that the enemy was steering 340° followed by 000° four minutes later. These reports indicated that the Bismarck was not able to hold her course and that her steering gear must have been damaged. It might still be possible to intercept her.
The Commander-in-Chief turned to the south at once hoping to make contact from the eastward in the failing light. Due to the bad weather conditions and visibility the Commander-in-Chief decided to haul off the the eastward and northward and then work round to engage from the westward at dawn. He turned eastward at 2306/26. During the night reports from Captain Vian's destroyers came in confirming the northerly course of the Bismarck. At 0236/27 the Commander-in-Chief ordered Captain Vian that the destroyers were to fire star-shell every half hour, but frequent rain squalls prevented these from being seen and they tended to attrack the enemy's fire. The Bismarck was still a formidable opponent for at 0353/27 Captain Vian reported that during the last hour she had done 8 nautical miles and that she was still capable of heavy and accurate fire. The Commander-in-Chief decided not to make a dawn approach but to wait until daylight while approaching from the west taking advantage of wind, sea and light. At 0529/27 HMS Rodney reported sighting HMS Norfolk to the eastward by DF. It was light at 0600 hours. At 0820 hours HMS Norfolk was sighted on the port bow of HMS King George V. She signalled 'enemy 130°, 16 nautical miles'. At 0843/27 looming on the starboard bow there emerges out of a rain squall the dark grey blot of a large ship. 'Enemy in sight'.
Bismarck 26/27 May 1941.
The Bismarck after altering course to the north-west had been labouring along with a jambed rudder, steering an erratic course at 8 knots. During the night the attacking destroyers were met with heavy and accurate salvoes. Sixteen torpedoes were fired at her. Early in the morning a glare of star-shell burst over her, lighting her up. Three torpedoes followed from a destroyer on the port bow (HMS Maori) of which one hit on the port side amidships. Three minutes later three more came from the starboard side (these were fired by HMS Cossack) of which one hit on the starboard bow. The damage that was sustained from these torpedo hits is not known. The Bismarck lay stopped for over one hour. At 0140/27 a message was received that a large number of Junkers bombers were coming to her aid as were U-boats but the Bismarck was beyond their help besides that the aircraft did not find her. One U-boat (U-556, which was out of torpedoes) on its way back from the Atlantic joined her and was within sight during the night. Another (U-74) arrived at 0600/27 but had been damaged in a depth charge attack and could do nothing as well. In the Bismarck the crew was exhausted and men were falling asleep at their posts. It was under these conditions that at 0840/27 two British battleships were seen to approach from the westward.
Situation before the action, 27 May 1941.
A north-westerly gale was blowing when dawn broke with a good light and clear horizon to the north-eastward. Reports received during the night indicated that, despite reduced speed and damaged rudders, Bismarck's armament was functioning effectively. Given the weather conditions the Commander-in-Chief decided to approach on a west-north-westerly bearing and, if the enemy continued his northerly course, to deploy to the southward on opposite course at a range of about 15000 yards. Further action was to be dictated by events.
Between 0600 and 0700 hours a series of enemy reports from HMS Maori which was herself located by DF bearings. This enabled HMS King George V to plot her position relatively to the Bismarck which had apparently settled down on a course of 330° at 10 knots. At 0708/27, HMS Rodney, was ordered to keep station 010° from the flagship. HMS Norfolk came in sight to the eastward at 0820/27 and provided a visual link between the Commander-in-Chief and the enemy. After the line of approach had been adjusted by two alterations of course, the Bismarck was sighted at 0843/27 bearing 118°, range about 25000 yards. Both British battleships was then steering 110° almost directly towards the enemy in line abreast formation, 8 cables apart.
Commencement of action 0847/27.
HMS Rodney opened fire at 0847/27, her first salvo sending a column of water 150 feet into the air. HMS King George V opened fire one minute later. Bismarck opened fire at 0850 hours after turning to open up A arcs. The first German salvo was short. The third and fourth salvoes straddled and nearly hit, but the Rodney manoeuvered succesfully to avoid them and the nearest fell 20 yards short. At 0854/27, HMS Norfolk joined in, but the target was not clearly visible and she opened fire without obtaining a range.
Observers state that the German gunnery was accurate at first, but commenced to deteriorate after 8 to 10 salvoes. The first hit on the Bismarck was believed to be scored by the Rodney at 0854 hours with her third salvo. Both British battleships made small alterations of course away from the enemy shortly after opening fire, the King George V to increase her distance from the Rodney and the latter to open her A arcs. From then onwards they manoeuvered independently although HMS Rodney conformed to the Flagship's general movements. The Bismarck's secondary armament came into action during this phase. HMS Rodney opened fire with her secondary armament at 0858 hours.
Run to the southward.
HMS King George V deployed to the southward at 0859/27 when the Bismarck was 16000 yards distant. HMS Rodney, 2.5 nautical miles to the northward, followed suit a minute or two later. Cordite smoke was hanging badly with the following wind and spotting was most difficult. Considerable smoke interference was therefore experienced on the southerly course which was partly overcome by radar. The Bismarck had transferred her fire to the King George V shortly after the turn but except for an occasional splash the latter hardly knew that she was under fire. At 0902/27, HMS Rodney saw a 16” shell hit the Bismarck on the upper deck forward, apparently putting the forward turrets out of action. At 0904 hours, HMS Dorsetshire joined in the firing from the eastwards from a range of 20000 yards but observation of the target was difficult and she had to check fire from 0913 to 0920 hours. Between 0910 and 0915 hours the range in King George V was more or less steady at 12000 yards.
The fate of the Bismarck was decided during this phase of the action although she did not sink until later. Around 0912 hours, the Bismarck was hit on her forward control position. During the run to the south HMS Rodney fired six torpedoes from 11000 yards and HMS Norfolk four from 16000 yards. No hits were obtained. The King George V’s secondary battery came into action at 0905 hours but this increased the smoke interference and was accordingly ordered to cease fire after two or three minutes.
Run to the northward.
At 0916/27 the Bismarck’s bearing was drawing rapidly aft and HMS Rodney turned 16 points to close and head her off. The King George V followed a minute or so later and both ships re-opened fire at ranges from 8600 and 12000 yards respectively. The Bismarck shifted her target to the Rodney about this time. A near miss damaged the sluice of her starboard torpedo tube. Most of the enemy’s guns had however been silenced at this time. Only one turret from her main armament was firing at this time as was part of her secondary armament. A fire was blazing amidships and she had a heavy list to port. During the run to the north HMS Rodney obtained a very favourable position on the Bismarck’s bow from which she poured in a heavy fire from close range. She also fired two torpedoes from 7500 yards but no hits were obtained.
HMS King George V’s position, further to leeward, was less favourable. Her view was obscured by smoke and splashes surrounding the target and her radar had temporarily broken down. Mechanical failures in the 14” turrets constituted, however, a more serious handicap at this stage. ‘A’, ‘X’ and ‘Y’ turrets were out of action for 30, 7 and a unspecified short period, respectively. This resulted in reduction of firepower of 80% for 7 minutes and 40% for 23 minutes which might have had serious effects under less favourable conditions. There were also several defects of individual guns in addition to those effecting the turrets.
At 0925/27, HMS King George V, altered outwards to 150° and reduced speed to avoid getting too far ahead of the Bismarck. She closed in again at 1005 hours, fired several salvoes from a range of only 3000 yards and then resumed her northerly course. Meanwhile HMS Rodney was zigzagging across the Bismarck’s line of advance at a range of about 4000 yards firing her main and secondary armaments. She also fired four torpedoes, one of which is thought to have hit. By 1015 hours the Bismarck was no more than a wreck. All her guns were silenced, her mast had been blown away, she was a black ruin, pouring high into the air a great cloud of smoke and flame. Men were seen jumping overboard at this time and the Captain of the King George V later remarked had he known it he would have ceased fire.
End of the action.
The Commander-in-Chief was confident that the enemy could never get back to harbour, and as both battleships were running short of fuel and as further gunfire was unlikely to hasten the Bismarck’s end, the Commander-in-Chief signalled the King George V and Rodney to steer 027° at 1015/27 in order to break off the action and return to base. At 1036/27 the Commander-in-Chief ordered HMS Dorsetshire to use her torpedoes, if she had any, on the enemy. In the meantime HMS Norfolk had been closing the target but due to the movements of the King George V and Rodney, had not fired her torpedoes until 1010 hours when she fired four torpedoes from 4000 yards and two possible hits were reported. The Dorsetshire was then approaching a mile or so to the southward, and anticipating the Commander-in-Chief’s signal at 1025 hours fired two torpedoes from 3600 yards into the enemy’s starboard side. She then steamed round the Bismarck’s bow and at 1036 hours fired another torpedo but now into her port side from 2600 yards. This was the final blow, the Bismarck heeled over quickly to port and commenced to sink by the stern. The hull turned over keel up and disappeared beneath the waves at 1040/27.
The Dorsetshire then closed and signalled to one of HMS Ark Royal’s aircraft to carry out a close A/S patrol while she was to pick up survivors assisted by HMS Maori. After 110 men had been picked up by both ships from the water both ships got underway again as a submarine was suspected to be in the area.
Damage to the Bismarck.
Survivors have told the story of terrible damage inflicted on her. The fore turrets seem to have been knocked out at 0902 hours. The fore control position was knocked out around 0912 hours. The after control position followed about 0915 hours. The after turrets were at that moment still in action. Then the aftermost gun turret was disabled by a direct hit on the left gun which burst sending a flash right through the turret. ‘C’ turret was the last one in action.
One survivor stated that around 0930 hours a shell penetrated the turbine room and another one entered a boiler room. A hit in the after dressing station killed all the medical staff and wounded that were in there at that moment. The upper deck was crowded with killed and wounded men and the seas surging in washed them overboard. Conditions below were even more terrible. Hatches and doors were jammed by concussion and blocked with wreckage. The air was thick with smoke and even more smoke was coming in from great holes in the upper deck. By 1000 hours all heavy guns were out of action and 10 minutes later the all secondary guns were also silent.
Commander-in-Chief returns.
As HMS King George V and HMS Rodney turned northwards they were joined by HMS Cossack, HMS Sikh and HMS Zulu at by 1600/28 more detroyers had joined the screen (HMS Maori, HMS Jupiter, HMS Somali, HMS Eskimo, HMS Punjabi, HMAS Nestor, HMS Inglefield, HMS Lance, HMS Vanquisher (Cdr. N.V. Dickinson, DSC, RN), HMCS St. Clair (Lt.Cdr. D.C. Wallace, RCNR), HMCS Columbia (Lt.Cdr. (Retd.) S.W. Davis, RN) and HMS Ripley (Lt.Cdr. J.A. Agnew, RN). Heavy air attacks were expected that day, but only four enemy aircraft appeared, one of which bombed the screen while another one jettisoned her bombs on being attacked by a Blenheim fighter. The destroyers HMS Mashona and HMS Tartar, 100 nautical miles to the southward, were not so furtunate. They were attacked in position 52°58’N, 11°36’W at 0955/28 by German aircraft. HMS Mashona was hit and sank at noon with the loss of 1 officer and 45 men. The Commander-in-Chief reached Loch Ewe at 1230/29. Vice-Admiral Somerville with Force H was on his way back to Gibraltar. HMS Renown, HMS Ark Royal, HMS Sheffield made rendezvous at 0800/29 with the destroyers HMS Faulknor (Capt. A.F. de Salis, RN), HMS Forester (Lt.Cdr. E.B. Tancock, DSC and Bar, RN), HMS Fury (Lt.Cdr. T.C. Robinson, RN) and HMS Wishart (Cdr. E.T. Cooper, RN). At 1605/29, HMS Forester and HMS Fury were detached to hunt a submarine further to the west. Force H, minus the two destroyers that had been detached, arrived at Gibraltar around 2030/29.
End of ‘Operation Rheinübung’.
The Bismarck’s consort, heavy cruiser Prinz Eugen, was not heard off until 4 June 1941 when aircraft reported her having arrived at Brest. After leaving the Bismarck at 1914/24, the Prinz Eugen’s primary need was to replenish her fuel stock. She set course for a rendez-vous with two tankers, the Spichern (9323 GRT, built 1935, former Norwegian Krossfonn) and the Esso Hamburg (9849 GRT, built 1939) which were position to the north-west of the Azores. All next day the German cruiser made her way southwards, and at 0906/26 , some 600 nautical miles west-north-west of the Azores she sighted the Spichern and refuelled. Two reconnaissance ships had also been ordered into this area, the Gonzenheim and the Kota Pinang. On the 28th Prinz Eugen fuelled from the Esso Hamburg. She then proceeded southwards to carry out cruiser warfare against independently routed ships in the area to the north and west of the Cape Verde Islands but an inspection of her engines the next day showed that an extensive overhaul was needed. Her Commanding Officer then decided to break off the action and course was set for Brest, France where she arrived at 2030/1 June.
A German reconnaissance ship, a supply vessel and two tankers were intercepted by Royal Navy warships and sunk by their own crew or sunk with gunfire. Also two tankers were captured. These were in chronological order; tanker Belchen (6367 GRT, built 1932, former Norwegian Sysla) by gunfire from HMS Kenya and HMS Aurora on 3 June 1941 in the Greenland area in approximate position 59°00'N, 47°00'W. On 4 June the tanker Esso Hamburg by HMS London and HMS Brilliant (Lt.Cdr. F.C. Brodrick, RN) in position 07°35'N, 31°25'W, tanker Gedania (8966 GRT, built 1920) was captured in the North Atlantic in position 43°38'N, 28°15'W by naval auxiliary (Ocean Boarding Vessel) HMS Marsdale (Lt.Cdr. D.H.F. Armstrong, RNR), she was put into service with the MOWT as Empire Garden, reconnaissance vessel Gonzenheim (4000 GRT, built 1937, former Norwegian Kongsfjord) was scuttled by her own crew after being sighted by HMS Esperance Bay ((Capt.(ret) G.S. Holden, RN) and intercepted by HMS Nelson (Capt. G.J.A. Miles, RN) and finally ordered to be boarded by HMS Neptune in position 43°29'N, 24°04'W. The next day (5 June) supply vessel Egerland (10040 GRT, built 1940) was intercepted by HMS London and HMS Brilliant in approximate position 07°00'N, 31°00'W. On 12 June, HMS Sheffield, intercepted tanker Friedrich Breme (10397 GRT, built 1936) in position 49°48'N, 22°20'W and finally on 15 June, HMS Dunedin (Capt. R.S. Lovatt, RN), captured the tanker Lothringen (10746 GRT, built 1940, former Dutch Papendrecht) in position 19°49'N, 38°30'W which had first been sighted by an aircraft from HMS Eagle (Capt. E.G.N. Rushbrooke, DSC, RN). The Lothringen was sent to Bermuda and was put into service by the MOWT as Empire Salvage. (54)
26 May 1941
Around 1100 hours, HMS Dorsetshire (Capt. B.C.S. Martin, RN), parted company with convoy SL 74 to join the hunt for the German battleship Bismarck. (53)
27 May 1941
At 0830 hours, HMS Dorsetshire (Capt. B.C.S. Martin, RN), sighted the German battleship Bismarck. Dorsetshire opened fire at 0902 hours.
At 1041 hours the Bismarck was seen to sink. Dorsetshire then commenced picking up survivors. (53)
29 May 1941
Shortly before midnight, HMS Dorsetshire (Capt. B.C.S. Martin, RN), arrived at Newcastle where she was to refit. (53)
3 Jun 1941
HMS Dorsetshire (Capt. B.C.S. Martin, RN) is docked at Newcastle. (55)
28 Jun 1941
HMS Dorsetshire (Capt. B.C.S. Martin, RN) was undocked. (55)
14 Jul 1941
HMS Dorsetshire (Capt. B.C.S. Martin, RN) is docked at Newcastle. (56)
19 Jul 1941
HMS Dorsetshire (Capt. B.C.S. Martin, RN) is undocked. (56)
27 Jul 1941
Having completed her refit, HMS Dorsetshire (Capt. B.C.S. Martin, RN), departed Newcastle for Scapa Flow. En-route post-refit trials were carried out. (56)
28 Jul 1941
HMS Dorsetshire (Capt. B.C.S. Martin, RN) arrived at Scapa Flow to commence a work-up period. (56)
4 Aug 1941
HMS Dorsetshire (Capt. B.C.S. Martin, RN) conducted gunnery exercises at Scapa Flow. (57)
8 Aug 1941
HMS Dorsetshire (Capt. A.W.S. Agar, VC, DSO, RN) conducted gunnery exercises at Scapa Flow. (57)
11 Aug 1941
HMS Dorsetshire (Capt. A.W.S. Agar, VC, DSO, RN) conducted gunnery exercises at Scapa Flow. (57)
15 Aug 1941
Convoy WS 10X
This convoy departed U.K. ports on 14/15 August 1941 for Suez where the ships arrived between 1 to 4 October 1941.
The convoy assembled in the Clyde area on 15 August 1941.
The convoy was made up of the following troop transports; Brisbane Star (12791 GRT, built 1937), Orion (23371 GRT, built 1935), Strathmore (23428 GRT, built 1935), Strathnaver (22283 GRT, built 1931), And the transports Palma (5419 GRT, built 1941) and Port Jackson (9687 GRT, built 1937).
Escort was initially provided by the heavy cruiser HMS Dorsetshire (Capt. A.W.S. Agar, VC, DSO, RN) (joined at sea on 17 August 1941 until 28 August when the convoy arrived at Freetown), the AA (light) cruiser HrMs Jacob van Heemskerck (Cdr. E.J. van Holte, RNN) (15 – 17 August) and the destroyers HMS Whitehall (Lt.Cdr. A.B. Russell, RN) (15-17 August), HMS Witch (Lt.Cdr. C.H. Holmes, RN) (15-17 August), HMS Gurkha (Cdr. C.N. Lentaigne, RN) (17-19 August), HMS Lance (Lt.Cdr. R.W.F. Northcott, RN) (17-19 August), HrMs Isaac Sweers (Cdr. J. Houtsmuller, RNN) (17-19 August) and ORP Piorun (Cdr. S. Hryniewiecki) (17-19 August).
When approaching Freetown the convoy was joined on 26 August by a local escort made up of the destroyers HMS Brilliant (Lt.Cdr. F.C. Brodrick, RN), HMS Velox (Lt.Cdr. E.G. Roper, DSC, RN) (left the convoy before noon on 27 August), HMS Wrestler (Lt. E.L. Jones, DSC, RN) and the corvettes HMS Clematis (Cdr. Y.M. Cleeves, DSO, DSC, RD, RNR) and HMS Crocus (Lt.Cdr. E. Wheeler, RNR). The convoy arrived at Freetown on 28 August 1941.
The convoy departed Freetown for Capetown on 1 September 1941. Escort was now provided by the battleship HMS Revenge (Capt. L.V. Morgan, CBE, MVO, DSC, RN) and the corvettes HMS Amaranthus (T/Lt. W.S. Thomson, RNR), HMS Armeria (T/Lt. H.N. Russell, DSC, RNR), HMS Mignonette (Lt. H.H. Brown, RNR) and HMS Woodruff (T/Lt. T. Muir, RNVR).
HMS Amaranthus parted company with the convoy around 1445Z/2 to return to Freetown due to defects.
Around 2133Z/2, HMS Revenge was rammed by the transport Orion. Damage to HMS Revenge was only minor but damage to the bow of the Orion was more serious. She dropped out of the convoy for a while but was later able to catch up again and was able of a speed of 15 knots.
At 1237Z/3, HMS Armeria, HMS Mignonette and HMS Woodruff parted company with the convoy to proceed to Takoradi.
The convoy arrived at Capetown on 11 September 1941.
The convoy departed Capetown for Suez on 14 September 1941. Escort was still provided by HMS Revenge until 22 September 1941 when the light cruiser, HMS Ceres (Capt. E.G. Abbott, AM, RN) took over until the dispersal of the convoy on 27 September 1941 when it was near Aden. The ships of the convoy then continued independently towards Suez where they arrived between 1 and 4 October 1941.
15 Aug 1941
HMS Dorsetshire (Capt. A.W.S. Agar, VC, DSO, RN) conducted AA gunnery exercises at Scapa Flow. Upon completion of these exercises she departed Scapa Flow for Greenock. (57)
16 Aug 1941
HMS Dorsetshire (Capt. A.W.S. Agar, VC, DSO, RN) arrived at Greenock. (57)
17 Aug 1941
HMS Dorsetshire (Capt. A.W.S. Agar, VC, DSO, RN) departed Greenock to join convoy WS 10X at sea.
More on this convoy see the event for 15 August 1941, Convoy WS 10X.
For the daily positions of HMS Dorsetshire during the period of 17 to 28 August 1941 see the map below.
(57)
28 Aug 1941
HMS Dorsetshire (Capt. A.W.S. Agar, VC, DSO, RN), which was escorting Convoy WS 10X, arrived at Freetown. (57)
29 Aug 1941
Around 0830N/29, the aircraft carrier HMS Eagle (Capt. E.G.N. Rushbrooke, DSC, RN), heavy cruiser HMS Dorsetshire (Capt. A.W.S. Agar, VC, DSO, RN), light cruiser HMS Newcastle (Capt. E.A. Aylmer, DSC, RN) departed Freetown to patrol in the mid-Atlantic off St. Paul's Rocks. They were escorted until 1800N/30 by the destoyers HMS Brilliant (Lt.Cdr. F.C. Brodrick, RN), HMS Wrestler (Lt. E.L. Jones, DSC, RN). HMS Newcastle parted company with HMS Eagle and HMS Dorsetshire around 0430N/31. HMS Newcastle was to make rendezvous with the troopship Durban Castle (17388 GRT, built 1938) and the armed merchant cruiser Queen of Bermuda (Capt. A.T.G.C. Peachey, RN) that were en-route from Capetown to Trinidad.
The RFA oiler Echodale (8150 GRT, built 1941), was to fuel HMS Eagle and HMS Dorsetshire at given times while at sea. The Echodale was escorted by the corvette HMS Calendula (Lt.Cdr. A.D. Bruford, RNVR). (58)
29 Aug 1941
For the daily positions of HMS Dorsetshire during the period from 29 August 1941 to 3 October 1941 see the map below.
(59)
5 Sep 1941
Around 1200N/5, the aircraft carrier HMS Eagle (Capt. E.G.N. Rushbrooke, DSC, RN) and heavy cruiser HMS Dorsetshire (Capt. A.W.S. Agar, VC, DSO, RN) made rendezvous in position 07°16'N, 27°00'W, with the RFA oiler Echodale (8150 GRT, built 1941) and her escort the corvette HMS Calendula (Lt.Cdr. A.D. Bruford, RNVR).
HMS Eagle then attempted to fuel from the oiler but all attempts failed.
Attempts continued for the next few days and by 8 September HMS Eagle had finally been successfully refueled.
HMS Dorsetshire was refuelled on the 9th and the 10th after which the oiler and the corvette parted company. (60)
17 Sep 1941
Around 1020ZA/17, HMS Eagle (Capt. E.G.N. Rushbrooke, DSC, RN) and HMS Dorsetshire (Capt. A.W.S. Agar, VC, DSO, RN) dropped anchor off St. Helena. HMS Eagle was then fuelled by the RFA oiler Darkdale (8145 GRT, built 1940). HMS Eagle sustained some minor damage due to the swell.
HMS Dorsetshire was fuelled by the oiler in the morning of the 18th. (61)
18 Sep 1941
Around 1845Z/18, HMS Eagle (Capt. E.G.N. Rushbrooke, DSC, RN) and HMS Dorsetshire (Capt. A.W.S. Agar, VC, DSO, RN) departed St. Helena to continue their patrol in the South Atlantic. (61)
21 Sep 1941
At 1437Z/21, while trying to land on HMS Eagle (Capt. E.G.N. Rushbrooke, DSC, RN) the Walrus aircraft from HMS Dorsetshire (Capt. A.W.S. Agar, VC, DSO, RN) crashed into the sea and sank. There were no casualties.
A death (Air Mechanic G.F. Burke, FAA) had occurred earlier on the day onboard HMS Eagle but this was not related to this aircraft crash. (61)
26 Sep 1941
Around 1130Z/26, HMS Eagle (Capt. E.G.N. Rushbrooke, DSC, RN) and HMS Dorsetshire (Capt. A.W.S. Agar, VC, DSO, RN) dropped anchor of St. Helena.
HMS Dorsetshire was then fuelled by the RFA oiler Darkdale (8145 GRT, built 1940).
HMS Eagle was fuelled the following day. (61)
28 Sep 1941
Around 0910Z/28, HMS Eagle (Capt. E.G.N. Rushbrooke, DSC, RN) and HMS Dorsetshire (Capt. A.W.S. Agar, VC, DSO, RN) departed St. Helena to resume their patrol and subsequent passage to Freetown.
(61)
29 Sep 1941
Convoy WS 12
This convoy departed U.K. ports on 29 / 30 September 1941.
The convoy assembled assembled at sea near Orsay Island on 1 October 1941.
The convoy was made up of the following troop transports / transports; Almanzora (15551 GRT, built 1914), City of Paris (10902 GRT, built 1922), Clan Campbell (7255 GRT, built 1937), Clan Lamont (7250 GRT, built 1939), Dominion Monarch (27155 GRT, built 1939), Duchess of Richmond (20022 GRT, built 1928), Empire Pride (9248 GRT, built 1941), Empire Trust (8143 GRT, built 1941), Empress of Canada (21517 GRT, built 1922), Empress of Russia (16810 GRT, built 1913), Franconia (20175 GRT, built 1923), Highland Brigade (14134 GRT, built 1929), Highland Princess (14133 GRT, built 1930), Prince Badouin (3219 GRT, built 1933), Leopoldville (11509 GRT, built 1929), Mendoza (8233 GRT, built 1919), Narkunda (16632 GRT, built 1920), Ormonde (14982 GRT, built 1917), Perseus (10272 GRT, built 1923), Perthshire (10496 GRT, built 1936), HMS Royal Ulsterman (T/Cdr. H.F. Jackson, RNR) (3244 GRT, built 1936), Samaria (19597 GRT, built 1921), Sarpedon (11321 GRT, built 1923) and Strathaird (22281 GRT, built 1932).
The aircraft carrier HMS Argus (Capt. T.O. Bulteel, RN) was also with the convoy in an aircraft ferry role. She was able to operate aircraft for A/S patrol though.
On assembly off Oversay around 1200A/1, the convoy was escorted by the heavy cruiser HMS Devonshire (Capt. R.D. Oliver, DSC, RN), AA cruiser HMS Cairo (A/Capt. I.R.H. Black, RN), armed merchant cruiser, HMS Cathay (A/Capt.(Retd.) C.M. Merewether, RN), auxiliary minelayer HMS Agamemnon (Capt.(Retd.) F. Ratsey, RN), destroyers HMS Sikh (Cdr. G.H. Stokes, RN), HMCS Assiniboine (A/Lt.Cdr. J.H. Stubbs, RCN), HMCS Saguenay (Lt. P.E. Haddon, RCN), HMS Lancaster (A/Cdr. N.H. Whatley, RN), HMS Newark (Lt.Cdr. R.H.W. Atkins, RN), HMS Stanley (Lt.Cdr.(Retd.) D.B. Shaw, OBE, RN) and the escort destroyer HMS Blankney (Lt.Cdr. P.F. Powlett, DSC, RN).
The destroyer HMS Bradford (Lt.Cdr. J.N.K. Knight, RN) was also to be part of the escort. She did sail from Londonderry but had to return to that port soon after departure owning to defects.
Around 1745A/1, the destroyers HMS Verity (Cdr. R.H. Mills, RN), HMS Whitehall (Lt.Cdr. A.B. Russell, RN), HMS Witch (Lt.Cdr. C.H. Holmes, RN) joined the convoy coming from Londonderry.
Around 1715A/2, the destroyer HMS Beverley (Lt.Cdr. J. Grant, RN) joined the convoy.
Around 0940A/3, a German Focke Wolf reconnaissance aircraft was sighted to be shadowing the convoy. HMS Cairo opened fire but the aircraft, which was flying very low, kept out of range. Shadowing ceased around 1040A/2 when the convoy disappeared into a patch of fog.
Around 1800A/3, HMS Lancaster and HMS Newark were detached to proceed to Londonderry. They had reached the limit of their endurance.
Around 0100A/4, HMS Verity and HMS Witch were detached to join the battleship HMS Resolution (Capt. A.R. Halfhide, CBE, RN) which was on passage from Bermuda to the Clyde.
Around 0800A/4, HMS Whitehall parted company with the convoy to proceed to Londonderry as she had reached the limit of her endurace.
Around 0930A/4,in position 50°16'N, 26°10'W, the troop tranport Highland Princess and auxiliary minelayer HMS Agamemnon were detached to proceed to Halifax. They formed convoy CT 3. They were escorted by HMS Cathay, HMCS Assiniboine and HMCS Saguenay.
Around 1400A/4, HMS Cairo was detached. She was to overtake HMS Whitehall and then return to Londonderry in company.
In the early hours of the 5th, HMS Beverley was detached as she had not been able to fuel from HMS Devonshire as the weather conditions had prevented this. She was also unable to fuel at the Azores as she had already done so in August.
Around 1700A/5, in position 44°18'N, 27°20'W, the destroyers HMS Cossack (Capt. E.L. Berthon, DSC and Bar, RN) and HMS Zulu (Cdr. H.R. Graham, DSO, RN) were met. They then took HMS Argus and HMS Sikh with them to proceed to Gibraltar. HMS Argus maintained A/S air patrol over the convoy until 1800A/5.
Around 2030A/5, HMS Royal Ulsterman and the Prince Badouin were detached to Ponta Delgada, Azores.
Around 1255A/7, the destroyer i>HrMs Isaac Sweers (Cdr. J. Houtsmuller, RNN) joined the convoy.
Around 2000A/7, in position 35°36'N, 26°31'W, HMS Stanley and HMS Blankney were detached to Ponta Delgada, Azores.
Around 1700A/8, the destroyer HMS Gurkha (Cdr. C.N. Lentaigne, RN) joined the convoy after having failed to find it the previous day.
Around 1430A/10, HMS Royal Ulsterman and the Prince Badouin rejoined the convoy.
Around 1250A/11, in position 18°12'N, 22°25'W, the destroyer HMS Velox (Lt.Cdr. E.G. Roper, DSC, RN) joined the convoy.
Around 1600A/11, in position 17°38'N, 21°59'W, the destroyer HMS Wrestler (Lt.Cdr. E.L. Jones, DSC, RN) joined the convoy.
Around 0800Z/12, the heavy cruiser HMS Dorsetshire (Capt. A.W.S. Agar, VC, DSO, RN) joined the convoy.
Around 1120N/12, the destroyer HMS Vimy (Lt.Cdr. H.G.D. de Chair, RN) joined the convoy.
Around 1145N/13, the destroyer HMS Vansittart (Lt.Cdr. R.L.S. Gaisford, RN) and the corvettes HMS Amaranthus (T/Lt. W.S. Thomson, RNR) and HMS Armeria (T/Lt. H.N. Russell, DSC, RNR) joined the convoy.
The convoy arrived at Freetown early in the afternoon on 14 October 1941.
----------------------------------------------------------------------------
The convoy, minus the Narkunda departed Freetown for South Africa on 19 October. Escort was provided by the heavy cruiser HMS Devonshire which joined the convoy early on 20 October after having patrolled south of Freetown since 16 October.
Local A/S escort out of Freetown was provided from 19 to 21 October 1941 and consisted of the destroyers HMS Velox, HMS Wrestler and the corvettes HMS Anchusa (Lt. J.E.L. Peters, RNR), HMS Calendula (Lt.Cdr. A.D. Bruford, RNVR) and HMS Mignonette (Lt. H.H. Brown, RNR).
Around 1815Z/21, HMS Wrestler parted company with the convoy.
Around 1830Z/21, in position 02°00'N, 08°30'W, HMS Royal Ulsterman and Ulster Monarch were detached and proceeded to Takoradi. They were escorted by HMS Anchusa and HMS Calendula.
Around 1900Z/21, Prince Badouin parted company to proceed to St. Helena.
Around 1925A/22, in approximate position 02°10'S, 06°12'W, HMS Velox and HMS Mignonette parted company.
On 30 October 1941 the convoy was off Capetown and the following ships of the convoy then split off to proceed into that port; Clan Campbell, Dominion Monach, Empire Pride, Empire Trust, Empress of Canada, Leopoldville, Mendoza, Perthshire, Sarpedon and Strathaird as did HMS Devonshire which went to Simonstown.
The other ships of the convoy; Empress of Russia, Franconia, Highland Brigade, Ormonde, Perseus, Richmond and Samaria then proceeded to Durban where they arrived on 3 November escorted by the armed merchant cruiser HMS Derbyshire (Capt.(Retd.) E.A.B. Stanley, DSO, MVO, RN) which had joined them off Capetown early on 31 October.
----------------------------------------------------------------------------
On 4 November 1941 the Strathaird departed Capetown for Durban where she arrived on 7 November.
On 5 November 1941 the following ships departed Capetown to continue their passage; Dominion Monarch, Empire Pride, Empire Trust, Empress of Canada, Leopoldville, Mendoza and Perthshire. They were escorted by the armed merchant cruiser HMS Dunnottar Castle (Capt.(Retd.) C.T.A. Bunbury, RN).
On 8 November the following ships departed Durban and joined the Capetown group at sea; Almanzora, City of Paris, Clan Campbell, Clan Lamont, Duchess of Richmond, Empress of Russia, Franconia, Nieuw Amsterdam (36287 GRT, built 1938), Nova Scotia (6791 GRT, built 1926), Perseus, Samaria and Strathaird. The escort of the Capetown group HMS Dunnottar Castle was relieved by the battlecruiser HMS Repulse (Capt. W.G. Tennant, CB, MVO, RN) which escorted the convoy from then on to until 0800C/14 when she was relieved in position 08°14'S, 40°34'E, by the battleship HMS Revenge (Capt. L.V. Morgan, CBE, MVO, DSC, RN) which then escorted the convoy until it arrived off Aden on 20 November. The convoy then dispersed and all ships proceeded to Suez independently.
On 14 November the convoy was joined by the Ascania (13900 GRT, built 1925) which came from Mombasa.
Around 0900C/17, HMS Glasgow (Capt. H. Hickling, DSO, RN) made rendezvous with convoy WS 12 in approximate position 06°06'N, 50°30'E. The Dominion Monarch, Duchess of Richmond, Empress of Canada and Perseus then split off from the convoy and continued on as convoy WS 12J towards Colombo, escorted by HMS Glasgow. This convoy arrived at Colombo on 23 November.
On 24 November the Dominion Monarch and Empress of Canada departed Colombo for Singapore as convoy WS 12V. They were escorted by HMS Glasgow until 26 November when HMS Dragon (Capt. R.J. Shaw, MBE, RN) took over the escort. The convoy arrived at Singapore on 28 November 1941. (62)
3 Oct 1941
Around 0800N/3, HMS Eagle (Capt. E.G.N. Rushbrooke, DSC, RN) and HMS Dorsetshire (Capt. A.W.S. Agar, VC, DSO, RN) arrived at Freetown from patrol / St. Helena. (63)
8 Oct 1941
HMS Dorsetshire (Capt. A.W.S. Agar, VC, DSO, RN) and HMS Albatross (Capt. W.A. Dallmeyer, DSO, RN) departed Freetown to patrol in the mid-Atlantic between 06°N and 10°N and 28°W and 31°W. Two corvettes were sent along as escorts, these were HMS Mignonette (Lt. H.H. Brown, RNR) and HMS Woodruff (T/Lt. T. Muir, RNVR). (64)
8 Oct 1941
For the daily positions of HMS Dorsetshire from 8 to 14 October 1941 see the map below.
(65)
11 Oct 1941
HMS Dorsetshire (Capt. A.W.S. Agar, VC, DSO, RN) parted company with HMS Albatross (Capt. W.A. Dallmeyer, DSO, RN) and then proceeded northwards to join the escort of convoy WS 12 which she joined early the next morning. (65)
14 Oct 1941
HMS Dorsetshire (Capt. A.W.S. Agar, VC, DSO, RN) arrived at Freetown. (65)
15 Oct 1941
Convoy SL 90
This convoy departed Freetown on 15 October 1941 for Liverpool where it arrived on 6 November 1941.
The convoy was made up of the following merchant vessels; Abosso (11330 GRT, built 1935), Alphacca (Dutch, 5759 GRT, built 1928), City of Rangoon (6635 GRT, built 1914), Dahomian (5277 GRT, built 1929), Dalhanna (5571 GRT, built 1930), Director (5107 GRT, built 1926), Empire Success (5988 GRT, built 1921), Kalewa (4389 GRT, built 1940), Katha (4357 GRT, built 1938), Kattegat (Norwegian, 4245 GRT, built 1936), King Edwin (4536 GRT, built 1927), Kiruna (Swedish, 5484 GRT, built 1921), Kohistan (5884 GRT, built 1930), Langleetarn (4908 GRT, built 1929), Lieutenant St. Loubert Bie (6126 GRT, built 1911), Mafuta (Belgian, tanker, 6322 GRT, built 1920), Martaban (4161 GRT, built 1934), Moanda (Belgian, 4621 GRT, built 1937), Stad Haarlem (Dutch, 4518 GRT, built 1929), Temple Yard (5205 GRT, built 1937) and Warfield (6070 GRT, built 1917).
Escort was initially provided by the destroyers HMS Brilliant (Lt.Cdr. A.G. Poe, RN) (15-18 October), HMS Vansittart (Lt.Cdr. R.L.S. Gaisford, RN) (15-20 October), HMS Gurkha (Cdr. C.N. Lentaigne, RN) (15-22 October), HMS HrMs Isaac Sweers (Cdr. J. Houtsmuller, RNN) (15-22 October), corvettes HMS Armeria (T/Lt. H.N. Russell, DSC, RNR) (15-20 October), HMS Aster (Lt.Cdr. E. Hewitt, RD, RNR) (15-18 October), HMS Clover (Lt.Cdr. F.A. Shaw, RNR) (15-18 October), HMS Crocus (Lt.Cdr. E. Wheeler, RNR) (15-18 October), HMS Cyclamen (Lt.Cdr. H.N. Lawson, RNR) (15-18 October).
Distant cover for the convoy was provided during 16 to 18 October 1941 by the heavy cruiser HMS Dorsetshire (Capt. A.W.S. Agar, VC, DSO, RN) and the light cruiser HMS Dunedin (Capt. R.S. Lovatt, RN).
HMS Gurkha and HrMs Isaac Sweers both parted company with the convoy on 17 October to fuel at Barhurst. They rejoined the convoy on the 18th but left on the 22nd and then proceeded to Gibraltar where they arrived later the same day.
On 18 October three sloops joined, these were; HMS Folkestone (A/Cdr. D.E.G. Wemyss, RN) (18 October – 6 November), HMS Londonderry (Cdr. J.S. Dalison, RN) (18 – 29 October) and HMS Weston (Cdr.(Retd.) J.G. Sutton, RN) (18 October – 6 November).
No ships were lost from this convoy.
16 Oct 1941
The heavy cruiser HMS Dorsetshire (Capt. A.W.S. Agar, VC, DSO, RN) and light cruiser HMS Dunedin (Capt. R.S. Lovatt, RN) departed Freetown to provide distant cover for Convoy SL 90 until noon on the 18th.
[For more info on this convoy see the event ' Convoy SL 90 ' for 15 October 1941.] (66)
16 Oct 1941
For the daily positions of HMS Dorsetshire from 16 to 19 October 1941 see the map below.
(65)
18 Oct 1941
HMS Dorsetshire (Capt. A.W.S. Agar, VC, DSO, RN) is ordered to return to Freetown.
HMS Dunedin (Capt. R.S. Lovatt, RN) is ordered to proceed to Bathust to fuel and then to provide cover for convoy OS 8 coming from the U.K. but later orders were changed. (65)
19 Oct 1941
HMS Dorsetshire (Capt. A.W.S. Agar, VC, DSO, RN) arrived at Freetown. (65)
25 Oct 1941
HMS Dorsetshire (Capt. A.W.S. Agar, VC, DSO, RN) departed Freetown to patrol in the mid/south Atlantic.
For the daily positions of HMS Dorsetshire from 25 October 1941 to 9 November 1941 see the map below.
(67)
26 Oct 1941
Convoy OS 10.
This convoy was assembled off Oversay on 26 October 1941.
The convoy was made up of the following merchant vessels; Aldermarin (Dutch, 7886 GRT, built 1920), Anglo-Indian (British, 5609 GRT, built 1938), Bennekom (Dutch, 5998 GRT, built 1917), Berwickshire (British, 7464 GRT, built 1912), Blommersdijk (British, 6855 GRT, built 1922), Clan Alpine (British, 5442 GRT, built 1918), Clan Chattan (British, 7262 GRT, built 1937), Custodian (British, 5881 GRT, built 1928), Derrymore (British, 4799 GRT, built 1938), Dundrum Castle (British, 5259 GRT, built 1919), Dunelmia (British, 5207 GRT, built 1929), Egyptian (British, 2868 GRT, built 1920), Elysia (British, 6757 GRT, built 1908), Empire Moonbeam (British, 6849 GRT, built 1941), Empire Ortolan (British, 4970 GRT, built 1919), Fana (Norwegian, 1375 GRT, built 1939), Gleniffer (British, 9559 GRT, built 1919), Halizones (British, 3298 GRT, built 1920), Henri Jaspar (Belgian, 5760 GRT, built 1929), Holmpark (British, 5780 GRT, built 1927), Industria (British, 4850 GRT, built 1940), Lagosian (British, 5412 GRT, built 1930), Lindenhall (British, 5248 GRT, built 1937), Lulworth Hill (British, 7628 GRT, built 1940), Mariso (British, 7659 GRT, built 1930), Marklyn (British, 3090 GRT, built 1918), Marsa (British, 4405 GRT, built 1928), Mary Kingsley (British, 5021 GRT, built 1930), New Brooklyn (British, 6546 GRT, built 1920), Rio Verde (Norwegian, 3223 GRT, built 1924), San Andres (Norwegian, 1975 GRT, built 1921), Silverteak (British, 6770 GRT, built 1930), Somerville (Norwegian, 4265 GRT, built 1929), Starstone (British, 5702 GRT, built 1938), Trader (British, 6087 GRT, built 1940), Trefusis (British, 5299 GRT, built 1918) and Twickenham (British, 4762 GRT, built 1940).
On assembly the convoy was escorted by the sloop HMS Bideford (Lt.Cdr. W.J. Moore, RNR), cutters HMS Culver (Lt.Cdr. R.T. Gordon-Duff, RN), HMS Landguard (Lt.Cdr.(Emgy.) R.E.S. Hugonin, RN), HMS Lulworth (Lt.Cdr. C. Gwinner, RN) and the corvettes HMS Freesia (Lt.Cdr. T.P.G. Crick, RN) and HMS Verbena (Lt.Cdr. D.A. Rayner, DSC, RNVR).
On 4 November 1941, HMS Verbena was detached.
On 13 November 1941, the destroyer HMS Vansittart (Lt.Cdr. R.L.S. Gaisford, RN) and the corvettes HMS Burdock (T/Lt. H.J. Fellows, SANF(V)), HMS Marguerite (Lt.Cdr. A.N. Blundell, RNR) and HMS Starwort (Lt.Cdr. N.W. Duck, RD, RNR) and the RFA tanker Rapidol (2648 GRT, built 1917) joined the convoy.
On 14 November 1941, HMS Bideford, cutters HMS Culver, HMS Landguard, HMS Lulworth, corvettes Freesia and the Rapidol were detached.
During 14/15 November 1941, cover for the convoy was provided by the heavy cruiser HMS Dorsetshire (Capt. A.W.S. Agar, VC, DSO, RN) and the light cruiser HMS Dunedin (Capt. R.S. Lovatt, RN).
The convoy arrived at Freetown on 18 November 1941.
6 Nov 1941
Convoy SL 92.
This convoy departed Freetown for the U.K. on 6 November 1941.
The convoy was made up of the following merchant vessels; Andreas (Greek, 6566 GRT, built 1919), Baron Herries (British, 4574 GRT, built 1940), Brika (British, 4412 GRT, built 1929), Calumet (British, 7268 GRT, built 1923), City of Worcester (British, 5469 GRT, built 1927), Clan MacWhirter (British, 5941 GRT, built 1918), Clan Ross (British, 5897 GRT, built 1914), Corabella (British, 5682 GRT, built 1937), Desirade (British, 9645 GRT, built 1921), Elmdale (British, 4872 GRT, built 1941), Empire Byron (British, 5894 GRT, built 1926), Euryades (British, 5801 GRT, built 1913), Gazcon (British, 4224 GRT, built 1932), Holmbury (British, 4566 GRT, built 1925), Imber (British, 1899 GRT, built 1920), Jeypore (British, 5318 GRT, built 1920), Lynhaug (Norwegian, 2829 GRT, built 1919), Maro (Greek, 3836 GRT, built 1924), Mary Slessor (British, 5027 GRT, built 1930), Meliskerk (Dutch, 6045 GRT, built 1919), Mokambo (British, 4996 GRT, built 1938), Nagpore (British, 5283 GRT, built 1920), New Brunswick (British, 6529 GRT, built 1919), Observer (British, 5881 GRT, built 1928), Penrose (British, 4393 GRT, built 1928), Pentridge Hill (British, 7579 GRT, built 1941), Richmond Hill (British, 7579 GRT, built 1940), Ripley (British, 4997 GRT, built 1936), San Francisco (Swedish, 4933 GRT, built 1915), Sandown Castle (British, 7607 GRT, built 1921), Savoia (British, 5490 GRT, built 1922), Skeldergate (British, 4251 GRT, built 1930), Sobo (British, 5353 GRT, built 1937), Tore Jarl (Norwegian, 1514 GRT, built 1920) and Zouave (British, 4256 GRT, built 1930).
The RFA tanker Rapidol (2648 GRT, built 1917) was also with the convoy to test the concept of an oiler for the escorts. She remained with the convoy until 12 November 1941.
On departure from Freetown the convoy was escorted by the destroyers HMS Vansittart (Lt.Cdr. R.L.S. Gaisford, RN), HMS Velox (Lt.Cdr. E.G. Roper, DSC, RN) and the corvettes HMS Burdock (T/Lt. H.J. Fellows, SANF(V)), HMS Marguerite (Lt.Cdr. A.N. Blundell, RNR) and HMS Starwort (Lt.Cdr. N.W. Duck, RD, RNR).
HMS Velox returned to Freetown on 12 November 1941, presumably she had parted company with the convoy on 10 November.
The heavy cruiser HMS Dorsetshire (Capt. A.W.S. Agar, VC, DSO, RN) and light cruiser HMS Dunedin (Capt. R.S. Lovatt, RN) provided close cover for the convoy during 12 and 13 November 1941.
On 11 November 1941 the sloop HMS Egret (A/Capt. E.M. Haes, RN) and cutters Banff (Lt.Cdr. P.S. Evans, RN) and Fishguard (Lt.Cdr. H.L. Pryse, RN) joined the convoy. They were then to fuel from the Rapidol but apparently only HMS Egret did so.
On 12 November 1941, HMS Vansittart,HMS Burdock, HMS Marguerite and HMS Starwort parted company to join convoy OS 10 coming from the U.K. taking the Rapidol.
On 24 November 1941, the destroyers HMS Foresight (Cdr. J.S.C. Salter, RN), HMS Fury (Lt.Cdr. T.C. Robinson, RN), escort destroyers HMS Badsworth (Lt.Cdr. M.S. Townsend, DSC and Bar, OBE, RN) and HMS Croome (Lt.Cdr. J.D. Hayes, DSO, RN) joined.
On 25 November 1941, the destroyer HMS Forester (Lt.Cdr. E.B. Tancock, DSC and Bar, RN) joined.
Later on 25 November 1941, HMS Foresight, HMS Forester, HMS Fury, escort destroyers HMS Badsworth and HMS Croome parted company with the convoy.
HMS Egret parted company with the convoy on 29 November 1941.
On 30 November 1941, the corvette HNoMS Montbretia and A/S trawler HMS Man o' War (T/Lt. W.W. Creber, RNR) joined the convoy but parted company again later the same day.
A/S trawler HMS Arab (T/Lt. C.A. Shillan, RNVR) was with the convoy on 1 December.
The convoy arrived in U.K. waters on 1 December 1941.
9 Nov 1941
HMS Dorsetshire (Capt. A.W.S. Agar, VC, DSO, RN) arrived at Freetown. (67)
10 Nov 1941
The heavy cruiser HMS Dorsetshire (Capt. A.W.S. Agar, VC, DSO, RN) and light cruiser HMS Dunedin (Capt. R.S. Lovatt, RN) departed Freetown to overtake convoy SL 92 and to provide cover during 12 and 13 November as it was feared that the Vichy-French at Dakar might want to attack this convoy as a reprisal for the interception of one of their convoys off South Africa.
After providing cover for northbound convoy SL 92 they were to provide cover for convoy OS 10.
[For more info on these convoy's see the events ' Convoy SL 92 ' for 6 November 1941 and ' Convoy OS 10 ' for 26 October 1941.] (68)
17 Nov 1941
HMS Dorsetshire (Capt. A.W.S. Agar, VC, DSO, RN) arrived back at Freetown. (67)
21 Nov 1941
HMS Dorsetshire (Capt. A.W.S. Agar, VC, DSO, RN) departed Freetown to patrol in the mid/south Atlantic. (67)
25 Nov 1941
HMS Dorsetshire (Capt. A.W.S. Agar, VC, DSO, RN) arrived back at Freetown. (67)
26 Nov 1941
HMS Dorsetshire (Capt. A.W.S. Agar, VC, DSO, RN) departed Freetown to patrol in the south Atlantic.
For the daily positions of HMS Dorsetshire during the period of 26 November 1941 to 7 December 1941 see the map below.
(67)
1 Dec 1941
HMS Dorsetshire (Capt. A.W.S. Agar, VC, DSO, RN) intercepted the German supply vessel Python (3664 GRT, built 1936) in position 27°53'S, 03°55'W. The German ships was then scuttled by her own crew. HMS Dorsetshire was unable to close to pick up survivors as the German supply ship was in the proces off transferring spplies and fuel to two submarines, U-68 and U-A. U-A fired a total of five torpedoes at the Dorsetshire but none hit. The submarines then picked up survivors but as Python also had survivors on board from the raider Atlantis that had been sunk by the British over a week ago, not all survivors could be taken on board and lifeboats had to be taken in tow. (69)
7 Dec 1941
HMS Dorsetshire (Capt. A.W.S. Agar, VC, DSO, RN) arrived at Simonstown, South Africa. (69)
13 Dec 1941
HMS Dorsetshire (Capt. A.W.S. Agar, VC, DSO, RN) departed Simonstown to escort convoy WS 12X to Bombay. This convoy was made up of the US troopships (carrying British troops !!!); Wakefield (24289 GRT, built 1931), Mount Vernon (24289 GRT, built 1932), West Point (26454 GRT, built 1940), Leonard Wood (13712 GRT, built 1922), Joseph T. Dickman (13869 GRT, built 1922) and Orizaba (6937 GRT, built 1918).
HMS Dorsetshire made rendez-vous at sea with the convoy that had departed Capetown earlier that day and was at that time escorted by the US destroyers USS Wainwright, USS Moffett, USS McDougal, USS Winslow, USS Mayrant and USS Rowan. These destroyers parted company with the convoy at 1600C/14 (C = time zone -3). (69)
13 Dec 1941
For the daily positions of HMS Dorsetshire during the period of 13 December 1941 to 10 January 1942 see the map below.
(70)
21 Dec 1941
In the morning, the US transport Orizaba (6937 GRT, built 1918) parted company with convoy WS 12X and set course for Mombasa. She was escorted by the British light cruiser HMS Ceres (Lt.Cdr.(Retd.) H.W.V. Stephenson, RN) which had departed Mombasa on 20 December to make rendez-vous with convoy WS 12X and its escort, the British light cruiser HMS Dorsetshire (Capt. A.W.S. Agar, VC, DSO, RN).
HMS Ceres and the Orizaba arrived at Mombasa on 22 December 1941. (71)
23 Dec 1941
In the morning, the US troop transport Mount Vernon (24289 GRT, built 1932) was detached to meet with the Britsh light cruiser HMS Colombo (Capt. C.C.A. Allen, RN) and then to proceed to Aden. The cruiser however failed to show up on the rendezvous and the Mount Vernon then proceeded to Mombasa.
HMS Dorsetshire (Capt. A.W.S. Agar, VC, DSO, RN) and the remaining four ships of convoy WS 12X continued on towards Bombay. (69)
27 Dec 1941
HMS Dorsetshire (Capt. A.W.S. Agar, VC, DSO, RN) and convoy WS 12X arrived at Bombay. (69)
2 Jan 1942
HMS Dorsetshire (Capt. A.W.S. Agar, VC, DSO, RN) departed Bombay for Durban. (72)
10 Jan 1942
HMS Dorsetshire (Capt. A.W.S. Agar, VC, DSO, RN) arrived at Durban. (72)
10 Jan 1942
HMS Dorsetshire (Capt. A.W.S. Agar, VC, DSO, RN) departed Colombo to escort convoy JS 2. This convoy was actually made up of only one ship, the troopship Orcades (23456 GRT, built 1937) that was to proceed to Singapore. (73)
13 Jan 1942
HMS Dorsetshire (Capt. A.W.S. Agar, VC, DSO, RN) departed Durban escorting convoy CM 25 which was made up of the troopships Athlone Castle (25564 GRT, built 1936), Durban Castle (17388 GRT, built 1938), Ile de France (43450 GRT, built 1926), Mauretania (35739 GRT, built 1939), Orcades (23456 GRT, built 1937), Reina del Pacifico (17702 GRT, built 1931) and Strathallan (23722 GRT, built 1938).
For the daily positions of HMS Dorsetshire during the period of 13 January to 8 February 1942 see the map below.
(74)
21 Jan 1942
HMS Dorsetshire (Capt. A.W.S. Agar, VC, DSO, RN) parted company with the convoy she was escorting, CM 25, and proceeded to Aden to refuel where she arrived later the same day.
The convoy was also split in two parts, CM 25A, went to Aden and was made up of the troopships Ile de France (43450 GRT, built 1926), Mauretania (35739 GRT, built 1939) and Orcades (23456 GRT, built 1937).
Convoy CM 25B was to proceed to Bombay the next day after HMS Dorsetshire had rejoined from Aden. This convoy was made up of the troopships Athlone Castle (25564 GRT, built 1936), Durban Castle (17388 GRT, built 1938), Reina del Pacifico (17702 GRT, built 1931) and Strathallan (23722 GRT, built 1938). While HMS Dorsetshire was absent, these ships were escorted by HMS Shoreham (Lt.Cdr. E. Hewitt, RD, RNR). HMS Dorsetshire rejoined this part of the convoy early in the afternoon of the next day and it then set course for Bombay. (72)
26 Jan 1942
HMS Dorsetshire (Capt. A.W.S. Agar, VC, DSO, RN) and convoy CM 25B arrived at Bombay. (72)
5 Feb 1942
HMS Dorsetshire (Capt. A.W.S. Agar, VC, DSO, RN) departed Bombay for Colombo. (73)
8 Feb 1942
HMS Dorsetshire (Capt. A.W.S. Agar, VC, DSO, RN) arrived at Colombo. (73)
10 Feb 1942
HMS Dorsetshire (Capt. A.W.S. Agar, VC, DSO, RN) departed Colombo as escort convoy JS 2 which was made up of only the British troopship Orcades (23456 GRT, built 1937) that was to proceed to Singapore.
For the daily positions of HMS Dorsetshire during the period of 10 to 19 February 1942 see the map below.
(73)
12 Feb 1942
Convoy SJ 1
This convoy departed Batavia, Netherlands East Indies on 12 February 1942. Destination for the majority of the convoy was Colombo where the convoy arrived on 21 February 1942
The convoy was made up of the following ships; British; Anglo-Indian (5609 GRT, built 1938), City of Canterbury (8331 GRT, built 1922), City of Pretoria (8049 GRT, built 1937), Clan Alpine (5442 GRT, built 1918), Halizones (3298 GRT, built 1920), Madura (9032 GRT, built 1921), Malancha (8124 GRT, built 1937), Yuen Sang (3229 GRT, built 1923), Dutch; Batavia (1279 GRT, built 1938), Van der Capellen (2073 GRT, built 1940) and Van Swoll (2147 GRT, built 1930).
Two damaged British warships were towed by two of the merchant vessels of the convoy. Both these warships had been damaged in 1941 while in action in the Mediterranean and had been sent to Singapore for repairs and refit. These were not completed when the Japanese attacked. Both ships had been towed from Singapore to Batavia. The warships were the destroyer HMS Isis (Lt. L.R.P. Lawford, DSC, RN) and the submarine HMS Rover (Lt.Cdr. G.H. Reynolds, RN). They were towed by the Malancha and the City of Pretoria respectively.
Escort was provided by the destroyer HMS Express (Lt.Cdr. F.J. Cartwright, RN) and the sloop HMIS Sutlej (Capt. P.A. Mare, RIN). On 14 February 1942 the heavy cruiser HMS Dorsetshire (Capt. A.W.S. Agar, VC, DSC, RN) joined until the 17th when she parted company with the convoy. On the 20th the convoy was joined by sloop HMS Falmouth (Cdr. U.H.R. James, RN). The Malancha with HMS Isis in tow and the City of Pretoria with HMS Rover in tow then parted company with the convoy and proceeded to Trincomalee where they arrived on 21 February 1942 escorted by HMIS Sutlej. The remainer of the convoy arrived at Colombo, also on the 21th, they were escorted by HMS Express and HMS Falmouth. HMS Express had suffered from a fire in the No.1 boiler room which could not be repaired at Singapore / Batavia / Surabaya so the was sent to Colombo for repairs.
13 Feb 1942
In the afternoon HMS Dorsetshire (Capt. A.W.S. Agar, VC, DSO, RN) gave over the escort of the troopship Orcades (British, 23456 GRT, built 1937) to HMS Dragon (Capt. R.J. Shaw, MBE, RN). Orcades was diverted to Oosthaven, Sumatra, Netherlands East Indies upon the capitulation of Singapore. On the 14th the destroyer HMS Encounter (Lt.Cdr. E.V.St J. Morgan, RN) also joined as escort.
HMS Dorsetshire then proceeded to a position east of the Sunda Strait where she was to rendez-vous with convoy JS 1 and then escort it to Colombo. (73)
13 Feb 1942
Combined convoy BM 13 and JS 3.
Convoy BM 13
This convoy departed Bombay on 13 February 1942.
It was made up of the following (troop) transports; City of London (British, 8875 GRT, built 1907, 2271 troops and stores), City of Paris (British, 10902 GRT, built 1922, 1390 troops and stores), Eastern Prince (British, 10926 GRT, built 1929, 1277 troops and stores), Egra (British, 5109 GRT, built 1911, 926 troops and stores), Esperance Bay (British, 13837 GRT, built 1922, 1357 troops and stores) and Kosciuszko (Polish, 6598 GRT, built 1915, 254 troops and stores).
On departure from Bombay this convoy was escorted by the light cruiser HMS Caledon (A/Capt. H.J. Haynes, DSO, DSC, RN).
The convoy merged with convoy JS 3 around 0930F/17 in position 05°52'S, 77°18'E. HMS Caledon then parted company to proceed to Colombo.
Convoy JS 3
This convoy departed Colombo on 16 February 1942.
It was made up of the following (troop) transports; Empire Glade (7006 GRT, built 1941, 243 service personnel), Madras City (9040 GRT, built 1940 200 service personnel), Penrith Castle (6369 GRT, built 1929, 236 service personnel), Silverteak (6770 GRT, built 1930, 500 service personnel) and Silverwillow (6373 GRT, built 1930, 236 service personnel).
On departure from Colombo this convoy was escorted by the light cruiser HMS Glasgow (Capt. J.W. Cuthbert, RN), sloop HMS Falmouth (Cdr. U.H.R. James, RN) and the minesweeper HMAS Bathurst (Lt.Cdr. A.V. Bunyan, RANR(S)).
The combined convoy then set course for the Batavia area.
Around 0700F/18, HMAS Bathurst parted company with the convoy to return to Colombo.
Around 1900F/18, HMAS Falmouth parted company with the convoy to return to Colombo.
On 21 February the combined convoy was ordered to steer to the north. Later it was ordered to proceed to Colombo where it arrived on 25 February 1942.
The heavy cruiser HMS Dorsetshire (Capt. A.W.S. Agar, VC, DSO, RN) had been breefly with the convoy during the morning of 23 February 1942. (75)
14 Feb 1942
HMS Dorsetshire (Capt. A.W.S. Agar, VC, DSO, RN) joined convoy SJ 1 east of the Sunda Strait.
[More on this convoy from Batavia to Colombo see the event for 10 February 1942, convoy SJ 1]. (73)
17 Feb 1942
At noon, HMS Dorsetshire (Capt. A.W.S. Agar, VC, DSO, RN), parted company with convoy SJ 1. She then proceeded to Colombo. (73)
19 Feb 1942
HMS Dorsetshire (Capt. A.W.S. Agar, VC, DSO, RN) arrived at Colombo. (73)
21 Feb 1942
HMS Dorsetshire (Capt. A.W.S. Agar, VC, DSO, RN) departed Colombo to bolster the escort of the combined convoy JS 3 / BM 13 that was en-route to the Dutch East Indies. Dorsetshire joined the convoy briefly on 23 February, in position 04°15'N, 87°45'E, but as the combined convoy was ordered to return to Colombo, HMS Dorsetshire separated from it and set course for Trincomalee.
This convoy was made up of the following ships; From convoy BM 13 (Bombay - Singapore); City of London (8875 GRT, built 1907), Eastern Prince (10926 GRT, built 1929), Egra (5109 GRT, built 1911), Esperance Bay (13837 GRT, built 1922), City of Paris (10902 GRT, built 1922) and Kosciuszko (6598 GRT, built 1915). This convoy had left Bombay on 13 February 1942 escorted by HMS Caledon (A/Capt. H.J. Haynes, DSO, DSC, RN) until it joined up with convoy JS 3.
From convoy JS 3 (Colombo - Batavia); Penrith Castle (6369 GRT, built 1929), Silverteak (6770 GRT, built 1930), Silverwillow (6373 GRT, built 1930), Madras City (9040 GRT, built 1940) and Empire Glade (7006 GRT, built 1941). This convoy had left Colombo on 16 February 1942 escorted by HMS Glasgow (Capt. H. Hickling, DSO, RN), HMS Falmouth (Cdr. U.H.R. James, RN) and HMAS Bathurst (Lt.Cdr. A.V. Bunyan, RANR(S)). They met with convoy BM 13 on 17 February in position 05°52'N, 77°18'E and then proceeded together towards the Sunda Strait. On 21 February the combined convoy was ordered to steer northwards. HMAS Bathurst had to return to Colombo with engine defects. The entire convoy returned to Colombo on 25 February 1942. (76)
21 Feb 1942
For the daily positions of HMS Dorsetshire from 21 February 1942 to 5 March 1942 see the map below.
(77)
24 Feb 1942
HMS Dorsetshire (Capt. A.W.S. Agar, VC, DSO, RN) arrived at Trincomalee. (73)
26 Feb 1942
HMS Dorsetshire (Capt. A.W.S. Agar, VC, DSO, RN) departed Trincomalee to join convoy MR 5 at sea which she did around 0830F/27 (zone -6).
This convoy had departed Madras, India the same day for Rangoon, Burma and was made up of the British merchants Erinpura (5143 GRT, built 1911), Ethiopia (5574 GRT, built 1922), Karoa (7009 GRT, built 1915) and Varsova (4701 GRT, built 1914). They were escorted by HMIS Ramdas (Lt. G.M. Hart, RINR) and HMIS Travancore (T/Lt. A. Taylor, RINR). These escorts returned when HMS Dorsetshire took over the escort from position 12°40'N, 82°30'E. (73)
3 Mar 1942
At 0110 hours (zone F, -6), HMS Dorsetshire (Capt. A.W.S. Agar, VC, DSO, RN), parted company with convoy MR 5 at 95°E. The four ships of this convoy safely put into Rangoon on the 5th. (78)
5 Mar 1942
HMS Dorsetshire (Capt. A.W.S. Agar, VC, DSO, RN) arrived at Trincomalee. (78)
24 Mar 1942
HMS Dorsetshire (Capt. A.W.S. Agar, VC, DSO, RN) and HMS Emerald (Capt. F.C. Flynn, RN) conducted exercises off Trincomalee. Upon completion of these exercises HMS Dorsetshire set course to Colombo where she was to undergo a (short) refit and much needed docking. (78)
25 Mar 1942
HMS Dorsetshire (Capt. A.W.S. Agar, VC, DSO, RN) arrived at Colombo. (78)
27 Mar 1942
HMS Dorsetshire (Capt. A.W.S. Agar, VC, DSO, RN) is docked at Colombo. (78)
29 Mar 1942
Operations by the Eastern Fleet from 29 March to 13 April 1942. Enemy air attacks on Colombo and later Trincomalee and the loss of HMS Dorsetshire and HMS Cornwall on 5 April 1942 and HMS Hermes, HMAS Vampire on 9 April 1942.
Dispositions of the Eastern Fleet on 29 March 1942.
On 29 March 1942 the disposition of the Eastern Fleet was as follows; At Colombo: Aircraft carrier HMS Formidable (Capt. A.W.LaT. Bisset, RN), heavy cruisers HMS Dorsetshire (Capt. A.W.S. Agar, VC, DSO, RN) (refitting) and HMS Cornwall (Capt. P.C.W. Manwaring, RN), light cruisers HMS Enterprise (Capt. J.C.A. Annesley, DSO, RN), HMS Dragon (Capt. R.J. Shaw, MBE, RN) and HMS Caledon (A/Capt. H.J. Haynes, DSO, DSC, RN), the destroyers HMS Paladin (Cdr. A.D. Pugsley, RN), HMS Panther (Lt.Cdr. R.W. Jocelyn, RN), HMAS Nestor (Cdr. A.S. Rosenthal, DSO and Bar, RAN), HMS Hotspur (Lt. T.D. Herrick, DSC, RN), HMS Arrow (Cdr. A.M. McKillop, RN) and HMS Express (Lt.Cdr. F.J. Cartwright, RN).
At Trincomalee: The flagship of the Eastern Fleet, the battleship HMS Warspite (Capt. F.E.P. Hutton, RN, flying the flag of Vice-Admiral J.F. Somerville, KCB, KBE, DSO, RN), the aircraft carrier HMS Hermes (Capt. R.F.J. Onslow, DSC, MVO, RN), light cruisers HMS Emerald (Capt. F.C. Flynn, RN) and HrMs Jacob van Heemskerck (Cdr. E.J. van Holte, RNN), the destroyer HMAS Vampire (Cdr. W.T.A. Moran, RAN). HMS Warspite departed Trincomalee this day and arrived at Colombo in the evening. HMS Hermes and HMAS Vampire also departed Trincomalee on the 29th.
At Addu Atoll; The battleships HMS Resolution (Capt. A.R. Halfhide, CBE, RN , flying the flag of A/Vice-Admiral A.U. Willis, DSO, RN, second in command Eastern Fleet), HMS Ramillies (Capt. D.N.C. Tufnell, DSC, RN), HMS Royal Sovereign (Capt. R.H. Portal, DSC, RN), HMS Revenge (Capt. L.V. Morgan, CBE, MVO, DSC, RN) the aircraft carrier HMS Indomitable (Capt. T.H. Troubridge, RN, flying the flag of Rear-Admiral D.W. Boyd, CBE, DSC, RN) and the destroyers HMAS Napier (Capt. S.H.T. Arliss, DSO, RN), HMAS Norman (Cdr. H.M. Burrell, RAN), HMAS Nizam (Lt.Cdr. M.J. Clark, DSC, RAN), HMS Fortune (Lt.Cdr. R.D.H.S. Pankhurst, RN), HMS Foxhound (Cdr. G.H. Peters, DSC, RN), HMS Griffin (Capt. H.St.L. Nicolson, DSO, RN), HMS Decoy (Lt.Cdr. G.I.M. Balfour, RN) and HrMs Isaac Sweers (Cdr. W. Harmsen, RNN).
The Japanese had been operating in the Indian Ocean in early March and more attacks were expected in this area by the Allies. The most likely target would be the island of Ceylon and the harbours of Colombo and Trincomalee.
30 and 31 March 1942.
Planning
Admiral Somerville therefore planned to concentrate the Eastern Fleet on the late afternoon / early evening of 31 March 1942 in position 04°40’N, 81°00’E. The fleet would then be divided in two groups; Force A (the fast division) was made up of the flagships, battleship HMS Warspite, both fleet carriers, HMS Indomitable and HMS Formidable. They were escorted by the cruisers HMS Cornwall, HMS Enterprise, HMS Emerald and six destroyers; HMAS Napier, HMAS Nestor, HMS Paladin, HMS Panther, HMS Hotspur and HMS Foxhound. This force would try to intercept the enemy and deliver a night air attack on the enemy with their carriers as the main target.
Force A would be covered by the slower Force B which was made up of the battleships HMS Resolution, HMS Ramillies, HMS Royal Sovereign and the light carrier HMS Hermes. Escort to these ships was proviced by the cruisers HMS Dragon, HMS Caledon, HrMs Jacob van Heemskerck and a total of eight destroyers HMS Griffin, HMS Decoy, HMAS Norman, HMS Fortune, HrMs Isaac Sweers, HMS Arrow and one of the old destroyers that had managed to escape from the China station also joined, this was HMS Scout (Lt.Cdr.(Retd.) H. Lambton, RN). They were to remain about 20 nautical miles to the west of Force A. If Force A encountered a superior enemy force the would withdraw towards Force B.
At 1400/30 the ships mentioned earlier at the top of this article departed Colombo. HMS Hotspur and HMAS Nestor carried out an A/S sweep of the searched channel before Force A sailed.
By 1600/31 the fleet had made the pre-arranged rendez-vous and formed up. It then proceeded northwards. After dark, to avoid detection from the air by the enemy, Force A altered course to 080° and proceeded at 15 knots until about 0230 hours when it was thought they would be in the estimated position from where the enemy would fly off their aircraft for the expected attack on Ceylon. If nothing was sighted or located by 0230/1, Force A was to turn back to the south-west and to withdraw outside the enemy’s air search area. Force B was to act as a supporting force for Force A, keeping 20 miles to the west of it and confirming to the movements of Force A through the night. This procedure was carried out as planned during the night of 31 March / 1 April but nothing was seen or located.
In the late afternoon / early evening of 31 March HMS Indomitable briefly separated from the fleet for flying operations during which she was escorted by HMS Emerald. From 2100/31 to 0600/1 a search was carried out, to a depth of 120 miles from 050° to 110°, by three A.S.V. fitted Albacores from HMS Formidable. Also two Albacores fitted with long-range tanks were kept standing by for shadowing purposes if required. One of the Albacores crash landed on HMS Formidable upon return at 0340/1.
1 April 1942.
At 0940 hours HMS Decoy reported the breakdown of her main feed pumps. She was detached to Colombo to effect repairs.
Around noon several of the destroyers reported submerged contacts. HMS Scout reported sighting a periscope. The fleet took avoiding action in each case, but nothing further transpired from these contact which are now considered to be non-sub.
At 1400 hours, HMS Scout, one of the oldest destroyers of the Royal Navy with a short enducance, was detached to oil at sea from RFA Appleleaf (5892 GRT, built 1917, Master E. Mills) in position 04°00’N, 80°00’E. Upon completion of oiling HMS Scout was to proceed to position 05°40’N, 81°08’E by 0800/2. RFA Appleleaf and her escort, HMS Shoreham (Cdr. E. Hewitt, RD, RNR), were to proceed towards a new waiting position 05°00’N, 80°30’E.
In the afternoon, around 1420 hours, HMS Dorsetshire joined Force A. This cruiser had been refitting at Colombo but this refit was cut short to enable her to take part in this operation. Air searches were carried out from Ceylon as the days before but they sighted nothing of the enemy. Also from 1430/1800 hours a search was carried out by aircraft from HMS Indomitable between 142° to 207° to a depth of 215 miles. Admiral Somerville decided to carry out the same sweep to the north-east as had been done the previous night. Again nothing was seen and Force A made rendez-vous with Force B at daybreak on 2 April 1942.
2 April 1942.
At 0800 hours the destroyers HMS Fortune and HMAS Vampire were detached to fuel from RFA Appleleaf in position 05°00’N, 80°30’E. and an Albacore was ordered to search for HMS Scout and order her to rejoin the fleet. Shortly after noon the fleet sighted RFA Appleleaf, HMS Shoreham, HMS Fortune and HMAS Vampire. The last two ships then rejoined the fleet while the tanker and it’s escort were ordered to proceed towards Colombo at 1200/3.
During the day the Eastern Fleet cruised in an area about 50 miles further to the west then the previous day to avoid being detected by enemy submarines that had been reported. Throughout the day several of the escorting destroyers obtained unconfirmed echoes. Two more destroyers fuelled during the afternoon, HMAS Napier and HMS Arrow took in fuel from HMS Dorsetshire and HMS Cornwall.
As the enemy had not shown herself by 2100 hours, Admiral Somerville decided to proceed to Addu Atoll to fuel and to take on fresh water as the R-class battleships were running out of this as they had been unable to top up at Addu Atoll before they sailed.
3 April 1942.
At 0520 hours, the destroyer HMS Fortune was detached to search for survivors from the merchant vessel Glensheil (9415 GRT, built 1924) that had been torpedoed by the Japanese submarine I-7 in position 00°48’S, 78°35’E at 0230 hours. HMS Fortune picked up 88 survivors and then proceeded to Addu Atoll where she arrived at 1130/4.
As at this time Admiral Somerville felt confident that something must have held up the Japanese or that their intentions were incorrectly appreciated. At 0940 hours, he sent HMS Dorsetshire and HMS Cornwall to Colombo. The former to continue her refit and the latter to act as escort for the Australian troop convoy SU 4. HMS Hermes and the destroyer HMAS Vampire were also detached but to Trincomalee as HMS Hermes was to prepare for the upcoming operation ‘Ironclad’, the attack on Madagascar. HMS Hermes and HMAS Vampire arrived at Trincomalee on the 4th.
Late in the morning three of the destroyers of the screen oiled from the battleships; HMAS Norman from HMS Warspite, HMS Griffin from HMS Revenge and HMS Foxhound from HMS Royal Sovereign.
At 1820 hours Force A proceeded ahead to Addu Atoll at 19 knots followed by Force B at 15 knots. Force A arrived at Addu Atoll at 1200/4. Force B at 1500/4.
4 April 1942.
In the early morning hours, and while approaching Addu Atoll, a simulated air strike was carried out on Force B by aircraft from HMS Indomitable and HMS Formidable. One aircraft crashed into the sea, it’s crew was picked up by the Dutch AA-cruiser Jacob van Heemskerck. A second simulated air attack was made on Force A later in the morning.
At 1630 hours, Admiral Somerville received a report that a large enemy force was in position 00°40’N, 83°10’E at 1605/F. Enemy course was 315°. Shortly afterwards this report was confirmed by another report in which they gave an enemy course of 330°. This positioned the enemy in a position 155° from Dondra Head, 360 miles, the distance from Addu Atoll being 085°, 600 miles. There was no indication about the composition of this force.
The condition of the Eastern Fleet at Addu Atoll at that time was as follows; Owning to the limited number of oilers available, the vessels comprising Force A had taken about half their fuel and Force B had not yet commenced fuelling. In addition the ‘R’-class battleships were very short of water which had to be taken in before they could sail. This meant that Force A could sail immediately, minus HMS Emerald and HMS Enterprise. These cruisers could sail shortly after midnight. Force B could not leave until 0700 hours the following morning at the earliest.
It appeared that the enemy’s probable plan was as follows. All the evidence supported Admiral Somerville’s original appreciation that the enemy would attack Colombo (and possibly Trincomalee) with carrier borne aircraft either before dawn or shortly afterwards and would return to the carriers in a position about 150 miles south-east of Ceylon. On completion the whole force would then withdraw to the east. The enemy’s reported position made it apparent that this attack was to be made on the morning of 5 April 1942.
Admiral Somerville considered his possible courses of action were as follows: 1) Force A, less HMS Emerald and HMS Enterprise to proceed immediately at best speed to the area to the south of Ceylon and to be joined there by HMS Dorsetshire and HMS Cornwall coming from Colombo and attack any enemy force located. 2) Delay the sailing of Force A until HMS Emerald and HMS Enterprise, valuable units with their strong torpedo armament, had completed refuelling and sail about midnight. Force B could sail in the morning of the 5th and follow astern to act as a supporting force. 3) Delay the sailing of Force A until both force could leave together on the morning of the 5th. 4) Force A and Force B would remain at Addu Atoll and leave the RAF to deal with the enemy attack.
The choise Admiral Somerville made was governed by the following considerations: 1) First and foremost the total defence of the Indian Ocean and it’s vital lines of communication depend on the existence of the Eastern Fleet. The longer this fleet remained ‘in being’ the longer it would limit and check the enemy’s advances against Ceylon and further west. This major policy of retaining ‘a fleet in being’, already approved by Their Lordships, was, in Admiral Somerville’s opinion, paramount. 2) The only hope of dealing the enemy an affective blow was by means of a carrier borne air striking force preferably at night. To operate both carriers escorted by HMS Warspite out of supporting distance of the ‘R’-class battleships would offer the enemy an opportunity to cripple our only offensive weapon. Admiral Somerville considered it a cardinal point in any operation the Force A should not proceed out of the supporting distance from Force B unless it could be presumed that that enemy capital ships would not be encountered. 3) No matter what course of action Admiral Somerville would take the enemy force could not be intercepted either before or during the attack on Ceylon on the morning of the 5th. The only hope was that the air striking force from Ceylon might inflict damage to the enemy so that the Eastern Fleet could ‘finish them off’, or that the enemy attack on Ceylon would be delayed 24 hours.
Admiral Somerville therefore decided to adopt ‘plan 2’. So he sailed Force A including both E-class cruisers at midnight and ordered Force B to proceed as early as possible the following morning.
Admiral Somerville therefore instructed HMS Dorsetshire and HMS Cornwall to sail from Colombo and to make rendez-vous with Force A at 1600/5 in position 00°58’N, 77°36’E. The position of this rendez-vous was based on their expected time of departure from Colombo and estimated as being the earliest possible time at which they could cross the track of Force A, taking into consideration that HMS Dorsetshire had resumed her refit and was at extended notice. Admiral Somerville considered that the course to be steered should take them well clear of any enemy forces operating in the vicinity. Actually these instructions had been anticipated by the Deputy Commander-in-Chief, Eastern Fleet and these two cruisers, at his discretion, sailed at 2300/4 for Addu Atoll. On receipt of the signal from Admiral Somerville the Deputy Commander-in-Chief amended his instructions accordingly at 0409/5.
5 April 1942.
Force A sailed from Addu Atoll at 0015 hours and proceeded 070° at 18 knots towards a position which would bring it 250 miles south of Ceylon by dawn on the 6th. Shortly before departure the destroyer HMS Hotspur conducted an A/S search of the entrance to Addu Atoll.
During the night Admiral Somerville received reports from the Catalina reconnaissance aircraft on patrol from Ceylon of an enemy destroyer in position 01°59’N, 82°20’E, course 315°, speed 20 knots; six enemy destroyers in position 02°54’N, 82°10’E, course 325°, speed 21 knots; and at 0701 hours a report of one battleship, two cruisers an four other ships in position 195°, Dondra Head, 110 miles. Later this message was subsequently amplified to the effect that the vessels previously reported were definitely hostile and consisted of two battleships, two cruisers and destroyers.
At about 0825 hours an air raid on shipping and harbour facilities at Colombo was commenced in which some 75 aircraft were taking part. These were later reported to be mainly Navy ‘O’ fighters, armed with one bomb each. This enemy force withdrew from Colombo before 0900 hours and was seen by several merchant ships to the south-west of Ceylon probably returning to the carriers. In several cases these merchant were machine gunned.
From 0645 hours an air A/S patrol was maintained ahead of the fleet. HMS Indomitable also sent four Fulmars to commence a search to the eastward. This search covered the area between the arcs 055° to 105° to a depth of 215 miles. It proved negative except for the sighting of an enemy seaplane at 0855 hours, 076°, 150 miles from Force A. This suggested that the enemy was carrying out reconnaissance in a south-westerly direction by means of cruiser aircraft, or a seaplane carrier, in a position 70 miles of the main enemy force. There was no indication that this aircraft sighted any of our surface forces or our air search.
Between 0702 and 1145 hours, Admiral Somerville received reports of battleships in approximate positions 03°55’N, 80°40’E, steering 290° at 0648 hours, steering 120° at 0730 hours, and at 1004 hours in position 04°00’N, 80°25’E steering 282°. This suggested that the battleships were making time while the carriers recovered their aircraft. The estimated position of HMS Dorsetshire and HMS Cornwall at this time was 150 miles from the enemy and opening.
At 1327 hours a mutilated ‘Shad’ signal was received from what was thought to be Colombo but was identified half an hour later as coming from HMS Dorsetshire whose position was estimated as being 037°, 90 miles from Force A at 1400 hours. No contact could be established.
At 1344 hours an enemy air formation was detected by RD/F, 030°, 84 miles from Force A. This had faded after five minutes and it later it became clear that this was the enemy attacking the Dorsetshire and Cornwall. At 1552 hours, a reconnaissance aircraft from Force A, reported wreckage in position 02°08’N, 78°08’E.
The destroyer HMS Panther was then detached to search but was recalled about one hour later when a reconnaissance aircraft from Force A reported a force of 5 ‘unknown’ ships in position 03°38’N, 78°18’E at 100 hours. There was no indication of the course or speed of the enemy but it could be either a force previously unreported or the force previously and last reported 1004 hours.
No relief shadowers were however sent off by the Rear-Admiral aircraft carriers as soon s the report was received and Admiral Somerville omitted to obtain confirmation that this had been done. At 1700 hours, Admiral Somerville, received a report from Ceylon that there were indications of enemy aircraft carriers steering 230° at 24 knots from an unknown position at 1400 hours. This was thought to be subsequent to the attack on our 8” cruisers and Admiral Somerville’s deductions from this enemy moves were as follows. If the enemy held on this course they would at 0400 be in a position to deliver a night attack on Addu Atoll. This seemed quite a possible course of action. In any case it was necessary for Force A to keep clear to the southward and for Force B (estimated to be 135 miles astern of Force A) to steer to the southward so that Force A and B could close for supporting action at daylight the following morning (April 6th). It was also necessary for Force B to steer to the southward to keep clear of the enemy carrier force should it be proceeding to attack Addu Atoll.
At 1726 hours, therefore, Force A altered course to 210° at 18 knots and a signal was made to Vice-Admiral second-in-Command and to HMS Dorsetshire to steer south, although at this time Admiral Somerville feared about the fate of the two heavy cruisers. As he had received no signal from them that they had been attacked he thought it possible they had escaped and maintained W/T silence.
At 1800 hours Admiral Somerville received a signal from the Rear-Admiral Aircraft Carriers, stating that a reconnaissance aircraft reported the estimated enemy position as 020°, 120 miles at 1710 hours. This position was very close to the previous position reported at 1600 hours. The course of the enemy had not been given in either of these reports but the positions fitted in well with the course received earlier (230°).
At 1817 hours, a further signal was received from the Rear-Admiral Aircraft Carriers, adjusting the 1600 hours position of the enemy’s force, amplifying it to include two carriers and three unknown vessels and giving the course north-west. This was the first indication Admiral Somerville had of the enemy now proceeding to the north-west. He immediately ordered force A to alter course to 315° and instructed the Vice-Admiral, second-in-Command to conform. These movements had to object of keeping Force A within night air striking distance of the enemy force, trusting to an A.S.V. (airborne surface vessel radar) search to locate the enemy and to bring Force B within supporting distance should it be necessary to retire in that direction. A dawn rendez-vous was arranged with Force B in approximate position 03°00’N, 75°00’E.
As no news had been received of HMS Dorsetshire and HMS Cornwall it was assumed they had been sunk.
At 1930 hours a night search with A.S.V. aircraft was commenced to cover the sector 345° to 030° to a depth of 180 nautical miles. Northing was located on this search.
6 April 1942.
From 2100/5 to 0600/6 further A.S.V. searches were carried out to cover the sector 020° to 080° to a depth of 200 miles. These searches also failed to make any contact with the enemy but reported that Force B was 220°, 25 miles from Force A at 0400 hours.
At 0615 hours, Force A altered course to 135° and sighted Force B ten minutes later. By 0720 hours the Fleet was formed up and course was altered to 090°.
Whilst no furher information had been received regarding the enemy’s movements nothing had occurred to diminish the possibility of the enemy’s being in the vicinity of Addu Atoll, either to attack it by air this morning or to await the return of the Eastern Fleet.
Admiral Somerville intended to keep clear of the superior enemy forces by day. It was still his intention to get into a position to attack them with a night air striking force on their possible return from at Addu Atoll area, and also rescue the possible survivors from HMS Dorsetshire and HMS Cornwall. He therefore steered east and at 1115 hours course was altered to south-east in the direction of the wreckage that had been reported the previous evening. During the morning reports came in from merchant ships being attacked in the Bay of Bengal. There must be a second Japanese force operating there.
At 1300 hours HMS Enterprise, HMS Paladin and HMS Panther were detached to search for survivors in the vicinity of the wreckage position. Air search was provided to assist and fighter escort was sent to cover the operation. These ships were successful in picking up a total of 1122 survivors from both heavy cruisers. They rejoined the fleet at noon the following day. At 1800/6, when about 50 miles from the wreckage position course was reversed and the fleet retired to the north-west. All-round air searches were carried out to a depth of 200 miles but again nothing was seen.
At about 1400 hours a signal was received from the C-in-C, Ceylon estimating that a strong Japanese force was still somewhere between Addu Atoll and Colombo. Admiral Somerville therefore decided to keep clear of the Addu area until daylight on the 7th.
7 April 1942.
At 0200 hours the Eastern Fleet altered course to the west, 270°.
At 0427 hours, an A.S.V. aircraft located two submarines in position 02°08’N, 75°16’E and 02°46’N, 75°10’E, to the southward of the course of the Eastern Fleet. This indicated that the possibility of an enemy submarine patrol having been established to cover the eastern approaches to Addu Atoll. Admiral Somerville therefore decided to pass through Veimandu Channel to the west of the Maldives and make an unexpected approach to Addu Atoll from the west. At 0700 hours the course of the fleet was altered to 210°.
At 1335 hours, HMS Fortune was detached to investigate a ship contact made by HMS Emerald but no ship was sighted. Fortune only rejoined the fleet at about 0600/8.
At 1600 hours, HMS Enterprise, HMS Paladin and HMS Panther rejoined with the survivors they had picked up and medical stores were transferred from HMS Warspite to HMS Paladin for treatment of the wounded. Enterprise and Paladin were then detached to proceed immediately to Addu Atoll.
At 2100 hours, the Eastern Fleet altered course to 160°.
8 April 1942.
At 0700 hours aircraft were flown off from the carriers to carry out an all-round search to a depth of 175 miles. Again nothing was seen and at 1100 hours the Eastern Fleet entered Addu Atoll. Refuelling commenced immediately, Force B being refuelled first.
Admiral Somerville held a conference on board HMS Warspite with Flag and Commanding Officers in the afternoon.
Having discussed the situation Admiral Somerville decided to sent Force B to Kilindini and to proceed to Bombay with Force A. This later decision coincided with Their Lordships views as later in the day he received Their Lordships instructions that Force A was not to be sent to Colombo for the time being. Further by proceeding to Bombay the could arrange a meeting with the Commander-in-Chief, India and discuss the situation in the Far East with him.
At 1800 hours HMAS Nestor departed Addu Atoll to maintain an A/S patrol in the sector between 090° to 150° to a depth of 35 miles from the Port War Signal Station. One hour earlier HMS Resolution launched her Walrus aircraft for a ‘round the island’ A/S patrol. It returned at dusk.
9 April 1942.
Force B (less HMS Dragon sailed for Kilindini at 0200 hours where it was due to arrive on April 15th. Force A sailed at 0600 hours for Bombay shaping course to pass to the westward of the Maldives.
During the morning Admiral Somerville was informed of further Japanese attacks in the Bay of Bengal and on Trincomalee and the sinking of several ships, including HMS Hermes and HMAS Vampire but nothing could be done about this.
10 April 1942.
At 1000 hours HMS Paladin closed HMS Warspite to transfer Staff Officers for passage to Colombo where they were to inform the Deputy Commander-in-Chief, Eastern Fleet of Admiral Somerville’s views and make preliminary arrangements to transfer Admiral Somerville’s administrative staff and secretariat to Kilindini.
11 April 1942.
At 0705 hours, HMS Paladin rejoined Force A bringing back the Staff Officers who had been transferred to her on 10 April and also Rear-Admiral Danckwerts, Admiral Somerville’s Chief of Staff ashore.
Force A arrived at Bombay in the morning of the 13th (1040 hours) and commenced oiling.
Japanese operation in the Indian Ocean in late March 1942 and April 1942.
On 26 March 1942, the 1st Japanese Carrier Fleet departed Staring Bay, Celebes, Netherlands East Indies for a raid on Ceylon. This Fleet was made up of the aircraft carriers Akagi, Hiryu, Soryu, Zuikaku, Shokaku, battlecruisers Kongo, Haruna, Hiei, Kirishima, heavy cruisers Tone, Chikuma and the destroyers Urakaze, Tanikaze, Isokaze, Hamakaze, Kasumi, Arare, Kagero, Shiranuhi and Akigumo. This force then proceeded west of Timor and to a position to the south of Java where they fuelled from oilers on April 1st.
On 27 March the Japanese submarines I-2, I-3, I-4, I-5, I-6 and I-7 departed Penang to take up positions in the Indian Ocean for the upcoming operation.
On 1 April the Japanese Mayala Force departed Mergui for operations in the Bay of Bengal. This force was made up of the heavy cruisers Chokai, Kumano, Mikuma, Mogami, Suzuya, aircraft carrier Ryujo, light cruiser Yura, and the destroyers Fubuki, Shirayuki, Hatsuyuki and Murakumo. On 4 April the estroyers were substituted for four other destroyers; Amagiri, Asagiri, Shirakumo and Yugiri.
On 5 April the Japanse 1st Carrier Fleet launched their air attack on Colombo. 53 bombers, 38 dive bombers and 36 fighters were launched. They destroyed 19 Hurricane fighters, 1 Fulmar fighter and 6 Swordfish torpedo bombers. At Colombo the harbour facilities were heavily damaged and the armed merchant cruiser HMS Hector and destroyer HMS Tenedos were sunk.
Then around noon a reconnaissance aircraft from the Tone sighted the heavy cruisers HMS Dorsetshire and HMS Cornwall. The 1st Carrier Fleet immediately launched an attack force of 53 dive bombers that sank both cruisers with the loss of 424 members of their crews (Dorsetshire 234 and Cornwall 190). The Japanese then retired to the south-east.
In the evening of 5 April the Japanese Malaya-Force was ordered to commence attacking Allied shipping along the Indian east coast. On 6 April the northern group (Kumano, Suzuya and Shirakumo destroyed 9 ships off Puri (Orissa). The central group (Chokai, Yura, Asagiri and Yugiri) sank 4 ships. The southern group (Mikuma, Mogami and Amagiri sank 3 ships and damaged 2 more. Meanwhile aircraft from the carrier Ryuju, which operated with the central group, sank 4 more ships and damaged 1 more. In all about 92000 GRT of shipping was sunk.
On 8 April 1942 a Catalina aircraft spotted the Japanese 1st Carrier Fleet proceeding for an attack on Trincomalee but the Eastern Fleet was approaching Addu Atoll to refuel and could do nothing. Shipping at Trincomalee was ordered to leave port and proceed to the southward. In the morning of the following day 91 Japanese bombers and 41 fighters attacked Trincomalee. They destoyed 9 Hurricane and Fulmar fighters and 14 aircraft on the ground. The harbour most mostly empty but they sank a merchant vessel and 4 aircraft it had on board and not unloaded yet. Also the British monitor HMS Erebus (Capt. H.F. Nalder, RN) was damged. The Japanese 1st Carrier Fleet was then attacked by 9 Blenheim bombers but they inflicted no damage for 5 of their own lost to Japanese fighter cover. Then Japanese reconnaissance aircraft from the Haruna sighted ships escaping southwards. 85 Dive bombers and 3 fighters were then launched which sank HMS Hermes and HMAS Vampire as well as the corvette HMS Hollyhock (Lt.Cdr. T.E. Davies, OBE, RNR), two tankers and a merchant ship.
By mid-April 1942 all Japanese forces had returned to their bases. (79)
30 Mar 1942
The refit work on HMS Dorsetshire (Capt. A.W.S. Agar, VC, DSO, RN) was suspended and the ship was made ready for undocking as soon as possible due to Japanese warships that were reported to be operating in the Indian Ocean. (78)
31 Mar 1942
HMS Dorsetshire (Capt. A.W.S. Agar, VC, DSO, RN) was undocked. She departed Colombo later the same day to join 'Force A' of the Eastern Fleet to the south of Ceylon which she did the next day around 1430F hours (zone F, -6). (80)
3 Apr 1942
In the morning, HMS Dorsetshire (Capt. A.W.S. Agar, VC, DSO, RN) and HMS Cornwall (Capt. P.C.W. Manwaring, RN), parted company with Force A and proceeded towards Colombo. (79)
4 Apr 1942
At 1000/F, HMS Dorsetshire (Capt. A.W.S. Agar, VC, DSO, RN) and HMS Cornwall (Capt. P.C.W. Manwaring, RN) arrived at Colombo. HMS Cornwall was to be used for upcoming escort duties, HMS Dorsetshire continued her refit. She had three major engine room defects. It was very desirable, although not essential, to correct these. She was therefore ordered to be on long notice to have these defects corrected.
However soon after the arrival of the heavy cruisers a Catalina reconnaissance aircraft reported an enemy force. Nothing further was heard of this aircraft and it was thought to have been shot down before further reports could be sent. As a Japanese air attack on Colombo was now expected for the following morning. It was then decided to sent the cruisers back to sea where they were to join Force A again.
Both cruisers then departed Colombo in company at 1600/F. The next morning, at 0657 hours on the 5th, HMS Dorsetshire reported that they were being shadowed by an enemy reconnaissance aircraft. A large Japanese air group then sank both cruisers before they could join Force A. (75)
Sources
- ADM 53/108347
- ADM 199/374
- ADM 53/108347 + ADM 53/109459
- ADM 53/108347 + ADM 53/108348
- ADM 186/794
- ADM 53/108348
- ADM 53/108348 + ADM 53/108349
- ADM 53/108349
- ADM 53/108349 + ADM 53/108350
- ADM 53/108100 + ADM 53/108349 + ADM 53/108443 + Report of proceedings of HMAS Waterhen for November 1939
- ADM 53/108350
- ADM 53/112031
- ADM 53/111320 + ADM 53/11203 + ADM 53/113223
- ADM 53/112031 + ADM 53/113223
- ADM 53/112031 + ADM 53/112032
- ADM 53/112032
- ADM 53/112032 + ADM 53/112399 + ADM 53/113004
- ADM 53/112033
- ADM 53/112034
- ADM 53/112034 + ADM 199/380
- ADM 53/112035
- ADM 53/111858
- ADM 53/112036
- ADM 53/112036 + ADM 53/111885 + ADM 53/112448
- ADM 234/318
- ADM 53/112037 + ADM 53/109179 + ADM 199/381
- ADM 234/318 + ADM 53/111848 + ADM 53/112037 + ADM 53/112435
- ADM 53/112037
- ADM 53/112037 + ADM 199/381
- ADM 53/112038
- ADM 53/112039
- ADM 53/112040
- ADM 199/372 + ADM 199/1136
- ADM 53/112040 + ADM 53/112041
- ADM 53/112041
- ADM 53/112042
- ADM 53/112042 + ADM 53/112879 + ADM 199/381
- ADM 199/1136
- ADM 53/112042 + ADM 53/112879
- ADM 53/114129 + ADM 53/114156 + ADM 53/114264 + ADM 53/114288 + ADM 53/114806
- ADM 53/114129
- ADM 53/114129 + ADM 53/114264 + ADM 53/114806
- ADM 53/114129 + ADM 199/394
- ADM 53/114130 + ADM 53/114323 + ADM 53/114324 + ADM 53/114332 + ADM 53/114333 + ADM 53/114489 + ADM 199/409
- ADM 53/114130
- ADM 53/114095 + ADM 53/114130 + ADM 53/114807
- ADM 53/114130 + ADM 53/114131
- ADM 199/408
- ADM 53/114131
- ADM 53/114132
- ADM 53/114132 + ADM 199/402
- ADM 53/114132 + ADM 53/114133
- ADM 53/114133
- ADM 234/322
- ADM 53/114134
- ADM 53/114135
- ADM 53/114136
- ADM 53/114137 + ADM 53/114193 + ADM 53/114789 + ADM 199/395
- ADM 53/114136 + ADM 53/114137 + ADM 53/114138
- ADM 53/114137 + ADM 53/114194
- ADM 53/114138 + ADM 53/114194
- ADM 199/1138
- ADM 53/114138 + ADM 53/114195
- ADM 53/113558 + ADM 53/114138 + ADM 199/395
- ADM 53/114138
- ADM 53/114138 + ADM 53/114165 + ADM 199/395
- ADM 53/114139
- ADM 53/114138 + ADM 199/395 + ADM 199/2552
- ADM 53/114140
- ADM 53/114140 + ADM 53/115814
- ADM 53/113893 + ADM 53/114140
- ADM 53/115814
- ADM 53/115815
- ADM 53/115814 + ADM 53/115815
- ADM 199/426
- ADM 53/115815 + ADM 199/426
- ADM 53/115815 + ADM 53/115816
- ADM 53/115816
- ADM 199/1389
- ADM 53/115816 + ADM 53/116762
ADM numbers indicate documents at the British National Archives at Kew, London.