
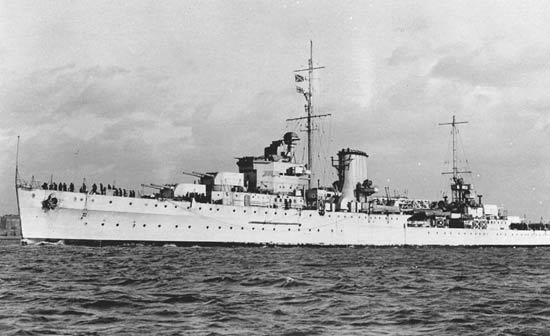
| Navy | The Royal Navy |
| Type | Light cruiser |
| Class | Leander |
| Pennant | 22 |
| Built by | Vickers Armstrong (Barrow-in-Furness, U.K.) |
| Ordered | 1 Oct 1932 |
| Laid down | 7 Feb 1933 |
| Launched | 1 Mar 1934 |
| Commissioned | 12 Apr 1935 |
| End service | Feb 1948 |
| History | HMS Ajax started the war on the South America station. She was damaged by the German pocket battleship Admiral Graf Spee during the Battle of the River Plate on 13 December 1939. Repaired and refitted at Chatham Dockyard from December 1939 until July 1940. After repairs she went to the Mediterranean. She was refitted at Chatham dockyard between May and October 1942. She returned to the Mediterranean upon completion of her refit and was almost immedeately badly damaged by bombing on 1 January 1943. She went to the United States for repairs at the New York Navy Yard and was out of action until October 1943. She again returned to the Mediterranean but was recalled to home waters for the Normandy invasion in June. Once again she returned to the Mediterranean for the invasion of southern France in August. She remained in the Mediterranean for the remainder of the war. HMS Ajax was decommissioned in February 1948. Initially intended to be sold to Thailand but this deal did not materialize. She arrived at Newport for breaking up on 18 November 1949. |
Commands listed for HMS Ajax (22)
Please note that we're still working on this section
and that we only list Commanding Officers for the duration of the Second World War.
| Commander | From | To | |
| 1 | Capt. Charles Henry Lawrence Woodhouse, RN | 9 Oct 1937 | 22 Apr 1940 |
| 2 | Capt. Edward Desmond Bewley McCarthy, RN | 22 Apr 1940 | 27 Nov 1941 |
| 3 | Capt. Stuart Latham Bateson, RN | 27 Nov 1941 | 26 May 1942 |
| 4 | Cdr. Ralph Heathcote, RN | 26 May 1942 | 2 Jul 1942 |
| 5 | Cdr. Richard Graham Stewart, RN | 2 Jul 1942 | 19 Sep 1942 |
| 6 | Capt. James Joseph Weld, RN | 19 Sep 1942 | 16 Sep 1944 |
| 7 | Capt. John Wilson Cuthbert, RN | 16 Sep 1944 | 19 Mar 1946 |
You can help improve our commands section
Click here to Submit events/comments/updates for this vessel.
Please use this if you spot mistakes or want to improve this ships page.
Notable events involving Ajax include:
3 Sep 1939
HMS Ajax (Capt. C.H.L. Woodhouse, RN) intercepts the German merchant Olinda (4576 GRT) off the coast of Uruguay in position 33°50'S, 53°30'W. The German ship is sunk by gunfire.
4 Sep 1939
HMS Ajax (Capt. C.H.L. Woodhouse, RN) intercepts the German merchant Carl Fritzen (6594 GRT) in the South Atlantic off the coast off Uruguay in position 34°19'S, 48°29'W. However before the ship can be captured she is scuttled by her crew.
1 Oct 1939
1 October 1939, an enemy raider reported in the South Atlantic and Indian Ocean. The chase of the German ‘pocket battleship’ Admiral Graf Spee
Movements of the German ‘pocket battleship’ Admiral Graf Spee 21 August 1939 – 13 December 1939.
Before the Second World War had started, on 21 August 1939, the German ‘pocked battleship’ Admiral Graf Spee departed Wilhelmshaven bound for the South Atlantic. On 1 September the Admiral Graf Spee was off the Canary Islands where she made rendes-vous with the supply ship Altmark and supplies were transferred.
On 11 September another rendes-vous was made with the Altmark in the South Atlantic. The Admiral Graf Spee had launched her Arado floatplane to scout in the area as supplies were transferred. The aircraft spotted the British heavy cruiser HMS Cumberland (Capt. W.H.G. Fallowfield, RN). The German ships then immediately parted company and cleared the area at high speed. Two days later, on the 13th, the ships again met and fueling was completed. The Admiral Graf Spee was still under orders to remain unseen.
On 20 September 1939 the Admiral Graf Spee and Altmark met again to fuel. On the 26th the Admiral Graf Spee was ordered to start raiding the British trade lanes. She then proceeded towards the Pernambuco area.
On 30 September 1939 the Admiral Graf Spee found her first victim, the British merchant vessel Clement (5050 GRT, built 1934) that was en-route from New York, U.S.A. to Bahia, Brasil. She then sank the ship in position 09°05’S, 34°05’W. The Admiral Graf Spee then proceeded eastwards and found three more victims between 5 and 10 October. On the 5th she captured the British merchant Newton Beech (4644 GRT, built 1925) in position 09°35’S, 06°30’W. This ship was en-route from Capetown to the U.K. via Freetown. On the 7th she sank the British merchant Ashlea (4222 GRT, built 1929) in position 09°52’S, 03°28’W. This ship was en-route from Durban to Falmouth. The crew of the Ashlea was transferred to the Newton Beech. The next day both crew were transferred to the Admiral Graf Spee and the Newton Beech was scuttled. On 10 October the Admiral Graf Spee captured the British merchant Huntsman (8196 GRT, built 1921) in position 08°30’S, 05°15’W. This ship was en-route from Calcutta to the U.K. On 15 October 1939 the Admiral Graf Spee met the Altmark again to receive supplies and fuel. On the 17th the crew of the Huntsman was transferred to the Altmark and the ship was scuttled in approximate position 16°S, 17°W. The next day the crews of the Newton Beech and Ashlea were also transferred to the Altmark and the German ships then parted company.
On 22 October 1939, the Admiral Graf Spee sank her next victim, the British merchant Trevanion (5299 GRT, built 1937) which was en-route from Port Pirie (Australia) to Swansea. This ship was sunk in position 19°40’S, 04°02’E. On 28 October 1939, near Tristan da Cunha, the Admiral Graf Spee once more refuelled from the Altmark. The Admiral Graf Spee then set course for the Indian Ocean.
On 15 November 1939 she sank the small British tanker Africa Shell (706 GRT, built 1939) in position 24°45’S, 35°00’E. This ship was in ballast and en-route from Quelimane (Portugese East Africa now called Mozambique) to Lourenco Marques (now Maputo, also in Portugese East Africa / Mozambique). Next day the Admiral Graf Spee stopped the Dutch merchant Mapia (7188 GRT, built 1923) but had to let her go as she was a neutral ship. The Admiral Graf Spee then set course to return to the South Atlantic where she met once more with the Altmark on 27 November 1939 and the next day she fuelled from her about 300 miles from Tristan da Cunha.
On 2 December 1939, the Admiral Graf Spee sank her largest victim, the British merchant Doric Star (10086 GRT, built 1921),in position 19°15’S, 05°05’E. This ship was en-route from Auckland, New Zealand to the U.K. The next morning the Admiral Graf Spee sank the British merchant Tairoa (7983 GRT, built 1920) in position 19°40’S, 04°02’E. This ship was en-route from Brisbane, Australia to London. On 6 December 1939 the Admiral Graf Spee refuelled once more from the Altmark. She then set course to the River Plate area where the British merchant traffic was the thickest. She was to sink more ships there and disrupt British shipping movements in that area before returning to Germany.
On 7 December 1939 the Admiral Graf Spee sank what was to be her last victim, the British merchant Streonshalh (3895 GRT, built 1928) in position 25°01’S, 27°50’W. This ship was en-route from Montevideo to Freetown and then onwards to the U.K.
Then in the morning of 13 December 1939, her smoke was sighted by three cruisers from the South America Division. More on this in the article ‘The Battle of the River Plate, 13 December 1939’.
British Dispositions in the South Atlantic / South America area
Shortly before the outbreak of the war the South America Division of the America and West Indies Station was transferred to the newly formed South Atlantic Station. The South America Division at that moment consisted of the heavy cruiser HMS Exeter (Capt. F.S. Bell, RN, flying the flag of Commodore H.H. Harwood, OBE, RN) and the light cruiser HMS Ajax (Capt. C.H.L. Woodhouse, RN). In late August 1939 HMS Exeter was at Devonport with her crew on foreign leave when she was recalled to South American waters. On 25 August 1939 she sailed from Devonport. HMS Exeter arrived at Freetown on 1 September 1939. Commodore Harwood then met the Commander-in-Chief South Atlantic Station, Vice-Admiral G. D’Oyly Lyon, CB, RN. Later the same day HMS Exeter sailed for Rio de Janeiro.
Meanwhile four destroyers from the 4th Destroyer Division, Mediterranean Fleet, the HMS Hotspur (Cdr. H.F.H. Layman, RN), HMS Havock (Lt.Cdr. R.E. Courage, RN), HMS Hyperion (Cdr. H.St.L. Nicholson, RN) and HMS Hunter (Lt.Cdr. L. de Villiers, RN) had left Gibraltar on 31 August 1939 for Freetown.
HMS Ajax was already on station off the coast of South America. Shortly after noon on 3 September she intercepted the German merchant vessel Olinda (4576 GRT, built 1927) in position 34°58’S, 53°32’W. This ship was en-route from Montivideo to Germany. As HMS Ajax had no prize crew available the ship was sunk by gunfire a few hours later. In the afternoon of the next day, the 4th, HMS Ajax intercepted another German ship, the Carl Fritzen (6594 GRT, built 1920) in position 33°22’S, 48°50’W. This ship was en-route from Rotterdam to Buenos Aires. This ship was also sunk with gunfire.
On 5 September two of the destroyers from the 4th Destroyer Division, HMS Hotspur and HMS Havock departed Freetown to join the South America Division. They were ordered to examine Trinidade Island on the way. On 8 September 1939 the heavy cruiser HMS Cumberland (Capt. W.H.G. Fallowfield, RN) departed Freetown to join the South America Division as well. This cruiser came from the Home Fleet and had arrived at Freetown on the 7th.
On 7 September 1939, HMS Exeter entered Rio de Janeiro where Commodore Harwood had a meeting with the Brazilian Secretary-General of Foreign Affairs and H.M. Ambassadors to Brazil and Argentine. HMS Exeter departed Rio de Janeiro the next day. Later that day Commodore Harwood was informed by the Admiralty that the German merchant ships General Artigas (11343 GRT, built 1923), Gloria (5896 GRT, built 1917) and Monte Pascoal (13870 GRT, built 1931) were assembling off the Patagonian coast. He decided to move both HMS Exeter and HMS Ajax south, and ordered the Ajax to meet him at 0800/9. They actually made rendezvous at 0700 hours. The Commodore considered it possible that the German merchant ships might embark German reservists and raid the Falkland Islands therefore he decided to sent HMS Ajax there. HMS Exeter proceeded to the Plate area to cover that important area.
On the evening of the 10th, Commodore Harwood was informed that the transportation of German reservists by the three German merchant ships was very unlikely but as it appeared probable that the German ships were converting themselves into armed raiders the Commodore decided to start short distance convoys from the Santos-Rio and Plate areas. He therefore ordered HMS Cumberland to refuel at Rio de Janeiro on her arrival there and to organize and run ‘out’ convoys in that area with HMS Havock as A/S escort. The convoys were to leave at dawn and be protected against submarines and surface raiders until dusk. The ships were then to be dispersed so that they would be far apart by dawn the next day. At the same time the Commodore ordered HMS Hotspur to join him in the Plate area after refuelling at Rio de Janeiro, so that similar convoys could be started from Montevideo. If one of the German ‘pocket battleships’ was to arrive of South America, HMS Cumberland was to abandon the convoy sheme and join HMS Exeter in the Plate area. Also on the 10th, Commodore Harwood was informed by the Admiralty that the German merchant Montevideo (6075 GRT, built 1936) was leaving Rio Grande do Sul for Florianopolis but decided not to intercept her as this would divert HMS Exeter 500 nautical miles from the Plate area.
On the night of 12 September 1939 the Commodore was informed by the British Naval Attaché, Buenos Aires, that a concentration of German reservists was taking place in southern Argentina with the Falklands as a possible objective. He therefore ordered HMS Ajax to remain in the Falklands till the situation cleared, and the Commodore then proceeded south of the Plate area to be closer to the Falklands himself and yet remain in easy reach of the Plate area. During the next few days HMS Exeter intercepted several British and neutral vessels.
In view of a report that the German merchant vessels Porto Alegré (6105 GRT, built 1936) and Monte Olivia (13750 GRT, built 1925) were leaving Santos on 15 September 1939 Commodore Harwood decided to start the short distance convoys from Montevideo as soon as possible. HMS Cumberland had meanwhile arranged a twelve-hour convoy system from Santos. Ships from Rio de Janeiro for Freetown would sail at dawn on odd numbered days, and ships for the south on even numbered days with HMS Havock as anti-submarine escort and HMS Cumberland in distant support. HMS Cumberland left Rio de Janeiro on 16 September and during the next eight days sighted 15 British and neutral ships while on patrol.
On 17 September 1939, HMS Hotspur joined HMS Exeter in the Plate area. HMS Exeter then made a visit to Montevideo and resumed her patrol off the Plate area on the 20th. Fuelling was done from the oiler RFA Olwen (6470 GRT, built 1917, Master B. Tunnard) in the mouth of the River Plate. Soon after leaving Montevideo on 20 September Commodore Harwood learned from the British Naval Attaché, Buenos Aires, that the local German authorities were endeavoring to inform German ships at sea that the British merchant Lafonia (1872 GRT, built 1911) was on her way to the Falklands with British reservists for the Falkland Islands defence force. It was also reported that on 17 September an unknown warship had passed Punta Arenas eastwards. In view of these reports and of other pointing out that German merchant ships in southern waters were being outfitted as armed raiders the Commodore ordered HMS Hotsput to escort the Laofona to Port Stanley. As the volume of trade in the Plate area was greater than in the Rio de Janeiro – Santos area, HMS Havock was ordered to proceed southwards to the Plate area.
The first local convoy outward from Montevideo sailed on 22 September 1939. It consisted of the British merchant ships Sussex (11062 GRT, built 1937), Roxby (4252 GRT, built 1923), El Ciervo (5841 GRT, built 1923) in addition to the earlier mentioned Lafonia, and was escorted by HMS Hotspur. HMS Exeter met this convoy during the forenoon and covered it throughout the day. At dusk the merchant ships were dispersed on prearranged courses while HMS Exeter remained within supporting distance and HMS Hotspur escorted the Lafonia to Port Stanley.
On 24 September 1939, Vice-Admiral Lyon (C-in-C, South Atlantic) and Commodore Harwood learned from the Naval Attaché, Buenos Aires, that ‘according to a reliable source’ arrangements had been made for a number of German ships and a submarine to meet near Ascension on 28 September 1939. HMS Cumberland was ordered to proceed there and HMS Ajax was ordered to leave the Falklands and take up her place in the Rio de Janeiro area. HMS Neptune (Capt. J.A.V. Morse, DSO, RN) was also ordered to proceed to the area off Ascension with the destroyers HMS Hyperion and HMS Hunter which departed Freetown on the 25th. No German ships were however encountered off Ascension and all ships then proceeded to Freetown where they arrived on 2 October 1939 with HMS Cumberland low on fuel.
While HMS Cumberland left the station to search for the German ships, HMS Exeter and HMS Ajax were sweeping of the Plate and Rio de Janeiro – Santos area respectively. On 27 September 1939, HMS Havock escorted a convoy made up of the British merchants Miguel de Larrinaga (5231 GRT, built 1924), Pilar de Larringa (7352 GRT, built 1918) and Sarthe (5271 GRT, built 1920) out of the Plate area. The next day another convoy, made up of the British merchants Adellen (7984 GRT, built 1930), Cressdene (4270 GRT, built 1936), Holmbury (4566 GRT, built 1925), Lord Byron (4118 GRT, built 1934), Ramillies (4553 GRT, built 1927) and Waynegate (4260 GRT, built 1931) left the Plate area escorted by HMS Havock and with cover from HMS Exeter.
At daylight on 29 September 1939 HMS Ajax was off Rio de Janeiro ready to escort ships sailing northward. She sighted none until the early afternoon when she met the Almeda Star (12848 GRT, built 1926) and a few hours later the tanker San Ubaldo (5999 GRT, built 1921). That night several neutral steamers were sighted off Rio de Janeiro and the next day the British La Pampa (4149 GRT, built 1938) was met and escorted during daylight on her way to Santos. So far on the work of the South American Division during September 1939. The ships assigned to Commodore Harwood had been busy patrolling and escorting ships near the focal areas.
A surface raider reported, 1 October 1939.
When a report that the British merchant Clement had been sunk on 30 September 1939 by a surface raider off Pernambuco was received by the Admiralty in the afternoon of October 1st, the C-in-C, South Atlantic was informed that he should retain the 4th Destroyer Division and that his command would be reinforced by the cruisers HMS Norfolk (Capt. A.G.B. Wilson, DSO, RN), HMS Capetown (Capt. T.H. Back, RN), HMS Effingham (Capt. J.M. Howson, RN), HMS Emerald (Capt. A.W.S. Agar, VC, DSO, RN) and HMS Enterprise (Capt. H.J. Egerton, RN). Also the battleships HMS Resolution (Capt. C.H. Knox-Little, RN), HMS Revenge (Capt. E.R. Archer, RN) and the aircraft carrier HMS Hermes (Capt. F.E.P. Hutton, RN) were to proceed to either Jamaica or Freetown. These dispositions however never materialised being superseded on 5 October 1939 by a more general policy (the institution of hunting groups) which cancelled them.
The institution of hunting groups, 5 October 1939.
On 5 October 1939 the Admiralty formed five hunting groups in the Atlantic and Indian Ocean of sufficient strength to destroy any ‘pocket battleship’ or Hipper-class cruiser. These were; Force F; area: North America and West Indies. HMS Berwick (Capt. I.M. Palmer, DSC, RN), HMS York (Capt. R.H. Portal, DSC, RN), Force G; area: S.E. coast of South America. HMS Cumberland, HMS Exeter Force H; area: Cape of Good Hope, South Africa. HMS Sussex (Capt. A.R. Hammick, RN), HMS Shropshire (Capt. A.W.LaT. Bisset, RN), Force I; area: Ceylon. HMS Cornwall (Capt. C.F. Hamill, RN), HMS Dorsetshire (Capt. B.S.C. Martin, RN), HMS Eagle (Capt. A.R.M. Bridge, RN), Force K; area: Pernambuco, Brazil. HMS Renown (Capt. C.E.B. Simeon, RN), HMS Ark Royal (Capt. A.J. Power, RN), Force L; area: Brest, France. Dunkerque (Capt. J.L. Nagadelle, replaced by Capt. M.J.M. Seguin on 16 October), Bearn (Capt. M.M.A. Lafargue, replaced by Capt. Y.E. Aubert on 7 October), Georges Leygues (Capt. R.L. Perot), Gloire (Capt. F.H.R. de Belot), Montcalm (Capt. P.J. Ronarc’h), Force M; area: Dakar, Senegal. Dupleix (Capt. L.L.M. Hameury), Foch (Capt. J. Mathieu), and Force N; area: West Indies. Strasbourg (Capt. J.F.E. Bouxin), HMS Hermes.
The institution of the hunting groups were not the only measures taken. The battleships HMS Resolution, HMS Revenge and the light cruisers HMS Emerald and HMS Enterprise were ordered to proceed to Halifax, Nova Scotia to escort homeward bound convoys. Light cruiser HMS Effingham was to join them later. The battleship HMS Ramillies (Capt. H.T. Baillie-Grohman, DSO, RN) left Gibraltar on 5 October for the same duty but was recalled the next day when the battleship HMS Malaya (Capt. I.B.B. Tower, DSC, RN) and the aircraft carrier HMS Glorious (Capt. G. D’Oyly-Hughes, DSO and Bar, DSC, RN) were ordered to leave the Mediterranean and proceed to the Indian Ocean where they formed an addition hunting group, Force J which was to operate in the Socotra area off the entrance to the Gulf of Aden.
Now back to the South Atlantic, on 9 October 1939 the C-in-C, South Atlantic had informed the Admiralty and Commodore Harwood that he intended to co-ordinate the movements of ‘Force G’, ‘Force H’ and ‘Force K’. As this would entail long periods of wireless silence in ‘Force G’ he proposed that Commodore Harwood should transfer his flag to HMS Ajax, leaving Capt. Fallowfield of HMS Cumberland in command of Force G. The Admiralty approved of this. Commodore Harwood stated that it was his intention to transfer his flag from HMS Exeter to HMS Ajax in the River Plate area on 27 October. He also stated that the endurance of HMS Exeter was only half the endurance of HMS Cumberland and that this would prove problematic when they were to operate together and he proposed that the Exeter would be relieved by another 10000 ton cruiser but for the moment no suitable cruiser was available to relieve her.
On 12 October 1939 the first of the hunting forces arrived on their station when HMS Renown and HMS Ark Royal reached Freetown that morning coming from the U.K. They were soon followed by three more destroyers of the H-class coming from the Mediterranean; HMS Hardy (Capt. B.A. Warburton-Lee, RN), HMS Hasty (Lt.Cdr. L.R.K. Tyrwhitt, RN) and HMS Hostile (Cdr. J.P. Wright, RN). On 13 October 1939 the cruisers HMS Sussex and HMS Shropshire arrived at Simonstown from the Mediterranean and one day later HMS Hermes arrived at Dakar from Plymouth.
The South America Division during the first half of October 1939.
When the news of an enemy raider in the South Atlantic reached the C-in-C at Freetown on 1 October 1939 he immediately suspended sailings from Pernambuco and Natal and he ordered HMS Havock and HMS Hotspur to escort British ships clear of the area. But next morning he cancelled these dispositions and ordered Commodore Harwood to concentrate HMS Exeter, HMS Ajax and the two destroyers off Rio de Janeiro. By this time, however, the raider was far away from the South American coast. On 3 October 1939 the Commodore signalled the C-in-C that he intened to concentrate the Exeter and Ajax off Rio and have the Hotspur to cover the Rio – Santos area and keep the Havock off the Plate but upon receiving the orders from the C-in-C to concentrate he ordered to destroyers to join the cruisers after fuelling but not later then 0800 hours on 4 October. Reports that the enemy raider was not a ‘pocket battleship’ however kept coming in and the Commodore decided that he could not leave the heavy traffic in the Plate area without some form of protection and he ordered HMS Havock to return there but when a report coming in from Bahia, Brazil confirmed that the Clement had been sunk by the ‘pocket battleship’ Admiral Scheer the Commodore once more ordered HMS Havock to join him. In the end HMS Ajax joined HMS Exeter at 1700/3, HMS Hotspur at 0500/4 and finally HMS Havock at 1300/4.
The Commodore was also informed by the Admiralty that the New Zealand cruiser HMS Achilles (New Zealand Division) (Capt. W.E. Parry, RN) would join his station coming from the west coast of South America. HMS Cumberland left Freetown at 1900/3 to join the Commodore in the Rio de Janeiro area as well.
Commodore Harwood’s policy against enemy raiders and a new raider report coming on on 5 October 1939.
Commodore Harwood had decided to keep his forces concentrated and as no new raider reports had come in to patrol the Rio de Janeiro area in accordance with the C-in-C, South Atlantic’s order. If he met a ‘pocket battleship’ he intended to shadow it until dusk. He would then close and attack in the dark hours. If, on the other hand, he made contact at night, his destroyers would at once close the enemy’s beam and attack her with torpedoes.
On 5 October 1939, the British merchant Martand (7967 GRT, built 1939) informed HMS Cumberland that a German armed raider had attacked an unknown ship, this unknown ship was in fact the Newton Beech that was attacked about 900 nautical miles away. This information was not acted upon by the Commanding Officer of the Cumberland. The Captain of the Cumberland assumed the raider report would have been intercepted by other ships and passed on to the C-in-C, South Atlantic. He considered it was important to keep radio silence and decided against breaking it. The Admiralty however later was of the opinion that the report should have been passed on to the Commander-in-Chief.
By 5 October 1939, the Exeter, Ajax, Havock and Hotspur were concentrated in the Rio de Janeiro area ready to engage the raider if she came south from the Pernambuco area. HMS Achilles was on her way round Cape Horn.
When HMS Ajax visited Rio de Janeiro on 7 October 1939, Commodore Harwood directed her to suggest to the Consular Shipping Advisers there, and at Santos, that, owning to the small volume of shipping leaving these ports, the local convoy systems, which had been instituted on 22 September against armed merchant raiders, should be suspended, and Allied merchant ships be routed independently.
The Commodore intended to meet HMS Cumberland at 1700/8, but at 1600/7 he received a message from the Consular Shipping Adviser at Rio de Janeiro in which he desired an escort for a 13 knot convoy that was to sail at 0430/8 and that had received much local publicity. The Commodore thought that this publicity might draw the enemy raider to the area and he therefore took his entire force back towards Rio de Janeiro and sent HMS Hotspur ahead to make contact with the convoy, while keeping his other ships in support. The convoy consisted of the British merchants Highland Chieftain (14131 GRT, built 1929), Nariva (8723 GRT, built 1920) and the French merchant Alsina (8404 GRT, built 1922).
Meanwhile the Commodore had directed HMS Cumberland to meet him at dawn on October 9th. When the convoy was dispersed at 1800/8 the Exeter and Ajax steered to meet her while the Havock was detached to fuel at Rio de Janeiro. At 2200/8 HMS Ajax was detached. HMS Cumberland made rendezvous with HMS Exeter at 0500/9. They were ordered by the C-in-C, South Atlantic to make a sweep northwards but this could not be carried out as HMS Exeter was short of fuel. The Commodore therefore decided to make a sweep southwards towards the Plate area where HMS Exeter could refuel. He also decided to keep HMS Hotspur with the two cruisers as long as possible.
On 12 October 1939, Rio Grande do Sul reported that the German merchant Rio Grande (6062 GRT, built 1939) was about to sail. The Commodore at once ordered HMS Cumberland to proceed there and intercept. She arrived off Rio Grande do Sul at 1600/13 but on finding it all quiet in the harbour she shaped course for the Plate area at nightfall. Meanwhile the Commodore had ordered HMS Hotspur to fuel at Montevideo when HMS Havock left that port early on the 14th.
about this time RFA Olwen informed the Commodore the the German merchant Bahia Laura (8611 GRT, built 1918) was leaving Montevideo at 1000 next morning and might protest if HMS Havock sailed the same day. Instead, therefore, of entering Montevideo HMS Hotspur at once fueled from the Olwen and then remained out on patrol. The Bahia Laura however, showed no signs of leaving and at 0800/14, HMS Havock put to sea. At 1200 hours HMS Hotspur entered Montevideo. Later that day HMS Exeter and HMS Cumberland fueled from the Olwen in San Borombon Bay at the southern entrance to the Plate estuary. At 1430 hours they were joined by HMS Havock. Commodore Harwood then ordered her to patrol off Montevideo to watch the Bahia Laura. When HMS Exeter finished fueling she immediately put to sea. HMS Cumberland rejoined him next morning at 0700 hours. HMS Havock was then ordered to join the cruisers. On 16 October the commodore learned that the Bahia Laura had sailed at 1015 hours the previous day. By the time the signal reached him the German ship was far out at sea well past his patrol line. But as the whole area was enveloped in dense fog the Commodore decided against trying to catch her.
The South America Division during the second half of October 1939.
Meanwhile Commodore Harwood had informed the Commander-in-Chief, South Atlantic on 13 October that as HMS Exeter required certain minor repairs he proposed to proceed to the Falklands on the17th and then return to the Plate area on the 27th. The Commander-in-Chief replied that he preferred that HMS Exeter would stay in the Plate area till the Commodore would transfer his Broad Pendant to HMS Ajax on the 27th. As HMS Achilles was due in the Plate area on this day also, she and HMS Cumberland could then operate as ‘Force G’ during the Exeter’s absence. This would mean that there would be no cruiser in the Rio de Janeiro area until HMS Exeter would return from her repairs at the Falklands. The Commodore therefore ordered HMS Havock to sail on 21 October for a four day patrol in the Rio – Santos Area, where HMS Hotspur, which could remain at sea until 2 November, would relieve her. From that date until the relief of HMS Achilles there would be no warship in this area. The Commodore therefore asked the Commander-in-Chief to allow ‘Force G’ to operate in that area from 2 to 10 November. When HMS Hotspur joined the Exeter and Cumberland from Montevideo on 17 October the Commodore ordered her to patrol off Rio Grande do Sul to intercept the German ships Rio Grande and Montevideo if they would come out, and sent HMS Havock to patrol inshore with orders to anchor the night clear of the shipping route.
This proved to be the last duty of these two destroyers with the South America Division. On 20 October the Admiralty ordered their transfer to the West Indies. Three days later the Commodore sent them into Buenos Aires to refuel, and as the distance to Trinidad, 4000 miles, was at the limit of their endurance, also obtained permission to refuel them at Pernambuco. They both left Buenos Aires on the 25th and, bidding the Commodore farewell, proceeded northwards. They sailed from Pernambuco on 1 November but on the 3rd HMS Havock was diverted to Freetown with engine trouble. The two remaining destroyers of the 4th Division, HMS Hyperion and HMS Hunter, had left Freetown with convoy SL 6 on 23 October. Off Daker their escort duty was taken over by the French light cruiser Duguay-Trouin (Capt. J.M.C. Trolley de Prevaux). The destroyers then fueled at Dakar on the 27th and sailed for Trinidad early on the 28th.
Meanwhile HMS Cumberland had entered Montevideo at 0800/26. At 0900/26 HMS Achilles joined HMS Exeter in the Plate area and after fueling from RFA Olwen sailed to meet HMS Cumberland off Lobos the next day and then patrol with her as ‘Force G’ in the Rio – Santos area. The Olwen was now nearly out of fuel and filled up HMS Ajax ,which had arrived from the Rio area on the 26th, with her remaining fuel minus 500 tons for her passage to Trinidad. In the morning of 27 October, Commodore Harwood transferred his Broad Pendant to HMS Ajax and HMS Exeter then parted company to proceed to the Falklands for repairs.
Meanwhile the newly formed ‘Force H’ and ‘Force K’ were busy on the other side of the South Atlantic. ‘Force H’, made up of HMS Sussex and HMS Shropshire had reached the Cape on 13 October. As HMS Cumberland had not passed on the report of the Martland, no news on the raider had reached the Admiralty or the Commander-in-Chief since October 1st. On 14 October ‘Force H’ sailed to search for her along the Cape – Freetown route as far as the latitude of St. Helena. That day ’Force K’ (HMS Ark Royal and HMS Renown) left Freetown with HMS Neptune, HMS Hardy, HMS Hero (Cdr. C.F. Tower, MVO, RN) and HMS Hereward (Lt.Cdr. C.W. Greening, RN) to search westwards towards St. Paul Rocks, the direction of their sweep being determined by the complete lack of any further raider information.
Finally a raider report on 22 October 1939, Sweeps by ‘Force H’ and ‘Force K’.
The three weeks old ‘mystery’ of the raiders whereabouts was partially solved on 22 October when the British merchant vessel Llanstephan Castle (11293 GRT, built 1914) intercepted a message from an unknown ship ‘Gunned in 16°S, 04°03’E’ at 1400 G.M.T. There was however no immediate confirmation of her report and the Commander-in-Chief ordered ‘Force H’ to sail after dark on the 27th to sail for the latitude of St. Helena. At noon on 31 October this Force was in 15°S, 02°51’E, the north-eastern limit of it’s patrol, when a Walrus aircraft failed to return to HMS Sussex from a reconnaissance flight. It was never found, though the two cruisers spend over three days searching for it. Being short of fuel they then returned to the Cape by the same route they had used outwards.
Sweep by ‘Force K’, 28 October – 6 November 1939.
To cover the northern end of the route from St. Helena onward, HMS Neptune and the destroyers HMS Hardy, HMS Hasty, HMS Hero and HMS Hereward had left Freetown on 28 October. HMS Neptune was to sweep independently from position 03°20’S, 01°10’W and then through 14°30’S, 16°50’W back to Freetown. On 30 October a report from Dakar stated that the German merchant Togo (5042 GRT, built 1938) had left the Congo on 26 October, that the German merchant Pionier (3254 GRT, built 1934) had sailed from Fernando Po (now called Bioko Island) on 28 October and that five German ships had left Lobito (Angola) the same day. When the Vice-Admiral, Aircraft Carriers, received this information her detached HMS Hardy and HMS Hasty to sweep north-westward for the Pioneer, while ‘Force K’ and the remaining two destroyers searched for her to the south-westward. Both searches were unsuccessful. Meanwhile a message from Lobito had stated that the five German ships that were stated to have left the harbour were still there. On 5 November the German merchant vessel Uhenfels (7603 GRT, built 1931), that had left Laurenco Marques (now called Maputo, Mozambique) on 16 October was sighted by an aircraft from HMS Ark Royal. Only energetic action from HMS Hereward saved her from being scuttled in position 06°02’N, 17°25’W. She was brought into Freetown on 7 November by HMS Herward, a few hours behind ‘Force K’.
’Force H’ and ‘Force G’, first half of November 1939.
The first half of November was relatively quiet on both sides of the South Atlantic At the start of the month ‘Force H’ and ‘Force K’ were still on the shipping lane between Sierra Leone and the Cape. On 3 November 1939 the Admiralty informed the Commander-in-Chief, South Atlantic that all German capital ships and cruisers were apparently in home waters. It appeared therefore that the pocket battleship, which was still thought to be the Admiral Scheer, had returned home and that the raider reported by the Llangstephan Castle on 22 October was nothing but an armed merchantman. Here was a good opportunity for resting the hunting groups and on 4 November the Admiralty issued orders that ‘Force G’ and ‘Force H’ should exchange areas. This exchange would not only give ‘Force G’ an opportunity of resting and refitting at the Cape, but would also provide Commodore Harwood with the hunting group of long endurance that he desired.
The Commander-in-Chief had planned that ‘Force H’ which had returned to the Cape on 7 November would then sweep towards Durban, arriving there on 16 November. However on the 11th they were ordered to sail for patrol in the Atlantic and on the evening of the 17th, while west of St. Helena, exchange patrol areas with ‘Force G’. The exchange of areas however did not take place as ‘Force G’ was delayed due to HMS Exeter being damaged while casting off from the oiler in heavy seas. Before the exchange now could take place it was cancelled.
South America Division, first half of November 1939.
After hoisting Commodore Harwood’s Broad on 27 October the HMS Ajax had swept the Plate focal area. When the Commodore received the signal of the Commander-in-Chief on the 5th regarding the changeover over patrol areas between ‘Force G’ and ‘Force H’, he ordered HMS Cumberland to proceed to the Plate at 20 knots to refuel. About this time a message reached him from Buenos Aires that the Argentinian Foreign Minister had drawn attention to cases of fueling in the Plate by HMS Exeter and HMS Ajax. Although the Argentinian Government had no apparent intention of raising the issue he decided to cut down the fuellings in the inshore waters of the Plate as much as possible. He therefore cancelled the fuelling of HMS Exeter, due to take place on 7 November from the oiler RFA Olynthus (6888 GRT, built 1918, Master L.N. Hill), which had relieved RFA Olwen. He ordered HMS Cumberland to fuel at Buenos Aires on 9 November. HMS Exeter which had arrived at the Falklands on 31 October for repairs, sailed again on 4 November to meet up with HMS Cumberland off the Plate on 10 November, but the Commodore ordered her to enter Mar del Plata for a 24-hour visit on the 9th. As this gave her some time at hand, he ordered her to cover the Plate while HMS Ajax visited Buenos Aires from 6 to 8 November during which the Commodore discussed the question of fuelling his ships in the River Plate Estuary with the Argentine naval authorities. During his visit to Buenos Aires, the Commodore discussed the matter of fuelling his ships of English Bank with the Argentinian Minister of Marine and his Chief of Naval Staff they both suggested that he should use San Borombon Bay which was most acceptable. He had in fact been using it for some time.
When HMS Ajax left Buenos Aires on 8 November she patrolled the Plate area. HMS Exeter arrived at Mar del Plata the next day but fuel could not be obtained there. She was ordered to fuel from RFA Olynthus in San Borombon Bay on the 10th and then meet up with HMS Cumberland off Lobos Island at 0600/11. On the 10th HMS Ajax also fueled from RFA Olynthus as did HMS Exeter after her while HMS Ajax was at anchor close by. However weather quickly deteriorated and the Olynthus was forced to cast off, damaging the Exeter in doing so. Besides that she was still 600 tons short of fuel. As she could not reach the Cape without a full supply the sailing of ‘Force G’ to exchange areas with ‘Force H’ was delayed. The Exeter finally finished fuelling on the 13th and sailed with HMS Cumberland for Simonstown. Before the exchange of areas could be effected, however, a raider was reported in the Indian Ocean and the order was cancelled.
Another raider report, 16 November 1939.
On 16 November 1939 the Naval Officer-in-Charge, Simonstown, reported that the small British tanker Africa Shell ( GRT, built ) had been sunk off Lourenco Marques the previous day by a raider identified as a pocket battleship. After the usual conflicting reports from eye-widnesses during the next few days, however, it was doubtful how many raiders there were or whether they were pocket battleships or heavy cruisers.
The presence of an enemy heavy ship in the Mozambique Channel called for new dispositions. When the raider report reached the Admiralty on 17 November they immediately cancelled the exchange of areas between ‘Force G’ an ‘Force H’. ‘Force H’ was ordered to return to the Cape and ‘Force G’ was ordered to return to the east coast of South America. They also ordered the dispatch of ‘Force K’ towards the Cape with instructions to go on to Diego Suarez in Madagascar. That morning a report reached the Commander-in-Chief, South Atlantic that the German merchant vessels Windhuk (16662 GRT, built 1937) and Adolph Woermann (8577 GRT, built 1922) had left Lobito. He at once ordered ‘Force H’, which was at that moment west of St. Helena in the approximate latitute of Lobito to spend three days searching for them.
Next day, 18 November 1939, ‘Force K’ left Freetown together with HMS Neptune, HMS Hardy, HMS Hero and HMS Hostile to sweep west of St. Helena through position 16°30’S, 10°W and thence on to Diego Suarez. The destroyers parted company at 2300/18 to search for the German ships. On 20 November 1939, the Commander-in-Chief ordered ‘Force H’ to return to the Cape of nothing of the German merchant vessels had been sighted. HMS Sussex and HMS Shropshire did so on 23 November.
The Adolph Woermann had not escaped. Early on 21 November 1939, the British merchant Waimarama (12843 GRT, built 1938) reported her in position 12°24’S, 03°31’W. At 1127/21, ‘Force K’ (HMS Ark Royal and HMS Renown) was in position 05°55’S, 12°26’W, altered course to close, and HMS Neptune, which was still with them, went ahead at high speed. Shortly after 0800/22 she made contact with the Adolf Woermann in position 10°37’S, 05°11’W and went alongside. Despite efforts to save her the German vessel was scuttled and when HMS Neptune returned to Freetown on 25 November 1939 she had 162 German survivors on board.
’Force H’ and ‘Force K’, second half of November 1939.
As the search for the Adolf Woermann had taken ‘Force K’ nearly 200 miles to the eastward, the Vice-Admiral, Aircraft Carriers decided to proceed to the Cape by the route east of St. Helena to save fuel. In hindsight this might have saved Altmark for being intercepted as she was waiting for the Admiral Graf Spee in the area ‘Force K’ would have otherwise passed through. On 23 November 1939, the Commander-in-Chief, South Atlantic, ordered ‘Force H’ to sail from the Cape the next day and patrol the ‘diverse routes’ as far as 33°E until 28 November.
At the northern end of the South Atlantic station HMS Neptune, HMS Hardy, HMS Hero, HMS Hostile, HMS Hasty and the submarine HMS Clyde (Cdr. W.E. Banks, RN) had established a patrol between 22 and 25 November 1939 to intercept escaping German merchant ships or raiders. No ships were however sighted and they were recalled to Freetown on 30 November.
In the meantime the Admiralty had ordered, ‘Force H’ and ‘Force K’ to conducted a combined patrol on the meridian of 20°E. The two forces met early on 1 December. The plan, according to the Commander-in-Chief, appeared to be a good one in theory but was found unsuitable in practice that on account of local weather conditions. These permitted flying off aircraft from HMS Ark Royal only once in five or six days, so that the patrol could not be extended far enough to the south to intercept a raider bent on evasion. In fact, only once, on 2 December weather was suitable for flying off aircraft.
South America Division, second half of November 1939.
After HMS Cumberland and HMS Exeter (‘Force G’) had sailed from San Borombon Bay for Simonstown on 13 November 1939, HMS Ajax patrolled the Plate area and escorted the French Massilia ( GRT, built ) that was bound for Europe from Buenos Aeres with French reservists. After parting from the Massilia she closed Rio Grande do Sul and ascertained that the German merchant vessels Rio Grande and Montevideo were still there. For the next two days she patrolled the normal peace time shipping routes.
When the Admiralty cancelled the exchange of ereas between ‘Force G’ and ‘Force H’ on 17 November, Commodore Harwood sent ‘Force G’ to cover Rio de Janeiro. He ordered HMS Achilles to fuel off the Olynthus in the Plate area on 22 November and then relieve ‘Force G’ in the Rio area as HMS Exeter would need to refuel in the Plate area again on 26 November. HMS Cumberland was to remain with the Exeter to keep ‘Force G’ together so she could refuel from the Olynthus as well. They were then to patrol the Plate area so that HMS Ajax could visit the Falklands.
On 18 November the Commodore was informed that the German merchant Ussukuma ( GRT, built ) might sail from Bahia Blanca for Montevideo at any time. He at once ordered the Olynthus to watch for her between Manos and Cape San Antonio and took the Ajax south to the same vicinity.
On 22 November 1939 HMS Achilles heard the German merchant Lahn (8498 GRT, built 1927) calling Cerrito by wireless, and when HMS Ajax arrived half an hour later a search was carried out. It was insuccessful for both cruisers but both the Lahn and another German merchant the Tacoma (8268 GRT, built 1930) reached Montevideo safely during the forenoon.
HMS Ajax and HMS Achilles then both fuelled from the Olynthus at San Borombon Bay during the next afternoon. The Achilles the sailed for the Rio de Janeiro area. She had orders to move up to Pernambuco and show herself off Cabadello and Bahia as a number of German ships in Pernambuco were reported ready to sail to Cabadello to load cotton for Germany. She was to return at once to the Rio area if any raiders were reported in the South Atlantic.
HMS Ajax left the Plate area on 25 November 1939 and sent up a seaplane to reconnoitre Bahia Blanca. The Ussukuma showed no signs of sailing so HMS Ajax proceeded to the Falklands, arriving there on the 27th. By this time HMS Cumberland and HMS Exeter were in urgent need of refits after long periods at sea, and Commodore Harwood ordered the Exeter to proceed to the Falklands forthwith. She arrived at Port Stanley on 29 November 1939 and her defects were immediately taken in hand as far as local resources permitted.
8 December 1939 was the twenty-fifth anniversary of the Battle of the Falklands, and thinking the enemy might attempt to avenge the defeat, the Commodore ordered HMS Cumberland to patrol off the Falklands as of 7 December for two days after which she too was to enter Port Stanley for rest and refit.
French Forces at Dakar in November 1939.
During November them most important event at Dakar, where the French were maintaining a number of more or less regular patrols, was the reorganisation of ‘Force X’. On 1 November 1939 the large destroyer L’Audacieux (Cdr. L.M. Clatin) sailed from Dakar to the westward to 26°W and thence south-west to search for the German merchant Togo. She returned to Dakar on 4 November having sighted nothing. That day the French light cruiser Duguay-Trouin sailed to sweep round the Cape Verde Islands and then on to St. Paul Rocks. She returned to Dakar on 10 November. The old ‘Force X’, the Strasbourg (Capt. J.F.E. Bouxin), Algerie (Capt. L.H.M. Nouvel de la Fleche) and Dupleix (Capt. L.L.M. Hameury) sailed on 7 November to sweep west of the Cape Verde Islands. It returned to Dakar on 13 November 1939. Meanwhile French submarines based at Casablanca were maintaining a continuous patrol round the Canary Islands between 25°N and 30°N.
On 18 November a new ‘Force X’ was formed, now made up of the Dupleix and her sister ship Foch (Capt. J. Mathieu) and the British aircraft carrier HMS Hermes. On 21 November the Strasbourg, Algerie and the destroyers Le Terrible (Cdr. A.E.R. Bonneau) and Le Fantasque (Capt. P.A.B. Still) left Dakar to return to France. The next day the new ‘Force X’ sailed with the destroyers Milan (Cdr. M.A.H. Favier) and Cassard (Cdr. R.A.A. Braxmeyer) to cruiser towards 08°N, 30°W. That day L’Audacieux departed Dakar with a convoy for Casablanca.
On 25 November, the Duguay-Trouin sailed to patrol the parallel of 19°N, between 25° and 30°W. Two days later the British submarine HMS Severn (Lt.Cdr. B.W. Taylor, RN) docked at Dakar. On the 30th the Dupleix and Foch returned from patrol being followed the next day by HMS Hermes and her escorts Milan and Cassard.
Dispositions of South Atlantic Forces at the beginning of December 1939.
At the beginning of December 1939, HMS Ark Royal, still flying the flag of Vice-Admiral Aircraft Carriers, and HMS Renown (‘Force K’), were patrolling the meridian of 20°E, south of the Cape together with HMS Sussex and HMS Shropshire (‘Force H’) to intercept the raider reported in the Mozambique Channel on 15 November 1939.
In the north the light cruiser HMS Neptune with the destroyers HMS Hardy, HMS Hero, HMS Hostile and HMS Hasty and the submarine HMS Clyde were returning to Freetown after patrolling between there and Cape San Roque for escaping German merchant ships or raiders. The French cruiers Dupleix and Foch and the British carrier HMS Hermes (‘Force X’) and their two escorting destroyers Milan and Cassard were approaching Dakar. The French cruiser Duguay-Trouin was patrolling the parallel of 19°N, between 25° and 30°W. The British submarine Severn was refitting at Dakar. Across the South Atlantic, Commodore Harwood, in HMS Ajax was at Port Stanley as was HMS Exeter. HMS Cumberland was patrolling of the Plate area and HMS Achilles was off Rio de Janeiro.
Forces ‘H’ and ‘K’, 1 – 13 December 1939.
No further reports have been received of the raider which had sunk the Africa Shell off Laurenco Marques on 15 November and it seemed clear that she had either gone further into the Indian Ocean or doubled back into the South Atlantic by going well south of the Cape. On 2 December 1939 the Admiralty ordered ‘Force K’ and ‘Force H’ to their patrol line south of the Cape after refueling, and the Commander-in-Chief, South Atlantic at once ordered them to proceed for the Cape ports to fuel. That day a reconnaissance aircraft of the South African Air Force reported a suspicious ship south of Cape Point at noon. HMS Sussex intercepted her but her crew set her on fire. She proved to be the German merchant Watussi (9521 GRT, built 1928). She was eventually be HMS Renown. Her survivors were taken on board HMS Sussex and were landed at Simonstown.
No news of the missing raider had been coming in since 16 November but then the mistery shrouding her whereabouts was again partially solved. At 1530/2 a raidar signal ‘R.R.R., 19°15’S, 05°05’E, gunned battleship) reached the Commander-in-Chief, South Atlantic. It came from the British merchant Doric Star. As this signal placed the raider in the South Atlantic he immediately ordered to abandon the patrol south of the Cape and ordered ‘Force H’ to cover the trade routes between the Cape and the latitude of St. Helena at 20 knots on completion of fuelling. As it was too late for ‘Force K’ to reach the Freetown-Pernambuco area in time to intercept the rainder if she was to proceed to the North Atlantic he proposed the Admiralty that ‘Force K’, after fuelling should sweep direct from the Cape to position 20°S, 15°W. This was changed at the request of the Vice-Admiral, Aircraft Carriers to place his force in a more central position for proceeding to Freetown, to the Falklands or to Rio de Janeiro. At 1030/3 a report reached the Commander-in-Chief that the pocket battleship Admiral Scheer had been in 21°20’S, 03°10’E at 0500 hours, clearly indicating that the raider was moving westwards, clear of the Cape-Sierra Leone trade route. ‘Force H’ left Simonstown at 1700 that afternoon and ‘Force K’ sailed from Capetown at 0915/4.
The Commander-in-Chief estimated that if the enemy was proceeding northwards to the North Atlantic she would cross the Freetown-Pernambuco line between 9 and 10 December. He therefore arranged that ‘Force X’ should take HMS Neptune and her destroyers under her orders and patrol the parallel of 3°N between 31° and 38°W from 10 to 13 December. ‘Force K’ would meet HMS Neptune and the destroyers on the 14th and then return with them to Freetown to refuel. The destroyers of the 3rd Division of the 2nd Destroyer Flotilla (HMS Hardy, HMS Hostile and HMS Hero) left Freetown on 6 December with the oiler RFA Cherryleaf (5896 GRT, built 1917). They had orders to meet the Dupleix, Foch, HMS Hermes and their escorting destroyers Milan and Cassard and HMS Neptune in position 03°N, 31°W on 10 December. On 7 December ‘Force X’ left Dakar for the rendez-vous. That day the submarine HMS Clyde left Freetown to patrol between 03°N, 23°W and 03°N, 28°W and thence to 05°15’N, 23°W between 9 (PM) and 13 (AM) December.
On the evening of 8 December 1939 the German merchant ship Adolf Leonhardt (2989 GRT, built 1925) sailed from Lobito for South America. ‘Force H’ which was by then between St. Helena and the west coast of Africa, was at once ordered to intercept her. The Walrus from HMS Shropshire made contact at 0952 hours next morning and alighted alongside in position 13°S, 11°44’E. At 1250 hours HMS Shropshire arrived at that position but the German ship was scuttled by her crew and could not be saved. ‘Force H’ then returned to the Cape to refuel where they arrived on 14 December.
At 0800/11 the submarine HMS Severn left Freetown for Port Stanley. She was to protect the whaling industry in South Georgio and was to intercept hostile raiders or supply ships. The cruiser HMS Dorsetshire, which arrived at Simonstown from Colombo on the 9th to finally relieve HMS Exeter in the South America Division left Simonstown on 13 December for Port Stanley. She was to call at Tristan da Cunha on the way. On that day, 13 December 1939, was fought the action between the British South America Division and the German pocket battleship Admiral Graf Spee, known as the Battle of the River Plate.
The South America Division, 1 to 13 December 1939.
At the beginning of December 1939, HMS Ajax and HMS Exeter were at Port Stanley in the Falkland Islands. HMS Cumberland was off the River Plate and HMS Achilles was patrolling the Rio de Janeiro area. On 2 December HMS Ajax left Port Stanley for the Plate area. That evening the Commodore learned that the Doric Star had been sunk by a raider to the south-east of St. Helena. Two days later the Commander-in-Chief, South Atlantic informed him that HMS Dorsetshire would arrive at Port Stanley on 23 December to relieve HMS Exeter which was then to proceed to Simonstown for a much needed refit.
Early on 5 December the British Naval Attaché at Buenos Aires reported that the German merchant Ussukuma had left Bahia Blanca at 1900 hours the previous evening. The Commodore immediately ordered HMS Cumberland which was on the way south to the Falkland Islands to search for her. Meanwhile HMS Ajax turned south and closed the Argentinian coast in case the Ussukuma, which was known to be short of fuel, should attempt to reach Montevideo inside territorial waters. At 1910/5, HMS Ajax sighted her smoke to the north-north-east but the Germans managed to scuttle their ship and despite the efforts to save her she sank during the night. At 0615/6, HMS Cumberland came up and embarked the German survivors and made off for the Falklands. HMS Ajax then refuelled at San Borombon Bay from the Olynthus.
About the same time the Brazilian authorities asked that HMS Achilles should not refuel in any Brazilian port at an interval less then three months. The Commodore, therefore, ordered her to return south and refuel at Montevideo on 8 December. HMS Achilles then joined HMS Ajax at 1000/10 in position 35°11’S, 51°13’W, 230 miles west of English Bank. At 0600/12 they were joined by HMS Exeter in position 36°54’S, 53°39’W.
Ever since the beginning of the war Commodore Harwood’s cruisers had worked off the east coast of South America either single or in pairs. The concentration of these three cruisers off the River Plate on 12 December 1939 was, however, no mere matter of chance.
Concentration of British Force in the River Plate area, 12 December 1939.
When a pocket battleship was located in position 19°15’S, 05°05’E on 2 December by the sinking of the Doris Star, her position was over 3000 miles from any of the South America focal areas. The Commodore however recognised that her next objective might be the valuable shipping off the east coast of South America. He estimated that at a cruising speed of 15 knots the enemy could reach the Rio area on 12 December the Plate area on 13 December and the Falklands on 14 December. As the Plate area was by far the most important of these three focal areas he decided to concentrate all his available ships off the Plate on 12 December.
The three cruisers then proceeded together towards position 32°N, 47°W. That evening the Commodore informed the Captains of his cruisers that it was intention that if they met a pocket battleship to attack immediately, by day or by night. By they they would act as two units, the light cruisers were to operate together and HMS Exeter was to operate diverged to permit flank marking. By night the ships were to remain in company in open order.
At 0614/13 HMS Ajax sighted smoke bearing 324° in position 34°28’S, 49°05’W and Commodore Harwood then ordered HMS Exeter to investigate it.
What then followed can be read in the article ‘The battle of the River Plate, 13 December 1939’ which can be found on the pages of HMS Ajax, HMS Exeter and HMS Achilles. (1)
5 Dec 1939
The German passenger/cargo ship Ussukuma (7834 GRT, built 1921) is intercepted in the South Atlantic off Bahia Blanca, Argentina in position 39°25'S, 57°15'W by the British light cruiser HMS Ajax (Capt. C.H.L. Woodhouse, RN, flying the flag of Commodore H.H. Harwood, OBE, RN). However, before the German ship can be captured she is scuttled by her own crew which was then picked up by the Ajax.
The German crew was trasnferred to the British heavy cruiser HMS Cumberland (Capt W.H.G. Fallowfield, RN) around noon the following day.
13 Dec 1939
Battle of the River Plate, 13 December 1939.
[Continuation of the event called ‘1 October 1939, an enemy raider reported in the South Atlantic and Indian Ocean. The chase of the German ‘pocket battleship’ Admiral Graf Spee’]
The battle, first phase.
When Commodore Harwood detached HMS Exeter (Capt. F.S. Bell, RN) at 0614 hours to investigate smoke bearing 324° his squadron was in position 34°28’S, 49°05’W in single line ahead in the order HMS Ajax (Capt. C.H.L. Woodhouse, RN, flying the flag of Commodore H.H. Harwood, OBE, RN), HMNZS Achilles (Capt. W.E. Parry, RN) and HMS Exeter, events followed quickly. Two minutes later the Exeter signalled ‘I think it is a pocket battleship’ and two minutes after that the Admiral Graf Spee opened fire on her, now there was no doubt anymore.
When the Admiral Graf Spee opened fire HMS Ajax and HMNZS Achilles increased speed and turned to 340° to close the range and engage the enemy from the eastward. At the same time HMS Exeter turned westward at full speed to engage her from the southward and to carry out the Commodore’s plan off attacking simultaneously from widely different bearings.
When he commodore signaled that his policy with three cruisers in company versus one pocket battleship was to act as two units, on divergent courses to permit flank marking he apparently intended the Exeter to take station on a line bearing from the enemy at approximately right angles to the line of fire of both light cruisers.
To put this into effect HMS Exeter first intention was to engage the enemy on her port bow. Seeing that this might hamper the two light cruisers, however, she turned to 280° and at 0620 hours opened fire to starboard from 18700 yards with her foremost two 8” gun turrets. These tactics were most effective. With two or more targets to engage, an enemy will always have to choose between engaging one ship or dividing her armament amongst them, no matter what formation the target ships are in. The difficulty that enhanced in this case was the wide dispersion of targets. The enemy having to choose between leaving one of the British units disengaged with her main armament or dividing it between them. The enemy choose for the latter and opened fire with one main gun turret on HMS Exeter and with the other on HMS Ajax. The salvoes from the Exeter however soon worried the enemy and the enemy once or twice concentrated both 11” turrets on her and quickly straddled. At this time the after gun turret on HMS Exeter also opened fire on the enemy.
At 0623 hours, a 11” shell from the third salvo from the Admiral Graf Spee, bursting short amidships, killed the crew of HMS Exeter’s starboard torpedo tubes and damaged her search lights, communications, funnels and aircraft. One minute later, when HMS Exeter had fired eight salvoes, another 11” shell knocked out her ‘B’ turret. Its splinters swept the bridge, killng or wounding all the bridge personnel except Captain Bell and two others. It also wrecked the wheelhouse communications. She was no longer under control from forward and Captain Bell made his way aft. He had hardly left the bridge before her head began to swing rapidly to starboard. Although her lower conning position at once took over the steering, she was in danger of masking her after turret. The torpedo-officer, Lt.Cdr. C.J. Smith, RN, had been momentarily stunned, but recovered in time to get an order through to bring her back on a westerly course. By this time she had received two more direct hits forward and damage from shells bursting short. Her aircraft were extensively riddled. Petrol from the port machine was spraying over the after conning position. There was a serious danger of fire and both aircraft were jettisoned.
Captain Bell then arrived aft only to find communications broken down between the after conning position and the steering flat. He was obliged to pass his orders through a chain of messengers. In a ships as heavily engaged this was a task of extreme difficulty, but it was successfully accomplished till Captain Bell was forced to break off the action due to amount of damage sustained.
While the Admiral Graf Spee was fiercely engaging HMS Exeter with 11” gun salvoes she was firing alternately at HMS Ajax and HMNZS Achilles with her secondary armament. Some of her 5.9” salvoes fell very close but none actually hit. Meanwhile HMS Ajax and HMNZS Achilles were hitting back hard with ‘concentrated fire’ at a rapidly closing range. Their shooting was effective, for at 0630 hours, the Admiral Graf Spee shifted one of her main turrets to HMS Ajax, halving the heavy volume of fire against HMS Exeter. At 0631 hours three 11” salvoes straddled the Ajax and both light cruisers then turned away a point or two to confuse the enemy’s fire. Three minutes later, however HMS Ajax turned back to port to close the range. At 0637 hours she catapulted her aircraft.
Meanwhile the Exeter had fired her starboard torpedoes in local control, and at 0637 hours the Admiral Graf Spee apparently finding the British attack too hot, turned 150° to port and retired to the north-westward under cover of a smoke screen. Both light cruisers then immediately hauled round at full speed, first to the north and then to the west to close the range and regain bearing. Three minutes later HMS Exeter turned several points to starboard to bring her port tubes to bear. At 0643 hours she fired her port torpedoes. She then steered north-east to close HMS Ajax and HMNZS Achilles but at 0645 hours she turned back once more to a westerly course to keep within range. By this time she had received two more direct 11” hits, one of them on ‘A’ turret, and was showing signs of acute distress. Both her foremost turrets were out of action and she was burning fiercely amidships. Her one remaining 8” turret was in local control. Her compasses were destroyed.
Meanwhile the Admiral Graf Spee was heavily engaging the light cruisers. At 0640 hours, a 11” shell bust on the water in line with the bridge of HMNZS Achilles. It killed or seriously wounded four ratings in her director control tower, stunned the gunnery officer, Lt. R.E. Washbourn, and slightly wounded Captain Perry. Her director tower, however was undamaged and her rate of fie unaffected as she was in concentration firing. At 0646 hour her fire control wireless set broke down, and she carried on in individual control. She had great difficulty at first in finding the range and her first salvoes fell short. Reports of these salvoes were transmitted by the aircraft from HMS Ajax. The Ajax however, not knowing the the Achilles was no longer in concentration firing, accepted them as referring to her own salvoes and corrected accordingly. At this time the enemy was making a smoke screen and spotting conditions were extremely bad. As a result the salvoes from from HMS Ajax fell far beyond the enemy. The range was not found again until 0708 hours.
At 0650 hours, HMS Exeter was steering west with her remaining 8” gun turret still in action. She had a 7° list to starboard and several forward compartments flooded. At 0656 hours the light cruisers hauled round to the north-westward and for a while the Admiral Graf Spee kept altering course frequently to confuse their fire. At 0710 hours the range was still 16000 yards. To shorten it HMS Ajax and HMNZS Achilles turned westwards at full speed. At 0716 hours the enemy made a large turn to port under the cover of a smoke screen steering straight for HMS Exeter in an apparent attempt to finish her off. The light cruisers immediately turned to the rescue, firing so accurately that the enemy was set on fire amidships and was forced to turn back to the north-west to re-engage HMS Ajax which was immediately straddled at 11000 yards by three 11” salvoes although the enemy’s secondary armamanet was shooting wildly.
At 0725 hours an 11” shell knocked out Ajax’s after turrets. She at once retaliated by turning to starboard and firing four torpedoes from 9000 yards. The Admiral Graf Spee avoided them with a large turn to port but almost immediately turned back to the north-west in an apparent attempt to close the light cruisers. At 0728 hours they turned to 280° to close the range still further. At 0731 hours the aircraft from Ajax reported ‘torpedoes approaching, they will pass ahead of you’. Commodore Harwood decided to take no chances and turned south and engaged the enemy on it’s starboard side with the range still closing rapidly. One minute later the Admiral Graf Spee turned westwards under the cover of yet another smoke screen to confuse the accurate gunfire of the light cruisers. At 0736 hours the enemy turned south-west, again bringing all her guns to bear. Two minutes later one of her salvoes brought down the topmast and wireless aerial of HMS Ajax from a range of 8000 yards.
Meanwhile HMS Exeter was dropping slowly astern with her after turret still firing. At 0730 hours pressure in this turret failed. She could keep up no longer and at 0740 hours turned slowly south-east to repair some of the damage.
About this time a report reached the Commodore that only 20 percent of Ajax’s 6” ammunition remained. With HMS Exeter out of action and with both the after turrets of HMS Ajax out of action and he decided that the action had to be broken off. The enemy was still firing accurately and appeared little damaged so the Commodore decided to break off the fight until dark when there would be a better chance to get close to a range in which his lighter armament and torpedoes would be effective. At 0740 hours the light cruisers turned away to the east under the cover of smoke. Thus ended the first phase of the battle. It had laster one hour an twenty-two minutes.
The battle, second phase.
When the Ajax and Achilles turned away at 0740 hours, the Admiral Graf Spee did not follow them. After opening the range for six minutes under cover of smoke Commodore Harwood turned back to the west. The action now developed into a procession, the Admiral Graf Spee in the van steering at 22 knots straight for the River Plate with both light cruisers about 15 miles behind with HMNZS Achilles on the starboard quarter and HMS Ajax on the port quarter.
At 0800 hours, HMS Ajax was in position 34°25’S, 49°29’W. Seven minutes later and afterwards every hour the cruisers broadcasted the enemy’s position, course and speed to warn merchant vessels to keep out of danger. By 0814 hours the Exeter was out of sight and Commodore Harwood ordered the aircraft from Ajax to tell her to close. At 0910 hoursm, the aircraft informed him that the Exeter, though badly damaged, was joining him as best she could. Two minutes later HMS Ajax recovered her aircraft. The Exeter was however unable to gain contact. Captain Bell decided to slow down to allow her to be brought to an even keel and bulkheads to be shored up. He then turned westwards for the nearest land. At 0946 hours, Commodore Harwood signalled HMS Cumberland (Capt. W.H.G. Fallowfield, RN) which was still at Port Stanley to proceed towards the Plate area at full speed. This signal took some time to get through. When HMS Cumberland sailed at 1200 hours she did so at the initiative of her Commanding Officer. When the signal from the Commodore finally reached him he increased to full speed.
Shortly after 1000 hours HMNZS Achilles had closed the Admiral Graf Spee to 23000 yards, having over estimated the speed of the enemy, was taken under fire by her when the enemy suddenly turned. Her first salvo was short but the second fell almost alongside. HMNZS Achilles then turned away at full speed behind a smoke screen to resume shadowing from a safe distance and the enemy ceased fire.
The next hour was uneventful. Then at 1104 hours, HMS Ajax sighted the British merchant Shakespeare (???? GRT, built ????) laying stopped near the Admiral Graf Spee. A few minutes later the enemy asked both cruisers to pick up the lifeboats from the British steamer. When they however reached her they found her in no need of assistance.
At 1105 hours HMS Exeter signalled that though she was flooded forward and had all her turrets out of action she could still steam 18 knots. Some time later she was able to report that one of her after turret guns could be fired in local control. It was clear, however, that she had no further fighting value and at 1340 hours the Commodore ordered her to make for the Falklands so at 1510 hours she turned south.
Meanwhile the early afternoon had passed quietly for both cruisers that were shadowing the enemybut then at 1543 hours HMNZS Achilles signaled ‘enemy in sight bearing 297°. Shortly afterwards she identified this new enemy as an 8” gun cruiser. The alarm fortunately turned out to be false as both cruisers were in no condition to take on an additional enemy. At 1559 hours the approaching vessel was identified as the merchant Delane (6054 GRT, built 1938). Her streamlined funnel had given the appearance of a ‘Blücher’ class cruiser at long range.
Shadowing then continued without further incident until 1900 hours. By that time the intention of the enemy to enter the River Plate was becoming clear. At 1902 hours Commodore Harwood signalled to the Achilles that she was to follow the enemy if she went west of Lobos Island.
At 1915 hours the enemy turned and fired two salvoes at HMS Ajax from 26000 yards. The first salvo was short but the second salvo fell in her wake as she turned away behind a smoke screen. HMNZS Achilles, too, turned away on seeing the gun flashes but soon resumed her westerly course. At 2000 hours Ajax turned south to frustrate a possible attempt by the enemy to double back and shake off the shadowing cruisers. They were now in position 35°08’S, 54°49’W about 50 nautical miles east of English Bank.
For more then twelve hours the Admiral Graf Spee had been closing the Plate at a steady speed of 22 knots with the two light cruisers on her tail. As soon as she passed Lobos Island the whole duty of shadowing her developed upon HMNZS Achilles. At 2014 hours Captain Perry increased speed to close before dusk. In half an hour he had reduced the distance to 23000 yards. At sunset, 2048 hours, the enemy, apparently as a counter to the shortening of the range, turned and fired three salvoes. The first two fell short and as the Achilles turned away at full speed, the third salvo fell only just astern. Two minutes later the Achilles turned northward to keep the full advantage of the after glow, and at 2054 hours fired five salvoes which appeared to straddle. She then turned west once more and increased to 30 knots to keep in touch. Between 2130 and 2145 hours the enemy fired three final salvoes from her after turrets. All three salvoes fell short, and the Achilles, not wanting to give away her position, did not return fire.
By 2200 hours, she had closed within 5 nautical miles, but finding it increasingly difficult to see the enemy. So she altered course at 2213 hours to silhouette her against the lights of Montevideo. She continued her westerly course for another hour. Then at 2317 hours the Commodore ordered her to withdraw. Shortly after midnight the Admiral Graf Spee entered Montevideo. Thus ended the second phase of the Battle of the River Plate.
The watch on the River Plate, 14 – 17 December 1939.
When commodore Harwood recalled the Achilles at 2317 hours the intention of the Admiral Graf Spee was quite clear. She was going to enter Montevideo. The main question was how long she would stay there. It was also of the utmost importance that the British cruisers should keep to seaward of her if she came out. It was equally important that they should not be caught against the light of dawn. At 2350 hours, therefore, both cruisers withdrew temporarily from the Plate. Achilles was to patrol the northern area between the Uruguayan coast and a line of 120° from English Bank while Ajax patrolled the southern area. The night passed without incident. Both ships moved back towards Montevideo as soon as the danger of the dawn light had passed.
For the moment these two small British cruisers stood alone between the enemy and the open sea. Both had been heavily engaged the previous day and were short of fuel. They had no hope at all to destroy the enemy unless they were concentrated, nor were the geographical factors in their favour. From the River Plate estuary, which is 120 miles wide between Cape S. Antonio and Lobos Island, run three widely separated deep-water channels. The difficulties of the situation were great and the Commodore could look for little immediate assistance.
On the morning of 13 December 1939, the day of the battle, ‘Force H’ (HMS Sussex (Capt. A.R. Hammick, RN), HMS Shropshire (Capt. A.W.LaT. Bisset, RN)) were sweeping off Lobito, on the west coast of Africa, 4000 nautical miles away from the Plate Estuary. ‘Force I’ of the East Indies Station (HMS Eagle (Capt. A.R.M. Bridge, RN), HMS Cornwall (Capt. C.F. Hamill, RN) and HMS Gloucester (Capt F.R. Garside, RN)) were at Durban. ‘Force G’ (HMS Cumberland) was at the Falkland Islands, 1000 nautical miles to the South. This was the closest ship to reinforce the cruisers of the Commodore. ‘Force K’ was the most powerful force on the South Atlantic station (HMS Ark Royal (Capt. A.J. Power, RN) and HMS Renown (Capt. C.E.B. Simeon, RN)). This force was off Pernambuco, 2000 nautical miles to the north. ‘Force X’ (the French cruisers Dupleix (Capt. L.L.M. Hameury) and Foch (Capt. J. Mathieu) with the British aircraft carrier HMS Hermes (Capt. F.E.P. Hutton, RN)) were off St. Paul Rocks, even further to the north. The British light cruiser HMS Neptune (Capt. J.A.V. Morse, DSO, RN) and the British destroyers HMS Hardy (Capt. B.A. Warburton-Lee, RN), HMS Hostile (Cdr. J.P. Wright, RN) and HMS Hero (Cdr. C.F. Tower, MVO, RN) were with them. The submarine HMS Severn (Lt.Cdr. B.W. Taylor, RN) was now halfway between St. Helena and Bahia, she was on the way from Freetown to the Falkland Islands. The submarine HMS Clyde (Cdr. W.E. Banks, RN) was approaching Dakar from a patrol off St. Paul Rocks.
Throughout 14 December 1939 HMS Ajax and HMNZS Achilles kept a constant watch over the mouth of the River Plate estuary as they possibly could. That night they received a much needed reinforcement as HMS Cumberland arrived from the Falklands at 2200 hours. She had made the passage north in 34 hours. This enabled Commodore Harwood to watch all three deep water Channels throughout the night. The Cumberland was placed in the centre, Achilles to the north and Ajax to the south.
Next day the problem of refuelling had to be faced. Fortunately RFA Olynthus was at hand and the Commodore ordered her to meet HMS Ajax in San Borombon Bay. HMS Cumberland closed them to provide cover in case the Admiral Graf Spee came out to attack them. Weather was bad and the lines which hold the ships together parted but despite this HMS Ajax was able to take on board 200 tons of fuel. She then proceeded to join the Cumberland.
Shortly after this the Commodore learned that the Admiral Graf Spee, which had been hit between 60 and 70 times, and was more extensively damaged then at first thought, had been given permission to remain in Montevideo for another 72 hours to make herself seaworthy. There could be no guarantee however, that she would stay there, so the British cruisers were in no way able to relax their instant readiness for action.
Thus, when just for dawn the next morning HMS Ajax, HMNZS Achilles and HMS Cumberland were concentrated off San Antonio in the southern part of the estuary, HMS Ajax flew off her aircraft for a reconnaissance flight. It returned at 0830 hours with a report that though visibility was extremely bad it had been fired on near the whistle buoy. This indicated that the enemy might be leaving and the three cruisers went to action stations. It was a false alarm as the enemy was soon reported to be still in the harbour. The day passed without further incident. The squardron spent the night patrolling north and south 5 miles east of English Bank.
Next morning, 17 December 1939, HMS Ajax and HMS Cumberland coverered HMNZS Achilles while she refuelled from the Olynthus off Rouen Bank. The whole squardron then cruised in company throughout the afternoon ready to take up its night patrols at dusk.
British Forces close the Plate Estuary, 13-17 December 1939.
While the cruisers of the South America Division were watching the Plate between 13 and 17 December strong British forces were steadily closing in on Montevideo.
On the afternoon of 13 December 1939, the day of the battle, the Admiralty placed ‘Force I’ that was at Durban at the disposal of the Commander-in-Chief, South Atlantic. He immediately ordered them to proceed to the Cape ports with all despatch. They sailed the next morning, but the Admiralty soon placed them back under the Commander-in-Chief, East Indies for work in connection to Australian and New-Zealand troop convoys. The Commander-in-Chief, East Indies immediately ordered them to return to Durban where they arrived on the afternoon of the 15th.
On the afternoon of 13 December 1939, ‘Force H’ were on their way south from the neighbourhood of Lobito Bay towards Cape Town. They had still some 400 nautical miles to go when at 1752 hours when to Commander-in-Chief, South Atlantic ordered them to proceed with all possible speed and refuel. Next morning he instructed them to sail to Freetown when they had completed fuelling but when ‘Force I’ was ordered to return to Durban they were ordered to remain at the Cape. At 1745/15 the Admiralty ordered HMS Dorsetshire (Capt. B.S.C. Martin, RN) which had arrived at Simonstown from Colombo on 9 December to proceed with HMS Shropshire to the River Plate steaming at 20 knots as to arrive off Montevideo on 23 December. HMS Sussex proceeded from Cape Town to Simonstown that day. She was kept at short notice to sail into the South Atlantic in case the Admiral Graf Spee cleared the River Plate. HMS Dorsetshire had orders to call at Tristan da Cunha on the 16th but the Admiralty cancelled these on the 15th and ordered her and HMS Shropshire on the 17th to close the Falklands at 25 knots to counter any attempt by the Admiral Graf Spee to escape to the southward. This was later changed to proceed to the Falklands at economical speed. Shortly after that order they were placed under the orders of the (now) Rear-Admiral South America Division (Commodore Harwood had been promoted to Rear Admiral) to intercept the German merchant the Tacoma (8268 GRT, built 1930) in case she might break out of Montevideo.
’Force K’ had left Cape Town on 4 December to sweep through position 28°S, 15°W. By 13 December they were near Pernambuco en-route to meet up with HMS Neptune and her destroyers near St. Paul Rocks. As HMS Renown had barely enough fuel on board to reach the Plate estuary they were to make rendez-vous as soon as possible and then proceed to Freetown to refuel. Early next morning the Admiralty ordered ‘Force K’ to proceed to the Plate Estuary which they did at 20 knots. Later the Commander-in-Chief, South Atlantic ordered them to proceed to Rio de Janeiro to refuel, on which they increased speed to 25 knots. They reached Rio at 0600/17. HMS Ark Royal left at 1800/17, having finished fuelling, for the Plate area at 25 knots. HMS Renown and HMS Neptune, which had now also arrived with her destoyers, were ordered to follow as soon as possible. Just before midnight however the Vice-Admiral Aircraft Carriers on board the Ark Royal ordered them and the destroyers to meet him at 1800/18 in position 22°50’S, 40°W.
At 1540 hours on 17 December 1939, Rear-Admiral Harwood, learned that the Admiral Graf Spee was transferring 300 to 400 men to the German merchant vessel Tacoma. At 1720 hours he received a message that over 700 men with baggage and provisions, were being transferred and shortly after that he learned that the enemy was weighing anchor. He immediately increased speed to 25 knots and turned to close the whistle buoy and flew off the aircraft from HMS Ajax to report the enemy’s position.
The Admiral Graf Spee left the harbour at 1815 hours and was followed by the Tacoma. They steamed slowly westwards. The British cruisers were in state of instant readiness. At 2054 hours the aircraft from the Ajax reported that the enemy was in shallow water six miles south-west of Montevideo and then made the dramatic signal ‘The Admiral Graf Spee had blown herself up !’.
The British cruisers then steamed towards Montevideo, passing the burning wreck of the German warship in the darkness. It was ablaze from stem to stern with flames reaching as high as the top of the control tower, a magnificent sight. (1) 5 Jan 1940 9 Jan 1940 12 Jan 1940 15 Jan 1940 Also on this day HMS Neptune fuelled from from the RFA tanker Cherryleaf (5896 GRT, built 1917).
In the evening the destroyers carried out dummy torpedo attacks on HMS Neptune. Apparently HMS Neptune and the destroyers were not in company with the capital ships and HMS Ajax.
They apparently rejoined these ships the following morning. Presumably after the exercises had been completed. (3) 16 Jan 1940 HMS Neptune then proceeded on patrol independently. (4) 19 Jan 1940 22 Aug 1940 This combined convoy sailed from the U.K. on 22 August 1940 and was made up of the following ships;
Denbighshire (British, 8983 GRT, built 1938),
Duchess of Bedford (British, 20123 GRT, built 1928),
Sydney Star (British, 12696 GRT, built 1936) and
Waiotira (British, 11090 GRT, built 1939).
The aircraft carrier HMS Argus (Capt. E.G.N. Rushbrooke, DSC, RN) was also part of this convoy serving in the role as aircraft transport.
The convoy was heavily escorted, mostly by warships proceeding from home waters to join other stations.
The aircraft carrier HMS Illustrious (Capt. D.W. Boyd, DSC, RN, flying the flag of Rear-Admiral A.L.St.G. Lyster, CVO, DSO, RN), heavy cruiser HMS York (Capt. R.H. Portal, DSC, RN), light cruiser HMS Sheffield (Capt. C.A.A. Larcom, RN) and the destroyers HMS Firedrake (Lt.Cdr. S.H. Norris, DSC, RN), HMS Ashanti (Cdr. W.G. Davis, RN), HMS Bedouin (Cdr. J.A. McCoy, DSO, RN) and HMS Tartar (Capt. C. Caslon, RN) departed Scapa Flow around 1045/22.
From Liverpool the battleship HMS Valiant (Capt. H.B. Rawlings, OBE, RN), light cruiser HMS Ajax (Capt. E.D. McCarthy, RN) and the destroyers HMS Faulknor (Capt. A.F. de Salis, RN), HMS Foresight (Lt.Cdr. G.T. Lambert, RN), HMS Forester (Lt.Cdr. E.B. Tancock, RN) and HMS Fury (Lt.Cdr. T.C. Robinson, RN) sailed around 1430/22.
From the Clyde the AA cruisers HMS Calcutta (Capt. D.M. Lees, DSO, RN), HMS Coventry (Capt. D. Gilmour, RN) and the destroyer HMS Fortune (Cdr. E.A. Gibbs, DSO, RN) sailed around 2030/22.
HMS Ashanti, HMS Bedouin and HMS Tartar had detached on 24 August.
HMS Valiant, HMS Illustrious, HMS Sheffield, HMS Calcutta, HMS Coventry, HMS Faulknor, HMS Firedrake, HMS Foresight, HMS Forester, HMS Fortune and HMS Fury proceeded to Gibraltar where they arrived on 29 August.
Convoy AP 1 arrived at Freetown on 1 September escorted by HMS York. It departed for Capetown later the same day.
Convoy AP 2 (Sydney Star and HMS Argus arrived at Freetown on 2 September 1940 escorted by HMS Ajax. It departed for Durban later the same day. HMS Argus parted company with the convoy on 4 September and proceeded to Takoradi.
Convoy AP 1 arrived at Capetown on 9 September. HMS York proceeed to Simonstown arriving later the same day. The convoy departed again on 10 September still escorted by HMS York.
Convoy AP 2 arrived at Durban on 13 September and sailed again later the same day still escorted by HMS Ajax.
Around 1650C/20, HMS York turned over the escort of convoy AP 1 to the light cruiser HMAS Hobart (Capt. H.L. Howden, RAN), AA cruiser HMS Coventry (Capt. D. Gilmour, RN) and the destroyers HMS Diamond (Lt.Cdr. P.A. Cartwright, RN) and HMS Kandahar (Cdr. W.G.A. Robson, RN). After turning over the convoy HMS York proceeded to Aden arriving in the evening of September, 20th.
Around 1800C/21, HMS Coventry parted company.
Around 0900C/22, HMS Kandahar parted company to proceed to Port Sudan to fuel.
Convoy AP 1, escorted by HMAS Hobart and HMS Diamond arrived at Suez around midnight during the night of 23/24 September 1940.
Convoy AP 2 arrived off Aden on 22 September, still escorted by HMS Ajax. There it was joined by the transport Amra (British, 8314 GRT, built 1938), heavy cruiser HMS York and the destroyers HMS Dainty (Cdr. M.S. Thomas, DSO, RN) and HMS Kingston (Lt.Cdr. P. Somerville, DSO, RN). HMS Ajax was then detached to Aden. The AA cruiser HMS Coventry also joined later on 22 September, parting company again at 1300/23.
Convoy AP 2 arrived at Suez on 25 September 1940. 19 Sep 1940 This convoy departed Bombay on 19 September 1940 for Suez where it arrived on 29 September 1940.
The convoy was made up of the following merchant vessels;
Empress of Japan (British, 26032 GRT, built 1930),
Orion (British, 23371 GRT, built 1935) and
Ormonde (British, 14982 GRT, built 1917).
On departure escort was provided by the light cruiser HMS Colombo (Capt. C.A.E. Stanfield, RN) and the armed merchant cruiser HMS Kanimbla (A/Capt. F.E. Getting, RAN).
The Ormonde was not ready to depart on the 19th and she departed one day later with orders to overtake the convoy. Until she made rendez-vous with the convoy she was escorted by the armed merchant cruiser HMS Antenor (Capt.(Retd.) D.I. McGillewie, RN).
The convoy arrived off Aden on 25 September and HMS Colombo and HMS Kanimbla were relieved by the light cruiser HMS Ajax (Capt. E.D. McCarthy, RN), AA cruiser HMS Coventry (Capt. D. Gilmour, RN), destroyers HMS Kandahar (Cdr. W.G.A. Robson, RN), HMS Kimberley (Lt.Cdr. J.S.M. Richardson, RN) and sloop HMS Flamingo (Cdr. J.H. Huntley, RN).
Light cruiser HMNZS Leander (Capt. H.E. Horan, RN) had also been with the convoy (briefly) but parted company on 26 September 1940.
On 27 September the southbound convoy SW 1 was sighted and the destroyers HMS Kandahar, HMS Kimberley and sloop HMS Flamingo joined that convoy as escorts. The convoy then continued northwards escorted by HMS Ajax and HMS Coventry.
Çonvoy BN 5A arived at Suez safely on 29 September 1940. (6) 25 Sep 1940 [For more info on this convoy see the event ' Convoy BN 5A ' for 19 September 1940.] (6) 3 Oct 1940 6 Oct 1940 The light cruiser HMS Ajax (Capt. E.D. McCarthy, RN) and AA cruiser HMS Coventry (Capt. D. Gilmour, RN) had already arrived at Alexandria very late on the 5th after being detached from the Force earlier on the 5th. (7) 8 Oct 1940 Convoy MF 3 from Alexandria to Malta and MF 4 from Malta to Alexandria.
8 October 1940.
Around 0900B/8, the Mediterranean Fleet made up of the battleships HMS Warspite (Capt. D.B. Fisher, CBE, RN, flying the flag of A/Admiral Sir A.B. Cunningham, KCB, DSO and 2 Bars, RN), HMS Valiant (Capt. H.B. Rawlings, OBE, RN), HMS Malaya (Capt. A.F.E. Palliser, DSC, RN, flying the flag of Rear-Admiral H.D. Pridham-Whippell, CB, CVO, RN), HMS Ramillies (Capt. H.T. Baillie-Grohman, OBE, DSO, RN), aircraft carriers HMS Illustrious (Capt. D.W. Boyd, DSC, RN, flying the flag of Rear-Admiral A.L.St.G. Lyster, CVO, DSO, RN), HMS Eagle (Capt. A.R.M. Bridge, RN), heavy cruisers HMS York (Capt. R.H. Portal, DSC, RN), light cruisers HMS Gloucester (Capt. H.A. Rowley, RN), HMS Ajax (Capt. E.D. McCarthy, RN), HMS Orion (Capt. G.R.B. Back, RN), HMAS Sydney (Capt. J.A. Collins, CB, RAN). They were escorted by the destroyers HMS Hyperion (Cdr. H.St.L. Nicolson, DSO and Bar, RN), HMS Havock (Cdr. R.E. Courage, DSO, DSC, RN), HMS Hasty (Cdr. L.R.K. Tyrwhitt, RN), HMS Hero (Cdr. H.W. Biggs, DSO, RN), HMS Hereward (Lt.Cdr. C.W. Greening, RN), HMS Ilex (Lt.Cdr. P.L. Saumarez, DSC and Bar, RN), HMS Imperial (Lt.Cdr. C.A.deW. Kitcat, RN), HMS Jervis (Capt. P.J. Mack, DSO, RN), HMS Janus (Cdr. J.A.W. Tothill, RN), HMS Juno (Cdr. W.E. Wilson, RN), HMS Nubian (Cdr. R.W. Ravenhill, RN), HMS Dainty (Cdr. M.S. Thomas, DSO, RN), HMS Decoy (Cdr. E.G. McGregor, DSO, RN), HMS Defender (Cdr. St.J.R.J. Tyrwhitt, RN), HMAS Vampire (Capt. H.M.L. Waller, DSO, RAN) and HMAS Vendetta (Lt.Cdr. R. Rhoades RAN).
When the fleet was clear of the swept channel gunnery exercises were carried out. On completion of these exercises the fleet proceeded to the north-westward divided into several groups.
At 2000B/8, the merchant vessels Memnon (7506 GRT, built 1931),
Lanarkshire (11275 GRT, built 1940),
Clan Macaulay (10492 GRT, built 1936) and
Clan Ferguson (7347 GRT, built 1938), which made up convoy MF 3 departed Alexandria for Malta. They were escorted by HMS Coventry (Capt. D. Gilmour, RN), HMS Calcutta (Capt. D.M. Lees, DSO, RN), HMAS Stuart ( Lt. R.C. Robison, RAN), HMAS Voyager (Cdr. J.C. Morrow, DSO, RAN), HMAS Waterhen (Lt.Cdr. J.H. Swain, RN) and HMS Wryneck (Lt.Cdr. R.H.D. Lane, RN).
At midnight the main body of the fleet was in position 31°58’N, 27°33’E steering 350°.
9 October 1940.
At 0524B/9, in position 33°11’N, 27°20’E, HMS Nubian, obtained a contact. HMS Hyperion then reported that a torpedo was approaching HMS Malaya. An object, possibly a torpedo at the end of its run, was sighted moving slowly and emitting small columns of smoke.
At 0550B/9, A/S patrols were flown off. These were maintained throughout the day.
At 0800B/9, the main body of the fleet was in position 33°33’N, 26°47’E. At 1000B/8, HMS Liverpool (Capt. P.A. Read, RN) and HMS Diamond (Lt.Cdr. P.A. Cartwright, RN), who had been delayed in sailing from Alexandria, joined the fleet. They had departed Alexandria shortly after midnight this day.
At noon the fleet was in position 33°51’N, 26°32’E, steering 280°.
At 1600B/9, the convoy was in position 34°18’N, 25°06’E making a good 13 knots. During the day three A/S contacts were made. One of the contacts warranted a depth charge attack by HMAS Vendetta.
At 2200B/9, the fleet altered course to 320°.
At midnight the fleet was in position 34°41’N, 23°23’E.
10 October 1940.
There were no incidents during the night and at 0400B/10 the fleet changed course to 300°.
At 0600B/10, aircraft were flown off the search between 270° and 340°.
At 1030B/10, a new air search was started between 240° and 340°, also a course change was made to close the convoy.
The first air search located a submarine on the surface in position 36°31’N, 20°20’E. Two aircraft were sent out to attack this submarine. Both depth charges that were dropped failed to explode. Other aircraft were then sent but the submarine was not found as she must have submerged. Two A/S contacts were made by the destroyer screen during the forenoon.
At 1330B/10, the fleet was in position 35°36’N, 20°42’E, steering 270°. The convoy was at this time 22 nautical miles astern of the fleet.
At 1400B/10, a final air search was launched.
At 1432B/10, one of the search aircraft reported an enemy submarine submerging 20 nautical miles ahead of the fleet. HMS Jervis, HMS Juno and HMS Ilex were sent ahead to hunt this submarine but with no result. Later a report was received that the aircraft had straddled the submarine with four bombs.
At 1600B/10, HMAS Vampire, the port wing destroyer in the screen, obtained a contact and made four depth charge attacks on it. She rejoined the screen at 1745B/10.
Late in the afternoon HMS Ramillies, HMS Nubian, HMS Hero and HMS Hereward were detached to fuel at Malta as were HMS Hyperion, HMS Hasty and HMS Ilex shortly afterwards. Also late in the afternoon the cruisers HMS York, HMS Gloucester and HMS Liverpool were detached to join the convoy.
At 1825B/10, HMS Defender attacked a suspected A/S contact with depth charges.
At 2000B/10, the main body of the fleet was in position 35°52’N, 18°55’E, course 300° which was changed to 270 at 2200B/10.
11 October 1940.
Again there were no incidents during the night.
At 0630B/11, aircraft were flown off to search the sector between 000° and 070°, keeping clear of the land. No enemy forces were sighted.
At 0800B/11, the main body of the fleet was in position 35°30’N, 15°39’E. Around this time HMS Ajax was detached to join HMS York, HMS Gloucester and HMS Liverpool near the convoy.
At 0915B/11, HMS Decoy was detached to fuel at Malta and HMS Mohawk (Cdr. J.W.M. Eaton, RN) joined the screen coming from Malta.
At 0942B/11, HMS Imperial was detached to fuel at Malta.
At 1105B/11, HMS Imperial reported that she had hit a mine in position 35°34’N, 14°34’E. She was able to proceed at slow speed to Malta with HMS Decoy standing by. She finally entered Malta at 1600B/11 being towed by Decoy. It was estimated that repairs would take at least four months.
During the forenoon several floating mines were sighted and HMS Coventry cut one off with her paravanes in position 35°30’N, 14°28’E so it was evident that there was an enemy minefield in this area.
At noon the main body of the fleet was in position 35°14’N, 14°50’E.
At 1450B/11, HMAS Vampire was detached to Malta. During the afternoon the fleet remained approximately 20 nautical miles to the south-west of Malta while the destroyers refuelled.
At 1600B/11, the convoy arrived safely at Malta.
At 1800B/11, HMS Nubian, HMS Hero and HMS Havock rejoined and HMS Dainty, HMS Defender and HMS Diamond were detached to refuel at Malta.
At 2100B/11, HMAS Vendetta, who had reported that she had her starboard engine out of action, was detached to Malta where she would remain for repairs.
At 2230B/11, Convoy MF 4 departed Malta for Alexandria. This convoy was made up of the Royal Fleet Auxiliary tanker Plumleaf (5916 GRT, built 1917) and the transport Volo (1587 GRT, built 1938). The river gunboat HMS Aphis (Lt.Cdr R.S. Stafford, RN), which had been refitting at Malta, was also part of this convoy. Escort for this convoy was provided by HMS Coventry, HMS Calcutta, HMS Wryneck and HMAS Waterhen. HMAS Stuart remained at Malta for a much needed refit.
Due to the weather conditions the British ships remained undetected by enemy aircraft.
12 October 1940.
At 0230B/12, HMS Ajax reported that she was engaging three enemy destroyers in position 35°57’N, 16°42’E and that she had sunk two of them. She then reported two cruisers in position 36°00’N, 16°53’E at 0306B/12. At 0333B/12 she reported that she had lost touch with them.
At 0400B/12, the bulk of the fleet was in position 35°10’N, 15°45’E, approximately 70 nautical miles to the south-west of Ajax.
At 0600B/12, aircraft were flown off to search between 340° and 070°.
At 0645B/12, HMS Orion reported that one enemy ship was still burning in position 35°47’N, 16°25’E at 0510B/12.
At 0710B/12, a flying boat reported two enemy destroyers in the same position. One on fire being towed by the other. On receipt of these reports a striking force of four aircraft was flown off. The fleet altered course to 010° to close.
At 0716B/12, HMS York, HMS Gloucester and HMS Liverpool reported they were closing to investigate smoke on the horizon. When closing they were obviously sighted by the enemy destroyer that was towing which then casted off the tow and retired to the north-westward at high speed. She was attacked with torpedoes by the air striking force but no hits were obtained. In the meantime the cruisers had closed the crippled destroyer which had hoisted the white flag. The survivors were ordered to abandon ship after which she was sunk by gun and torpedo fire from HMS York. Rafts were thrown in the water for the survivors. Later a few survivors were picked up by HMS Nubian and HMAS Vampire. They reported that the enemy destroyer sunk was the Artigliere.
At 0930B/12, the bulk of the fleet was in position 35°47’E, 16°42’E, steering 120°.
Between 0915B/12 and 1034B/12, HMS Orion, HMAS Sydney and HMS Ajax rejoined the bulk of the fleet. HMS Ajax reported that following her action D/G, RD/F and one 4” gun were out of action. She had also two officers killed and one seriously wounded. Also she had lost ten ratings killed and twenty minor casualties.
At 1000B/12, HMS Dainty, HMS Defender and HMS Diamond rejoined the fleet from Malta as did HMS Revenge that was escorted by HMS Jervis, HMS Janus, HMS Hereward and HMS Decoy.
At 1150B/12, a flying boat from Malta reported three Italian heavy cruisers and three destroyers in position 36°10’N, 16°02’E. They were steering to the north-westward. This flying boat did not shadow and no further reports on this force were received. HMS Liverpool, HMS Orion, HMAS Sydney and HMS York were ordered to proceed to cover convoy MF 4 which was then in position 35°15’N, 16°22’E, 55 nautical miles to the southward of the enemy cruisers. In the meantime the fleet had been located by enemy aircraft and one shadower was shot down by Fulmars at 1145B/12.
At 1232B/12, the fleet was attacked by eleven enemy aircraft but only a few bombs were dropped. At 1345B/12 the fleet was again attacked, this time by five aircraft which dropped eleven bombs near HMS Eagle. During this time Fulmars prevented other enemy aircraft from attacking.
At 1440B/12, when in position 35°30’N, 17°50’E, course was altered to 200° to close the convoy and at 1630B/12 when in position 35°23’N, 17°20’E (080°, 21 nautical miles from the convoy), course was altered to 090°.
The weather deteriorated rapidly during the day and aircraft from the final search had to be homed in by D/F. The last aircraft was landed on in the dark at 1850B/12.
At 2000B/12, the fleet was in position 35°25’N, 18°10’E still steering 090°. At 2200B/12 this was altered to 070°.
13 October 1940.
At 0100B/13, the fleet was in position 36°02’N, 19°23’E and course was altered to 120° and at 0400 to 160°.
At 0600B/13, aircraft were flown off to search between 280° and 310°.
At 0700B/13, HMS Ajax, HMS Jervis and HMS Janus were detached to join convoy AS 4 which sailed from the Gulf of Athens around that time. From convoy MF 4 HMS Coventry was also detached later to join this convoy.
At 0800B/13, when in position 36°00’N, 21°04’E, course was altered to 240° to close convoy MF 4. At 1307B/13 they sighted the convoy in position 35°46’N, 20°32’E. The convoy was steering 095° making a good 9 knots. As the transport Volo was able to make 12 knots she was ordered to proceed ahead escorted by HMS Wryneck.
At 1120B/13, HMS Illustrious, HMS Gloucester, HMS Liverpool, HMS Nubian, HMS Havock, HMS Hero and HMS Hereward were detached to carry out a night attack on Leros.
During the rest of the day the course of the fleet was adjusted to remain close to convoy MF 4.
At 1800B/13, the fleet was in position 35°42’N, 22°24’E and changed course to 140° doing 14 knots.
At midnight the fleet was in position 34°35’N, 23°42’E.
14 October 1940.
At 0300B/14, the fleet altered course to 090°.
At 0600B/14, HMS Eagle launched aircraft to search between 270° and 330°.
At 0800B/14, the fleet was in position 34°24’N, 25°37’E.
At 0840B/14, the Illustrious-force rejoined. They reported a very successful attack on Port Lago. Complete surprise had been achieved. Fiveteen aircraft took part in the attack. They dropped 92 250-lb bombs. Hangars at Lepida Cove were set on fire, workshops and probably a fuel tank hit at San Georgio. All aircraft had returned safely.
At 0900B/14, HMS York, which was short of fuel, was detached to Alexandria together with HMS Defender. They arrived at Alexandria very late on the 14th.
At 0945B/14, aircraft from HMS Eagle reported that both convoys MF 4 and AS 4 were together about 10 nautical miles east of Gavdo Island at 0830B/13, making good 10 knots. Volo and HMS Wryneck were 60 nautical miles ahead.
At 1132B/14, HMAS Vampire and HMS Hasty obtained an A/S contact and attacked with depth charges firing a total of three patterns.
At 1230B/14, HMS Ajax rejoined the fleet which had remained near position 34°35’N, 25°37’E to provide cover for the convoys.
At 1435B/14, the fleet was attacked by five enemy aircraft which dropped their bombs outside the destroyer screen after having been attacked by AA gunfire.
At 1442B/14, a second attack was made by three aircraft, their bombs landed between HMS Warspite and HMS Illustrious.
At 1600B/14, the fleet was in position 34°13’N, 25°54’E, steering 130°.
At 1902B/14, HMS Valiant and HMS Illustrious opened a heavy barrage of AA fire and later Valiant reported that she had shot down an enemy aircraft.
At 1911B/14, HMS Liverpool reported that she had been struck by a torpedo in position 33°58’E, 26°20’E at 1855B/14. She was heavily on fire and required assistance.
HMS Decoy and HMS Hereward were sent to stand by her.
At 2345B/14, the tug HMS St. Issey was sailed from Alexandria.
At midnight the fleet was in position 32°40’N, 27°38’E and course was altered to 310° to cover the passage of HMS Liverpool to Alexandria.
15 October 1940.
At 0100B/15, it was reported that HMS Liverpool was being towed by HMS Orion in position 33°57’N, 26°33’E making good 9 knots on a course of 135°. The fire was under control.
At 0630B/15, when the fleet was in position 33°36’N, 26°20’E, course was altered to close HMS Liverpool.
At noon, HMS Liverpool was in position 32°50’N, 27°31’E. By this time the tow from HMS Orion had parted. HMS Liverpool’s bow was hanging down and acted as a rudder. HMS Liverpool had three screws in action.
At 1432B/15, the towline had again been passed and the damaged portion of the full forward of ‘A’ turret had broken off and this simplified towing.
The fleet remained in close company until dusk and then proceeded to Alexandria. HMS Mohawk was detached to take of the escort duties wit convoy AS 4 from HMS Jervis and to escort this convoy to Port Said.
16 October 1940.
The fleet arrived at Alexandria around 0100B/16.
HMS Liverpool and it’s escort arrived in the harbour around noon.
Convoy ME 4 arrived at Alexandria later in the afternoon. (7) 29 Oct 1940 Landing of British troop on Crete.
29 October 1940.
By 0130B/29, the Mediterranean Fleet had left Alexandria Harbour. For this operation the fleet made up of the battleships HMS Warspite (Capt. D.B. Fisher, CBE, RN, flying the flag of A/Admiral A.B. Cunningham, KCB, DSO and 2 Bars, RN), HMS Valiant (A/Capt. J.P.L. Reid, RN), HMS Malaya (Capt. A.F.E. Palliser, DSC, RN, flying the flag of A/Rear-Admiral H.B. Rawlings, OBE, RN), HMS Ramillies (Capt. A.D. Read, RN), aircraft carriers HMS Illustrious (Capt. D.W. Boyd, DSC, RN, flying the flag of Rear-Admiral A.L.St.G. Lyster, CVO, DSO, RN), HMS Eagle (Capt. A.R.M. Bridge, RN), heavy cruisers HMS York (Capt. R.H. Portal, DSC, RN), light cruisers HMS Gloucester (Capt. H.A. Rowley, RN), HMS Orion (Capt. G.R.B. Back, RN), HMAS Sydney (Capt. J.A. Collins, CB, RAN). Escort was provided by the destroyers HMS Hyperion (Cdr. H.St.L. Nicolson, DSO and Bar, RN), HMS Havock (Cdr. R.E. Courage, DSO, DSC, RN), HMS Hasty (Lt.Cdr. L.R.K. Tyrwhitt, RN), HMS Hero (Cdr. H.W. Biggs, DSO, RN), HMS Hereward (Lt.Cdr. C.W. Greening, RN), HMS Ilex (Lt.Cdr. P.L. Saumarez, DSC and Bar, RN), HMS Dainty (Cdr. M.S. Thomas, DSO, RN), HMS Decoy (Cdr. E.G. McGregor, DSO, RN), HMS Defender (Cdr. St.J.R.J. Tyrwhitt, RN), HMS Diamond (Lt.Cdr. P.A. Cartwright, RN), HMS Jervis (Capt. P.J. Mack, DSO, RN), HMS Janus (Cdr. J.A.W. Tothill, RN), HMS Juno (Cdr. W.E. Wilson, RN), HMS Nubian (Cdr. R.W. Ravenhill, RN), HMS Mohawk (Cdr. J.W.M. Eaton, RN).
On clearing the swept channel the fleet set a course of 315° at 15 knots.
At 0700B/29, A/S patrols were flown off.
At noon, the fleet was in position 32°32’N, 27°30’E.
At 1350B/29, the fleet altered course to 350°.
At 1400B/29, a convoy carrying troops, made up of Royal Fleet Auxiliary tankers Olna (7073 GRT, built 1921), Brambleleaf (5917 GRT, built 1917), the armed boarding vessels HMS Chakla (Cdr. L.C. Bach, RD, RNR) and HMS Fiona (Cdr. A.H.H. Griffiths, RD, RNR), departed Alexandria for Suda Bay. They were escorted by the AA cruisers HMS Coventry (Capt. D. Gilmour, RN), HMS Calcutta (Capt. D.M. Lees, DSO, RN), net tender HMS Protector (Cdr. R.J. Gardner, RN), the destroyers HMAS Vampire (Capt. H.M.L. Waller, DSO, RAN), HMAS Voyager (Cdr. J.C. Morrow, DSO, RAN), HMAS Waterhen (Lt.Cdr. J.H. Swain, RN), HMS Wryneck (Lt.Cdr. R.H.D. Lane, RN) and the minesweeper HMS Fareham (Lt. W.J.P. Church, RN).
At 1800B/29, the fleet altered course to 290°.
At midnight the fleet was in position 34°10’N, 25°04’E.
30 October 1940.
There were no incidents during the night. A/S patrols and aircraft to search a sector 270° to 000° to maximum depth were flown off.
At 0800B/30, the fleet was in position 35°00’N, 22°50’E, course 310°, speed 16 knots. Visibility was poor and the earlier launched air search sighted nothing.
At 1130B/30, HMS Dainty obtained an A/S contact. Later an Italian report was picked up that the fleet had been sighted by either an aircraft or a submarine at 1120B/30.
At noon, the fleet was in position 35°20’N, 22°00’E.
At 1230B/30, a second air search was launched but again these sighted nothing.
At 2000B/30, the fleet was in position 36°35’N, 20°43’E steering 340°.
31 October 1940.
At 0330B/31, when in position 38°18’N, 19°25’E the fleet altered course to 160°.
At 0430B/31, HMS Ajax (Capt. E.D. McCarthy, RN), departed Alexandria with troops for Suda Bay.
At 0645B/31, an air search was flown off to search between the Greek coast and 270°.
At 0800B/31, the fleet was in position 37°22’N, 20°35’E steering 090°. The air search did not sight the enemy but three Greek destroyers were sighted.
At 1020B/31, HMS Warspite catapulted her Walrus aircraft to take the Fleet Gunnery Officer to Suda Bay.
At 1150B/31, the fleet was sighted and reported by an enemy aircraft.
At noon, the fleet was in position 37°02’N, 21°25’E. During the afternoon the fleet proceeded to the southward.
At 1600B/31, the fleet was in position 36°17’N, 21°37’E. A second air search during the afternoon had sighted nothing.
At 1450B/31, HMS Juno and HMS Defender were detached to Suda Bay to refuel.
At 1530B/31, HMS Nubian and HMS Mohawk rejoined the fleet having been detached late in the morning to investigate Navarinon Bay.
At 1630B/31 the convoy arrived at Suda Bay less Olna escorted by Calcutta and Wryneck, these ships arrived at 0630/1. The Australian destroyers remained out on A/S patrol until HMS Protector completed a net barrier on 2 November.
At 1830B/31, when the fleet was in position 36°15’N, 21°30’E course was changed to 280°.
At 2300B/31, the fleet altered course to 100°.
At midnight the fleet was in position 36°20’N, 20°25’E.
1 November 1940.
At 0100B/1, the fleet changed course to 120°.
At 0630B/1, A/S and search aircraft were flown off. The search was to take place between 270° and the Greek coast.
At 0650B/1, HMS Ajax arrived at Suda Bay.
At 0700B/1, HMS Juno returned from fuelling at Suda Bay. With her was HMAS Voyager. She would take the place of HMS Defender who had fouled the nets at Suda Bay.
At 0800B/1, the fleet was in position 35°23’N, 22°38’E steering 280°. The fleet remained west of Crete to cover the Suda Bay operations.
At 1020B/1, the fleet was reported by an enemy aircraft and at 1155B/1 an enemy aircraft was shot down in flames by the fighter patrol.Another Italian aircraft was damaged by them.
At noon, the fleet was in position 35°43’N, 22°00’E steering 130°.
At 1630B/1, the Commander-in-Chief, in HMS Warspite and with HMS Illustrious, HMS York, HMS Gloucester, HMS Jervis, HMS Hero, HMS Hereward, HMS Hasty and HMS Ilex split off and proceeded towards Alexandria.
At midnight, the Commander-in-Chief (HMS Warspite) was in position 33°52’N, 24°25’E.
2 November 1940.
At 1340B/2, the group of ships not with the Commander-in-Chief were attacked by four Italian torpedo bombers in position 32°39’N, 27°11’E. All torpedoes however missed astern.
At 1900B/2, the Commander-in-Chief, in HMS Warspite, arrived at Alexandria.
HMS Orion and HMAS Sydney arrived at Alexandria shortly before midnight.
The remainder of the fleet did not enter the harbour during the dark hours due to the weather conditions. They arrived at Alexandria in groups the next day. (7) 2 Nov 1940 The convoy arrived at Alexandria on 3 November 1940.
The light cruiser HMS Ajax (Capt. E.D. McCarthy, RN) also departed Suda Bay on 2 November 1940. She also arrived at Alexandria on 3 November 1940. She was not with the actual convoy but most likely provided some distant cover during a part of the voyage. (8) 4 Nov 1940 Operation MB 8, convoy operations in the Eastern Mediterranean.
Operation Coat, transfer of reinforcements from the Western Mediterranean to the Eastern Mediterranean.
Operation Crack, air attack on Cagliary, Sardinia.
Operation Judgment, air attack on Taranto.
4 November 1940.
Convoy AN 6 departed Port Said / Alexandria today for Greece. The convoy was made up of the following tankers; Adinda (Dutch, 3359 GRT, built 1939), British Sergeant (5868 GRT, built 1922), Pass of Balhama (758 GRT, built 1933) and the transports Hannah Moller (2931 GRT, built 1911), Odysseus (Greek, 4577 GRT, built 1913). Several more transports (probably Greek) were also part of this convoy.
The Pass of Balhama sailed from Alexandria, the others from Port Said.
The convoy was escorted by the A/S trawlers HMS Kingston Crystal (Lt.Cdr. G.H.P. James, RNR) and HMS Kingston Cyanite (Skr. F.A. Yeomans, RNR).
HMS Ajax (Capt. E.D. McCarthy, RN) and HMAS Sydney (Capt. J.A. Collins, CB, RAN) both proceeded from Alexandria to Port Said on this day. At Port Said the were to embark troops for Crete.
Owning to breakdowns in Kingston Crystal and Kingston Cyanite, HMS Dainty (Cdr. M.S. Thomas, DSO, RN), HMS Kingston Coral (Skr. W. Kirman, RNR) and HMS Sindonis (Ch.Skr. G. Rawding, RNR) departed Alexandria late on the 4th to rendez-vous with convoy AN 6.
5 November 1940.
Convoy MW 3 departed Alexandria for Malta. This convoy was made up of the transports
Devis (6054 GRT, built 1938), Rodi (3220 GRT, built 1928, former Italian), Volo (1587 GRT, built 1938), Waiwera (12435 GRT, built 1934) and the Royal Fleet Auxiliary tanker Plumleaf (5916 GRT, built 1917).
Escort was provided by the AA cruisers HMS Coventry (Capt. D. Gilmour, RN), HMS Calcutta (Capt. D.M. Lees, DSO, RN) and the destroyers HMS Diamond (Lt.Cdr. P.A. Cartwright, RN), HMAS Vampire (Capt. H.M.L. Waller, DSO, RAN), HMAS Voyager (Cdr. J.C. Morrow, DSO, RAN), HMAS Waterhen (Lt.Cdr. J.H. Swain, RN) and the minesweeper HMS Abingdon (Lt. G.A. Simmers, RNR).
Also sailing with this convoy were the transport Brisbane Star (12791 GRT, built 1937) and the Royal Fleet Auxiliary tanker (5917 GRT, built 1917), the the armed boarding vessels HMS Chakla (Cdr. L.C. Bach, RD, RNR) and HMS Fiona (Cdr. A.H.H. Griffiths, RD, RNR), net tender HMS Protector (Cdr. R.J. Gardner, RN). They were to sail with this convoy until off Crete when they were to be detached to proceed to Suda Bay.
HMS Ajax and HMAS Sydney departed Port Said for Suda Bay with Headquarters, 14th Infantery Brigade, one light and one heavy AA battery and administrative troops.
6 November 1940.
Vice-Admiral light forces, in HMS Orion (Capt. G.R.B. Back, RN, flying the flag of Vice-Admiral H.D. Pridham-Whippell, CB, CVO, RN), left Alexandria for Piraeus to consult with the Greek authorities. Also some RAF personnel was embarked for passage.
At 0600B/6, convoy AN 6 was in position 34°40’N, 22°20’E.
The Commander-in-Chief departed Alexandria with the battleships HMS Warspite (Capt. D.B. Fisher, CBE, RN, flying the flag of Admiral Sir A.B. Cunningham, KCB, DSO, RN), HMS Valiant (A/Capt. J.P.L. Reid, RN), aircraft carrier HMS Illustrious (Capt. D.W. Boyd, DSC, RN, flying the flag of Rear-Admiral A.L.St.G. Lyster, CVO, DSO, RN). They were escorted by HMS Hyperion (Cdr. H.St.L. Nicolson, DSO and Bar, RN), HMS Hasty (Lt.Cdr. L.R.K. Tyrwhitt, RN), ), HMS Havock (Cdr. R.E. Courage, DSO, DSC, RN), HMS Hero (Cdr. H.W. Biggs, DSO, RN), HMS Hereward (Lt.Cdr. C.W. Greening, RN), HMS Ilex (Lt.Cdr. P.L. Saumarez, DSC and Bar, RN), HMS Decoy (Cdr. E.G. McGregor, DSO, RN) and HMS Defender (Lt.Cdr. G.L. Farnfield, RN).
The Rear-Admiral 1st Battle Squadron sailed with HMS Malaya (Capt. A.F.E. Palliser, DSC, RN, flying the flag of A/Rear-Admiral H.B. Rawlings, OBE, RN), HMS Ramillies (Capt. A.D. Read, RN). They were escorted by HMS Jervis (Capt. P.J. Mack, DSO, RN), HMS Janus (Cdr. J.A.W. Tothill, RN), HMS Juno (Cdr. St.J.R.J. Thyrwhitt, RN), HMS Nubian (Cdr. R.W. Ravenhill, RN) and HMS Mohawk (Cdr. J.W.M. Eaton, RN). HMS Eagle had defects and was unable to proceed to sea with this group as had been originally intended. Three aircraft from Eagle were embarked on Illustrious.
The heavy cruiser HMS York (Capt. R.H. Portal, DSC, RN) and the light cruiser HMS Gloucester (Capt. H.A. Rowley, RN, flying the flag of Rear-Admiral E. de F. Renouf, CVO, RN) also departed Alexandria for these operations.
The fleet was clear of the harbour by 1300B/6, and then proceded on a mean line of advance of 310° until 1800B/6 when it was changed to 270°. At 2000B/6, course was changed to 320°.
7 November 1940.
There were no incidents during the night.
At 0800 hours, the Commander-in-Chief was in position 34°15’N, 24°47’E.
Around 1000B/7, the Vice-Admiral light forces, arrived at Piraeus in HMS Orion.
At noon, the Commander-in-Chief was in position 34°26’N, 23°43’E. At this time the mean line of advance was changed to 320°.
At 1300B/7, aircraft were flown off to search a sector 300° to 360°. Nothing was however sighted by this search.
At 1700B/7, HMAS Sydney joined the Commander-in-Chief from Suda Bay. She reported that ships for Suda Bay had all arrived according to plan and that stores and troops had all ben landed by dark on 6 November.
At 1800B/7, the position of convoy MW 3 was 35°44’N, 22°41’E and shortly afterwards the convoy altered course to 290°.
At 2000B/7, the position of the convoy was 35°48’N. 21°45’E, course was now altered to 320°.
----------------------------------------------------------------------------------------------------------------------------
At 1800A/7, ‘Force H’ departed Gibraltar for ‘Operation Coat’ and ‘Operation Crack’. ‘Force H’ was made up of the aircraft carrier HMS Ark Royal (Capt. C.S. Holland, RN, flying the flag of Vice-Admiral J.F. Somerville, KCB, DSO, RN), light cruiser HMS Sheffield (Capt. C.A.A. Larcom, RN) and the destroyers HMS Faulknor (Capt. A.F. de Salis, RN), HMS Firedrake (Lt.Cdr. S.H. Norris, DSC, RN), HMS Forester (Lt.Cdr. E.B. Tancock, RN), HMS Fortune (Cdr. E.A. Gibbs, DSO, RN), HMS Foxhound (Cdr. G.H. Peters, DSC, RN), HMS Fury (Lt.Cdr. T.C. Robinson, RN), HMS Duncan (Cdr. A.D.B. James, RN), HMS Isis (Cdr. C.S.B. Swinley, DSC, RN). Also part of this force were a group of warships that was to reinforce the Mediterranean Fleet. These were the battleship HMS Barham (Capt G.C. Cooke, RN), heavy cruiser HMS Berwick (Capt. G.L. Warren, RN), light cruiser HMS Glasgow (Capt. H. Hickling, RN) and the destroyers HMS Gallant (Lt.Cdr. C.P.F. Brown, RN), HMS Greyhound (Cdr. W.R. Marshall A'Deane, DSC, RN) and HMS Griffin (Lt.Cdr J. Lee-Barber, DSO, RN). These ships carried troops for Malta as well as three of the destroyers from ‘Force H’, HMS Faulknor, HMS Fortune, HMS Fury. A total of 2150 troops were embarked as follows; HMS Berwick 750, HMS Barham 700, HMS Glasgow 400, and the six destroyers had each 50 troops on board.
8 November 1940.
At 0001B/8, the Commander-in-Chief was in position 36°36’N, 21°08’E, the mean line of advance was 280°.
At 0400B/8, the mean line of advance was changed to 220°.
At 0645B/8, an air search was flown off to search a sector 310° to the Greek coast. It sighted nothing.
At 0900B/8, when the Commander-in-Chief was in position 36°40’N, 18°50’E course was changed to 180° to close the convoy.
At noon, the Commander-in-Chief was in position 35°57’N, 18°46’E. The convoy was at that time in position 35°46’N, 18°41’E. Also around noon he convoy was reported by an enemy aircraft and at 1230 hours one Cant. 501 was attacked by Gladiators but apparently managed to escape.
At 1400B/8, aircraft were flown off to search between 200° and 350°. Also one aircraft was flown off with messages for Malta. The air search again sighted nothing.
At 1520B/8, the fleet was reported by enemy aircraft.
At 1610B/8, three Fulmar fighters attacked a formation of seven Italian S. 79’s shooting down two of them. The remainder jettisoned their bombs and made off.
At 1700B/8, HMS Ajax joined the fleet coming from Suda Bay.
The fleet had remained in a covering position to the north of the convoy all day and at 1830B/8, when in position 35°’20’N, 17°25’E course was changed to 000°. At that time the convoy was only five nautical miles to the southward of the fleet.
At 2130B/8, the fleet altered course to 180°.
At 2230B/8, the fleet altered course to 210°.
----------------------------------------------------------------------------------------------------------------------------
At dawn A/S air patrols were flown off by HMS Ark Royal. These were maintained throughout the day.
A fighter patrol was maintained throughout the afternoon but no enemy aircraft were encountered.
The weather was fine and visibility good it was considered very likely that the force would be sighted and attacked by enemy aircraft. So it was decided at 1530 hours that HMS Ark Royal, HMS Sheffield, HMS Glasgow and six destroyers would proceed ahead to carry out the planned attack (‘Operation Crack’) on the Cagliari aerodrome. [According to the plan these destroyers should be HMS Faulknor, HMS Foretune, HMS Fury, Gallant, HMS Greyhound and HMS Griffin. It is currently not known to us if it were indeed these destroyers that with this force when they split off from the other ships.]
That evening fighters from the Ark Royal shot down an enemy aircraft.
9 November 1940.
At 0001B/9, the Commander-in-Chief was in position 35°42’N, 17°09’E, the mean line of advance was 270°.
At 0800B/9, the convoy was closed in position 34°42’N, 15°00’E.
At 0920B/9, HMS Ramillies, HMS Hyperion, HMS Hero and HMS Ilex were detached to join the convoy and escort it to Malta. The weather was overcast and squally so no air search was flown off.
The main fleet remained to the south-west of the Medina-Bank during the day. The 3rd and 7th Cruiser Squadrons being detached to search to the north.
The main fleet was being shadowed by enemy aircraft and was reported four times between 1048B/9 and 1550B/9. One Cant 506B aircraft was shot down by a Fulmar at 1640B/9.
At noon, the Commander-in-Chief was in position 34°47’N, 16°35’E.
At 1219B/9, a Swordfish A/S patrol force landed near HMS Warspite shortly after taking off. The crew was picked up by HMS Jervis. The depth charge and A/S bombs exploded close to Warspite.
At 2100B/9, when the Commander-in-Chief was in position 34°45’N, 16°10’E, course was altered to 310° to make rendez-vous with ‘Force F’, the reinforcements for the Mediterranean Fleet coming from Gibraltar.
----------------------------------------------------------------------------------------------------------------------------
At 0430B/9, HMS Ark Royal launched a strike force of nine Swordfish aircraft to bomb Cagliari aerodrome with direct and delay action bombs. On completion of flying off, course was altered to 160° for the flying on position.
At 0745B/9, a fighter section and a section of three Fulmars that were to be transferred to HMS Illustrious (via Malta) were flown off and the nine Swordfish of the strike force landed on. The fighter section for Illustrious landed at Malta at 1020 hours.
The raid on Cagliari appeared to have been quite successful. Five Swordfish attacked the aerodrome and hits were observed on two hangars an other buildings. Two fires were seen to break out and also a large explosion occurred. One Swordfish attacked a group of seaplanes moored off the jetty. Another Swordfish attacked some factories near the power station and obtained a direct hit with a 250-lb bomb and incendiaries. The remaining two aircraft were unable to locate the target and attacked AA batteries instead. Two fires were seen to start but the AA batteries continued firing.
On completion of flying on course was altered to rendez-vous with HMS Barham, HMS Berwick and the remaining five destroyers which were sighted at 0910 hours. The ships then formed up in formation and set off on an easterly course at 18 knots.
At 0930B/9 an enemy aircraft that was shadowing the fleet was picked up by RD/F at a distance of about thirty miles. After working round the fleet clockwise the aircraft was sighted by HMS Barham and then by the Fulmar fighter patrol. The aircraft, which was a large floatplane, was shot down at 1005B/9, twenty miles on the starboard beam of the fleet.
At 1048B/9, a large formation of enemy aircraft was located by RD/F about fifty miles ahead of the fleet and closing. Five minutes later a section of Skua’s was flown off.
A section of Fulmar’s intercepted the enemy as they were working their way round to the sun and forced them to turn away but ten minutes later the enemy again approached. The fleet was then bombed from a height of 13000 feet. No British ships were hit, although HMS Barham, HMS Ark Royal and HMS Duncan had been near missed. It was believed that one of the attackers was shot down.
Throughout the remainder of the day fighter patrols were kept up but no further enemy aircraft attacked the fleet.
At 1915B/9, HMS Ark Royal, HMS Sheffield, HMS Duncan, HMS Isis, HMS Firedrake, HMS Forester and HMS Foxhound turned to the west. HMS Barham, HMS Berwick, HMS Glasgow, HMS Faulknor, HMS Fortune, HMS Fury, HMS Gallant, HMS Greyhound and HMS Griffin continued to the east under the command of Capt. Warren of the Berwick, which was the senior Captain.
10 November 1940.
At 0001B/10, the Commander-in-Chief was in position 35°13’N, 15°25’E steering 300°. Shortly afterwards, at 0010 hours, two heavy explosions were felt. It appears that the fleet had been under attack at this time.
At 0700B/10, aircraft were flown off to search a sector 315° to 045°. Shortly after takeoff one Swordfish crashed into the sea. The crew was rescued by HMS Nubian.
At 0715B/10, the 3rd and 7th Cruiser Squadrons rejoined. Shortly afterwards, at 0730B/10, HMAS Vampire, HMAS Voyager, HMAS Waterhen, HMS Dainty, HMS Diamond, HMS Hyperion, HMS Havock and HMS Ilex joined the fleet. HMS Jervis, HMS Janus, HMS Juno, HMS Nubian, HMS Mohawk, HMS Decoy, HMS Defender and HMS Hasty were detached to fuel at Malta.
At 1015B/10, rendez-vous was made with ‘Force F’ which was made up of HMS Barham, HMS Berwick, HMS Glasgow, HMS Griffin, HMS Greyhound, HMS Gallant, HMS Fury, HMS Fortune and HMS Faulknor. HMS Fortune and HMS Fury joined the destroyer screen. The other ships were ordered to proceed to Malta to land troops and stores there. The course of he fleet was changed to 110° in position 36°08’N, 13°10’E around this time.
At noon, the Commander-in-Chief was in position 35°55’N, 13°30’E.
At 1330B/10, convoy ME 3 departed Malta. It consisted of the transports Memnon (7506 GRT, built 1931), Lanarkshire (11275 GRT, built 1940), Clan Macaulay (10492 GRT, built 1936) and Clan Ferguson (7347 GRT, built 1938). Escort was provided by the battleship HMS Ramillies, AA cruiser HMS Coventry and the destroyers HMS Decoy and HMS Defender.
Around 1400B/10 the monitor HMS Terror (Cdr. H.J. Haynes, DSC, RN) and the destroyer HMAS Vendetta (Lt.Cdr. R. Rhoades RAN) departed Malta for Suda Bay. Before departure HMAS Vendetta had first carried out an A/S patrol off Valetta harbour.
At 1435B/10, HMS Mohawk rejoined the fleet.
At 1450B/10, HMS Hero was detached to Malta with correspondence.
In the afternoon three Fulmars, which had been flown to Malta from HMS Ark Royal, landed on HMS Illustrious.
At 2100B/10, the Commander-in-Chief was in position 35°15’N, 14°16’E steering 090°. The 3rd and 7th Cruiser Squadrons were detached to search between 020° to 040°.
----------------------------------------------------------------------------------------------------------------------------
In the western Mediterranean all was quiet. Fighter patrols were maintained overhead during the day. Also A/S patrols were maintained all day.
11 November 1940.
At 0001B/11, the Commander-in-Chief was in position 35°18’N, 15°14’E. At 0100 hours the fleet altered course to 060°.
At 0135B/11, HMS Ramillies, which was with convoy ME 3, reported three explosions in position 34°35’N, 16°08’E. This might have been a submarine attack. [This was indeed the case as the Italian submarine Pier Capponi attacked a battleship around this time.]
At 0700B/11, an air search was launched to search between 315° and 045°. One aircraft was flown to Malta to collect photographs of Taranto harbour.
At 0800B/11, the Commander-in-Chief was in position 36°55’N, 17°36’E.
At noon, the Vice-Admiral light forces in HMS Orion coming from Piraeus, joined the fleet in position 36°10’N, 18°30’E. Correspondence was transferred to HMS Warspite via HMS Griffin.
At 1310B/11, the Vice-Admiral light forces, in HMS Orion and with HMS Ajax and HMAS Sydney, HMS Nubian and HMS Mohawk in company, parted company to carry out an anti-shipping raid into the Straits of Otranto.
At 1800B/11, HMS Illustrious, HMS York, HMS Gloucester, escorted by HMS Hyperion, HMS Hasty, HMS Havock and HMS Ilex were detached for ‘Operation Judgement’ the torpedo and dive-bombing attack on the Italian fleet in Taranto harbour.
For this operation this force proceeded to position 38°11’N, 19°30’E. Here aircraft were flown off in two waves, at 2000 and at 2100 hours.
At 2000B/11, the Commander-in-Chief was in position 37°54’N, 19°09’E. One hour later the fleet altered course to 000°.
At 2030B/11, the Vice-Admiral light forces with the cruisers passed through position 39°10’N, 19°30’E, course 340° doing 25 knots.
At 2140B/11, HMS Juno obtained an A/S contact and attacked it with depth charges.
----------------------------------------------------------------------------------------------------------------------------
In the western Mediterranean the fleet arrived back at Gibraltar around 0800A/11.
12 November 1940.
At 0700B/12, both detached groups rejoined the fleet. The attack on Taranto harbour was reported as a success. Eleven torpedoes had been dropped and hits were claimed on a Littorio-class and two Cavour-class battleships in the outer harbour. Sticks of bombs had been dropped amongst the warships in the inner harbour. Two aircraft failed to return to HMS Illustrious. [Damage was done to the battleships Littorio (three torpedo hits), Caio Duilio and Conte di Cavour (one torpedo hit each), in fact the Conti di Cavour never returned to service. Also damaged (by bombs) were the heavy cruiser Trento and the destroyer Libeccio.]
The raid into the Straits of Otranto had also been successful as an Italian convoy had been intercepted off Valona around 0115 and largely destroyed. The convoy had been made up of four merchant vessels which had all been sunk. There had been two escorts, thought to be destroyers or torpedo boats. These managed to escape. [The merchant vessels Antonio Locatelli (5691 GRT, built 1920), Capo Vado (4391 GRT, built 1906), Catalani (2429 GRT, built 1929) and Premuda (4427 GRT, built 1907) had been sunk. Their escorts had been the armed merchant cruiser Ramb III (3667 GRT, built 1938) and the torpedo boat Nicola Fabrizi. The convoy had been en-route from Vlore, Albania to Brindisi.]
At 0800B/12, the fleet was in position 37°20’N, 20°18’E.
At 0930B/12, HMS Warspite catapulted her Walrus aircraft to take massages to Suda Bay for forwarding to the Admiralty by transmission.
At noon, the fleet was in position 37°20’N, 20°08’E. Course at that time was 140°.
As it was intended to repeat ‘Operation Judgement’ tonight the fleet remained in the area. Course being altered to 340° at 1600 hours.
Fortunately the fleet was not reported at this time. Three enemy aircraft were shot down during the day but these were shot down before they had reported the fleet.
At 1800B/12, the decision was taken not to proceed with the repeat of ‘Operation Jugement’ due to the bad weather in the Gulf of Taranto. At that time the fleet was in position 37°06’N, 19°44’E. Course was set to 140° to return to Alexandria.
At 1830B/12, HMS Malaya, HMS Ajax, HMS Dainty, HMS Diamond, HMS Greyhound, HMS Griffin and HMS Gallant were detached to fuel at Suda Bay. HMS Berwick and HMS York were detached to proceed to Alexandria where they arrived in the evening of the 13th.
13 November 1940.
At 0001B/13, the Commander-in-Chief was in position 35°44’N, 20°53’E.
At 0630B/13, HMS Terror and HMAS Vendetta arrived at Suda Bay. Terror was to remain at Suda Bay as guardship.
At 1000B/13, the force with HMS Malaya arrived at Suda Bay. After fuelling the departed later the same day for Alexandria taking HMAS Vendetta with them.
Also around 1000B/13, convoy ME 3 arrived at Alexandria.
At noon, the Commander-in-Chief was in position 34°23’N, 23°43’E.
At about 1530B/13, Fulmar’s attacked an Italian shadowing aircraft which however managed to escape although damaged.
At 1600B/13, the fleet altered course to 050° when in position 33°23’N, 26°18’E. Course was altered back to 090° at 1800B/13. RD/F later detacted an enemy formation to the southward but the fleet was not sighted.
At 2000B/13, the fleet was in position 33°38’N, 27°34’E.
14 November 1940.
Around 0700B/14, the bulk of the fleet with the Commander-in-Chief arrived at Alexandria. (9) 12 Nov 1940 11 November 1940.
At 1310 hours, the Vice-Admiral light forces, in HMS Orion (Capt. G.R.B. Back, RN, flying the flag of Vice-Admiral H.D. Pridham-Whippell, CB, CVO, RN) with HMS Ajax (Capt. E.D. McCarthy, RN), HMAS Sydney (Capt. J.A. Collins, CB, RAN), HMS Nubian (Cdr. R.W. Ravenhill, RN) and HMS Mohawk (Cdr. J.W.M. Eaton, RN) in company, parted company with the bulk of the fleet to carry out an anti-shipping raid into the Straits of Otranto.
12 November 1940.
At 0100 hours, the force had reached their northern limit and turned back. No enemy ships had so far been sighted.
At 0115 hours, while just on the way back towards the fleet, ships were sighted to the south-east. They bore 120° and were about 8 nautical miles away. They were thought to be four merchant vessels escorted by a destroyer and a torpedo boat. They were steering westwards towards Brindisi.
At 0125 hours, HMS Mohawk opened fire on the torpedo boat.
At 0128 hours, HMS Orion crossed the bow of the convoy and opened fire with her 6” guns on the third merchant vessel in line and with her 4” guns she fired four salvoes at the torpedo boat. Range was 6400 yards, bearing 88°. The merchant ship was badly damaged and set on fire. Two torpedoes were fired at her of which one hit and she was seen to sink.
Fire with her 6” guns was then shifted to the fourth merchant ship in line bearing 63°, range 5300 yards. The 4” guns meanwhile fired star shell to light up the target. Hit repeatedly she was set on fire and abandoned by her crew. She was then hit by a torpedo fired from 5000 yards and was seen to settle by the stern.
HMS Ajax had opened fire at 0130 hours on the destroyer. She did not appeared to have been hit. She then shifted fire to one of the merchant ships that was set ablaze. She then opened fire on another ship and also fired a torpedo which apparently missed. The ship was then hit by two salvoes and left in a sinking condition.
HMAS Sydney, the last ship in line, opened fire from 7000 yards on the leading ship which was hit and set ablaze. Fire was then shifted to the second ship from the right which was lit up by star shell. This ship was seen turning away with shots falling all around her. Then the destroyer, which was making smoke, came under fire. She drew ahead and fire was now shifted back to the original targets now bunched together. The targets were hit but were soon lost out of sight into the night. At 0140 hours, a torpedo track passed underneath Sydney. Fire was then shifted to a ship hat was laying stopped and was also under fire from other ships. This ship was seen to be badly hit. At 0148 hours two torpedoes were fired by Sydney on a ship that was to the right of the previous one. At 0150 hours Sydney ceased fire. Two ships were in sight bearing 20° and 25°. Also a ship on fire was in sight bearing 349°. This ship was seen to sink at 0200 hours.
HMS Nubian had opened fire at 0131 hours on a light grey ship from 8000 yards. When this ship was on fire she shifted her gunfire to the ship to the right of the previous target. The escorts by now had been lost out of sight. At 0145 hours HMS Nubian sighted land looming on the starboard bow.
HMS Mohawk opened fire at 0125 hours on one of the escorts from 4000 yards. A hit was obtained with the fourth salvo and the enemy turned towards the convoy making smoke. Fire was then shifted to the second merchant vessel from the left. Mohawk also sighted land at the same time as Nubian. Mohawk then shifted target to the fourth ship from the left. This ship was hit by a salvo and was seen to lay stopped emitting large clouds of steam. HMS Nubian who was now astern of HMS Mohawk took over the target. HMS Mohawk was about to attack disabled enemy ships with torpedoes when she received orders to leve the area with the remainder of the force and course was set to 166°, speed 28 knots.
At 0315 hours, HMS Ajax reported a shadowing aircraft which remained with the force until around 0515 hours. The force had maintained a speed of 28 knots to get as far as possible from the enemy bases. No attacks however followed.
The force rejoined the fleet around 0700 hours.
The convoy this force attacked had been made up of four merchant vessels which had all been sunk. There had been two escorts, these were thought to be a destroyer and a torpedo boat. These managed to escape. The merchant vessels Antonio Locatelli (5691 GRT, built 1920), Capo Vado (4391 GRT, built 1906), Catalani (2429 GRT, built 1929) and Premuda (4427 GRT, built 1907) had been sunk. Their escorts had been the armed merchant cruiser Ramb III (3667 GRT, built 1938) and the torpedo boat Nicola Fabrizi. The convoy had been en-route from Vlore, Albania to Brindisi. (10) 15 Nov 1940 Transportation of troops from Alexandria to Piraeus.
15 November 1940.
Around 1600B/15, the heavy cruisers HMS Berwick (Capt. G.L. Warren, RN), HMS York (Capt. R.H. Portal, DSC, RN) and the light cruisers HMS Gloucester (Capt. H.A. Rowley, RN), HMS Glasgow (Capt. H. Hickling, RN) and HMAS Sydney (Capt. J.A. Collins, CB, RAN) departed Alexandria with a total of around 3400 troops to Piraeus, Greece.
These cruisers proceeded at high speed (30 knots) towards Piraeus.
HMS Orion (Capt. G.R.B. Back, RN, flying the flag of Vice-Admiral H.D. Pridham-Whippell, CB, CVO, RN) and HMS Ajax (Capt. E.D. McCarthy, RN) also departed Alexandria to give close cover.
A convoy made up of the transports Clan Macaulay (British, 10492 GRT, built 1936), Imperial Star (British, 12427 GRT, built 1934) and Nieuw Zeeland (Dutch, 11069 GRT, built 1928) also departed Alexandria for Piraeus on this day. They were escorted by the AA cruisers HMS Coventry (Capt. D. Gilmour, RN) and the destroyers HMAS Vampire (Capt. H.M.L. Waller, DSO, RAN), HMS Nubian (Cdr. R.W. Ravenhill, RN) and HMS Mohawk (Cdr. J.W.M. Eaton, RN). They were joined at sea by the transport Johan de Witt (Dutch, 10474 GRT, built 1920) that had departed Port Said on the 14th escorted by the destroyer HMAS Waterhen (Lt.Cdr. J.H. Swain, RN).
16 November 1940.
A cover force for these operations departed Alexandria today; it was made up of the battleships HMS Barham (Capt. G.C. Cooke, RN, flying the flag of A/Rear-Admiral H.B. Rawlings, OBE, RN), HMS Valiant (Capt. C.E. Morgan, DSO, RN), aircraft carrier HMS Eagle (Capt. A.R.M. Bridge, RN) and the destroyers HMS Hyperion (Cdr. H.St.L. Nicolson, DSO and Bar, RN), HMAS Vendetta (Lt.Cdr. R. Rhoades RAN), HMS Dainty (Cdr. M.S. Thomas, DSO, RN), HMS Diamond (Lt.Cdr. P.A. Cartwright, RN), HMS Jervis (Capt. P.J. Mack, DSO, RN), HMS Greyhound (Cdr. W.R. Marshall A'Deane, DSC, RN), HMS Gallant (Lt.Cdr. C.P.F. Brown, RN) and HMS Griffin (Lt.Cdr J. Lee-Barber, DSO, RN).
The cruisers with the troops arrived at Piraeus on this day as did HMS Orion and HMS Ajax.
After disembaring the troops the cruisers departed to return to Alexandria or Port Said after a short patrol in the Aegean.
Also the convoy of transports arrived at Pireaus this day. The destroyers then departed for an A/S sweep in the Aegean. HMAS Waterhen was detached to fuel at Suda Bay. After doing so she rejoined the other three destroyers. They arrived at Alexandria on the 18th after having carried out an A/S sweep in the Aegean and along the northern coast of Crete en-route. HMS Coventry remained at Piraeus to escort a convoy of Greek troopships together with Greek destroyers.
17 November 1940.
The cover force arrived at Suda Bay to refuel. They departed again later the same day to return to Alexandria where they arrived on the 19th. In the meantime HMS Barham had developed engine trouble. (7) 17 Nov 1940 Around 0700C/18, HMS Orion parted company and proceeded to Suda Bay where she arrived around 1115C/18.
Around 1500C/18, HMS Orion departed Suda Bay and rejoined HMS Ajax and HMAS Sydney around 1600C/18. The cruisers then resumed their patrol in the Aegean.
Around 0930C/20, the three cruisers arrived at Alexandria. (11) 23 Nov 1940 Convoy operations in the Eastern Mediterranean.
See also the event for 25 November 1940 called ‘Operation Collar and the resulting Battle of Cape Spartivento’ for the events in the Western Mediterranean.
23 November 1940.
Convoy MW 4 departed Alexandria for Malta today. The convoy was made up of the transports HMS Breconshire (9776 GRT, built 1939), Memnon (7506 GRT, built 1931), Clan Ferguson (7347 GRT, built 1938) and Clan Macaulay (10492 GRT, built 1936). Close escort was provided by (‘Force D’) the AA cruisers HMS Coventry (Capt. D. Gilmour, RN), HMS Calcutta (Capt. D.M. Lees, DSO, RN) and the destroyers HMS Greyhound (Cdr. W.R. Marshall A'Deane, DSC, RN), HMAS Vampire (Capt. H.M.L. Waller, DSO, RAN), HMAS Vendetta (Lt.Cdr. R. Rhoades RAN) and HMAS Voyager (Cdr. J.C. Morrow, DSO, RAN).
A cover force (‘Force C’) for this convoy also departed Alexandria today. They were to proceed to Suda Bay where they were to refuel. This cover force was made up of the battleships HMS Malaya (Capt. A.F.E. Palliser, DSC, RN), HMS Ramillies (Capt. A.D. Read, RN), aircraft carrier HMS Eagle (Capt. A.R.M. Bridge, RN), light cuisers HMS Orion (Capt. G.R.B. Back, RN, flying the flag of Vice-Admiral H.D. Pridham-Whippell, CB, CVO, RN), HMS Ajax (Capt. E.D. McCarthy, RN), HMAS Sydney (Capt. J.A. Collins, CB, RAN) and the destroyers HMS Hyperion (Cdr. H.St.L. Nicolson, DSO and Bar, RN), HMS Hasty (Lt.Cdr. L.R.K. Tyrwhitt, RN), HMS Havock (Cdr. R.E. Courage, DSO, DSC, RN), HMS Ilex (Lt.Cdr. P.L. Saumarez, DSC and Bar, RN), HMS Gallant (Lt.Cdr. C.P.F. Brown, RN), HMS Dainty (Cdr. M.S. Thomas, DSO, RN), HMS Defender (Lt.Cdr. G.L. Farnfield, RN) and HMS Diamond (Lt.Cdr. P.A. Cartwright, RN).
HMS Berwick (Capt. G.L. Warren, RN) departed Alexandria later this day to make rendez-vous with ‘Force C’ off Suda Bay next morning.
24 November 1940.
Both ‘Force C’ and ‘Force D’ passed the Kaso Strait early this day. ‘Force C’ arrived at Suda Bay to refuel at 0800B/24.
At noon, the convoy was attacked by three enemy torpedo bombers in position 36°13’N, 24°48’E. The enemy planes were forced to drop their torpedoes from long range by the effective AA fire from the escorts and no hits were obtained.
In the afternoon both forces passed the Kithera Channel.
25 November 1940.
At 0200B/25, the 3rd Cruiser Squadron, HMS York (Capt. R.H. Portal, DSC, RN), HMS Gloucester (Capt. H.A. Rowley, RN, flying the flag of Rear-Admiral E. de F. Renouf, CVO, RN) and HMS Glasgow (Capt. H. Hickling, RN), departed Alexandria for exercises.
Around 0300B/25, ‘Force A’ departed Alexandria to provide cover for the operations. This force was made up of the battleships HMS Warspite (Capt. D.B. Fisher, CBE, RN, flying the flag of Admiral Sir A.B. Cunningham, KCB, DSO, RN), HMS Valiant (Capt. C.E. Morgan, DSO, RN), aircraft carrier HMS Illustrious (Capt. D.W. Boyd, DSC, RN, flying the flag of Rear-Admiral A.L.St.G. Lyster, CVO, DSO, RN) and the destroyers HMS Jervis (Capt. P.J. Mack, DSO, RN), HMS Janus (Cdr. J.A.W. Tothill, RN), HMS Juno (Cdr. St.J.R.J. Tyrwhitt, RN), HMS Nubian (Cdr. R.W. Ravenhill, RN), HMS Mohawk (Cdr. J.W.M. Eaton, RN), HMS Griffin (Lt.Cdr J. Lee-Barber, DSO, RN), HMS Decoy (Cdr. E.G. McGregor, DSO, RN), HMS Wryneck (Lt.Cdr. R.H.D. Lane, RN) and HMAS Waterhen (Lt.Cdr. J.H. Swain, RN). HMS Decoy had completed temporary repairs at Alexandria to the damage she had sustained in an air attack on 13 November. She was to proceed to the Malta Dockyard for permanent repairs.
At 0500B/25, HMS Hero (Cdr. H.W. Biggs, DSO, RN) and HMS Hereward (Lt.Cdr. C.W. Greening, RN) departed Malta to make rendez-vous the next day with ‘Force A’.
At 0645B/25, Illustrious flew off fighter and A/S patrols.
Around 1600B/25, having completed their exercises, the 3rd Cruiser Squadron joined ‘Force A’.
At 2000B/25, ‘Force A’ was in position 34°25’N, 26°33’E, steering 000°.
26 November 1940.
At 0030B/26, ‘Force A’ changed course to 285°.
At 0230B/26, HMS Illustrious, with HMS Gloucester, HMS Glasgow, HMS Janus, HMS Juno, HMS Mohawk and HMS Nubian split off for an air attack on Port Laki, Leros.
At 0300B/26, HMS Illustrious began to fly off the aircraft involved in the raid, which were a total of 15.
At 0600B/26, off Suda Bay, the aircraft returned to HMS Illustrious. They reported that targets were difficult to distinguish but fires were started in the dockyard and other areas. Two aircraft attacked a ship, believed to be a cruiser, but the results were unobserved. One aircraft failed to return.
Meanwhile, at 0500B/26, HMS York, had been detached to refuel at Suda Bay and then to join the Rear-Admiral 3rd Cruiser Squadron (in Gloucester) off Cape Matapan.
The remainder of ‘Force A’ entered Suda Bay between 0700 and 0830B/26. The destroyers were fuelled there.
A fighter patrol was maintained over the harbour until ‘Force A’ sailed again around 1030B/26. They then set course for the Kithera Channel.
Meanwhile convoy MW 4 had arrived at Malta around 0800B/26. Also HMS Malaya and HMS Ramillies had put into the harbour.
At noon, ‘Force A’ was in position 35°37’N, 24°20’E. As it was considered that the fleet had been located by enemy aircraft a fighter patrol was flown off and maintained for the remainder of the day (during daylight hours).
Also around noon HMS Ramillies, HMS Newcastle (Capt. E.A. Aylmer, DSC, RN), HMS Coventry, HMS Greyhound, HMS Gallant, HMS Hereward, HMS Defender and HMS Diamond departed Malta to join HMS Berwick at sea and then proceed westwards to join the fleet in the western Mediterranean.
At 1600B/26, ‘Force A’ was in position 35°44’N, 23°05’E.
At 1630B/26, Convoy ME 4 departed Malta for Alexandria. This convoy was made up of the transports Waiwera (12435 GRT, built 1934), Cornwall (10603 GRT, built 1920), Rodi (3220 GRT, built 1928, former Italian), Volo (1587 GRT, built 1938) and Devis (6054 GRT, built 1938). Escort was provided by HMS Calcutta, HMAS Vampire, HMAS Vendetta and HMAS Voyager.
At 1815B/26, ‘Force A’ altered course to 220° and at 1930B/26, when in position 35°52’N, 22°08’E, to 290°. This course was maintained throughout the night to cover the convoy.
27 November 1940.
At 0001B/27, ‘Force A’ was in position 36°15’N, 20°40’E.
At 0600B/27, ‘Force A’ altered course to 230°.
At 0700B/27, an air search was flown off to search a sector of 295° to 025° but nothing was sighted.
At 1100B/27, the 3rd Cruiser Squadron (HMS York, HMS Gloucester and HMS Glasgow) rejoined the fleet having carried out a sweep to the north-west of the fleet through positions 36°06’N, 20°56’E and 37°48’N, 17°47’E.
At noon ‘Force A’ was in position 35°56’N, 17°47’E.
On receipt of enemy reports from ‘Force H’, the 3rd Cruiser Squadron was detached to the west to cover the ‘Collar convoy’ coming from that direction. They were to reach a rendez-vous position of 36°32’N, 12°00’E at 0400/28.
The fleet remained in a covering position for convoy ME 4 for the rest of the day. A second air search was flown off at 1430B/27 to search a sector between 310° and 010° but again sighted nothing.
28 November 1940.
At 0230B/28, ‘Force A’ was in position 35°15’N, 14°24’E. Course was altered to 320° to rendez-vous with the ‘Collar convoy’ in position 36°00’N, 13°25’E.
At 0700B/28, HMS Wryneck was detached to fuel at Malta, she returned in the afternoon.
At 0800B/28, the 3rd Cruiser Squadron was sighted and one hour later rendezvous was made with the ‘Collar convoy’ in position 36°02’N, 13°18’E. HMS Decoy and HMS Hotspur (Cdr. H.F.H Layman, DSO, RN) were detached with the merchant vessels Clan Forbes (7529 GRT, built 1938) and Clan Fraser (7529 GRT, built 1939) to Malta. Where they arrived at 1430B/27. The destroyers also remained at Malta where they were to refit / be repaired. At the same time HMS Greyhound joined the destroyer screen of the fleet.
The merchant vessel New Zealand Star (10740 GRT, built 1935) proceeded eastwards escorted by HMS Defender and HMS Hereward. Cover was provided by HMS Manchester (Capt. H.A. Packer, RN) and HMS Southampton (Capt. B.C.B. Brooke, RN).
At 1200B/28, ‘Force A’ was in position 35°41’N, 14°11’E. Half an hour later course was altered to 270° to close the corvettes HMS Peony (Lt.Cdr. (rtd.) M.B. Sherwood, DSO, RN), HMS Salvia (Lt.Cdr. J.I. Miller, DSO, RD, RNR), HMS Gloxinia (Lt.Cdr. A.J.C. Pomeroy, RNVR) and HMS Hyacinth (T/Lt. F.C. Hopkins, RNR) which were astern of the convoyas they had been unable to keep up. They were sighted at 1245B/28 and course was then altered to 180°.
At 1250B/28, HMS Glasgow was attacked by six Italian JU-87 dive bombers. One bomb fell within 30 yards from the ship but all the others missed by a wider margin. Glasgow sustained no damage or casualties.
Of the corvettes HMS Gloxinia had to put into Malta with the defects, while the remaining three proceeded to Suda Bay.
At 1600B/28, ‘Force A’ was in position 35°20’N, 14°37’E. The 3rd Cruiser Squadron was again detached to patrol to the north, this time to cover the passage of the corvettes to Suda Bay.
At 1700B/28, HMS Griffin was detached to Malta with engine defects.
Meanwhile from the escort of convoy ME 4 (the group with HMS Malaya) the destroyers HMS Diamond and HMAS Waterhen were detached to escort convoy AS 7 from the Aegean to Port Said.
29 November 1940.
At 0001B/29, ‘Force A’ was in position 35°18’N, 17°03’E.
At 0730B/29, an air search was flown off to search a sector between 310° and 020°.
At 1200B/29, ‘Force A’ was in position 35°00’N, 21°00’E. The three remaining corvettes were at that time 80 nautical miles to the north-westward.
At 1330B/29, the 3rd Cruiser Squadron was detached to Suda Bay.
At 1450B/29, HMS Manchester and HMS Southampton joined ‘Force A’ but at 1720B/29 they were detached to proceed independently to Alexandria.
At 2000B/29, ‘Force A’ was in position 34°37’N, 23°20’E.
Convoy ME 4 arrived at Alexandria this day as did her escort ‘Force C’. Some of the merchant vessels (Volo, Rodi and Cornwall) continued on to Port Said escorted by HMAS Vendetta and HMAS Voyager.
30 November 1940.
At 0001B/30, ‘Force A’ was in position 34°00’N, 24°45’E.
In the morning HMS Manchester and HMS Southampton arrived at Alexandria.
Also in the morning HMS York, HMS Gloucester and HMS Glasgow arrived at Suda Bay as did the three corvettes.
Around 1800B/30, ‘Force A’ arrived at Alexandria.
The remaining ships of the convoy and their escorts arrived at Port Said on this day. (7) 5 Dec 1940 6 Dec 1940 7 Dec 1940 10 Dec 1940 12 Dec 1940 After having completed fuelling they departed again around 1630B/12 to resume their patrol. (14) 13 Dec 1940 14 Dec 1940 15 Dec 1940 Convoy operations in the Mediterranean (MC 2), raid by the Mediterranean fleet into the Straits of Otranto (MC 3) and the passage of two transports from Malta, HMS Malaya and five destroyers to Gibraltar (HIDE).
15 December 1940.
The Port Said section of convoy MW 5B departed today. It was made up of the transports Volo (1587 GRT, built 1938), Rodi (3220 GRT, built 1928, former Italian), tanker Pontfield (8290 GRT, built 1940) and transport Ulster Prince (3791 GRT, built 1930). They were escorted by the corvette HMS Peony (Lt.Cdr.(Retd.) M.B. Sherwood, RN).
Also on this day HMS Orion (Capt. G.R.B. Back, RN, flying the flag of Vice-Admiral H.D. Pridham-Whippell, CB, CVO, RN) departed Alexandria for Suda Bay and Piraeus.
16 December 1940.
The Alexandria section of convoy MW 5B departed today. It was made up of the transport Devis (6054 GRT, built 1938) and the tanker Hoegh Hood (9351 GRT, built 1936, Norwegian). The submarine HMS Parthian (Lt.Cdr. M.G. Rimington, DSO, RN) also took passage in this convoy to Malta. Escort for this convoy was provided by HMS Havock (Cdr. R.E. Courage, DSO, DSC, RN). This convoy sailed before noon. The corvettes HMS Salvia (Lt.Cdr. J.I. Miller, DSO, RD, RNR) and HMS Hyacinth (T/Lt. F.C. Hopkins, RNR) joined the convoy at sea coming from Suda Bay.
Another convoy for Malta also departed today, MW 5A, this convoy was made up of the faster transports Waiwera (12435 GRT, built 1934), Lanarkshire (8167 GRT, built 1940). Close escort for this convoy was made up of the battleship HMS Malaya (Capt. A.F.E. Palliser, DSC, RN) and the destroyers HMS Defender (Lt.Cdr. G.L. Farnfield, RN) and HMS Diamond (Lt.Cdr. P.A. Cartwright, RN). This convoy sailed in the afternoon.
Cover for these convoys was provided by ships from the Mediterranean fleet which for this sortie was made up of the battleships HMS Waspite (Capt. D.B. Fisher, CBE, RN, flying the flag of Admiral Sir A.B. Cunningham, KCB, DSO, RN), HMS Valiant (Capt. C.E. Morgan, DSO, RN), aircraft carrier HMS Illustrious (Capt. D.W. Boyd, DSC, RN, flying the flag of Rear-Admiral A.L.St.G. Lyster, CVO, DSO, RN), heavy cruiser HMS York (Capt. R.H. Portal, DSC, RN), light cruiser HMS Gloucester (Capt. H.A. Rowley, RN, flying the flag of Rear-Admiral E. de F. Renouf, CVO, RN) and the destroyers HMS Jervis (Capt. P.J. Mack, DSO, RN), HMS Janus (Cdr. J.A.W. Tothill, RN), HMS Juno (Cdr. St.J.R.J. Thyrwhitt, RN), HMS Mohawk (Cdr. J.W.M. Eaton, RN), HMS Greyhound (Cdr. W.R. Marshall-A’Deane, DSO, DSC, RN), HMS Dainty (Cdr. M.S. Thomas, DSO, RN), HMS Hyperion (Cdr. H.St.L. Nicolson, DSO and Bar, RN), HMS Hasty (Lt.Cdr. L.R.K. Tyrwhitt, RN), HMS Hero (Cdr. H.W. Biggs, DSO, RN), HMS Hereward (Lt.Cdr. C.W. Greening, RN) and HMS Ilex (Lt.Cdr. P.L. Saumarez, DSC and Bar, RN) . This cover force sailed from Alexandria around 0100 hours.
At 0745 hours, HMS York, HMS Gloucester, HMS Dainty and HMS Greyhound were detached to fuel at Suda Bay.
At noon the Commander-in-Chief in HMS Warspite was in position 33°36’N, 28°14’E. Course was set for the Kaso Strait which was reached at midnight.
Also on this day HMS Orion arrived at Piraeus. HMS Ajax (Capt. E.D. McCarthy, RN) and HMAS Sydney (Capt. J.A. Collins, CB, RAN) then departed that port for Suda Bay.
17 December 1940.
At 0400 hours, the Commander-in-Chief was in position 35°50’N, 25°56’E. Between 0345 and 0430 hours ten aircraft were flown off by HMS Illustrious to attack Stampalia and Rhodes. Results of these attacks were difficult to observe but several fires were seen to have been started at Stampalia. The weather over Rhodes was bad and only one aircraft was able to locate the target there.
At 0500 hours HMS York, HMS Gloucester, HMS Dainty and HMS Greyhound arrived at Suda Bay where they immediately started to fuel. They departed again at 0700 hours joined by the destroyer HMS Gallant (Lt.Cdr. C.P.F. Brown, DSC, RN). The 3rd Cruiser Squadron was to patrol off the Kithera Channel and the destroyers were to carry out an A/S patrol off the bay when the fleet was to fuel at Suda Bay.
At 0600 hours, HMS Orion arrived at Suda Bay from Piraeus. She sailed at 1130 hours to join HMS Ajax and HMAS Sydney which were patrolling to the west of Crete and had departed Suda Bay at 0300 hours today.
At 0800 hours, the Alexandria and Port Said sections of convoy MW 5B made rendez-vous in position 33°40’N, 27°10’E. Owning to the slow speed of the Hoegh Hood she was detached escorted by HMS Havock.
At 0830 hours, the fleet entered Suda Bay and the destroyers were fuelled.
At 1130 hours, the Rear-Admiral Aircraft Carriers proceeded independently with HMS Illustrious, HMS Valiant, HMS Jervis, HMS Janus, HMS Juno and HMS Mohawk. They were to make rendez-vous with the remainder of the fleet on the 18th but until then had to act independently.
At 1415 hours, the remainder of the fleet also departed. Course was set for the Anti-Kithera Channel which was passed at 1830 hours.
At 1600 hours, the destroyer HMS Griffin (Lt.Cdr. J. Lee-Barber, RN) departed Malta to join the Commander-in-Chief.
The 3rd Cruiser Squadron (York and Gloucester) and the 7th Cruiser Squadron (Orion, Ajax and Sydney) carried out a sweep to the north-west during the night.
At midnight the Commander-in-Chief was in position 34°42’N, 21°45’E.
18 December 1940.
At 0900 hours, the 3rd and 7th Cruiser Squadrons rejoined the Commander-in-Chief in position 36°45’N, 20°28’E. Also HMS Griffin joined from Malta.
At 0930 hours, the Rear-Admiral Aircraft Carriers, also joined.
During the afternoon the weather deteriorated, with high winds and bad visibility, and it appeared unlikely that the proposed bombardment of Valona could take place and that air operations were certainly out of the question.
It was however decided to proceed with the sweep into the Adriatic.
At 1600 hours therefore, a striking force made up of HMS Orion, HMS Ajax, HMAS Sydney, HMS Jervis, HMS Juno and HMS Mohawk was detached. They were ordered to cross latitude 40°25’N at 2330 hours.
At 1800 hours the air striking force, made up of HMS Illustrious, HMS York, HMS Gloucester, HMS Dainty, HMS Greyhound, HMS Gallant and HMS Griffin was also detached. They were to be in position 39°00’N, 20°00’E by 2200 hours.
At 2000 hours, the Commander-in-Chief was in position 39°19’N, 19°20’E.
19 December 1940.
At 0001 hours, the Commander-in-Chief was in position 40°15’N, 19°05’E and at that time the weather had undergone great improvement with good visibility.
It was therefore decided to go ahead with the bombardment. Course was altered to 120° at 0030 hours to close Valona. At 0110 hours, course was altered to a firing course of 140°. HMS Hasty and HMS Hereward swept ahead of HMS Warspite with T.S.D.S. (Two Speed Destroyer Sweep) but no mines were encountered.
At 0113 hours, fire was opened and ceased seven minutes later. About 100 round having been fired. The results of the firing could not be observed.
Between 0130 and 0200 hours, enemy starshell and searchlights were seen in the neighbourhood of Saseno but the bombardment appeared to be a complete surprise to the enemy.
Couse was altered to 210° at 0130 and to 170° and 0230 hours.
In the meantime the striking force had swept up to the line Bari – Durazzo but sighted nothing.
At 0800 hours, the Vice-Admiral light forces (in HMS Orion and his force rejoined the Commander-in-Chief in position 38°33’N, 19°32’E.
One hour later, the Rear-Admiral Aircraft Carriers (in HMS Illustrious and his force also rejoined the Commander-in-Chief. Course was then altered to 220°.
At noon, when in position 34°42’N, 18°44’E, the cuisers HMS Orion, HMS Ajax, HMAS Sydney, HMS Gloucester and HMS York as well as the destroyers HMS Dainty, HMS Gallant, HMS Greyhound, HMS Griffin and HMS Hasty were detached to cover the convoy’s.
At 1400 hours, one aircraft was flown off by HMS Illustrious to carry correspondence to Malta.
There were no further incidents during the day and course was altered to 180° at 1400 hours, to 240° at 2000 hours.
At midnight the Commander-in-Chief was in position 35°40’N, 16°37’E.
20 December 1940.
At 0300 hours, course was altered to 270°.
Early in the morning, convoy MW 5A and her escort of HMS Malaya, HMS Defender, HMS Diamond and now also HMS Nubian (Cdr. R.W. Ravenhill, RN) and HMS Wryneck (Lt.Cdr. R.H.D. Lane, RN) arrived at Malta. After fuelling the destroyers left Malta to join the Commander-in-Chief which they did around 0800 hours.
After these destroyers joined the Commander-in-Chief, HMS Hyperion, HMS Hero, HMS Hereward and HMS Ilex were then detached to fuel.
Meanwhile, at 0630 hours, the destroyers HMS Dainty, HMS Gallant, HMS Greyhound, HMS Griffin and HMS Hasty arrived at Malta to refuel. They had been detached by the Vice-Admiral light forces (in HMS Orion). After fuelling these five destroyers joined the Commander-in-Chief at 1000 hours.
At noon the Commander-in-Chief was in position 35°40’N, 14°10’E. HMS Warspite escorted by HMS Jervis, HMS Janus and HMS Juno then proceeded into Grand Harbour, Malta.
At 1205 hours, the first part of convoy MW 5B arrived at Malta, the other part arrived a little over an hour later except for the Hoegh Hood and her escort HMS Havock.
At 1250 hours, HMS Malaya, escorted by HMS Hyperion, HMS Hereward and HMS Ilex departed Malta to join HMS Illustrious and HMS Valiant and the remaining destroyers at sea.
At 1450 hours, convoy ME 5A sailed from Malta for the east. It was made up of the transports Clan Ferguson (7347 GRT, built 1938), Clan Macaulay (10492 GRT, built 1936), Memnon (7506 GRT, built 1931) and HMS Beconshire (9776 GRT, built 1939). They were escorted by the AA cruiser HMS Calcutta and the corvettes HMS Peony, HMS Salvia and HMS Hyacinth. The destroyer HMS Wryneck also joined.
---------------------------------------------------------------------------------------------------------------------------------
Meanwhile in the western Mediterranean ‘Force H’ was to sail from Gibraltar today to provide cover for convoy MG 1 (see below) and HMS Malaya during their passage to Gibraltar.
At 0930 hours, five destroyers; HMS Duncan (A/Capt. A.D.B. James, RN), HMS Encounter (Lt.Cdr. E.V.St.J. Morgan, RN), HMS Isis (Cdr. C.S.B. Swinley, DSC, RN), HMS Jaguar (Lt.Cdr. J.F.W. Hine, RN) and HMS Wishart (Cdr. E.T. Cooper, RN) departed Gibraltar eastward. This was done so they could sweep ahead of the fleet and that they could also economise fuel in a proportion of the destroyers so the be able to conduct another A/S sweep ahead of ‘Force H’ later in the Skerki Channel.
The remainder of ‘Force H’; battlecruiser HMS Renown (Capt. C.E.B. Simeon, RN, flying the flag of Vice-Admiral J.F. Somerville, KCB, DSO, RN), aircraft carrier HMS Ark Royal (Capt. C.S. Holland, RN), light cruiser HMS Sheffield (Capt. C.A.A. Larcom, RN) and the destroyers HMS Faulknor (Capt. A.F. de Salis, RN), HMS Firedrake (Lt.Cdr. S.H. Norris, DSO, DSC, RN), HMS Forester (Lt.Cdr. E.B. Tancock, DSC and Bar, RN), HMS Fortune (Lt.Cdr. E.N. Sinclair, RN), HMS Foxhound (Lt.Cdr. G.H. Peters, DSC, RN) and HMS Fury (Lt.Cdr. T.C. Robinson, RN), departed Gibraltar westwards at 18 knots at 1800 hours. It was then still daylight. At 1930 hours, when it was completely dark, they reversed course to pass Gibraltar eastwards and also increased speed to 23 knots.
21 December 1940.
At 0700 hours, Hoegh Hood and HMS Havock arrived at Malta.
At 0845 hours, the Vice-Admiral Light Forces which was escorting convoy ME 5, detached HMAS Sydney to Suda Bay where she was to pick up her damaged Walrus aircraft following which Sydney was to proceed to Malta for a short refit.
At 1000 hours, HMS Hyperion, HMS Hero, HMS Hereward and HMS Ilex put into Malta.
At noon, convoy MG 1 departed Malta for Gibraltar, it was made up of transports Clan Forbes (7529 GRT, built 1938) and Clan Fraser (7529 GRT, built 1939) escorted by HMS Hyperion, HMS Hasty, HMS Hero, HMS Hereward and HMS Ilex. At sea HMS Malaya also joined.
Also at noon, HMS Jervis, HMS Janus and HMS Juno departed Malta to proceed ahead of convoy MG 1 on an A/S sweep to the north-west of Pantelleria.
At 1300 hours, a reconnaissance aircraft from HMS Illustrious sighted an enemy convoy. This convoy was then attacked by nine Swordfish fitted with torpedoes. They managed to sink two Italian transports in position 34°39’N, 10°48’E. These were the Norge (6511 GRT, built 1907) and Peuceta (1926 GRT, built 1902).
---------------------------------------------------------------------------------------------------------------------------------
As dawn broke the five destroyers that had sailed earlier were sighted by ‘Force H’ and then joined the fleet. Speed was reduced to 18 knots. A/S patrol aircraft were launched by Ark Royal and a section of fighters was kept at the ready but the RD/F (radar) screens remained clear.
At 1800 hours, four destroyers; HMS Duncan, HMS Encounter, HMS Isis and HMS Jaguar went ahead at 26 knots to make the A/S sweep referred to earlier. ‘Force H’ meanwhile increased speed to 20 knots and at 1930 hours to 22.5 knots.
22 December 1940.
At 0240 hours, HMS Malaya reported that HMS Hyperion had been mined in positon 37°04’N, 11°31’E. HMS Ilex was detached to pick up survivors which she did. She then proceeded to Malta to land them there.
HMS Dainty and HMS Greyhound were detached by the Rear-Admiral Aircraft Carriers to Malta to escort HMS Warspite which was due to return to rejoin the fleet at sea. She departed Malta at 0700 hours escorted by these two destroyers as well as HMS Havock. They rejoined the fleet shortly after 1100 hours in position 35°38’N, 14°06’E
Earlier that morning HMS Illustrious had launched a total of fifteen Swordfish aircraft, in two waves, at 0515 and 0615 hours, to attack Tripoli. Fires were seen to have been started and a warehouse was seen to blew up. All aircraft returned safely.
At 0900 hours, convoy MG 1 and her escort made rendez-vous with ‘Force H’ near Galita Island and continued on the west.
At noon, the Commander-in-Chief was in position 35°34’N, 14°15’E. Course was then set for the eastward.
At 1415 hours, an air search was flown off to search between the Sicilian coast and 070°. This search sighted nothing except a hospital ship.
At 1715 hours, HMS Dainty, HMS Greyhound and HMS Ilex departed Malta to joined the Commander-in-Chief around 0900 hours the next day.
The fleet proceeded to the eastward without incident. Course being altered to 070° at 1800 hours and to 100° at 2030 hours.
At midnight the Commander-in-Chief was in position 35°17’N, 17°56’E.
---------------------------------------------------------------------------------------------------------------------------------
The moon rose at 0135 hours and visibility was high. Therefore a torpedo bomber striking force was made ready on board HMS Ark Royal as of 0200 hours.
At 0400 hours, a signal was received from HMS Malaya, that one of the destroyers in her screen, HMS Hyperion, had been mined in position 37°04’N, 11°34’E.
At 0834 hours, a signal was received that HMS Hyperion had sunk and that HMS Ilex had the survivors on board and was proceeding to Malta leaving three destroyers with HMS Malaya.
Shortly before dawn eight aircraft were flown off by HMS Ark Royal but these sighted no enemy ships. Two enemy aircraft were sighted, one by a Swordfish aircraft and one by HMS Jaguar. HMS Duncan and HMS Isis rejoined with ‘Force H’. HMS Encounter and HMS Jaguar had been detached to join HMS Malaya which made rendez-vous with ‘Force H’ at 0940 hours. They then proceeded westwards at 15 knots.
Ark Royal launched a feighter patrol at 1020 hours and this was maintained throughout the day.
At 1245 hours another air search was flown off but again they sighted no enemy ships.
Shortly afterwards, when ‘Force H’ was in position 37°49’N, 08°33’E an aircraft was detected by RD/F and Ark Royal reported that her Skua patrol had driven off an Italian aircraft.
The remainder of the day was uneventful except for sighting a Vichy-French convoy which was not molested.
23 December 1940.
At 0745 hours, an air search was flown off to search a sector between 290° and 270°.
At 0800 hours, the Commander-in-Chief was in position 35°02’N, 20°35’E. Course was 095°.
At 1315 hours, HMS Dainty, HMS Greyhound and HMS Ilex joined the fleet. They had been delayed due to a defect to the steering gear of HMS Greyhound.
At 1400 hours, HMS Defender and HMS Griffin were detached for convoy escort duty with convoy AS 9. They arrived at Suda Bay later this day.
There were no further incidents during the day.
The Vice-Admiral Light Forces in HMS Orion arrived at Alexandia today with HMS Ajax and convoy ME 5. The third cruiser squadron (HMS Gloucester and HMS York) had been detached earlier for Piraeus where they arrived on this day. They had made a short stop at Suda Bay on 22 December.
HMAS Sydney arrived at Malta for a shot refit.
---------------------------------------------------------------------------------------------------------------------------------
Meanwhile in the western Mediterranean all was quiet as well. Air patrol was kept up throughout the day but they saw no action. Some destroyers carried out exercises.
At 1700 hours, the force was split into two groups; HMS Renown, HMS Malaya and HMS Ark Royal went ahead with a screen on nine destroyers (HMS Faulknor, HMS Firedrake, HMS Forester, HMS Fortune, HMS Foxhound, HMS Fury, HMS Hasty, HMS Hero and HMS Hereward) and set course for Gibraltar at 18 knots. The merchant vessels proceeded at 13 knots escorted by HMS Sheffield and five destroyers (HMS Duncan, HMS Encounter, HMS Isis, HMS Jaguar and HMS Wishart).
24 December 1940.
At 0001 hours, the Commander-in-Chief was in position 33°34’N, 25°27’E steering 120°.
There were no incidents during the day and Alexandria was reached around 1500 hours.
’Force H’ and convoy MG 1 and it’s escort all arrived at Gibraltar today. At 0730 hours, HMS Renown and three destroyers (HMS Faulknor, HMS Forester and HMS Foxhound had increased speed to 24 knots to exercises with the defences of Gibraltar. All ships of the ‘fast group’ had entered Gibraltar by 1230 hours. The ‘slow group’ entered Gibraltar around 1500 hours.
(9) 15 Dec 1940 Around 1330B/15, HMS Ajax then entered Suda Bay to fuel leaving again around 1600B/15.
The two cruisers rejoined company for patrol around 1720B/15. (14) 16 Dec 1940 Around 1145B/16, they departed for Suda Bay where they arrived
around 1800B/16. (14) 17 Dec 1940 [For more info see the event ' Operations MC 2, MC 3 and HIDE ' for 15 December 1940.] (14) 31 Dec 1940 En-route they were to provide cover for the transport Ulster Prince (British, 3791 GRT, built 1930) which was en-route from Port Said (departed 31 December) to Piraeus (arrived 5 January) escorted part of the way by the destroyer HMS Gallant (Lt.Cdr. C.P.F. Brown, DSC, RN) (returned to Alexandria on 2 January). (15) 1 Jan 1941 After having completed fuelling they departed around 1550B/1, to patrol in the southern Aegean to cover the Kaso Strait. (16) 2 Jan 1941 Around 1550B/2, they departed again to proceed to Piraeus. (16) 3 Jan 1941 6 Jan 1941 Convoy operations in the Mediterranean.
Timespan; 6 January to 18 January 1941.
The principal object of this operation was the passage of a convoy of four ships (five were intended, see below) from Gibraltar to Malta and Piraeus (Operation Excess). One of these was to unload her stores at Malta, the other three had supplies on board for the Greek army.
Three subsidiary convoys (Operation M.C. 4) were to be run between Malta and Egypt. These consisted of two fast ships from Malta to Alexandria (convoy M.E. 5½), two fast ships from Alexandria to Malta (convoy M.W. 5½) and six slow ships from Malta to Port Said and Alexandria (convoy M.E. 6).
Composition of the convoys and their escort.
The ‘Excess convoy from Gibraltar’ was made up of one ship that was to proceed with stores to Malta. This was the Essex (11063 GRT, built 1936). The three other ships were to proceed with stores to Piraeus, these were the Clan Cumming (7264 GRT, built 1938), Clan Macdonald (9653 GRT, built 1939) and Empire Song (9228 GRT, built 1940). It had the light cruiser HMS Bonaventure (Capt. H.G. Egerton, RN) and the destroyers HMS Hasty (Lt.Cdr. L.R.K. Tyrwhitt, RN), HMS Hero (Cdr. H.W. Biggs, DSO, RN), HMS Hereward (Cdr. C.W. Greening, RN) and HMS Duncan (A/Capt. A.D.B. James, RN) as close escort (‘Force F’). A fifth merchant ship was to have been part of this convoy and was to have proceeded to Malta with stores and troops. However this ship, the Northern Prince (10917 GRT, built 1929) grounded at Gibraltar and was not able to join the convoy. The about four-hundred troops now boarded HMS Bonaventure for passage to Malta.
The most dangerous part of the ‘Excess convoy’ would be the part between Sardinia and Malta. For a stretch of about 400 nautical miles ships were exposed to enemy air attack from bases in Sardinia and Sicily less then 150 nautical miles away from the convoy’s track. Also submarines and surface torpedo craft were a constant menace. An attack by large enemy surface forces was thought less likely although this was potentially more dangerous.
’Convoy M.W.5 ½ from Alexandria to Malta’ made the passage westwards at the same time as the Mediterranean fleet moved westwards (see below). This convoy was made up of HMS Breconshire (9776 GRT, built 1939) and Clan Macauley (10492 GRT, built 1936). These ships were escorted by HMS Calcutta (Capt. D.M. Lees, DSO, RN), HMS Defender (Lt.Cdr. G.L. Farnfield, RN) and HMS Diamond (Lt.Cdr. P.A. Cartwright, RN).
’Convoy’s M.E. 5½ and M.E. 6’ that sailed from Malta to Egypt will be dealth with later on.
Cover forces for these convoy’s
At Gibraltar there was ‘Force H’ which had the following ships available for the operation.
Battlecruiser HMS Renown (Capt. C.E.B. Simeon, RN and flagship of Vice-Admiral J.F. Somerville, RN, KCB, DSO, RN), battleship HMS Malaya (Capt. A.F.E. Palliser, DSC, RN), aircraft carrier HMS Ark Royal (Capt. C.S. Holland, RN), light cruiser HMS Sheffield (Capt. C.A.A. Larcom, RN) and the destroyers HMS Faulknor (Capt. A.F. de Salis, RN), HMS Firedrake (Lt.Cdr. S.H. Norris, DSO, DSC, RN), HMS Forester (Lt.Cdr. E.B. Tancock, DSC and Bar, RN), HMS Fortune (Lt.Cdr. E.N. Sinclair, RN), HMS Foxhound (Cdr. G.H. Peters, DSC, RN), HMS Fury (Lt.Cdr. T.C. Robinson, RN) and HMS Jaguar (Lt.Cdr. J.F.W. Hine, RN).
’Force H’ was to provide cover for the ‘Excess convoy’ from Gibraltar to the Sicilian narrows.
South-south-west of Sardina ‘Force H’ was to be reinforced by ‘Force B’ which came from the eastern Mediterranean and was made up of the light cruisers HMS Gloucester (Capt. H.A. Rowley, RN, flying the flag of Rear-Admiral E. de F. Renouf, CVO, RN), HMS Southampton (Capt. B.C.B. Brooke, RN) and the destroyer HMS Ilex (Capt. H.St.L. Nicholson, DSO and Bar, RN). The destroyer HMS Janus (Cdr. J.A.W. Tothill, RN) had also been part of 'Force B' during the passage from Alexandria to Malta but remained there for a quick docking. After this docking she departed Malta around noon on the 10th to join 'Force A'.
Further cover was to be provided by ‘Force A’, this was the Mediterranean fleet based at Alexandria. This force was made up of the following warships.
Battleships HMS Warspite (Capt. D.B. Fisher, CBE, RN, flying the flag of Admiral Sir A.B. Cunningham, KCB, DSO, RN), HMS Valiant (Capt. C.E. Morgan, DSO, RN), aircraft carrier HMS Illustrious (Capt. D.W. Boyd, CBE, DSC, RN, flying the flag of Rear-Admiral A.L.St.G. Lyster, CB, CVO, DSO, RN) and the destroyers HMS Jervis (Capt. P.J. Mack, DSO, RN), HMS Juno (Cdr. St.J.R.J. Thyrwhitt, RN), HMS Mohawk (Cdr. J.W.M. Eaton, RN), HMS Nubian (Cdr. R.W. Ravenhill, RN), HMS Greyhound (Cdr. W.R. Marshall-A’Deane, DSO, DSC, RN), HMS Gallant (Lt.Cdr. C.P.F. Brown, DSC, RN), HMS Griffin (Lt.Cdr. J. Lee-Barber, RN) and HMS Dainty (Cdr. M.S. Thomas, DSO, RN).
During the passage of the ‘Excess convoy’ three submarines were stationed off Sardinia. HMS Pandora off the east coast and HMS Triumph and HMS Upholder were stationed to the south of Sardinia.
Chronology of events
The actual ‘Excess convoy’ and it’s escort (Force F) departed Gibraltar before dark in the evening of January 6th. Course was set to the west as if to proceed into the Atlantic. This was done to deceive enemy spies based in Spain. They turned back in the night after moonset and passes Europa Point well before daylight next morning. At dawn the next morning HMS Bonaventure parted company with the convoy to make rendez-vous with ‘Force H’ which departed Gibraltar around that time. All that day the ‘Excess convoy’ followed the Spanish coast so as if to make for a Spanish port. During the night of 7/8 January the convoy crossed over towards the coast of North-Africa and steered eastwards towards the Sicilian narrows while keeping about 30 nautical miles from the shore of North Africa. ‘Force H’ overtook the convoy during the night and was now stationed to the north-east of it to shield it from Italian air attack. If Italian naval units were reported the plan was that he would join the convoy.
In the morning of the 8th, HMS Bonaventure rejoined the actual ‘Excess convoy’. Late in the afternoon of the 8th HMS Malaya escorted by HMS Firedrake and HMS Jaguar parted company with ‘Force H’ and joined the ‘Excess convoy’ very early in the evening.
At dawn on the 9th ‘Force H’ was ahead of the convoy. At 0500/9, while in position 37°45’N, 07°15’E, HMS Ark Royal flew off five Swordfish aircraft for Malta which was still some 350 nautical miles away. All of which arrived safely. ‘Force H’ then turned back and joined the ‘Excess convoy’ at 0900/9 about 120 nautical miles south-west of Sardinia. HMS Ark Royal meanwhile had launched several aircraft, one of her reconnaissance aircraft reported at 0918 hours that it had sighted two enemy cruisers and two destroyers but this soon turned out to be Rear-Admiral Renouf’s ‘Force B’ which was to join the Excess convoy for the passage through the Sicilian narrows. They joined the convoy about one hour later.
’Force B’ had departed Alexandria in the morning of the 6th with troop for Malta on board. They had arrived at Malta in the morning of the 8th and after disembarking the troops (25 officers and 484 other ranks of the Army and RAF) sailed early in the afternoon. At 0900/9 ‘Force B’ was sighted by an Italian reconnaissance aircraft. This aircraft soon made off when being fired at. One hour later another Italian reconnaissance aircraft was however sighted. It was engaged by the fighter patrol from HMS Ark Royal but managed to escape. At 1320 hours, while in position 37°38’N, 08°31’E, Italian bombers arrived on the scene and made their attack on the convoy.
The convoy of the four merchant ships was steaming in two columns in line ahead, 1500 yards apart. HMS Gloucester and HMS Malaya were leading the columns while HMS Bonaventure and HMS Southampton were the sternmost ships. The seven destroyers were placed as a screen ahead of the convoy. ‘Force H’, with HMS Renown, HMS Ark Royal, HMS Sheffield and their five escorting destroyers were on the convoy’s port quarter, operating in close support. The mean line of advance was 088° and the ships were zigzagging at 14 knots.
The enemy consisted of ten Savoia bombers. HMS Sheffield detected them on her radar about 43 nautical miles off, this was the maximum range of her radar equipment. They were fine on the starboard bow and came into sight fourteen minutes later, flying down the starboard side of the convoy out of range of the AA guns at a eight of about 11000 feet. At 1346 hours, when they were broad on the bow, they started their attack. They came in from 145°, which was the bearing of the sun. All the ships opened up a very heavy fire and the enemy was diverted of their course. Eight of the aircraft were seen to drop bombs, some of which fell close to HMS Gloucester and HMS Malaya but no damage was caused. The other two bombers were seen to turn away during their approach. Both were shot down by a Fulmar fighter from HMS Ark Royal. Three men from their crews were picked up from the water. Another bombers is thought to have been shot down by HMS Bonaventure. The other seven are thought to have got away.
Nothing more happened during the afternoon of the 9th. Reconnaissance showed that the Italian fleet was not at sea so at dusk, while in position 37°42’N, 09°53’E, some 30 nautical miles west of the Sicilian narrows and north of Bizerta, Tunisia, ‘Force H’ parted company with the ‘Excess convoy’ and set course to return to Gibraltar. Rear-Admiral Renouf in HMS Gloucester meanwhile continued eastwards with the convoy with his three cruisers and five destroyers of forces ‘B’ and ‘F’.
They had a quiet night, passing Pantelleria after moonset. They remained in deep water to reduce the danger of mines. Next morning, at dawn on the 10th at 0720 hours, they encountered two Italian torpedo boats in position 36°30’N, 12°10’E. HMS Jaguar, the port wing destroyer in the screen, and HMS Bonaventure, stationed astern of the convoy columns, sighted the enemy at the same time. Initially thinking they might be destroyers from the Mediterranean Fleet, which the convoy was due to meet. British ships reported the contact by signal to Rear-Admiral Renouf. HMS Bonaventure challenged the ‘strangers’ and fired a star shell and then turned to engage the enemy working up to full speed. Rear-Admiral Renouf meanwhile turned away with the bulk of the convoy. HMS Southampton, HMS Jaguar and HMS Hereward hauled out from their stations on the engaged side of the convoy and made for the enemy. HMS Bonaventure meanwhile was engaging the right-hand ship of the pair. When the other three ships arrived on the scene Bonaventure shifted her fire to the other enemy ship which came towards her at full speed to attack. The enemy fired her torpedoes which HMS Bonaventure avoided. The four British ships now quickly stopped the enemy but she did not sink. In the end HMS Hereward torpedoed the damaged Italian torpedo boat some 40 minutes later. The other Italian torpedo-boat meanwhile had disappeared. [The Italian ships were the torpedo-boats Vega, which was sunk, and the Circe. HMS Boneventure had sustained some superficial damage from splinters during the action.
Enemy air attacks during 10 January.
At 0800/10, Admiral Cunningham arrived on the scene with ‘Force A’ before the fight was finished. ‘Force A’ turned to the south-east in the wake of the ‘Excess convoy around 0830 hours. While doing so, the destroyer HMS Gallant hit a mine and had her bow blown off. [This was a mine from the Italian minefield ‘7 AN’]. HMS Mohawk took the stricken destroyer in tow towards Malta escorted by HMS Bonaventure and HMS Griffin. They were later joined by HMS Gloucester and HMS Southampton. While HMS Mohawk was passing the towline two Italian torpedo planes attacked but they had to drop their torpedoes from long range and they missed. Between 1130 and 1800 hours, as the tow crept along at five or six knots, with their escort zig-zagging at 20 knots, they were attacked or threatened by aircraft ten times. Nearly all German high level bombers, which came in ones, twos or threes. The enemy dropped bombs in five out of the ten attempts but no hits were obtained. At 1300 hours German dive bombers arrived an obtained a near miss on HMS Southampton causing some minor damage.
At 0500/11, when about 15 nautical miles from Malta, all was going well and Rear-Admiral Renouf made off with for Suda Bay, Crete with HMS Gloucester, HMS Southampton and HMS Diamond. This last ship had joined the evening before. HMS Gallant, still being towed by HMS Mohawk and escorted by HMS Bonaventure and HMS Griffin arrived at Malta in the forenoon. At Malta, HMS Bonaventure disembarked the soldiers she had on board. [HMS Gallant was further damaged by bombs while at Malta and was eventually found to be beyond economical repair and was cannibalized for spares.]
Meanwhile, Admiral Cunningham in ‘Force A’ had a similar experience on a larger scale. He had sailed from Alexandria on the 7th and enemy aircraft spotted his force already on the same day. During the afternoon of the 10th heavy dive bombing attacks were pressed home by the enemy with skill and determination. The main target was HMS Illustrious. Had the enemy attacked the convoy itself the four transports would most likely all have been sunk, instead the Ilustrious was disabled and she would be out of action of many months.
At noon on the 10th the transports were steering south-eastward, zigzagging at 14 to 15 knots with an escort of three destroyers. At 1320 hours, HMS Calcutta joined them. HMS Warspite, HMS Illustrious and HMS Valiant were steaming in line ahead on the convoy’s starboard quarter, course 110° and zigzagging at 17 to 18 knots. These ships were screened by seven destroyers. The weather was clear, with high cloud.
The fleet was in position 35°59’N, 13°13’E some 55 nautical miles west of Malta when the battle began with an air attack by two Savoia torpedo planes which were detected six nautical miles away on the starboard beam at 1220 hours. They came in at a steady level, 150 feet above the water and dropped their torpedoes about 2500 yards from the battleships. They were sighted a minute before firing and the ships received them with a barrage from long- and short-range guns, altering course to avoid the torpedoes, which passed astern of the rearmost ship HMS Valiant. Five Fulmar fighters from the Illustrious had been patrolling above the fleet. One had returned before the attack being damaged while assisting to destroy a shadower some time before the attack. The other four aircraft chased the torpedo aircraft all the way to Linosa Island, which was about 20 miles to the westward. They claimed to have damaged both the enemy machines.
Directly after this attack, while the ships were reforming the line, a strong force of aircraft were reported at 1235 hours, coming from the northward some 30 miles away. The Fulmars, of course, were then a long way off, flying low and with little ammunition remaining. Actually two were even out of ammunition. They were ordered to return and the Illustrious sent up four fresh fighters as well as reliefs for the anti-submarine patrol. This meant a turn of 100° to starboard into the wind to fly off these aircraft. The enemy aircraft came into sight in the middle of this operation which lasted about four minutes. All the ships opened fire. The fleet had just got back to the proper course, 110°, and the Admiral had made the signal to assume loose formation, when the new attack began. The enemy had assembled astern of their target ‘in two very loose and flexible formations’ at a height of 12000 feet.
They were Junkers dive bombers, perhaps as many as 36, of which 18 to 24 attacked HMS Illustrious at 1240 hours, while a dozen attacked the battleships and the destroyer screen. They came down in flights of three on different bearings astern and on either beam, to release their bombs at heights from 1500 to 800 feet, ‘a very severe and brilliantly executed dive-bombing attack’ says Captain Boyd of the Illustrious. The ships altered course continually, and beginning with long-range controlled fire during the approach, shifted to barrage fire as the enemy dived for attack. The ships shot down at least three machines, while the eight Fulmar fighters that were up shot down five more, at the coast of one British machine. Even the two Fulmars that were out of ammo made dummy attacks and forced two Germans to turn away. But, as Captain Boyd pointed out ‘ at least twelve fighters in the air would have been required to make any impression on the enemy, and double that number to keep them off’.
HMS Illustrious was seriously damaged. She was hit six times, mostly with armour-piercing bombs of 1100 pounds. They wrecked the flight deck, destroyed nine aircraft on board and put half the 4.5” guns out of action, and did other damage, besides setting the ship on fire fore and aft and killing and wounding many of the ship’s company (13 officers and 113 ratings killed and 7 officers and 84 ratings injured) . The Warspite too, narrowly escaped serious injury, but got away with a split hawsepipe and a damaged anchor.
As HMS Illustrious was now useless as a carrier and likely to become a drag on the fleet Captain Boyd decided to make for Malta. The Commander-in-Chief gave her two destroyers as escort, one from his own screen and one from the convoy’s (these were HMS Hasty and HMS Jaguar) and she parted company accordingly. She had continual trouble with her steering gear, which at last broke down altogether, so that she had to steer with the engines, making only 17 to 18 knots. Her aircraft that were in the air also proceeded to Malta.
A third attack came at 1330 hours. By this time HMS Illustrious was 10 nautical miles north-eastward of the battleships which, due to the manoeuvres during the previous attack, were nearly as far away from the transports. The enemy came in again with high level bombers. Seven machines attacked the Illustrious and seven more the battleships. They were received with heavy AA fire. All the bombs they dropped fell wide. HMS Calcutta claimed to have destroyed one of the attackers.
More serious in it’s results was a second dive-bombing attack upon HMS Illustrious at 1610 hours. There were 15 JU-87’s Stuka’s escorted by 5 fighters. Actually 9 of the Stuka’s dropped their bombs, the other 6 were kept at bay due to heavy AA fire from the Illustrious, Hasty and Jaguar. One bomb hit and two near misses on the Illustrious were obtained by the enemy for the loss of one of their aircraft which was shot down by the Illustrious and the Jaguar. A few minutes later the 6 Stuka’s that had been driven off attacked the battleships but they again retired after fire was opened on them.
At 1715 hours, 17 more Stuka’s attacked the battleships. Again they were received with heavy AA fire. The enemy dropped their bombs from a greater height and non of them hit although splinters from a near miss killed a rating on board HMS Valiant and a bombs fell very near HMS Janus but it did not explode. The ships may have destroyed one aircraft with their AA fire. Three of the Fulmars from the Illustrious came from Malta and destroyed three of the attackers.
This turned out to be the end of the ordeal for the ‘Excess Convoy’ and its supporting ships of war, but not for HMS Illustrious which had one more encounter with the enemy before she reached Malta. At about 1920 hours, a little more then an hour after sunset and in moonlight, some aircraft approached from seaward when she was only five nautical miles from the entrance to Grand Harbour, Malta. She had received warning from Malta that enemy aircraft were about and she sighted two – probably torpedo planes. Illustrious, Hasty and Jaguar fired a blind barrage on which the enemy disappeared. Directly afterwards HMS Hasty obtained an Asdic contact and attacked it with depth charges, but whether it was a submarine remains uncertain. HMS Illustrious finally entered harbour at 2100 hours accompanied by HMS Jaguar which had passengers to land.
Movements of the actual ‘Excess Convoy’.
In the meantime, after the mild attack at 1340/10, the convoy went on its way unhindered. Its movements then became involved in those of the Malta to Egypt convoys, which were to sail under cover of the main operation with the special support of Vice-Admiral Pridham-Whippell’s ‘Force D’ which was made up of the cruisers HMS Orion (Capt. G.R.B. Back, RN, flying the flag of Vice-Admiral H.D. Pridham-Whippell, CB, CVO, RN), HMS Ajax (Capt. E.D.B. McCarthy, RN), HMAS Perth (Capt. P.W. Bowyer-Smith, RN) and HMS York (Capt. R.H. Portal, DSC, RN). The first of these convoys, the two ships of M.W. 5½ (see above), had left Alexandria for Malta on 7 January, some hours after Admiral Cunningham sailed westwards with ‘Force A’ to meet the ‘Excess Convoy’. To reinforce ' Force D ' the light cruiser HMAS Sydney (Capt. J.A. Collins, CB, RAN) and destroyer HMAS Stuart (Capt. H.M.L. Waller, DSO, RAN) departed Malta on 8 January 1941. They joined ' Force D ' on the 9th. Both transports of this convoy reached Malta without adventure in the morning of the 10th escorted by HMS Calcutta, HMS Diamond and HMS Defender. On arrival HMS Calcutta joined the six slow ships which made up convoy M.E. 6 which was bound for Port Said and Alexandria. The ships in this convoy were the; Devis (6054 GRT, built 1938), Hoegh Hood (tanker, Norwegian, 9351 GRT, built 1936), Pontfield (tanker, 8290 GRT, built 1940), Rodi (3220 GRT, built 1928, former Italian), Trocas (tanker, 7406 GRT, built 1927) and Volo (1587 GRT, built 1938). They were escorted by four corvettes; HMS Peony (Lt.Cdr.(Retd.) M.B. Sherwood, DSO, RN), HMS Salvia (Lt.Cdr. J.I. Miller, DSO, RN, RNR), HMS Hyacinth (T/Lt. F.C. Hopkins, RNR), HMS Gloxinia (Lt.Cdr. A.J.C. Pomeroy, RNVR). At the end of the searched channel this convoy was joined by ‘Force D’. HMS Calcutta was then ordered to join the ‘Excess Convoy’ and arrived in time to defend it from the Italian bombers as already described.
The last convoy, M.E. 5½, two fast ships (the Lanarkshire (8167 GRT, built 1940) and Waiwera (12435 GRT, built 1934)) bound for Alexandria, also left Malta in the morning of the 10th under escort of HMS Diamond. They were to join the ‘Excess Convoy’ until they were to turn to the south to clear Crete and then proceed to Alexandria. The ‘Excess Convoy’ would then proceed to Piraeus, Greece. The two convoys met that afternoon. The transport Essex then left and proceeded to Malta escorted by HMS Hero. After the Essex was safely inside Grand Harbour, HMS Hero joined the fleet.
Vice-Admiral Pridham-Whippell stayed with convoy M.E. 6 until dark on the 10th. As ‘Force A’ was somewhat behind due to the air attacks and Admiral Cunningham ordered Vice Admiral Pridham-Whippell to position HMS Orion and HMAS Perth to the north of the convoy to be in a good position in case of an attack by Italian surface forces. ‘Force A’ made good ground during the night and was some 25 nautical miles north of the convoy by daylight on the 11th at which time Orion and Perth joined ‘Force A’. Their forces stayed within a few miles of the convoy until the afternoon when they turned back to help HMS Gloucester, HMS Southampton which had come under air attack (see below). In the evening the ships destined for Alexandria left the convoy, while HMS Calcutta went ahead to Suda Bay to fuel there. The three ships and their destroyer escort continued on to Piraeus where they arrived safely next morning, at 1000 on the 12th.
HMS Ajax and HMS York had been ordered to join convoy M.E. 6. HMS Ajax however was ordered to proceed to Suda Bay soon after she had joined the convoy. In the morning of the 11th therefore, Rear-Admiral Renouf in HMS Gloucester and with HMS Southampton and HMS Diamond in company, was ordered to overtake the convoy and support it. They were at that moment steering for Suda Bay having left the disabled Gallant off Malta some hours before. Rear-Admiral Renouf altered course accordingly and made 24 knots against the convoys 9 to 10 knots. He also send up a Walrus aircraft to find the convoy.
The sinking of HMS Southampton.
At 1522 hours, when his ships were some 30 nautical miles astern of the convoy, and in position 34°56’N, 18°19’E, they were suddenly attacked by a dozen German Ju-87 ‘Stuka’ dive-bombers. Fortune was against them. The attack came as an entire surprise and according to Captain Rowley of the Gloucester the ‘aircraft were not sighted until the whistle of the first bomb was heard’. Six machines attacked each cruiser, diving steeply from the direction of the sun, releasing a 550-lb bomb each, at heights of around 1500 to 800 feet. The ships opened fire with 4” AA guns and smaller AA guns. They also increased speed and altered course to avoid the attack but two bombs, perhaps three hit HMS Southampton causing disastrous damage. Another hit and some near misses did some damage to HMS Gloucester, most important damage was to her DCT (director control tower). Half-an-hour later seven high-level bombers attacked but they were detected in time and taken under fire as a result of which all bombs fell wide. During the attack the Walrus from HMS Gloucester returned and ditched alongside HMS Diamond which took off the crew and then scuttled the aircraft.
Rear-Admiral Renouf immediately reported the damage to his cruisers to Admiral Cunningham who went to their aid. He send Vice-Admiral Pridham-Whippell ahead with the Orion, Perth, Jervis and Janus. From Malta HMS Griffin and HMS Mohawk were sent. Before they arrived however, Rear-Admiral Renouf reported that the Southampton must be abandoned and that he would sink her. HMS Gloucester took on board 33 officers and 678 ratings of which 4 officers and 58 ratings were wounded while HMS Diamond took on board 16 wounded ratings. Upon this signal the battleships turned east again. HMS Southampton had cought fire badly upon being hit. For a time the ships company fought the fire successfully and kept the ship in action and under control but in the end the fire got out of control. Also it was found that some magazines could not be flooded. In the end the crew had to give it up and was taken off. A torpedo was fired into her by HMS Gloucester but it did not sink her. Soon afterwards Vice-Admiral Pridham-Whippell arrived on the scene and his flagship, HMS Orion then scuttled her with three more torpedoes (four were fired).
Further proceedings of the convoys and the fleet.
Next morning, the 12th, HMS Orion, HMS Perth, HMS Gloucester, HMS Jervis and HMS Janus joined Admiral Cunningham’s Force off the west end of Crete meeting there also A/Rear-Admiral Rawlings (‘Force X’) in HMS Barham (Capt. G.C. Cooke, RN, flying the flag of A/Rear-Admiral H.B. Rawlings, OBE, RN) and with HMS Eagle (Capt. A.R.M. Bridge, CBE, RN), HMS Ajax and their destroyer screen made up of HMAS Stuart, HMAS Vampire (Cdr. J.A. Walsh, RAN), HMAS Vendetta (Lt.Cdr. R. Rhodes, RAN), HMAS Voyager (Cdr. J.C. Morrow, DSO, RAN) and HMS Wryneck (Lt.Cdr. R.H.D. Lane, RN) which had departed Alexandria on 11 January. These ships were to have begun a series of attacks on the Italian shipping routes but the disabling of HMS Illustrious put an end to that part of the plan so Admiral Cunningham took HMS Warspite, HMS Valiant, HMS Gloucester and the destroyers HMS Jervis, HMS Janus, HMS Greyhound, HMS Diamond, HMS Defender, HMS Hero and HMAS Voyager straight to Alexandria where they arrived in the early morning hours of the 13th.
HMS Barham, HMS Eagle, HMS York, HMS Orion, HMS Ajax, HMAS Perth, HMAS Stuart, HMAS Vampire, HMAS Vendetta, HMS Wryneck, HMS Griffin and HMS Mohawk then proceeded to Suda Bay to fuel where they arrived around 1900/12.
After fuelling at Suda Bay, Vice-Admiral Pridham-Whippell took HMS Orion, HMAS Perth to Piraeus where they arrived at 0230/13. There they took some troops from the ‘Excess Convoy’ on board and departed for Malta at 0600/13, a task the Southampton was to have done. They arrived at Malta around 0830/14. After unloading HMS Orion departed for Alexandria later the same day together with HMS Bonaventure and HMS Jaguar. They arrived at Alexandria in the morning of the 16th. HMAS Perth remained at Malta due to defects.
Meanwhile the six ships of convoy M.E. 6 arrived safely at their destinations on 13 January.
HMS Barham, HMS Eagle, HMS Ajax, HMAS Stuart, HMS Juno, HMS Hereward, HMS Hasty and HMS Dainty departed Suda Bay for operations south-west of Crete early in the morning of the 13th. The destroyers HMS Ilex, HMS Wryneck, HMAS Vampire and HMAS Vendetta also departed Suda Bay to conduct a sweep in the Kythera Channel. They joined ‘Force X’ around noon but Vampire and Vendetta were soon detached to investigate explosions which turned out to be underwater volcano activity. Meanwhile Ilex and Wryneck were also detached for a sweep towards Stampalia. These four destroyers fuelled at Suda Bay on the 14th and then departed for Piraeus where they arrived in the evening of the 14th. An A/S sweep had been carried out en-route.
’Force X’ returned to Suda Bay in the afternoon of the 15th and departed from there on the 16th for Alexandria where they arrived on the 18th, although some of the destroyers remained behind at Suda Bay.Leave van given to their crews at Piraeus and the destroyers departed Piraeus early on the 16th. HMS Ilex proceeded independently while HMAS Vampire, HMAS Vendetta and HMS Wryneck peroceeded to Suda Bay joining ' Force X ' on its departure.
Not a single of the 14 merchant ships in the convoys was lost but the fleet paid a heavy price for this loosing a light cruiser and a valuable aircraft carrier out of action for many months. As there were now German aircraft based in Italy future operations for the supply of Malta would be extremely difficult and dangerous.
The return of ' Force H' to Gibraltar.
That now leaves us with the return of ' Force H ' to Gibraltar which parted company with the eastbound convoy and its escort at 1920/9 in position 37°42'N, 09°53'E. ' Force H ' turned away to port. At 1935/9, ' Force H ' alter course to 300° and increased speed to 20 knots. Further alterations to course were made at 2200/9 to 260° and at mindnight durng the night of 9/10 January to 290°.
At 0100/10 course was altered for a quarter of an hour to clear three merchant vessels which had been sighted to the northward in position 38°03'N, 07°58'N, steering 180°. At 0900/10, course was altered to 246° and speed reduced to 18 knots.
A reconnaissance flight of seven aircraft was flown off to carry out an all round search to a depth of 50 miles from position 38°44'N, 05°18'E. On their return at 1030/10, they had nothing to report. Visibility was variable - from 5 to 15 miles. There was a slight sea and wind, force 3 from south-south-west. Speed was increased to 19 knots at 1110/10 since there appeared vibration in HMS Malaya when proceeding at 18 knots.
During the afternoon, three attack exercises were carried out on ' Force H ' by a total of nine Swordfish. Flying was completed by 1800/10. Moonlight exercises were cancelled due to a deterioration of weather and visibility. During the night the wind veered to the southwest and increased to force 6.
At 2345/10, Captain (D), 8th Destroyer Flottila, reported that the destroyers could maintain 19 knots provided that their A/S domes were housed, but would have to reduce to 16 knots if they were to remain lowered. Destroyers were accordingly orderd to house their domes.
The sea increased considerably, and by 0020/11 it was necessary to reduce speed to 14 knots in order to prevent damage to the destroyers. Course was altered for a short time at 0135/11 to avoid a merchant ship sighted in position 36°37'N, 00°06'W, steering to the north. Speed was further reduced to 11 knots by 0310/11, but gradual improvement in sea conditions permitted a corresponding increase of speed, so that by 0700/11, ' Force H ' was proceeding at 17 knots. Later in the day HMS Fury reported tat her forward gun shield had been distorted and that the gun could not be trained.
Six Swordfish were flown off by HMS Ark Royal at 0715/11 in order to carry out a light torpedo attack on ' Force H '. They were landed at 0815/11. At 0930/11, course was altered to 270° and speed increased to 19 knots. Weather conditions continued unfavourable, and not only had air training to be abandoned, but also the projected reconnaissance flight to Oran and Mers-el-Kebir to obtain photographs requisted by the Admiralty.
A London flying boat sent out from Gibraltar as A/S patrol ahead of ' Force H ' was sighted at 1015/11. By 1220/11, the sea had moderated sufficiently for the destroyers to increase speed and HMS Renown, HMS Sheffield, HMS Faulknor and HMS Foxhound proceeded ahead at 24 knots, increasing at 1730/11 to 26 knots. They arrived in harbour at 1920/11. The remainder of ' Force H ' arrived in harbour at 2020/11. (17) 6 Jan 1941 7 Jan 1941 After having completed fuelling they departed again around 1515B/7 to patrol in the western Aegean. (16) 8 Jan 1941 They departed again around 1100B/8, in company with HMS Orion (Capt. G.R.B. Back, RN, flying the flag of Vice-Admiral H.D. Pridham-Whippell, CB, CVO, RN) and HMS York (Capt. R.H. Portal, DSC, RN) for operations.
[See the event ' Operations Excess and Operation MC 4 ' for 6 January 1941 for more information.] (16) 21 Jan 1941 For the daily positions of these cruisers during 21/22 January 1941 see the map below.
(18) 22 Jan 1941 Extraction of the damaged HMS Illustrious from Malta.
Timespan; 22 January to 25 January 1941.
Having arrived at Malta in the evening of January 10th, HMS Illustrious (Capt. D.W. Boyd, CBE, DSC, RN) underwent temporary repairs there. However the enemy soon noticed this and commenced a series of heavy air attacks with the object of destroying the crippled carrier. It soon became obvious that the Illustrious had to leave Malta as soon as possible.
While at Malta HMS Illustrious was damaged further in these air attacks. She was hit again on the 16th but this caused no serious damage. On the 17th she was hit again on the quarterdeck but again this caused no serious damage. On the 19th she was hit yet again and now more serious damage was caused causing the operation to move her to be delayed. At 1927/20 Vice-Admiral Malta reported that HMS Illustrious would be ready to sail after noon on the 23rd at a speed of about 20 knots.
Departure of HMS Illustrious from Malta.
At 1930/23 HMS Illustrious departed Malta escorted by HMS Jervis (Capt. P.J. Mack, DSO, RN), HMS Janus (Cdr. J.A.W. Tothill, RN), HMS Juno (Cdr. St.J.R.J. Thyrwhitt, RN) and HMS Greyhound (Cdr. W.R. Marshall-A’Deane, DSO, DSC, RN). During the night of 23/24 January the Illustrious made better speed then anticipated (about 24 knots).
A cover force, ‘Force B’, made up of HMS Orion (Capt. G.R.B. Back, RN, flying the flag of Vice-Admiral H.D. Pridham-Whippell, CB, CVO, RN), HMS Ajax (Capt. E.D.B. McCarthy, RN), HMS Bonaventure (Capt. H.G. Egerton, RN), HMS York (Capt. R.H. Portal, DSC, RN), HMS Ilex (Capt. H.St.L. Nicolson, DSO and Bar, RN) and HMS Hero (Cdr. H.W. Biggs, DSO, RN), which had departed Suda Bay around dawn on the 23rd, failed to make contact with her.
However in the forenoon ‘Force C’ made up of HMS Barham (Capt. G.C. Cooke, RN, flying the flag of A/Rear-Admiral H.B. Rawlings, OBE, RN), HMS Valiant (Capt. C.E. Morgan, DSO, RN), HMAS Perth (Capt. P.W. Bowyer-Smith, RN), HMS Nubian (Cdr. R.W. Ravenhill, RN), HMS Mohawk (Cdr. J.W.M. Eaton, RN), HMS Hasty (Lt.Cdr. L.R.K. Tyrwhitt, RN), HMS Hereward (Cdr. C.W. Greening, RN), HMS Griffin (Lt.Cdr. J. Lee-Barber, RN) and HMS Diamond (Lt.Cdr. P.A. Cartwright, RN), which had departed Alexandria around noon on the 22nd, joined her.
HMS Illustrious was detected by enemy aircraft twice but no air attacks on her developed. ‘Force B’ however came under heavy air attack. Torpedo bombing, high-level bombing and dive-bombing attacks were carried out. HMS Hero became detached due to a breakdown in her steering gear and was singled out for a specially heavy attack. There were many near misses no ship was actually hit, although HMS Ajax sustained some minor damage from a near miss. At least one enemy aircraft was shot down by AA gunfire.
All forces involved arrived at Alexandria on the 25th minus HMAS Perth which had been detached P.M. on the 25th to operate in the Aegean. (19) 22 Jan 1941 30 Jan 1941 31 Jan 1941 After fuelling they departed again around 2200B/31 to resume patrol. (16) 1 Feb 1941 Diversion in the eastern Mediterranean during operations by Force H in the western Mediterranean.
1 February 1941.
The light cruisers HMS Orion (Capt. G.R.B. Back, RN, flying the flag of Vice-Admiral H.D. Pridham-Whippell, CB, CVO, RN), HMS Bonaventure (Capt. H.G. Egerton, RN) and the destroyers HMS Ilex (Capt. H.St.L. Nicolson, DSO and Bar, RN), HMS Hero (Cdr. H.W. Biggs, DSO, RN) and HMS Hereward (Cdr. C.W. Greening, RN) departed Alexandria at 0300B/1. The destroyers were detached shortly after leaving harbour to proceed to the north-eastward to sweep the waters around Rhodes during the night of ½ February. They were to be at Suda bay at 0700/2.
The cruisers were to proceed through the Kaso Strait around 2200B/1. They then were to proceed to Suda Bay where they were to make rendez-vous with the destroyers.
At 0800B/1 the Mediterranean Fleet departed Alexandria. The Fleet was made up of the battleships HMS Warspite (Capt. D.B. Fisher, CBE, RN, flying the flag of Admiral Sir A.B. Cunningham, KCB, DSO, RN), HMS Barham (Capt. G.C. Cooke, RN, flying the flag of A/Rear-Admiral H.B. Rawlings, OBE, RN), the aircraft carrier HMS Eagle (Capt. A.R.M. Bridge, CBE, RN) and the destroyers HMS Jervis (Capt. P.J. Mack, DSO, RN), HMS Janus (Cdr. J.A.W. Tothill, RN), HMS Nubian (Cdr. R.W. Ravenhill, RN), HMS Mohawk (Cdr. J.W.M. Eaton, RN), HMS Diamond (Lt.Cdr .P.A. Cartwright, RN), HMS Defender (Lt.Cdr. G.L. Farnfield, RN), HMS Wryneck (Lt.Cdr. R.H.D. Lane, RN), HMAS Vendetta (Lt.Cdr. R. Rhodes, RAN) and HMAS Vampire (Cdr. J.A. Walsh, RAN).
At 2200B/1 the light cruisers HMS Ajax (Capt. E.D.B. McCarthy, RN), HMAS Perth (Capt. P.W. Bowyer-Smith, RN) and the destroyer HMS Jaguar (Lt.Cdr. J.F.W. Hine, RN) departed Suda Bay to join the Mediterranean Fleet at sea.
2 February 1941.
At 0645B/2 Italian reconnaissance aircraft sighted the Fleet. At 0800 hours the Fleet was in position 34.25’N, 23.49’E. At this time HMS Ajax, HMAS Perth and HMS Jaguar joined the Fleet. HMS Wryneck was detached to return to Alexandria. She was ordered to proceed along the western desert coast in order to reinforce the inshore squadron during her passage.
At 1500B/2, HMS Defender parted company and proceeded to Malta where she was to refit. She also had RAF personnel on board for Malta. She arrived at Malta at 0800/3.
The destroyer HMS Decoy (Cdr. E.G. McGregor, DSO, RN), which had completed her repairs, left Malta at 1900B/2 to join the Fleet at 1100/3.
HMS Orion, HMS Bonaventure, HMS Ilex, HMS Hero and HMS Hereward joined the Fleet at 1545B/2. No enemy had been encountered during their operations. HMS Bonaventure was detached shortly afterwards on account of her shortage of ammunition. She arrived back at Alexandria around 1300B/3.
At 1800B/2, HMS Orion, HMS Ajax, HMAS Perth, HMS Ilex and HMS Hereward were detached to cover the movements of HMS Defender and HMS Decoy (see above) during the night. They later turned around to rejoin the fleet by 0900B/3.
The Fleet continued to proceed to the north-west until 0100B/3, then turned west but at 0300B/3 turned to the east.
3 February 1941.
At 0800B/3 a signal was received from Force H that ‘ Operation Picket ‘ had been completed but that ‘ Operation Result ‘ had been abandoned due the the severe weather conditions. As ‘ Operation MC 7 ‘’s main purpose was a diversion for these operations Admiral Cunningham decided to return to Alexandria.
Vice-Admiral Pridham-Whippell’s force rejoined the fleet at 0900B/3. At 0930B/3, HMS Ajax and HMAS Perth were detached for patrol duty in the Aegean to cover convoy’s. The destroyers HMAS Vampire and HMAS Vendetta were detached with orders to fuel at Suda Bay and then to join the escort of convoy AS 14 coming from the Aegean towards Alexandria / Port Said.
HMS Decoy, coming from Malta, joined the fleet at 1130B/3.
4 February 1941.
The Mediterranean Fleet returned to Alexandria around 1830B/4. Practice attacks by aircraft from HMS Eagle had been made on the fleet during the day. (19) 1 Feb 1941 Around 2200B/1 the light cruisers HMS Ajax, HMAS Perth and the destroyer HMS Jaguar (Lt.Cdr. J.F.W. Hine, RN) departed Suda Bay to join the Mediterranean Fleet at sea for operation MC 7.
[For more information on this operation see the event ' Operation MC 7 ' for 1 February 1941.] (16) 4 Feb 1941 5 Feb 1941 7 Feb 1941 12 Feb 1941 Clearence of Benghazi harbour.
At 0730B/12, HMS Orion (Capt. G.R.B. Back, RN, flying the flag of Vice-Admiral H.D. Pridham-Whippell, CB, CVO, RN) and HMS Ajax (Capt. E.D.B. McCarthy, RN) departed Alexandria to make rendez-vous in position 34°00'N, 21°00'E with the Aegean Force.
The Aegean force, made up of HMS York (Capt. R.H. Portal, DSC, RN), HMS Bonaventure (Capt. H.G. Egerton, RN), HMS Jervis (Capt. P.J. Mack, DSO, RN), HMS Janus (Cdr. J.A.W. Tothill, RN), HMS Jaguar (Lt.Cdr. J.F.W. Hine, RN) and HMS Mohawk (Cdr. J.W.M. Eaton, RN) departed Suda Bay at 1700B/12 to make this rendez-vous.
The whole of this force was to cover the entry of the Inshore Squadron into Benghazi, advancing into the Gulf of Sirte at night and to retire towards Crete by day.
HMS Aphis (Lt.Cdr.(Retd.) J.O. Campbell, DSC, RN) entered Benghazi during daylight on the 12th.
HMS Chakla (Cdr. L.C. Bach, RD, RNR), HMAS Stuart (Capt. H.M.L. Waller, DSO, RAN), HMAS Voyager (Cdr. J.C. Morrow, DSO, RAN), HMAS Vampire (Cdr. J.A. Walsh, RAN), HMS Fareham (Lt. W.J.P. Church, RN), HMS Peony (Lt.Cdr.(Retd.) M.B. Sherwood, DSO, RN) and HMS Hyacinth (T/A/Lt.Cdr. F.C. Hopkins, DSC, RNR) left Tobruk at 0730B/12 to reach Benghazi early on the 13th.
On the 13th, HMS Chakla, HMS Fareham, HMS Peony and HMS Hyacinth entered Bengazi harbour with the destroyers remaining out on patrol. Between 0600B/13 and 0630B/13, first HMS Hereward (Cdr. C.W. Greening, RN) and then HMS Decoy (Cdr. E.G. McGregor, DSO, RN) joined the destroyers on patrol. Several air attacks then followed. Later HMS Hereward, with minesweeping gear embarked, entered Bengazi harbour.
In the afternoon HMAS Vampire was detached to return to Tobruk to escort the monitor HMS Terror (Cdr. H.J. Haynes, DSC, RN) from there to Benghazi.
The remaining destroyers conducted a covering sweep to the north-west of Benghazi during the night.
On the 14th, HMS Hereward rejoined the other destroyers on their return from patrol. P.M. HMS Decoy and HMS Hereward were detached to proceed to Alexandria and HMAS Voyager to Tobruk. HMAS Stuart set course to proceed to Derna. (21) 14 Feb 1941 HMS Orion (Capt. G.R.B. Back, RN, flying the flag of Vice-Admiral H.D. Pridham-Whippell, CB, CVO, RN) and HMS Ajax (Capt. E.D.B. McCarthy, RN) had parted company 1100/14 to proceed to Alexandria. This order was however later cancelled and they were ordered to proceed to Suda Bay instead where they arrived around 1800/15. (22) 19 Feb 1941 19 February 1941.
The purpose of this operation was to transport two battalions of infantry and certain most urgent stores to Malta in three cruisers; HMS Orion (Capt. G.R.B. Back, RN, flying the flag of Vice-Admiral H.D. Pridham-Whippell, CB, CVO, RN), HMS Ajax (Capt. E.D.B. McCarthy, RN) and HMS Gloucester (Capt. H.A. Rowley, RN, flying the flag of Rear-Admiral E. de F. Renouf, CVO, RN) and to convoy Breconshire (9776 GRT, built 1939) and Clan Macaulay (10492 GRT, built 1936) from Malta to the east (Alexandria / Port Said) escorted by HMS Hotspur (Lt.Cdr. C.P.F. Brown, DSC, RN) and HMS Havock (Cdr. R.E. Courage, DSO, DSC, RN) (which last destroyer had completed her repairs there). Also the destroyer HMS Diamond (Lt.Cdr. P.A. Cartwright, RN) was to proceed to Malta for refit.
Around 1200B/19, HMS Eagle (Capt. A.R.M. Bridge, CBE, RN) proceeded to see for exercises with her aircraft. She was escorted by the destroyers HMS Decoy (Cdr. E.G. McGregor, DSO, RN), HMS Dainty (Cdr. M.S. Thomas, DSO, RN), HMS Diamond and HMS Hereward (Cdr. C.W. Greening, RN).
The operation was to be covered by ‘Force A’ which departed Alexandria around 1630B/19 and was made up of the battleships HMS Barham (Capt. G.C. Cooke, RN, flying the flag of Rear-Admiral H.B. Rawlings, OBE, RN), HMS Valiant (Capt. C.E. Morgan, DSO, RN), the aircraft carrier HMS Eagle (which was to join on completion of her flying exercises). These were escorted by the destroyers HMS Jervis (Capt. P.J. Mack, DSO, RN), HMS Janus (Cdr. J.A.W. Tothill, RN), HMS Jaguar (Lt.Cdr. J.F.W. Hine, RN), HMS Ilex (Capt. H.St.L. Nicolson, DSO and Bar, RN), HMS Hereward, HMS Hero (Cdr. H.W. Biggs, RN), HMS Hasty (Lt.Cdr. L.R.K. Tyrwhitt, RN), HMS Dainty and HMS Decoy. When clear of the swept channel HMS Eagle and her escorting destroyers joined.
’Force B’ was to transport the troops and was made up of the light cruisers HMS Orion, HMS Ajax, HMS Gloucester. These were escorted by the destroyers HMS Nubian (Cdr. C.W. Ravenhill, RN), HMS Mohawk (Cdr. J.W.M. Eaton, RN) and HMS Diamond. 410 Army officers and other ranks were embarked in Orion, 374 in Ajax and 657 in Gloucester. Also stores were loaded. This force departed Alexandria around 1730B/19.
20 February 1941.
The convoy from Malta departed eastwards at dusk. All other forces proceeded with the operation as planned.
21 February 1941.
At 0630B/20, ‘Force B’ arrived at Malta having made the passage unobserved. They departed again, less HMS Diamond at 1900B/20 having disembarked the troops and stores. During the night HMS Nubian and HMS Mohawk were detached to join ‘Force A’ at daylight the next morning.
’Force A’ was joined by Breconshire and HMS Havock. This force was also not sighted by the enemy.
However at 1600B/20 the Clan Macaulay, and her escorts, the AA cruiser HMS Coventry (Capt. D. Gilmour, RN), which had joined at daylight that day coming from Tobruk, and the destroyer HMS Hotspur, were bombed by five Heinkel 111’s. One bomb passed through the funnel of the Clan Macaulay without causing an serious damage or casualties. One of these Heinkels attacked with a torpedo which missed and was subsequently shot down by Fulmars from HMS Eagle. Another Heinkel was severely damaged and possibly also shot down by the Fulmars.
22 February 1941.
When HMS Nubian and HMS Mohawk joined ‘Force A’ around daylight. HMS Decoy and HMS Hereward were then detached to Suda Bay where they arrived later the same day. Shortly before noon HMS Gloucester was detached from ‘Force B’ also with orders to proceed to Suda Bay where she arrived around 1830B/22.
The destroyers HMAS Stuart (Capt. H.M.L. Waller, DSO, RAN) and HMAS Vampire (Cdr. J.A. Walsh, RAN) joined the fleet coming from Tobruk. HMS Dainty and HMS Hasty were then detached with orders to proceed to Tobruk where they arrived later the same day.
All forces continued to proceed to the east without incident.
23 February 1941.
At 0745B/23, Breconshire, HMS Coventry and HMS Havock arrived at Alexandria.
’Force B’ arrived at Alexandria at 1000B/23.
Clan Macaulay and HMS Hotspur arrived at Port Said at 1630B/23.
’Force A’ arrived at Alexandria at 1830B/23.
(19) 28 Feb 1941 Around 1315B/28, they were joined by the light cruiser HMAS Perth (Capt. P.W. Bowyer-Smith, RN) and the destroyers HMS Hasty (Lt.Cdr. L.R.K. Tyrwhitt, RN) and HMS Jaguar (Lt.Cdr. J.F.W. Hine, RN).
Around 1425B/28, HMS Nubian, HMS Jaguar and HMS Hasty parted company to conduct a sweep between Rhodes and Castelorizo and to proceed to Alexandria afterwards. The cruisers then proceeded northwards to patrol south of the Kaso Straits to provide cover for the destroyers and convoys. (23) 2 Mar 1941 After fuelling, they departed again around 1730B/2 to patrol in the western Aegean. (24) 3 Mar 1941 4 Mar 1941 Around 1800B/4, she joined HMS Ajax (Capt. E.D.B. McCarthy, RN) and course was set to proceed to Alexandria via the Anti-Kythira Channel. (24) 6 Mar 1941 7 Mar 1941 8 Mar 1941 10 Mar 1941 Around 1620B/10, they departed Suda Bay to proceed to Alexandria / Port Said via the Anti-Kythira Channel. (25) 11 Mar 1941 HMS Orion and HMAS Perth proceeded to Alexandria where they arrived around 1745B/19.
HMS Ajax arrived at Port Said around 0830B/12. (25) 19 Mar 1941 Convoy MW 6 to Malta.
19 March 1941.
On 19 March 1941 three merchant vessels departed from Haifa to Malta. One more merchant vessel departed from Alexandria.
The merchant vessels that departed from Haifa were the City of Manchester (8917 GRT, built 1935), Clan Ferguson (7347 GRT, built 1938) and Perthshire (10496 GRT, built 1936). They were escorted by HMS Hotspur (Lt.Cdr. C.P.F. Brown, DSC, RN) and HMS Griffin (Lt.Cdr. J. Lee-Barber, DSO, RN).
The merchant vessel that departed from Alexandria was the City of Lincoln (8039 GRT, built 1938). She was escorted by HMS Greyhound (Cdr. W.R. Marshall-A'Deane, DSO, DSC, RN).
20 March 1941.
Around 0430B/20, HMS Bonaventure (Capt. H.G. Egerton, RN) departed Alexandria to joined the convoy which was known as ‘Force C’.
Around 0700B/20, ‘Force A’ which was made up of the battleships HMS Warspite (Capt. D.B. Fisher, CBE, RN, flying the flag of Admiral Sir A.B. Cunningham, KCB, DSO, RN), HMS Barham (Capt. G.C. Cooke, RN, flying the flag of A/Rear-Admiral H.B. Rawlings, OBE, RN), HMS Valiant (Capt. C.E. Morgan, DSO, RN), aircraft carrier HMS Formidable (Capt. A.W.La T. Bisset, RN, flying the flag of A/Rear-Admiral D.W. Boyd, CBE, DSC, RN) departed Alexandria to cover
this convoy. These capital ships were escorted by the destroyers HMS Jervis (Capt. P.J. Mack, DSO, RN), HMS Janus (Cdr. J.A.W. Tothill, RN), HMS Jaguar (Lt.Cdr. J.F.W. Hine, RN), HMS Juno (Cdr. St.J.R.J. Thyrwhitt, RN), HMS Mohawk (Cdr. J.W.M. Eaton, RN), HMS Nubian (Cdr. R.W. Ravenhill, RN), HMS Ilex (Capt. H.St.L. Nicolson, DSO and Bar, RN), HMS Havock (Lt. G.R.G. Watkins, RN) and HMS Hero (Cdr. H.W. Biggs, DSO, RN).
21 March 1941.
Around 0700B/21, ‘Force B’ which was made up of the cruisers HMS Orion (Capt. G.R.B. Back, RN, flying the flag of Vice-Admiral H.D. Pridham-Whippell, CB, CVO, RN), HMS Ajax (Capt. E.D.B. McCarthy, RN), HMAS Perth (Capt. P.W. Bowyer-Smith, RN) and HMS York (Capt. R.H. Portal, DSC, RN) departed Suda Bay to join ‘Force A’ at sea. Before they did so HMS Gloucester (Capt. H.A. Rowley, RN) joined ‘Force B’ around noon. She came from Piraeus. The destroyers HMAS Stuart (Capt. H.M.L. Waller, DSO, RAN), HMS Hasty (Lt.Cdr. L.R.K. Tyrwhitt, RN) and HMS Hereward (Lt. W.J. Munn, RN) were also in company. HMS Hasty, like HMS Gloucester came from Pireaus. These ships joined up with ‘Force A’ around 1600B/21.
When ‘Force A’ and ‘Force B’ joined up, HMS Havock was detached to the convoy (‘Force C’). Also on this day ‘Force C’ was reinforced by the AA-cruisers HMS Coventry (Capt. D. Gilmour, RN), HMS Calcutta (Capt. D.M. Lees, DSO, RN), HMS Carlisle (Capt. T.C. Hampton, RN) which had been on convoy escort duty in the Aegean.
During the night of 21/22 March 1941, ‘Force A’ remained about 20 nautical miles north of ‘Force C’ with ‘Force B’ a further 20 nautical miles to the north-west.
22 March 1941.
At 0740 hours ‘Force B’ rejoined ‘Force A’ and remained close to the convoy all day. None of the forces was detected by enemy air reconnaissance all day.
One Fulmar fighter from HMS Formidable crashed into the sea around 1115 hours. The crew was rescued by HMS Gloucester.
At 2000 hours, when in position 35°08’N, 16°42’E, ‘Force A’ parted company. They set course for Alexandria after covering ‘Force B’ during the night. ‘Force B’, reinforced with HMS Nubian and HMS Mohawk from ‘Force A’, covered ‘Force C’ to the northward during the night.
HMS Coventry and HMS Carlisle left the convoy (‘Force C’) at 2030 hours and proceeded to Alexandria. The remainder of the convoy took the direct route to Malta at the maximum speed of the merchant ships.
At 1945 hours, HMS Defender (Lt.Cdr. G.L. Farnfield, RN), which had been refitting at Malta, left that place to join ‘Force A’.
23 March 1941.
At 0800 hours, ‘Force A’ was in position 35°16’N, 19°32’E where it was rejoined by ‘Force B’. HMS Defender, coming from Malta, joined shortly afterwards. Course was continued towards Alexandria during the day.
The convoy (‘Force C’) arrived at Malta safely but were bombed in the harbour. HMS Bonaventure and HMS Griffin were slightly damaged by near misses. The City of Lincoln was hit on the bridge and the Perthshire took a hit in No.1 hold.
The cruisers and destroyers of ‘Force C’ departed Malta at 1930B/23.
At 1900B/23, ‘Force B’ had been detached to cover the passage east of ‘Force C’. ‘Force B’ was strengthened by HMS Ilex and HMS Hasty while HMS Hereward was detached from ‘Force A’ to strengthen the escort of convoy AN 22.
24 March 1941.
At 0800 hours, ‘Force A’ was in position 32°27'N, 25°45'E and continued direct to Alexandria where it arrived around 2230B/24.
The cruisers and destroyers of ‘Force C’ joined ‘Force B’ around 0730 hours. HMS Coventry and HMS Hereward joined the escort of convoy AN 22. HMS Carlisle arrived at Alexandria in the afternoon.
HMS Calcutta, HMS Ilex and HMS Hasty proceeded to Port Said.
Cover was provided for convoy AN 22 from west of the Kithera Channel.
HMS Bonaventure, HMS Griffin, HMS Greyhound, HMS Hasty and HMS Hotspur proceeded to Alexandria where they arrived the next day.
Part of ’Force B’ then patrolled the Aegean while the other part went to Suda Bay. (19) 19 Mar 1941 Around 1500B/19, HMS York (Capt. R.H. Portal, DSC, RN), which had been on patrol, joined.
They all arrived at Suda Bay around 1330B/20. (25) 21 Mar 1941 [For more info see the event ' Operation MC 9. ' for 19 March 1941.] 27 Mar 1941 For further developments see the event ' Battle of Cape Matapan. ' for 28 March 1941.] (26) 28 Mar 1941 Timespan: 26 to 30 March 1941. (All times are zone B/-2)
26 March 1941.
The Italian battleship Vittorio Veneto departed Naples escorted by the destroyers Alpino, Bersagliere, Fuciliere and Granatiere from the 13th Destroyer Division.
The Italian heavy cruisers Fiume, Zara and Pola from the 1st Cruiser Division departed Taranto escorted by the destroyers Vittorio Alfieri, Giosuè Carducci Alfredo Oriani and Vincenzo Gioberti from the 9th Destroyer Division.
The Italian light cruisers Luigi di Savoia Duca Degli Abruzzi and Giuseppe Garibaldi from the 8th Cruiser Division departed Brindisi escorted by the destroyers Nicoloso Da Recco and Emanuele Pessagno from the 16th Destroyer Division.
27 March 1941.
The Italian battleship Vittorio Veneto and her escorting destroyers passed the Straits of Messina after which they were joined by the heavy cruisers Trieste, Trento and Bolzano (3rd Cruiser Division) and their escorting destroyers from the 12th Destroyer Division; Ascari, Carabiniere and Corazziere which sailed from Messina.
The 1st and 8th Cruiser Divisions were to proceed to the Aegean to search for British/Greek convoy’s while the Veneto and the 3rd Cruiser Division were to proceed towards Gavdos Island to take up a cover position. Late in the evening however the 1st and 8th Cruiser Divisions were ordered to join the Veneto and 3rd Cruiser Division.
However in the meantime the British were aware of the Italian fleet movements and shortly after noon this day the 3rd Cruiser Division had been sighted and reported by a Sunderland aircraft.
In response Admiral Cunningham departed Alexandria at 1900 hours with the Mediterranean Fleet which was made up of the battleships HMS Warspite (Capt. D.B. Fisher, CBE, RN, flying the flag of Admiral Sir A.B. Cunningham, KCB, DSO, RN), HMS Valiant (Capt. C.E. Morgan, DSO, RN), HMS Barham (Capt. G.C. Cooke, RN, flying the flag of A/Rear-Admiral H.B. Rawlings, OBE, RN), aircraft carrier HMS Formidable (Capt. A.W.La T. Bisset, RN, flying the flag of A/Rear-Admiral D.W. Boyd, CBE, DSC, RN), HMS Jervis (Capt. P.J. Mack, DSO, RN), HMS Janus (Cdr. J.A.W. Tothill, RN / other sources give Lt. L.R.P. Lawford, RN in command), HMS Mohawk (Cdr. J.W.M. Eaton, RN), HMS Nubian (Cdr. R.W. Ravenhill, RN), HMS Greyhound (Cdr. W.R. Marshall-A'Deane, DSO, DSC, RN), HMS Griffin (Lt.Cdr. J. Lee-Barber, DSO, RN), HMAS Stuart (Capt. H.M.L. Waller, DSO, RAN), HMS Havock (Lt. G.R.G. Watkins, RN) and HMS Hotspur (Lt.Cdr. C.P.F. Brown, DSC, RN).
The fleet steered a course of 300° at 20 knots.
Six hours before, at 1300/27, Vice-Admiral Pridham-Whippell, had departed Pireaus with the light cruisers HMS Orion (Capt. G.R.B. Back, RN, flying the flag of Vice-Admiral H.D. Pridham-Whippell, CB, CVO, RN), HMS Ajax (Capt. E.D.B. McCarthy, RN), HMAS Perth (Capt. P.W. Bowyer-Smith, RN), HMS Gloucester (Capt. H.A. Rowley, RN) and the destroyers HMS Hereward (Lt. W.J. Munn, RN) and HMAS Vendetta (Lt.Cdr. R. Rhoades, RAN). They were to patrol in the Aegean to provide cover for convoy’s but when the Italian warships were known to be at sea they were ordered to make rendez-vous at 0630/28 south of crete with the Mediterranean Fleet in position 34°20’N, 24°10’E, 30 nautical miles south of Gavdos Island, south of Crete.
28 March 1941 and onwards.
At 0430 hours, the Fleet was in position 32°22’N, 27°12’E steering 310° at 16 knots. They were a little over 200 nautical miles from the rendez-vous position with the cruiser force.
At 0555 hours, HMS Formidable, launched A/S and fighter aircraft. They were to search an area between Crete and Cyrenaica as far west as longitude 23°E. An air search from Maleme, in Crete, had started earlier. Four torpedo bombers (armed indeed with torpedoes) took off at 0445 hours to search to the west of Crete. One however developed engine trouble and ha to jettison her torpedo and return. The other sighted nothing of the enemy and returned at 0845 hours.
At 0630 hours, the cruiser force was proceeding to the south-east at 18 knots. They sighted an Italian aircraft of a type that was used as catapult aircraft by Italian surface ships. So this indicated that these must be in the area.
At 0630 hours, the cruiser force was joined by two more destroyers. These were HMS Ilex (Capt. H.St.L. Nicolson, DSO and Bar, RN) and HMS Hasty (Lt.Cdr. L.R.K. Tyrwhitt, RN) which came from Suda Bay. The cruiser force then set course to 200°.
At 0720 hours, the enemy was first sighted by aircraft ‘5 B’ from HMS Formidable. At 0722 hours this aircraft amplified her report ‘four cruisers and four destroyers’ were reported in position 34°22’N, 24°57’E. They were steering 230°.
The next report came from aircraft ‘5 F’ from HMS Formidable at 0739 hours which announced four cruisers and six destroyers in position 34°05’N, 24°26’E steering 200°.
As the force reported at 0720 hours was identical in composition as the British cruiser force and only 35 miles north of this force it was thought that the aircraft had sighted our own ships.
The report of the force reported at 0739 hours was still being studied by Vice-Admiral Pridham-Whippell when HMS Orion sighted smoke astern at 0745 hours bearing 010°. One minute later the enemy ships were sighted and identified.
Commencement of the action.
At 0752 hours the cruiser force altered course to 140° and increased speed to 23 knots. Shorty afterwards the ships astern were seen to be three cruisers and some destroyers and speed was increased to 28 knots. As the enemy was suspected to be 8” cruisers of the Zara-class which outgunned our cruisers and were also faster it was decided to try to draw them towards out battleships which were about 90 nautical miles to the eastward.
At 0812 hours the enemy opened fire from 25000 yards. It were however not Zara-class heavy cruisers but it were Trieste, Trento and Bolzano. Enemy salvoes however fell short. Enemy fire concentrated on HMS Gloucester which commenced zig-zagging to avoid being hit.
At 0829 hours HMS Gloucester opened fire on the enemy from 23500 yards. The salvoes fell short but caused the enemy to alter course away and draw outside the British gun range. The Italians continued firing although all their salvoes were falling short. Both forces continued speeding to the south-east when at 0854 hours the aspect of affairs was suddenly changed when aircraft ‘5 F’ from HMS Formidable reported enemy battleships in position 34°00’N, 24°16’E steering course 210° at 20 knots. Vice-Admiral Pridham-Whippell had been in that position less then one hour before and thought the position to be incorrect but enemy battleships must be nearby non the less.
One minute later the enemy cruisers ceased fire and turned away to the north-east. They had been ordered to break off the engagement as the Italian C-in-C feared that his cruisers were drawn to far into waters controlled by British aircraft. Vice-Admiral Pridham-Whippell decided to follow the enemy and altered course accordingly. At 0936 hours he reported that the enemy was still in sight bearing 320°, range 16 nautical miles, speed 28 knots. During this phase of the action HMAS Vendetta developed engine trouble and was detached to Alexandria.
Movements of the Mediterranean Fleet.
When Admiral Cunningham received Vice-Admiral Pridham-Whippell’s contact report at 0827 hours the Fleet increased speed to 22 knots and altered course to 310°. Twenty minutes later HMS Valiant was ordered to proceed at her utmost speed and join Vice-Admiral Pridham-Whippell’s cruiser force. HMS Mohawk and HMS Nubian were ordered to join her.
At 0833 hours HMS Formidable was ordered to ready a torpedo bomber striking force. Also the aircraft at Maleme, Crete were ordered to attack the enemy cruisers.
Aircraft reports then came in regarding another enemy force further to the northward, though their presence was by no means certain. Aircraft reports continued to come in but the situation was very unclear. It was therefore decided to hold back the torpedo bomber striking force of HMS Formidable until the situation had cleared.
Striking force of HMS Formidable finally takes off.
At 0939 hours the C-in-C finally orders HMS Formidable to lauch her torpedo bomber strike force to attack the enemy and relieve the pressure on the cruiser force.
At 0956 hours Formidable therefore launches six Albacore torpedo aircraft and two Fulmar fighters as escort. Also a Swordfish was launched for observation duty.
Meanwhile the cruiser force was still in pursuit of the enemy cruisers. They were barely visible from the director of HMS Orion when at 1058 hours the enemy motive for breaking off the action and turning to the north-west became evident when HMS Orion sighted an enemy battleship bearing 002°. The battleship quickly opened fire and Vice-Admiral Pridham-Whippell at once altered course to the southward in order to disengage. Also speed was increased to 30 knots which all cruisers fortunately could make despite some machinery problems in HMS Gloucester. For ten minutes the enemy battleship concentrated her fire on HMS Orion which suffered some minor damage from a near miss. Smoke was made and the cruiser force then became invisible to the enemy except for HMS Gloucester. Fire was then shifted to this ship and she was repeatedly straddled until HMS Hasty was able to cover her in smoke. Meanwhile the Italian 8” cruisers that had been encountered first tried to cut off the retreat of our cruisers but fortunately right at this moment the air striking force from HMS Formidable intervened.
The air attack on the Vittorio Veneto.
While flying at 9000 feet the air striking force from HMS Formidable sighted the Vittorio Veneto at 1058 hours. Her salvoes were seen to straddle our cruisers. The planes proceeded to manoeuvre to reach a position off her starboard bow on the opposite site of the battleships destroyer escort.
They attacked at 1127 hours, in two waves, each plane being able to act independently. The enemy destroyers began to move over to starboard when our planes commenced their dive and the battleship altered course more then 180° to starboard when the first wave was at 1000 feet. Two aircraft (‘4 A’ and ‘4 F’) were already committed to the attack released their torpedoes on the starboard side. The third aircraft (‘4 C’) attacked from fine on the starboard bow.
The second sub-flight (aircraft ‘5 A’, ‘4 P’ and ‘4 K’) was able to take advantage of Vittorio Veneto’s turn and dropped their torpedoes from good positions on the battleships port bow. Although the striking force reported a possible hit all torpedoes passed clear astern of the target.
The enemy battleship then broke off the action with our cruiser force and retired on a north-westerly course at 25 knots. This was fortunate for the cruiser force but the C-in-C was not at all happy because this lessened his chance to bring his battleships into action against the enemy battleship.
At 1230 hours, Vice-Admiral Pridham-Whippell made contact with the Fleet.
Attack by FAA aircraft from Maleme on the Italian 3rd Cruiser Division.
The aircraft from Maleme also took part in this phase of the action. Three Swordfish had been flow off at 1050 hours. Flying at 9000 feet they sighted enemy cruisers in position 34°22’N, 23°02’E at 1200 hours. The enemy force was steering 300° at 28 to 30 knots. The aircraft then attacked out of the sun. Their target was the rear cruiser, Bolzano. The two leading aircraft dropped their torpedoes from the port bow and beam. The third aircraft came in too high, turned to port and then dropped it’s torpedo on the bow of the target. The enemy cruiser took avoiding action and all torpedoes missed. AA fire was opened but none of the aircraft was damaged.
Movements of the battlefleet 1100 – 1305 hours.
At 0918 hours, the C-in-C ordered HMS Valiant, HMS Mohawk and HMS Nubian to rejoin him. This was done after it was heard by the C-in-C that the Italian cruisers had broken off the action with the British cruiser force.
At 1112 hours, the C-in-C asked Rear-Admiral Boyd on board HMS Formidable when a second air strike force could be ready. The reply was ‘in about half an hour’. At 1153 hours, HMS Formidable reported this second strike force to be ready for takeoff. They were however told to wait for a moment.
At 1225 hours the battleships were ordered to launch spotter aircraft as action might be near. Shortly afterwards the C-in-C realised that the speed of the enemy battleship had to be reduced if his battleships were to see action against it. Meanwhile the cruiser force had been retiring towards the battlefleet and at 1228 hours HMS Orion had been sighted by HMS Jervis from the destroyer screen.
At 1305 hours, the cruiser force was ordered to proceed ahead of the battlefleet on a bearing of 290° at maximum visual signalling distance. They remained near the battlefleet until 1644 hours when they were ordered to press on and gain touch with the retreating enemy.
The Formidable’s second strike force awaits orders.
The first air strike force returned to HMS Formidable between 1200 and 1215 hours after attacking the Vittorio Veneto. This necessitated the second air strike force to be flown off in order to have the first one to land on. The two operations were completed by 1244 hours and HMS Formidable set course to rejoin the battlefleet she had to split off from during flight operations.
The second striking force consisted of three Albacore’s and two Swordfish accompanied by two Fulmar’s. After flying of it was ordered to wait overhead until the battlefleet engaged the enemy which was hoped to be around 1330 hours.
Whilst proceeding to rejoin the battleships, HMS Formidable was attacked by two Italian S-79 torpedo bombers but the torpedo tracks could be easily combed and both torpedoes missed astern. At 1400 hours Formidable was back in position and the Fleet was still proceeding westwards in pursuit of the enemy.
As touch with the enemy had been lost due to lack of shadowing aircraft three Albacores from the first strike group were launched again at 1400 hours to search for the enemy. One of them (aircraft ‘4 F’) sighted the Vittorio Veneto at 1459 hours in position 34°45’N, 22°14’E. The report was received at 1515 hours. This aircraft was able to remain in touch with the enemy until being relieved at 1920 hours.
The second striking force sighted the enemy battleship at 1510 hours. The squadron leader worked into the sun and succeeded in getting down to 5000 feet unobserved. The leading destroyer on the battleships bow then opened fire but turned away when shot up by the fighter escort. As the three Albacores (‘5 F’, ‘5 G’ and ‘5 H’) attacked on the Vittorio Veneto’s port bow she turned 180° to starboard and splashes were seen on her port bow and amidships. The two Swordfish (‘4 B’ and ‘5 K’) had worked round ‘up sun’ to attack separately. But as the Vittorio Veneto in turning presented her starboard side clear of the screen they decided to attack together diving from 8000 feet. By that time the enemy battleship was doing only 14 knots thus providing an easy shot. A large splash was seen on her starboard quarter and another on her starboard side. In fact only one hit was obtained which caused a reduction in the battleships speed.
Activities from R.A.F. bombers from Greece.
During the afternoon of the 28th R.A.F. bombers from Greece made a series of attacks on the enemy. When an enemy report was received from an R.A.F. Sunderland ay 1235/28 six Blenheim aircraft from 84 Squadron were ordered to take off from Menidi airfield (some 20 miles north of Athens) and attack the contact. These aircraft made an attack at 1420 hours. The target appears to have been the Vittorio Veneto but no hits were obtained.
Then at 1520 hours four more Blenheims from 84 Squadron attacked the Italian 3rd Cruiser Division. Two hits were claimed on a cruiser with 250 lb. bombs and two more on another cruiser with 500 lb. bombs. Unfortunately these were only near misses on the Trento and Bolzano.
Between 1515 and 1645 hours, several attacks were made by a total of 11 Blenheims on the Italian 1st and 8th Cruiser Divisions and near misses were obtained on the Zara and Garibaldi.
The pursuit, 1330 to 1810 hours.
At 1600 hours, the C-in-C ordered HMS Formidable to make strong as possible torpedo bomber attack on the damaged battleship.
At 1618 hours, the destroyers were organized into divisions for a possible night attack.
At 1644 hours, the cruiser force was ordered to press on to gain touch with the damaged battleship. They made off at 30 knots.
Shortly afterwards HMS Mohawk and HMS Nubian were ordered to proceed ahead of the battlefleet as a visual link between the battleships and the cruisers.
When evening was beginning to fall at 1720 hours, the destroyers were organized for night attack.
At 1810 hours, the C-in-C signalled that if the cruisers were to gain touch most of the destroyers would be sent to join them for a night torpedo attack on the damaged battleship. The situation was however not very clear due to lack of enemy reports.
At 1831 hours, the observer aircraft from HMS Warspite, which had been catapulted at 1745 hours, made a report that the damaged Vittorio Veneto was in company with three cruisers and seven destroyers and about 50 nautical miles bearing 292°, speed 12 knots, from the C-in-C’s position.
The British battleships then formed in line ahead and were doing 20 knots. Shortly afterwards the observer aircraft from Warspite reported that enemy forces were concentrating and at 1912 the aircraft reported that the enemy forces had formed five columns.
Situation at 1915 hours on 28 March 1941.
The sun had set at 1840 hours. By 1915 hours it appeared that the damaged enemy battleship was about 45 nautical miles to the westward steering 290° at 15 knots. Another cruiser force had joined the enemy fleet which was formed in five columns. The battleship was apparently in the centre with four destroyers screening ahead and two astern. On her port side were thee 8” cruisers and outside of them were three destroyers. On her starboard side were also three 8” cruisers with what appeared to be two 6” cruisers but were in fact destroyers. Both the 6” cruisers had by that time gone on to the westward.
Third torpedo attack on the Vittorio Veneto by aircraft from HMS Formidable and Maleme.
It was 1925 hours when aircraft from HMS Formidable made their third and last attack. They had flown off at 1735 hours when Formidable was in position 34°42’N, 22°44’E. Composition of this third strike force was; six Albacore’s and two Swordfish aircraft.
The sun was sinking when the force sighted the enemy and took up a waiting position astern and well out of range at low height. It was joined by two aircraft (Swordfish) from Maleme. These had sighted the enemy at 1810 hours when they were 25 miles off. On closing them they identified the enemy as four ships screened by six destroyers steering 320° at about 14 knots. At 1835 hours they saw the strike force from Formidable coming up from the eastward and took station in its rear.
Dusk had fallen at 1925 hours when the aircraft swept in to attack. During the approach the enemy was steering 230°. On closing the enemy put up barrage fire. The aircraft were forced to turn away to starboard and lost their formation after which they had to attack independently from very different angles.
Most of the pilots reported to have fired their torpedoes at the Vittorio Veneto but it was extremely difficult to observe anything with precision. Several observers of the attacking aircraft however reported a hit on a cruiser. Indeed a torpedo hit the Pola during this attack. Most likely it was fired by aircraft ‘5 A’ which dropped it’s torpedo at 1945 hours and Pola was hit one minute later. Following the attack the aircraft from Formidable proceeded to Suda Bay. Aircraft ‘5 A’ was out of petrol and had to made a forced landing on the water near destroyer HMS Juno, which then picked up the crew.
Also the two aircraft from Maleme attacked independently. They both dropped their torpedoes but obtained no hits. Both aircraft then returned to Maleme although one was damaged by enemy AA fire.
The attack by the aircraft had important results. The Pola was hit on the starboard side between the engine and the boiler room, causing her main engines to stop and putting out of action all her electric power and with it all her turrets. The attack was observed by a shadowing aircraft from HMS Formidable which had relieved the aircraft from HMS Warspite. At 1950 hours the aircraft reported that the enemy force had divided, the major portion going off on a course of 220° while the ‘battleship’ (which was in fact the Pola) remained stopped with smoke rising from her. This report however was never received which was just as well as the reported course of 220° was incorrect (300° was correct).
Movements of the British Fleet, 1920 to 2040 hours.
By 1920 hours the C-in-C was aware of the position and formation of the enemy fleet and knew that Vice-Admiral Pridham-Whippell’s cruiser force was in touch with it. The report of the dusk air attack was received at 2008 hours. It mentioned only probable hits. It was in light of this information that the C-in-C had to decide if it would be justified to take the fleet closer to the enemy.
At 2040 hours he decided that the destroyers were to attack. Capt. Mack with his eight destroyers then drew ahead making 28 knots with the intention of passing up the starboard side of the Vittorio Veneto and then attack from ahead.
The cruiser force.
Meanwhile the cruiser force had been pressing on at 30 knots to the westward to get in touch and at 1832 hours had seen the aircraft from HMS Formidable going up to attack the enemy.
At 1907 the Vice-Admiral ordered his ships to spread on a line of 20° apart, seven nautical miles apart. They were still opening out when at 1914 hours three or four enemy ships were sighted on the starboard bow. The Vice-Admiral then decided to keep his ships concentrated and they reformed in line ahead.
By 1930 hours the air attack had begun an was clearly visible on the horizon bearing 303°, distance about 15 nautical miles. Two minutes later the cruisers altered course to 320°. At 1949 hours speed was reduced to 20 knots in order to ‘reduce bow waves’. The last stage of the air attack was at that moment still in progress. Searchlights and gunfire was visible bearing 278°. At 195 hours course was changed to 290° to close the enemy. Visibility to the westward was then about four nautical miles and no ships were in sight.
At 2014 hours, HMS Orion altered course to 310°. A minute later a vessel was plotted and followed for 18 minutes. It became clear that the contact was either stopped or moving very slowly. At 2017 hours, the force had reduced speed to 15 knots. At 2029 hours HMS Ajax reported an enemy vessel in position 35°16’N, 21°04’E. This was 275°, 5 nautical miles from Ajax. The enemy was stationary.
Vice-Admiral Pridham-Whippell then decided to lead clear of this ship to the northward and try to regain touch with the retreating enemy. Accordingly at 2033 hours, the cruiser force turned to 60° and at 2036 hours to 110°. At 2040 hours the stationary Italian ship was reported to the C-in-C. It was thought the destroyers would be ordered to deal with this ship. At 2048 hours, course was altered to 310° and at 2115 hours to 300°. Speed was increased to 20 knots at 2119 hours.
The cruisers had been proceeding for some time on this course and the Vice-Admiral considered spreading them again when he realised that Capt. Mack and his destroyers might have gone further west and would almost certainly encounter his cruisers. At 2155 hours HMS Ajax reported three unknown vessels being picked up by radar 5 nautical miles to the southward. Though rather far to the westward these were thought to be some of our own destroyers. The Vice-Admiral then decided to keep concentrated and steer more to the northward as to keep clear of them. According at 2204 hours course was altered to 340°.
At 2229 hours, gun flashes from the battlefleet were seen astern bearing 150° to 160°. Then at 2243 hours, a red light was sighted by HMS Orion and HMS Gloucester bearing 320° on the port bow. The general alarm was made and the cruisers formed single line ahead. Course was altered to 000° at 2255 hours.
At 2314 hours a heavy explosion bearing 150° to 160° lit up the horizon to the southward. Shortly afterwards the Vice-Admiral received a signal from the C-in-C of 2312 hours ordering all forces not in action at that moment to withdraw to the north. At 2332 hours course was altered to 60°. Then at 0018/29 HMS Gloucester sighted an object to the south-west but lost it out of sight at 0030 hours. No other ship sighted this ‘object’. Nothing more was seen until 0635/29 when the smoke of the battlefleet was sighted to the eastward.
The destroyer striking force 2037 to 0200 hours.
After leaving the battlefleet at 2043 hours, the eight destroyers; 14th Destroyer Flotilla: HMS Jervis, HMS Janus, HMS Mohawk, HMS Nubian and the 2nd Destroyer Flottilla: HMS Ilex, HMS Hasty, HMS Hereward, HMS Hotspur, drew ahead on course 300° while making 28 knots. The 14th Destroyer Flotilla was in line ahead with the 2nd Destroyer Flotilla six cables on it’s starboard beam. It was Capt. Mack’s (who was in overall command) intention to pass up the starboard side of the damaged battleship outside visible range and then attack from ahead.
Capt. Mack did not receive the 2029 signal from HMS Ajax nor the 2040 signal from HMS Orion. It was very unfortunate that the destroyers proceeded northwards as did the cruisers leaving the south flank open for the enemy to escape.
Around 2200 hours, he received Ajax’s 2155 report of the three unknown ships. They were thought to be three miles ahead but due to a navigational error were in fact about ten miles on his port bow. As the destroyers proceeded westwards on course 285° the gunflashes of the battleships were seen at 2230 hours. Ten minutes later HMS Hardy sighted a red light bearing 010°. This was evidently the same red light that was seen to the north-westward by HMS Orion and HMS Gloucester.
The destroyers continued to proceed westwards on course 285° until 2320 hours when a signal came from the C-in-C to forces not engaging enemy ships at that moment to retire to the north-east. Capt. Mack did so and quickly sent a signal if this included his forces. He was told ‘after your attack’. This reply was received at 2337 hours and the destroyers then turned westwards again proceeding on course 270° for 20 minutes.
At midnight it was thought that the destroyers had drawn sufficiently ahead course was altered to 200° and speed reduced to 20 knots. Then at 0030 hours, just as Capt. Mack thought to have reached a position just ahead of the enemy, a signal was received from HMS Havock, which was with the disabled Italian cruisers about 50 miles further to the east, that she was in touch with a Littorio-class battleship and that she had expended all her torpedoes. Course was then altered to 110° and speed increased to 28 knots. A full hour passed before a signal was received from Havock that the contact was an Italian 8” cruiser and not a battleship.
In these circumstances Capt. Mack decided it was best to continue on to the east and at 0200 hours the destroyers sighted searchlights ahead and, steaming through a number of survivors, arrived on the scene of the battlefleet’s action and they then sighted the Italian cruiser Zara.
The British battlefleet. Night action 2213 to 2312 hours.
At 2043 hours, when the destroyer striking force proceeded on its quest, the battlefleet was left with a screen of only four destroyers; HMAS Stuart, HMS Havock, HMS Greyhound and HMS Griffin.
At 2111 hours, Vice-Admiral Pridham-Whippell’s report of a ‘stopped ship’ came in. The C-in-C at once turned to 280° and made for the reported position at 20 knots. The Warspite, Valiant, Formidable and Barham were in single line ahead at three cables distance. HMAS Stuart and HMS Havock were stationed one mile off to starboard and HMS Greyhound and HMS Griffin to port. Visibility was about 2.5 miles.
Nearly an hour had passed when at 2203 hours HMS Valiant’s radar detected a ‘stopped ship’ on the port bow bearing 244°, range 8 to 9 nautical miles. At 2213 hours course was altered to 240°, towards the ‘stopped ship’. At 2220 hours, the ‘stopped ship’ was reported 191°, range 4.5 nautical miles. The destroyers on the port side were ordered to move over to the starboard side but the order had hardly been given when HMAS Stuart sighted a ship 4 miles off, fine on the starboard bow bearing 250° and gave the night alarm. This however had not reached the C-in-C when two minutes later the massive outlines of ships were seen by the Chief of Staff and the C-in-C himself looming through the night. Two large cruisers could be made out on the starboard bow with a smaller vessel ahead of them.
These cruisers were the Zara and Fiume which had turned back to help the disabled Pola. They were in single line with a destroyer ahead and three destroyers astern. They were steering approximately 130° and were some 4000 yards from HMS Warspite. Almost at the same time HMS Greyhound which was drawing ahead opened her searchlight, its beam fell right across the water, most valuably illuminating a cruiser without revealing the position of our battleships.
HMS Formidable, being of no use in a gun battle hauled out of line to starboard. HMS Warspite then opened fire followed seven seconds later by HMS Valiant. A salvo of 15” shells crashed into Fiume. Her after turret was blown overboard, she started to list heavily to starboard and burst into a sea of flames. She was driven out of the line and apparently sank about 30 minutes later. Fire was then shifted to the Zara which was now illuminated by searchlights.
Just before the enemy cruisers were sighted HMS Barham, in the rear of the line, had sighted the disabled Pola on the port quarter making identification signals and had trained her turrets on her. When the Greyhound’s searchlight shone out, the Barham trained forward at once, opening fire on the leading ship which was the destroyer Vittorio Alfieri but was at that moment thought to be a 6” cruiser. A brilliant orange flash shot up under the bridge and bursts were seen along the whole length of the ship which turned to starboard and made off to the westward making smoke. The Barham then shifed fire to the Zara which was soon being heavily hit. A big explosion forward hurled one of her turrets overboard. The action lasted barely five minutes, shell after shell crashing into the helpless Italian ships which were caught unprepared with their gun turrets trained forward and aft.
At 2231 hours the remaining Italian destroyer turned towards the British battleships and one of them was seen to fire torpedoes. To avoid them the battlefleet made an emergency turn of 90° to starboard. The Warspire’s 6” guns then shifted fire to a destroyer that was illuminated by a searchlight but having difficulty in finding the target after the turn had been completed fired only one salvo at it which was fortunate as the target turned out to be HMS Havock.
By now the Italian cruisers were completely crippled and burning. At 2238 hours the C-in-C ordered the destroyers to finish them off.
The destroyers that were escorting the battlefleet, 2240 to 0140 hours.
As the battlefleet turned north after their action the Stuart was about to attack the enemy cruisers when three enemy destroyers were sighted steering to the westward. HMS Greyhound and HMS Griffin went off in pursuit while HMAS Stuart and HMS Havock proceeded south in search of the enemy cruisers. It was then 2240 hours. A minute later came the signal from the C-in-C to finish off the enemy bearing 165° and both destroyers proceeded on this mission.
at 2259 hours a burning and apparently stationary Italian cruiser could be seen about two nautical miles to the southward with what appeared to be another large cruiser circling slowly around her. HMAS Stuart then fired her whole outfit of eight torpedoes against this pair of cruisers and observed a ‘dim explosion’ low down on the ‘non burning’ one. HMS Havock did not fire torpedoes for the moment, being unable to make out a suitable target. It was then 2301 hours. HMAS Stuart then opened fire on the burning ship and then went after the other and found her at 2305 hours, about 1.5 miles off, with a heavy list and stopped. Fire was opened and two salvoes caused a big explosion and fires. She was seen to be of the Zara-class. A ship then suddenly loomed up on the port bow passing very close and Stuart had to turn to port to avoid collision. This was seen to be a Grecale class destroyer, apparently undamaged. Stuart then fired two salvoes at her. Havock which was following up Stuart lost touch with her but did sighted the Italian destroyer. She fired four torpedoes at it, one of which hit.
HMAS Stuart then sighted what was thought to be another cruiser but this could not have been the case, probably it was an enemy destroyer. She followed this ship to the south-west. HMS Havock meanwhile continued to engage the Italian destroyer for about 20 minutes until this ship had her decks awash and was blazing from fore to aft. This destroyer blew up and sank around 2330 hours.
HMS Havock still had half her torpedoes left. She sighted a cruiser which was heavily on fire and about to blow up. It was decided not to engage this cruiser as another one was sighted with a single fire abreast the bridge. Havock fired her remaining torpedoes at this ship but all missed. Havock then turned to the north and made off at high speed towards the cruiser that was heavily burning, fired star shell and then a few more salvoes in her. The star shell illuminated a large ship thought to be a battleship (this was in fact the disabled Pola) laying stopped. It was then 2345 hours. Havock then opened fire on this ship while retiring to the north-east. A signal was then sent reporting this ‘battleship’.
This was the signal received by Capt. Mack which then returned eastwards with his eight destroyers (D. 2 and D.14). At 0005 hours the Commanding Officer of the Havock realised his mistake and a signal was sent at 0030 stating that the reported ‘battleship’ was in fact a heavy (8”) cruiser. This signal was received by Capt. Mack at 0134 hours who decided (as stated earlier) to continue on to the eastward.
Meanwhile HMS Greyhound and HMS Griffin had been pursuing the enemy destroyers. The Greyhound, after her opportune searchlight display, sighted three destroyers in the rear of the Italian cruisers making off to the westward and gave chase together with Griffin. Fire was opened and hits were observed, but the enemy, lost in the smoke, turned southwards, was lost in the smoke around 2320 hours. Just then the C-in-C’s sigbal to retired to the north came in and both destroyers than proceeded accordingly until 0050 hours when HMS Havock’s signal was received, then then turned southwards.
At 0140 hours HMS Greyhound encountered the Pola, laying stopped on an even keel with ensigns flying and guns trained fore and aft. It was then that a challenge was seen and Capt. Mack and his destroyers arrived at the scene.
Captain D.14, the sinking of the Zara and Pola.
Capt. Mack in HMS Jervis had sighted searchlights ahead, and, steaming through a number of survivors, sighted what turned out to be the Zara, with a few small fires burning on the upper deck. As he passed her he fired four torpedoes, two of which appeared to hit and she blew up and sank. It was then 0240 hours. He ordered his destroyers to pick up survivors but not to lower their boats. Nine survivors were picked up by HMS Jervis.
Then at 0250 hours a red and white recognition signal was observed from the direction of the Pola which was about two miles away. The rescue of survivors was then stopped and the destroyers moved off in that direction. As they were closing they were met by HMS Havock which reported that the enemy cruiser seemed to be on an even keel with a large number of her crew on the forecastle and in the water around her. HMS Jervis then passed close to the Italian cruiser. No visible damage could be seen except for a small fire on the tarboard side abreast her after turret. He ordered his destroyers to pick up survivors from the water while HMS Jervis went alongside. To take of the rest of the ships company. They seemed thoroughly demoralised, many half drunk. The upper deck was an mess. The Jervis was alongside for about a quarter of an hour. At 0322 hours she had embarked 22 officers (including the ships Commanding Officer), 26 petty officers and 202 ratings. HMS Jervis then casted off and fired a torpedo into the stricken cruiser. As she appeared to settle very slowly Capt. Mack ordered HMS Nubian to fire another torpedo into her which completed the destruction of the Pola. At 0403 hours she blew up and sank.
Capt. Mack then reformed his flotilla’s in single line ahead, with the 2nd Flotilla on his starboard beam. Course was set to 055° at 20 knots to rejoin the C-in-C. Rendezvous was made at 0648/29.
Proceedings of the Battle Fleet, 2330 – 0800 hours.
At 2330/28, the Battle Fleet, leaving the Italian cruisers on fire and out of action, proceeded on a course of 070°, reducing speed to 18 knots. At 0006/29, the C-in-C signalled his course and speed and the position of a rendezvous at 0700/29. Light cruiser HMS Bonaventure (Capt. H.G. Egerton, RN) which had left Alexandria at 1300/28 together with the destroyers HMS Decoy (Cdr. E.G. McGregor, DSO, RN) and HMAS Waterhen (Lt.Cdr. J.H. Swain, RN) were ordered to stay east of the C-in-C until 0430 hours. As were the destroyers HMS Juno (Cdr. St.J.R.J. Tyrwhitt, RN), HMS Jaguar (Lt.Cdr. J.F.W. Hine, RN) and HMS Defender (Lt.Cdr. G.L. Farnfield, RN) which had sailed from Piraeus, Greece in the morning of the 28th and made for the Kithera Channel. Patrol there was discontinued on the 29th, HMS Juno and HMS Jaguar were ordered to join the fleet while HMS Defender was ordered to proceed to Suda Bay for escort duties. HMS Bonaventure and HMS Decoy were ordered to proceed to join convoy's GA 8 and AN 23 respectively. HMS Watherhen returned to Alexandria with the fleet.
At 0430 hours, HMS Formidable flew off three aircraft for a morning search between 160° and 305° while another was sent to the south-east for 30 miles and then to proceed to Maleme with orders for the aircraft that had landed there after their air strike the day before.
Between 0600 and 0700 hours all units of the Fleet joined the Flag. None had any damage or casualties to report except for one Swordfish aircraft that was missing. The searching aircraft returned at 0830 hours. They reported having sighted only a number of rafts and survivors. At 0800 hours the Fleet was in position 35°43’N, 21°40’E and course was now set to search the scene of the action. Between 0950 and 1100 hours many boats and rafts were seen and destroyers picked up a number of survivors, a work that was interrupted by the appearance of German aircraft. The total number of survivors picked up by the British ships had now risen to 55 officers and 850 men. Further to that Greek destroyers picked up 110 survivors on the 29th.
The return to Alexandria.
While the Fleet was on the way back to Alexandria a continuous air patrol was maintained by HMS Formidable for the remainder of the voyage. Fighters dealt effectively with a dive bombing attack made by 12 Ju.88’s at 1530/29 which was directed mainly against Formidable. No damage was caused although she was shaken by two near misses. One Ju.88 was shot down, another one was damaged and four had been forced to jettison their bombs early. At 0834/30 an S.79 that was shadowing the fleet was shot down by Fulmar fighters.
The Fleet arrived at Alexandria around 1730/30. A submarine was reported while the Fleet was entering the harbour. Destroyers cleared the area by dropping depth charges but all ships arrived in harbour safely.
Around 1000P/5, HMS Dorsetshire (Capt. B.C.S. Martin, RN) and HMS Shropshire (Capt. A.W.la T. Bisset, RN) made rendez-vous in the Plate area with HMS Ajax (Capt. C.H.L. Woodhouse, CB, RN, flagship of Rear-Admiral Sir H. Harwood, KCB, OBE, RN) and HMS Achilles (New Zealand Division) (Capt. W.E. Parry, CB, RN) which had departed Monevideo and Buenos Aires respectively earlier in the day after having fuelled there. HMS Achilles then took over as flagship of the South America division as HMS Ajax was to return to the U.K. to refit soon. [Rear-Admiral Harwood transferred his flag around 1430P/5.] (2)
In the early evening, HMS Dorsetshire (Capt. B.C.S. Martin, RN) and HMS Shropshire (Capt. A.W.la T. Bisset, RN), made rendez-vous with HMS Ajax (Capt. C.H.L. Woodhouse, CB, RN). They then continued their patrol in the Rio de Janeiro focal area. (2)
After gunnery exercises, in the early evening, HMS Ajax (Capt. C.H.L. Woodhouse, CB, RN) parted company with HMS Dorsetshire (Capt. B.C.S. Martin, RN) and HMS Shropshire (Capt. A.W.la T. Bisset, RN). HMS Ajax set course to proceed to Freetown and eventually the U.K. where she was to refit. HMS Dorsetshire and HMS Shropshire continued their patrol. (2)
HMS Renown (Capt. C.E.B. Simeon, RN), HMS Ark Royal (Capt. A.J. Power, RN, flying the flag of Vice-Admiral L.V. Wells, CB, DSO, RN), HMS Neptune (Capt. J.A.V. Morse, DSO, RN), HMS Hasty (Lt.Cdr. L.R.K. Tyrwhitt, RN) and HMS Hero (Cdr. C.F. Tower, MVO, RN) made rendezvous with HMS Ajax (Capt. C.H.L. Woodhouse, CB, RN).
In the afternoon, HMS Neptune (Capt. J.A.V. Morse, DSO, RN), parted company with HMS Renown (Capt. C.E.B. Simeon, RN), HMS Ark Royal (Capt. A.J. Power, RN, flying the flag of Vice-Admiral L.V. Wells, CB, DSO, RN), HMS Ajax (Capt. C.H.L. Woodhouse, CB, RN), HMS Hasty (Lt.Cdr. L.R.K. Tyrwhitt, RN) and HMS Hero (Cdr. C.F. Tower, MVO, RN).
HMS Renown (Capt. C.E.B. Simeon, RN), HMS Ark Royal (Capt. A.J. Power, RN, flying the flag of Vice-Admiral L.V. Wells, CB, DSO, RN), HMS Ajax (Capt. C.H.L. Woodhouse, CB, RN), HMS Hasty (Lt.Cdr. L.R.K. Tyrwhitt, RN) and HMS Hero (Cdr. C.F. Tower, MVO, RN) arrived at Freetown. (5)Convoy's AP 1 and AP 2.
Convoy BN 5A.
Light cruiser HMS Ajax (Capt. E.D. McCarthy, RN), AA cruiser HMS Coventry (Capt. D. Gilmour, RN), destroyers HMS Kandahar (Cdr. W.G.A. Robson, RN), HMS Kimberley (Lt.Cdr. J.S.M. Richardson, RN) and sloop HMS Flamingo (Cdr. J.H. Huntley, RN) departed Aden to join convoy BN 5A as escort.
Shortly after midnight the battleships HMS Malaya (Capt. A.F.E. Palliser, DSC, RN, flying the flag of Rear-Admiral H.D. Pridham-Whippell, CB, CVO, RN), HMS Ramillies (Capt. H.T. Baillie-Grohman, OBE, DSO, RN), aircraft carrier HMS Eagle (Capt. A.R.M. Bridge, RN), light cruiser HMS Ajax (Capt. E.D. McCarthy, RN), AA cruiser HMS Coventry (Capt. D. Gilmour, RN) and the destroyers HMAS Vampire (Capt. H.M.L. Waller, DSO, RAN), HMAS Voyager (Cdr. J.C. Morrow, DSO, RAN), HMAS Vendetta (Lt.Cdr. R. Rhoades RAN), HMAS Waterhen (Lt.Cdr. J.H. Swain, RN), HMS Dainty (Cdr. M.S. Thomas, DSO, RN), HMS Decoy (Cdr. E.G. McGregor, DSO, RN), HMS Defender (Cdr. St.J.R.J. Tyrwhitt, RN) and HMS Diamond (Lt.Cdr. P.A. Cartwright, RN) departed Alexandria to exert a threat upon enemy Libyan convoys and cover Crete. Also some exercises were to be carried out. (7)
Shortly after noon, HMS Malaya (Capt. A.F.E. Palliser, DSC, RN, flying the flag of Rear-Admiral H.D. Pridham-Whippell, CB, CVO, RN), HMS Ramillies (Capt. H.T. Baillie-Grohman, OBE, DSO, RN), aircraft carrier HMS Eagle (Capt. A.R.M. Bridge, RN) and the destroyers HMAS Vampire (Capt. H.M.L. Waller, DSO, RAN), HMAS Voyager (Cdr. J.C. Morrow, DSO, RAN), HMAS Vendetta (Lt.Cdr. R. Rhoades RAN), HMAS Waterhen (Lt.Cdr. J.H. Swain, RN), HMS Dainty (Cdr. M.S. Thomas, DSO, RN), HMS Decoy (Cdr. E.G. McGregor, DSO, RN), HMS Defender (Cdr. St.J.R.J. Tyrwhitt, RN) and HMS Diamond (Lt.Cdr. P.A. Cartwright, RN) returned to Alexandria.
Operation MB 6.
Operation BN.
On 2 November 1940, the RFA tanker Brambleleaf, (5917 GRT, built 1917), netlayer HMS Protector (Cdr. R.J. Gardner, RN) and the armed boarding vessels HMS Chakla (Cdr. L.C. Bach, RD, RNR) and HMS Fiona (Cdr. A.H.H. Griffiths, RD, RNR) departed Suda Bay for Alexandria. They were escorted by the destroyers HMAS Vampire (Capt. H.M.L. Waller, DSO, RAN), HMAS Waterhen (Lt.Cdr. J.H. Swain, RN) and HMS Defender (Cdr. St.J.R.J. Tyrwhitt, RN).
Several operations in the Mediterranean.
Attack on Italian convoy in the Straits of Otranto.
Operation Barbarity
Around 1500C/17, HMS Orion (Capt. G.R.B. Back, RN, flying the flag of Vice-Admiral H.D. Pridham-Whippell, CB, CVO, RN), HMS Ajax (Capt. E.D. McCarthy, RN) and HMAS Sydney (Capt. J.A. Collins, CB, RAN) departed Piraeus for patrol in the Aegean.
Operation MB 9.
the battleship HMS Warspite (Capt. D.B. Fisher, CBE, RN, flying the flag of Admiral Sir A.B. Cunningham, KCB, DSO, RN), light cruisers HMS Orion (Capt. G.R.B. Back, RN, flying the flag of Vice-Admiral H.D. Pridham-Whippell, CB, CVO, RN), HMS Ajax (Capt. E.D. McCarthy, RN), HMAS Sydney (Capt. J.A. Collins, CB, RAN) and the destroyers HMS Jervis (Capt. P.J. Mack, DSO, RN), HMS Juno (Cdr. St.J.R.J. Thyrwhitt, RN), HMS Mohawk (Cdr. J.W.M. Eaton, RN), HMS Nubian (Cdr. R.W. Ravenhill, RN) and HMS Gallant (Lt.Cdr. C.P.F. Brown, DSC, RN) conducted exercises off Alexandria. (12)
Around 1015B/6, HMS Orion (Capt. G.R.B. Back, RN, flying the flag of Vice-Admiral H.D. Pridham-Whippell, CB, CVO, RN), HMS Ajax (Capt. E.D. McCarthy, RN) and HMAS Sydney (Capt. J.A. Collins, CB, RAN) departed Alexandria for Suda Bay where they arrived around 1215B/7. (13)
Around 1445B/7, HMS Orion (Capt. G.R.B. Back, RN, flying the flag of Vice-Admiral H.D. Pridham-Whippell, CB, CVO, RN), HMS Ajax (Capt. E.D. McCarthy, RN) and HMAS Sydney (Capt. J.A. Collins, CB, RAN) departed Suda Bay for patrol in the Aegean. They arrived at Piraeus around 1030B/8. (13)
Around 1630B/10, HMS Ajax (Capt. E.D. McCarthy, RN) and HMAS Sydney (Capt. J.A. Collins, CB, RAN) departed Piraeus for patrol in the Aegean. (14)
Around 1315B/12, HMS Ajax (Capt. E.D. McCarthy, RN) and HMAS Sydney (Capt. J.A. Collins, CB, RAN) arrived at Suda Bay from patrol.
Around 0930B/13, HMS Ajax (Capt. E.D. McCarthy, RN) and HMAS Sydney (Capt. J.A. Collins, CB, RAN) arrived at Piraeus from patrol. (14)
Around 1700B/14, HMS Ajax (Capt. E.D. McCarthy, RN) and HMAS Sydney (Capt. J.A. Collins, CB, RAN) departed Piraeus to patrol in the Aegean. (14)Operations MC 2, MC 3 and HIDE
Around 0645B/15, HMS Ajax (Capt. E.D. McCarthy, RN) and HMAS Sydney (Capt. J.A. Collins, CB, RAN) parted company. HMAS Ajax remained on patrol while HMAS Sydney proceeded to Suda Bay to fuel. She arrived there around 0845B/15 and left again around 1315B/15 to resume patrol.
Around 0845B/16, HMS Ajax (Capt. E.D. McCarthy, RN) and HMAS Sydney (Capt. J.A. Collins, CB, RAN) arrived at Piraeus from patrol.
Around 0300B/17, HMS Ajax (Capt. E.D. McCarthy, RN) and HMAS Sydney (Capt. J.A. Collins, CB, RAN) departed Suda Bay for operations.
Around 1510B/31, the light cruisers HMS Ajax (Capt. E.D.B. McCarthy, RN) and HMAS Perth (Capt. P.W. Bowyer-Smith, RN) departed Alexandria for the Aegean.
Around 1000B/1, the light cruisers HMS Ajax (Capt. E.D.B. McCarthy, RN) and HMAS Perth (Capt. P.W. Bowyer-Smith, RN) arrived at Suda Bay from Alexandria.
Around 1130B/2, the light cruisers HMS Ajax (Capt. E.D.B. McCarthy, RN) and HMAS Perth (Capt. P.W. Bowyer-Smith, RN) arrived at Suda Bay from patrol.
Around 0930B/3, the light cruisers HMS Ajax (Capt. E.D.B. McCarthy, RN) and HMAS Perth (Capt. P.W. Bowyer-Smith, RN) arrived at Piraeus from Suda Bay. (16)Operations Excess and Operation MC 4.
Around 1615B/6, the light cruisers HMS Ajax (Capt. E.D.B. McCarthy, RN) and HMAS Perth (Capt. P.W. Bowyer-Smith, RN) departed Piraeus for Suda Bay. (16)
Around 0945B/7, the light cruisers HMS Ajax (Capt. E.D.B. McCarthy, RN) and HMAS Perth (Capt. P.W. Bowyer-Smith, RN) arrived at Suda Bay from Piraeus.
Around 0800B/8, the light cruisers HMS Ajax (Capt. E.D.B. McCarthy, RN) and HMAS Perth (Capt. P.W. Bowyer-Smith, RN) arrived at Suda Bay from patrol.
HMS Ajax (Capt. E.D.B. McCarthy, RN) and HMS Bonaventure (Capt. H.G. Egerton, RN) both departed Suda Bay shortly after 0900/21 to provide cover for convoy AN 12 during it's passage through the Kaso Strait.
Operation MBD 2 (also called operation Inspection).
HMS Ajax (Capt. E.D.B. McCarthy, RN) and HMS Bonaventure (Capt. H.G. Egerton, RN) returned to Suda Bay around 1600/22. (18)
Around 0945B/30, HMS Ajax (Capt. E.D.B. McCarthy, RN) and HMAS Perth (Capt. P.W. Bowyer-Smith, RN) departed Suda Bay to patrol in the southern Aegean and to cover the Kaso Strait. (16)
Around 1900B/31, HMS Ajax (Capt. E.D.B. McCarthy, RN) and HMAS Perth (Capt. P.W. Bowyer-Smith, RN) returned to Suda Bay from patrol.
Operation MC 7.
Around 0845B/1, HMS Ajax (Capt. E.D.B. McCarthy, RN) and HMAS Perth (Capt. P.W. Bowyer-Smith, RN) returned to Suda Bay from patrol.
Around 1200B/4, HMS Ajax (Capt. E.D.B. McCarthy, RN) and HMAS Perth (Capt. P.W. Bowyer-Smith, RN) arrived at Piraeus from operations and patrol. (20)
Around 1300B/5, HMS Ajax (Capt. E.D.B. McCarthy, RN) and HMAS Perth (Capt. P.W. Bowyer-Smith, RN) departed Piraeus for Alexandria. They were to proceed via the Anti-Kythira Channel. (20)
Around 0400B/7, HMS Ajax (Capt. E.D.B. McCarthy, RN) and HMAS Perth (Capt. P.W. Bowyer-Smith, RN) arrived at Alexandria from Piraeus. They had been unable to enter the harbour earlier due to a heavy sandstorm with very limited visibility. (20)Operation Shelford.
HMS York (Capt. R.H. Portal, DSC, RN), HMS Bonaventure (Capt. H.G. Egerton, RN), HMS Jervis (Capt. P.J. Mack, DSO, RN), HMS Janus (Cdr. J.A.W. Tothill, RN), HMS Jaguar (Lt.Cdr. J.F.W. Hine, RN) and HMS Mohawk (Cdr. J.W.M. Eaton, RN) arrived at Suda Bay around 1800/14.
Operations MC 8, troops to be ferried to Malta and a convoy of empty transports was to return from Malta.
Around 0630B/28, the light cruiser HMS Ajax (Capt. E.D.B. McCarthy, RN) and destroyer HMS Nubian (Cdr. C.W. Ravenhill, RN) departed Alexandria.
Around 1150B/2, HMS Ajax (Capt. E.D.B. McCarthy, RN) and HMAS Perth (Capt. P.W. Bowyer-Smith, RN) arrived at Suda Bay from operations.
Around 1630B/3, HMS Ajax (Capt. E.D.B. McCarthy, RN) and HMAS Perth (Capt. P.W. Bowyer-Smith, RN) arrived at Piraeus from operations.
(24)
In the afternoon HMAS Perth (Capt. P.W. Bowyer-Smith, RN) conducted petometer log trials in Salamis Bay.
Around 0815B/6, HMS Ajax (Capt. E.D.B. McCarthy, RN) and HMAS Perth (Capt. P.W. Bowyer-Smith, RN) arrived at Alexandria from Piraeus. (24)
Around 1230B/7, HMS Orion (Capt. G.R.B. Back, RN, flying the flag of Vice-Admiral H.D. Pridham-Whippell, CB, CVO, RN), HMS Ajax (Capt. E.D.B. McCarthy, RN) and HMAS Perth (Capt. P.W. Bowyer-Smith, RN) departed Alexandria for Piraeus. On board the cruisers were troops and stores. Their transport run was also known as convoy AG 3. (25)
Around 1215B/8, HMS Orion (Capt. G.R.B. Back, RN, flying the flag of Vice-Admiral H.D. Pridham-Whippell, CB, CVO, RN), HMS Ajax (Capt. E.D.B. McCarthy, RN) and HMAS Perth (Capt. P.W. Bowyer-Smith, RN) arrived at Piraeus from Alexandria. After disembarking the troops and stores they departed around 1630B/8 to patrol in the western Aegean. (25)
Around 0745B/10, HMS Orion (Capt. G.R.B. Back, RN, flying the flag of Vice-Admiral H.D. Pridham-Whippell, CB, CVO, RN), HMS Ajax (Capt. E.D.B. McCarthy, RN) and HMAS Perth (Capt. P.W. Bowyer-Smith, RN) arrived at Suda Bay from patrol.
Around 1450B/11, HMS Ajax (Capt. E.D.B. McCarthy, RN) parted company with HMS Orion (Capt. G.R.B. Back, RN, flying the flag of Vice-Admiral H.D. Pridham-Whippell, CB, CVO, RN) and HMAS Perth (Capt. P.W. Bowyer-Smith, RN).
Operation MC 9.
Around 1000B/19, HMS Orion (Capt. G.R.B. Back, RN, flying the flag of Vice-Admiral H.D. Pridham-Whippell, CB, CVO, RN), HMS Ajax (Capt. E.D.B. McCarthy, RN) and HMAS Perth (Capt. P.W. Bowyer-Smith, RN), HMAS Stuart (Capt. H.M.L. Waller, DSO, RAN) and HMS Hereward (Lt. W.J. Munn, RN) departed Piraeus to patrol in the western Aegean.
Around 0700B/21, ' Force B ' which was made up of the light cruisers HMS Orion (Capt. G.R.B. Back, RN, flying the flag of Vice-Admiral H.D. Pridham-Whippell, CB, CVO, RN), HMS Ajax (Capt. E.D.B. McCarthy, RN), HMAS Perth (Capt. P.W. Bowyer-Smith, RN), heavy cruiser HMS York (Capt. R.H. Portal, DSC, RN) and the destroyers HMAS Stuart (Capt. H.M.L. Waller, DSO, RAN), HMS Hasty (Lt.Cdr. L.R.K. Tyrwhitt, RN) and HMS Hereward (Lt. W.J. Munn, RN) departed Suda Bay for operations.
Around 1330B/27, the light cruisers HMS Orion (Capt. G.R.B. Back, RN, flying the flag of Vice-Admiral H.D. Pridham-Whippell, CB, CVO, RN), HMS Ajax (Capt. E.D.B. McCarthy, RN), HMAS Perth (Capt. P.W. Bowyer-Smith, RN), HMS Gloucester (Capt. H.A. Rowley, RN) and the destroyers HMS Hereward (Lt. W.J. Munn, RN) and HMAS Vendetta (Lt.Cdr. R. Rhoades, RAN) departed Piraeus for patrol in the western Aegean and Anti-Kythira Channel.
Battle of Cape Matapan.
30 Mar 1941
In the afternoon, HMS Ajax (Capt. E.D.B. McCarthy, RN) and HMAS Perth (Capt. P.W. Bowyer-Smith, RN) arrived at Salamis Bay. (24)
31 Mar 1941
Around 0900B/31, HMS Ajax (Capt. E.D.B. McCarthy, RN) and HMAS Perth (Capt. P.W. Bowyer-Smith, RN) departed Salamis Bay to patrol in the western Aegean. (24)
1 Apr 1941
Around 0620B/1, HMS Ajax (Capt. E.D.B. McCarthy, RN) and HMAS Perth (Capt. P.W. Bowyer-Smith, RN) arrived at Suda Bay from patrol.
They departed again around 1430B/1, to patrol in the western Aegean. (28)
2 Apr 1941
Around 1200B/2, HMS Ajax (Capt. E.D.B. McCarthy, RN) and HMAS Perth (Capt. P.W. Bowyer-Smith, RN) arrived in Salamis Bay from patrol.
They departed again around 1900B/2, to patrol in the western Aegean. (29)
3 Apr 1941
Around 0645B/3, HMS Ajax (Capt. E.D.B. McCarthy, RN) and HMAS Perth (Capt. P.W. Bowyer-Smith, RN) arrived at Suda Bay from patrol.
They departed again around 1245B/3, to patrol in the western Aegean. (28)
5 Apr 1941
In the morning, HMS Ajax (Capt. E.D.B. McCarthy, RN) and HMAS Perth (Capt. P.W. Bowyer-Smith, RN), arrived at Piraeus from patrol. (29)
7 Apr 1941
Around 1700B/7, HMS Ajax (Capt. E.D.B. McCarthy, RN), HMAS Perth (Capt. P.W. Bowyer-Smith, RN) and HMS Calcutta (Capt. D.M. Lees, DSO, RN) departed Piraeus for Suda Bay.
Around 2200B/7, HMS Calcutta parted company to join the close escort of convoy AG 8. (30)
8 Apr 1941
At daybreak, HMS Ajax (Capt. E.D.B. McCarthy, RN) and HMAS Perth (Capt. P.W. Bowyer-Smith, RN) arrived at Suda Bay from Piraeus.
They departed again around 1700B/8, to patrol in the western Aegean. (29)
9 Apr 1941
Around 1730B/9, HMS Ajax (Capt. E.D.B. McCarthy, RN) and HMAS Perth (Capt. P.W. Bowyer-Smith, RN) arrived at Suda Bay from patrol. On arrival an enemy aircraft dropped two bombs close by HMAS Perth but no damage was sustained.
They departed again around 2000B/9, to patrol in the eastern Aegean. (29)
10 Apr 1941
Around 0700B/10, HMS Ajax (Capt. E.D.B. McCarthy, RN) and HMAS Perth (Capt. P.W. Bowyer-Smith, RN) arrived at Suda Bay from patrol. They then both fuelled from the chartered tanker British Lord (British, 6098 GRT, built 1922). In the afternoon, during an air raid four bombs were dropped close to HMS Ajax but no damage was sustained.
The cruisers departed around 1730B/10 to cover the passage of the destroyers HMS Jervis (Capt. P.J. Mack, DSO, RN), HMS Janus (Cdr. J.A.W. Tothill, RN), HMS Nubian (Cdr. R.W. Ravenhill, RN) and HMS Mohawk (Cdr. J.W.M. Eaton, RN) from Suda Bay to Malta. These destroyers had departed Suda Bay around 1200B/10. (29)
11 Apr 1941
Operation MBD 3
Offensive sweep along the Cyrenaican coast.
Around 2000B/11 the light cruiser HMS Orion (Capt. G.R.B. Back, RN, flying the flag of Vice-Admiral H.D. Pridham-Whippell, CB, CVO, RN) and the destroyers HMAS Stuart (Capt. H.M.L. Waller, DSO, RAN), HMS Griffin (Lt.Cdr. J. Lee-Barber, DSO, RN), HMS Hasty (Lt.Cdr. L.R.K. Tyrwhitt, RN), HMS Jaguar (Lt.Cdr. J.F.W. Hine, RN) and HMS Juno (Cdr. St.J.R.J. Tyrwhitt, RN) departed Alexandria. The destroyers were to conduct an offensive sweep along the Cyrenaican coast during the night of 12/13 April 1941.
Cover for this operation was provided by HMS Orion along with the light cruisers HMS Ajax (Capt. E.D.B. McCarthy, RN) and HMAS Perth (Capt. P.W. Bowyer-Smith, RN) which had come from the Aegean. They joined HMS Orion and the destroyers around 1300B/12.
Around 1700B/12, HMS Jaguar and HMS Juno parted company, followed half an hour later by HMAS Stuart and HMS Griffin. These destroyers were detached to conduct the sweep while the light cruisers remained to seaward as cover. HMS Hasty remained with the cruisers for A/S protection.
The destroyers swept in pairs; HMS Jaguar and HMS Juno from Ras Toyones to Ras Tolmeita, HMAS Stuart and HMS Griffin from Ras Tolmeita to Ras el Hilal. Two more destroyers, from the Inshore Squadron joined to sweep along the coast from Ras el Hilal to Ras el Tin, these were HMAS Vendetta (Lt.Cdr. R. Rhoades, RAN) and HMAS Waterhen (Lt.Cdr. J.H. Swain, RN).
The sweep was continued until about dawn but nothing was sighted. The destroyers then rejoined the cruisers minus HMAS Vendetta and HMAS Waterhen which rejoined the Ishore Squadron.
HMAS Perth and the destroyers then set course to Alexandria while HMS Orion and HMS Ajax proceeded to a position to the west of Crete to provide cover for convoys to and from the Aegean.
HMAS Stuart and HMS Griffin were detached P.M. on the 13th for duty with the Inshore Squadron.
HMS Perth, HMS Hasty, HMS Jaguar and HMS Juno arrived at Alexandria around 0600B/14. (19)
11 Apr 1941
Around 1200B/11, HMS Ajax (Capt. E.D.B. McCarthy, RN) and HMAS Perth (Capt. P.W. Bowyer-Smith, RN) arrived at Athens (Phaleron) from patrol.
They departed again around 1500B/11 to patrol in the western Aegean.
During the night of 11/12 April 1941, they departed the Aegean and proceeded southwards to make rendezvous with HMS Orion (Capt. G.R.B. Back, RN, flying the flag of Vice-Admiral H.D. Pridham-Whippell, CB, CVO, RN) and a group of destroyers for operation MBD 3.
[For more info on this operation see the event ' Operation MBD 3. ' for 11 April 1941. (29)
18 Apr 1941
Operations MD 2 and MD 3, convoy movements to and from Malta and bombardment of Tripoli.
Timespan 18 to 23 April 1941. (All times are zone C/-3)
18 April 1941.
Around 0700 hours the Mediterranean Fleet departed Alexandria for these operations. The Fleet was made up of the battleships HMS Warspite (Capt. D.B. Fisher, CBE, RN, flying the flag of Admiral Sir A.B. Cunningham, KCB, DSO, RN), HMS Valiant (Capt. C.E. Morgan, DSO, RN), HMS Barham (Capt. G.C. Cooke, RN, flying the flag of A/Rear-Admiral H.B. Rawlings, OBE, RN), aircraft carrier HMS Formidable (Capt. A.W.la T. Bisset, RN, flying the flag of A/Rear-Admiral D.W. Boyd, CBE, DSC, RN), light cruiser HMS Phoebe (Capt. G. Grantham, RN), AA cruiser HMS Calcutta (Capt. D.M. Lees, DSO, RN) and the destroyers HMS Juno (Cdr. St.J.R.J. Tyrwhitt, RN), HMS Jaguar (Lt.Cdr. J.F.W. Hine, RN), HMS Kingston (Lt.Cdr. P. Somerville, DSO, DSC, RN), HMS Kimberley (Lt.Cdr. J.S.M. Richardson, DSO, RN), HMS Griffin (Lt.Cdr. J. Lee-Barber, DSO, RN), HMS Havock (Lt. G.R.G. Watkins, RN), HMS Hereward (Lt. W.J. Munn, RN) and HMS Encounter (Lt.Cdr. E.V.St J. Morgan, RN). Destroyer HMS Defender (Lt.Cdr. G.L. Farnfield, RN) joined later at sea having overtaken the fleet after being delayed on leaving Alexandria as she fouled her mooring buoy. The Fleet was to proceed to Suda Bay where the destroyers would be refuelled. Also HMS Warspite was to land salvage equipment there that was to be used in the attempt to salvage the heavily damaged heavy cruiser HMS York. Initially the Fleet set course to pass through the Kithera Channel but this was later changed to pass through the Kaso Strait.
At dusk (around 1935C/18) the British transport HMS Breconshire (9776 GRT, built 1939) departed Alexandria for Malta. She was loaded with petrol and ammunition. She was escorted by the light cruiser HMAS Perth (Capt. P.W. Bowyer-Smith, RN), and the destroyer HMAS Waterhen (Lt.Cdr. J.H. Swain, RN) which was relieved early on the 19th by the destroyer HMS Hotspur (Lt.Cdr. C.P.F. Brown, RN) which had departed Alexandria around 2300B/18 to overtake. They were to make rendezvous with the Fleet south-west of Kithera at daybreak on the 20th. HMAS Waterhen set course to make rendezvous with a raiding force against Bardia.
19 April 1941.
The Battlefleet passed through the Kaso Strait during the night and arrived at Suda Bay around noon to refuel the destroyers and disembark the salvage gear embarked in Warspite.
In the morning the light cruiser HMS Phoebe and the AA-cruiser HMS Calcutta were detached from the Fleet to join a convoy coming from Pireaus. They remained with the convoy until after dark and then proceeded to join the convoy of empty freighters that was to be sailed from Malta (see below).
The Fleet sailed around 1530 hours and set course to pass through the Kithera Channel and then set course to the south-west. Enemy reconnaissance aircraft reported the Fleet leaving the harbour.
At dark a convoy of empty merchant vessels (Convoy ME 7) departed Malta for Alexandria. It was made up of four merchant vessels; City of Lincoln (8039 GRT, built 1938), City of Manchester (8917 GRT, built 1935), Clan Ferguson (7347 GRT, built 1938) and Perthshire (10496 GRT, built 1936). Escort was provided by four destroyers; HMS Jervis (Capt. P.J. Mack, DSO, RN), HMS Janus (Cdr. J.A.W. Tothill, RN), HMS Nubian (Cdr. R.W. Ravenhill, RN), and HMS Diamond (Lt.Cdr. P.A. Cartwright, RN). This last destroyer had just completed a refit a Malta.
20 April 1941.
At 0800 hours, the Battlefleet made rendes-vous with the force of the Vice-Admiral light forces; the light cruisers HMS Orion (Capt. G.R.B. Back, RN, flying the flag of Vice-Admiral H.D. Pridham-Whippell, CB, CVO, RN), HMS Ajax (Capt. E.D.B. McCarthy, RN), HMS Gloucester (Capt. H.A. Rowley, RN) and the destroyers HMS Hasty (Lt.Cdr. L.R.K. Tyrwhitt, RN) and HMS Hero (Cdr. H.W. Biggs, DSO, RN). Rendez-vous was also made with HMS Breconshire, HMAS Perth and HMS Hotspur. Breconshire joined the battleship line. The cruisers formed round the Battlefleet and the destroyers joined the screen. Course was westwards to meet convoy ME 7.
Convoy ME 7 was met around noon and HMS Jervis and HMS Janus joined the Battlefleet. The convoy then continued on to Alexandria escorted by HMS Phoebe, HMS Calcutta, HMS Nubian and HMS Diamond.
The Fleet was not attacked by aircraft despite being sighted by enemy aircraft in the forenoon.
At dark several of the destroyers streamed their T.S.D.S. (minesweeping gear) and the Vice-Admiral Light Forces was detached in HMS Orion with HMS Formidable, HMS Ajax, HMAS Perth, and the destroyers HMS Griffin, HMS Kingston and HMS Kimberley for independent flying operations. Also HMS Breconshire was detached for Malta escorted by HMS Encounter.
21 April 1941.
Between 0500 and 0545 hours, the Battlefleet bombarded Tripoli at ranges from 11000 to 14000 yards. HMS Warspite, HMS Barham, HMS Valiant and HMS Gloucester were in line ahead with destroyers screening, these were; HMS Jervis, HMS Jaguar, HMS Janus, HMS Juno, HMS Hasty, HMS Havock, HMS Hereward, HMS Hero and HMS Hotspur.
The submarine HMS Truant (Lt.Cdr. H.A.V. Haggard, RN) served as navigational beacon during the approach and aircraft from HMS Formidable provided illumination of the target area by dropping flares. The night was clear but dust and smoke made it difficult to see the results of the bombardment. The spotting aircraft later reported much damage in the harbour area including to fuel tanks. Also five ships were thought to have been sunk. A coast defence battery opened fire after 25 (sic !) minutes but without result.
[According to Italian sources the following damage was inflicted; The torpedo-boat Partenope was damaged by shells of medium calibre. The bridge was hit and her commander, Capitano di Corvetta Guglielmo Durantini was hit in the head by a shell and killed instantly. The ship was temporarily disabled. In all two were killed and five slightly wounded. It is not clear if the destroyer Geniere was also hit (Supermarina does not list her as damaged) but she had three of her crew killed, thirteen wounded (they may have been ashore at the time). Unfortunately, the report of Geniere could not be found in her file. The torpedo-boat Pleiadi had one wounded (again he might have been wounded ashore as no mention of damage to the warship in her file). The transports Assiria (2705 GRT, built 1928) and Marocchino (1524 GRT, built 1920, one wounded) were sunk in shallow water, the Custom (Guardi di Finanza) motor boat Cicconetti (61 tons) was also sunk (all three had not returned to service when the British occupied Tripoli in 1943). The transport Sabbia (5788 GRT, built 1926) was damaged. We currently do not have any data on civilian casualties but the Italians mentioned that several of the enemy 381mm shells failed to explode. The Tripoli 190mm coastal battery fired 88 rounds and claimed an enemy vessel probably hit but this was not the case.]
On completion of the bombardment the fleet withdrew at maximum speed to the north-east and at daylight made contact with the Vice-Admiral Light Forces ships. Air attacks were expected on the Fleet but none followed.
At dark the cruisers were detached to make a sweep to the north of the Fleet and HMS Jervis, HMS Jaguar, HMS Janus and HMS Juno were detached to Malta arriving there the following day.
22 April 1941.
Convoy ME 7 safely arrived at Alexandria at 0700 hours this day.
At daylight the cruisers rejoined the Fleet which then continued eastwards without any attacks on it or any other delay. Enemy shadowers reported the Fleet throughout the day and at 1800 hours an attack by three Ju-88’s was developing but Fulmars from HMS Formidable intercepted them and shot down two of them.
Around noon HMS Kandahar (Cdr. W.G.A. Robson, DSO, RN) joined the Fleet coming from Alexandria, having sailed on 21 April, and HMS Griffin then parted company and proceeded to Suda Bay for fueling and then escort duty in the Aegean.
At 1600 hours HMS Gloucester was detached to Suda Bay to fuel and from there onwards to Malta where she arrived on April 24th. HMAS Perth was to join HMS Phoebe in the Aegean. Having arrived at Alexandria with convoy ME 7, Phoebe and Calcutta departed Alexandria in the afternoon to join a convoy towards the Aegean.
23 April 1941.
The Fleet arrived at Alexandria without further incident at 1030 hours.
HMS Defender went to Tobruk instead of Alexandria. (19)
27 Apr 1941
Operation Demon continued, more troops were to be evacuated from Greece during the night of 27/28 April 1941.
From the Raphina and Raphtis area;
Light cruiser HMS Ajax (Capt. E.D.B. McCarthy, RN) and the destroyers HMS Kimberley (Lt.Cdr. J.S.M. Richardson, DSO, RN), HMS Kingston (Lt.Cdr. P. Somerville, DSO, DSC, RN) and HMS Havock (Lt. G.R.G. Watkins, RN) evacuated around 4200 troops. (19)
28 Apr 1941
Operation Demon continued, more troops were to be evacuated from Greece during the night of 28/29 April 1941.
From Kithera; About 750 RAF and other personnel were taken off by the sloop HMS Auckland (Cdr. E.G. Hewitt, DSO, RN) and the corvettes HMS Hyacinth (T/A/Lt.Cdr. F.C. Hopkins, DSC, RNR) and HMS Salvia (Lt.Cdr. J.I. Miller, DSO, RN, RNR).
From Monemvasia; About 4320 troops were evacuated by the light cruiser HMS Ajax (Capt. E.D.B. McCarthy, RN) and the destroyers HMS Griffin (Lt.Cdr. J. Lee-Barber, DSO, RN), HMS Havock (Lt. G.R.G. Watkins, RN), HMS Hotspur (Lt.Cdr. C.P.F. Brown, DSC, RN) and HMS Isis (Cdr. C.S.B. Swinley, DSC, RN).
From Kalamata; 450 troops were taken off, more was not possible as Kalamata was already in enemy hands, by the light cruisers HMAS Perth (Capt. P.W. Bowyer-Smith, RN), HMS Phoebe (Capt. G. Grantham, RN) and the destroyers HMS Decoy (Cdr. E.G. McGregor, DSO, RN), HMS Defender (Lt.Cdr. G.L. Farnfield, RN), HMS Hereward (Lt. W.J. Munn, RN), HMS Hero (Cdr. H.W. Biggs, DSO, RN), HMS Nubian (Cdr. R.W. Ravenhill, RN), HMS Kandahar (Cdr. W.G.A. Robson, DSO, RN), HMS Kimberley (Lt.Cdr. J.S.M. Richardson, DSO, RN) and HMS Kingston (Lt.Cdr. P. Somerville, DSO, DSC, RN). (19)
29 Apr 1941
Convoy GA 15.
This convoy was formed north of Crete on 29 April 1941 for Alexandria / Port Said where it arrived on 1 May 1941.
This convoy was made up of the following transports; Comliebank (British, 5149 GRT, built 1929), Corinthia (Greek, 3721 GRT, built 1911), Delane (British, 6054 GRT, built 1938), Ionia (British, 1936 GRT, built 1923), Itria (British, 6845 GRT, built 1940), Thurland Castle (British, 6372 GRT, built 1929) and the RFA oiler Brambleleaf (5917 GRT, built 1917).
Escort was provided by the AA cruiser HMS Carlisle (Capt. T.C. Hampton, RN), destroyers HMS Kandahar (Cdr. W.G.A. Robson, DSO, RN), HMS Kingston (Lt.Cdr. P. Somerville, DSO, DSC, RN) and the sloop HMS Auckland (Cdr. E.G. Hewitt, DSO, RN).
Cover was provided by the light cruisers HMS Orion (Capt. G.R.B. Back, RN, flying the flag of Vice-Admiral H.D. Pridham-Whippell, CB, CVO, RN), HMS Ajax (Capt. E.D.B. McCarthy, RN), HMAS Perth (Capt. P.W. Bowyer-Smith, RN), HMS Phoebe (Capt. G. Grantham, RN) and the destroyers HMS Decoy (Cdr. E.G. McGregor, DSO, RN), HMS Defender (Lt.Cdr. G.L. Farnfield, RN), HMS Hasty (Lt.Cdr. L.R.K. Tyrwhitt, RN), HMS Hereward (Lt. W.J. Munn, RN) and HMS Nubian (Cdr. R.W. Ravenhill, RN). During an air attack HMS Nubian was near missed sustaining some minor damage.
The battleships HMS Barham (Capt. G.C. Cooke, RN, flying the flag of A/Rear-Admiral H.B. Rawlings, OBE, RN), HMS Valiant (Capt. C.E. Morgan, DSO, RN), aircraft carrier HMS Formidable (Capt. A.W.la T. Bisset, RN), and the destroyers HMAS Stuart (Capt. H.M.L. Waller, DSO, RAN), HMAS Vampire (Cdr. J.A. Walsh, RAN), HMAS Vendetta (Lt.Cdr. R. Rhoades, RAN), HMAS Voyager (Cdr. J.C. Morrow, DSO, RAN), HMAS Waterhen (Lt.Cdr. J.H. Swain, RN) and HMS Greyhound (Cdr. W.R. Marshall-A'Deane, DSO, DSC, RN) sailed from Alexandria to support the convoy. The forces met south of the Kaso Strait on 30 April where HMAS Perth, HMS Phoebe and HMS Nubian joined the force of Rear-Admiral Rawlings. His force was also joined by three more destroyers; HMS Ilex (Capt. H.St.L. Nicholson, DSO and Bar, RN) joined from Alexandria while HMS Jaguar (Lt.Cdr. J.F.W. Hine, RN) and HMS Juno (Cdr. St. J.R.J. Tyrwhitt, RN) joined coming from Malta from where they had sailed on the 28th. HMAS Perth and HMS Nubian were however soon detached and joined the close escort of the actual convoy briefly before they went on ahead to Alexandria.
On 1 May, HMS Jaguar and HMS Juno attacked an A/S contact in position 32°59'N, 27°52'E. During this attack a depth charge exploded prematurely on board HMS Juno causing some minor damage to the ship. Five of the crew were killed in this mishap. Eleven more were wounded. The submarine in question was the Italian Turchese
The bulk of the convoy arrived at Alexandria on the 1st, but Comliebank and Itria went to Port Said instead escorted by HMS Decoy and HMS Defender. They also arrived on May 1st.
On 2 May 1941 the destroyers HMS Hasty, HMS Imperial (Lt.Cdr. C.A.de W. Kitcat, RN), HMS Jaguar, HMS Juno and HMS Kandahar departed Alexandria to join the fleet and relieve the Australian destroyers Stuart, Vampire, Vendetta, Voyager and Waterhen which then proceeded ahead of the fleet to Alexandria arriving in the evening of 2 May.
The Fleet arrived at Alexandria on the 3rd. (19)
5 May 1941
Operation Tiger, supply convoy from Gibraltar to Alexandria and reinforcements for the Mediterranean Fleet and Operation MD 4, supply convoy from Alexandria to Malta and taking up the reinforcements for the Mediterranean Fleet.
Timespan: 5 to 12 May 1941.
5 May 1941.
Western Mediterranean.
Part of Convoy WS 8A was approaching Gibraltar from the west. This part of convoy WS 8A was to proceed to Malta during operation ‘Tiger’.
It was made up of five transports; Clan Campbell (7255 GRT, built 1937), Clan Chattan (7262 GRT, built 1937), Clan Lamont (7250 GRT, built 1939), Empire Song (9228 GRT, built 1940) and New Zealand Star (10740 GRT, built 1935). During the passage from the U.K. it had been escorted by the battlecruiser HMS Repulse (Capt. W.G. Tennant, CB, MVO, RN), light cruiser HMS Naiad (Capt. M.H.A. Kelsey, DSC, RN, flying the flag of Rear-Admiral E.L.S. King, CB, MVO, RN) and the destroyers HMS Harvester (Lt.Cdr. M. Thornton, DSC, RN), HMS Havelock (Cdr. E.H. Thomas, DSC, RN) and HMS Hesperus (Lt.Cdr. A.A. Tait, RN) (with the additional local escorts when still close to the U.K.)
Around 0700A/5, HMS Repulse, HMS Harvester, HMS Havelock and HMS Hesperus were relieved from the escort by the battleship HMS Queen Elizabeth (Capt. C.B. Barry, DSO, RN) and the destroyers HMS Fearless (Cdr. A.F. Pugsley, RN) , HMS Foresight (Cdr. J.S.C. Salter, RN) , HMS Fortune (Lt.Cdr. E.N. Sinclair, RN) and HMS Velox (Lt.Cdr. E.G. Roper, DSC, RN). The Repulse and the three H-class destroyers then proceeded to Gibraltar to refuel where they arrived shortly before 1800 hours. It had originally been intended to include Repulse in the upcoming operation but she was left at Gibraltar due to her inadequate anti-aircraft armament.
HMS Naiad had already arrived at Gibraltar around 0900/4, having been relieved shortly after noon on the 2nd of May by HMS Mauritius (Capt. W.D. Stephens, RN). Around the same time HMS Naiad arrived at Gibraltar the cruiser HMS Fiji (Capt. P.B.R.W. William-Powlett, RN) arrived, she had been part of the escort of convoy SL 72.
Around 0930A/5, the battlecruiser HMS Renown (Capt. R.R. McGrigor, RN, flying the flag of Vice-Admiral J.F. Somerville, KCB, DSO, RN), aircraft carrier HMS Ark Royal (Capt. L.E.H. Maund, RN), light cruisers HMS Sheffield (Capt. C.A.A. Larcom, RN), HMS Fiji and the destroyers HMS Kashmir (Cdr. H.A. King, RN), HMS Kipling (Cdr. A. St. Clair-Ford, RN) and HMS Wrestler (Lt. E.L. Jones, DSC, RN). Kashmir and Kipling had departed a little earlier and carried out an A/S sweep in Gibraltar Bay first.
For the upcoming operation two groups were formed; The cover force which was formed on Renown was group I, the close escort, which was to remain with the transports was group II. When they arrived near the convoy at 1800A/5, group I was formed and was made up of Renown, Queen Elizabeth, Ark Royal, Sheffield, Fiji, Kashmir and Kipling. Group II remained with the convoy and was (for the moment) made up of Fearless, Foresight, Fortune, Velox and Wrestler. Group II and the convoy proceeded towards the Straits of Gibraltar at 13 knots while Group I proceeded to the south until 2130 hours when course was changed to 074°. At 1930 hours, Group I, had been joined by HMS Naiad. This cruiser had sailed from Gibraltar at 1300 hours.
Eastern Mediterranean.
Convoy MW 7B departed Alexandria for Malta this day. It was made up of the Norwegian tankers Hoegh Hood (9351 GRT, built 1936) and Svenor (7616 GRT, built 1931). These tankers were able to proceed at 10 knots. Escort was provided by the AA-cruisers HMS Carlisle (Capt. T.C. Hampton, RN), HMS Coventry (Capt. D. Gilmour, RN), destroyers HMS Defender (Lt.Cdr. G.L. Farnfield, RN), HMS HMS Greyhound (Cdr. W.A. Marshall-A’Deane, DSO, DSC, RN) and HMS Hasty (Lt.Cdr. L.R.K. Tyrwhitt, DSC, RN). Also part of the escort of this convoy was the corvette HMS Gloxinia (Lt.Cdr. A.J.C. Pomeroy, RNVR) which was to serve as minesweeper at Malta and the whaler HMS Swona which was to be outfitted as minesweeper (LL-sweep) at the Malta Dockyard.
6 May 1941.
Western Mediterranean.
The convoy with Group II passed through the Straits of Gibraltar between 0130 and 0330 hours followed by Group I between 0300 and 0430 hours. Although the moon did not set until 0314 hours the sky was completely overcast and visibility was low.
At 0330 hours, HMS Faulknor (Capt. A.F. de Salis, RN), HMS Forester (Lt.Cdr. E.B. Tancock, DSC and Bar, RN), HMS Fury (Lt.Cdr. T.C. Robinson, RN), HMS Harvester, HMS Havelock and HMS Hesperus departed Gibraltar followed at 0420 hours by HMS Gloucester (Capt. H.A. Rowley, RN) which had completed her repairs and undocking shortly before.
By 0550 hours, Group I was about 32 miles to the east of Gibraltar with the convoy and Group II 10 miles to the north. At this time Faulknor, Forester and Fury joined Group I. At 0615 hours Queen Elizabeth with Kashmir and Kelvin was detached to join Group II, followed thirty minutes later by Naiad.
At 0625 hours, Gloucester joined Group I and speed was then increased to 24 knots to draw well ahead of the convoy. During the day Group I steered 060°. Group II was steering parallel to the Spanish coast at 13 knots. Velox and Wrestler were detached from Group II to arrive at Gibraltar after dark to avoid being sighted returning from the East.
At 1740 hours Renown, in position 37°05’N, 00°21’W sighted a French merchant ship most likely en-route to Oran. On sighting the British ships she immediately steered clear to the westward. Shorty afterwards Group I reduced speed to 17 knots as to not get too far ahead of Group II and the convoy.
By midnight Group I was about 150 nautical miles east-north-east of Group II.
Eastern Mediterranean.
The Mediterranean Fleet departed Alexandria in the forenoon, it was made up of the battleships HMS Warspite (Capt. D.B. Fisher, CBE, RN, flying the flag of Admiral Sir A.B. Cunningham, GCB, DSO and 2 Bars, RN), HMS Barham (Capt. G.C. Cooke, RN), HMS Valiant (Capt. C.E. Morgan, DSO, RN), aircraft carrier HMS Formidable (Capt. A.W.la T. Bisset, RN), light cruisers HMS Orion (Capt. G.R.B. Back, RN, flying the flag of Vice-Admiral H.D. Pridham-Whippell, CB, CVO, RN), HMS Ajax (Capt. E.D.B. McCarthy, RN), HMAS Perth (Capt. P.W. Bowyer-Smith, RN), destroyers (D.14) HMS Jervis (Capt. P.J. Mack, DSO, RN), HMS Jaguar (Lt.Cdr. J.F.W. Hine, RN), HMS Juno (Cdr. St. J.R.J. Tyrwhitt, RN), HMS Kandahar (Cdr. W.G.A. Robson, DSO, RN), HMS Kimberley (Lt.Cdr. J.S.M. Richardson, DSO, RN), HMS Kingston (Lt.Cdr. P. Somerville, DSO, DSC, RN), (D.7) HMAS Napier (Capt. S.H.T. Arliss, RN), HMAS Nizam (Lt.Cdr. M.J. Clark, RAN), HMS Imperial (Lt.Cdr. C.A.de W. Kitcat, RN), HMS Havock (Lt. G.R.G. Watkins, RN), HMS Hotspur (Lt.Cdr. C.P.F. Brown, DSC, RN) and HMS Griffin (Lt.Cdr. J. Lee-Barber, DSO, RN). The fast minesweeper HMS Abdiel (Capt. E. Pleydell-Bouverie, MVO, RN) and the naval transport HMS Breconshire (9776 GRT, built 1939) also sailed with the Fleet. HMS Abdiel was to lay a minefield off Lampedusa. HMS Breconshire had on board oil and petrol for Malta as well as oil to supply this to destroyers at sea. Abdiel took station in the destroyer screen while Breconshire took station in the battleship line. After sailing the fleet proceeded to the northwest. No aircraft were flown off by HMS Formidable due to a dust storm and very limited visibility.
After the Fleet sailed, convoy MW 7A departed Alexandria. It was made up of four transport vessels; Amerika (10218 GRT, built 1930), Settler (6202 GRT, built 1939), Talabot (6798 GRT, built 1936) and Thermopylae (6655 GRT, built 1930). These were able to proceed at 14 knots. Escort was provided by the light cruisers HMS Dido (Capt. H.W.U. McCall, RN), HMS Phoebe (Capt. G. Grantham, RN), AA-cruiser HMS Calcutta (Capt. D.M. Lees, DSO, RN) and the destroyers (D.2) HMS Ilex (Capt. H.St.L. Nicholson, DSO and Bar, RN), HMS Isis (Cdr. C.S.B. Swinley, DSC, RN), HMS Hereward (Lt. W.J. Munn, RN) and HMS Hero (Cdr. H.W. Biggs, DSO, RN).
One of the destroyers from the escort of convoy MW 7B, HMS Defender, that had sailed on the 5th had to return to Alexandria due to condenser problems.
7 May 1941.
Western Mediterranean.
At 0400 hours, Group II, which was approximately 30 nautical miles east of Cape Palos, altered course to the south for about two hours before turning eastwards for the run to Malta.
Group I meanwhile had altered course to the northward at 0130 hours to pass between Ibiza and Majorca in order to carry out a diversion to the north of the Baleares during the day should this appear desirable.
By 0715 hours there was no indication that Group I had been sighted, and as visibility varied from poor to moderate, course was altered to pass again between Ibiza and Majorca to reach a position well ahead of Group II so as to divert any attention of any enemy aircraft from Group II and the convoy.
At 1000 hours, when 33 nautical miles south-west of Malta, Group I encountered a small Spanish fishing vessel which was seen to proceed towards Palma de Majorca.
At noon, Group I altered course to 140°. At 1630 hours course was altered to 100° to keep about 40 nautical miles to the eastward of Group II. Group I streamed paravanes at 1800 hours.
At 1945 hours, two Sunderland flying boats flying east passed north of the force and did not identify themselves till challenged. At the same time smoke was sighted astern and shortly afterwards a fighter aircraft reported that it was the convoy at a distance of 26 nautical miles.
At 2100 hours, Group I altered course to the north-east until dark in order to mislead any hostile aircraft. The sky had been overcast all day but towards the evening the visibility improved considerably and the convoy was clearly visible to the southwestward making a great deal of smoke.
At 2225 hours, RD/F in Fiji detected a group of aircraft bearing 170°, range 30 miles. The bearing changed to 154° and the range opened to 40 miles until the echo faded at 2230 hours. Group I altered course to 080° at 2300 hours.
Eastern Mediterranean.
All forces continued on their way during the day without incident. Destroyers were being fuelled from Breconshire one at a time.
The submarine HMS Triumph reported three transports proceeding towards Benghazi. Accordingly HMS Ajax, HMS Havock, HMS Hotspur and HMS Imperial were detached to attack Benghazi during the night of 7/8 May.
The Vice-Admiral Malta reported that the harbour had been mined and that the destroyers based at Malta were therefore unable to leave the harbour and participate in the convoy operations.
8 May 1941.
Western Mediterranean.
Soon after midnight Group I had to alter course to avoid being sighted by a lighted merchant ship steering a course of 110°.
At 0535 hours, HMS Ark Royal launched three reconnaissance A.S.V. aircraft in position 38°06’N, 06°26’E to search to the eastward south of Sardinia. At 0700 hours a fourth aircraft was flown off to search to the west of Sardinia. These aircraft returned at 0800 hours and had nothing to report. They had covered 140 miles to the eastward and 50 miles to the westward. Group I then proceeded to join the convoy. The first fighter patrol was flown off by Ark Royal at 0830 hours.
By 1000 hours, Group I had joined the convoy, which was proceeding on a course of 085° at 14 knots. This was the Clan Campbell’s best speed. Renown and Ark Royal took station on the starboard side of the convoy in order to facilitate flying operations and at the same time provide AA protection for the convoy. Queen Elizabeth took station astern of Ark Royal to provide AA protection for this vulnerable ship. Gloucester and Fiji formed on the transport ships.
At 1115 hours an enemy signal was intercepted that our forces had been sighted at 0800 hours. Naiad detected an enemy aircraft approaching at 1133 hours and three minutes later a large float-plane emerged from the clouds ahead of the convoy. Naiad opened fire and the aircraft retreated into the clouds. Fighters were sent in pursuit but failed to intercept. At noon a full and accurate report was made by this float-plane on the composition of our forces.
The sky cleared to some extent at noon, it had been overcast all morning. Visibility continued to improve all day although considerable cloud prevailed until the evening.
At 1345 hours, eight aircraft were seen approaching very low, fine on the starboard bow. These were engaged as they approached, but the AA fire appeared to be not very well directed. Torpedoes were dropped from outside the destroyer screen, which was roughly 3000 yards ahead of the convoy and extended to starboard to cover Renown, Ark Royal and Queen Elizabeth. The four Fulmar fighters on patrol at this time were engaging CR. 42 fighters that had accompanied these torpedo aircraft.
Torpedoes were evidently aimed at Renown and Ark Royal but by very skilful handling by the Commanding Officers of these two ships all tracks were combed or avoided. Two torpedoes passed close to Renown. A third which was being successfully combed made a sudden alteration of 60° towards Renown and a hit forward seemed inevitable when the torpedo reached the end of it’s run and sank. Two torpedoes passed to port and two to starboard of Ark Royal.
Of the eight aircraft which attacked one was brought down during the approach, probably by AA fire from the destroyers. Two others were seen to fall from the sky during their retirement. The destroyers were disappointingly slow in opening fire on the approaching torpedo-bombers and a full barrage never developed. During the action between the Fulmar’s and the CR. 42’s one Fulmar was brought down and the crew of two was lost.
At 1400 hours a few bomb splashes were observed on the horizon to the northwestward.
At 1525 hours, two sections of Fulmar’s attacked and shot down in flames an S.79 shadower. On returning from this attack one Fulmar had to make a forced landing on the water about 9 nautical miles from the fleet. HMS Foresight closed the position and was able to pick up the crew of two. At this time the fleet was about 28 nautical miles north of Galita Island.
At 1600 hours, as the wind had backed from south of east to north of east. The starboard column; Renown, Ark Royal and Queen Elizabeth, was moved over to the port quarter of the convoy and the destroyer screen was readjusted accordingly. This allowed freedom of manoeuvre for flying operations and enabled the column to increase speed and snake the line whenever a bombing attack developed, in order to hamper the bombers and at the same time remain in a position to afford full AA support of the convoy.
The first high level bombing attack of the day developed at 1622 hours when three S.79’s approached from astern at about 5000 feet, i.e. just under the cloud level. One, diverted by AA fire, jettisoned his bombs and subsequently crashed astern of the Fleet. The other two dropped twelve bombs close ahead of Ark Royal and escaped into the clouds. It is probable that both of these were hit by the concentrated AA fire with which they were met. About 10 minutes later a single aircraft approached from astern and encountering heavy AA fire turned across the stern of the Fleet, dropping its bombs well clear.
At 1710 hours, another S.79 shadower was shot down in flames on the port quarter of the Fleet by a Fulmar fighter. Twenty minutes later five S.79’s attacked the fleet from south to north. Two broke formation under gunfire and the remainder delivered a poor attack, bombs falling near the destroyer screen. A similar attack by three S.79’s took place at 1800 hours, when bombs were again dropped near the destroyer screen.
The provision a adequate fighter protection for the Fleet was a difficult problem with the small numbers of fighters available. Aircraft returned to the carrier at various times with damage and failure of undercarriage, and every opportunity was taken, whenever the RD/F screen cleared to land on, refuel and rearm the Fulmars, sometimes singly and sometimes two or three at a time. There were occasions when no more then two fighters were in the air, but whenever an attack appeared to be impending every fighter that could be made serviceable was sent up.
At 1910 hours enemy aircraft were detected at a range of 70 miles approaching from Sicily. At this time only seven Fulmars remained serviceable of which only three were in the air. The other four were immediately flown off. The total number of hostile aircraft is uncertain, but the Fulmars sighted three separate formations of sixteen Ju.87’s, twelve Ju.87’s and six Me.110’s. One formation was seen from Renown for a short time at 1933 hours in a patch of clear sky. RD/F indicated several formations circling to the northwest of the Fleet for nearly one hour and several bomb splashes were seen well away to the northward and northwestward. During this period Fulmars intercepted the enemy and, although greatly outnumbered, fought several vigorous and gallant actions, resulting in the certain destruction of one Ju.87 and damage to several others, including at least one Me.110. These attacks disorganised the enemy and forced them to the northward with the result that they probably missed sighting the Fleet. They then entered thick cloud and it is possible that the groups became separated and all cohesion in the attack disappeared. Whatever the reason RD/F showed these groups retiring to the northward and no attack on the Fleet developed.
The Fleet reached the entrance to the Skerki Channel at 2015 hours. ‘Force B’ then turned westwards. It was made up of Renown, Ark Royal, Sheffield, Harvester, Havelock and Hesperus. Queen Elizabeth was ordered to join ‘Force F’.
The turn to the west was just being completed when ‘Force B’ was attacked at 2030 hours by three torpedo-bombers which came from right ahead. The destroyers were still manoeuvering to take up their screening positions and did not sight the enemy aircraft in time to put up a barrage of AA fire. This attack was pressed home by the enemy with great determination. All three aircraft were heavily engaged and two were seen to be hit. Renown combed the torpedo tracks, two passing close down the port side and one down the starboard side.
During this attack No. P (port) 3, 4.5” gun turret in Renown malfunctioned and fired two round into the back of No. P 2 gun turret. This resulted in five ratings killed, five seriously wounded of which one later died and one officer and twenty-five ratings wounded.
Speed was increased to 24 knots at 2038 hours and a westerly course was maintained throughout the night.
As a result of the day’s air attacks, seven enemy aircraft were destroyed, two probably destroyed and at least three, probably more, damaged. Of the seven destroyed AA fire accounted for four and feighters for three. No hits, either by bomb or torpedo were obtained on our ships, nor were there any casualties besides than caused by the accident in Renown. Two Fulmars were lost, the crew of one of them was saved.
Meanwhile the convoy continued eastwards escorted now by HMS Queen Elizabeth, HMS Naiad, HMS Gloucester, HMS Fiji, HMS Faulknor, HMS Fearless, HMS Foresight, HMS Forester, HMS Fortune, HMS Fury, HMS Kashmir and HMS Kipling.
Eastern Mediterranean.
Visibility was still poor with patches of heavy rain. This helped the Fleet and convoy from being detected by the enemy and attacked by aircraft. On the other hand it resulted in the loss of two Albacore aircraft. One Fulmar was lost in combat with enemy aircraft.
HMS Ajax, HMS Havock, HMS Hotspur and HMS Imperial rejoined the Fleet at 1700 hours. Their attack on Benghazi had been successful although there was little shipping in the harbour two transports were intercepted after the bombardment. The largest blew up, and the other was ran aground and was left on fire after several explosions. These were the Italian Tenace (1142 GRT, built 1881) and Capitano A. Cecchi (2321 GRT, built 1933).
The Fleet remained with convoy MW 7A during the day and at dark moved to the southward. HMS Dido, HMS Phoebe, HMS Calcutta, HMS Carlisle and HMS Coventry were detached from their convoy’s to join the Tiger convoy coming from Gibraltar.
Both MW convoy’s made direct for Malta escorted by HMS Hotspur, HMS Havock and HMS Imperial. All other destroyers had been oiled from Breconshire during the past two days.
9 May 1941.
Western Mediterranean.
Further torpedo-bomber attacks were expected and a screen made up of Sheffield and the three destroyers was stationed ahead, astern and on either beam of Renown and Ark Royal at 5000 yards. The night was however uneventful and at 0800 hours speed was reduced to 20 knots and screening diagram no.4 was resumed by the escorts.
A shadower was detected, bearing 115°, range 12 nautical miles at 1027 hours. Two fighters were flown off but failed to intercept the enemy. An enemy sighting report was intercepted in Renown.
At 1100 hours a merchant vessel was sighted in position 37°54’N, 03°30’E about 8 nautical miles to the northward. At the same time Ark Royal reported that a periscope had been sighted about 4000 yards away. No further action was taken as detaching a single destroyer to search for the submarine was thought to be of little use and it was not thought wise to detach more then one destroyer as there were only three present.
At 1300 hours course was altered to 145° and speed reduced to 16 knots to conserve fuel in the destroyers.
At 1700 hours five search aircraft were flown off from position 37°27’N, 01°29’E to search between bearings 045° and 340° from Oran and south of parallel 38°45’N. Nothingwas sighted except for a merchant vessel. A Fulmar was also flown off to carry out a reconnaissance of Oran. This aircraft took photographs and reported the battlecruiser Dunkerque in her usual position at Mers-el-Kebir surrounded by nets, with lighters alongside and a pontoon gangway to the shore. One large and two small destroyers were sighted inside Oran harbour and probably six or seven submarines.
The six destroyers from the 8th Destroyer Flotilla which had taken part in getting the ‘Tiger’ convoy to as far as Malta sailed from there at 2000B/9 for their return passage to Gibraltar. HMS Foresight however had to return to Malta with an engine problem.
At 2200 hours ‘Force B’ altered course to the eastward as to be in a position to support the destroyers during their passage west at daylight the next day when they were passing south of Sardinia.
The Tiger convoy and it’s escort.
Shortly after midnight the transport Empire Song was mined and damaged. Initially she was able to remain with the convoy but around 0140 hours she was slowly sinking having also been on fire. The destroyers HMS Foresight and HMS Fortune were detached to stand by her. In the end Empire Song blew up during which Foresight was damaged.
The transport New Zealand Star was also damaged but she was able to remain with the convoy as her speed was not affected.
The convoy was attacked by torpedo-bombers early in the night but no damage was done by them. One torpedo passed very close to HMS Queen Elizabeth.
Around 0700 hours the Tiger convoy was joined by HMS Dido and HMS Phoebe. An hour later HMS Calcutta, HMS Carlisle and HMS Coventry also joined.
At 1515 hours the Tiger convoy made rendez-vous with the Mediterreanean Fleet about 50 nautical miles south of Malta.
Eastern Mediterranean.
Convoy’s MW 7A and MW 7B both arrived safely at Malta. Both were swept in by HMS Gloxinia who succeeded in exploding a number of mines. The 5th Destroyer Flotilla was then also able to leave the harbour and they joined the Mediterranean Fleet; these were HMS Kelly (Capt. L.F.A.V.N. Mountbatten, GCVO, DSO, RN), HMS Kelvin (Cdr. J.H. Allison, DSO, RN) , HMS Jackal (Lt.Cdr. R.McC.P. Jonas, DSC, RN) and HMS Janus (Cdr. J.A.W. Tothill, RN)
Also Breconshire arrived at Malta where she fuelled HMS Hotspur, HMS Havock and HMS Imperial.
As said above, at 1515 hours the Tiger convoy made rendez-vous with the Mediterreanean Fleet about 50 nautical miles south of Malta. HMS Queen Elizabeth then joined the battleship column. The Fleet then turned eastward but remained near the convoy for the remainder of the day. During the night he Fleet covered the convoy from a position to the north-eastward of it.
10 May 1941.
Western Mediterranean.
At 0700 hours, when in position 37°35’N, 03°02’E, course was altered to the westward at 15 knots. This being the most comfortable speed for the destroyers in the rising westerly gale.
At 1000 hours, the Capt. (D) 8th Destroyer Flotilla, reported he was in position 37°18’N, 08°45’E steering 275° at 28 knots. He also reported hat his ships were being shadowed by enemy aircraft. The enemy aircraft report was intercepted at 1025 hours. Course was then altered by ‘Force B’ to the eastward to reduce the distance between the two forces.
At 1100 hours, the Capt. (D) 8th Destroyer Flotilla, reported he was in position 37°22’N, 07°54’E, still steering 275° at 28 knots. The destroyers were still being shadowed.
At noon ‘Force B’ altered course to the westward. The wind was by then force 8 with a rising sea. Ten minutes later the enemy aircraft was again heard to report the position of the 8th Destroyer Flotilla and it’s course and speed.
At 1300 hours, the Capt. (D) 8th Destroyer Flotilla, reported he was in position 37°25’N, 07°01’E, steering 270° at 28 knots and that his ships were still being shadowed. At this time ‘Force B’ was 134 nautical miles to the westward and they could only maintain 13 knots in the sea without suffering damage. In view of the weather conditions and the fact that HMS Ark Royal had now only four serviceable fighters available it was not possible to afford the 8th Destroyer Flotilla any fighter protection without hazarding Ark Royal unduly. It was hoped that if an attack would develop the destroyers were able to avoid damage by high speed manoeuvring.
At 1430 hours a signal was received that the 8th Destroyer Flotilla was being bombed in position 37°25’N, 06°18’E and that HMS Fortune had been hit and her speed had been reduced to 8 knots. ‘Force B’ immediately altered course to the eastward and ran before the sea at 24 knots the maximum safe speed for the destroyers in the prevailing weather conditions.
An unidentified aircraft that had been detected by RD/F overtook the force at 1530 hours and was fired at by HMS Sheffield. The aircraft retired to the northward before resuming it’s easterly course. A reconnaissance of three aircraft was flown off at 1600 hours to cover the area to the northward and eastward of the 8th Destroyer Flotilla to maximum depth, in case enemy surface units were out in pursuit. These aircraft reported having sighted nothing on their return.
At 1750 hours a signal was received that the 8th Destroyer Flotilla had been subjected to another bombing attack but that no damage had been done. ‘Force B’ continued eastwards to provide close support in case of more air attacks.
At 1820 hours rendes-vous was made with the 8th Destroyer Flotilla and all ships proceeded westwards steering 280° at 12 knots. This was the best course and speed HMS Fortune could maintain. By this time this destroyer was down by the stern with seas breaking continually over her quarterdeck.
Five search aircraft were flown off by Ark Royal to search to maximum depth between 025° and 090°. Nothing was sighted except for one enemy aircraft. By 2030 hours all aircraft had returned.
As a speed of 12 knots subjected Fortune’s bulkhead to undue strain, HMS Fury was ordered to escort Fortune and proceed at 8 knots for the night. The remainder of the force zig-zagged, clear of these two destroyers, at higher speed.
It became also clear that Fortune had not received a direct hit but that five near misses had bent one shaft and caused flooding in several compartments aft, and minor flooding in the engine room.
Eastern Mediterranean.
The Battlefleet remained near the convoy for the entire day. Visibility improved throughout the day although conditions were still difficult for the enemy to attack from the air. One Ju.88 aircraft was shot down and another one was damaged. One Fulmar was lost when taking off from Formidable.
No enemy air attacks developed until dark when a number of aircraft, probably torpedo bombers, endeavoured to attack the convoy and battlefleet. A very heavy blind barrage of AA fire however kept them off and no torpedoes were seen.
At 1700 hours, Capt. D.5 in HMS Kelly was detached with the ships of the 5th Destroyer Flotilla (besides Kelly these were Kashmir, Kelvin, Kipling and Jackal) to bombard Benghazi before returning to Malta. The bombardment was carried out successfully. Following the bombardment they were dive bombed by German aircraft and all but Kipling were near missed. The Flotilla reached Malta p.m. on the 11th.
11 May 1941.
Western Mediterranean.
At 0532 hours, Vice-Admiral Somerville sent a signal to the Vice-Admiral commanding the North Atlantic station at Gibraltar reporting the position, course and speed of his forces. He also requested a tug to be sent for the assistance of HMS Fortune.
The wind eased considerably during the morning and at daylight Fortune and Fury were sighted about 4 nautical miles in advance of the Fleet and making good about 10 knots.
A reconnaissance of six aircraft were flown off at 0700 hours. These searched for a depth of about 140 miles between 030° and 085°. Visibility was reported as being 10 to 20 miles. Also a search was conducted for a depth of about 100 miles between 085° and 110° with a visibility of 3 to 5 miles. Only a few French merchant vessels were sighted.
Nothing happened during the day.
At 1700 hours a reconnaissance was flown of from position 36°54’N, 01°11’E to a depth of 180 nautical miles between north and east and to a depth of 90 nautical miles between north and 290°. The visibility was reported as being 10 to 15 nautical miles. Nothing was sighted.
The Fleet turned to the eastward for an hour before dark to take up a position well astern of Fortune and Fury during the night.
Eastern Mediterranean.
The Tiger convoy and the Fleet continued eastwards. Enemy aircraft were in the vicinity all day but no attacks developed. One Ju.88 was shot down and another one was damaged, one Fulmar was lost. At dark the cruisers were detached to proceed to Alexandria and the Fleet went on ahead of the convoy.
12 May 1941.
Western Mediterranean.
Just before daylight contact was made by the Fleet with Fortune and Fury. At dawn the tug HMS St. Day and four ML’s arrived from Gibraltar.
HMS Sheffield, HMS Harvester, HMS Hesperus and the four ML’s then remained with HMS Fortune and HMS Fury. Fortune was now able to make 12 knots.
HMS Renown and HMS Ark Royal, screened by HMS Faulknor, HMS Fearless, HMS Forester, HMS Foresight and HMS Havelock, then proceeded ahead to conduct flying exercises east of Gibraltar before entering harbour.
A reconnaissance was flown off at 0800 hours to search to the east but nothing was sighted. On their return these aircraft made a practice attack on Renown and Ark Royal. More exercises were carried out during the day.
The Fleet arrived at Gibraltar at 1800 hours. Renown berthed in no.1 dock to enable her damaged 4.5” gun turret to be hoised out.
HMS Sheffield entered harbour at 2030 hours followed shortly afterwards by the damaged Fortune and her escorts.
Eastern Mediterranean.
The bulk of the Fleet arrived at Alexandria around 1000 hours. The convoy arrived later, around 1300 hours. Some ships had been detached from the fleet to arrive early, fuel and then depart again for escort duties. (31)
11 May 1941
Around 1530C/11, HMS Orion (Capt. G.R.B. Back, RN, flying the flag of Vice-Admiral H.D. Pridham-Whippell, CB, CVO, RN), HMS Ajax (Capt. E.D.B. McCarthy, RN) and HMAS Perth (Capt. P.W. Bowyer-Smith, RN) arrived at Alexandria from operations. (32)
13 May 1941
Operation MD 8.
Bombardment of the El Fateyah airfield near Derna.
The light cruisers HMS Orion (Capt. G.R.B. Back, RN, flying the flag of Rear-Admiral H.B. Rawlings, OBE, RN), HMS Ajax (Capt. E.D.B. McCarthy, RN), HMAS Perth (Capt. P.W. Bowyer-Smith, RN) and the destroyers HMS Juno (Cdr. St.J.R.J. Tyrwhitt, RN), HMS Kandahar (Cdr. W.G.A. Robson, DSO, RN) and HMS Kingston (Lt.Cdr. P. Somerville, DSO, DSC, RN) departed Alexandria to bombard the El Fateyah airdrome near Derna during the night of 13/14 May 1941.
The bombardment could not be carried out due to navigational difficulties as the forces position could not be fixed accurately.
The force returned to Alexandria very early on the 15th. (19)
18 May 1941
Force A 1, made up of the battleships HMS Warspite (Capt. D.B. Fisher, CBE, RN, flying the flag of Rear-Admiral H.B. Rawlings, OBE, RN), HMS Valiant (Capt. C.E. Morgan, DSO, RN), light cruiser HMS Ajax (Capt. E.D.B. McCarthy, RN), destroyers HMAS Napier (Capt. S.H.T. Arliss, RN), HMS Kimberley (Lt.Cdr. J.S.M. Richardson, DSO, RN), HMS Janus (Cdr. J.A.W. Tothill, RN), HMS Isis (Cdr. C.S.B. Swinley, DSC, RN), HMS Hereward (Lt. W.J. Munn, RN), HMS Hero (Cdr. H.W. Biggs, DSO, RN), HMS Griffin (Lt.Cdr. J. Lee-Barber, DSO, RN) and HMS Decoy (Cdr. E.G. McGregor, DSO, RN) departed Alexandria to take up a position to the west of Crete. (19)
20 May 1941
Battle for Crete.
Timespan: 20 May to 1 June 1941.
Opening of the German airborn attack on Crete, 20 May 1941.
At 0915 hours, 20 May 1941, just three weeks after the British withdrawal from Greece, the German attack on Crete commenced. This took the form of intense bombing of Maleme airfield and Suda Bay areas, closely followed by the landing of troops by parachute, gliders and troop carrying aircraft. The enemy’s main objective appeared to be Maleme airfield but in the afternoon similar attacks developed at Heraklion and Retimo.
Fierce hand to hand fighting took place throughout the day on the Maleme airfield. At nightfall the situation appeared to be in hand, though about 1200 of the 3000 enemy who had landed by air appeared to be unaccounted for.
The naval situation at dawn, 20 May 1941.
The position of British (Allied) naval forces at sea at daylight on the 20th of May was as follows;
Force A 1 was about 100 nautical miles to the west of Crete. It was made up of the following warships; battleships HMS Warspite (Capt. D.B. Fisher, CBE, RN, flying the flag of Rear-Admiral H.B. Rawlings, OBE, RN), HMS Valiant (Capt. C.E. Morgan, DSO, RN), light cruiser HMS Ajax (Capt. E.D.B. McCarthy, RN), destroyers HMAS Napier (Capt. S.H.T. Arliss, RN), HMS Kimberley (Lt.Cdr. J.S.M. Richardson, DSO, RN), HMS Janus (Cdr. J.A.W. Tothill, RN), HMS Imperial (Lt.Cdr. C.A.de W. Kitcat, RN), HMS Isis (Cdr. C.S.B. Swinley, DSC, RN), HMS Hereward (Lt. W.J. Munn, RN), HMS Hero (Cdr. H.W. Biggs, DSO, RN), HMS Hotspur (Lt.Cdr. C.P.F. Brown, DSC, RN), HMS Griffin (Lt.Cdr. J. Lee-Barber, DSO, RN) and HMS Decoy (Cdr. E.G. McGregor, DSO, RN).
Force B was enroute from Alexandria to join force A 1 and consisted of the light cruisers HMS Gloucester (Capt. H.A. Rowley, RN also in command of this force as senior Captain) and HMS Fiji (Capt. P.B.R.W. William-Powlett, RN).
Force C was to the south of the Kaso Strait and was made up of the light cruisers HMS Naiad (Capt. M.H.A. Kelsey, DSC, RN, flying the flag of Rear-Admiral E.L.S. King, CB, MVO, RN), HMAS Perth (Capt. P.W. Bowyer-Smith, RN), destroyers HMS Kandahar (Cdr. W.G.A. Robson, DSO, RN), HMS Kingston (Lt.Cdr. P. Somerville, DSO, DSC, RN), HMS Juno (St.J.R.J. Tyrwhitt, RN) and HMS Nubian (Cdr. R.W. Ravenhill, RN).
Force D had reached the Antikithera Channel during the night and was now steering to join Force A 1. Force D was made up of the light cruisers HMS Orion (Capt. G.R.B. Back, RN, flying the flag of the Rear-Admiral (D) [D = Destroyers] I.G. Glennie, RN) and HMS Dido (Capt. H.W.U. McCall, RN).
The Commander-in-Chief’s intentions, 20-21 May 1941.
On learning that the attack on Crete had started, the Commander-in-Chief, Mediterranean at once ordered the forces at sea to move up towards the island but to keep out of sight of land. In the course of the forenoon he signalled his intentions for the night.
Force B was ordered to pass close to Cape Matapan at 0400/21 and then rendezvous with Force A 1 about 50 miles west of Crete at 0700/21.
Force D, augmented by HMS Ajax and the destroyers HMS Isis HMS Imperial, HMS ar and HMS Kimberley was to pass through the Antikithera Channel to sweep the area Cape Malea (36°26’N, 23°12’E), Hydra (37°21’N, 23°35’E), Phalconera (36°50’N, 23°54’E) and to be off Canea at 0700/21.
Force C was to pass through the Kaso Strait and sweep round Stampalia (75 miles north of Kaso) arriving off Heraklion at 0700/21.
Later in the day air reconnaissance reported caiques in the Aegean, and these two sweeps were cancelled as it was feared that they might miss south-bound convoys in the darkness. Instead forces C and D were ordered to establish patrols to the east and west of Longitude 25°E respectively. A new force of destroyers (Force E) made up of HMS Jervis (Capt. P.J. Mack, DSO, RN), HMS Ilex (Capt. H.St.L. Nicolson, DSO and Bar, RN) and HMAS Nizam (Lt.Cdr. M.J. Clark, RAN) was to bombard the Italian airfield at Scarpanto (50 miles to the east of Crete), withdrawing to the southward before daylight.
Night operations, 20-21 May 1941.
Scarpanto airfield was bombarded at 0245/21. The result could not be observed, but intelligence reports later indicated that two Do.17 aircraft were damaged. After examining Pegadia Bay (six miles to the northward of the airfield on the east coast of Scarpanto), and finding it empty, Force E retired to the southward.
The other operations ordered by the Commander-in-Chief were duly carried out but no convoys were sighted. Force C was attacked by torpedo-carrying aircraft with approaching the Kaso Strait at 2040/20. All torpedoes could be avoided. An hour later six MAS boats were encountered. Juno, Kandahar and Naiad engaged them and they retired after four of them had been damaged.
Naval situation at dawn, 21 May 1941.
At daylight, 21 May, Force A 1 (Warspite, Valiant, HMAS Napier, HMS Hereward, HMS Hero, HMS Hotspur, HMS Griffin and HMS Decoy) was 60 miles west of the Antikithera Channel, steering to the south-east to meet Force D (HMS Orion, HMS Ajax, HMS Dido, HMS Isis, HMS Imperial, HMS Janus and HMS Kimberley), which sighted nothing during the night and was now to the northward of Canea Bay and withdrawing towards the Antikithera Channel.
Force B (HMS Gloucester and HMS Fiji) was closing Force A 1 after an uneventful sweep between Cape Matapan and Cape Elophonesi (the south-west point of Crete).
The minelayer HMS Abdiel (Capt. E. Peydell-Bouverie, MVO, RN) was returning to Alexandria after laying mines off Cephalonia.
At the eastern end of Crete Force C (HMS Naiad, HMAS Perth, HMS Kandahar, HMS Kingston, HMS Juno and HMS Nubian) was joined at 0600 hours by the AA cruiser HMS Calcutta (Capt. D.M. Lees, DSO, RN). This force was now retiring from the Aegean through the Kaso Strait.
Force E (HMS Jervis, HMS Ilex and HMAS Nizam) was to the southward of Scarpanto and operating under the orders of Rear-Admiral King (Force C) as was the AA cruiser HMS Carlisle (Capt. T.C. Hampton, RN) which was on passage from Alexandria.
Operations during 21 May 1941. Loss of HMS Juno.
During 21 May, Force A 1, B and D remained to the south-west of Kithera. Every opportunity, between air attacks, being taken to refuel destroyers from the battleships. Force C cruiser to the southward of the Kaso Strait where HMS Carlisle joined him in the afternoon. Force E was recalled to Alexandria.
Throughout the day various forces were subjected to heavy air attacks. Force C in particular suffered attacks from daylight onwards, and after withdrawing through the Kaso Strait, was bombed continuously from 0950 to 1350 hours.
At 1249 hours, HMS Juno was hit and sank in two minutes. Six officers and ninety-one ratings were rescued by Kandahar, Kingston and Nubian. During the attacks one enemy aircraft was shot down and two, maybe more, were damaged.
To the west of Crete Force D was located at daylight and heavily bombed while withdrawing towards Force A 1. HMS Orion and HMS Ajax both suffered damage from near misses.
Force A 1 was attacked once during the forenoon and for two and a half hours during the afternoon. This later bombing was shared by Forces B and D which were then in company. Two enemy aircraft were probably shot down.
No seaborne landing has as yet taken place but during the afternoon air reconnaissance reported groups of small craft, escorted by destroyers, moving towards Crete from Milos (80 miles north of Retimo). Forces B, C and D were therefore ordered into the Aegean to prevent landings during the night. If there were no developments Forces C and D, in the eastern and western areas respectively, were to commence working northwards on a wide zigzag at 0530/22, to locate convoys.
Force A followed Force D well into the Antikithera Channel as AA support, turning to the westward at sunset to patrol for the night in the supporting area. As the two forces parted company a sharp attack by four Ju.88’s was made on Force D which shot down three of them.
Force D breaks up a troop convoy, night of 21/22 May 1941.
At 2330/21 when some 18 miles north of Canea, Rear-Admiral Glennie with Force D which now consisted of HMS Dido, HMS Orion, HMS Ajax, HMS Janus, HMS Kimberley, HMS Hasty (Lt.Cdr. L.R.K. Tyrwhitt, DSC, RN) and HMS Hereward, encountered an enemy convoy composed mainly of caiques escorted by a torpedo boat. The caiques which were crowded with German troops were engaged for two and a half hours. In all, at least a dozen caiques, two or three steamers and a steam yacht were sunk or left burning. It was estimated that about 4000 German troops were accounted for [an over-estimate, the real number was about 800 of which some were rescued later]. In addition the Italian torpedo-boat Lupo, after firing torpedoes at the cruisers, was damaged by a broadside from HMS Ajax.
After taking a further sweep to the east and north, Rear-Admiral Glennie decided that, in view of serious shortage of AA ammunition (AA ammunition remaining; Orion 38%, Ajax 42%, Dido 30%) and the scale of air attack to be anticipated the next day, he was not justified in keeping his force in the Aegean to carry out the intended sweep to the northward at daylight. He accordingly turned to the westward at 0330/22. His ships which had become considerably scattered during the action were given a rendezvous some 30 miles west of Crete. This decision, together with the result of his attack on the convoy, he reported to the Commander-in-Chief who ordered Force D to return to Alexandria with all dispatch.
Meanwhile Force B (Gloucester, Fiji, HMS Greyhound (Cdr. W.A. Marshall-A’Deane, DSO, DSC, RN) and Griffin) had been ordered by the Commander-in-Chief to leave their patrol off Cape Matapan and to proceed with dispatch to Heraklion where part of the town and harbour were reported to be in enemy hands. These orders reached Capt. Rowley in the Gloucester too late to be carried out, but the force entered the Aegean and at daylight was about 25 miles north of Canea. Nothing was sighted, and they retired to the westward towards Force A 1. Force B was attacked almost continuously by dive bombers for an hour and a half from 0630/22 onwards but escaped with slight damage only to each cruiser. They joined Force A 1 at 0830/22.
Naval situation at dawn, 22 May 1941.
At daylight on 22 May 1941, the position of the naval forces at sea was as follows. Rear-Admiral Rawlings with Force A 1 (HMS Warspite, HMS Valiant. HMAS Napier, HMS Imperial, HMS Isis, HMS Hero, HMS Hotspur and HMS Decoy) was about 45 miles south-west of Kithera, steering to the north-westward and shortly to be joined by the forces D and B from the Aegean.
The 5th Destroyer Flottilla had meanwhile (21 May) sailed from Malta the previous evening and was on passage to join Rear-Admiral Rawlings around 1000/22. This Flotilla was made up of five destroyers; HMS Kelly (Capt. L.F.A.V.N. Mountbatten, DSO, RN), HMS Kashmir (Cdr. H.A. King, RN), HMS Kelvin (Cdr. J.H. Alliston, RN), HMS Kipling (Cdr. A. St.Clair-Ford, RN) and HMS Jackal (Lt.Cdr. R.McC.P. Jonas, DSC, RN).
HMAS Stuart (Capt. H.M.L. Waller, DSO, RAN), HMAS Vendetta (Lt.Cdr. R. Rhoades, RAN) and HMAS Voyager (Cdr. J.C. Morrow, DSO, RAN) from the 10th Destroyer Flotilla as well as HMS Jervis, HMS Ilex and HMAS Nizam from the 14th Destroyer Flotilla were on passage from Alexandria to join Rear-Admiral Rawlings (Force A 1) and Rear-Admiral King (Force C) respectively.
Force C (HMS Naiad, HMAS Perth, HMS Calcutta, HMS Carlisle, HMS Kandahar, HMS Kingston and HMS Nubian) was off Heraklion about to sweep to the north-westward in search of enemy troop convoys.
The 22nd of May was to prove an expensive day for the British naval forces costing them two cruisers and a destroyer sunk, and leading directly to the situation which occasioned the loss of a further two destroyers the next morning. Also two battleships and two cruisers were damaged.
On the other hand the enemy was prevented from making a seaborne landing, and that so effectively as to deter him from any further attempts to do so, until the fall of Crete had been decided by his airborne troops.
Force C’s encounter with an enemy troop convoy, AM 22nd May.
Rear-Admiral King’s Force C had spent the night of 21/22 May patrolling of Heraklion. Nothing was sighted and at dawn the force formed up to carry out the sweep to the northward as ordered by the Commander-in-Chief. Air attacks on Force C commenced at 0700/22 and were continued without intermission. At 0830 hours a single caique carrying German troops was sighted. This caique was sunk by HMAS Perth, and as she was being heavily attacks by enemy aircraft, HMS Naiad turned back to support her. A small merchant vessel, reported by HMS Calcutta at 0909 hours was dealt with by the destroyers.
At 1000/22 Force C was 25 miles south of Milo (90 miles north of Retimo), HMAS Perth had rejoined the rest of the force but HMS Naiad was being heavily attacked and was still some way astern. Ten minutes later an enemy torpedo-boat (the Italian Saggitario) with four or five small sailing vessels was sighted to the northward. The destroyers gave chase, while the Perth and Naiad engaged the torpedo boat, causing her to retire behind smoke. HMS Kingston then engaged another destroyer, who was laying a smoke screen, at 7000 yards range, claiming two hits. She also reported a large number of caiques behind the smoke.
Force C was running short of AA ammunition. Air attacks were incessant and the force had to be kept together for mutual support. Its speed was limited as HMS Carlisle was unable to do more than 21 knots due to a bomb hit by enemy aircraft. During the same attack HMAS Perth had been near-missed but her speed was not effected.
For these reasons, Rear-Admiral King considered that he would jeopadise his whole force if he proceeded any further to the northward. He therefore decided to withdraw to the westward and ordered his destroyers to abandon the chase. A signal from the Commander-in-Chief (timed 0941 hour), which showed that this convoy was of considerable size, was not seen by him until 1100 hours. The brief action did, however, cause the enemy to turn back, and the troops, if they ever reached Crete at all, were not in time to influence the battle.
During its withdrawal to the westward, Force C, was continuously bombed for three and a half hours. HMS Naiad due to avoiding action had been unable to overtake the remainder of the force had two 5.25” turrets out of action. Several compartments were flooded by near misses, and at 1125 hours, her speed being reduced to 16-19 knots, the remainder of the force was ordered back to her support. Over a period of two hours, 181 bombs had been counted as being aimed at HMS Naiad.
HMS Carlisle was hit, and although not seriously damaged her Commanding Officer was killed. Torpedo bombers attacked the force at 1258 and 1315 hours but all torpedoes were avoided. At 1321 hours Force C sighted Force A 1 coming up the Kithera Channel from the westward.
The junction of Force A 1 with Force C, 22 May 1941.
On learning that Rear-Admiral King would be withdrawing through the Kithera Channel, Rear-Admiral Rawlings had decided that he would meet him in that neighbourhood. Accordingly, after being joined by Forces B and D he spent the forenoon patrolling between 20 and 30 miles west of the channel. The ammunition situation was causing anxiety, and rigid economy was ordered.
At 1225 hours, Rear-Admiral Rawlings heard from Rear-Admiral King that HMS Naiad was badly damaged and in need of support. He immediately decided to enter the Aegean and steered for the Kithera Channel at 23 knots. AA shell bursts from Force C were sighted at 1312 hours and a few minutes afterwards a large caique was seen between Pori and Antikithera Islands, to the south of the channel. HMS Greyhound was ordered to sink it.
At 1332 hours, just as forces A 1/B/D and C were meeting HMS Warspite was attacked by three Me 109’s equipped with bombs. A bomb hit and wrecked the starboard 4” and 6” batteries and damaged number three boiler room fan intakes, thereby reducing the ship’s speed. Both forces then withdrew to the south-westward, air attacks continuing intermittently for most of the afternoon.
The loss of HMS Greyhound, HMS Gloucester, HMS Fiji, 22 May 1941.
HMS Greyhound meanwhile, after sinking the caique, was returning to her place in Force A 1’s screen when at 1351 hours she was struck by two bombs and sank stern first 15 minutes later. HMS Kandahar and HMS Kingston were detached from Force C to pick up survivors and shortly after 1400 hours, Rear-Admiral King (who was the senior officer of all the forces present) ordered HMS Gloucester and HMS Fiji to give them AA support and to stand by the sinking Greyhound. These rescuing ships, and the men swimming in the water were subjected to almost continuous bombing and machine gun attacks. HMS Kingston was damaged by three near misses.
At 1413 hours, Rear-Admiral King asked Rear-Admiral Rawlings for close support as Force C by that time had practically no AA ammunition left. Force A 1 closed at the Warspite’s best speed (18 knots), and Rear-Admiral Rawlings, who was feeling uneasy about the orders given to Gloucester and Fiji informed Rear-Admiral King about the depleted state of their AA ammunition stocks of which the latter was not aware. At 1457 hours, Rear-Admiral King therefore ordered the rescuing ships to withdraw at their discretion, leaving boats and rafts if air attack prevented the rescue of survivors from Greyhound.
At 1530 hours, HMS Gloucester and HMS Fiji were coming up astern of HMS Warspite at high speed, engaging enemy aircraft. At 1550 hours, HMS Gloucester was hit by several bombs and came to a full stop. She was badly on fire and her upper deck was a shambles. In view of the intensity of the air attacks the Captain of HMS Fiji reluctantly decided that he could offer no assistance to her. All available boats and floats were dropped and the Fiji proceeded to the southward with Kandahar and Kingston still being hotly attacked by enemy aircraft.
At 1710 hours, HMS Fiji reported that she was in position 24 miles, 305°, Cape Elophonesi (the south-west point of Crete), steering 175° at 27 knots, a position 30 miles due east of Forces A 1 and C which were steering 215°.
At 1845 hours, after having survived about 20 bombing attacks by aircraft formations during the last four hours she fell victim to a single Me. 109. The machine flew out of the clouds in a shallow dive and dropped its bomb very close to the port side amidships. The ship took up a heavy list, but was able to steam at 17 knots until half an hour later when another single machine dropped three bombs which hit above ‘A’ boiler room. The list increased and at 2015 hours she rolled right over and sank in position 34°45’N, 23°12’E. She had expended all her 4” ammunition except for six star shell.
HMS Kandahar and HMS Kingston dropped boats and floats and then withdrew to the southward to avoid almost certain damage from air attacks if they had stayed in the area. They returned after dark and were able to rescue 523 officers and men. It was during this rescue work that Cdr. W.R. Marshall-A’Deane the Commanding Officer of HMS Greyhound, who had been picked up by HMS Kandahar earlier in the day when his own ship was sunk, jumped overboard to help a men in distress. He was lost out of sight in the darkness and was never seen again.
HMS Kandahar and HMS Kingston had been subjected to 22 air attacks between 1445 and 1920 hours and were now running short of fuel. At 2245 hours they left the scene of the loss of HMS Fiji and shaped course to rendezvous with Rear-Admiral King’s forces to the southward of Crete.
Night operations, 22-23 May 1941
Meanwhile, Rear-Admiral King, with Forces C and A 1 had been steering to the south-westward. Spasmodic air attacks continued till dusk. At 1645 hours HMS Valiant was hit by two medium bombs but no serious damage was done to her. Course was altered to the southward at 1800 hours and to the eastward at 2100 hours
Captain Lord Louis Mountbatten with his five destroyers; HMS Kelly, HMS Kashmir, HMS Kelvin, HMS Kipling and HMS Jackal had been delayed on his passage from Malta by a promising A/S hunt and only effected his junction with Force A 1 at 1600/22. At 2030 hours Kelly, Kashmir and Kipling were detached to search for survivors from Fiji and half an hour later Kelvin and Jackal were also detached to try to search for survivors from Gloucester. Subsequently these searches for survivors were cancelled and the destroyers were ordered to patrol inside Kisamo and Canea Bays.
On arrival at the Antikithera Channel HMS Kipling developed a steering defect and was detached to join Force A 1. Later on as the defect was remedied, her Commanding Officer decided to remain to the south-west of Crete where he anticipated he was able to make rendezvous with the other destroyer on their return. To this fortunate decision Capt. D.5 and over 250 of his officers and men in all probability were to owe their lives.
Continuing into Canea Bay Kelly and Kashmir fell in with a troop carrying caique, which they damaged badly with gunfire. They then carried out a short bombardment at Maleme and, whilst withdrawing, they engaged and set on fire another caique.
The Naval Officer in Command Suda had meanwhile reported some lights in Canea Bay. These lights the Kelvin and Jackal, who were operating in Kissamo Bay, were ordered to investigate, and finding them to be shore lights, proceeded independently for Alexandria informing the Commander-in-Chief of this intention at 0300/23.
Towards the eastern end of Crete, Force E, consisting of HMS Jervis, HMAS Nizam, HMS Ilex and HMS Havock (Lt. G.R.G. Watkins, RN) maintained a patrol off Heraklion without incident. They set course to return to Alexandria in the morning. On the way there were bombed for five hours, Ilex and Havock being damaged by near misses.
During the night HMS Decoy and HMS Hero embarked the Greek King, members of the government and other prominent Greeks at Agriarumeli on the south coast of Crete after which the two destroyers sailed to join Rear-Admiral King forces to the southward.
In the meantime Forces C and A 1 were some 75 miles to the southward of Crete steering 110°. At 0100/23 ‘Force C’ parted company and proceeded for Alexandria. Some hours previously Rear-Admiral Rawlings had signalled to the Commander-in-Chief that a rallying point further to the east would be better than one to the southwest of Kithera. If this was approved it was suggested that the 5th Destroyer Flotilla should make it’s withdrawal from Canea Bay to the eastward and that the Commander-in-Chief should issue orders accordingly, to all forces. Force A 1 therefore continued steering 110° until 0400/23, when, no reply having been received from the Commander-in-Chief, course was altered to the south-westward. Rear-Admiral Rawlings was about to signal a rendezvous to the southwest of Cape Elophonesi when a message was received ordering the withdrawal of all force to Alexandria. He accordingly set course for Alexandria at 15 knots, informing scattered units of his position, course and speed at 0530/23.
The Commander-in-Chief orders withdrawal to Alexandria, 23 May 1941.
At 2230/22, the Commander-in-Chief had received a ‘Most Immediate’ message from Rear-Admiral Rawlings reporting the loss of HMS Gloucester and HMS Fiji, and giving details of the ammunition situation. Owning to an error at Alexandria this signal made it appear that the battleships of Force A 1 had no pompon ammunition left. Therefore at 0408/23 orders were given to all forces to retire to the eastward.
In actual fact, the battleships had plenty of ammunition. Had the Commander-in-Chief been aware of this, they would not have been ordered to Alexandria, and would have been available as a support and rallying point for the 5th Destroyer Flotilla in the morning of the 23rd.
Naval situation at dawn, 23 May 1941.
Dawn on 23 May 1941 found the naval forces in the waters around Crete considerably scattered. To the eastward Capt. Mack with Force E was north of Crete, returning to Alexandria through the Kaso Strait.
Rear-Admiral Glennie in HMS Dido was just arriving at Alexandria with HMS Orion and HMS Ajax some distance astern of him.
The transport HMS Glenroy (Capt.(Retd.) J.F. Paget, RN), with reinforcements on board and escorted by HMS Coventry (A/Capt. W.P. Carne, RN), HMS Auckland (A/Capt. E.G. Hewitt, RN) and HMS Flamingo (Cdr. R.J.O. Otway-Ruthven, RN) had left Alexandria the previous afternoon and was 130 miles out making for Tymbaki.on the south coast of Crete.
Forces A 1 and C were about 25 miles apart to the south of Crete and were returning to Alexandria. The destroyers HMS Kandahar and HMS Kingston, with survivors from HMS Fiji on board were about to join Force C. The destroyers HMS Decoy and HMS Hero, with the King of Greece on board, were to the northward of Force A 1 which they joined at 0745/23.
Further to the west, a bit to the south of Gavdos Island, was Capt. Waller in HMAS Stuart, HMAS Vendetta and HMAS Voyager, who had been ordered around 2330C/22, by Rear-Admiral Rawlings to search for survivors from HMS Fiji. The Australian destroyers searched until around 0600C/23 and joined Force A 1 around 1000C/23. Also in that area were the destroyers HMS Jaguar (Lt.Cdr. J.F.W. Hine, RN) and HMS Defender (Lt.Cdr. G.L. Farnfield, RN) which had left Alexandria the day before with munitions for the army.
HMS Kelvin and HMS Jackal were to the south-west of Crete and returning to Alexandria where they arrived on May, 24th. HMS Kipling was also in that vicinity and was hoping to join HMS Kelly and HMS Kashmir, who had cleared Canea Bay and were retiring close to the west coast of Crete.
Loss off HMS Kelly and HMS Kashmir, 23 May 1941.
Captain Lord Louis Mountbatten had been withdrawing at full speed since dawn. At 0755 hours, after surviving two air attacks without suffering damage, he was about 13 nautical miles to the southward of Gavdos Island when his ships were attacked by a force of 24 Ju.87 dive bombers. The Kashmir was hit and sunk in 2 minutes. A large bomb struck the Kelly while she was doing 30 knots under full starboard rudder. She turned turtle to port with considerable way on, and after floating upside down for about half an hour, finally sank. In accordance with earlier practice the dive bombers then machine-gunned the survivors in the water, killing and wounding several.
The attack was witnessed by HMS Kipling, who was some 7 to 8 miles to the southward. She immediately closed and succeeded in picking up 281 officers and men from the water including the Commanding Officers of both destroyers. She left the scene of the sinking for Alexandria at 1100/23. She was considerably hampered in this rescue work by six high level bombing attacks and it was subsequently estimated that between 0820 and 1300 hours no less then 40 aircraft attacked her, dropping 83 bombs, though she emerged from the ordeal unscathed.
Return of the British naval forces to Alexandria, 23 May 1941.
In the meantime Force C had been joined by HMS Kandahar and HMS Kingston with survivors from HMS Fiji on board at 0630/23. Both destroyers were very low on fuel. Force A 1 was only 25 miles to the north-west. Force C then closed Force A 1 and both destroyers were able to fuel from the battleships. Shortly after 0800 hours, a signal was received from HMS Kipling reporting the loss of HMS Kelly and HMS Kashmir. Rear-Admiral King reluctantly decided that he could sent no help from Forces A 1 and C.
HMS Decoy and HMS Hero, with the Greek Royal party on board, had joined Force A 1 about the same time, and in course of the forenoon all the scattered destroyer joined up except for HMS Kipling. Later in the day HMS Jaguar and HMS Defender were detached to land ammunition at Suda Bay. The remained of the force proceeded to Alexandria where they arrived in the early hours of the 24th.
The fighting in Crete, 21 -24 May 1941.
On shore, meanwhile, the situation deteriorated. During the 21st although Maleme airfield remained no-man’s land under fire from Italian guns manned by New Zealand gunners, enemy troop carriers landed there regardless of losses. Parachute reinforcements also arrived, and the Germans concentrated between Aliakanou and Canea, and immediately west of Meleme. The savage air bombardment of the British positions continued.
Early on the 22nd, a British counter attack reached Maleme airfield, but heavy dive bombing, and machine gun fire from air and ground rendered further progress impossible. Fighting continued throughout the day, but enemy troop carriers with reinforcements were arriving at a rate of more than 20 each hour, and the withdrawal of British troops to a new line further east was commenced.
The steady flow of German reinforcements, and very heavy air attacks on the British troops continued throughout the 23rd. On this day, the five Motor Torpedo Boats of the 10th M.T.B. Flotilla in Suda Bay (MTB 67, MTB 213, MTB 214, MTB 216 and MTB 217) were all sunk by air attacks. During their operations off the Cretan coast and in harbour they accounted for two aircraft shot down for sure and another two probably shot down.
By the 24th the AA defences of Suda had been seriously reduced and losses to small craft in port were heavy. Severe bombing of Canea compelled the withdrawal of the Army Headquarters to the Naval Headquarters at Suda.
At Heraklion, in the meantime, the Germans had been unable to make much headway. Successful counter attacks were carried out by British troops, in conjunction with Greek and Cretan forces on the 21st, and the situation remained will in hand the next day. 20 to 30 German troop carrying aircraft were destroyed by AA fire. On the 23rd an ultimatum from the Germans calling for the surrender of Heraklion was rejected by the British and Greek commanders, though by this time the Greeks were running short of ammunition.
Reinforcements and supplies to the Army in Crete.
Throughout the Battle of Crete, frequent attempts were made to throw reinforcements and supplies into the island, with varying success.
All disembarkation had to planned to take place at night, owning to the German command of the air. Attempts were made to use HMS Glenroy and merchant vessels for this purpose, but it was found in practice that only warships were able to get through.
On the night of the 23rd – 24th of May, HMS Jaguar and HMS Defender landed stores and ammunition at Suda between midnight and 0200 hours. They returned to Alexandria with officers and men not required in Crete as well as some wounded.
HMS Glenroy embarked 900 men from the Queens Royal Regiment, H.Q. staff of the 16th Infantry Brigade and 18 vehicles at Alexandria. She then sailed for Tymbaki on the afternoon of the 22nd escorted by HMS Coventry, HMS Auckland and HMS Flamingo. These ships were recalled at 1127/23 due to the heavy air attacks sustained by the Fleet.
The following day, HMS Isis, HMS Hero and HMAS Nizam sailed from Alexandria with the Headquarters and two battalions of special service troops, known as ‘Layforce’. These were to be landed on the south-west coast of Crete at Selinos Kastelli. The weather conditions however did not permitted a landing and it had to be cancelled.
During the night of 24 – 25 May, the fast minelayer HMS Abdiel landed about 200 personnel of ‘Layforce’ and about 80 tons of stores at Suda. She returned with about 50 wounded and 4 Greek Cabinet Ministers. A dive bombing attack by 4 Ju.88’s at 1300/25 was successfully avoided.
On arrival at Alexandria in the evening of the 25th, HMS Abdiel embarked Brigadier Laycock with 400 men and 100 tons of stores. She left again early on the 26th accompanied by HMS Hero and HMAS Nizam. These ships landed about 750 troops and stores at Suda during the night of 26 – 27 May. These were the last reinforcements landed in Crete.
About 930 men no longer required there were then embarked and taken back to Alexandria in HMS Abdiel. Air attacks commenced at daylight, just north-west of the Kaso Strait, and continued intermittently till 1130/27. No damage was sustained except by HMS Hero whose speed was reduced to 28 knots by a near miss at 0700 hours.
Meanwhile the Glenroy with a battalion of the Queen’s Regiment on board, had sailed from Alexandria for Tymbaki during the evening of the 25th. She was being escorted by HMS Coventry, HMAS Stuart and HMS Jaguar. The force was subjected to bombing attacks by enemy reconnaissance aircraft during the forenoon. At 1820/26 there were heavy dive bombing attacks. Glenroy was slightly damaged sustained some casualties owing to near misses and machine gun attacks. Three of her landing craft were holed and a large dump of cased petrol on the upper deck caught fire, which necessitated steering down wind until the fire was put out. With 800 troops on board and with a large cargo of petrol it was a nasty situation. By 1950 hours the fire was under control and course was resumed to the northward. A final attack by torpedo bombers at 2050 hours caused no further damage. The torpedoes were being successfully evaded. The Glenroy was now about three hours behind schedule and wither landing craft capacity down by about a third and the weather forecast in mind it was decided to cancel the operation and the force was ordered to return to Alexandria.
One other attempt was made to transport some supplies to Crete. Convoy AN 31 of three Greek merchant ships escorted by HMS Auckland left Alexandria at 0500/26. One of the merchant vessels soon had to turn back due to engine trouble. The convoy escort was later reinforced by HMS Calcutta and HMS Defender. Early the next forenoon it was realised that under the existing conditions they would not have a chance of reaching the island and they too were recalled. Shortly after turning back the convoy was attacked by about 9 Ju.88’s but no damage was sustained. One of the attacking aircraft was seen to be hit by AA fire.
Naval situation at dawn, 24 May 1941.
At daylight on the 24th, the only naval forces at sea were HMS Jaguar and HMS Defender, which were about to pass through the Kaso Strait on passage from Suda Bay to Alexandria and HMS Abdiel which had left Alexandria during the night and was on passage to Suda Bay with more stores for the Army.
HMS Kipling with the survivors from HMS Kelly and HMS Kashmir on board was about 70 miles from Alexandria, practically out of fuel. HMS Protector (Cdr. R.J. Gardner, RN) had been sent out to meet her.
It was on this day that the Commander-in-Chief, well aware under which strain his ships were working, signalled to his Fleet. ‘The Army is just holding its own against constant reinforcement of airborne enemy troops. We must NOT let them down. At whatever cost to ourselves, we must land reinforcements for them and keep the enemy from using the sea. There are indications that the enemy resources are stretched to the limit. We can and must outlast them. STICK IT OUT.’
The Commander-in-Chief’s appreciation, 24 May 1941.
Four days had now elapsed since the opening of the attack on Crete and in reply to a request from the Chiefs-of-Staff for an appreciation, the Commander-in-Chief, Mediterranean, informed them that the scale of air attack now made it no longer possible for the Navy to operate in the Aegean or vicinity of Crete by day. The Navy could not guarantee to prevent seaborne landings without suffering losses which, added to those already sustained, would very seriously prejudice our command of the Eastern Mediterranean.
The Chiefs-of-Staff replied that the Fleet and Royal Air Force were to accept whatever risk was entailed in preventing any considerable enemy reinforcement from reaching Crete. If enemy convoys were reported north of Crete, the Fleet would have to operate in that area by day, although considerable losses might be expected. Experience would show for how long this situation could be maintained.
To this the Commander-in-Chief replied on the 26th that the determining factor in operating in the Aegean was not the fear of sustaining losses but the need to avoid crippling the Fleet. He added that the enemy, so far, had apparently not succeeded in landing any appreciable reinforcements by sea.
As how long the situation could be maintained, he pointed out that in three days two cruisers and four destroyers had been sunk, one battleship had been put out of action for several months, and two cruisers and four destroyers had been considerably damaged. He also referred to the strain both to personnel and machinery in the light craft, who had been operating to the limits of their endurance since February.
Captain McCarthy’s Force , 24-26 May 1941.
There had been indications that a landing might take place in the east of Crete at Sitia on the night of 24-25 May. To deal with this threat a Force consisting of the cruisers HMS Ajax (Senior Officer), HMS Dido, destroyers HMS Hotspur, HMS Imperial and HMS Kimberley left Alexandria at 0800/24 and passing through the Kaso Strait swept the north coast of Crete during the night. Nothing was sighted and the Force withdrew to the southward of Kaso before daylight. Here they remained during the 25th, repeating the sweep north of Crete the next night. Again nothing was sighted.
F.A.A. attack on Scarpanto airfield, 26 May 1941 (Operation MAQ 3).
It was known that Scarpanto airfield was being extensively used by the enemy in his operations against Crete, and it was therefore decided to attack it with Fleet Air Arm aircraft from HMS Formidable (Capt. A.W.la T. Bisset, RN, flying the flag of A/Rear-Admiral D.W. Boyd, CBE, DSC, RN), who had now built up her fighter strength to 12 Fulmars.
Vice-Admiral Pridham-Whippel left Alexandria on the 25th with Force A which was made up of the battleships HMS Queen Elizabeth (Capt. C.B. Barry, DSO, RN, flying the flag of Vice-Admiral H.D. Pridham-Whippell, CB, CVO, RN), HMS Barham (Capt. G.C. Cooke, RN), aircraft carrier HMS Formidable and the destroyers HMS Jervis, HMS Janus, HMS Kandahar, HMS Nubian, HMS Hasty, HMS Hereward, HMAS Voyager and HMAS Vendetta.
At 0330/26 this Force was about 100 miles to the south-south-west of Scarpanto. Four Albacores and later five Fulmars were flown off from HMS Formidable to attack the airfield. The Albacores achieved complete surprise. They destroyed two enemy aircraft and damaged several others while the Fulmars damaged a number of Cr.42’s and Ju.87’s. All aircraft had returned to Formidable by 0700 hours. By now the Force headed by HMS Ajax had also joined coming from the Kaso Strait. ‘Force A’ now set course to the southward.
Operations of ‘Force A’, HMS Formidable and HMS Nubian damaged, 26 May 1941.
During the forenoon of the 26th May, enemy aircraft were continually being detected. The eight remaining serviceable aircraft, four of which were fighters, made 24 flights, during which there were 20 combats. Two enemy aircraft were shot down and two more were probably destroyed. One Fulmar was lost.
At 1320 hours, when about 150 miles south of the Kaso Strait ‘Force A’ was attacked by about 20 dive bombers which approached from the African coast. HMS Formidable was hit twice, her starboard side was blown out between numbers 17 and 24 bulkheads and ‘X’ turret and cable and accelerator gear were put out of action.
During the same attack, HMS Nubian, was hit right aft and had her stern blown off. She was still able to steam 20 knots. She was then detached to Alexandria with HMS Jackal where she arrived under her own steam that night.
Force A than shaped course to the eastward and after dark HMS Formidable escorted by HMS Hereward, HMAS Vendetta and HMAS Voyager parted company and set course for Alexandria where they arrived around 0715C/27. The remainder of the Force operated to the north-eastward of Alexandria during the night.
Naval situation at dawn, 27 May 1941.
At daylight, 27 May 1941, ‘Force A’, now consisted of the battleships HMS Queen Elizabeth, HMS Barham and escorted by the destroyers HMS Jervis, HMS Janus, HMS Kandahar, HMS Kelvin, HMAS Napier and HMS Hasty were about 250 nautical miles south-east of Kaso, steering to the north-westward. In the Kaso Strait HMS Abdiel, HMS Hero and HMAS Nizam were returning from Suda Bay.
Some 90 nautical miles to the north-west of Force A, HMS Glenroy and her escorting destroyers; HMAS Stuart and HMS Jaguar were steering for Alexandria after their abortive attempt to land troops and supplies at Tymbaki. About half way between these two forces was convoy AN 31 heading for Crete. This convoy was recalled soon afterwards.
Operations of ‘Force A’, HMS Barham damaged, 27 May 1941.
Vice-Admiral Pridham-Whippel with Force A had been steering since daylight for the Kaso Strait to cover the withdrawal of HMS Abdiel, HMS Hero and HMAS Nizam. At 0859 hours, 15 Ju.88’s and He.111’s attacked from the direction of the sun. HMS Barham was hit on ‘Y’ turret and two of her bulges were flooded by near misses. A fire was started, which necessitated steering down wind to the south until it was extinguished two hours later. Two enemy aircraft were shot down and one was seen to be damaged.
At 1230 hours, on receipt of instructions from the Commander-in-Chief, Force A shaped course for Alexandria, arriving there at 1900 hours that evening.
The collapse in the Suda-Maleme area, 26 May 1941.
While these operation had been in progress at sea, the battle on shore had continued with unabated bitterness. Sunday, May 25th, the sixth day of the enemy attack was critical for the Australian and New Zealand troops in the Maleme area. After continuous bombing of their positions all day, a strong enemy attack took Galatos. British light tanks and New Zealand troops retook it at the point of the bayonet. This was described by General Fryberg as ‘one of the great efforts in the defence of Crete’. The position could not be held, however, and with Maleme no longer under fire, enemy troop carriers poured in reinforcements. Late that night the new line formed in the Maleme-Canea sector was broken by the Germans, after several attacks had been repulsed.
The next day (May 26th) further attacks compelled the tired New Zealand and Australian troops to withdraw still further towards Suda. They had fought for six days without respite; more then 20 fiece bayonet counter attacks had been carried out, and throughout the whole period they had been subjected to air attacks on unprecedented scale. That night the line collapsed and the retreat commenced.
So suddenly did the collapse come at the last, that there had been no time to organise the retirement and though the infantry which withdrew from the front line did so in good order, the movements of the rest of the force were uncontrolled, and much congestion on the route resulted.
The withdrawal, which was directed towards Sphakia continued during the 27th. By this time a rearguard had been organised which was able to cover the retirement of the bulk of the remainder to Sphakia.
Meanwhile in the Heraklion sector the British troops were holding out. On the 26th, the Argyll and Sutherland Highlanders, and two of the ‘I’ tanks landed at Tymbaki on the 19th, succeeded in breaking through from the south and joining them. With the Suda-Maleme area in the hands of the enemy, however, the position of the troops at Heraklion was clearly untenable and it appeared to be only a matter of time before the enemy would launch a major attack on them.
The work of the Royal Air Force.
Throughout the battle, the Royal Air Force, working from Egypt, did all that was possible to afford relief to our troop in Crete; but the distance was too great to maintain a scale of attack on the Germans that could affect the issue.
Enemy positions and aircraft were attacked at Maleme by Blenheims and Marylands (of the S.A.A.F.) at intervals on the 23rd, 25th, 26th and 27th of May. In these raids at least 40 enemy aircraft of various types were destroyed and many others damaged. Nine Ju.52’s carrying troops were destroyed by Hurricanes on the 23rd and 26th. Wellingtons bombed Maleme on the nights of the 23rd, 25th, 26th, 27th and 29th. They also attacked Scarpanto on the nights of the 25th, 27th, 28th and 29th and Heraklion on the 30th at 31st of May and 1st of June.
All these attacks caused fires and explosions but the extent of the damage is not known. During the battle the R.A.F. lost 38 aircraft, 33 of them in the air.
The decision to evacuate Crete, 27 May 1941.
Messages received from the G.O.C. Troops in Crete and the N.O.I.C. Suda Bay made it clear that our line defending Suda had collapsed with great suddenness.
In a message times 0824/27, General Wavell informed the Prime Minister that he feared we must recognise that Crete was no longer tenable, and that, so far as possible, the troops must be withdrawn. In reply to this message, the Chiefs-of-Staff ordered Crete to be evacuated forthwith.
Evacuation from Sphakia, 1st night, 28-29 May 1941.
At 0600/28, less then 24 hours after the decision to evacuate Crete had been taken, Force B, consisting of the light cruisers HMS Orion, HMS Ajax, HMS Dido and the destroyers HMS Decoy, HMS Hereward, HMS Hotspur, HMS Imperial, HMS Jackal and HMS Kimberley departed Alexandria to evacuate the Heraklion garrison. Rear-Admiral Rawlings, flying his flag in Orion was given charge of this operation.
Two hours later, Force C, under Capt. Arliss, left Alexandria for Sphakia. It was made up of HMAS Napier, HMAS Nizam, HMS Kandahar and HMS Kelvin. Force C had an uneventful passage and commenced embarkation at 0030/29. The operation was completed by 0300/29 by which time the four destroyers had taken on board nearly 700 troops and had landed badly needed rations for 15000.
On the return passage, the force was attacked by four Ju.88’s at about 0900 hours, HMAS Nizam suffered minor damage from a near miss. Fighter protection had been arranged from 0545 hours and at 0940 hours a crashed enemy aircraft was sighted, probably shot down by our fighters. Force C arrived at Alexandria at 1700/29 without much enemy interference.
Evacuation of the Heraklion garrison, 1st night, 28-29 May 1941.
Rear-Admiral Rawlings, meanwhile, had been having a much more different experience. At 1700/28 Force B was about 90 miles from Scarpanto and from then until dark was subjected to a series of air attacks. High level, dive bombing and torpedo.
At 1920 hours, HMS Imperial was near missed but appeared to be undamaged and 50 minutes later a near miss caused slight damage and some casualties in HMS Ajax which was then detached to Alexandria.
On arrival of the force at Heraklion at 2330/28 the destroyers immediately entered harbour, embarked troops from the jetties and ferried them to the cruisers outside. By 0245/29 the ferrying was complete and a quarter of an hour later HMS Kimberley and HMS Imperial had embarked the rearguard.
At 032 hours the force proceeded to sea at 29 knots with the whole of the Heraklion garrison on board, some 4000 troops. All went well until 0345 hours when HMS Imperial’s steering gear failed and she nearly collided with HMS Orion and HMS Dido. Her rudder was jammed and repairs could not be made. Delaying the force would mean more air attacks and it was vital to be as far away as possible from the enemy airfields before daylight. It was therefore decided to take off the troops from HMS Imperial and then sink her. At 0445 hours this was successfully done by HMS Hotspur which had now 900 troops on board. By now Force B was about 1,5 hours late and it was only at sunrise that they arrived off the Kaso Strait. The German air force was already waiting.
Air attacks commenced at 0600 hours and continued at intervals to 1500 hours when the force was within 100 miles from Alexandria.
At 0625 hours, HMS Hereward was hit by a bomb which forced her to reduce speed and fall away from her position in the screen. The force was then in the middle of the Kaso Strait and once more Rear-Admiral Rawlings had to decide whether to endanger his whole force and the troops on board for the sake of a single ship, or to leave her for a certain destruction. HMS Hereward was last seen making slowly towards Crete which was only five miles distant with her guns engaging enemy aircraft.
Twenty minutes later HMS Decoy suffered damage to her machinery as the result of a near miss and the speed of the force had to be reduced to 25 knots. A further reduction to 21 knots was needed after HMS Orion had been near-missed at 0730 hours.
With 4000 troops on board, the speed reduced to 21 knots, and no fighter support, things were beginning to look ugly. The Commander-in-Chief realised from Rear-Admiral Rawlings signals that our fighters had not appeared and every endeavour was made to rectify this but the fighters only appeared at noon.
By this time Force B had suffered badly. Shortly after 0730 hours Capt. Back, the Flag captain of HMS Orion was wounded and died two hours later. His place was taken by Cdr. Wynne.
At 0815 hours, HMS Dido was hit on ‘B’ turret and the Orion on ‘A’ turret at 0900 hours, both by bombs from Ju.87 dive bombers. In each case the turrets were put out of action.
At 1045 hours, HMS Orion was again attacked by Ju.87’s and a bomb passed through her bridge, putting the lower conning tower out of action. Force B was then 100 miles south of Kaso and this was the last attack made by dive bombers.
The Orion had nearly 1100 troops on board and the casualties on the crowded mess decks were very heavy. It is believed that a total of 260 were killed and 280 were wounded. In addition three of the engineer officers were killed. All normal communication between the bridge and the engine room was destroyed, the steering gear was put out of action, and three boiler rooms were damaged. Also there were fires in the foremost 6” and 4” magazines.
Fortunately there was a lull in the air attacks until 1300/29 when a high level bombing attack developed, followed by another one at 1330 hours and a final one at 1500 hours.
Force B arrived at Alexandria at 2000/29. HMS Orion only having 10 tons of fuel and two rounds of 6” HE remaining.
Feasibility of further evacuation considered, 29-30 May 1941.
This disastrous commencement of the evacuation placed the Commander-in-Chief in a most unpleasant predicament. Of the 4000 troops embarked in Force B, no less then 800 had been killed or captured (those on the Hereward) after leaving Crete. If this was to be the scale of the casualties, it appeared that quite apart from prospective naval losses of ships and men, who could be ill spared, our efforts to rescue the army from capture might only lead to destruction of a large portion of the troops.
Particular anxiety was feld for the transport HMS Glengyle (A/Capt.(Retd.) C.H. Petrie, RN) which was already at sea and was due to embark 3000 troops the next night (29-30 May).
It was only after long and anxious consideration, and consultation with the Admiralty, as well as with the military authorities, that the decision to continue the evacuation could be taken.
Once taken this decision was amply justified. The remainder of the evacuation proceeded almost without casualties to personnel. Fighter protection became steadily more effective, and the enemy less enterprising. His failure to interfere with the nightly embarkations at Sphakia was most surprising.
The original intention to send ships to Plaka Bay to take off the Retimo garrison was abandoned, as it was not known whether the troops had received the message ordering them to retire there. Moreover it was doubtful that they would be able to reach the coast, since they had no supplies. 1200 rations were dropped by air at Plaka, in case any should get there, but it was decided to send ships to Sphakia only.
From messages received from Crete during the night of 28-29 May, it was thought that the next night was going to be the last night of the evacuation but in the course of the day it became clear that the situation was not so desperate as it had appeared and the Commander-in-Chief decided to send four destroyers to embark men on the night of 30-31 May.
Evacuation from Sphakia, 2nd night, 29-30 May 1941.
Meanwhile Rear-Admiral King, wearing his flag in HMS Phoebe (Capt. G. Grantham, RN, flying the flag of Rear-Admiral E.L.S. King, CB, MVO, RN) had left Alexandria in the evening of the 28th with the light cruiser HMAS Perth, AA cruisers HMS Calcutta, HMS Coventry, transport HMS Glengyle, destroyers HMS Jervis, HMS Janus and HMS Hasty (Force D). Detination was Sphakia and their passage was uneventful except for one attack by one Ju.88 which dropped a stick of bombs near HMAS Perth but no damage was caused.
The cruisers and the Glengyle anchored off Sphakia at 2330/29 and the destroyers closed in one at a time to embark their quota. The troops were ferried from the beach in the landing craft from Glengyle assisted by two assault craft carried in HMAS Perth. The beach was too small for ships boats to be used in addition.
By 0320/30 a total of 6000 men had been embarked and Force D sailed for Alexandria, leaving three motor landing craft behind for use on subsequent nights. During the passage there were three air attacks on the force which had been joined by the destroyers HMAS Stuart, HMS Defender and HMS Jaguar at 0645 hours.
In the fist of these attacks, at 0930 hours, HMAS Perth was hit and her foremost boiler room was put out of action. The second and third attacks achieved no result although bombs fell close to HMAS Perth and HMS Jaguar. Fighter cover was able to drive off quite a number of enemy aircraft. The force returned to Alexandria during the night of 30 / 31 May.
Evacuation from Sphakia, 3rd night, 30-31 May 1941.
At 0915/30, Force C, consisting of the destroyers HMAS Napier, HMAS Nizam, HMS Kandahar and HMS Kelvin again left Alexandria for Sphakia. After a few hours Kandahar developed a mechanical defect and had to return to Alexandria.
At 1530 hours, three Ju.88’s carried out an unseen dive from astern. Bombs were dropped and HMS Kelvin was near missed. The result was that her speed had to be reduced to 20 knots and she too was detached to Alexandria.
Captain Arliss now continued on with only the two Australian destroyers and arrived at Sphakia at 0030/31. By 0300 hours, each destroyer had embarked over 700 troops, using the three motor landing craft that had been left behind the previous night, supplemented by the ships boats.
On the return passage to Alexandria the two Australian destroyers were attacked by 12 Ju.88’s between 0815 and 0915 hours. Both destroyers were damaged by near misses and HMAS Napier had her speed reduced to 23 knots. One Ju.88 was shot down while three others were seen to be hit.
Fighter cover was able to shoot down three Ju.88’s and one Cant 1007 during the day. The remainder of the passage was without incident and HMAS Napier and HMAS Nizam arrived at Alexandria in the evening with a total of 1510 troop on board.
The final evacuation, Sphakia, 31 May – 1 June 1941.
A final evacuation of about 3000 men was required, which was more then previously was estimated. It was therefore decided to sent over one more Force to evacuate these men during the night of 31 May – 1 June.
So at 0600/31, Vice Admiral King departed Alexandria with the light cruiser HMS Phoebe (Flag), fast minelayer HMS Abdiel, destroyers HMS Hotspur, HMS Jackal and HMS Kimberley to carry out this final evacuation (Force D).
That forenoon the Commander-in-Chief received a signal from Capt. Arliss, who was then on his way back from Sphakia, which indicated that there was then some 6500 men to come off Crete. Vice-Admiral King was then authorized to increase the total number he was allowed to embark to 3500 men. This was later changed to ‘fill up to maximum capacity’.
In the evening of the 31st the force was attacked three times by enemy aircraft. None of the bombs fell very close and one Ju.88 was believed to be damaged by AA fire. Many bombs were seen to be jettisoned on the horizon indicating several successful combats by our fighters.
Force D arrived at 2320/31. Three fully loaded landing craft, the ones left behind, immediately went alongside. The embarkation went so quickly that for a time the beach was empty of troops. This was unfortunate as it led to a last minute rush, which could not be dealt with in the time available and some troops had to be left behind. Some medical stores were landed and finally the three motor landing craft were destroyed or sunk.
The force departed at 0300/1 having embarked nearly 4000 troops and arrived at Alexandria at 1700 hours that day. The return passage was uneventful.
The loss off HMS Calcutta.
Yet one more loss was suffered by the Fleet. In order to provide additional protection for Force D the AA cruisers HMS Calcutta and HMS Coventry were sailed from Alexandria early on the 1st of June. When only about 100 nautical miles out, they were attacked by two Ju.88’s, who dived from the direction of the sun. HMS Coventry was narrowly missed by the first but two bombs from the second hit HMS Calcutta and she sank within a few minutes at 0920/1. HMS Coventry then picked up 23 officers and 232 ratings. She then immediately returned to Alexandria. (33)
6 Jun 1941
The Syrian campaign.
6 June 1941.
At 1415C/6, the destroyer HMS Hero (Cdr. H.W. Biggs, DSO, RN) had departed Port Said for Haifa. On board were 2 officers and a small beach party. HMS Hero arrived at Haifa around 2130C/6. Cdr. Biggs and the two officers then met the Naval Officer in Charge Haifa to arrange a reconnaisance of the landing beaches. The NOIC Haifa then put the patrol vessel Cadwell (a 50 foot fast motor boat) at their disposal.
At 2355C/6, the Cadwell departed Haifa with the two officers and the small beach party. Twenty minutes later HMS Hero followed to give support for the reconnaisance.
7 June 1941.
During the night, the Cadwell conducted reconnaisance to the north of mouth of the Litani river. HMS Hero patrolled 7 miles from the shore in case Cadwell needed assistance. The reconnaisance party encountered a heavy surf. Cadwell and HMS Hero retired from the area at first light and returned to Haifa around 0600C/7 after which the results of the reconnaisance were discussed. Conclusion was that it would be impracticable to land under the current weather conditions. It was expected that this would be the case for at least two days.
Around 1145C/7, 'Force B', the cover force, made up of the light cruisers HMS Phoebe (Capt. G. Grantham, RN, flying the flag of Rear-Admiral E.L.S. King, CB, MVO, RN), HMS Ajax (Capt. E.D.B. McCarthy, RN) and the destroyers HMS Kandahar (Cdr. W.G.A. Robson, DSO, RN), HMS Kimberley (Lt.Cdr. J.S.M. Richardson, DSO, RN), HMS Jackal (Lt.Cdr. R.McC.P. Jonas, DSC, RN) and HMS Janus (Cdr. J.A.W. Tothill, RN) departed Alexandria so to be off the Syrian coast at dawn the following day for their role supporting the Army during Operation Exporter, the Allied attack on the Vichy-French colony of Syria.
Around 1200C/7, ' Force C ', the landing force, departed Port Said for Syria. Force C was made up of the transport HMS Glengyle (A/Capt.(Retd.) C.H. Petrie, RN), AA cruiser HMS Coventry (A/Capt. W.P. Carne, RN) and the destroyers HMS Ilex (Capt. H.St.L. Nicholson, DSO and Bar, RN), HMS Isis (Cdr. C.S.B. Swinley, DSC, RN) and HMS Hotspur (Lt.Cdr. C.P.F. Brown, DSC, RN). On board HMS Glengyle were troops (27 officers and 456 men).
Around 1500C/7, HMS Hero departed Haifa to join Force C which she did around 1850C/7 in position 32°21'N, 34°01'E.
8 June 1941.
At 0038C/8, HMS Glengyle arrived in position 270° - mouth of the Litani river - 4 miles. She had lowered her boats by 0100C/8. It was then that the Cadwell approached and it was stated that landing the troops would be impossible due to the surf. The attempt was then abandoned at 0115C/8. ' Force C ' then set course to return to Port Said.
At 0600C/8, HMS Coventry, HMS Isis and HMS Hotspur from Force C joined Force B.
At 0645C/8, Force B closed the coast to the southward of Tyrus and HMS Hotspur was detached to try to make contact with the Naval Liaison Officer with the Army ashore. It proved very difficult to determine the progress of the army. A land mine was seen to explode three miles north of the border at 0700C/8. It apparently had destroyed a considerable stretch of the road and as a result the Allied motor transport was being held up.
At 1230C/8, HMS Kimberley was also sent inshore but no definite news could be obtained until 1530C/8 when it seemed fairly certain that the Allied troops had taken Tyrus. Owing to the uncertainty of the situation, no supporting fire was given or asker for until 2200C/8 when HMS Kimberley was able to bombard some French positions near Khan bridge for half an hour, after which Force B retired to seaward for the night. HMS Isis and HMS Hotspur were detached with orders to join HMS Glengyle, HMS Ilex and HMS Hero for another attempt at landing the troops.
At 1430C/8, HMS Glengyle, HMS Ilex and HMS Hero arrived back at Port Said.
At 1615C/8, HMS Glengyle, HMS Ilex and HMS Hero departed Port Said for a further attempt of landing the troops.
9 June 1941.
At 0100C/9, when near Haifa, HMS Glengyle, HMS Ilex and HMS Hero were joined by HMS Isis and HMS Hotspur. HMS Glengyle was now able to land the special service troops around 0430C/9 after which she returned immediately to Haifa arriving there around 0615C/9 escorted by HMS Isis and HMS Hotspur. Her landing craft later proceeded to Haida under their own power where they had all arrived around 1145C/9 escorted by HMS Ilex and HMS Hero. During the landings around 0530C/9, French shore batteries had opened fire after which HMS Ilex and HMS Hero closed their position and carried out a bombardment which was ceased after five minutes as the positions of the special service troops were not known.
Around 0310C/7, HMS Phoebe was attacked but missed ahead by the Vichy-French submarine Caiman. HMS Kandahar and HMS Kimberley were detached to hunt the attacker but they failed to obtain contact. Shortly afterwards, around 0400C/7, Force B commenced to close the coast again to give support for the landings by Force C. As the presence of Vichy Submarines was now proven no destroyers could be spared for inshore support as they were required to screen the cruisers. At 0845C/9, Force B retired to the westward.
At 1005C/9, a report was received from the Naval Liaison Officer with the Army that two Vichy-French destroyers were shelling the Allied positions near Khan Bridge. These were the Guepard and Valmy. HMS Coventry was detached to Haifa while the remainder of Force B closed the coast at full speed but noting was seen of the French ships which had meanwhile retired to the north. Their raid had lasted half an hour and was well timed from their point of view.
At 1045C/9, HMS Isis and HMS Hotspur which had just returned after having oiled at Haifa, which they had left at 0930C/9, were sent inshore to give fire support to the Army. However the situation on land was too confused to permit immediate supporting fire.
At 1225C/9, HMS Phoebe, HMS Ajax, HMS Kandahar and HMS Kimberley left the area to proceed to Haifa so that more destroyers would be available for close (inshore) support. HMS Janus and HMS Jackal therefore joined HMS Isis and HMS Hotspur. This was considered a strong enough force to deal with the two French destroyers in case they would come out again.
At 1240C/9, HMS Janus was ordered by the Commanding Officer of HMS Isis (Senior Officer) to take HMS Jackal and HMS Hotspur under his command and conduct an A/S sweep until 1600C/9. HMS Isis would meanwhile patrol inshore.
At 1240C/9, HMS Glengyle, HMS Ilex and HMS Hero departed Haifa for Alexandria where they arrived around 2350C/9.
At 1335C/9, while in position 33°30'N, 35°12'E, HMS Janus sighted two destroyers on the horizon, bearing 040°. They were steering to the south-west. Immediately an enemy report was made, speed was increased and course was altered towards. HMS Janus ordered HMS Jackal and HMS Hotspur to form single line ahead on the most advance ship and proceed at 30 knots. It was consided important to advance as fast as possible and not to wait until the line was properly formed up.
At 1339C/9, the two French destroyers (Guepard and Valmy) opened fire from a range of about 17000 yards.
At 1340C/9, HMS Phoebe received the contact report from HMS Janus which reported she was in contact with the two French destroyers, HMS Phoebe, HMS Ajax, HMS Kandahar and HMS Kimberley immediately turned back at full speed.
At 1342C/9, HMS Janus opened fire on the leading French destroyer from 15000 yards. At that time HMS Jackal was about 8 cables on the starboard quarter. HMS Hotspur had been unable to keep up and was at least a mile astern.
At 1347C/9, when the range was about 10000 yards HMS Janus was hit on the bridge, in the foremost boiler room and aft. The hit on the bridge killed or wounded all the bridge personnel except the Commanding Officer, and cut all fire-control leads. The hit in No.1 boiler room stopped the ship and cut off all electric high power. The hit aft did not affect the fighting efficiency of the ship. While stopped the ship was hit twice, again in No.1 boiler room, and an unexploded shell ended up in the seamen's bathroom.
Fire was continued in local conttrol and quarters firing by all gins, until A and B guns would no longer bear. X gun continued in action as long as the enemy were in range, and whenever they were in sight.
HMS Janus finally stopped, with the enemy fine on the port quarter, and the wind on the starboard beam. Smoke floats were lit and launched over the stern and, as the ship drifter to leeward proved effective. HMS Jackal passed between HMS Janus and the enemy making smoke.
HMS Jackal and HMS Hotspur continued to engage the enemy and as a result the French did not close the range to finish off the damaged HMS Janus. At 1406C/7, HMS Jackal fired three torpedoes towards the French destroyers.
Meanwhile HMS Isis also come north at full speed ans as soon as she opened fire the French made smoke and withdrew around 1412C/7, chased by the three British destroyer, HMS Jackal in the lead. Afterwards the French destroyers briefly turned and engaged the British several times. Last action between HMS Jackal and the two French destroyers was at 1445C/9 after which the three British destroyers turned to the south while the French retired to Beirut. HMS Jackal sustained some minor damage from a shell hit during the action.
At 1450C/9, HMS Phoebe, HMS Ajax, HMS Kandahar and HMS Kimberley passed the disabled HMS Janus. HMS Ajax, HMS Kandahar and HMS Kimberley were ordered to stand by the stricken destroyer while HMS Phoebe proceeded on to join and give support to HMS Isis, HMS Hotspur and HMS Jackal. 10 Minutes later HMS Phoebe saw the three destroyers returning southwards after their action with the French destroyers which now had retired back into the port of Beirut.
Shortly afterwards, while HMS Kimberley was taking HMS Janus in tow the force was bombed by Vichy aircraft but no damage was sustained.
By 1545C/9, HMS Kimberley had HMS Janus in tow at a speed of 10 knots towards Haifa escorted by the remainder of the force minus HMS Ajax which had been ordered to proceed ahead to Haifa independently. She arrived at Haifa around 1730C/9.
At 1600C/9, a British and French fighter aircraft collided with each other. Both pilots survived and were picked up by HMS Kandahar.
At 1820C/9, when the tow was off Ras Nakura (Naqoura), HMS Phoebe, HMS Isis and HMS Hotspur parted company and returned to the coast. They were later joined by HMS Jackal.
Between 2036C/9 and 2051C/9, HMS Phoebe, on requist of the Naval Liaison Officer with the Army, bombarded enemy positions on the northern side of Khan Bridge, after which HMS Phoebe, HMS Isis, HMS Hotspur and HMS Jackal retired to seaward for the night.
PM on this day,
HMAS Stuart (Capt. H.M.L. Waller, DSO, RAN), HMS Jaguar (Lt.Cdr. J.F.W. Hine RN), HMS Griffin (Lt.Cdr. J. Lee-Barber, DSO, RN) and Defender (Lt.Cdr. G.L. Farnfield, RN) departed Alexandria for the operations area of the Syrian Coast.
10 June 1941.
At 0400C/10, HMS Ilex and HMS Hero departed Port Said to return to the operations area of the Syrian Coast. They were to join HMAS Stuart, HMS Jaguar, HMS Griffin and Defender coming from Alexandria also for the operations area of the Syrian Coast.
At dawn on the 10th, HMS Phoebe, HMS Isis, HMS Hotspur and HMS Jackal were to the west of Beirut to cut off the French destroyers in case they had come out for another sweep but when a French reconnaissance aircraft was seen at 0702C/10 it became apparent that this would not materialise.
Around dawn HMS Kandahar and HMS Kimberley had left Haifa to give close inshore support to the Army. They did good work and destroyed French tucks, tanks and ammunition depots north of Khan Bridge.
Around 1130C/10, HMS Ajax departed Haifa. She was joined shortly afterwards by HMAS Stuart, HMS Hero, HMS Griffin and HMS Defender.
Around 1315C/10, HMS Phoebe then left the area for Haifa escorted by HMS Ilex, HMS Hotspur and HMS Jackal. HMS Isis and HMS Jaguar were ordered inshore to reinforce HMS Kandahar and HMS Kimberley.
Around 1620C/10, HMS Phoebe, HMS Ilex, HMS Hotspur and HMS Jackal arrived at Haifa.
At 1640C/10, the four 'inshore' destroyers were attacked by 5 Potez bombers but no damage was done.
11 June 1941.
At 0625C/11, HMS Coventry, HMS Ilex and HMS Jackal left Haifa to relieve HMAS Stuart, HMS Kandahar and HMS Isis which subsequently arrived at Haifa around 1000C/11. HMS Ilex took over from HMS Isis as leading destroyer of the inshore squadron. During the day the 'Inshore Squadron' bombarded visible targets north of a line indicated by the Army.
At 1800C/11, HMS Janus left Haifa in tow of HMS Protector (Cdr. R.J. Gardner, RN) and escorted by HMS Flamingo (Cdr. R.J.O. Otway-Ruthven, RN).
12 June 1941.
An air raid on Haifa, during which minedropping was suspected, delayed HMS Phoebe, HMAS Stuart, HMS Kandahar, HMS Isis and HMS Hotspur from sailing until 0830C/12. Around 1215C/12, they relieved HMS Ajax, HMS Griffin, HMS Defender, HMS Jaguar and HMS Kimberley which then set course to Haifa where they arrived around 1500C/12.
During the day HMS Ilex, HMS Kandahar, HMS Isis and HMS Jackal formed the 'Inshore Squadron' which carried out further shore bombardments which assisted the Army advance to a position on the Zahrani River. Close support to the 'Inshore Squadron' was provided by HMS Phoebe, HMS Coventry screened by HMAS Stuart, HMS Hero and HMS Hotspur.
By 1630C/12, the Army had advanced to within two miles of Sidon where stiff resistance was met and the advance halted. At 1950C/12, a request was received to bombard Sidon but this was declined as Rear-Admiral King had no authority to open fire on non-military targets.
At dusk, HMS Jackal picked up an agent with his boat at Tyre and landed him close to Beirut. HMS Ilex, HMS Kandahar and HMS Isis gave close support for this operation. The remainder of the force gave cover to the northward.
13 June 1941.
The coast was closed at dawn and the 'Inshore Squadron' began their bombardment around 0800C/13. Main target was the wooden areas south of Sidon where the Vichy-French had strong defensive positions.
HMS Griffin, HMS Kimberley and HMS Defender joined from Haifa at 1040C/13 and relieved HMS Ilex, HMS Hero and HMS Jackal which then returned to Haifa with HMS Coventry. They arrived at Haifa around 1500C/13.
Around 1200C/13, the light cruiser HMS Leander (New Zealand Division, Capt. R.H. Bevan, RN) and the destroyers HMS Jervis (Capt. P.J. Mack, DSO, RN) and HMS Hasty (Lt.Cdr. L.R.K. Tyrwhitt, DSC, RN) joined coming from Alexandria which they had departed around 1800C/12.
On these ships joining, HMS Isis and HMS Kimberley were sent inshore with HMS Phoebe, HMS Leander, HMS Jervis, HMS Griffin, HMS Hasty and HMS Defender providing cover.
Around 1245C/13, HMS Ajax and HMS Jaguar departed Haifa for Alexandria. They were joined at sea by HMAS Stuart, HMS Kandahar and HMS Hotspur. They arrived at Alexandria around 0700C/14.
Warnings were received that German air attack might be expected and French bombers were noticeably more in evidence in attacking onshore. On receipt therefore of information from the NOIC Haifa that for the future it would not be possible to do more than maintain fighters at call for the protection of ships off the coast, Rear-Admiral King reported that it was most desirable that extra fighters should be made available, since fighters at call could not arrive in time to prevent attack.
At 1530C/13, eight JU 88's attacked the force without causing damage. Allied fighters were on their way out for a routine patrol, shot down three and damaged two after the attack.
After dark, as the Army was still held up and did not want fire support during the night, the force withdrew and patrolled north of Beirut.
14 June 1941.
Bombardment was continued at dawn by HMS Isis and HMS Kimberley which were relieved inshore at 0640C/14 by HMS Jervis and HMS Griffin.
At 0719C/14, a message was sent for fighters to deal with a formation of aircraft closing from the westward. No attack took place and it is possible that the aircraft were French reinforcements flying to Syria. The fighters took 36 minutes to arrive. The NOIC Haifa reported that they had left the ground 16 minutes after receipt of the message at the W/T station but he hoped to speed up communications. Later it was noticed that the time needed had been halved.
At 1020C/14, HMS Coventry and HMS Hero joined coming from Haifa and half an hour later HMS Phoebe and HMS Isis left for Haifa where they arrived around 1345C/14. HMS Ilex and HMS Jackal were delayed in their departure from Haida due to the later arrival of ammunition. They eventually relieved HMS Jervis and HMS Hasty around 1600C/14 which then proceeded to Haifa.
At 1620C/14, HMS Griffin sighted the French destroyers Guepard and Valmy which had again come out of Beirut harbour.
The possibility that the French intended to mine the coast north of Saida threatened to hamper the work of the destroyers inshore.
15 June 1941.
Around 0800C/15, HMS Phoebe, HMS Jervis, HMS Isis and HMS Hasty departed Haifa and joined HMS Leander and her escorting destroyers around 1100C/15. It was decided to keep the whole force together, except for the 'Inshore Squadron' as a Cassard-class destroyers was reported to be to the north of Cyprus proceeding towards Syria. [This was the Vichy French destroyer Chevalier Paul.]
The 'Inshore Squadron' for this day was made up of HMS Jervis, HMS Hasty and HMS Defender.
During the day Sidon surrendered as reported by the Naval Liaison Officer with the Army in his report received at 1730C/15. He also reported that gunfire from the destroyers had destroyed 12 75mm guns as well as several tanks.
At 1703C/15, eight JU 88's attacked and a near miss caused severe damage HMS Isis to the machinery spaces and boiler rooms off the ship. Three fighters were in the area and drove off half the bombers before they completed their attack, bringing down one. HMS Coventry and HMS Defender were ordered to escort HMS Isis to Haifa.
At 1908C/15, another air attack was made by a number of Vichy French aircraft. Their number was estimated between 14 and 18. At 1915C/15, HMS Ilex was badly damaged by a near miss and had to be towed back to Haifa by HMS Hasty. No fighters were present during this attack. [The report by HMS Ilex on this attack however stated that the bombs that caused the damage were dropped by a JU 88 aircraft so if that is correct the attacker must have been German.] The boiler rooms were damaged but the ship managed to get underway again by 1935C/15 but she came to a stop at 1950C/15 due to the fuel oil being contaminated with water.
After having escorted HMS Isis to Haifa, HMS Coventry was ordered to Port Said to make good engine defects and HMS Defender was ordered to escort the transport Rodi (British (former Italian), 3220 GRT, built 1928) on the first part of her voyage from Famagusta to Port Said.
The remainder of Force B patrolled to the north of Beirut during the night with the object of intercepting the Cassard-class destroyer and engaging the two other French destroyers if they came out of Beirut.
16 June 1941.
At 0415C/16, HMS Kimberley sighted the Guepard and Valmy close inshore off Beirut. In the brief engagement which followed, before the enemy made smoke and retired under the protection of the shore batteries, HMS Kimberley and HMS Jervis both claimed to have seen hits on the second destroyer.
Around 0500C/16, the damaged HMS Ilex arrived at Haifa still in tow of HMS Hasty.
At 0800C/16, after a report from 815 Squadron (FAA) that they had hit the Cassard-class destroyer, north of Rouad Island Rear-Admiral King turned his force to the northward to close the position but on further consideration decided that he was not justified in risking the ships against air attack north of Beirut for a destroyer which there was a small chance of intercepting before she reached Tripoli (Syria) even if still afloat which was doubtful. He therefore turned back to the southward and in the middle of the turn torpedo tracks were sighted by HMS Kimberley. While following up, HMS Kimberley was attacked by two bombers and fired on by shore batteries. She was therefore ordered to rejoin the other ships.
At 1025C/16, a signal was received from the C-in-C Mediterranean ordering Force B to return to Haifa. The C-in-C had decided not to operate off Syria in daylight unless full fighter protection was available. Force B arrived at Haifa around 1500C/16.
17 June 1941.
During the forenoon, the light cruiser HMS Naiad (Capt. M.H.A. Kelsey, DSC, RN) and the destroyers HMS Kingston (Lt.Cdr. P. Somerville, DSO, DSC, RN) and HMS Jaguar (Lt.Cdr. M.J. Clark, RAN) arrived from Alexandria which they had departed around 1800C/16.
HMAS Nizam arrived later in the day as she had departed Alexandria after the other ships which had arrived earlier.
Around 1800C/17, HMS Griffin and HMS Defender departed Haifa for Alexandria.
During the day, Rear-Admiral King visited the General Officer Commanding of the Army and the Air Officer Commanding of the RAF, in Jerusalem to discuss the situation, and the question of fighter protection in particular. It became clear that unless required from bombardment purposes no or little fighter protection could be provided for Force B. The little fighter protection that could be provided would be able to give three hours of fighter protection if need for a bombardment arose.
At 1815C/17, the Naval Liaison Officer reported a French destroyer, later reported to be a 'gun boat' which fired a few rounds before retiring back to Beirut having done no damage.
At 1830C/17, Rear-Admiral King transferred his flag from HMS Phoebe to HMS Naiad.
At 1900C/17, HMS Phoebe, HMS Jackal, HMS Jaguar, HMS Nizam and HMS Kingston departed Haifa with the object of destroying the Cassard-class destroyer if it had managed to reach Tripoli (Syria). While at sea it was learned that this ship had in fact been sunk and so a sweep between Beirut and Tripoli was carried out instead.
18 June 1941.
At 0715C/18, HMS Phoebe, HMS Jackal, HMS Jaguar, HMS Nizam and HMS Kingston returned to Haifa after a blank patrol.
At 1945C/18, HMS Phoebe departed Haifa for Alexandria where she arrived around 1315C/19.
At 1900C/18, HMS Naiad, HMS Jervis, HMS Kimberley, HMS Jaguar and HMS Kingston departed Haifa for a patrol off Syria. With them the minesweeper HMS Harrow (Lt.(Retd.) G.C. Hocart, RNR) also sailed to carry out a searching sweep of area QB 44 for enemy mines but no mines were found. Force B also provided cover for her.
19 June 1941.
At dawn Force B closed the coast and HMS Jervis and HMS Kingston were detached and carried out a 40 minute bombardment of enemy positions at El Atiqua just south of Damur. On completion they rejoined Force B with subsequently returned to Haifa arriving there around 0835C/19.
HMS Coventry arrived from Port Said.
Around 1900C/19, HMS Leander, HMS Hero, HMS Hasty, HMS Jackal and HMAS Nizam sailed and carried out a search north of Beirut during which nothing was sighed.
20 June 1941.
Around 0920C/20, HMS Leander, HMS Hero, HMS Hasty, HMS Jackal and HMAS Nizam returned to Haifa. At dawn, HMS Hero and HMS Jackal had carried out a short bombardment during which they came under some light return fire from the shore but they sustained no damage.
Around 1945C/20, HMS Naiad, HMS Leander, HMS Jervis, HMS Kimberley, HMS Kingston, HMS Jaguar, HMS Jackal, HMAS Nizam, HMS Hero and HMS Hasty departed Haifa with the object of intercepting another Cassard-class destroyer reported to be arriving at Beirut at daylight the following morning. This was the Vauquelin.
At 2130C/20, HMS Jervis, HMS Hasty, HMS Jaguar, HMS Kingston and HMAS Nizam were detached as a searching force while the cruisers and the other three destroyers formed a striking force.
At 2353C/20, HMS Jervis sighted a submarine but she failed to gain contact after it had dived. The operation continued as planned.
21 June 1941.
The search was carried out to a point 60 miles north of Beirut at 0320C/21 but nothing was seen of the enemy. At 0530C/21, the two French destroyers already based at Beirut, Guepard and Valmy, were sighted close to the harbour entrance at a range of 26000 yards.
The Army did not desire a dawn bombardment and on return to Haifa around 0930C/21, reconnaissance reports were received which showed that the Vauquelin had waited till daylight before making the coast and was being escorted to Beirut by 20 aircraft.
That morning the destroyers HMS Decoy (Lt.Cdr. J.M. Alliston, RN), HMS Havock (Lt. G.R.G. Watkins, RN) and HMS Hotspur arrived from Alexandria. HMS Hero, HMS Kimberley and HMS Jackal then departed for Alexandria [It seems likely these destroyers did not enter Haifa on their return with Force B and set course direct for Alexandria on Force B entering harbour around 0930C/21.]
Around 1915C/21, HMS Naiad, HMS Decoy, HMS Hotspur and HMS Havock departed Haifa to intercept the Vichy-French hospital ship Canada (9684 GRT, built 1912). HMS Hero had detached HMS Jackal at 1600C/21 to search and at 2245C/21, a report was received that she was escorting the Canada towards Haifa.
22 June 1941.
The Canada was sighed by Force B at 0030C/22 and escorted to Haifa while HMS Jackal was detached to continue her passage to Alexandria. Force B arrived at Haifa around 0630C/22. HMS Decoy had been detached to escort the Canada arrived a little later that morning with the French hospital ship. The Canada was examined and, nothing irregular being found, was allowed to proceed to Beirut latter in the forenoon.
Information was received from the Naval Liaison Officer of the three days programme of naval supporting fire that would be required when the coastal advance was resumed, the date for which could not then be given.
Around 1915C/22, Force B departed Haifa for a sweep to the northward of Beirut while HMS Jervis, HMS Havock, HMS Hotspur and HMS Decoy were ordered to carry out an A/S patrol to seaward while HMS Naiad, HMS Leander, HMS Jaguar, HMS Kingston and HMAS Nizam swept close inshore to look for the French destroyers.
23 June 1941.
At 0148C/23, when about 10 miles north of Beirut on a southerly course HMS Naiad sighted first one and then a second French destroyer on the port bow, on a northerly course close inshore and at a range of 5000 yards.
The French destroyers turned away making smoke and retired under the coast defence battery of Nahr el Kelb which opened fire. They were engaged by the cruisers and their escorting destroyers for about eleven minutes and several hits were observed on both.
It is probable that two torpedoes fired by HMS Jaguar and four by HMS Leander ran ashore in approximate position 34°05'N, 35°38'E. Owing to the nature of the coast it was considered almost certain they will have exploded on grounding and HMS Kingston (rear ship) reported hearing underwater explosions at the time.
The Army had no specific bombardment requirements and Force B returned to Haifa around 0615C/23.
The submarine HMS Parthian (Cdr. M.G. Rimington, DSO, RN) arrived on patrol off Beirut during the afternoon.
Around 1930C/23, HMS Harrow sailed to carry out another searching sweep of QB 44. She was covered during the night by HMS Leander, HMS Hasty, HMS Jaguar and HMAS Nizam. No mines were found.
24 June 1941.
The Leander's force closed the coast at dawn and HMS Leander, HMS Hasty and HMS Jaguar bombarded enemy positions until 0600C/24 when all ships set course for Haifa where they arrived around 0845C/24. During the bombardment they came under some light fire from batteries on shore.
The Air Officer Commanding, visited Rear-Admiral King during the day and the fighter situation was discussed. It was reported that improvements had been made but the escort for any extended period could only be undertaken at the expense of other tasks such as attacking French aerodromes. It was decided not to take the fighters of these other tasks.
Around 2030C/24, HMS Naiad, HMS Jervis, HMS Kingston and HMS Hotspur departed Haifa to carry out a sweep to the northwestward during the nigh. Nothing was seen. Dawn bombardment was not required.
In an air raid on Haifa during the nigh a bomb was dropped fairly close to HMS Leander but did no damage.
25 June 1941.
Around 0500C/25, HMS Hasty and HMS Jaguar departed Haifa for Alexandria.
Around 0630C/25, HMS Naiad, HMS Jervis, HMS Kingston and HMS Hotspur returned to Haifa from their night patrol.
At 1248C/25, HMS Parthian sank a French Requin-class submarine between Damur and Beirut.
Around 2030C/25, HMS Leander, HMS Decoy, HMAS Nizam and HMS Havock departed Haifa to carry out a sweep to the northwestward. Nothing was seen.
26 June 1941.
The Leander's force closed the coast at dawn and bombarded enemy positions between 0518 and 0555C/26. Course was then set for Haifa where they arrived around 0850C/26. HMS Leander did not enter harbour but was joined by HMS Coventry which had departed Haifa around 0645C/26. The cruisers then set course for Alexandria.
Around 1000C/26, the light cruisers HMAS Perth (Capt. P.W. Bowyer-Smith, RN) and HMS Carlisle (A/Cdr. W. Pope, RN) arrived from Alexandria.
Around 2030C/26, HMS Naiad, HMS Jervis, HMS Kingston and HMS Hotspur departed Haifa for a sweep to the northwestward during the night.
27 June 1941.
The Naiad's force closed the coast at dawn and HMS Jervis and HMS Hotspur bombarded shore targets between 0500 and 0600C/27. Shore batteries replied.
At 0545C/27, four bombers and at 0615C/27, one bomber attacked Force B but no damage was done. Allied fighters were in the vicinity but failed to intercept owing to cloud conditions and the brief warning received of the attack. The incident however showed that the dawn bombardments were becoming too much a matter of routine.
On recovering paravanes, HMS Naiad port wire was found to be cut and it was decided to carry out another searching sweep of QB 44.
Around 0600C/27, HMS Kandahar and HMS Griffin arrived at Haifa from Alexandria.
Around 0830C/27, HMS Naiad, HMS Jervis, HMS Kingston and HMS Hotspur returned to Haifa.
Around 1915C/27, HMS Kandahar, HMS Griffin and HMS Havock departed Haifa for a T.S.D.S. (this is minesweeping gear fitted on destroyers) search of QB 44. HMAS Perth also sailed to support the destroyers if required. No mines were found.
28 June 1941.
Around 0550C/28, HMAS Perth, HMS Kandahar, HMS Griffin and HMS Havock returned to Haifa.
At the Army's requist six hours of fighter protection was arranged and at 1215C/28, HMAS Perth, HMS Carlisle, HMS Jervis, HMS Kingston, HMAS Nizam, HMS Decoy and HMS Hotspur departed Haifa. They arrived off Damur around 1530C/28. HMS Jervis and HMS Kingston bombarded various targets while HMAS Perth opened fire on and silenced the Khalde battery. They returned to Haifa around 1930C/28.
Around 2000C/28, the damaged HMS Ilex left for Port Said in tow of HMS Decoy and escorted by HMS Carlisle, HMAS Nizam and HMS Hotspur.
29 June 1941.
Around 1800C/29, HMS Jervis departed Haifa for Alexandria.
Around 2045C/29, HMS Carlisle, HMS Decoy and HMS Hotspur returned to Haifa from escorting / towing HMS Ilex. HMAS Nizam did not return to Haifa but proceeded to Alexandria instead.
Around 2030C/29, HMS Naiad, HMS Kandahar and HMS Griffin sailed to carry out a night bombardment of targets in the Damur area.
30 June 1941.
The Naiad's force closed the coast around 0030C/30. HMS Naiad illuminated the targets with starshell while HMS Kandahar carried out a short bombardment. This was done mainly for its nuisance value. The 5.25" star shell proved to have considerable incendiary effect. The force returned to Haifa around 0620C/30.
Around 2030C/30, HMAS Perth, HMS Kingston, HMS Havock and HMS Hotspur departed Haifa to carry out a sweep during the night.
1 July 1941.
Around 0615C/1, HMAS Perth, HMS Kingston, HMS Havock and HMS Hotspur returned to Haifa from patrol.
Around 0900C/1, HMS Parthian arrived at Haifa from patrol.
Around 2030C/1, HMS Naiad, HMS Kandahar, HMS Decoy and HMS Havock departed Haifa for patrol.
2 July 1941.
Around 0600C/2, HM MTB 68 and HM MTB 215 arrived at Haifa from Famagusta. Their tender HMS Vulcan followed around 1330C/2.
Around 0615C/2, HMS Naiad, HMS Kandahar, HMS Decoy and HMS Havock returned to Haifa from patrol.
Around 1015C/2, HMS Naiad, HMAS Perth, HMS Kandahar, HMS Kingston, HMS Havock and HMS Griffin departed Haifa and subsequently carried out a bombardment of the Damur area. HMAS Perth managed the destroy four guns from a battery at Abey also an ammunition dump was blown up.
Around 1500C/2, Force B was bombed by Allied aircraft by mistake but no damage was sustained. Rear-Admiral King decided to remain at sea during the night to intercept possible Vichy French freighters with reinforcements which have been reported to be on their way to Syria.
Around 1600C/2, HMS Parthian departed Haifa to patrol off Tripoli.
3 July 1941.
Around 0650C/3, HMS Naiad, HMAS Perth, HMS Kandahar, HMS Kingston, HMS Havock and HMS Griffin returned to Haifa from patrol. The destroyers HMS Jaguar (with Capt. S.H.T. Arliss, RN, on board) and HMS Hasty had arrived from Alexandria. The Yugoslav motor torpedo boats Kajmak?alan and Durmitor also arrived from Alexandria.
Around 1500C/3, HMS Ajax (flying the flag of Rear-Admiral H.B. Rawlings, OBE, RN), HMS Phoebe, HMAS Nizam and HMS Kimberley arrived at Haifa from Alexandria.
Around 2030C/3, HMAS Perth, HMS Phoebe, HMS Kingston, HMS Hotspur and HMS Griffin departed Haifa for a night sweep.
Also on this day HMS Decoy and HMS Kandahar departed Haifa for Alexandria.
4 July 1941.
Around 0630C/4, HMAS Perth, HMS Phoebe, HMS Kingston, HMS Hotspur and HMS Griffin returned to Haifa.
Around 0930C/4, HMS Naiad, HMS Ajax, HMS Jackal, HMAS Nizam, HMS Kimberley, HMS Havock and HMS Hasty departed Haifa to carry out a bombardment in the Damur area. The destroyers found and plastered their targets but the shoot by HMS Ajax was less successful. The force returned to Haifa around 1730C/4.
Around 2030C/4, HMS Naiad, HMS Phoebe, HMS Kimberley and HMS Hasty departed Haifa for a night search keeping clear of the area HMS Parthian was patrolling. Nothing was seen though.
5 July 1941.
Around 0630C/5, HMS Naiad, HMS Phoebe, HMS Kimberley and HMS Hasty returned to Haifa from their patrol.
Around 1100C/5, HMS Ajax, HMAS Perth, HMS Carlisle, HMS Jackal, HMS Kingston, HMAS Nizam, HMS Griffin, HMS Havock and HMS Hotspur departed Haifa to carry out another bombardment in the Damur area. HMS Ajax, HMAS Perth, HMS Kingston and HMAS Nizam were the ships which carried out bombardments. The force returned to Haifa around 1800C/5.
Around 2030C/5, HMAS Perth, HMS Carlisle, HMAS Nizam and HMS Havock departed Haifa for a nigth sweep again keeping clear of HMS Parthian who had been ordered to leave patrol P.M. and was returning the Haifa.
6 July 1941.
At 0045C/6, HMS Ajax, HMS Jackal, HMS Griffin, HMS Kingston and HMS Hotspur departed Haifa to join Perth's force at 0500C/6 off Damur. The Army advance over the Damur river began at dawn and throughout the day Force B gave support to the coastal column. Force B returned to Haifa around 2015C/6.
Around 0930C/6, HMS Parthian arrived at Haifa from patrol.
Around 1945C/6, HMS Naiad, HMS Phoebe, HMS Kimberley and HMS Hasty departed Haifa for a night sweep during which nothing was sighed.
7 July 1941.
Around 0620C/7, HMS Naiad, HMS Phoebe, HMS Kimberley and HMS Hasty returned to Haifa from their sweep. They did not enter harbour but anchored off the breakwater entering only around 1000C/7.
Between 0930C/7 and 1000C/7, HMS Ajax, HMAS Perth, HMS Carlisle, HMS Jackal, HMS Hotspur, HMAS Nizam, HMS Kimberley, HMS Havock and HMS Hasty departed Haifa to support Army operations. They returned to Haifa around 1830C/7. They had carried out no bombardments due to the confusing situation on land and the poor visibility.
A strong force of Vichy-French bombers approached the bombarding force during the afternoon but were driven off by the fighter escort. The fighters reported having shot down a JU 88 which was most likely a German reconnaissance aircraft.
From air reconnaissance reports during the day of the three Vichy-French destroyers (Guepard, Valmy and Vauquelin) on the Turkish coast it appeared possible that they might attempt to reach Beirut during the night. At 1815C/7, HMS Naiad and HMS Phoebe departed Haifa to look for them. HMS Jackal, HMS Hotspur, HMAS Nizam and HMS Havock joined them on leaving harbour having been detached from the Ajax's force.
At the same time the four MTB's (MTB 68, MTB 215, Kajmak?alan and Durmitor) departed Haifa to operate of Beirut during the night. MTB 68 actually entered the harbour but on finding it very difficult to attack merchant vessels with torpedoes due to the limited space and therefore firing only one torpedo which missed. She dropped depth charges instead alongside two of the merchant vessels.
around 2330C/7, it became apparent that the French destroyers were not proceeding towards Beirut this night and HMS Naiad, HMS Phoebe, HMS Jackal, HMS Hotspur, HMAS Nizam and HMS Havock turned southwards and set course to return to Haifa.
8 July 1941.
On their arrival off Haifa HMS Naiad, HMS Phoebe, HMS Jackal, HMS Hotspur, HMAS Nizam and HMS Havock found the port closed due to enemy air laid mines having been dropped in the harbour. They therefore patrolled to seaward throughout the day and then proceeded on a normal night sweep at sunset. In the port mines had been dropped close to HMS Carlisle which was towed out of the danger area.
9 July 1941.
Around 0600C/9, HMS Naiad, HMS Phoebe, HMS Jackal, HMS Hotspur, HMAS Nizam and HMS Havock returned to Haifa from patrol.
A report was received that the French had asked for an armistice and this was later confirmed.
Around 1800C/9, HMS Parthian departed Haifa for Alexandria.
Around 2030C/9, HMS Ajax, HMAS Perth, HMS Griffin, HMS Hasty, HMS Kimberley and HMS Kingston departed Haifa for a regular night sweep.
10 July 1941.
Around 0620C/10, HMS Ajax, HMAS Perth, HMS Griffin, HMS Hasty, HMS Kimberley and HMS Kingston returned to Haifa.
Reconnaissance during the day reported two large merchant vessels at Banias, two between Rouad Island and the coast and one north of Tripoli harbour. The reports were not trusted but at 1618C/10, a signal was received from the Commander-in-Chief Mediterranean that these ships were to be captured so at 2015C/10, HMS Ajax, HMAS Perth, HMS Jackal, HMS Griffin, HMS Hasty, HMS Kimberley and HMS Kingston departed Haifa to do so. Boarding parties had been sent by the cruisers which remained in harbour to the destroyers.
No merchant ships were found in the reported places and off the coast.
11 July 1941.
Around 0635C/11, HMAS Nizam, HMS Havock and HMS Hotspur departed Haifa to join HMS Ajax's force (possibly for exercises ?).
Around 0805C/11, HMS Jackal arrived at Haifa after having been detached.
Around 0930C/11, HMS Ajax, HMAS Perth, HMS Griffin, HMS Hasty, HMS Kimberley, HMS Kingston, HMAS Nizam, HMS Havock and HMS Hotspur returned to Haifa.
Around 2030C/11, HMS Naiad, HMAS Perth, HMS Griffin, HMAS Nizam and HMS Kingston departed Haifa for a night sweep.
12 July 1941.
Information was received during the night that hostilities would cease at 0001C/12 and that armistice delegates would meet at 1100C/12 at Acre.
Around 0620C/12, HMS Naiad, HMAS Perth, HMS Griffin, HMAS Nizam and HMS Kingston returned to Haifa from patrol.
Around 2030C/12, HMS Naiad, HMAS Perth, HMS Kimberley, HMS Hasty and HMS Hotspur departed Haifa for a night sweep and also to avoid congestion in the harbour.
13 July 1941.
Around 0625C/13, HMS Naiad, HMAS Perth, HMS Kimberley, HMS Hasty and HMS Hotspur returned to Haifa from patrol.
Around 2030C/12, HMS Ajax, HMS Phoebe, HMS Jackal, HMS Kingston and HMS Havock departed Haifa for a night sweep and also to avoid congestion in the harbour.
14 July 1941.
Around 0630C/14, HMS Ajax, HMS Phoebe, HMS Jackal, HMS Kingston and HMS Havock returned to Haifa from patrol.
Around 1800C/14, HMS Naiad, HMS Phoebe, HMAS Perth, HMS Kimberley, HMS Griffin, HMS Havock and HMS Hotspur departed Haifa for Alexandria.
15 July 1941.
Around 1400C/15, HMS Moy departed Haifa for Beirut.
Around 1900C/15, HMS Harrow and HMS Lydiard (Lt. D.M. Gibb, RNR) departed Haifa for Beirut.
Around 2000C/15, HMS Carlisle departed Haifa for Beirut.
All the above ships were due to arrive at Beirut around 0530C/16.
Around 2000C/15, HMS Hasty and HMAS Nizam departed Haifa to carry out an A/S sweep from 5 to 15 miles from Beirut. The search was negative.
16 July 1941.
Around 0800C/16, HMS Hasty and HMAS Nizam returned to Haifa.
Around 1145C/16, HMS Leander arrived at Haifa from Alexandria. She had been delayed by a reduction of speed at 21 knots due to excessive vibration.
17 July 1941.
Around 0800C/17, HMS Jervis arrived at Haifa from Alexandria.
Around 2000C/17, HMS Jackal, HMAS Nizam and HMS Hasty departed Haifa for Alexandria. Off Alexandria they were to join the Fleet for exercises.
Around 2030C/17, HMS Ajax, HMS Jervis and HMS Kingston departed Haifa to provide cover for convoy LE 25 which they did until 0500C/18.
18 July 1941.
Around 0800C/18, HMS Ajax and HMS Kingston returned to Haifa.
Around 0930C/18, HMS Leander departed Haifa for full power trials after divers had removed wire fouling her inner port propeller. The full power trial was satisfactory though there was still some vibration aft but this may also be due to a foul bottom as her last undocking had been on 26 December 1940. She returned to Haifa around 1120C/18.
Around 1130C/18, HMS Jervis returned to Haifa having conducted D/F trials before entering harbour. (34)
7 Jun 1941
Around 1145C/7, 'Force B', made up of the light cruisers HMS Phoebe (Capt. G. Grantham, RN, flying the flag of Rear-Admiral E.L.S. King, CB, MVO, RN), HMS Ajax (Capt. E.D.B. McCarthy, RN) and the destroyers HMS Kandahar (Cdr. W.G.A. Robson, DSO, RN), HMS Kimberley (Lt.Cdr. J.S.M. Richardson, DSO, RN), HMS Jackal (Lt.Cdr. R.McC.P. Jonas, DSC, RN) and HMS Janus (Cdr. J.A.W. Tothill, RN) departed Alexandria so to be off the Syrian coast at dawn the following day for their role supporting the Army during Operation Exporter, the Allied attack on the Vichy-French colony of Syria.
Around 0600C/8, they were joined by the AA cruiser HMS Coventry (A/Capt. W.P. Carne, RN) and the destroyers HMS Isis (Cdr. C.S.B. Swinley, DSC, RN) and HMS Hotspur (Lt.Cdr. C.P.F. Brown, DSC, RN) which came from Port Said.
[For more information on the attack on the Vichy-French colony of Syria and subsequent movements see the event ' The Syrian campaign ' for 6 June 1941.] (35)
9 Jun 1941
During the British operations against Vichy-French held Syria, the Vichy-French submarine Caiman narrowly misses the British light cruiser HMS Ajax (Capt. E.D. McCarthy, RN).
13 Jun 1941
The light cruiser HMS Ajax (Capt. E.D.B. McCarthy, RN) and the destroyers HMS Kandahar (Cdr. W.G.A. Robson, DSO, RN) and HMS Jaguar (Lt.Cdr. J.F.W. Hine, RN) departed Haifa early in the afternoon to return to Alexandria. They were joined at sea by HMAS Stuart (Capt. H.M.L. Waller, DSO, RAN) and HMS Hotspur (Lt.Cdr. C.P.F. Brown, DSC, RN). (35)
14 Jun 1941
HMS Ajax (Capt. E.D.B. McCarthy, RN), HMAS Stuart (Capt. H.M.L. Waller, DSO, RAN), HMS Kandahar (Cdr. W.G.A. Robson, DSO, RN), HMS Jaguar (Lt.Cdr. J.F.W. Hine, RN) and HMS Hotspur (Lt.Cdr. C.P.F. Brown, DSC, RN) arrived at Alexandria from Haifa after operations off Syria. (35)
26 Jun 1941
The battleships HMS Queen Elizabeth (Capt. C.B. Barry, DSO, RN, flying the flag of Vice-Admiral H.D. Pridham-Whippell, KCB, CVO, RN), HMS Warspite (Capt. D.B. Fisher, CBE, RN), HMS Valiant (Capt. C.E. Morgan, DSO, RN), light cruiser HMS Ajax (Capt. E.D.B. McCarthy, RN), fast minelayer HMS Abdiel (Capt. E. Peydell-Bouverie, MVO, RN) and the destroyers HMS Defender (Lt.Cdr. G.L. Farnfield, RN), HMS Griffin (Lt.Cdr. J. Lee-Barber, DSO, RN), HMS Hasty (Lt.Cdr. L.R.K. Tyrwhitt, DSC, RN), HMS Hero (Cdr. H.W. Biggs, DSO and Bar, RN), HMS Jaguar (Lt.Cdr. J.F.W. Hine, RN), HMS Kandahar (Cdr. W.G.A. Robson, DSO, RN) and HMS Kimberley (Lt.Cdr. J.S.M. Richardson, DSO, RN) departed Alexandria for exercises between Alexandria and Port Said.
HMS Warspite was later detached to Port Said. She was to proceed to the USA for repairs and refit. She was escorted to Port Said by HMS Griffin, HMS Kandahar and HMS Kimberley. After delivering the battleship at Port Said, Griffin and Kandahar proceeded to Haifa, where they arrived on 27 June, to operate off the Syrian coast while Kimberley rejoined the Fleet.
The light cruiser HMS Phoebe (Capt. G. Grantham, RN) and the fast minelayer HMS Latona (Capt. S.L. Bateson, RN) also joined the Fleet for the exercises on the 27th.
The Fleet returned to Alexandria the next day (27th). (35)
3 Jul 1941
Around 0100C/3, HMS Ajax (Capt. E.D.B. McCarthy, DSO, RN, flying the flag of Rear-Admiral H.B. Rawlings, OBE, RN), HMS Phoebe (Capt. G. Grantham, RN), HMS Kimberley (Cdr. J.S.M. Richardson, DSO, RN) and HMAS Nizam (Lt.Cdr. M.J. Clark, RAN) departed Alexandria for Haifa where they arrived around 1500C/3.
[For more information on the attack on the Vichy-French colony of Syria and subsequent movements see the event ' The Syrian campaign ' for 6 June 1941.] (36)
22 Jul 1941
Around 2100C/22, the Mediterranean Fleet, made up of the battleships HMS Queen Elizabeth (Capt. C.B. Barry, DSO, RN, flying the flag of Vice-Admiral H.D. Pridham-Whippell, KCB, CVO, RN), HMS Valiant (Capt. C.E. Morgan, DSO, RN), light cruisers HMS Naiad (Capt. M.H.A. Kelsey, DSC, RN, flying the flag of Vice-Admiral E.L.S. King, CB, MVO, RN), HMS Phoebe (Capt. G. Grantham, RN), HMS Neptune (Capt. R.C. O'Conor, RN), HMAS Hobart (Capt. H.L. Howden, CBE, RAN), fast minelayers HMS Abdiel (Capt. E. Peydell-Bouverie, MVO, RN), HMS Latona (Capt. S.L. Bateson, RN) and the destroyers HMS Griffin (Cdr. J. Lee-Barber, DSO, RN), HMS Hasty (Lt.Cdr. L.R.K. Tyrwhitt, DSC, RN), HMS Havock (Lt. G.R.G. Watkins, RN), HMS Jackal (Lt.Cdr. R.McC.P. Jonas, DSC, RN), HMS Kimberley (Cdr. J.S.M. Richardson, DSO, RN), HMS Kipling (Cdr. A. St. Clair-Ford, RN) and HMAS Nizam (Lt.Cdr. M.J. Clark, RAN) departed Alexandria to proceed to a position to the west of Crete.
Around 1400C/22, the light cruisers HMS Ajax (Capt. E.D.B. McCarthy, DSO, RN, flying the flag of Rear-Admiral H.B. Rawlings, OBE, RN), HMS Leander (New Zealand Division) (Capt. R.H. Bevan, RN) and the destroyers HMS Jervis (Capt. P.J. Mack, DSO, RN), HMS Jaguar (Lt.Cdr. J.F.W. Hine, RN), HMS Kandahar (Cdr. W.G.A. Robson, DSO, RN) and HMS Kingston (Lt.Cdr. P. Somerville, DSO, DSC, RN) had departed Haifa to rendez-vous with the fleet at 0600C/23.
At daylight on 23 July the AA cruiser HMS Carlisle (A/Cdr. W. Pope, RN) also joined the fleet.
After dark on 23 July the fleet turned eastwards. HMS Neptune, HMS Abdiel and HMS Kimberley were then detached with orders to proceed to Port Said where they arrived on 24 July.
HMS Latona, HMS Jervis, HMS Jaguar and HMS Kandahar were detached on the 24th to make rendezvous off Alexandria with the damaged aircraft carrier HMS Formidable (Capt. A.W.la T. Bisset, RN) and escort her to Port Said. A/Rear-Admiral D.W. Boyd, CBE, DSC, RN had struck his flag in HMS Formidable before departure. HMS Formidable arrived at Port Said on the 25th and immediately entered the Suez Canal for a southbound passage. She arrived at Ismalia early in the evening of the 25th. HMS Formidable is to proceed to the U.S.A. for repairs. HMS Latona and the destroyers then proceeded to Haifa.
On the 24th HMS Leander was also detached with orders to proceed to Port Said where she arrived on 25 July to embark troops together with HMS Latona and HMS Jaguar.
The bulk of the fleet returned to Alexandria around 1800C/24. (35)
20 Aug 1941
Around 0830C/20 the fast minelayer HMS Latona (Capt. S.L. Bateson, RN) and the destroyers HMS Kingston (Lt.Cdr. P. Somerville, DSO, DSC, RN), HMS Kipling (Cdr. A. St.Clair Ford, RN) and HMAS Nizam (Lt.Cdr. M.J. Clark, RAN) departed Alexandria with troops and supplies for Tobruk. Cover was provided by the light cruisers HMS Ajax (Capt. E.D.B. McCarthy, DSO, RN, flying the flag of Rear-Admiral H.B. Rawlings, OBE, RN) and HMS Neptune (Capt. R.C. O'Conor, RN) which departed Alexandria at the same time.
Having unloaded at Tobruk, HMS Latona, HMS Kingston, HMS Kipling and HMAS Nizam departed there around 0050C/21.
On the return trip they were attacked by German Ju-88 bombers. HMAS Nizam was near missed in position 31°45'N, 26°09'E (north-east of Sidi Barani) and sustained some hull damage.
All ships returned to Alexandria around 1810C/21. (37)
24 Aug 1941
Around 0830C/24, the fast minelayer HMS Latona (Capt. S.L. Bateson, RN) and the destroyers HMS Griffin (Cdr. J. Lee-Barber, DSO, RN), HMS Kingston (Lt.Cdr. P. Somerville, DSO, DSC, RN) and HMS Kipling (Cdr. A. St.Clair Ford, RN) departed Alexandria with troops and supplies for Tobruk. Cover was provided by the light cruisers HMS Ajax (Capt. E.D.B. McCarthy, DSO, RN, flying the flag of Rear-Admiral H.B. Rawlings, OBE, RN) and HMS Neptune (Capt. R.C. O'Conor, RN).
All ships returned to Alexandria around 1330C/25. (35)
26 Aug 1941
Around 0900C/26, the fast minelayer HMS Latona (Capt. S.L. Bateson, RN) and the destroyers HMS Jervis (Capt. P.J. Mack, DSO and Bar, RN with Rear-Admiral I.G. Glennie, RN on board), HMS Griffin (Cdr. J. Lee-Barber, DSO, RN) and HMS Havock (Lt. G.R.G. Watkins, DSC, RN) departed Alexandria for Tobruk. Cover for these ships was provided by the light cruisers HMS Ajax (Capt. E.D.B. McCarthy, DSO, RN, flying the flag of Rear-Admiral H.B. Rawlings, OBE, RN) and HMS Neptune (Capt. R.C. O'Conor, RN).
The ships arrived back at Alexandria around 1500C/27. (35)
28 Aug 1941
Around 0845C/28, the fast minelayer HMS Latona (Capt. S.L. Bateson, RN) and the destroyers HMAS Napier (Capt. S.H.T. Arliss, RN), HMS Jackal (Lt.Cdr. R.McC.P. Jonas, DSC, RN) and
HMS Decoy (Lt.Cdr. J.M. Alliston, RN) departed Alexandria for Tobruk. They were covered by the light cruisers HMS Ajax (Capt. E.D.B. McCarthy, DSO, RN, flying the flag of Rear-Admiral H.B. Rawlings, OBE, RN) and HMS Neptune (Capt. R.C. O'Conor, RN).
All ships returned to Alexandria around 1500C/29. (35)
9 Sep 1941
HMS Barham (Capt. G.C. Cooke, RN), HMS Neptune (Capt. R.C. O'Conor, RN), HMS Abdiel (Capt. E. Peydell-Bouverie, MVO, RN), HMS Latona (Capt. S.L. Bateson, RN), HMAS Napier (Capt. S.H.T. Arliss, RN) and HMAS Nizam (Lt.Cdr. M.J. Clark, RAN) conducted exerises off Alexandria.
Shorty after noon they were joined by the light cruisers HMS Ajax (Capt. E.D.B. McCarthy, DSO, RN, flying the flag of Rear-Admiral H.B. Rawlings, OBE, RN) and HMAS Hobart (Capt. H.L. Howden, CBE, RAN).
HMS Barham, HMS Neptune, HMS Ajax and HMAS Hobart returned to Alexandria early in the evening and HMS Napier returned to Alexandria late in the evening. The other ships remained at sea. (38)
15 Sep 1941
Around 0855C/15, the destroyers HMAS Napier (Capt. S.H.T. Arliss, RN), HMAS Nizam (Lt.Cdr. M.J. Clark, RAN) and HMS Havock (Lt. G.R.G. Watkins, DSC, RN) departed Alexandria with supplies for Tobruk where they arrived around 2325C/15.
The light cruisers HMS Ajax (Capt. E.D.B. McCarthy, DSO, RN, flying the flag of Rear-Admiral H.B. Rawlings, OBE, RN), HMS Neptune (Capt. R.C. O'Conor, RN) and HMAS Hobart (Capt. H.L. Howden, CBE, RAN) had departed Alexandria around 0840C/15 for exercises.
The destroyers HMS Kimberley (Cdr. J.S.M. Richardson, DSO, RN) and HMS Kingston (Lt.Cdr. P. Somerville, DSO, DSC, RN) departed Alexandria around 1035C/15 to join the light cruisers on completion of their exercises and then to cover provide cover for the store carrying destroyers.
All ships returned to Alexandria on the 16th, HMAS Napier, HMAS Nizam and HMS Havock around 1345C/16 followed by HMS Kingston around 1405C/16. HMS Ajax, HMS Neptune and HMAS Hobart returned around 1445C/16 and finally HMS Kimberley entered harbour around 1610C/16. (39)
17 Sep 1941
Around 1850B/17, HMS Ajax (Capt. E.D.B. McCarthy, DSO, RN, flying the flag of Rear-Admiral H.B. Rawlings, OBE, RN), HMS Neptune (Capt. R.C. O'Conor, RN) and HMAS Hobart (Capt. H.L. Howden, CBE, RAN) departed Alexandria to embark troops at Beirut or Haifa.
Around 0800B/18, HMS Neptune parted company with the other ships and proceeded to Haifa arriving there around 1110B/18.
HMS Ajax and HMAS Hobart arrived at Beirut around 1405B/18.
HMS Neptune departed Haifa around 0430B/19 and arrived at Beirut around 0815B/19.
All three cruisers departed Beirut for Alexandria around 1100B/19.
They were joined at sea around 1230B/19 by the destroyers HMS Griffin (Cdr. J. Lee-Barber, DSO, RN) and HMS Hotspur (Lt. T.D. Herrick, DSC, RN).
All five ships arrived at Alexandria around 0615B/20. (40)
22 Sep 1941
Around 0800B/22, the fast minelayer HMS Abdiel (Capt. E. Peydell-Bouverie, MVO, RN) and the destroyers HMS Kandahar (Cdr. W.G.A. Robson, DSO, RN), HMS Jaguar (Lt.Cdr. J.F.W. Hine, RN) and HMS Griffin (Cdr. J. Lee-Barber, DSO, RN) departed Alexandria with about 1000 troops and supplies for Tobruk.
Their return passage was covered by the light cruisers HMS Ajax (Capt. E.D.B. McCarthy, DSO, RN, flying the flag of Rear-Admiral H.B. Rawlings, OBE, RN), HMS Neptune (Capt. R.C. O'Conor, RN) and HMAS Hobart (Capt. H.L. Howden, CBE, RAN) which departed Alexandria around 2200B/22.
All ships returned to Alexandria around noon the following day.
This was 'Serial 8' of 'Operation Supercharge'. (41)
26 Sep 1941
Around 0900B/26, the battleships HMS Queen Elizabeth (Capt. C.B. Barry, DSO, RN, flying the flag of Admiral Sir A.B. Cunningham, GCB, DSO and 2 Bars, RN), HMS Barham (Capt. G.C. Cooke, RN, flying the flag of Vice-Admiral H.D. Pridham-Whippell, KCB, CVO, RN), HMS Valiant (Capt. C.E. Morgan, DSO, RN), light cruisers HMS Ajax (Capt. E.D.B. McCarthy, DSO, RN, flying the flag of Rear-Admiral H.B. Rawlings, OBE, RN), HMS Neptune (Capt. R.C. O'Conor, RN), HMAS Hobart (Capt. H.L. Howden, CBE, RAN) and the destroyers HMS Jervis (Capt. P.J. Mack, DSO and Bar, RN), HMS Jupiter (Lt.Cdr. N.V.J.P. Thew, RN), HMS Kingston (Lt.Cdr. P. Somerville, DSO, DSC, RN), HMS Kipling (Cdr. A. St.Clair-Ford, RN), HMS Hero (Cdr. H.W. Biggs, DSO and Bar, RN), HMS Hotspur (Lt. T.D. Herrick, DSC, RN), HMS Decoy (Lt.Cdr. J.M. Alliston, RN) and HMAS Vendetta (Lt.Cdr. C.J. Stephenson, RAN) departed Alexandria for a diversion in the Eastern Mediterranean during 'Operation Halberd' in the Western Mediterranean.
They returned to Alexandria in the afternoon of the 27th. (35)
10 Oct 1941
Shortly after 0900B/10, the battleships HMS Barham (Capt. G.C. Cooke, RN, flying the flag of Vice-Admiral H.D. Pridham-Whippell, KCB, CVO, RN), HMS Valiant (Capt. C.E. Morgan, DSO, RN), light cruisers HMS Ajax (Capt. E.D.B. McCarthy, DSO, RN, flying the flag of Rear-Admiral H.B. Rawlings, OBE, RN), HMAS Hobart (Capt. H.L. Howden, CBE, RAN) and the destroyers HMS Jervis (Capt. P.J. Mack, DSO and Bar, RN), HMS Jaguar (Lt.Cdr. J.F.W. Hine, RN), HMS Jupiter (Lt.Cdr. N.V.J.P. Thew, RN), HMS Kandahar (Cdr. W.G.A. Robson, DSO, RN), HMS Hasty (Lt.Cdr. L.R.K. Tyrwhitt, DSC, RN), HMS Hotspur (Lt. T.D. Herrick, DSC, RN), HMS Griffin (Cdr. J. Lee-Barber, DSO, RN), HMS Decoy (Lt.Cdr. J.M. Alliston, RN) and the escort destroyers HMS Avon Vale (Lt.Cdr. P.A.R. Withers, DSO, RN) and HMS Eridge (Lt.Cdr. W.F.N. Gregory-Smith, RN) departed Alexandria for a sweep to the westwards.
The destroyers HMS Jupiter, HMS Kandahar, HMS Griffin, HMS Decoy and the escort destroyers HMS Avon Vale, HMS Eridge were detached for a sweep towards Bardia. The destroyers HMS Hero (Cdr. H.W. Biggs, DSO and Bar, RN), HMS Kipling (Cdr. A. St.Clair-Ford, RN) and HMAS Nizam (Lt.Cdr. M.J. Clark, RAN) had sailed from Alexandria to join the fleet to take their place in the screen.
The fleet turned back to the east around 1800B/10. They returned to Alexandria around 0830B/11.
The destroyers that had been detached returned to Alexandria around 1500B/11. (35)
12 Oct 1941
Operation 'Cultivate'.
Replacement of Australian troops at Tobruk with 'fresh' troops.
At 0700B/12 the fast minelayer HMS Abdiel (Capt. E. Peydell-Bouverie, MVO, RN) and the destroyers HMS Hero (Cdr. H.W. Biggs, DSO and Bar, RN), HMS Kipling (Cdr. A. St.Clair-Ford, RN) and HMAS Nizam (Lt.Cdr. M.J. Clark, RAN) departed Alexandria with troops and stores for Tobruk. This was 'Serial 1' of 'Operation Cultivate'.
A cover force also sailed from Alexandria. It was made up of the battleships HMS Queen Elizabeth (Capt. C.B. Barry, DSO, RN, flying the flag of Admiral Sir A.B. Cunningham, GCB, DSO and 2 Bars, RN), HMS Barham (Capt. G.C. Cooke, RN, flying the flag of Vice-Admiral H.D. Pridham-Whippell, KCB, CVO, RN), light cruisers HMS Ajax (Capt. E.D.B. McCarthy, DSO, RN, flying the flag of Rear-Admiral H.B. Rawlings, OBE, RN), HMS Galatea (Capt. E.W.B. Sim, RN), HMAS Hobart (Capt. H.L. Howden, CBE, RAN), destroyers HMS Jervis (Capt. P.J. Mack, DSO and Bar, RN), HMS Jaguar (Lt.Cdr. J.F.W. Hine, RN), HMS Jupiter (Lt.Cdr. N.V.J.P. Thew, RN), HMS Kandahar (Cdr. W.G.A. Robson, DSO, RN), HMS Hasty (Lt.Cdr. L.R.K. Tyrwhitt, DSC, RN), HMS Hotspur (Lt. T.D. Herrick, DSC, RN), HMS Griffin (Cdr. J. Lee-Barber, DSO, RN), HMS Decoy (Lt.Cdr. J.M. Alliston, RN) and the escort destroyers HMS Avon Vale (Lt.Cdr. P.A.R. Withers, DSO, RN) and HMS Eridge (Lt.Cdr. W.F.N. Gregory-Smith, RN).
The cruisers with three of the destroyers were detached during the night. They rejoined at daylight when the fleet set course to return to Alexandria.
Meanwhile Abdiel with her destroyers had landed the stores and troops at Tobruk and taken on board troops that were being relieved and set course to return to Alexandria.
Early in the afternoon a report was received of Italian cruisers and destroyers and the fleet was turned westwards again. Shortly afterwards the fleet was attacked by three enemy torpedo bombers but no damage was done. During the night the cruisers and three of the destroyers were again detached.
At daylight on the 14th the detached ships again rejoined and course was set to return to Alexandria. The fleet arrived at Alexandria around 1300B/13. The ships that had been on the transport run to tobruk returned to Alexandria around 1745B/14.
Operation 'Cultivate' continued for a while sending 'fresh' troops to Tobruk. (35)
20 Oct 1941
The light cruisers HMS Ajax (Capt. E.D.B. McCarthy, DSO, RN, flying the flag of Rear-Admiral H.B. Rawlings, OBE, RN), HMS Galatea (Capt. E.W.B. Sim, RN) and HMAS Hobart (Capt. H.L. Howden, CBE, RAN) and the destroyers HMS Griffin (Cdr. J. Lee-Barber, DSO, RN) and HMS Jaguar (Lt.Cdr. J.F.W. Hine, RN) departed Alexandria at 0830B/20 to bombard an enemy gun battery near Tobruk during the night of 20/21 October.
The cruisers returned to Alexandria at 1330B/21. At 0610B/21 the destroyers had been detached to go to the assistance of the gunboat HMS Gnat (Lt.Cdr. S.R.H. Davenport, RN) which had been torpedoed and heavily damaged. Due to the air threat they remained near Mersa Matruh and were not allowed to proceed further to the west. HMS Griffin and HMS Jaguar were later joined by the escort destroyers HMS Avon Vale (Lt.Cdr. P.A.R. Withers, DSO, RN) and HMS Eridge (Lt.Cdr. W.F.N. Gregory-Smith, RN).
They contacted the damaged gunboat before sunset. HMS Griffin took HMS Gnat in tow escorted by HMS Jaguar and the A/S whalers HMSAS Southern Maid and HMS Klo.
Tow was later passed to the tug HMS St. Monance.
HMS Jaguar, HMS Avon Vale and HMS Eridge arrived at Alexandria at 0030B/23.
HMS Gnat and HMS Griffin arrived at Alexandria later on 23 October. (42)
23 Oct 1941
The light cruisers HMS Ajax (Capt. E.D.B. McCarthy, DSO, RN, flying the flag of Rear-Admiral H.B. Rawlings, OBE, RN), HMS Neptune (Capt. R.C. O'Conor, RN), HMAS Hobart (Capt. H.L. Howden, CBE, RAN), destroyers HMAS Napier (Capt. S.H.T. Arliss, RN), HMAS Nizam (Lt.Cdr. M.J. Clark, RAN), HMS Jupiter (Lt.Cdr. N.V.J.P. Thew, RN), HMS Hasty (Lt.Cdr. L.R.K. Tyrwhitt, DSC, RN) and the escort destroyers HMS Avon Vale (Lt.Cdr. P.A.R. Withers, DSO, RN) and HMS Eridge (Lt.Cdr. W.F.N. Gregory-Smith, RN) departed Alexandria around 0845B/23 on a bombardment operation.
During the night of 23/24 October the light cruisers and the escort destroyers bombarded the Bardia area. Petrol dumps and a building, thought to be the Army headquarters were the main targets.
The four fleet destroyers had been detached and bombarded the Sollum area.
All ships then returned to Alexandria. The cruisers arrived around 1145B/24. (35)
25 Oct 1941
The light cruisers HMS Ajax (Capt. E.D.B. McCarthy, DSO, RN, flying the flag of Rear-Admiral H.B. Rawlings, OBE, RN), HMS Neptune (Capt. R.C. O'Conor, RN), HMAS Hobart (Capt. H.L. Howden, CBE, RAN) and the destroyers HMS Jervis (Capt. P.J. Mack, DSO and Bar, RN), HMS Jaguar (Lt.Cdr. J.F.W. Hine, RN), HMS Jupiter (Lt.Cdr. N.V.J.P. Thew, RN), HMS Kimberley (Cdr. J.S.M. Richardson, DSO, RN), HMAS Napier (Capt. S.H.T. Arliss, RN), HMAS Nizam (Lt.Cdr. M.J. Clark, RAN) and HMS Hasty (Lt.Cdr. L.R.K. Tyrwhitt, DSC, RN) departed Alexandria around 1400B/25 for further bombardment operations.
The light cruisers and the destroyers HMAS Napier, HMAS Nizam and HMS Hasty bombarded the Bardia area during the night of 25/26 October.
The destroyers HMS Jervis, HMS Jaguar, HMS Jupiter and HMS Kimberley were detached to go to the assistance of the fast minelayer HMS Latona (Capt. S.L. Bateson, RN) which had been bombed and later sank as result of the damage.
All ships returned to Alexandria very late in the morning or in the first half of the afternoon of the 26th. (35)
16 Nov 1941
Operation Chieftan
Dummy convoy to Malta from Gibraltar to create a diversion for the enemy during army operations in Libya.
16 November 1941.
Western Mediterranean.
On 16 November a dummy convoy departed Gibraltar and proceeded eastwards, it was made up of the merchant vessels; Baron Newlands (British, 3386 GRT, built 1928), Blairatholl (British, 3319 GRT, built 1925), Cisneros (British, 1886 GRT, built 1926), Ottinge (British, 2818 GRT, built 1940) and Shuna (British, 1575 GRT, built 1937).
The RFA tanker Brown Ranger (3417 GRT, built 1941) was also part of the convoy.
Escort was provided by the destroyer HMS Wild Swan (Lt.Cdr. C.E.L. Sclater, RN), sloop HMS Deptford (Lt.Cdr. H.R. White, RN), and the corvettes HMS Convolvulus (T/Lt. R.C. Connell, RNR), HMS Marigold (T/Lt. J. Renwick, RNR) and HMS Rhododendron (Lt.Cdr. W.N.H. Faichney, DSO, RNR).
HMS Wild Swan got an A/S contact and was detached to hunt it reinforced by the corvette HMS Samphire (Lt.Cdr. F.T. Renny, DSC, RNR) from Gibraltar.
The corvette Marigold detected and depth charged the German submarine U-433. The submarine surfaced and was sunk at 2155/6 on 16 November 1941 in the Mediterranean east of Gibraltar, in position 36°13'N, 04°42'W.
17 November 1941.
Western Mediterranean.
The dummy convoy turned back to the eastwards again on the 17th.
18 November 1941.
Western Mediterranean.
The dummy convoy arrived back at Gibraltar in the evening of the 18th.
Eastern Mediterranean.
Around 0730/18 the battleships HMS Queen Elizabeth (Capt. C.B. Barry, DSO, RN, flying the flag of Admiral Sir A.B. Cunningham, GCB, DSO and 2 Bars, RN), HMS Barham (Capt. G.C. Cooke, RN, flying the flag of Vice-Admiral H.D. Pridham-Whippell, KCB, CVO, RN), HMS Valiant (Capt. C.E. Morgan, DSO, RN), light cruisers HMS Naiad (Capt. M.H.A. Kelsey, DSC, RN, flying the flag of Rear-Admiral P.L. Vian, DSO and 2 Bars, RN), HMS Euryalus (Capt. E.W. Bush, DSO, DSC, RN), HMS Galatea (Capt. E.W.B. Sim, RN) and the destroyers HMS Jervis (Capt. P.J. Mack, DSO and Bar, RN), HMS Jackal (Lt.Cdr. R.McC.P. Jonas, DSC, RN), HMS Kimberley (Cdr. J.S.M. Richardson, DSO, RN), HMS Kingston (Lt.Cdr. P. Somerville, DSO, DSC, RN), HMS Kipling (Cdr. A. St.Clair Ford, RN), HMAS Napier (Capt. S.H.T. Arliss, RN), HMAS Nizam (Lt.Cdr. M.J. Clark, RAN), HMS Decoy (Lt.Cdr. J.M. Alliston, RN) and the escort destroyers HMS Avon Vale (Lt.Cdr. P.A.R. Withers, DSO, RN) and HMS Eridge (Lt.Cdr. W.F.N. Gregory-Smith, RN) departed Alexandria to be at sea to support several operations in the Mediterranean.
Around 1105B/18, the fleet was joined by the light cruisers HMS Ajax (Capt. E.D.B. McCarthy, DSO, RN, flying the flag of Rear-Admiral H.B. Rawlings, OBE, RN), HMS Neptune (Capt. R.C. O'Conor, RN), and HMAS Hobart (Capt. H.L. Howden, CBE, RAN) and the destroyers HMS Kandahar (Cdr. W.G.A. Robson, DSO, DSC, RN), HMS Hasty (Lt.Cdr. L.R.K. Tyrwhitt, DSC, RN) and HMS Hotspur (Lt. T.D. Herrick, DSC, RN) which had already been at sea.
The fleet turned back towards Alexandria after dark.
On the 18th HMS Naiad and HMS Euryalus split off together with the destroyers HMS Jackal and HMS Kipling for a night bombardment of the Helfaya pass area upon which they also returned to Alexandria. They too arrived before noon on the 19th.
' Force K ', made up of light cruisers HMS Aurora (Capt. W.G. Agnew, RN), HMS Penelope (Capt. A.D. Nicholl, RN) and the destroyers HMS Lance (Lt.Cdr. R.W.F. Northcott, RN) and HMS Lively (Lt.Cdr. W.F.E. Hussey, DSC, RN), departed Malta around 1845/18 to create a diversion during the night.
19 November 1941.
Eastern Mediterranean.
' Force K ' returned to Malta around 0730/19.
The fleet arrived back in harbour before noon on the 19th followed shortly afterwards by HMS Naiad, HMS Euryalus, HMS Jackal and HMS Kipling. (35)
17 Nov 1941
Around 1115B/17 the light cruisers HMS Ajax (Capt. E.D.B. McCarthy, DSO, RN, flying the flag of Rear-Admiral H.B. Rawlings, OBE, RN), HMS Neptune (Capt. R.C. O'Conor, RN), and HMAS Hobart (Capt. H.L. Howden, CBE, RAN) and the destroyers HMS Kandahar (Cdr. W.G.A. Robson, DSO, DSC, RN), HMS Hasty (Lt.Cdr. L.R.K. Tyrwhitt, DSC, RN) and HMS Hotspur (Lt. T.D. Herrick, DSC, RN) departed Alexandria to bombard the Sollum area during the night of 17/18 November 1941. The bombardment however had to be cancelled due to the bad weather conditions. The ships then joined the Mediterranean Fleet which had departed Alexandria in the morning of the 18th at noon on the 18th.
They returned to Alexandria with the Fleet on the 19th.
[For more info see the event ' Operation Chieftan ' for 16 November 1941.] (43)
20 Nov 1941
Around 1130B/20, the light cruisers HMS Ajax (Capt. E.D.B. McCarthy, DSO, RN, flying the flag of Rear-Admiral H.B. Rawlings, OBE, RN), HMS Neptune (Capt. R.C. O'Conor, RN) and HMAS Hobart (Capt. H.L. Howden, CBE, RAN) departed Alexandria to conduct a bombardment of the Bardia area during the night of 20/21 November. They were joined off the gate by the escort destroyers HMS Avon Vale (Lt.Cdr. P.A.R. Withers, DSO, RN) and HMS Heythrop (Lt.Cdr R.S. Stafford, RN) which had departed around 1000B/20.
Around 1400B/20, they were joined, about 40 miles east of Alexandria by the escort destroyers HMS Farndale (Cdr. S.H. Carlill, RN) and HMS Eridge (Lt.Cdr. W.F.N. Gregory-Smith, RN) which had departed Alexandria around 1315B/19 for an A/S hunt for a reported enemy submarine reported by an aircraft. (which in the end turned out to be HMSAS Southern Maid).
A bombardment was carried out around 0200B/21 and course was then set to join the fleet at sea which was done around noon. (44)
21 Nov 1941
Operations ME 7 and Landmark.
Diversionary attack on Tripoli to divert enemy air strenght away from the Bardia / Halfaya pass area during land operations.
The battleships HMS Queen Elizabeth (Capt. C.B. Barry, DSO, RN, flying the flag of Admiral Sir A.B. Cunningham, GCB, DSO and 2 Bars, RN), HMS Barham (Capt. G.C. Cooke, RN, flying the flag of Vice-Admiral H.D. Pridham-Whippell, KCB, CVO, RN), HMS Valiant (Capt. C.E. Morgan, DSO, RN), light cruisers HMS Naiad (Capt. M.H.A. Kelsey, DSC, RN, flying the flag of Rear-Admiral P.L. Vian, DSO and 2 Bars, RN), HMS Euryalus (Capt. E.W. Bush, DSO, DSC, RN), HMS Galatea (Capt. E.W.B. Sim, RN) and the destroyers HMS Jervis (Capt. P.J. Mack, DSO and Bar, RN), HMS Jackal (Lt.Cdr. R.McC.P. Jonas, DSC, RN), HMS Kandahar (Cdr. W.G.A. Robson, DSO, DSC, RN), HMS Kimberley (Cdr. J.S.M. Richardson, DSO, RN), HMS Kingston (Lt.Cdr. P. Somerville, DSO, DSC, RN), HMS Kipling (Cdr. A. St.Clair Ford, RN), HMAS Napier (Capt. S.H.T. Arliss, RN), HMAS Nizam (Lt.Cdr. M.J. Clark, RAN), HMS Hasty (Lt.Cdr. L.R.K. Tyrwhitt, DSC, RN), HMS Hotspur (Lt. T.D. Herrick, DSC, RN) and HMS Decoy (Lt.Cdr. J.M. Alliston, RN) departed Alexandria for operation ME 7.
At noon, the light cruisers HMS Ajax (Capt. E.D.B. McCarthy, DSO, RN, flying the flag of Rear-Admiral H.B. Rawlings, OBE, RN), HMS Neptune (Capt. R.C. O'Conor, RN), HMAS Hobart (Capt. H.L. Howden, CBE, RAN) and the escort destroyers HMS Avon Vale (Lt.Cdr. P.A.R. Withers, DSO, RN), HMS Eridge (Lt.Cdr. W.F.N. Gregory-Smith, RN), HMS Farndale (Cdr. S.H. Carlill, RN) and HMS Heythrop (Lt.Cdr R.S. Stafford, RN) joined the fleet at sea having completed their bombardment. The four hunt-class destroyers were however detached to return to Alexandria where they arrived around 1500B/21.
After dark HMS Naiad, HMS Euryalus, HMS Galatea were detached after dark to make false W/T reports further to the west. The fleet then turned back towards Alexandria.
The fleet arrived back at Alexandria at daybreak on the 22nd. The detached cruisers arrived back later the same day.
To simulate a fake landing attempt on the coast near Tripoli (Operation Landmark) a convoy made up of the transports HMS Breconshire (9776 GRT, built 1939), Ajax (7540 GRT, built 1931), Clan Ferguson (7347 GRT, built 1938) and Sydney Star (12696 GRT, built 1936) departed Malta. It was escorted by the corvette HMS Gloxinia (Lt.Cdr. A.J.C. Pomeroy, RNVR) and cover was provided by ' Force K ', made up of HMS Aurora (Capt. W.G. Agnew, RN), HMS Penelope (Capt. A.D. Nicholl, RN) and the destroyers HMS Lance (Lt.Cdr. R.W.F. Northcott, RN) and HMS Lively (Lt.Cdr. W.F.E. Hussey, DSC, RN). These ships all departed Malta around 1415/21. [Both destroyers had actually departed around 1235/21, presumably to conduct an A/S sweep before the other ships departed the harbour.]
' Force K ' returned to Malta around 0600/22 followed around 2 hours later by the convoy. It does not appear the convoy had been sighted by the enemy. (35)
23 Nov 1941
Operations against enemy convoy's / Sinking of HMS Barham.
23 November 1941.
'Force K', made up of the light cruisers HMS Aurora (Capt. W.G. Agnew, RN), HMS Penelope (Capt. A.D. Nicholl, RN) and the destroyers HMS Lance (Lt.Cdr. R.W.F. Northcott, RN) and HMS Lively (Lt.Cdr. W.F.E. Hussey, DSC, RN), departed Malta around 2330B/23 to intercept reported enemy convoy's. They were to proceed to position 33°40'N, 21°14'E at first.
24 November 1941.
'Force B', made up of the light cuisers HMS Naiad (Capt. M.H.A. Kelsey, DSC, RN, flying the flag of Rear-Admiral P.L. Vian, DSO and 2 Bars, RN), HMS Euryalus (Capt. E.W. Bush, DSO, DSC, RN), HMS Ajax (Capt. E.D.B. McCarthy, DSO, RN, flying the flag of Rear-Admiral H.B. Rawlings, OBE, RN), HMS Neptune (Capt. R.C. O'Conor, RN), HMS Galatea (Capt. E.W.B. Sim, RN) and the destroyers HMS Kandahar (Cdr. W.G.A. Robson, DSO, DSC, RN), HMS Kimberley (Cdr. J.S.M. Richardson, DSO, RN), HMS Kingston (Lt.Cdr. P. Somerville, DSO, DSC, RN) and HMS Hotspur (Lt. T.D. Herrick, DSC, RN) departed Alexandria around 0500B/24 to also operate directly against the enemy convoy's.
A cover force, made up of the battleships HMS Queen Elizabeth (Capt. C.B. Barry, DSO, RN, flying the flag of Admiral Sir A.B. Cunningham, GCB, DSO and 2 Bars, RN), HMS Barham (Capt. G.C. Cooke, RN, flying the flag of Vice-Admiral H.D. Pridham-Whippell, KCB, CVO, RN), HMS Valiant (Capt. C.E. Morgan, DSO, RN) and the destroyers HMS Jervis (Capt. P.J. Mack, DSO and Bar, RN), HMS Griffin (Capt. H.St.L. Nicolson, DSO and Bar, RN) and HMS Decoy (Lt.Cdr. J.M. Alliston, RN) departed Alexandria around 1700 hours. They were joined at sea by the escort destroyers HMS Avon Vale (Lt.Cdr. P.A.R. Withers, DSO, RN), HMS Eridge (Lt.Cdr. W.F.N. Gregory-Smith, RN) and HMS Farndale (Cdr. S.H. Carlill, RN). Around 2245 hours these escort destroyers were relieved by the destroyers HMAS Napier (Capt. S.H.T. Arliss, RN), HMAS Nizam (Lt.Cdr. M.J. Clark, RAN), HMS Kipling (Cdr. A. St.Clair Ford, RN), HMS Jackal (Lt.Cdr. R.McC.P. Jonas, DSC, RN) and HMS Hasty (Lt.Cdr. L.R.K. Tyrwhitt, DSC, RN) which came from Alexandria but had not completed fuelling at the time the fleet sailed.
In the meantime the Italian submarine Luigi Settembrini had heard the HE of fast moving ships which was thought to be 'Force K'. This was reported shortly after 0500B/24. Enemy convoy's were then ordered to proceed to the nearest ports.
At 1040B/24, ' Force K ' was informed that an enemy convoy was in position 35°40'N, 22°22'E. Enemy course was 239° at 5 knots.
It appeared likely to Capt. Agnew, Senior Officer ' Force K ', that the enemy from the current position of ' Force K ' and its course would think his ships would be on passage from Malta to Alexandria. Therefore this course was held for as long as possible in order to mislead the enemy in order to avoid the possibility that the convoy would be turning back. Capt. Agnew also thought it wise to attack as late as possible in the day so that the convoy would be further away from Crete and that there would be less daylight left for the enemy to deliver dive-bombing attacks.
At 1310B/24, ' Force K ' altered course to 029° and the ships were spread five miles apart in the order, from left to right, HMS Lively, HMS Penelope, HMS Lance and HMS Aurora. For the next three hours enemy aircraft, mostly He-111's, ere seen apparently ferrying between Greece and Benghasi. These were engaged whenever they provided a suitable target.
At 1524B/24, HMS Lively and HMS Penelope sighted smoke bearing 005° and these reports were quickly followed by ' masts in sight '.
All the ships of ' Force K ' at once altered course to intercept. HMS Aurora and HMS Lance increasing to full speed.
During the approach a number of Ju-88's which had apparently been escorting the convoy, attacked with bombs in shallow dives. These attacks were ineffective.
HMS Penelope was now closing the convoy rapidly. HMS Lively was dropping back to clear Penelope's line of fire and to give her AA protection from an up-sun direction. The two enemy escorts were zig-zagging across the front of the merchant ships laying smoke and firing at HMS Penelope.
As ' Force K ' gradually closed, the enemy escorts made off to the northward, leaving the merchant ships to their fate.
Up to this point the merchant ships had been firing their guns, but when the destroyers left them they stopped engines and abandoned ship.
HMS Penelope then engaged the merchant ships which caught fire quickly and after about ten minutes blew up.
There were no casualties in ' Force K ' but HMS Penelope was holed above the waterline by splinters.
The action took place within 100 miles of Crete and there was over two hours of daylight remaining so at 1630B/24 ' Force K ' retired to the westward at 23 knots.
As there was insufficient fuel remaining in the destroyers for upcoming operations Capt. Agnew decided to retire to Malta to refuel.
One of the enemy convoys, which was en-route from the Aegean to Benghazi, however did not receive the order to return and it was this convoy that was attacked by ' Force K '. Both transports in the convoy, the Maritza (German, 2910 GRT, built 1936) and Procida (German, 1842 GRT, built 1927), were sunk but the two escorts, the Italian torpedo boats Cassiopea and Lupo managed to escape although Cassiopea was damaged by splinters.
25 November 1941.
'Force K' returned to Malta around 0745B/25.
'Force B' meanwhile had set course to conduct a sweep alongt the coast of Cyrenaica during the night of 25/26 November but they sighted nothing.
At 1629B/25, the fleet (cover force) was attacked north-north-east of Sidi Barrani, Egypt in position 32°34'N, 26°24'E by the German uboat U-331 and HMS Barham was hit on the port side by three torpedoes. She quickly rolled over and then a magazine exploded. She quickly sank. The destroyers HMS Jervis, HMS Jackal and HMAS Nizam were left behind to pick up survivors while the fleet continued on to the westward.
26 November 1941.
The fleet (cover force) returned to Alexandria around 1000B/26. The three detached destroyers returned at 1400B/26. A total of 449 survivors had been picked up from HMS Barham.
'Force B' returned to Alexandria around 1800B/26. (45)
27 Nov 1941
' Force B ' made up of the light cruisers HMS Ajax (Capt. E.D.B. McCarthy, DSO, RN, flying the flag of Rear-Admiral H.B. Rawlings, OBE, RN), HMS Neptune (Capt. R.C. O'Conor, RN) and the destroyers HMS Kimberley (Cdr. J.S.M. Richardson, DSO, RN) and HMS Kingston (Lt.Cdr. P. Somerville, DSO, DSC, RN) departed Alexandria 0500B/27 for Malta where they were to join ' Force K ' operating from there.
They were joined for the first part of the passage to Malta by the light cruisers HMS Naiad (Capt. M.H.A. Kelsey, DSC, RN, flying the flag of Rear-Admiral P.L. Vian, DSO and 2 Bars, RN), HMS Euryalus (Capt. E.W. Bush, DSO, DSC, RN) and the destroyers HMS Griffin (Capt. H.St.L. Nicolson, DSO and Bar, RN) and HMS Hotspur (Lt. T.D. Herrick, DSC, RN).
They remained in company until 1650B/27 after which they set course to return to Alexandria while making a sweep along the coast of Cyrenaica. They returned to Alexandria around 0845B/28.
' Force B '; HMS Ajax, HMS Neptune, HMS Kimberley and HMS Kingston arrived at Malta around 0845B/29. (35)
30 Nov 1941
Around ' Force B ' made up of the light cruisers HMS Ajax (Capt. E.D.B. McCarthy, DSO, RN, flying the flag of Rear-Admiral H.B. Rawlings, OBE, RN), HMS Neptune (Capt. R.C. O'Conor, RN) and the destroyers HMS Kimberley (Cdr. J.S.M. Richardson, DSO, RN) and HMS Kingston (Lt.Cdr. P. Somerville, DSO, DSC, RN) and ' Force K ' made up of the light cruisers HMS Aurora (Capt. W.G. Agnew, RN), HMS Penelope (Capt. A.D. Nicholl, RN) and the destroyer HMS Lively (Lt.Cdr. W.F.E. Hussey, DSC, RN) [HMS Lance remained at Malta] departed Malta at 0500B/30 to intercept Italian forces that had been reported in the Ionian Sea.
Around 2330B/30, ' Force K ' was detached with orders to intercept the Italian transport Adriatico (1976 GRT, built 1931) which was en-route, unescorted, from Argostoli (departed 2300B/29) to Benghazi. She was intercepted and sunk around 0315/1 north-east of Benghazi in position 32°52'N, 20°30'E. HMS Lively picked up two officers and nineteen ratings from the steamer. The Italian destroyer Giovanni da Verrazzano was sailed from Tripoli and rescued 66 survivors and also picked up 3 bodies. The hospital ship Aquileja (9322 GRT, built 1914) was also sent to look for survivors
Around 1800B/1, ' Force K ' sighted the Italian tanker Iridio Mantovani (10540 GRT, built 1939) and its escorting destroyer Alvise da Mosto. Soon both ships were sunk with gunfire north-west of Tripoli in position 33°45'N, 12°30'E with HMS Lively picking up survivors. The tanker had already been damaged by air attack.
The tanker Iridio Mantovani had sailed from Taranto at 1500B/26 escorted by the destroyer Alvise Da Mosto (equipped with German S-Gerät) and the torpedo boats Giuseppe Dezza and Enrico Cosenz. They crossed the Strait of Messina and proceeded north of the Sicilian coast to Trapani where they arrived at 0500B/28. Mantovani escorted this time only by Alvise Da Mosto sailed from Trapani at 1335B/30 for Tripoli.
' Force B ' arrived back at Malta around 1815B/1. ' Force K ' returned to Malta around 0730B/2. Both force had not sighted any more of the enemy. (46)
6 Dec 1941
The destroyers HMS Kandahar (Cdr. W.G.A. Robson, DSO, DSC, RN) and HMS Jaguar (Lt.Cdr. L.R.K. Tyrwhitt, DSC, RN) departed Alexandria at 0630B/6 to patrol off Derna during the night of 6/7 December 1941 and then proceed to Malta where they arrived around 0915B/8.
Around 1315B/6, the light cruisers HMAS Hobart (Capt. H.L. Howden, CBE, RAN), HMS Galatea (Capt. E.W.B. Sim, RN), AA cruiser HMS Carlisle (Capt. D.M.L. Neame, DSO, RN) and the destroyers HMS Griffin (Capt. H.St.L. Nicolson, DSO and Bar, RN) and HMS Hotspur (Lt. T.D. Herrick, DSC, RN) departed Alexandria to make rendezvous with the transport HMS Breconshire (9776 GRT, built 1939) which was coming from Malta having departed there around 1700B/5 escorted by the destroyers HMS Kimberley (Cdr. J.S.M. Richardson, DSO, RN) and HMS Kingston (Lt.Cdr. P. Somerville, DSO, DSC, RN). To cover these ships the light cruisers HMS Ajax (Capt. E.D.B. McCarthy, DSO, RN, flying the flag of Rear-Admiral H.B. Rawlings, OBE, RN), HMS Neptune (Capt. R.C. O’Coner, RN) and destroyer HMS Lively (Lt.Cdr. W.F.E. Hussey, DSC, RN) had departed Malta around 2000B/5 and joined with HMS Breconshire, HMS Kimberley and HMS Kingston around 0800B/6.
Around 0700B/7, HMAS Hobart, HMS Galatea, HMS Carlisle, HMS Griffin and HMS Hotspur joined HMS Kingston and HMS Kimberley to escort HMS Breconshire to Alexandria where they arrived around 0445B/8. HMS Ajax, HMS Neptune and HMS Lively then set course to return to Malta where they arrived around 0400B/8.
Later on the 7th both forces were attacked by enemy aircraft several times but no damage was caused. (47)
26 Dec 1941
Convoy ME 8
This convoy departed Malta on 26 December 1941 for Alexandria where it arrived on 29 December 1941.
The convoy was made up of the following transports; Ajax (7797 GRT, built 1931), City of Calcutta (8063 GRT, built 1940), Clan Ferguson (7347 GRT, built 1938) and Sydney Star (11095 GRT, built 1936).
Escort was provided by the light cruisers HMS Ajax (Capt. E.D.B. McCarthy, DSO, RN, flying the flag of Rear-Admiral H.B. Rawlings, OBE, RN), HMS Dido (Capt. H.W.U. McCall, RN) and the destroyers HMS Lance (Lt.Cdr. R.W.F. Northcott, RN), HMS Lively (Lt.Cdr. W.F.E. Hussey, DSC, RN), HMS Arrow (Cdr. A.M. McKillop, RN), HMS Foxhound (Cdr. G.H. Peters, DSC, RN), HMS Gurkha (Cdr. C.N. Lentaigne, RN) and HMAS Nestor (Cdr. A.S. Rosenthal, DSO, RAN).
On the same day the light (AA) cruiser HMS Carlisle (Capt. D.M.L. Neame, DSO, RN) and the destroyers HMAS Napier (Capt. S.H.T. Arliss, RN), HMAS Nizam (Lt.Cdr. M.J. Clark, RAN), HMS Maori (Cdr. R.E. Courage, DSO, DSC and Bar, RN) and HrMs Isaac Sweers (Cdr. J. Houtsmuller, RNN) departed Alexandria. They were to make rendez-vous with the convoy on the 27th but due to bad weather rendez-vous was only made in the morning of the 28th. By then the Dutch destroyer HrMs Isaac Sweers had already left the force on the 27th to return to Alexandria due to weather damage. She arrived at Alexandria on the 28th.
When the two groups met HMS Lance and HMS Lively split off and returned to Malta where they arrived on the 29th.
During the 28th the convoy was attacked several times by German Ju.88’s and Italian torpedo aircraft. The destroyer HMS Maori was damaged by near-misses. There were also some casualties amongst her crew.
The convoy and it’s escort arrived at Alexandria on the 29th less the transport Sydney Star which proceeded to Port Said escorted by HMAS Nizam. The destroyer then arrived at Alexandria on the 30th. (35)
22 Jan 1942
Shortly before 1700 hours, HMS Ajax (Capt. S.L. Bateson, RN), departed Alexandria for Port Said. She was escorted until 2003 hours by the destroyers HMS Hotspur (Lt. T.D. Herrick, DSC, RN) and HrMs Isaac Sweers (Cdr. W. Harmsen, RNN). The destroyers then returned to Alexandria where they arrived later the same day. (48)
23 Jan 1942
Around 1100 hours HMS Ajax (Capt. S.L. Bateson, RN) arrived at Port Said. (48)
21 Nov 1942
HMS Kent (Capt. A.E.M.B. Cunninghame-Graham, RN) and HMS Ajax (Capt. J.J. Weld, MVO, RN) conducted exercises at Scapa Flow. (49)
25 Nov 1942
The battleship HMS Howe (Capt. C.H.L. Woodhouse, CB, RN), escorted by the destroyers HMS Onslow (Capt H.T. Armstrong, DSC, RN), HMS Oribi (Cdr. J.E.H. McBeath, DSO, DSC, RN) and HMS Obedient (Lt.Cdr. D.C. Kinloch, RN), and the heavy cruiser HMS Cumberland (Capt. A.H. Maxwell-Hyslop, AM, RN) and light cruiser HMS Ajax (Capt. J.J. Weld, MVO, RN) conducted exercises off Scapa Flow. (50)
8 Dec 1942
HMS Kent (Capt. A.E.M.B. Cunninghame-Graham, RN, flying the flag of Rear Admiral L.H.K. Hamilton, DSO and Bar, RN) and HMS Ajax (Capt. J.J. Weld, MVO, RN) conducted exercises at Scapa Flow. (51)
15 Dec 1942
The battleship HMS Howe (Capt. C.H.L. Woodhouse, CB, RN), heavy cruiser HMS Kent (Capt. A.E.M.B. Cunninghame-Graham, RN, flying the flag of Rear Admiral L.H.K. Hamilton, DSO and Bar, RN) and light cruiser HMS Ajax (Capt. J.J. Weld, MVO, RN) conducted exercises off Scapa Flow. During the exercises HMS Howe was escorted by the destroyers HMS Matchless (Lt.Cdr. J. Mowlam, DSO, RN) and HMS Relentless (Lt.Cdr. R.A. Fell, RN). (52)
17 Dec 1942
In the afternoon HMS Kent (Capt. A.E.M.B. Cunninghame-Graham, RN, flying the flag of Rear Admiral L.H.K. Hamilton, DSO and Bar, RN) conducted exercises off Scapa Flow.
In the late afternoon HMS Penelope (Capt. G.D. Belben, DSC, AM, RN) also conducted exercises off Scapa Flow.
In the evening night encounter exercises were carried out for which HMS Ajax (Capt. J.J. Weld, MVO, RN) also joined them. (53)
18 Dec 1942
In the afternoon, HrMs O 15 (Lt. A.J. Schouwenaar, RNN) conducted A/S exercises at Scapa Flow with HMCS Iroquois (Cdr. W.B.L. Holms, RCN). HMCS Iroquois was escorting HMS Ajax (Capt. J.J. Weld, MVO, RN) on which HrMs O 15 conducted practice attacks. (54)
31 Dec 1943
HMS Ajax (Capt. J.J. Weld, MVO, RN) and HMS Bellona (Capt. C.F.W. Norris, RN) both conducted gunnery exercises at Scapa Flow.
They then left Scapa Flow and conducted trow off firing exercises in the Pentland Firth. (55)
28 Feb 1944
HMS Caledon (Capt. R.F. Nichols, RN) and HMS Ajax (Capt. J.J. Weld, MVO, RN) conducted rangefinding and inclination exercises (RIX) off Alexandria on completion of which HMS Ajax entered harbour.
HMS Caledon then conducted RIX exercises with the escort destroyers ORP Slazak (Kmdr.ppor. (Cdr.) R. Nalecz-Tyminski) and HMS Catterick (Lt. D.P. Willan, DSC, RN). Following the RIX exercises night encounter exercises were carried out following which they all entered harbour. (56)
26 May 1944
During 26/27 May, HMS Belfast (Capt. F.R. Parham, DSO, RN, flying the flag of flying the flag of Rear-Admiral F.H.G. Dalrymple-Hamilton, CB, RN), HMS Diadem (Capt. E.G.A. Clifford, RN), HMS Argonaut (Capt. E.W.L. Longley-Cook, CBE, RN), HMS Ajax (Capt. J.J. Weld, MVO, RN), HMS Orion (Capt. J.P. Gornall, RN) and HMS Emerald (Capt. F.J. Wylie, RN) conducted exercises off Scapa Flow. These included night exercises. (57)
30 May 1944
The light cruisers HMS Belfast (Capt. F.R. Parham, DSO, RN, flying the flag of flying the flag of Rear-Admiral F.H.G. Dalrymple-Hamilton, CB, RN), HMS Diadem (Capt. E.G.A. Clifford, RN), HMS Argonaut (Capt. E.W.L. Longley-Cook, CBE, RN), HMS Ajax (Capt. J.J. Weld, MVO, RN), HMS Orion (Capt. J.P. Gornall, RN), HMS Emerald (Capt. F.J. Wylie, RN) and the destroyers HMS Grenville (Capt. H.P. Henderson, RN), HMS Ulster (Lt.Cdr. W.S. Donald, DSC and Bar, RN), HMS Undine (Cdr. T.C. Robinson, RN) and HMS Urchin (Lt.Cdr. J.T.B. Birch, DSO, DSC, RN) departed Scapa Flow for the Clyde where they arrived the following day. (58)
3 Jun 1944
Around 1100B/3, 'Bombarding Group E' made up of the light cruisers HMS Belfast (Capt. F.R. Parham, DSO, RN, flying the flag of flying the flag of Rear-Admiral F.H.G. Dalrymple-Hamilton, CB, RN), HMS Diadem (Capt. E.G.A. Clifford, RN) and 'Bombarding Group K' made up of the light cruisers HMS Emerald (Capt. F.J. Wylie, RN), HMS Argonaut (Capt. E.W.L. Longley-Cook, CBE, RN), HMS Ajax (Capt. J.J. Weld, MVO, RN) and HMS Orion (Capt. J.P. Gornall, RN) departed Greenock as part of the invasion force for Operation Neptune, the Normandy landings. They were escorted by the destroyers HMS Grenville (Capt. H.P. Henderson, RN), HMS Ulster (Lt.Cdr. W.S. Donald, DSC and Bar, RN), HMS Undine (Cdr. T.C. Robinson, RN) and HMS Urchin (Lt.Cdr. J.T.B. Birch, DSO, DSC, RN).
They were given the designation of convoy ' G 14 '.
Around 2200B/5, the gunboat HMS Flores (Lt.Cdr. G. Koudijs, RNN) joined 'Bombarding Group E' in position 50°27'N, 01°25'W (south of the Isle of Wight).
Convoy ' G 14 ' was to arrive in their selected position for the landings at 0435B/6.
The two bombarding groups parted company around 0120B/6 to proceed to their respective destinations.
[Further research on these ships exact movements and bombardments during Operation Neptune is required.] (59)
15 Jun 1944
At 0020B/15, HMS Mauritius (Capt. W.W. Davis, RN, flying the flag of Rear-Admiral W.R. Patterson, CB, CVO, RN) weighed anchor to return to the Sword Area where she anchored around 0140B/15.
At 1021B/15, fire was opened on enemy troops. A total of 31 rounds were fired.
At 1205B/15, fire was opened. This was an area bombardment in which 36 rounds were fired.
At 1345B/15, Rear-Admiral W.R. Patterson, CB, CVO, RN, temporary transferred to HMS Ajax (Capt. J.J. Weld, MVO, RN).
At 1400B/15, HMS Mauritius departed the Sword Area for Spithead where she arrived around 1830B/15 to re-ammunition which was completed by 0700B/16. She also fuelled. (60)
16 Jun 1944
Around 1445B/16, HMS Mauritius (Capt. W.W. Davis, RN) departed Spithead for the Sword Area.
Around 1905B/16, HMS Mauritius anchored in the Sword Area.
Around 2000B/16, Rear-Admiral W.R. Patterson, CB, CVO, RN, transferred from HMS Ajax (Capt. J.J. Weld, MVO, RN) to HMS Mauritius. (60)
21 Jun 1944
Around 1215B/21, HMS Mauritius (Capt. W.W. Davis, RN, flying the flag of Rear-Admiral W.R. Patterson, CB, CVO, RN) and HMS Ajax (Capt. J.J. Weld, MVO, RN) departed the operations area for Spithead where they arrived shortly after 1700B/21.
At 1800B/21, Rear-Admiral W.R. Patterson, CB, CVO, RN, struck his flag and he and his staff then left HMS Mauritius. (60)
25 Jan 1945
HMS Ajax (Capt. J.W. Cuthbert, RN) is docked in the floating dock at Alexandria (AFD 5). (61)
27 Jan 1945
HMS Ajax (Capt. J.W. Cuthbert, RN) is undocked. (61)
Sources
- ADM 186/794
- ADM 53/111320 + ADM 53/11203 + ADM 53/113223
- ADM 53/112868 + ADM 53/113068 + ADM 199/380
- ADM 53/111320
- ADM 53/113068 + ADM 199/380
- ADM 199/383
- ADM 199/387
- Report of proceedings of HMAS Vampire for November 1940 + Report of proceedings of the 10th Destroyer Flotilla
- ADM 199/387 + ADM 199/392
- ADM 234/325
- ADM 53/111330 + ADM 53/112926 + ADM 53/113300
- ADM 53/111331 + ADM 53/112927 + ADM 53/113301 + ADM 53/113426
- ADM 53/111331 + ADM 53/112927 + ADM 53/113301 + ADM 199/387
- ADM 53/111331 + ADM 53/113301 + ADM 199/387
- ADM 199/387 + ADM 199/414 + Report of proceedings of HMAS Perth from 27 November 1940 to 31 December 1940
- ADM 53/113526 + Report of proceedings of HMAS Perth for January 1941
- ADM 199/414 + ADM 199/656 + ADM 223/679 + ADM 234/335
- ADM 199/414 + ADM 53/113720
- ADM 199/414
- ADM 53/113527 + Report of proceedings of HMAS Perth for February 1941
- ADM 53/113721 + ADM 53/115234 + Report of proceedings of the 10th Destroyer Flotilla
- ADM 53/113721 + ADM 53/114820
- ADM 53/113527 + ADM 199/414 + Report of proceedings of HMAS Perth for February 1941
- ADM 53/113528 + Report of proceedings of HMAS Perth for March 1941
- ADM 53/113528 + ADM 53/114821 + ADM 199/414 + Report of proceedings of HMAS Perth for March 1941
- ADM 53/113528 + ADM 53/114343 + ADM 53/114821 + ADM 199/414 + Report of proceedings of HMAS Perth for March 1941 + Report of proceedings of HMAS Vendetta for March 1941
- ADM 186/795 + ADM 199/414
- ADM 53/115236 + Report of proceedings of HMAS Perth for April 1941
- Report of proceedings of HMAS Perth for April 1941
- ADM 53/113766 + Report of proceedings of HMAS Perth for April 1941
- ADM 199/414 + ADM 199/656
- ADM 53/113529 + ADM 53/114823 + Report of proceedings of HMAS Perth for May 1941
- ADM 199/414 + 234/320
- ADM 199/679
- ADM 199/415
- ADM 53/113531 + ADM 53/114866 + War diary of HMAS Nizam for July 1941
- ADM 199/415 + Report of proceedings of HMAS Nizam for August 1941
- ADM 199/415 + Report of proceedings of HMAS Hobart for September 1941
- ADM 53/113533 + ADM 53/114778 + ADM 53/115214 + ADM 199/415 + Report of proceedings of HMAS Hobart for September 1941 + Report of proceedings of HMAS Nizam for September 1941
- ADM 53/113533 + ADM 53/114778 + ADM 199/415
- ADM 53/115213 + ADM 199/415
- ADM 53/115215 + ADM 199/415
- ADM 53/115216 + ADM 199/415
- ADM 53/113535 + ADM 53/114780 + ADM 199/415
- ADM 1/12257 + ADM 199/415
- ADM 53/113535 + ADM 53/113536 + ADM 53/113680 + ADM 53/113681 + ADM 53/114780 + ADM 53/114852 + ADM 53/114853 + ADM 199/413 + ADM 199/415
- ADM 53/115217 + ADM 199/415
- ADM 53/115260
- ADM 53/115266 + ADM 53/116117
- ADM 53/115266 + ADM 53/115691 + ADM 53/116071
- ADM 53/115267 + ADM 53/116118
- ADM 53/115267 + ADM 53/116072 + ADM 53/116118
- ADM 53/115267 + ADM 53/116118 + ADM 53/116431
- File 2.12.03.6397 (Dutch Archives, The Hague, Netherlands)
- ADM 53/116865 + ADM 53/117023
- ADM 53/118796 + ADM 53/119031 + ADM 53/119059
- ADM 53/118877 + ADM 53/118967 + ADM 53/119262 + ADM 53/119332
- ADM 53/118877 + ADM 53/118967 + ADM 53/119262 + ADM 53/119332 + ADM 199/1392 + ADM 199/1427
- ADM 53/118968
- ADM 53/119862 + ADM 199/1662
- ADM 53/121025
ADM numbers indicate documents at the British National Archives at Kew, London.