
Allied Warships
HMS Bonaventure (i) (31)
Light cruiser of the Dido class
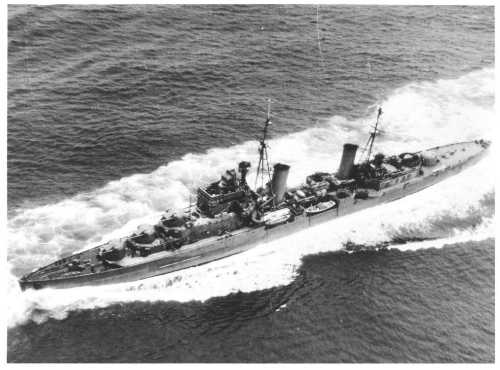
HMS Bonaventure in October 1940
| Navy | The Royal Navy |
| Type | Light cruiser |
| Class | Dido |
| Pennant | 31 |
| Built by | Scotts Shipbuilding & Engineering Co. (Greenock, Scotland) |
| Ordered | 20 Mar 1937 |
| Laid down | 30 Aug 1937 |
| Launched | 19 Apr 1939 |
| Commissioned | 24 May 1940 |
| Lost | 31 Mar 1941 |
| Loss position | 33° 20'N, 26° 35'E |
| History | HMS Bonaventure (Capt. Henry Jack Egerton, RN) was torpedoed and sunk, while escorting convoy GA-8 from Greece to Alexandria, by the Italian submarine Ambra about 100 nautical miles south-south-east of Crete in position 33º20'N, 26º35'E. There were 310 survivors and 139 casualties. |
Commands listed for HMS Bonaventure (i) (31)
Please note that we're still working on this section
and that we only list Commanding Officers for the duration of the Second World War.
| Commander | From | To | |
| 1 | Capt. Henry Jack Egerton, RN | 29 Mar 1940 | 31 Mar 1941 |
You can help improve our commands section
Click here to Submit events/comments/updates for this vessel.
Please use this if you spot mistakes or want to improve this ships page.
Notable events involving Bonaventure (i) include:
The page for this light cruiser was last updated in June 2019.
15 May 1940
At 0800 hours, Bonaventure, was commissioned at Greenock with Capt. H.J. Egerton, RN in command.
Due to a shortage in the supply of the new 5.25" gun turrets, HMS Bonaventure was completed with a starshell gun in the position of the 'X' turret. Her main armament therefore was only 8 5.25" guns. (1)
16 May 1940
HMS Bonaventure (Capt. H.J. Egerton, RN) conducted anchor and D/G trials off Greenock. (1)
22 May 1940
HMS Bonaventure (Capt. H.J. Egerton, RN) conducted gunnery, full power and steering trials in the Clyde area. (1)
24 May 1940
HMS Bonaventure (Capt. H.J. Egerton, RN) conducted full power and steering trials in the Clyde area.
(1)
25 May 1940
HMS Bonaventure (Capt. H.J. Egerton, RN) conducted trials and exercises in the Clyde area.
HMS Bonaventure then went back to the shipyard to have some defects made good. Also there were some problems with the gun turrets. This was not surprising as HMS Bonaventure was the first of her class to be completed. (1)
5 Jul 1940
The British liner Monarch of Bermuda (22424 GRT, built 1931) and the Polish liners Batory (14387 GRT, built 1936) and Sobieski (11030 GRT, built 1939) departed the Clyde for Halifax Canada. They were escorted by the light cruiser HMS Bonaventure (Capt. H.J. Egerton, RN).
At sea they were joined by the battleship HMS Revenge (Capt. E.R. Archer, RN) and the destroyers HMS Havelock (Capt. E.B.K. Stevens, DSC, RN), HMS Hesperus (Lt.Cdr. D.G.F.W. MacIntyre, RN) and HMS Wanderer (Cdr. J.H. Ruck-Keene, RN).
All ships carried gold from the Bank of England for safekeeping in Canada.
They arrived at Halifax on 12 July 1940 except for the Batory which had developed engine defects and was diverted to St. John's escorted by HMS Bonaventure which released her off the harbour and then continued her passage to Halifax. (2)
5 Jul 1940
For the daily position of HMS Bonaventure during the period of 5 to 13 July 1940 see the map below.
13 Jul 1940
HMS Bonaventure (Capt. H.J. Egerton, RN) arrived at Halifax.
At Halifax some repairs were made to defects to her gun turrets. (3)
18 Jul 1940
HMS Bonaventure (Capt. H.J. Egerton, RN) departed Halifax for Scapa Flow.
For the daily position of HMS Bonaventure during the period of 18 to 25 July 1940 see the map below.
(3)
25 Jul 1940
HMS Bonaventure (Capt. H.J. Egerton, RN) arrived at Scapa Flow. (3)
29 Jul 1940
HMS Bonaventure (Capt. H.J. Egerton, RN) conducted working up practices at Scapa Flow. (3)
30 Jul 1940
HMS Bonaventure (Capt. H.J. Egerton, RN) conducted working up practices at Scapa Flow. (3)
3 Aug 1940
HMS Bonaventure (Capt. H.J. Egerton, RN) conducted exercises at Scapa Flow. (4)
5 Aug 1940
HMS Bonaventure (Capt. H.J. Egerton, RN) conducted exercises at Scapa Flow. (4)
7 Aug 1940
During the night of 7/8 August 1940, HMS Bonaventure (Capt. H.J. Egerton, RN), conducted exercises off Scapa Flow. (4)
12 Aug 1940
HMS Bonaventure (Capt. H.J. Egerton, RN) conducted exercises at Scapa Flow. (4)
13 Aug 1940
During the night of 13/14 August 1940, HMS Bonaventure (Capt. H.J. Egerton, RN), conducted exercises off Scapa Flow. (4)
15 Aug 1940
HMS Bonaventure (Capt. H.J. Egerton, RN) and HMS Naiad (Capt. M.H.A. Kelsey, DSC, RN, flying the flag of Rear-Admiral E.L.S. King, CB, MVO, RN) both departed Scapa Flow to patrol off the Faroer Islands to intercept German shipping, relieving HMAS Australia (Capt. R.R. Stewart, RN) and HMS Norfolk (Capt. A.J.L. Phillips, RN). (5)
20 Aug 1940
HMS Bonaventure (Capt. H.J. Egerton, RN) and HMS Naiad (Capt. M.H.A. Kelsey, DSC, RN) both returned to Scapa Flow from patrol. (5)
2 Sep 1940
During the night of 2/3 September 1940, HMS Bonaventure (Capt. H.J. Egerton, RN) and HMS Naiad (Capt. M.H.A. Kelsey, DSC, RN, flying the flag of Rear-Admiral E.L.S. King, CB, MVO, RN), conducted exercises off Scapa Flow. (6)
6 Sep 1940
Operation 'DF', raid on enemy shipping in the Trondheim area.
Around 0845A/6, the following ships departed Scapa Flow for an anti-shipping raid in the Trondheim area; Aircraft carrier HMS Furious (Capt. T.H. Troubridge, RN), battleship HMS Nelson (Capt. G.J.A. Miles, RN, flying the flag of Admiral of the Fleet C.M. Forbes, GCB, DSO, RN), light cruisers HMS Bonaventure (Capt. H.J. Egerton, RN) and HMS Naiad (Capt. M.H.A. Kelsey, DSC, RN, flying the flag of Rear-Admiral E.L.S. King, CB, MVO, RN). They were escorted by the destroyers HMS Somali (Capt. C. Caslon, RN), HMS Tartar (Cdr. L.P. Skipwith, RN), HMS Bedouin (Cdr. J.A. McCoy, DSO, RN), HMS Punjabi (Cdr. J.T. Lean, DSO, RN), HMS Ashanti (Cdr. W.G. Davis, RN), HMS Eskimo (Cdr. St. J.A. Micklethwait, DSO and Bar, RN) and HMS Matabele (Cdr. R.St.V. Sherbrooke, DSO, RN).
The force proceeded to position 62°00'N, 01°00'E which was reached at 0500A/7. HMS Furious then flew of aircraft (nine Skuas of 801 Squadron and twelve Swordfish of 816 and 825 Squadrons) to attack shipping off the Norwegian coast. The aircraft were return to Hatson airfield (Kirkwall) after the raid. One ship was claimed to have been sunk but this can not be confirmed.
The raiding force returned to Scapa Flow around 2000A/7. (5)
8 Sep 1940
HMS Bonaventure (Capt. H.J. Egerton, RN) conducted exercises at Scapa Flow. (6)
9 Sep 1940
HMS Bonaventure (Capt. H.J. Egerton, RN) conducted exercises at Scapa Flow. (6)
13 Sep 1940
The battleship HMS Nelson (Capt. G.J.A. Miles, RN, flying the flag of Admiral of the Fleet C.M. Forbes, GCB, DSO, RN), battlecruiser HMS Hood (Capt. I.G. Glennie, RN, flying the flag of Vice-Admiral W.J. Whitworth, CB, DSO, RN) and the light cruisers HMS Bonaventure (Capt. H.J. Egerton, RN) and HMS Naiad (Capt. M.H.A. Kelsey, DSC, RN, flying the flag of Rear-Admiral E.L.S. King, CB, MVO, RN) proceeded from Scapa Flow to Rosyth. They were escorted HMS Kashmir (Cdr. H.A. King, RN), HMS Kipling (Cdr. A. St. Clair-Ford, RN), HMS Zulu (Cdr. J.S. Crawford, RN), HMS Sikh (Cdr. J.A. Giffard, RN), HMS Somali (Capt. C. Caslon, RN), and HMS Eskimo (Cdr. St. J.A. Micklethwait, DSO and Bar, RN). At sea they were joined by the light cruiser (AA cruiser) HMS Cairo (Capt. P.V. McLaughlin, RN) and destroyers HMS Jackal (Cdr. C.L. Firth, MVO, RN) and HMS Electra (Lt.Cdr. S.A. Buss, MVO, RN). (5)
16 Sep 1940
HMS Bonaventure (Capt. H.J. Egerton, RN) and HMS Naiad Capt. M.H.A. Kelsey, DSC, RN, flying the flag of Rear-Admiral E.L.S. King, CB, MVO, RN) escorted by the destroyers HMS Punjabi (Cdr. J.T. Lean, DSO, RN), HMS Ashanti (Cdr. W.G. Davis, RN) and HMS Tartar (Cdr. L.P. Skipwith, RN) departed Rosyth to intercept a German convoy reported in the North Sea in position 55°20'N, 02°32'E.
This position was later reported to be erroneous and the force returned to Rosyth a few hours after sailing. (5)
23 Sep 1940
HMS Bonaventure (Capt. H.J. Egerton, RN) and HMS Naiad (Capt. M.H.A. Kelsey, DSC, RN) conducted HA gunnery exercises off Rosyth. (5)
23 Sep 1940
HMS Bonaventure (Capt. H.J. Egerton, RN) and HMS Naiad (Capt. M.H.A. Kelsey, DSC, RN) conducted HA gunnery exercises off Rosyth. (5)
30 Sep 1940
HMS Bonaventure (Capt. H.J. Egerton, RN) conducted special trials off Rosyth with aircraft. (5)
4 Oct 1940
HMS Bonaventure (Capt. H.J. Egerton, RN) conducted HA gunnery exercises off Rosyth. During this exercises the aircraft towing the target crashed. HMS Bonaventure picked up the crew from the sea.
HMS Bonaventure, together with HMS Naiad (Capt. M.H.A. Kelsey, DSC, RN, flying the flag of Rear-Admiral E.L.S. King, CB, MVO, RN) then conducted anti-E boat gunnery exercises. (5)
8 Oct 1940
HMS Bonaventure (Capt. H.J. Egerton, RN) and HMS Naiad (Capt. M.H.A. Kelsey, DSC, RN, flying the flag of Rear-Admiral E.L.S. King, CB, MVO, RN) served as targets during gunnery exercises off Rosyth for the battleships HMS Nelson (Capt. G.J.A. Miles, RN, flying the flag of Admiral of the Fleet C.M. Forbes, GCB, DSO, RN) and HMS Rodney (Capt. F.H.G. Dalrymple-Hamilton, RN).
The destroyers HMS Cossack (Capt. P.L. Vian, DSO, RN), HMS Ashanti (Cdr. W.G. Davis, RN), HMS Maori (Cdr. H.T. Armstrong, RN), HMS Sikh (Cdr. J.A. Giffard, RN), HMS Zulu (Cdr. J.S. Crawford, RN), HMS Fame (Cdr. C.A.N. Chatwin, RN), HMS Electra (Lt.Cdr. S.A. Buss, MVO, RN), HMS Brilliant (Lt.Cdr. F.C. Brodrick, RN) and HMS Bulldog (Lt.Cdr. F.J.G. Hewitt, RN) provided an A/S screen for the battleships during the exercises. (7)
16 Oct 1940
The newly constructed battleship HMS King George V (Capt. W.R. Patterson, CVO, RN) was ready to move from the Tyne to Rosyth. To provide escort for this valuable new ship the light cruisers HMS Bonaventure (Capt. H.J. Egerton, RN) and HMS Naiad (Capt. M.H.A. Kelsey, DSC, RN) as well as the destroyers HMS Ashanti (Cdr. W.G. Davis, RN), HMS Maori (Cdr. H.T. Armstrong, RN), HMS Sikh (Cdr. J.A. Giffard, RN), HMS Fame (Cdr. C.A.N. Chatwin, RN), HMS Electra (Lt.Cdr. S.A. Buss, MVO, RN) and HMS Brilliant (Lt.Cdr. F.C. Brodrick, RN) departed Rosyth for the Tyne. The destroyers were to make a high speed run up the river to simulate a strong magnetic field to detonate any possible German magnetic mines. During this run HMS Ashanti and HMS Fame ran hard aground and were heavily damaged. The other ships arrived safely at Rosyth in the afternoon. (5)
19 Oct 1940
HMS Bonaventure (Capt. H.J. Egerton, RN) and HMS Naiad (Capt. M.H.A. Kelsey, DSC, RN) conducted fighter direction trials off Rosyth. (5)
23 Oct 1940
Operations DN 2 and DNU
Anti shipping raids off the Norwegian coast.
The battlecruisers HMS Hood (Capt. I.G. Glennie, RN, flying the flag of Vice-Admiral W.J. Whitworth, CB, DSO, RN), HMS Repulse (Capt. W.G. Tennant, CB, MVO, RN), light cruisers HMS Dido (Capt. H.W.U. McCall, RN), HMS Phoebe (Capt. G. Grantham, RN) escorted by the destroyers HMS Isis (Cdr. C.S.B. Swinley, DSC, RN), HMS Mashona (Cdr. W.H. Selby, RN), HMS Keppel (Lt. R.J. Hanson, RN), HMS Douglas (Cdr.(Retd.) J.G. Crossley, RN) and HMS Bulldog (Lt.Cdr. F.J.G. Hewitt, RN) departed Scapa Flow for exercises in the Pentland Firth. Upon completion of these they took op a position off Obrestad to cover operations DN 2 and DNU.
Further cover was provided by the cruisers HMS Norfolk (Capt. A.J.L. Phillips, RN), HMS Southampton (Capt. B.C.B. Brooke, RN) and HMS Arethusa (Capt. Q.D. Graham, RN) which proceeded to an area off Stadlandet.
For operation DN.2 the light cruisers HMS Bonaventure (Capt. H.J. Egerton, RN) and HMS Naiad (Capt. M.H.A. Kelsey, DSC, RN, flying the flag of Rear-Admiral E.L.S. King, CB, MVO, RN) went to sea from Rosyth.
The destroyers HMS Somali (Capt. C. Caslon, RN), HMS Matabele (Cdr. R.St.V. Sherbrooke, DSO, RN) and HMS Punjabi (Cdr. J.T. Lean, DSO, RN) had departed Sullom Voe on 22 October and were on patrol to the east of the Shetlands. They were ordered to intercept (operation DNU) a group of 20 'German' fishing vessels and a patrol vessel that were reported off Egersund.
These destroyers intercepted and sank the German weather ship WBS 5 / Adolf Vinnen (391 GRT, built 1929) west of Stadlandet in position 62°29'N, 04°23'E on 24 October 1940. This weather ship had been operating north of Iceland and was on the return trip back to Norway.
All ships arrived back at their bases on 24 October 1940. HMS Bonaventure had sustained some damage to her forecastle in the heavy weather conditions (5)
23 Oct 1940
For the daily positions of HMS Bonaventure during 23/24 October 1940 see the map below.
2 Nov 1940
HMS Bonaventure (Capt. H.J. Egerton, RN) completed her repairs at Rosyth. (5)
4 Nov 1940
The battleships HMS Nelson (Capt. G.J.A. Miles, RN, flying the flag of Admiral of the Fleet C.M. Forbes, GCB, DSO, RN) and HMS Rodney (Capt. F.H.G. Dalrymple-Hamilton, RN) and the light cruisers HMS Bonaventure (Capt. H.J. Egerton, RN) and HMS Naiad (Capt. M.H.A. Kelsey, DSC, RN, flying the flag of Rear-Admiral E.L.S. King, CB, MVO, RN) departed the Firth of Forth for full calibre gunnery exercises before these ships were to proceed to Scapa Flow. Due to enemy air activity the exercises were cancelled. Escort for these ships was provided by the destroyers HMS Cossack (Capt. P.L. Vian, DSO, RN), HMS Maori (Cdr. H.T. Armstrong, RN), HMS Matabele (Cdr. R.St.V. Sherbrooke, DSO, RN), HMS Electra (Lt.Cdr. S.A. Buss, MVO, RN), HMS Brilliant (Lt.Cdr. F.C. Brodrick, RN). These were later joined by HMS Punjabi (Cdr. J.T. Lean, DSO, RN) which had come from Scapa Flow. All ships arrived at Scapa Flow the next day with both light cruiser gone ahead of the battleships and destroyers. (5)
5 Nov 1940
Hunt for the German pocket battleship Admiral Scheer after the attack on convoy HX 84.
Timespan: 5 to 23 November 1940.
In response to the attack on convoy HX 84 by the German pocket battleship Admiral Scheer the Admiralty acted quickly.
The battlecruisers HMS Hood (Capt. I.G. Glennie, RN, flying the flag of Vice-Admiral W.J. Whitworth, CB, DSO, RN), HMS Repulse (Capt. W.G. Tennant, CB, MVO, RN), light cruisers HMS Naiad (Capt. M.H.A. Kelsey, DSC, RN, flying the flag of Rear-Admiral E.L.S. King, CB, MVO, RN), HMS Phoebe (Capt. G. Grantham, RN), HMS Bonaventure (Capt. H.J. Egerton, RN) and the destroyers HMS Somali (Capt. C. Caslon, RN), HMS Eskimo (Cdr. St. J.A. Micklethwait, DSO and Bar, RN), HMS Mashona (Cdr. W.H. Selby, RN), HMS Matabele (Cdr. R.St.V. Sherbrooke, DSO, RN), HMS Punjabi (Cdr. J.T. Lean, DSO, RN) and HMS Electra (Lt.Cdr. S.A. Buss, MVO, RN) departed Scapa Flow at 2330A/5 to proceed to the last reported position of the German pocket battleship 52°50'N, 32°15'W at 2003A/5.
At 1050A/6 the force split up; HMS Hood, HMS Naiad, HMS Phoebe, HMS Somali, HMS Eskimo and HMS Punjabi proceeded to patrol off the Bay of Biscay to cover the approaches to Brest and Lorient.
HMS Repulse, HMS Bonaventure, HMS Mashona, HMS Matabele and HMS Electra towards the Admiral Scheer's last known position.
At 0700A/6 the battleships HMS Nelson (Capt. G.J.A. Miles, RN, flying the flag of Admiral of the Fleet C.M. Forbes, GCB, DSO, RN) and HMS Rodney (Capt. F.H.G. Dalrymple-Hamilton, RN), light cruiser HMS Southampton (Capt. B.C.B. Brooke, RN) and the destroyers HMS Cossack (Capt. P.L. Vian, DSO, RN), HMS Maori (Cdr. H.T. Armstrong, RN), HMS Brilliant (Lt.Cdr. F.C. Brodrick, RN), HMS Douglas (Cdr.(Retd.) J.G. Crossley, RN), HMS Keppel (Lt. R.J. Hanson, RN) and HMS Vimy (Lt.Cdr. D.J.B. Jewitt, RN) departed Scapa Flow to cover the patrols in the Iceland-Faroes Channel.
Shortly before midnight during the night of 6/7 November HMS Rodney was detached to escort to escort convoy HX 83 and once this convoy was safe, HX 85 from Halifax.
Three armed merchant cruisers, which were on patrol were recalled to port on the 8th. These were HMS Chitral (Capt.(Retd.) G. Hamilton, RN), which was to the northwest of Iceland and HMS California (Capt. C.J. Pope, RAN) and HMS Worcestershire (A/Capt. J. Creswell, RN), which were to the south of Iceland. The light cruiser HMS Southampton was ordered to take over the place of HMS Chitral. She split off from HMS Nelson at 1600A/8. HMS Worcestershire joined HMS Nelson and her escorting destroyers around 1500A/9.
There were also the destroyers HMS Churchill (Cdr.(Retd.) G.R. Cousins, RN), HMS Lewes (Lt.Cdr. J.N.K. Knight, RN), HMS Lincoln (Cdr. A.M. Sheffield, RN) and HMS Ludlow (Cdr. G.B. Sayer, RN). They were en-route to the U.K. and had departed Halifax on 31 October and refuelled at St. Johns on 3 November. After receiving distress signals from ships in convoy HX 84 they rushed to the reported location. The only thing they found was an empty lifeboat. They then continued their Atlantic crossing and arrived at Londonderry on 9 November.
The destroyer HMS Stanley (A/Lt.Cdr. R.B. Stannard, VC, RNR) had departed Halifax on 1 November and St. Johns on 5 November. Now she and the Canadian destroyer HMCS St.Francis (Lt.Cdr. H.F. Pullen, RCN) escorted convoy HX 85, which had been recalled, back to Nova Scotia.
On 8 November, after machinery defects had been repaired, the heavy cruiser HMAS Australia (Capt. R.R. Stewart, RN) departed the Clyde to protect convoys.
The battlecruiser HMS Renown (Capt C.E.B. Simeon, RN) and the destroyers HMS Encounter (Lt.Cdr. E.V.St J. Morgan, RN), HMS Forester (Lt.Cdr. E.B. Tancock, RN) and HMS Gallant (Lt.Cdr. C.P.F. Brown, RN) departed Gibraltar at 0500A/6 to provide cover for convoys HG 46 and SL 53.
At 1225A/6, off Cape St Vincent, the submarine HMS Utmost (Lt. J.H. Eaden, DSC, RN) was identified as enemy by HMS Encounter which then rammed the submarine which was en-route to Gibraltar. HMS Encounter was escorted to Gibraltar by HMS Forester. They arrived at 0800A/7.
On 11 November, HMAS Australia relieved Renown from covering convoy HG 46 and Renown arrived back at Gibraltar around 1515A/12. Renown had been joined at 0807A/12 by the destroyers HMS Duncan (Cdr. A.D.B. James, RN) and HMS Forester.
Aircraft carrier HMS Argus (Capt. E.G.N. Rushbrooke, DSC, RN), light cruiser HMS Despatch (Commodore 2nd cl. C.E. Douglas-Pennant, DSC, RN) and the destroyers HMS Verity (Cdr. R.H. Mills, RN), HMS Vesper (Lt.Cdr. W.F.E. Hussey, DSC, RN) and HMS Windsor (Lt.Cdr. G.P. Huddart, RN) departed the Clyde on 7 November for Gibraltar and were also ordered to keep a look out for the German pocket battleship. The destroyers were later detached; HMS Windsor around 0100A/9 and HMS Verity and HMS Vesper around 0600A/9. HMS Despatch was detached at 1000A/13 and proceeded to Gibraltar where she arrived around noon the next day. Shortly before HMS Despatch was detached the destroyers HMS Wishart (Cdr. E.T. Cooper, RN) and HMS Wrestler (Lt. E.L. Jones, DSC, RN) had joined followed later in the day by HMS Vidette (Lt. E.N. Walmsley, RN). HMS Argus, HMS Vidette, HMS Wishart and HMS Wrestler arrived at Gibraltar very late on the 14th.
Battlecruiser HMS Repulse escorted by the destroyers HMS Matabele and HMS Electra arrived at Scapa Flow for refuelling around 1100A/11.
Light cruiser HMS Bonaventure and destroyer HMS Mashona arrived at Scapa Flow around 1130A/11 for refuelling.
Battlecruiser HMS Hood, light cruisers HMS Naiad, HMS Phoebe and the destroyers HMS Somali, HMS Eskimo and HMS Punjabi returned to Scapa Flow around 1400A/11 for refuelling. HMS Eskimo had suffered weather damage to her asdic dome and had some forecastle deck plates buckled. She was docked for repairs in the floating drydock at Scapa Flow from 13 to 16 November. HMS Phoebe had also sustained weather damage for which she was later taken in hand for repairs at Glasgow.
After fuelling HMS Bonaventure departed Scapa Flow at 2300A/11 to continue to search for survivors from convoy HX 84. Armed merchant cruiser HMS Chitral was also back at sea to search for survivors. She had departed from Reykjavik, Iceland around 2330A/10.
HMS Bonaventure returned to Scapa Flow on the 19th with weather damage.
The armed merchant cruiser HMS Letitia (A/Capt. E.H. Longsdon, RN) departed the Clyde around 1300A/11 for the Northern Patrol.
HMS Repulse, HMS Naiad departed Scapa Flow around 1330A/12 for patrol and also to provide cover for ships of the Northern Patrol. They were escorted by the destoyers HMS Sikh (Cdr. G.H. Stokes, RN), HMS Mashona, HMS Matabele and HMS Punjabi.
HMS Naiad parted company on the 13th to proceed to Jan Mayen Island where a German weather / wireless station in Jameson Bay was to be raided.
HMS Repulse returned to Scapa Flow at 0015A/19 being escorted by the destroyers HMS Ashanti (Cdr. W.G. Davis, RN), HMS Mashona and HMS Matabele. They had provided cover for HMS Naiad during her raid on Jan Mayen Island.
The battleship HMS Nelson arrived at Scapa Flow around 1630A/13 escorted by the destroyers Maori, HMS Beagle (Lt.Cdr. R.H. Wright, RN), HMS Bulldog (Lt.Cdr. F.J.G. Hewitt, RN) and Keppel.
Battleship HMS Rodney only arrived at Scapa Flow around 1500A/23. She had been joined at dawn the previous day by the destroyers HMS Beagle, HMS Brilliant, HMS Bulldog and HMS Electra. (5)
5 Nov 1940
For the daily positions of HMS Bonaventure during the period 5/11 November 1940 see the map below.
11 Nov 1940
HMS Bonaventure (Capt. H.J. Egerton, RN) returned to Scapa Flow late in the morning for refuelling.
Late in the evening she departed again for the position where convoy HX 84 had been attacked by the German pocket battleship Admiral Scheer to search for survivors to the limit of her endurance.
For the daily positions of HMS Bonaventure during the period of 11/19 November 1940 see the map below.
(5)
19 Nov 1940
HMS Bonaventure (Capt. H.J. Egerton, RN) returned to Scapa Flow. (5)
23 Nov 1940
HMS Bonaventure (Capt. H.J. Egerton, RN) shifted from Scapa Flow to Rosyth for alterations and repairs. (8)
3 Dec 1940
HMS Bonaventure (Capt. H.J. Egerton, RN) is docked in No.1 graving dock at the Rosyth Dockyard. (9)
13 Dec 1940
HMS Bonaventure (Capt. H.J. Egerton, RN) is undocked. (9)
16 Dec 1940
HMS Bonaventure (Capt. H.J. Egerton, RN) departed Rosyth for the Clyde. (5)
17 Dec 1940
En-route from Rosyth to the Clyde, HMS Bonaventure (Capt. H.J. Egerton, RN), conducted gunnery exercises in Pentland Firth. (5)
18 Dec 1940
HMS Bonaventure (Capt. H.J. Egerton, RN) arrived at the Clyde. (5)
18 Dec 1940
Convoy WS 5A and the attack by the German heavy cruiser Admiral Hipper
This convoy departed U.K. ports on 18/19 December 1940. Destination for the majority of the convoy was Suez where the convoy arrived on 16 February 1941.
On 17 December 1940 the transport Rangitiki (British, 16698 GRT, built 1929) departed Avonmouth. She was escorted by HMS Kipling (Cdr. A. St. Clair-Ford, RN) towards the rendezvous position.
On 18 December 1940 the following troop transports / transports departed Liverpool, they formed WS 5A slow; Anselm (British, 5954 GRT, built 1935), Atreus (British, 6547 GRT, built 1911), Bhutan (British, 6104 GRT, built 1929), City of Canterbury (British, 8331 GRT, built 1922), City of London (British, 8956 GRT, built 1907), Delane (British, 6054 GRT, built 1938), Elizabethville (Belgian, 8351 GRT, built 1922), Menelaus (British, 10307 GRT, built 1923), Orbita (British, 15495 GRT, built 1915), Settler (British, 6202 GRT, built 1939) and Tamaroa (British, 12405 GRT, built 1922). They were escorted by the destroyers HMS Witherington (Lt.Cdr. J.B. Palmer, RN), HMS Witch (Lt.Cdr. J.R. Barnes, RN), sloop HMS Wellington (Cdr. I.H. Bockett-Pugh, RN) and the corvettes HMS Clematis (Cdr. Y.M. Cleeves, DSO, DSC, RD, RNR), HMS Jonquil (Lt.Cdr. R.E.H. Partington, RNR), HMS Cyclamen (Lt. H.N. Lawson, RNR) and HMS Geranium (T/Lt. A. Foxall, RNR).
On 18 December 1940 the following troop transports / transports departed from the Clyde; Costa Rica (Dutch, 8055 GRT, built 1910), Ernebank (British, 5388 GRT, built 1937), Leopoldville (Belgian, 11509 GRT, built 1929) and Neuralia (British, 9182 GRT, built 1912). Ernebank was however forced to return around 1800 hours on the 21st escorted by HMS Witch and HMS St. Mary’s. On the 22nd, HMS Wellington, was detached to take over the escort of the Ernebank. They were escorted by the anti-aircraft cruiser HMS Cairo (Capt. P.V. McLaughlin, RN) and the destroyers HMS Bath (Cdr.(Retd.) A.V. Hemming, RN), HMS St. Marys (Lt. K.H.J.L. Phibbs, RN), HMS St. Albans (Lt.Cdr.(Emgy.) S.G.C. Rawson, RN), HMS Worcester (Lt.Cdr. E.C. Coats, RN).
On 18 December 1940 the following troop transports / transports departed from Lough Foyle (Belfast); City of Derby (British, 6616 GRT, built 1921) and Stentor (British, 6148 GRT, built 1926). They were escorted by the destroyer HMS Venomous (Lt.Cdr. J.E.H. McBeath, RN).
The slow part of the convoy was met around dawn on the 19th by the light cruiser HMS Bonaventure (Capt. H.G. Egerton, RN) and the destroyers HMS Vesper (Lt.Cdr. W.F.E. Hussey, DSC, RN), HMS Harvester (Lt.Cdr. M. Thornton, RN) and HMS Highlander (Cdr. W.A. Dallmeyer, RN).
Around 2300/21 all destroyers parted company with the slow part of the convoy.
On 19 December 1940 the following troop transports / transports departed Liverpool, they formed WS 5A fast; Clan MacDonald (British, 9653 GRT, built 1939), Essex (British, 13655 GRT, built 1936) and Northern Prince (British, 10917 GRT, built 1929).
On 19 December 1940 the following troop transports / transports departed from the Clyde; Adviser (British, 6348 GRT, built 1939), Arabistan (British, 5874 GRT, built 1929), Barrister (British, 6348 GRT, built 1939), Benrinnes (5410 GRT, built 1921), Clan Cumming (British, 7264 GRT, built 1938), Empire Song (British, 9228 GRT, built 1940) and Empire Trooper (British, 14106 GRT, built 1922).
Escort for the fast section of convoy WS 5A joined around dawn on the 20th and was provided by the aircraft carrier HMS Argus (Capt. E.G.N. Rushbrooke, DSC, RN), light cruiser HMS Naiad (Capt. M.H.A. Kelsey, DSC, RN, flying the flag of Rear-Admiral E.L.S. King, CB, MVO, RNRN), destroyers HMCS Ottawa (Cdr. E.R. Mainguy, RCN), HMCS St. Laurent (Lt. H.S. Rayner, RCN) and Piorun (Cdr. E.J.S. Plawski) which came from the Clyde. And also by the destroyers HMS Highlander, HMS Harvester and FSS Le Triomphant (Cdr. P.M.J.R. Auboyneau) which came from Londonderry. The first two of these destroyers had fuelled there after escorting the slow part of the convoy for a while. Also the aircraft carrier HMS Furious (Capt. A.G. Talbot, DSO, RN) (with fighters embarked for Takoradi) and the destroyers HMS Beverley (Cdr.(Retd.) E.F. Fitzgerald, RN), HMS Kelvin (Cdr. J.H. Allison, DSO, RN) and HMS Kipling joined from Liverpool.
The destroyers of the fast portion of the convoy were detached during the night of 21/22 December 1940.
At dawn on 23 December 1940 the slow and fast part of the convoy made rendez-vous and proceeded in company.
On the 24th, HMS Naiad parted company to return to the U.K. The heavy cruiser HMS Berwick (Capt. G.L. Warren, RN) and the light cruiser HMS Dunedin (Capt. R.S. Lovatt, RN) both joined the escort of the convoy.
At dawn on the 25th the convoy was attacked by the German heavy cruiser Admiral Hipper. She had made contact with the convoy with radar the previous day and had already made a torpedo attack shortly before 0400/25 but no hits had been obtained nor had the attack been noticed by the British.
Then shortly after 0800/25 she made visual contact with the convoy and it came as a surprise to the Germans to sight HMS Berwick.
Around 0830 hours the Germans opened fire on HMS Berwick but due to the bad visibility she soon shifted target to the troopship Empire Trooper which was not in her assigned station. The troopship was slightly damaged as was the merchant vessel Arabistan.
The convoy was ordered to scatter and HMS Berwick and HMS Bonaventure both engaged the German cruiser as did the corvette Cyclamen briefly.
Meanwhile HMS Dunedin laid a smokescreen to cover the ships of the convoy. HMS Furious flew off a few aircraft but these failed to find the German cruiser in the bad visibility.
HMS Berwick was damaged by gunfire from the German cruiser but she forced, together with HMS Bonaventure, the enemy to break off the action around 0915 hours.
In the evening HMS Boneventure was detached to search for the damaged Empire Trooper.
On the 28th the convoy was reassembled at sea (minus Empire Trooper which was ordered to proceed to Gibraltar via the Azores) and continued on to Freetown where it arrived on 5 January 1941.
------------------------------------------------------------------------------------------------------
The convoy departed Freetown for South Africa on 8 January.
The convoy was now made up of the (troop) transports; Adviser, Anselm, Arabistan, Atreus, Barrister, Benrinnes, Bhutan, City of Canterbury, City of Derby, City of London, Costa Rica, Delane, Elisabethville, Empire Ability (British, 7603 GRT, built 1931), Menelaus, Neuralia, Orbita, Rangitiki, Settler, Stentor and Tamaroa.
On departure from Freetown the convoy was escorted by the aircraft carrier HMS Formidable (Capt. A.W.La T. Bisset, RN, flying the flag of Rear-Admiral W.F. Wake-Walker CB, OBE, RN), heavy cruisers HMS Dorsetshire (Capt. B.C.S. Martin, RN), HMS Hawkins (Capt. H.P.K. Oram, RN), destroyers HMS Velox (Lt.Cdr. E.G. Roper, DSC, RN), HMS Vidette (Lt. E.N. Walmsley, RN), sloops HMS Milford (Cdr. (Retd.) the Hon. V.M. Wyndham-Quin, RN), HMS Bridgewater (A/Cdr. (Retd.) H.F.G. Leftwich, RN) and the corvettes HMS Asphodel (Lt.Cdr.(Retd.) K.W. Stewart, RN) and HMS Calendula (Lt.Cdr. A.D. Bruford, RNVR).
At 0700N/9, the heavy cruiser HMS Norfolk (Capt. A.J.L. Phillips, RN) joined the convoy. She had also departed Freetown around the same time as the convoy but apparently acted independently until the time she joined the convoy.
At 0600N/10, HMS Formidable, HMS Dorsetshire, HMS Norfolk, HMS Velox and HMS Vidette parted company with the convoy. At the same time the heavy cruiser HMS Devonshire (Capt. R.D. Oliver, DSC, RN) joined.
It appears that HMS Bridgewater, HMS Milford, HMS Asphodel and HMS Calendula parted company on 12 January.
At 1000B/21, the heavy cruiser HMS Shropshire (Capt. J.H. Edelsten, RN) joined the convoy and HMS Devonshire parted company.
At 1600B/22, HMS Hawkins parted company with the convoy taking the transports Anselm and City of Canterbury to Capetown where they arrived on 23 January.
The remainder of the convoy arrived at Durban on 25 January 1941 escorted by HMS Shropshire.
------------------------------------------------------------------------------------------------------
The convoy departed Durban for Suez on 29 January 1941. It was now made up of the transports, Adviser, Anselm, Arabistan, Atreus, Barrister, Benrinnes, Bhutan, City of Canterbury, City of Derby, City of London, Costa Rica, Delane, Elisabethville, Empire Ability, Menelaus, Neuralia, Nieuw Holland (Dutch, 11066 GRT, built 1927), Orbita, Rangitiki, Settler, Stentor, Talamba (British, 8018 GRT, built 1924) and Tamaroa.
They were escorted by the heavy cruiser HMS Shropshire and the light cruiser HMS Ceres (Capt. E.G. Abbott, AM, RN).
Around 0800B/30, HMS Shropshire was relieved by the light cruiser HMS Enterprise (Capt. J.C. Annesley, DSO, RN).
In the morning of 31 January the transport Delane parted company with the convoy to return to Durban due to engine defects.
At 1000CD(-3.5)/4, HMS Ceres parted company taking the transports Nieuw Holland and Orbita with her to Kilindini / Mombasa where they arrived on 5 February.
At 1440CD/5, the armed merchant cruiser HMS Hector (Capt.(Retd.) F. Howard, DSC, RN) joined.
At 1500CD/5, the light cruiser HMS Capetown (Capt. P.H.G. James, RN) joined.
At 0430CD/6, HMS Capetown parted company with the convoy having been ordered to do so.
At 1730CD/10, HMS Enterprise parted company with the convoy to fuel at Aden. She rejoined the convoy around 2130C/11.
Around 0630C/11, the convoy was joined by the light cruiser HMS Caledon (Capt. C.P. Clarke, RN) and the sloops HMS Flamingo (Cdr. J.H. Huntley, RN) and HMIS Indus (Cdr. E.G.G. Hunt, RIN). HMS Hector then parted company with the convoy.
At 2300C/11, HMIS Indus parted company with the convoy upon being relieved by the sloop HMS Grimsby (Cdr. K.J. D'Arcy, RN).
At 1830C/13, HMS Flamingo parted company with the convoy to return to Aden and HMS Grimsby parted company with the convoy taking the transport Neuralia with her to Port Sudan.
At 0400C/14, HMS Enterprise parted company with the convoy.
The convoy escorted by HMS Caledon arrived at Suez on 16 February 1941. (10)
19 Dec 1940
For the daily position of HMS Bonaventure during the period of 19/29 December 1940 see the map below.
25 Dec 1940
Operations by 'Force H' following the attack by the German heavy cruiser Admiral Hipper on convoy WS 5A.
[For more info on convoy WS 5A on the first leg of her passage, it's composition, and the attack by the German cruiser Admiral Hipper see the event ' Convoy WS 5A and the attack by the German heavy cruiser Admiral Hipper ' for 18 December 1940 on for instance the page of HMS Berwick.]
25 December 1940.
At 1020/25 an enemy report of a pocket battleships (later corrected to an 8" cruiser), in position 43°59'N, 25°08'W, was received from HMS Berwick (Capt. G.L. Warren, RN). Vice-Admiral Somerville immediately ordered 'Force H' (less HMS Malaya) to come to one hour's notice for full speed. Twenty minutes later, instructions were received from the Admiralty for 'Force H' to raise steam with all despatch, and shortly afterwards for the force to proceed to sea.
Ships commenced to leave Gibraltar at 1315 hours and by 1430 hours; battlecruiser HMS Renown (Capt. C.E.B. Simeon, RN, flying the flag of Vice-Admiral J.F. Somerville, KCB, DSO, RN), aircraft carrier HMS Ark Royal (Capt. C.S. Holland, RN), light cruiser HMS Sheffield (Capt. C.A.A. Larcom, RN) and the destroyers HMS Faulknor (Capt. A.F. de Salis, RN), HMS Firedrake (Lt.Cdr. S.H. Norris, DSO, DSC, RN), HMS Fortune (Lt.Cdr. E.N. Sinclair, RN), HMS Foxhound (Lt.Cdr. G.H. Peters, DSC, RN), HMS Duncan (A/Capt. A.D.B. James, RN), HMS Hero (Cdr. H.W. Biggs, DSO, RN), HMS Hereward (Lt.Cdr. C.W. Greening, RN) and HMS Wishart (Cdr. E.T. Cooper, RN), were clear of the harbour and on a Westerly course.
Course was set to position 37°00'N, 16°00'W as this was considered to be the best position to either cover the convoy or assist in the hunt for the enemy. Vice-Admiral Somerville reported to the Admiralty that 'Force H' was proceeding to this position at high speed with eight destroyers, who would remain in company or follow, depending on the weather.
At 1500/25 a signal was received from the Admiralty ordering the convoy and escort to proceed to Gibraltar. At this time Vice-Admiral Somerville was not aware - nor apparently were the Admiralty - that the convoy had scattered. As there now appeared little chance to bringing the raider to action. Vice-Admiral Somerville decided to join the convoy and reported accordingly to the Admiralty. Weather conditions enabled the destroyers to remain in company at 27 knots.
An hour later a further signal was received from the Admiralty directing the convoy to pass through positions 41°00'N, 19°00'W and 37°00'N, 16°00'W. These instructions were only passed to HM Ships, all of whom, it was subsequently learnt, were out of touch with the scattered convoy.
In view of the low endurance of HMS Wishart, she was detached at 1845/25 with instructions to follow at economical speed and join the convoy during daylight on December, 27th in position 37°00'N, 16°00'W.
The first indication that the convoy had scattered was received at 2000/25 when HMS Dunedin (Capt. R.S. Lovatt, RN) reported that she had met the City of Canterbury who was proceeding to the convoy Commodore's Noon/26 rendez-vous.
Shortly after this reported a report was received from the corvette HMS Clematis confirming that the Commodore had ordered to convoy to scatter, it also stated that the troopship Empire Trooper was damaged, believed slightly.
At 2200/25, general instructions to all units were received from the Admiralty, still acting on the assumption that escort and convoy were in company. 'Force H' was directed to rendez-vous with HMS Berwick and escort the convoy until 'Force K' (aircraft carrier HMS Formidable (Capt. A.W.La T. Bisset, RN) and heavy cruiser HMS Norfolk (Capt. A.J.L. Phillips, RN) joined. 'Force K' was then to escort the main body of the convoy to Freetown, whilst 'Force H', with aircraft carrier HMS Argus (Capt. E.G.N. Rushbrooke, DSC, RN) and light cruisers HMS Bonaventure (Capt. H.G. Egerton, RN) and HMS Dunedin escorted the 'Operation Excess' section to Gibraltar. The damaged heavy cruiser HMS Berwick was to proceed to the U.K. if fit for passage. It also directed that if needed the upcoming 'Operation Excess' could be postponed for 24 hours.
26 December 1940.
At 0200/26 a signal was received from the Admiralty stating that the convoy had scattered and that the ships were most likely proceeding to one of the following positions; the Commodore's noon/26 rendezvous; position 41°00'N, 19°00'W; or direct to Gibraltar. Vice-Admiral Somerville was ordered to take charge.
As he was unaware of the position of 'Force K' he ordered the Senior Officer 'Force K' to report his position, course, speed and intention. Later the aircraft carrier HMS Furious (Capt. A.G. Talbot, DSO, RN) was also ordered to report similarly. All units were informed of the position, course and speed of 'Force H'.
No further news had been received regarding the damaged troopship Empire Trooper. At 0801/26, Vice-Admiral Somerville, ordered the armed merchant cruiser HMS Derbyshire (Capt.(Retd.) E.A.B. Stanley, DSO, MVO, RN) to proceed to her assistance.
At 1100/26, the situation was still obscure. No reply had been received from 'Force K' and HMS Furious. HMS Bonaventure had just reported that she was proceeding to the assistance of the corvette HMS Cyclamen (Lt. H.N. Lawson, RNR). Ships of the convoy were apparently scattered over a wide area, each making for one of three different positions. Visibility to the westward was apparently very low. Vice-Admiral Somerville therefore requested the Admiralty to broadcast instructions on commercial wave to ships of the convoy to proceed to position 37°00'N, 16°00'W. He also informed the Admiralty that it was his intention to have HMS Derbyshire to take over from HMS Bonaventure to enable Bonaventure to proceed to Gibraltar for 'Operation Excess'.
'Force K' and HMS Furious reported between 1200 and 1300/26. 'Force K' was intending to collect the convoy at the Commodor's noon/26 rendez-vous and escort them to 37°00'N, 16°00'W. HMS Furious reported that she was in company with HMS Argus so as to reach position 37°00'N, 16°00'W at 1300/27. Also it was reported that she needed to refuel at Gibraltar before she could proceed to Freetown.
A reconnaissance of nine aircraft was flow off by HMS Ark Royal at 1300 hours in position 38°23'N, 15°45'W but nothing was sighted by these aircraft.
A report from HMS Bonaventure was received at 1630/26. She had intercepted the German merchant ship Baden (8204 GRT, built 1922) in position 44°00'N, 25°07'W. The German ship could not be boarded in the foul weather and the Germans had also set it on fire. HMS Bonaventure sank the German ship with a torpedo. She also stated that she had not yet sighted the Empire Trooper.
The situation at 1700/26 was as follows; the approximate position of all H.M. Ships in the area was known (except for the corvettes). HMS Cyclamen, with her W/T out of action, was believed to be standing by the Empire Trooper, and it appeared probable that the three remaining corvettes (HMS Jonquil (Lt.Cdr. R.E.H. Partington, RNR), HMS Clematis (Cdr. Y.M. Cleeves, DSO, DSC, RD, RNR) and HMS Geranium (T/Lt. A. Foxall, RNR)) had proceeded to Ponta Delgada to fuel. Only one merchant ship had been located. The City of Canterbury, in company with HMS Dunedin. Whilst the situation of the Empire Trooper caused some anxiety priority was given to assist in rounding up and covering the remainder of the convoy which might be making for position 37°00'N, 16°00'W.
At 1720/26, all units were instructed to act as follows; 'Force H' was to maintain position between the northern and southern appoaches to position 37°00'N, 16°00'W. 'Force K' was to continue to search for ships passing through position 39°08'N, 21°38'W. HMS Furious was to arrive in position 37°00'N, 16°00'W at 1400/27, searching to the north and east for ships proceeding direct to Gibraltar. HMS Berwick was to search to the north and west of position 37°00'N, 16°00'W, during the forenoon of December, 27th. She was to make rendez-vous with 'Force H' at 1400/27. HMS Dunedin was also to make rendez-vous with 'Force H' at 1400/27. All ships were directed to report at 2200/26 and 1200/27 the number of merchant ships in company.
The 2200 reports received indicated that only three merchant ships had been located, two by 'Force K' and one by HMS Dunedin. Both HMS Norfolk and HMS Dunedin reported to be getting low on fuel. At the same time HMS Berwick reported to the Admiralty that she had to proceed to Gibraltar to make good underwater damage, to free 'X' turret and to fuel.
27 December 1940.
At 0145/27 the Admiralty informed Vice-Admiral Somerville that further steps were required to locate the Empire Trooper who had 2500 troops on board. In view of the existing fuel situation and the necessity for providing air reconnaissance to locate the damaged ship and as there were no further indications of the precense of the enemy cruiser Vice-Admiral Somerville decided to proceed with HMS Renown and HMS Ark Royal to locate the Empire Trooper, whose last known position was some 600 nautical miles to the north-west. This nescessitated dropping the screening destroyers. Vice-Admiral Somerville therefore informed the Admiralty accordingly and directed 'Force K' to take charge of operations in connection to the convoy. At the same time Vice-Admiral Somerville instructed HMS Derbyshire to report her position, course and speed, and ordered HMS Clematis to report the position of the corvettes and to provide any further information regarding the condition of the Empire Trooper.
HMS Renown and HMS Ark Royal proceeded at 22 knots, later increasing to 24 knots, to the north-westward, with the intention of locating the Empire Trooper by air after daylight the following morning.
At 0800/27, Vice-Admiral Somerville ordered HMS Cyclamen, if still in touch with the Empire Trooper, to report her position, course and speed and also requested the Admiralty to order the Empire Trooper herself to report her position.
Two hours later, HMS Clematis reported that she had sighted the Empire Trooper through the mist half an hour after the latter had been hit in No.1 hold. The transport was then steaming 13 knots and damage was not believed to be serious. Owning to low visibility the other corvettes had not been located. Shortly after this HMS Derbyshire reported her position, course and speed at 1000/27 and added that visibility was half a mile.
In view of the low visibility prevailing, which would preelude air reconnaissance, and of the encourageing report from HMS Clematis of Empire Trooper's condition, it appeared to Vice-Admiral Somerville doubtful wheter the presence of HMS Renown and HMS Ark Royal would serve any useful purpose. Whilst so far to the northward they were unable to afford any protection to the remaining ships of the convoy, whose escorts in some cases were running short of fuel. Furtherm to remain in this position would inevitably result in delay in carrying out the upcoming 'Operation Excess'. Vice-Admiral Somerville there proposed to the Admiralty that HMS Derbyshire should remain in the vicinity of the Empire Trooper's last reported position and that HMS Renown and HMS Ark Royal should return to Gibraltar, covering the convoy.
Pending the Admiralty reply to this signal, HMS Renown and HMS Ark Royal proceeded to a suitable position to carry out a dawn reconnaissance with aircraft to locate the Empire Trooper should this be required whilst at the same time enabling Renown and Ark Royal to return to Gibraltar at high speed in time to carry out 'Operation Excess'.
Reports received from all units indicated that a total of four merchant ships had been located by 1200/27. The Senior Officer 'Force K', at this time ordered HMS Furious, HMS Argus, HMS Dunedin and the five transports which were to participate in 'Operation Excess', when collected, to proceed to Gibraltar with the nescessary destroyers. HMS Berwick, HMS Sheffield and the remaining destroyers to remain at the rendez-vous position until 'Force K' arrived there.
The Admiralty reply to Vice-Admiral Somerville's proposal was received at 1500/27 and directed the Vice-Admiral to remain in the area with HMS Renown and HMS Ark Royal until the situation regarding the Empire Trooper had been cleared up or as long as endurance of the screen allowed.
As Vice-Admiral Somerville had previously reported that HMS Renown and HMS Ark Royal had proceeded unscreened at 0200/27, he was uncerain how to interpret this signal. He assumed that it was intended that he should rejoin his destroyers in the vicinity of 37°00'N, 16°00'W and this was reported to the Admiralty accordingly.
At 1700/27 a report was intercepted from HMS Cyclamen that she was standing by the Empire Trooper who had been holed in No.1 and No.4 hatches and whose situation was serious. Her position at 0800/27 was given as 41°00'N, 22°09'W, course 138°, speed 4 knots. Shortly afterwards a report in Merchant Navy Code was intercepted from the Empire Trooper, in which she suggested that assistance should be sent to disembark the troops if necessary. The position given by the Empire Trooper differed considerably from that reported by HMS Cyclamen, whilst first class D/F bearing obtained at this time was also at variance with both positions. From all the evidence available it appeared that the Empire Trooper was in approximate position 40°40'N, 21°16'W at 1730/27.
in view of these less satisfactory reports, Vice-Admiral Somerville at once ordered HMS Bonaventure to proceed to the Empire Trooper estimated position. As it appeared possible that transfer of troops at sea might be necessary, the Vice-Admiral ordered HMS Sheffield to detach the two destroyers with the most fuel remaining to proceed at 16 knots towards the Empire Trooper. It was doubtful wheter these had enough endurance to return to Gibraltar, but in emergency they could proceed to the Azores if refuelling at sea was impracticable. In the meantime HMS Renown and HMS Ark Royal proceeded westwards to reach the most favourable position for flying off a dawn reconnaissance should weather conditions enable this to be done.
At 2030/27, Admiralty instructions were received for Empire Trooper to steer for Ponta Delgada as soon as weather permitted. Twenty-five minutes later a signal from the Admiralty was received the the light cruiser HMS Kenya (Capt. M.M. Denny, CB, RN, flying the flag of Rear-Admiral H.M. Burrough, CB, RN), who had previously had been ordered to join convoy SL 59, was ordered to join the Empire Trooper instead.
At 2300/27 Admiralty instructions to all concerned regarding the Empire Trooper were received. HMS Kenya, HMS Berwick, HMS Cyclamen, HMS Clematis, HMS Jonquil and HMS Geranium were ordered to join the Empire Trooper and escort her to Punta Delgada. If it was found that HMS Berwick could remain with the Empire Trooper, HMS Bonaventure was to be released for 'Operation Excess' as soon as HMS Berwick relieved her, otherwise HMS Bonaventure was to remain with the Empire Trooper.
HMS Berwick reported she expected to join the Empire Trooper by 1700/28. As Bonaventure's shortage of fuel would prelude her joining the Empire Trooper before the latter had been joined by HMS Berwick, Vice-Admiral Somerville ordered HMS Bonaventure to proceed to Gibraltar.
At midnight, Vice-Admiral Somerville received a signal from 'Force K' containing proposals for the future movements of the convoy and escort.
28 December 1940.
A report was received from HMS Cyclamen at 0330/28 giving the position of the Empire Trooper at 2000/27 as 40°12'N, 21°13'W, speed 6 knots. The damaged ship had thus made good some 250 nautical miles since being attacked. As it now appeared that sufficient ships would be available to stand by her and in view of the critical fuel situation in the two destroyer that had been ordered to join her (these were HMS Duncan and HMS Hero) they were ordered to proceed to Gibraltar.
The fore end of HMS Renown's starboard bulge, which had started to tear away some time previously, now became more serious, rendering it inadvisable for the ship to exceed 20 knots. As weather conditions still precluded flying, and as HMS Kenya, HMS Berwick, HMS Derbyshire and the four corvettes were all in the vicinity of or approaching the Empire Trooper, it dit not appear that any useful purpose would be served by HMS Renown and HMS Ark Royal remaining unscreened in submarine infested waters and risking further damage to Renown's bulge.
The Admiralty was then informed that HMS Renown and HMS Ark Royal were returning to Gibraltar. Also a signal was sent to prepare No.1 dock at Gibraltar for HMS Renown with all despatch.
As the docking of HMS Renown would involve some delay in 'Operation Excess', Vice-Admiral Somerville informed the Admiralty and the Commander-in-Chief Mediterranean, that the earliest possible D.1 for would be January, 1st, and that even this date was dependent on it being possible for Renown to be made seaworthy within 24 hours of docking.
By 1500/28 the weather had improved sufficiently for an A/S patrol to be flown off. This was maintained till dusk.
During the afternoon further damage was caused to the bulge. By this time about 30 feet of the top strake had been town away and a large number of rivets were leaking. Shores and cofferdams were placed.
In order to provide a screen for HMS Renown and HMS Ark Royal, Vice-Admiral Somerville ordered HMS Duncan and HMS Hero, now on passage to Gibraltar, to rendez-vous with the capital ships at 1000/29, and also the Admiral Commanding, North Atlantic Station was asked to sail additional destroyers if pacticable. HMS Faulknor, HMS Firedrake, HMS Hasty (Lt.Cdr. L.R.K. Tyrwhitt, RN) and HMS Jaguar (Lt.Cdr. J.F.W. Hine, RN) were sailed from Gibraltar to rendez-vous with the capital ships at 1100/29.
Air reconnaissance sighted nothing of interest during the day. At dusk couse was altered to pass north of convoy HG 49 which had left Gibraltar at 1800/28 and speed was reduced to 18 knots to increase the efficiency of the Asdic operating.
29 December 1940.
HMS Faulknor, HMS Firedrake, HMS Hasty and HMS Jaguar indeed joined 'Force H' at 1100/29.
30 December 1940.
HMS Renown, HMS Ark Royal, HMS Faulknor, HMS Firedrake, HMS Duncan, HMS Hasty, HMS Hero and HMS Jaguar arrived at Gibraltar at 0830 hours when HMS Renown immediately entered No.1 Dock. (11)
26 Dec 1940
At 1044 hours (G.M.T.), HMS Bonaventure (Capt. H.J. Egerton, RN), intercepted the German passenger/cargo ship Baden (8204 GRT, built 1922) about 325 nautical miles north-east Ponta Delgada, Azores in position 43°00'N, 23°50'W. The German ship was en route from Tenerife to France. A capture was not possible due to the bad weather so Bonaventure had to sink the German ship with a torpedo at 1523 hours. (12)
29 Dec 1940
HMS Bonaventure (Capt. H.J. Egerton, RN) arrived at Gibraltar. (12)
31 Dec 1940
Operation Ration
Interception of a Vichy-French convoy off Oran.
This operation was carried out with the object of ‘preventing the Vichy-French of making a hole in the blockade’.
At 1845 hours (zone -1) on 31 December 1940, five destroyers departed Gibraltar, these were HMS Duncan (A/Capt. A.D.B. James, RN), HMS Firedrake (Lt.Cdr. S.H. Norris, DSO, DSC, RN), HMS Foxhound (Cdr. G.H. Peters, DSC, RN), HMS Hero (Cdr. H.W. Biggs, DSO, RN) and HMS Jaguar (Lt.Cdr. J.F.W. Hine, RN). They were to intercept a Vichy-French convoy that had passed the Straits of Gibraltar.
At noon on 1 January 1941, while about half way between Gibraltar and Oran, in position 35°33'N, 03°04'W, they intercepted the Vichy-French convoy K 5 that had departed Casablanca on 30 December 1940 for Oran. This convoy was made up of the passenger/cargo ship Chantilly (9986 GRT, built 1923), Tanker Octane (2034 GRT, built 1939) and the merchant vessels Suroit (554 GRT, built 1938) and Sally Maersk (Danish, 3252 GRT, built 1923). They were escorted by the A/S trawler La Touilonnaise (425 GRT, built 1934, former British Hampshire).
All merchant ships were seized and taken to Gibraltar while their escort was allowed to proceed to Oran. There were however problems during the seizure of the Chantilly. Causing HMS Jaguar firing a burst of machine gun fire in the water close to the ship. However two passengers were killed and four were wounded, presumably from ricochets.
To support the destroyers, the light cruiser HMS Bonaventure (Capt. H.G. Egerton, RN) had departed Gibraltar for this purpose shortly before noon on 1 January 1941. All ships had entered Gibraltar by the 3rd. (13)
1 Jan 1941
HMS Bonaventure (Capt. H.G. Egerton, RN) departed Gibraltar for operations in the western Mediterranean.
[See the event 'Operation Ration' for 31 December 1940 for more info.]
For the daily positions of HMS Bonaventure during the period of 1/3 January 1941 see the map below.
(13)
3 Jan 1941
HMS Bonaventure (Capt. H.G. Egerton, RN) returned to Gibraltar.
[See the event 'Operation Ration' for 31 December 1940 for more info.] (14)
6 Jan 1941
Operations Excess and Operation MC 4.
Convoy operations in the Mediterranean.
Timespan; 6 January to 18 January 1941.
The principal object of this operation was the passage of a convoy of four ships (five were intended, see below) from Gibraltar to Malta and Piraeus (Operation Excess). One of these was to unload her stores at Malta, the other three had supplies on board for the Greek army.
Three subsidiary convoys (Operation M.C. 4) were to be run between Malta and Egypt. These consisted of two fast ships from Malta to Alexandria (convoy M.E. 5½), two fast ships from Alexandria to Malta (convoy M.W. 5½) and six slow ships from Malta to Port Said and Alexandria (convoy M.E. 6).
Composition of the convoys and their escort.
The ‘Excess convoy from Gibraltar’ was made up of one ship that was to proceed with stores to Malta. This was the Essex (11063 GRT, built 1936). The three other ships were to proceed with stores to Piraeus, these were the Clan Cumming (7264 GRT, built 1938), Clan Macdonald (9653 GRT, built 1939) and Empire Song (9228 GRT, built 1940). It had the light cruiser HMS Bonaventure (Capt. H.G. Egerton, RN) and the destroyers HMS Hasty (Lt.Cdr. L.R.K. Tyrwhitt, RN), HMS Hero (Cdr. H.W. Biggs, DSO, RN), HMS Hereward (Cdr. C.W. Greening, RN) and HMS Duncan (A/Capt. A.D.B. James, RN) as close escort (‘Force F’). A fifth merchant ship was to have been part of this convoy and was to have proceeded to Malta with stores and troops. However this ship, the Northern Prince (10917 GRT, built 1929) grounded at Gibraltar and was not able to join the convoy. The about four-hundred troops now boarded HMS Bonaventure for passage to Malta.
The most dangerous part of the ‘Excess convoy’ would be the part between Sardinia and Malta. For a stretch of about 400 nautical miles ships were exposed to enemy air attack from bases in Sardinia and Sicily less then 150 nautical miles away from the convoy’s track. Also submarines and surface torpedo craft were a constant menace. An attack by large enemy surface forces was thought less likely although this was potentially more dangerous.
’Convoy M.W.5 ½ from Alexandria to Malta’ made the passage westwards at the same time as the Mediterranean fleet moved westwards (see below). This convoy was made up of HMS Breconshire (9776 GRT, built 1939) and Clan Macauley (10492 GRT, built 1936). These ships were escorted by HMS Calcutta (Capt. D.M. Lees, DSO, RN), HMS Defender (Lt.Cdr. G.L. Farnfield, RN) and HMS Diamond (Lt.Cdr. P.A. Cartwright, RN).
’Convoy’s M.E. 5½ and M.E. 6’ that sailed from Malta to Egypt will be dealth with later on.
Cover forces for these convoy’s
At Gibraltar there was ‘Force H’ which had the following ships available for the operation. Battlecruiser HMS Renown (Capt. C.E.B. Simeon, RN and flagship of Vice-Admiral J.F. Somerville, RN, KCB, DSO, RN), battleship HMS Malaya (Capt. A.F.E. Palliser, DSC, RN), aircraft carrier HMS Ark Royal (Capt. C.S. Holland, RN), light cruiser HMS Sheffield (Capt. C.A.A. Larcom, RN) and the destroyers HMS Faulknor (Capt. A.F. de Salis, RN), HMS Firedrake (Lt.Cdr. S.H. Norris, DSO, DSC, RN), HMS Forester (Lt.Cdr. E.B. Tancock, DSC and Bar, RN), HMS Fortune (Lt.Cdr. E.N. Sinclair, RN), HMS Foxhound (Cdr. G.H. Peters, DSC, RN), HMS Fury (Lt.Cdr. T.C. Robinson, RN) and HMS Jaguar (Lt.Cdr. J.F.W. Hine, RN).
’Force H’ was to provide cover for the ‘Excess convoy’ from Gibraltar to the Sicilian narrows.
South-south-west of Sardina ‘Force H’ was to be reinforced by ‘Force B’ which came from the eastern Mediterranean and was made up of the light cruisers HMS Gloucester (Capt. H.A. Rowley, RN, flying the flag of Rear-Admiral E. de F. Renouf, CVO, RN), HMS Southampton (Capt. B.C.B. Brooke, RN) and the destroyer HMS Ilex (Capt. H.St.L. Nicholson, DSO and Bar, RN). The destroyer HMS Janus (Cdr. J.A.W. Tothill, RN) had also been part of 'Force B' during the passage from Alexandria to Malta but remained there for a quick docking. After this docking she departed Malta around noon on the 10th to join 'Force A'.
Further cover was to be provided by ‘Force A’, this was the Mediterranean fleet based at Alexandria. This force was made up of the following warships. Battleships HMS Warspite (Capt. D.B. Fisher, CBE, RN, flying the flag of Admiral Sir A.B. Cunningham, KCB, DSO, RN), HMS Valiant (Capt. C.E. Morgan, DSO, RN), aircraft carrier HMS Illustrious (Capt. D.W. Boyd, CBE, DSC, RN, flying the flag of Rear-Admiral A.L.St.G. Lyster, CB, CVO, DSO, RN) and the destroyers HMS Jervis (Capt. P.J. Mack, DSO, RN), HMS Juno (Cdr. St.J.R.J. Thyrwhitt, RN), HMS Mohawk (Cdr. J.W.M. Eaton, RN), HMS Nubian (Cdr. R.W. Ravenhill, RN), HMS Greyhound (Cdr. W.R. Marshall-A’Deane, DSO, DSC, RN), HMS Gallant (Lt.Cdr. C.P.F. Brown, DSC, RN), HMS Griffin (Lt.Cdr. J. Lee-Barber, RN) and HMS Dainty (Cdr. M.S. Thomas, DSO, RN).
During the passage of the ‘Excess convoy’ three submarines were stationed off Sardinia. HMS Pandora off the east coast and HMS Triumph and HMS Upholder were stationed to the south of Sardinia.
Chronology of events
The actual ‘Excess convoy’ and it’s escort (Force F) departed Gibraltar before dark in the evening of January 6th. Course was set to the west as if to proceed into the Atlantic. This was done to deceive enemy spies based in Spain. They turned back in the night after moonset and passes Europa Point well before daylight next morning. At dawn the next morning HMS Bonaventure parted company with the convoy to make rendez-vous with ‘Force H’ which departed Gibraltar around that time. All that day the ‘Excess convoy’ followed the Spanish coast so as if to make for a Spanish port. During the night of 7/8 January the convoy crossed over towards the coast of North-Africa and steered eastwards towards the Sicilian narrows while keeping about 30 nautical miles from the shore of North Africa. ‘Force H’ overtook the convoy during the night and was now stationed to the north-east of it to shield it from Italian air attack. If Italian naval units were reported the plan was that he would join the convoy.
In the morning of the 8th, HMS Bonaventure rejoined the actual ‘Excess convoy’. Late in the afternoon of the 8th HMS Malaya escorted by HMS Firedrake and HMS Jaguar parted company with ‘Force H’ and joined the ‘Excess convoy’ very early in the evening.
At dawn on the 9th ‘Force H’ was ahead of the convoy. At 0500/9, while in position 37°45’N, 07°15’E, HMS Ark Royal flew off five Swordfish aircraft for Malta which was still some 350 nautical miles away. All of which arrived safely. ‘Force H’ then turned back and joined the ‘Excess convoy’ at 0900/9 about 120 nautical miles south-west of Sardinia. HMS Ark Royal meanwhile had launched several aircraft, one of her reconnaissance aircraft reported at 0918 hours that it had sighted two enemy cruisers and two destroyers but this soon turned out to be Rear-Admiral Renouf’s ‘Force B’ which was to join the Excess convoy for the passage through the Sicilian narrows. They joined the convoy about one hour later.
’Force B’ had departed Alexandria in the morning of the 6th with troop for Malta on board. They had arrived at Malta in the morning of the 8th and after disembarking the troops (25 officers and 484 other ranks of the Army and RAF) sailed early in the afternoon. At 0900/9 ‘Force B’ was sighted by an Italian reconnaissance aircraft. This aircraft soon made off when being fired at. One hour later another Italian reconnaissance aircraft was however sighted. It was engaged by the fighter patrol from HMS Ark Royal but managed to escape. At 1320 hours, while in position 37°38’N, 08°31’E, Italian bombers arrived on the scene and made their attack on the convoy.
The convoy of the four merchant ships was steaming in two columns in line ahead, 1500 yards apart. HMS Gloucester and HMS Malaya were leading the columns while HMS Bonaventure and HMS Southampton were the sternmost ships. The seven destroyers were placed as a screen ahead of the convoy. ‘Force H’, with HMS Renown, HMS Ark Royal, HMS Sheffield and their five escorting destroyers were on the convoy’s port quarter, operating in close support. The mean line of advance was 088° and the ships were zigzagging at 14 knots.
The enemy consisted of ten Savoia bombers. HMS Sheffield detected them on her radar about 43 nautical miles off, this was the maximum range of her radar equipment. They were fine on the starboard bow and came into sight fourteen minutes later, flying down the starboard side of the convoy out of range of the AA guns at a eight of about 11000 feet. At 1346 hours, when they were broad on the bow, they started their attack. They came in from 145°, which was the bearing of the sun. All the ships opened up a very heavy fire and the enemy was diverted of their course. Eight of the aircraft were seen to drop bombs, some of which fell close to HMS Gloucester and HMS Malaya but no damage was caused. The other two bombers were seen to turn away during their approach. Both were shot down by a Fulmar fighter from HMS Ark Royal. Three men from their crews were picked up from the water. Another bombers is thought to have been shot down by HMS Bonaventure. The other seven are thought to have got away.
Nothing more happened during the afternoon of the 9th. Reconnaissance showed that the Italian fleet was not at sea so at dusk, while in position 37°42’N, 09°53’E, some 30 nautical miles west of the Sicilian narrows and north of Bizerta, Tunisia, ‘Force H’ parted company with the ‘Excess convoy’ and set course to return to Gibraltar. Rear-Admiral Renouf in HMS Gloucester meanwhile continued eastwards with the convoy with his three cruisers and five destroyers of forces ‘B’ and ‘F’.
They had a quiet night, passing Pantelleria after moonset. They remained in deep water to reduce the danger of mines. Next morning, at dawn on the 10th at 0720 hours, they encountered two Italian torpedo boats in position 36°30’N, 12°10’E. HMS Jaguar, the port wing destroyer in the screen, and HMS Bonaventure, stationed astern of the convoy columns, sighted the enemy at the same time. Initially thinking they might be destroyers from the Mediterranean Fleet, which the convoy was due to meet. British ships reported the contact by signal to Rear-Admiral Renouf. HMS Bonaventure challenged the ‘strangers’ and fired a star shell and then turned to engage the enemy working up to full speed. Rear-Admiral Renouf meanwhile turned away with the bulk of the convoy. HMS Southampton, HMS Jaguar and HMS Hereward hauled out from their stations on the engaged side of the convoy and made for the enemy. HMS Bonaventure meanwhile was engaging the right-hand ship of the pair. When the other three ships arrived on the scene Bonaventure shifted her fire to the other enemy ship which came towards her at full speed to attack. The enemy fired her torpedoes which HMS Bonaventure avoided. The four British ships now quickly stopped the enemy but she did not sink. In the end HMS Hereward torpedoed the damaged Italian torpedo boat some 40 minutes later. The other Italian torpedo-boat meanwhile had disappeared. [The Italian ships were the torpedo-boats Vega, which was sunk, and the Circe. HMS Boneventure had sustained some superficial damage from splinters during the action.
Enemy air attacks during 10 January.
At 0800/10, Admiral Cunningham arrived on the scene with ‘Force A’ before the fight was finished. ‘Force A’ turned to the south-east in the wake of the ‘Excess convoy around 0830 hours. While doing so, the destroyer HMS Gallant hit a mine and had her bow blown off. [This was a mine from the Italian minefield ‘7 AN’]. HMS Mohawk took the stricken destroyer in tow towards Malta escorted by HMS Bonaventure and HMS Griffin. They were later joined by HMS Gloucester and HMS Southampton. While HMS Mohawk was passing the towline two Italian torpedo planes attacked but they had to drop their torpedoes from long range and they missed. Between 1130 and 1800 hours, as the tow crept along at five or six knots, with their escort zig-zagging at 20 knots, they were attacked or threatened by aircraft ten times. Nearly all German high level bombers, which came in ones, twos or threes. The enemy dropped bombs in five out of the ten attempts but no hits were obtained. At 1300 hours German dive bombers arrived an obtained a near miss on HMS Southampton causing some minor damage.
At 0500/11, when about 15 nautical miles from Malta, all was going well and Rear-Admiral Renouf made off with for Suda Bay, Crete with HMS Gloucester, HMS Southampton and HMS Diamond. This last ship had joined the evening before. HMS Gallant, still being towed by HMS Mohawk and escorted by HMS Bonaventure and HMS Griffin arrived at Malta in the forenoon. At Malta, HMS Bonaventure disembarked the soldiers she had on board. [HMS Gallant was further damaged by bombs while at Malta and was eventually found to be beyond economical repair and was cannibalized for spares.]
Meanwhile, Admiral Cunningham in ‘Force A’ had a similar experience on a larger scale. He had sailed from Alexandria on the 7th and enemy aircraft spotted his force already on the same day. During the afternoon of the 10th heavy dive bombing attacks were pressed home by the enemy with skill and determination. The main target was HMS Illustrious. Had the enemy attacked the convoy itself the four transports would most likely all have been sunk, instead the Ilustrious was disabled and she would be out of action of many months.
At noon on the 10th the transports were steering south-eastward, zigzagging at 14 to 15 knots with an escort of three destroyers. At 1320 hours, HMS Calcutta joined them. HMS Warspite, HMS Illustrious and HMS Valiant were steaming in line ahead on the convoy’s starboard quarter, course 110° and zigzagging at 17 to 18 knots. These ships were screened by seven destroyers. The weather was clear, with high cloud.
The fleet was in position 35°59’N, 13°13’E some 55 nautical miles west of Malta when the battle began with an air attack by two Savoia torpedo planes which were detected six nautical miles away on the starboard beam at 1220 hours. They came in at a steady level, 150 feet above the water and dropped their torpedoes about 2500 yards from the battleships. They were sighted a minute before firing and the ships received them with a barrage from long- and short-range guns, altering course to avoid the torpedoes, which passed astern of the rearmost ship HMS Valiant. Five Fulmar fighters from the Illustrious had been patrolling above the fleet. One had returned before the attack being damaged while assisting to destroy a shadower some time before the attack. The other four aircraft chased the torpedo aircraft all the way to Linosa Island, which was about 20 miles to the westward. They claimed to have damaged both the enemy machines.
Directly after this attack, while the ships were reforming the line, a strong force of aircraft were reported at 1235 hours, coming from the northward some 30 miles away. The Fulmars, of course, were then a long way off, flying low and with little ammunition remaining. Actually two were even out of ammunition. They were ordered to return and the Illustrious sent up four fresh fighters as well as reliefs for the anti-submarine patrol. This meant a turn of 100° to starboard into the wind to fly off these aircraft. The enemy aircraft came into sight in the middle of this operation which lasted about four minutes. All the ships opened fire. The fleet had just got back to the proper course, 110°, and the Admiral had made the signal to assume loose formation, when the new attack began. The enemy had assembled astern of their target ‘in two very loose and flexible formations’ at a height of 12000 feet.
They were Junkers dive bombers, perhaps as many as 36, of which 18 to 24 attacked HMS Illustrious at 1240 hours, while a dozen attacked the battleships and the destroyer screen. They came down in flights of three on different bearings astern and on either beam, to release their bombs at heights from 1500 to 800 feet, ‘a very severe and brilliantly executed dive-bombing attack’ says Captain Boyd of the Illustrious. The ships altered course continually, and beginning with long-range controlled fire during the approach, shifted to barrage fire as the enemy dived for attack. The ships shot down at least three machines, while the eight Fulmar fighters that were up shot down five more, at the coast of one British machine. Even the two Fulmars that were out of ammo made dummy attacks and forced two Germans to turn away. But, as Captain Boyd pointed out ‘ at least twelve fighters in the air would have been required to make any impression on the enemy, and double that number to keep them off’.
HMS Illustrious was seriously damaged. She was hit six times, mostly with armour-piercing bombs of 1100 pounds. They wrecked the flight deck, destroyed nine aircraft on board and put half the 4.5” guns out of action, and did other damage, besides setting the ship on fire fore and aft and killing and wounding many of the ship’s company (13 officers and 113 ratings killed and 7 officers and 84 ratings injured) . The Warspite too, narrowly escaped serious injury, but got away with a split hawsepipe and a damaged anchor.
As HMS Illustrious was now useless as a carrier and likely to become a drag on the fleet Captain Boyd decided to make for Malta. The Commander-in-Chief gave her two destroyers as escort, one from his own screen and one from the convoy’s (these were HMS Hasty and HMS Jaguar) and she parted company accordingly. She had continual trouble with her steering gear, which at last broke down altogether, so that she had to steer with the engines, making only 17 to 18 knots. Her aircraft that were in the air also proceeded to Malta.
A third attack came at 1330 hours. By this time HMS Illustrious was 10 nautical miles north-eastward of the battleships which, due to the manoeuvres during the previous attack, were nearly as far away from the transports. The enemy came in again with high level bombers. Seven machines attacked the Illustrious and seven more the battleships. They were received with heavy AA fire. All the bombs they dropped fell wide. HMS Calcutta claimed to have destroyed one of the attackers.
More serious in it’s results was a second dive-bombing attack upon HMS Illustrious at 1610 hours. There were 15 JU-87’s Stuka’s escorted by 5 fighters. Actually 9 of the Stuka’s dropped their bombs, the other 6 were kept at bay due to heavy AA fire from the Illustrious, Hasty and Jaguar. One bomb hit and two near misses on the Illustrious were obtained by the enemy for the loss of one of their aircraft which was shot down by the Illustrious and the Jaguar. A few minutes later the 6 Stuka’s that had been driven off attacked the battleships but they again retired after fire was opened on them.
At 1715 hours, 17 more Stuka’s attacked the battleships. Again they were received with heavy AA fire. The enemy dropped their bombs from a greater height and non of them hit although splinters from a near miss killed a rating on board HMS Valiant and a bombs fell very near HMS Janus but it did not explode. The ships may have destroyed one aircraft with their AA fire. Three of the Fulmars from the Illustrious came from Malta and destroyed three of the attackers.
This turned out to be the end of the ordeal for the ‘Excess Convoy’ and its supporting ships of war, but not for HMS Illustrious which had one more encounter with the enemy before she reached Malta. At about 1920 hours, a little more then an hour after sunset and in moonlight, some aircraft approached from seaward when she was only five nautical miles from the entrance to Grand Harbour, Malta. She had received warning from Malta that enemy aircraft were about and she sighted two – probably torpedo planes. Illustrious, Hasty and Jaguar fired a blind barrage on which the enemy disappeared. Directly afterwards HMS Hasty obtained an Asdic contact and attacked it with depth charges, but whether it was a submarine remains uncertain. HMS Illustrious finally entered harbour at 2100 hours accompanied by HMS Jaguar which had passengers to land.
Movements of the actual ‘Excess Convoy’.
In the meantime, after the mild attack at 1340/10, the convoy went on its way unhindered. Its movements then became involved in those of the Malta to Egypt convoys, which were to sail under cover of the main operation with the special support of Vice-Admiral Pridham-Whippell’s ‘Force D’ which was made up of the cruisers HMS Orion (Capt. G.R.B. Back, RN, flying the flag of Vice-Admiral H.D. Pridham-Whippell, CB, CVO, RN), HMS Ajax (Capt. E.D.B. McCarthy, RN), HMAS Perth (Capt. P.W. Bowyer-Smith, RN) and HMS York (Capt. R.H. Portal, DSC, RN). The first of these convoys, the two ships of M.W. 5½ (see above), had left Alexandria for Malta on 7 January, some hours after Admiral Cunningham sailed westwards with ‘Force A’ to meet the ‘Excess Convoy’. To reinforce ' Force D ' the light cruiser HMAS Sydney (Capt. J.A. Collins, CB, RAN) and destroyer HMAS Stuart (Capt. H.M.L. Waller, DSO, RAN) departed Malta on 8 January 1941. They joined ' Force D ' on the 9th. Both transports of this convoy reached Malta without adventure in the morning of the 10th escorted by HMS Calcutta, HMS Diamond and HMS Defender. On arrival HMS Calcutta joined the six slow ships which made up convoy M.E. 6 which was bound for Port Said and Alexandria. The ships in this convoy were the; Devis (6054 GRT, built 1938), Hoegh Hood (tanker, Norwegian, 9351 GRT, built 1936), Pontfield (tanker, 8290 GRT, built 1940), Rodi (3220 GRT, built 1928, former Italian), Trocas (tanker, 7406 GRT, built 1927) and Volo (1587 GRT, built 1938). They were escorted by four corvettes; HMS Peony (Lt.Cdr.(Retd.) M.B. Sherwood, DSO, RN), HMS Salvia (Lt.Cdr. J.I. Miller, DSO, RN, RNR), HMS Hyacinth (T/Lt. F.C. Hopkins, RNR), HMS Gloxinia (Lt.Cdr. A.J.C. Pomeroy, RNVR). At the end of the searched channel this convoy was joined by ‘Force D’. HMS Calcutta was then ordered to join the ‘Excess Convoy’ and arrived in time to defend it from the Italian bombers as already described.
The last convoy, M.E. 5½, two fast ships (the Lanarkshire (8167 GRT, built 1940) and Waiwera (12435 GRT, built 1934)) bound for Alexandria, also left Malta in the morning of the 10th under escort of HMS Diamond. They were to join the ‘Excess Convoy’ until they were to turn to the south to clear Crete and then proceed to Alexandria. The ‘Excess Convoy’ would then proceed to Piraeus, Greece. The two convoys met that afternoon. The transport Essex then left and proceeded to Malta escorted by HMS Hero. After the Essex was safely inside Grand Harbour, HMS Hero joined the fleet.
Vice-Admiral Pridham-Whippell stayed with convoy M.E. 6 until dark on the 10th. As ‘Force A’ was somewhat behind due to the air attacks and Admiral Cunningham ordered Vice Admiral Pridham-Whippell to position HMS Orion and HMAS Perth to the north of the convoy to be in a good position in case of an attack by Italian surface forces. ‘Force A’ made good ground during the night and was some 25 nautical miles north of the convoy by daylight on the 11th at which time Orion and Perth joined ‘Force A’. Their forces stayed within a few miles of the convoy until the afternoon when they turned back to help HMS Gloucester, HMS Southampton which had come under air attack (see below). In the evening the ships destined for Alexandria left the convoy, while HMS Calcutta went ahead to Suda Bay to fuel there. The three ships and their destroyer escort continued on to Piraeus where they arrived safely next morning, at 1000 on the 12th.
HMS Ajax and HMS York had been ordered to join convoy M.E. 6. HMS Ajax however was ordered to proceed to Suda Bay soon after she had joined the convoy. In the morning of the 11th therefore, Rear-Admiral Renouf in HMS Gloucester and with HMS Southampton and HMS Diamond in company, was ordered to overtake the convoy and support it. They were at that moment steering for Suda Bay having left the disabled Gallant off Malta some hours before. Rear-Admiral Renouf altered course accordingly and made 24 knots against the convoys 9 to 10 knots. He also send up a Walrus aircraft to find the convoy.
The sinking of HMS Southampton.
At 1522 hours, when his ships were some 30 nautical miles astern of the convoy, and in position 34°56’N, 18°19’E, they were suddenly attacked by a dozen German Ju-87 ‘Stuka’ dive-bombers. Fortune was against them. The attack came as an entire surprise and according to Captain Rowley of the Gloucester the ‘aircraft were not sighted until the whistle of the first bomb was heard’. Six machines attacked each cruiser, diving steeply from the direction of the sun, releasing a 550-lb bomb each, at heights of around 1500 to 800 feet. The ships opened fire with 4” AA guns and smaller AA guns. They also increased speed and altered course to avoid the attack but two bombs, perhaps three hit HMS Southampton causing disastrous damage. Another hit and some near misses did some damage to HMS Gloucester, most important damage was to her DCT (director control tower). Half-an-hour later seven high-level bombers attacked but they were detected in time and taken under fire as a result of which all bombs fell wide. During the attack the Walrus from HMS Gloucester returned and ditched alongside HMS Diamond which took off the crew and then scuttled the aircraft.
Rear-Admiral Renouf immediately reported the damage to his cruisers to Admiral Cunningham who went to their aid. He send Vice-Admiral Pridham-Whippell ahead with the Orion, Perth, Jervis and Janus. From Malta HMS Griffin and HMS Mohawk were sent. Before they arrived however, Rear-Admiral Renouf reported that the Southampton must be abandoned and that he would sink her. HMS Gloucester took on board 33 officers and 678 ratings of which 4 officers and 58 ratings were wounded while HMS Diamond took on board 16 wounded ratings. Upon this signal the battleships turned east again. HMS Southampton had cought fire badly upon being hit. For a time the ships company fought the fire successfully and kept the ship in action and under control but in the end the fire got out of control. Also it was found that some magazines could not be flooded. In the end the crew had to give it up and was taken off. A torpedo was fired into her by HMS Gloucester but it did not sink her. Soon afterwards Vice-Admiral Pridham-Whippell arrived on the scene and his flagship, HMS Orion then scuttled her with three more torpedoes (four were fired).
Further proceedings of the convoys and the fleet.
Next morning, the 12th, HMS Orion, HMS Perth, HMS Gloucester, HMS Jervis and HMS Janus joined Admiral Cunningham’s Force off the west end of Crete meeting there also A/Rear-Admiral Rawlings (‘Force X’) in HMS Barham (Capt. G.C. Cooke, RN, flying the flag of A/Rear-Admiral H.B. Rawlings, OBE, RN) and with HMS Eagle (Capt. A.R.M. Bridge, CBE, RN), HMS Ajax and their destroyer screen made up of HMAS Stuart, HMAS Vampire (Cdr. J.A. Walsh, RAN), HMAS Vendetta (Lt.Cdr. R. Rhodes, RAN), HMAS Voyager (Cdr. J.C. Morrow, DSO, RAN) and HMS Wryneck (Lt.Cdr. R.H.D. Lane, RN) which had departed Alexandria on 11 January. These ships were to have begun a series of attacks on the Italian shipping routes but the disabling of HMS Illustrious put an end to that part of the plan so Admiral Cunningham took HMS Warspite, HMS Valiant, HMS Gloucester and the destroyers HMS Jervis, HMS Janus, HMS Greyhound, HMS Diamond, HMS Defender, HMS Hero and HMAS Voyager straight to Alexandria where they arrived in the early morning hours of the 13th.
HMS Barham, HMS Eagle, HMS York, HMS Orion, HMS Ajax, HMAS Perth, HMAS Stuart, HMAS Vampire, HMAS Vendetta, HMS Wryneck, HMS Griffin and HMS Mohawk then proceeded to Suda Bay to fuel where they arrived around 1900/12.
After fuelling at Suda Bay, Vice-Admiral Pridham-Whippell took HMS Orion, HMAS Perth to Piraeus where they arrived at 0230/13. There they took some troops from the ‘Excess Convoy’ on board and departed for Malta at 0600/13, a task the Southampton was to have done. They arrived at Malta around 0830/14. After unloading HMS Orion departed for Alexandria later the same day together with HMS Bonaventure and HMS Jaguar. They arrived at Alexandria in the morning of the 16th. HMAS Perth remained at Malta due to defects.
Meanwhile the six ships of convoy M.E. 6 arrived safely at their destinations on 13 January.
HMS Barham, HMS Eagle, HMS Ajax, HMAS Stuart, HMS Juno, HMS Hereward, HMS Hasty and HMS Dainty departed Suda Bay for operations south-west of Crete early in the morning of the 13th. The destroyers HMS Ilex, HMS Wryneck, HMAS Vampire and HMAS Vendetta also departed Suda Bay to conduct a sweep in the Kythera Channel. They joined ‘Force X’ around noon but Vampire and Vendetta were soon detached to investigate explosions which turned out to be underwater volcano activity. Meanwhile Ilex and Wryneck were also detached for a sweep towards Stampalia. These four destroyers fuelled at Suda Bay on the 14th and then departed for Piraeus where they arrived in the evening of the 14th. An A/S sweep had been carried out en-route.
’Force X’ returned to Suda Bay in the afternoon of the 15th and departed from there on the 16th for Alexandria where they arrived on the 18th, although some of the destroyers remained behind at Suda Bay.Leave van given to their crews at Piraeus and the destroyers departed Piraeus early on the 16th. HMS Ilex proceeded independently while HMAS Vampire, HMAS Vendetta and HMS Wryneck peroceeded to Suda Bay joining ' Force X ' on its departure.
Not a single of the 14 merchant ships in the convoys was lost but the fleet paid a heavy price for this loosing a light cruiser and a valuable aircraft carrier out of action for many months. As there were now German aircraft based in Italy future operations for the supply of Malta would be extremely difficult and dangerous.
The return of ' Force H' to Gibraltar.
That now leaves us with the return of ' Force H ' to Gibraltar which parted company with the eastbound convoy and its escort at 1920/9 in position 37°42'N, 09°53'E. ' Force H ' turned away to port. At 1935/9, ' Force H ' alter course to 300° and increased speed to 20 knots. Further alterations to course were made at 2200/9 to 260° and at mindnight durng the night of 9/10 January to 290°.
At 0100/10 course was altered for a quarter of an hour to clear three merchant vessels which had been sighted to the northward in position 38°03'N, 07°58'N, steering 180°. At 0900/10, course was altered to 246° and speed reduced to 18 knots.
A reconnaissance flight of seven aircraft was flown off to carry out an all round search to a depth of 50 miles from position 38°44'N, 05°18'E. On their return at 1030/10, they had nothing to report. Visibility was variable - from 5 to 15 miles. There was a slight sea and wind, force 3 from south-south-west. Speed was increased to 19 knots at 1110/10 since there appeared vibration in HMS Malaya when proceeding at 18 knots.
During the afternoon, three attack exercises were carried out on ' Force H ' by a total of nine Swordfish. Flying was completed by 1800/10. Moonlight exercises were cancelled due to a deterioration of weather and visibility. During the night the wind veered to the southwest and increased to force 6.
At 2345/10, Captain (D), 8th Destroyer Flottila, reported that the destroyers could maintain 19 knots provided that their A/S domes were housed, but would have to reduce to 16 knots if they were to remain lowered. Destroyers were accordingly orderd to house their domes.
The sea increased considerably, and by 0020/11 it was necessary to reduce speed to 14 knots in order to prevent damage to the destroyers. Course was altered for a short time at 0135/11 to avoid a merchant ship sighted in position 36°37'N, 00°06'W, steering to the north. Speed was further reduced to 11 knots by 0310/11, but gradual improvement in sea conditions permitted a corresponding increase of speed, so that by 0700/11, ' Force H ' was proceeding at 17 knots. Later in the day HMS Fury reported tat her forward gun shield had been distorted and that the gun could not be trained.
Six Swordfish were flown off by HMS Ark Royal at 0715/11 in order to carry out a light torpedo attack on ' Force H '. They were landed at 0815/11. At 0930/11, course was altered to 270° and speed increased to 19 knots. Weather conditions continued unfavourable, and not only had air training to be abandoned, but also the projected reconnaissance flight to Oran and Mers-el-Kebir to obtain photographs requisted by the Admiralty.
A London flying boat sent out from Gibraltar as A/S patrol ahead of ' Force H ' was sighted at 1015/11. By 1220/11, the sea had moderated sufficiently for the destroyers to increase speed and HMS Renown, HMS Sheffield, HMS Faulknor and HMS Foxhound proceeded ahead at 24 knots, increasing at 1730/11 to 26 knots. They arrived in harbour at 1920/11. The remainder of ' Force H ' arrived in harbour at 2020/11. (15)
6 Jan 1941
HMS Bonaventure (Capt. H.G. Egerton, RN) departed Gibraltar for operations.
[See the event 'Operations Excess and Operation M.C. 4.' for 6 January 1941 for more info.] (14)
6 Jan 1941
For the daily positions of HMS Bonaventure during 6/11 January 1941 see the map below.
11 Jan 1941
HMS Bonaventure (Capt. H.G. Egerton, RN) arrived at Malta.
[See the event 'Operations Excess and Operation M.C. 4.' for 6 January 1941 for more info.] (14)
14 Jan 1941
HMS Bonaventure (Capt. H.G. Egerton, RN) departed Malta for Alexandria.
[See the event 'Operations Excess and Operation M.C. 4.' for 6 January 1941 for more info.]
For the daily positions of HMS Bonaventure during the period of 14/16 Janaury 1941 see the map below.
(14)
16 Jan 1941
HMS Bonaventure (Capt. H.G. Egerton, RN) arrived at Alexandria.
[See the event 'Operations Excess and Operation M.C. 4.' for 6 January 1941 for more info.] (14)
17 Jan 1941
Operation IS 1.
Bombardment of Tobruk.
Timespan; 17 January to 22 January 1941.
At 1800/17 the monitor HMS Terror (Cdr. H.J. Haynes, DSC, RN) and the gunboat HMS Aphis (Lt.Cdr.(Retd.) J.O. Campbell, DSC, RN) departed Alexandria for Operation IS 1. The object was to bombard enemy positions off Mersa-el-Sahal in the Tobruk area during the nights of 18/19 and 19/20 January to aid the British Army in their attempt to capture Tobruk from the Italians.
At 0400/18, a force made up of the light cruisers HMS Orion (Capt. G.R.B. Back, RN, flying the flag of Vice-Admiral H.D. Pridham-Whippell, CB, CVO, RN),HMS Bonaventure (Capt. H.G. Egerton, RN) and the destroyers HMS Jervis (Capt. P.J. Mack, DSO, RN), HMS Nubian (Cdr. R.W. Ravenhill, RN) and HMS Hero (Cdr. H.W. Biggs, DSO, RN) departed Alexandria. They were to cover the operations off Tobruk. The cruisers were to patrol to the north-west while the destroyers were to patrol off the north-east.
The weather however became bad and the operation had to be postponed for 24 hours. The cover forces however remained in their positions as it was thought possible that the old Italian armoured cruiser San Giorgio might try to escape from Tobruk. In the end the cover force was withdrawn for more urgent operations and was ordered to proceed to Suda Bay where they arrived in the afternoon of the 20th. Due to this bad weather the shallow draft HMS Aphis got into trouble as she was unable to seek shelter. Two destroyers and an aircraft were sent out for assistance. She was found at 1300/19 off Damietta. HMS Griffin then accompanied her to Port Said where she arrived at 0700/20. She had to be docked there for repairs to her hull.
The weather however remained bad and it was not possible to bombard during the night of 19/20 January as well. Also HMS Terror sustained weather damage but was able remain at sea.
During the night of 20/21 January, HMS Terror assisted by HMS Gnat (Lt.Cdr. S.R.H. Davenport, RN) and HMS Ladybird (Cdr.(Retd.) J.F. Blackburn, RN) from the Inshore Squadron did manage to carry out her bombardment duties. Little enemy opposition was experienced.
Also the destroyers HMAS Stuart (Capt. H.M.L. Waller, DSO, RAN), HMAS Vampire (Cdr. J.A. Walsh, RAN) and HMAS Voyager (Cdr. J.C. Morrow, DSO, RAN) were on patrol to the west of Tobruk to cut the enemy sea communications. HMAS Stuart and HMAS Vampire had departed Alexandria on 21st the to join the Inshore Squadron. HMAS Voyager had already been operating with the Inshore Squadron since 15 January. During the night of 21/22 January, HMAS Vampire sank the Italian schooner Diego west of Tobruk. The crew of ten were taken prisoner. On the 22nd HMAS Voyager returned to Alexandria due to defects. She was relieved the next day by HMS Defender (Lt.Cdr. G.L. Farnfield, RN).
HMS Terror and HMS Gnat also returned to on the 22nd. HMS Terror had lost her mast and sustained some additional damage in the recent heavy weather. HMS Gnat had to clean her boilers. The destroyers remained on the inshore patrol for now. (16)
18 Jan 1941
HMS Bonaventure (Capt. H.G. Egerton, RN) departed Alexandria.
[See the event 'Operation IS 1' for 17 January 1941 for more info.]
For the daily positions of HMS Bonaventure during 18/20 January 1941 see the map below.
(14)
20 Jan 1941
HMS Bonaventure (Capt. H.G. Egerton, RN) arrived at Suda Bay.
[See the event 'Operation IS 1' for 17 January 1941 for more info.]
(14)
21 Jan 1941
HMS Ajax (Capt. E.D.B. McCarthy, RN) and HMS Bonaventure (Capt. H.G. Egerton, RN) both departed Suda Bay shortly after 0900/21 to provide cover for convoy AN 12 during it's passage through the Kaso Strait.
For the daily positions of these cruisers during 21/22 January 1941 see the map below.
(17)
22 Jan 1941
HMS Ajax (Capt. E.D.B. McCarthy, RN) and HMS Bonaventure (Capt. H.G. Egerton, RN) returned to Suda Bay around 1600/22. (17)
22 Jan 1941
Operation MBD 2 (also called operation Inspection).
Extraction of the damaged HMS Illustrious from Malta.
Timespan; 22 January to 25 January 1941.
Having arrived at Malta in the evening of January 10th, HMS Illustrious (Capt. D.W. Boyd, CBE, DSC, RN) underwent temporary repairs there. However the enemy soon noticed this and commenced a series of heavy air attacks with the object of destroying the crippled carrier. It soon became obvious that the Illustrious had to leave Malta as soon as possible.
While at Malta HMS Illustrious was damaged further in these air attacks. She was hit again on the 16th but this caused no serious damage. On the 17th she was hit again on the quarterdeck but again this caused no serious damage. On the 19th she was hit yet again and now more serious damage was caused causing the operation to move her to be delayed. At 1927/20 Vice-Admiral Malta reported that HMS Illustrious would be ready to sail after noon on the 23rd at a speed of about 20 knots.
Departure of HMS Illustrious from Malta.
At 1930/23 HMS Illustrious departed Malta escorted by HMS Jervis (Capt. P.J. Mack, DSO, RN), HMS Janus (Cdr. J.A.W. Tothill, RN), HMS Juno (Cdr. St.J.R.J. Thyrwhitt, RN) and HMS Greyhound (Cdr. W.R. Marshall-A’Deane, DSO, DSC, RN). During the night of 23/24 January the Illustrious made better speed then anticipated (about 24 knots).
A cover force, ‘Force B’, made up of HMS Orion (Capt. G.R.B. Back, RN, flying the flag of Vice-Admiral H.D. Pridham-Whippell, CB, CVO, RN), HMS Ajax (Capt. E.D.B. McCarthy, RN), HMS Bonaventure (Capt. H.G. Egerton, RN), HMS York (Capt. R.H. Portal, DSC, RN), HMS Ilex (Capt. H.St.L. Nicolson, DSO and Bar, RN) and HMS Hero (Cdr. H.W. Biggs, DSO, RN), which had departed Suda Bay around dawn on the 23rd, failed to make contact with her.
However in the forenoon ‘Force C’ made up of HMS Barham (Capt. G.C. Cooke, RN, flying the flag of A/Rear-Admiral H.B. Rawlings, OBE, RN), HMS Valiant (Capt. C.E. Morgan, DSO, RN), HMAS Perth (Capt. P.W. Bowyer-Smith, RN), HMS Nubian (Cdr. R.W. Ravenhill, RN), HMS Mohawk (Cdr. J.W.M. Eaton, RN), HMS Hasty (Lt.Cdr. L.R.K. Tyrwhitt, RN), HMS Hereward (Cdr. C.W. Greening, RN), HMS Griffin (Lt.Cdr. J. Lee-Barber, RN) and HMS Diamond (Lt.Cdr. P.A. Cartwright, RN), which had departed Alexandria around noon on the 22nd, joined her.
HMS Illustrious was detected by enemy aircraft twice but no air attacks on her developed. ‘Force B’ however came under heavy air attack. Torpedo bombing, high-level bombing and dive-bombing attacks were carried out. HMS Hero became detached due to a breakdown in her steering gear and was singled out for a specially heavy attack. There were many near misses no ship was actually hit, although HMS Ajax sustained some minor damage from a near miss. At least one enemy aircraft was shot down by AA gunfire.
All forces involved arrived at Alexandria on the 25th minus HMAS Perth which had been detached P.M. on the 25th to operate in the Aegean. (16)
23 Jan 1941
HMS Bonaventure (Capt. H.G. Egerton, RN) departed Suda Bay.
[See the event 'Operation MBD 2' for 22 January 1941 for more info.]
For the daily positions of HMS Bonaventure during the period of 23/25 January 1941 see the map below.
(14)
25 Jan 1941
HMS Bonaventure (Capt. H.G. Egerton, RN) arrived at Alexandria.
[See the event 'Operation MBD 2' for 22 January 1941 for more info.] (14)
1 Feb 1941
Operation MC 7.
Diversion in the eastern Mediterranean during operations by Force H in the western Mediterranean.
1 February 1941.
The light cruisers HMS Orion (Capt. G.R.B. Back, RN, flying the flag of Vice-Admiral H.D. Pridham-Whippell, CB, CVO, RN), HMS Bonaventure (Capt. H.G. Egerton, RN) and the destroyers HMS Ilex (Capt. H.St.L. Nicolson, DSO and Bar, RN), HMS Hero (Cdr. H.W. Biggs, DSO, RN) and HMS Hereward (Cdr. C.W. Greening, RN) departed Alexandria at 0300B/1. The destroyers were detached shortly after leaving harbour to proceed to the north-eastward to sweep the waters around Rhodes during the night of ½ February. They were to be at Suda bay at 0700/2.
The cruisers were to proceed through the Kaso Strait around 2200B/1. They then were to proceed to Suda Bay where they were to make rendez-vous with the destroyers.
At 0800B/1 the Mediterranean Fleet departed Alexandria. The Fleet was made up of the battleships HMS Warspite (Capt. D.B. Fisher, CBE, RN, flying the flag of Admiral Sir A.B. Cunningham, KCB, DSO, RN), HMS Barham (Capt. G.C. Cooke, RN, flying the flag of A/Rear-Admiral H.B. Rawlings, OBE, RN), the aircraft carrier HMS Eagle (Capt. A.R.M. Bridge, CBE, RN) and the destroyers HMS Jervis (Capt. P.J. Mack, DSO, RN), HMS Janus (Cdr. J.A.W. Tothill, RN), HMS Nubian (Cdr. R.W. Ravenhill, RN), HMS Mohawk (Cdr. J.W.M. Eaton, RN), HMS Diamond (Lt.Cdr .P.A. Cartwright, RN), HMS Defender (Lt.Cdr. G.L. Farnfield, RN), HMS Wryneck (Lt.Cdr. R.H.D. Lane, RN), HMAS Vendetta (Lt.Cdr. R. Rhodes, RAN) and HMAS Vampire (Cdr. J.A. Walsh, RAN).
At 2200B/1 the light cruisers HMS Ajax (Capt. E.D.B. McCarthy, RN), HMAS Perth (Capt. P.W. Bowyer-Smith, RN) and the destroyer HMS Jaguar (Lt.Cdr. J.F.W. Hine, RN) departed Suda Bay to join the Mediterranean Fleet at sea.
2 February 1941.
At 0645B/2 Italian reconnaissance aircraft sighted the Fleet. At 0800 hours the Fleet was in position 34.25’N, 23.49’E. At this time HMS Ajax, HMAS Perth and HMS Jaguar joined the Fleet. HMS Wryneck was detached to return to Alexandria. She was ordered to proceed along the western desert coast in order to reinforce the inshore squadron during her passage.
At 1500B/2, HMS Defender parted company and proceeded to Malta where she was to refit. She also had RAF personnel on board for Malta. She arrived at Malta at 0800/3.
The destroyer HMS Decoy (Cdr. E.G. McGregor, DSO, RN), which had completed her repairs, left Malta at 1900B/2 to join the Fleet at 1100/3.
HMS Orion, HMS Bonaventure, HMS Ilex, HMS Hero and HMS Hereward joined the Fleet at 1545B/2. No enemy had been encountered during their operations. HMS Bonaventure was detached shortly afterwards on account of her shortage of ammunition. She arrived back at Alexandria around 1300B/3.
At 1800B/2, HMS Orion, HMS Ajax, HMAS Perth, HMS Ilex and HMS Hereward were detached to cover the movements of HMS Defender and HMS Decoy (see above) during the night. They later turned around to rejoin the fleet by 0900B/3.
The Fleet continued to proceed to the north-west until 0100B/3, then turned west but at 0300B/3 turned to the east.
3 February 1941.
At 0800B/3 a signal was received from Force H that ‘ Operation Picket ‘ had been completed but that ‘ Operation Result ‘ had been abandoned due the the severe weather conditions. As ‘ Operation MC 7 ‘’s main purpose was a diversion for these operations Admiral Cunningham decided to return to Alexandria.
Vice-Admiral Pridham-Whippell’s force rejoined the fleet at 0900B/3. At 0930B/3, HMS Ajax and HMAS Perth were detached for patrol duty in the Aegean to cover convoy’s. The destroyers HMAS Vampire and HMAS Vendetta were detached with orders to fuel at Suda Bay and then to join the escort of convoy AS 14 coming from the Aegean towards Alexandria / Port Said.
HMS Decoy, coming from Malta, joined the fleet at 1130B/3.
4 February 1941.
The Mediterranean Fleet returned to Alexandria around 1830B/4. Practice attacks by aircraft from HMS Eagle had been made on the fleet during the day. (16)
1 Feb 1941
For the daily positions of HMS Bonaventure during the period of 1/3 February 1941 see the map below.
1 Feb 1941
For the daily positions of HMS Bonaventure during the period of 1/3 February 1941 see the map below.
3 Feb 1941
HMS Bonaventure (Capt. H.G. Egerton, RN) returned to Alexandria around 1300 hours.
[See the event 'Operation MC 7' for 1 February 1941 for more info.] (18)
6 Feb 1941
HMS York (Capt. R.H. Portal, DSC, RN) and HMS Bonaventure (Capt. H.G. Egerton, RN) departed Alexandria for Suda Bay. (16)
8 Feb 1941
HMS York (Capt. R.H. Portal, DSC, RN) and HMS Bonaventure (Capt. H.G. Egerton, RN) arrived at Suda Bay. (18)
10 Feb 1941
The destroyers HMS Jervis (Capt. P.J. Mack, DSO, RN), HMS Janus (Cdr. J.A.W. Tothill, RN), HMS Jaguar (Lt.Cdr. J.F.W. Hine, RN) and HMS Mohawk (Cdr. J.W.M. Eaton, RN) departed Suda Bay for a sweep through the Scarpanto Straits and around Stampalia. Cover was provided by the cruisers HMS York (Capt. R.H. Portal, DSC, RN) and HMS Bonaventure (Capt. H.G. Egerton, RN). (19)
11 Feb 1941
HMS York (Capt. R.H. Portal, DSC, RN) and HMS Bonaventure (Capt. H.G. Egerton, RN) returned to Suda Bay.
They departed Suda Bay later the same day for a night patrol the Kythera area from which they returned to Suda Bay around 1000/12. (20)
12 Feb 1941
Operation Shelford.
Clearence of Benghazi harbour.
At 0730B/12, HMS Orion (Capt. G.R.B. Back, RN, flying the flag of Vice-Admiral H.D. Pridham-Whippell, CB, CVO, RN) and HMS Ajax (Capt. E.D.B. McCarthy, RN) departed Alexandria to make rendez-vous in position 34°00'N, 21°00'E with the Aegean Force.
The Aegean force, made up of HMS York (Capt. R.H. Portal, DSC, RN), HMS Bonaventure (Capt. H.G. Egerton, RN), HMS Jervis (Capt. P.J. Mack, DSO, RN), HMS Janus (Cdr. J.A.W. Tothill, RN), HMS Jaguar (Lt.Cdr. J.F.W. Hine, RN) and HMS Mohawk (Cdr. J.W.M. Eaton, RN) departed Suda Bay at 1700B/12 to make this rendez-vous.
The whole of this force was to cover the entry of the Inshore Squadron into Benghazi, advancing into the Gulf of Sirte at night and to retire towards Crete by day.
HMS Aphis (Lt.Cdr.(Retd.) J.O. Campbell, DSC, RN) entered Benghazi during daylight on the 12th.
HMS Chakla (Cdr. L.C. Bach, RD, RNR), HMAS Stuart (Capt. H.M.L. Waller, DSO, RAN), HMAS Voyager (Cdr. J.C. Morrow, DSO, RAN), HMAS Vampire (Cdr. J.A. Walsh, RAN), HMS Fareham (Lt. W.J.P. Church, RN), HMS Peony (Lt.Cdr.(Retd.) M.B. Sherwood, DSO, RN) and HMS Hyacinth (T/A/Lt.Cdr. F.C. Hopkins, DSC, RNR) left Tobruk at 0730B/12 to reach Benghazi early on the 13th.
On the 13th, HMS Chakla, HMS Fareham, HMS Peony and HMS Hyacinth entered Bengazi harbour with the destroyers remaining out on patrol. Between 0600B/13 and 0630B/13, first HMS Hereward (Cdr. C.W. Greening, RN) and then HMS Decoy (Cdr. E.G. McGregor, DSO, RN) joined the destroyers on patrol. Several air attacks then followed. Later HMS Hereward, with minesweeping gear embarked, entered Bengazi harbour.
In the afternoon HMAS Vampire was detached to return to Tobruk to escort the monitor HMS Terror (Cdr. H.J. Haynes, DSC, RN) from there to Benghazi.
The remaining destroyers conducted a covering sweep to the north-west of Benghazi during the night.
On the 14th, HMS Hereward rejoined the other destroyers on their return from patrol. P.M. HMS Decoy and HMS Hereward were detached to proceed to Alexandria and HMAS Voyager to Tobruk. HMAS Stuart set course to proceed to Derna. (21)
12 Feb 1941
For the daily positions of HMS Bonaventure during the period of 12/14 February 1941 see the map below.
14 Feb 1941
HMS York (Capt. R.H. Portal, DSC, RN), HMS Bonaventure (Capt. H.G. Egerton, RN), HMS Jervis (Capt. P.J. Mack, DSO, RN), HMS Janus (Cdr. J.A.W. Tothill, RN), HMS Jaguar (Lt.Cdr. J.F.W. Hine, RN) and HMS Mohawk (Cdr. J.W.M. Eaton, RN) arrived at Suda Bay around 1800/14.
HMS Orion (Capt. G.R.B. Back, RN, flying the flag of Vice-Admiral H.D. Pridham-Whippell, CB, CVO, RN) and HMS Ajax (Capt. E.D.B. McCarthy, RN) had parted company 1100/14 to proceed to Alexandria. This order was however later cancelled and they were ordered to proceed to Suda Bay instead where they arrived around 1800/15. (22)
16 Feb 1941
Around 1030/16, HMS York (Capt. R.H. Portal, DSC, RN), HMS Bonaventure (Capt. H.G. Egerton, RN) and HMS Janus (Cdr. J.A.W. Tothill, RN) departed Suda Bay to patrol north of Crete. (20)
18 Feb 1941
Around 1000/18, HMS York (Capt. R.H. Portal, DSC, RN), HMS Bonaventure (Capt. H.G. Egerton, RN) and HMS Janus (Cdr. J.A.W. Tothill, RN) returned to Suda Bay from a patrol to the north of Crete. (20)
19 Feb 1941
Around 1840 hours, HMS Bonaventure (Capt. H.G. Egerton, RN), departed Suda Bay to patrol off Crete. She returned to Suda Bay around 0715/20. (18)
20 Feb 1941
Around 1100/20, HMS York (Capt. R.H. Portal, DSC, RN), HMS Bonaventure (Capt. H.G. Egerton, RN) departed Suda Bay for Alexandria and Piraeus respectively.
Around 1900 hours both ships parted company and proceeded on their way. (20)
20 Feb 1941
For the daily positions of HMS Bonaventure during 20/21 February 1941 see the map below.
21 Feb 1941
Around 0900 hours, HMS Bonaventure (Capt. H.G. Egerton, RN), arrived at Piraeus. (18)
22 Feb 1941
Around 1700 hours, HMS Bonaventure (Capt. H.G. Egerton, RN), departed Piraeus for Suda Bay. She arrived at Suda Bay the next morning at 0730 hours. (18)
23 Feb 1941
Operation Abstention (MARS 3).
Landing on and capture of the Italian island of Castelelorizo.
The destroyers HMS Decoy (Cdr. E.G. McGregor, DSO, RN) and HMS Hereward (Cdr. C.W. Greening, RN) embarked 200 Commandos at Suda Bay and then sailed for Castelorizo in the afternoon of 23 February 1941.
Later the same day the light cruisers HMS Gloucester (Capt. H.A. Rowley, RN, flying the flag of Rear-Admiral E. de F. Renouf, CVO, RN) and HMS Bonaventure (Capt. H.G. Egerton, RN) departed Suda Bay to provide cover for this operation.
The submarine HMS Parthian (Cdr. M.G. Rimington, DSO, RN) was also involved in this operation. During 18 and 19 February 1941 she had carried out submarine periscope reconnaissance of the island and during the actual landings she was to act as beacon.
a part (24 men) of the garrison for Castelorizo of Royal Marines which had to be landed after the commandos had taken the island was embarked on the river gunboat HMS Ladybird (Lt.Cdr.(Retd.) J.F. Blackburn, RN). This vessel departed from Famagusta, Cyprus at 2330/23.
Before dawn on the 25th the destroyers landed the Commandos which then successfully captured the island after the small Italian garrison surrendered. HMS Ladybird also managed to land the Marines in daylight. During an Italian air raid HMS Ladybird was hit while in the harour. The commanding officer of the Commandos stated that he did not require the Marines so these were re-embarked on HMS Ladybird which then left for Cyprus.
The main garrison of Royal Marines was embarked in the armed boarding vessel HMS Rosaura (Capt. R. Spencer, RD, RNR). Her sailing to Castelorizo was cancelled due to the enemy’s air raids on the harbour. She was to sail at night but this gave trouble due to her slow speed. She was to be escorted by the two destroyers but by now these were low on fuel.
In the end all ships involved in the operation were ordered at 0230/26 to proceed to Alexandria where the destroyers were to fuel and then take over the Royal Marines from Rosaria and land them at Castelorizo. The Commandos in the meantime had to held the island.
HMS Gloucester, HMS Bonaventure and HMS Decoy arrived at Alexandria at 2000/26. HMS Rosauria and HMS Hereward arrived at 0400/27. HMS Ladybird was ordered to remain at Famagusta, Cyprus. When HMS Gloucester arrived at Alexandria Rear-Admiral Renouf reported sick and command of the operation was transferred to Captain Everton of HMS Bonaventure.
The garrison from the Rosauria was then transferred to the destroyers HMS Hero (Cdr. H.W. Biggs, RN) and HMS Decoy.
The Italians however meanwhile did not wait and counter attacked. Over 300 troops were embarked at Rhodes by the torpedo boats Lupo and Lince. They were supported by the destroyers Francesco Crispi, Quintino Sella and the motor torpedo boats MAS 541 and MAS 546.
When HMS Ladybird left Castelorizo for Famagusta the commandos were left without support and means to communicate. So when the Italians attacked they were on their own.
At 0700/27, HMS Decoy with half the garrison, and HMS Hasty (Lt.Cdr. L.R.K. Tyrwhitt, RN) departed Alexandria for Castelorizo. They were followed around 0830 hours by HMS Bonaventure, HMAS Perth (Capt. P.W. Bowyer-Smith, RN), HMS Hero (with the other half of the garrison) and HMS Jaguar (Lt.Cdr. J.F.W. Hine, RN). HMS Decoy and HMS Hero were to land the garrison at Castelorizo and take off the commandos.
When the force arrived off Castelorizo a small party was landed and found out about the Italian counter attack. It was then concluded that without more naval and air support the situation would be hopeless. The bulk of the exhausted commandos were then embarked and the whole force then set course for Suda Bay.
While covering the withdrawal of the commandos HMS Jaguar sighted a unknown ship in the harbour (this was the Italian destroyer Francesco Crispi). Jaguar fired five torpedoes into the harbour entrance. Four explosions were heard but the enemy ship was not hit. Shortly afterwards Jaguar sighted two torpedo tracks passing astern. Jaguar then opened fire on the enemy destroyer and claimed two hits. After the searchlight of Jaguar had broken down starshell was fired by her with some delay but in the meantime she had lost contact with the enemy.
The whole force then proceeded towards Suda Bay but at 1000/28, HMAS Perth, HMS Hasty and HMS Jaguar were detached. HMS Bonaventure then escorted HMS Dainty and HMS Hero south of Crete towards Suda Bay but parted company with them at 1500/28 and Bonaventure then set course for Alexandra where she arrived at 0715 hours on March 1st. Decoy and Hero continued on to Suda Bay where the commandos were landed in the afternoon of March 1st. They then also proceeded to Alexandria still with the intended garrison for Castelorizo on board. They arrived at Alexandria at 0630 hours on 2 March 1941. (16)
23 Feb 1941
For the daily positions of HMS Bonaventure from 23/26 February 1941 see the map below.
26 Feb 1941
HMS Bonaventure (Capt. H.G. Egerton, RN) arrived at Alexandria at 2000 hours.
[See the event 'Operation Abstention' for 23 February 1941 for more info.] (18)
27 Feb 1941
HMS Bonaventure (Capt. H.G. Egerton, RN) departed Alexandria at 0830 hours.
[See the event 'Operation Abstention' for 23 February 1941 for more info.]
For the positions of HMS Bonaventure during the period of 27 February to 1 March 1941 see the map below.
(18)
27 Feb 1941
Around 0830B/27, the light cruisers HMS Bonaventure (Capt. H.G. Egerton, RN), HMAS Perth (Capt. P.W. Bowyer-Smith, RN) and the destroyers HMS Hero and HMS Jaguar (Lt.Cdr. J.F.W. Hine, RN) departed Alexandria for operations.
[For more info see the event ' Operation Abstention (MARS 3) ' for 23 February 1941.] (23)
1 Mar 1941
HMS Bonaventure (Capt. H.G. Egerton, RN) returned to Alexandria at 0715 hours.
[See the event 'Operation Abstention' for 23 February 1941 for more info.] (24)
6 Mar 1941
Shortly after noon this day, HMS York (Capt. R.H. Portal, DSC, RN), HMS Gloucester (Capt. H.A. Rowley, RN) and HMS Bonaventure (Capt. H.G. Egerton, RN) departed Alexandria with troops for Piraeus, Greece. (25)
7 Mar 1941
Shortly bofore noon, HMS York (Capt. R.H. Portal, DSC, RN), HMS Gloucester (Capt. H.A. Rowley, RN) and HMS Bonaventure (Capt. H.G. Egerton, RN) arrived at Piraeus where they immediately disembarked the troops.
They departed again for Alexandria around 1430 hours. (25)
8 Mar 1941
HMS York (Capt. R.H. Portal, DSC, RN), HMS Gloucester (Capt. H.A. Rowley, RN) and HMS Bonaventure (Capt. H.G. Egerton, RN) returned to Alexandria around 1400 hours. (25)
9 Mar 1941
Around noon, HMS York (Capt. R.H. Portal, DSC, RN), HMS Gloucester (Capt. H.A. Rowley, RN) and HMS Bonaventure (Capt. H.G. Egerton, RN) departed Alexandria with troops for Piraeus, Greece. (25)
10 Mar 1941
Around 1100 hours, HMS York (Capt. R.H. Portal, DSC, RN), HMS Gloucester (Capt. H.A. Rowley, RN) and HMS Bonaventure (Capt. H.G. Egerton, RN) arrived at Piraeus where they immediately disembarked the troops.
They departed for Suda Bay around 1800 hours. (25)
11 Mar 1941
Around 0700 hours, HMS York (Capt. R.H. Portal, DSC, RN), HMS Gloucester (Capt. H.A. Rowley, RN) and HMS Bonaventure (Capt. H.G. Egerton, RN) arrived at Suda Bay.
They departed again around 1430 hours to patrol in the western Aegean. (25)
13 Mar 1941
Around 0700 hours, HMS York (Capt. R.H. Portal, DSC, RN), HMS Gloucester (Capt. H.A. Rowley, RN) and HMS Bonaventure (Capt. H.G. Egerton, RN) arrived at Suda Bay from patrol in the Aegean.
They departed later the same day, together with the destroyers HMS Nubian (Cdr. R.W. Ravenhill, RN), HMS Mohawk (Cdr. J.W.M. Eaton, RN), to provide cover for convoy operations. (25)
16 Mar 1941
Around 0700 hours, HMS York (Capt. R.H. Portal, DSC, RN), HMS Gloucester (Capt. H.A. Rowley, RN) and HMS Bonaventure (Capt. H.G. Egerton, RN) arrived at Suda Bay from their convoy protection duties.
Around 1830 hours, HMS Gloucester and HMS Bonaventure again departed Suda Bay for patrol duties. (26)
17 Mar 1941
In the morning HMS Bonaventure (Capt. H.G. Egerton, RN) parted company with HMS Gloucester (Capt. H.A. Rowley, RN) and set course to proceed to Alexandria. HMS Gloucester set course to return to Suda Bay but before she arrived there she too was ordered to proceed to Alexandria. (25)
18 Mar 1941
HMS Bonaventure (Capt. H.G. Egerton, RN) arrived at Alexandria around 0630 hours. (27)
19 Mar 1941
Operation MC 9.
Convoy MW 6 to Malta.
19 March 1941.
On 19 March 1941 three merchant vessels departed from Haifa to Malta. One more merchant vessel departed from Alexandria.
The merchant vessels that departed from Haifa were the City of Manchester (8917 GRT, built 1935), Clan Ferguson (7347 GRT, built 1938) and Perthshire (10496 GRT, built 1936). They were escorted by HMS Hotspur (Lt.Cdr. C.P.F. Brown, DSC, RN) and HMS Griffin (Lt.Cdr. J. Lee-Barber, DSO, RN).
The merchant vessel that departed from Alexandria was the City of Lincoln (8039 GRT, built 1938). She was escorted by HMS Greyhound (Cdr. W.R. Marshall-A'Deane, DSO, DSC, RN).
20 March 1941.
Around 0430B/20, HMS Bonaventure (Capt. H.G. Egerton, RN) departed Alexandria to joined the convoy which was known as ‘Force C’.
Around 0700B/20, ‘Force A’ which was made up of the battleships HMS Warspite (Capt. D.B. Fisher, CBE, RN, flying the flag of Admiral Sir A.B. Cunningham, KCB, DSO, RN), HMS Barham (Capt. G.C. Cooke, RN, flying the flag of A/Rear-Admiral H.B. Rawlings, OBE, RN), HMS Valiant (Capt. C.E. Morgan, DSO, RN), aircraft carrier HMS Formidable (Capt. A.W.La T. Bisset, RN, flying the flag of A/Rear-Admiral D.W. Boyd, CBE, DSC, RN) departed Alexandria to cover this convoy. These capital ships were escorted by the destroyers HMS Jervis (Capt. P.J. Mack, DSO, RN), HMS Janus (Cdr. J.A.W. Tothill, RN), HMS Jaguar (Lt.Cdr. J.F.W. Hine, RN), HMS Juno (Cdr. St.J.R.J. Thyrwhitt, RN), HMS Mohawk (Cdr. J.W.M. Eaton, RN), HMS Nubian (Cdr. R.W. Ravenhill, RN), HMS Ilex (Capt. H.St.L. Nicolson, DSO and Bar, RN), HMS Havock (Lt. G.R.G. Watkins, RN) and HMS Hero (Cdr. H.W. Biggs, DSO, RN).
21 March 1941.
Around 0700B/21, ‘Force B’ which was made up of the cruisers HMS Orion (Capt. G.R.B. Back, RN, flying the flag of Vice-Admiral H.D. Pridham-Whippell, CB, CVO, RN), HMS Ajax (Capt. E.D.B. McCarthy, RN), HMAS Perth (Capt. P.W. Bowyer-Smith, RN) and HMS York (Capt. R.H. Portal, DSC, RN) departed Suda Bay to join ‘Force A’ at sea. Before they did so HMS Gloucester (Capt. H.A. Rowley, RN) joined ‘Force B’ around noon. She came from Piraeus. The destroyers HMAS Stuart (Capt. H.M.L. Waller, DSO, RAN), HMS Hasty (Lt.Cdr. L.R.K. Tyrwhitt, RN) and HMS Hereward (Lt. W.J. Munn, RN) were also in company. HMS Hasty, like HMS Gloucester came from Pireaus. These ships joined up with ‘Force A’ around 1600B/21.
When ‘Force A’ and ‘Force B’ joined up, HMS Havock was detached to the convoy (‘Force C’). Also on this day ‘Force C’ was reinforced by the AA-cruisers HMS Coventry (Capt. D. Gilmour, RN), HMS Calcutta (Capt. D.M. Lees, DSO, RN), HMS Carlisle (Capt. T.C. Hampton, RN) which had been on convoy escort duty in the Aegean.
During the night of 21/22 March 1941, ‘Force A’ remained about 20 nautical miles north of ‘Force C’ with ‘Force B’ a further 20 nautical miles to the north-west.
22 March 1941.
At 0740 hours ‘Force B’ rejoined ‘Force A’ and remained close to the convoy all day. None of the forces was detected by enemy air reconnaissance all day.
One Fulmar fighter from HMS Formidable crashed into the sea around 1115 hours. The crew was rescued by HMS Gloucester.
At 2000 hours, when in position 35°08’N, 16°42’E, ‘Force A’ parted company. They set course for Alexandria after covering ‘Force B’ during the night. ‘Force B’, reinforced with HMS Nubian and HMS Mohawk from ‘Force A’, covered ‘Force C’ to the northward during the night.
HMS Coventry and HMS Carlisle left the convoy (‘Force C’) at 2030 hours and proceeded to Alexandria. The remainder of the convoy took the direct route to Malta at the maximum speed of the merchant ships.
At 1945 hours, HMS Defender (Lt.Cdr. G.L. Farnfield, RN), which had been refitting at Malta, left that place to join ‘Force A’.
23 March 1941.
At 0800 hours, ‘Force A’ was in position 35°16’N, 19°32’E where it was rejoined by ‘Force B’. HMS Defender, coming from Malta, joined shortly afterwards. Course was continued towards Alexandria during the day.
The convoy (‘Force C’) arrived at Malta safely but were bombed in the harbour. HMS Bonaventure and HMS Griffin were slightly damaged by near misses. The City of Lincoln was hit on the bridge and the Perthshire took a hit in No.1 hold.
The cruisers and destroyers of ‘Force C’ departed Malta at 1930B/23.
At 1900B/23, ‘Force B’ had been detached to cover the passage east of ‘Force C’. ‘Force B’ was strengthened by HMS Ilex and HMS Hasty while HMS Hereward was detached from ‘Force A’ to strengthen the escort of convoy AN 22.
24 March 1941.
At 0800 hours, ‘Force A’ was in position 32°27'N, 25°45'E and continued direct to Alexandria where it arrived around 2230B/24.
The cruisers and destroyers of ‘Force C’ joined ‘Force B’ around 0730 hours. HMS Coventry and HMS Hereward joined the escort of convoy AN 22. HMS Carlisle arrived at Alexandria in the afternoon.
HMS Calcutta, HMS Ilex and HMS Hasty proceeded to Port Said.
Cover was provided for convoy AN 22 from west of the Kithera Channel.
HMS Bonaventure, HMS Griffin, HMS Greyhound, HMS Hasty and HMS Hotspur proceeded to Alexandria where they arrived the next day.
Part of ’Force B’ then patrolled the Aegean while the other part went to Suda Bay. (16)
20 Mar 1941
HMS Bonaventure (Capt. H.G. Egerton, RN) departed Alexandria at 0430 hours for convoy duty.
[See the event 'Operation MC 9' for 19 March 1941 for more info.] (27)
23 Mar 1941
HMS Bonaventure (Capt. H.G. Egerton, RN) and the convoy she was escorting arrived at Malta.
The escorts of the convoy departed Malta again early in the evening.
[See the event 'Operation MC 9' for 19 March 1941 for more info.] (16)
25 Mar 1941
HMS Bonaventure (Capt. H.G. Egerton, RN), HMS Griffin (Lt.Cdr. J. Lee-Barber, DSO, RN), HMS Greyhound (Cdr. W.R. Marshall-A'Deane, DSO, DSC, RN), HMS Hasty (Lt.Cdr. L.R.K. Tyrwhitt, RN) and HMS Hotspur (Lt.Cdr. C.P.F. Brown, DSC, RN) arrived at Alexandria. (16)
28 Mar 1941
Around 1300B/28, HMS Bonaventure (Capt. H.G. Egerton, RN), departed Alexandria to join the Mediterranean Fleet at sea.
Around 1425B/28, HMAS Waterhen (Lt.Cdr. J.H. Swain, RN) sailed to join HMS Bonaventure
HMS Decoy (Cdr. E.G. McGregor, DSO, RN) sailed around 1645B/28 to join HMS Bonaventure and HMAS Waterhen.
Both destroyers had only arrived at Alexandria from convoy escort duty around 0830B/28.
[For subsequent movements see the event ' Battle of Cape Matapan. ' for 28 March 1941.] (16)
28 Mar 1941
Battle of Cape Matapan.
Timespan: 26 to 30 March 1941. (All times are zone B/-2)
26 March 1941.
The Italian battleship Vittorio Veneto departed Naples escorted by the destroyers Alpino, Bersagliere, Fuciliere and Granatiere from the 13th Destroyer Division.
The Italian heavy cruisers Fiume, Zara and Pola from the 1st Cruiser Division departed Taranto escorted by the destroyers Vittorio Alfieri, Giosuè Carducci Alfredo Oriani and Vincenzo Gioberti from the 9th Destroyer Division.
The Italian light cruisers Luigi di Savoia Duca Degli Abruzzi and Giuseppe Garibaldi from the 8th Cruiser Division departed Brindisi escorted by the destroyers Nicoloso Da Recco and Emanuele Pessagno from the 16th Destroyer Division.
27 March 1941.
The Italian battleship Vittorio Veneto and her escorting destroyers passed the Straits of Messina after which they were joined by the heavy cruisers Trieste, Trento and Bolzano (3rd Cruiser Division) and their escorting destroyers from the 12th Destroyer Division; Ascari, Carabiniere and Corazziere which sailed from Messina.
The 1st and 8th Cruiser Divisions were to proceed to the Aegean to search for British/Greek convoy’s while the Veneto and the 3rd Cruiser Division were to proceed towards Gavdos Island to take up a cover position. Late in the evening however the 1st and 8th Cruiser Divisions were ordered to join the Veneto and 3rd Cruiser Division.
However in the meantime the British were aware of the Italian fleet movements and shortly after noon this day the 3rd Cruiser Division had been sighted and reported by a Sunderland aircraft.
In response Admiral Cunningham departed Alexandria at 1900 hours with the Mediterranean Fleet which was made up of the battleships HMS Warspite (Capt. D.B. Fisher, CBE, RN, flying the flag of Admiral Sir A.B. Cunningham, KCB, DSO, RN), HMS Valiant (Capt. C.E. Morgan, DSO, RN), HMS Barham (Capt. G.C. Cooke, RN, flying the flag of A/Rear-Admiral H.B. Rawlings, OBE, RN), aircraft carrier HMS Formidable (Capt. A.W.La T. Bisset, RN, flying the flag of A/Rear-Admiral D.W. Boyd, CBE, DSC, RN), HMS Jervis (Capt. P.J. Mack, DSO, RN), HMS Janus (Cdr. J.A.W. Tothill, RN / other sources give Lt. L.R.P. Lawford, RN in command), HMS Mohawk (Cdr. J.W.M. Eaton, RN), HMS Nubian (Cdr. R.W. Ravenhill, RN), HMS Greyhound (Cdr. W.R. Marshall-A'Deane, DSO, DSC, RN), HMS Griffin (Lt.Cdr. J. Lee-Barber, DSO, RN), HMAS Stuart (Capt. H.M.L. Waller, DSO, RAN), HMS Havock (Lt. G.R.G. Watkins, RN) and HMS Hotspur (Lt.Cdr. C.P.F. Brown, DSC, RN).
The fleet steered a course of 300° at 20 knots.
Six hours before, at 1300/27, Vice-Admiral Pridham-Whippell, had departed Pireaus with the light cruisers HMS Orion (Capt. G.R.B. Back, RN, flying the flag of Vice-Admiral H.D. Pridham-Whippell, CB, CVO, RN), HMS Ajax (Capt. E.D.B. McCarthy, RN), HMAS Perth (Capt. P.W. Bowyer-Smith, RN), HMS Gloucester (Capt. H.A. Rowley, RN) and the destroyers HMS Hereward (Lt. W.J. Munn, RN) and HMAS Vendetta (Lt.Cdr. R. Rhoades, RAN). They were to patrol in the Aegean to provide cover for convoy’s but when the Italian warships were known to be at sea they were ordered to make rendez-vous at 0630/28 south of crete with the Mediterranean Fleet in position 34°20’N, 24°10’E, 30 nautical miles south of Gavdos Island, south of Crete.
28 March 1941 and onwards.
At 0430 hours, the Fleet was in position 32°22’N, 27°12’E steering 310° at 16 knots. They were a little over 200 nautical miles from the rendez-vous position with the cruiser force.
At 0555 hours, HMS Formidable, launched A/S and fighter aircraft. They were to search an area between Crete and Cyrenaica as far west as longitude 23°E. An air search from Maleme, in Crete, had started earlier. Four torpedo bombers (armed indeed with torpedoes) took off at 0445 hours to search to the west of Crete. One however developed engine trouble and ha to jettison her torpedo and return. The other sighted nothing of the enemy and returned at 0845 hours.
At 0630 hours, the cruiser force was proceeding to the south-east at 18 knots. They sighted an Italian aircraft of a type that was used as catapult aircraft by Italian surface ships. So this indicated that these must be in the area.
At 0630 hours, the cruiser force was joined by two more destroyers. These were HMS Ilex (Capt. H.St.L. Nicolson, DSO and Bar, RN) and HMS Hasty (Lt.Cdr. L.R.K. Tyrwhitt, RN) which came from Suda Bay. The cruiser force then set course to 200°.
At 0720 hours, the enemy was first sighted by aircraft ‘5 B’ from HMS Formidable. At 0722 hours this aircraft amplified her report ‘four cruisers and four destroyers’ were reported in position 34°22’N, 24°57’E. They were steering 230°.
The next report came from aircraft ‘5 F’ from HMS Formidable at 0739 hours which announced four cruisers and six destroyers in position 34°05’N, 24°26’E steering 200°.
As the force reported at 0720 hours was identical in composition as the British cruiser force and only 35 miles north of this force it was thought that the aircraft had sighted our own ships.
The report of the force reported at 0739 hours was still being studied by Vice-Admiral Pridham-Whippell when HMS Orion sighted smoke astern at 0745 hours bearing 010°. One minute later the enemy ships were sighted and identified.
Commencement of the action.
At 0752 hours the cruiser force altered course to 140° and increased speed to 23 knots. Shorty afterwards the ships astern were seen to be three cruisers and some destroyers and speed was increased to 28 knots. As the enemy was suspected to be 8” cruisers of the Zara-class which outgunned our cruisers and were also faster it was decided to try to draw them towards out battleships which were about 90 nautical miles to the eastward.
At 0812 hours the enemy opened fire from 25000 yards. It were however not Zara-class heavy cruisers but it were Trieste, Trento and Bolzano. Enemy salvoes however fell short. Enemy fire concentrated on HMS Gloucester which commenced zig-zagging to avoid being hit.
At 0829 hours HMS Gloucester opened fire on the enemy from 23500 yards. The salvoes fell short but caused the enemy to alter course away and draw outside the British gun range. The Italians continued firing although all their salvoes were falling short. Both forces continued speeding to the south-east when at 0854 hours the aspect of affairs was suddenly changed when aircraft ‘5 F’ from HMS Formidable reported enemy battleships in position 34°00’N, 24°16’E steering course 210° at 20 knots. Vice-Admiral Pridham-Whippell had been in that position less then one hour before and thought the position to be incorrect but enemy battleships must be nearby non the less.
One minute later the enemy cruisers ceased fire and turned away to the north-east. They had been ordered to break off the engagement as the Italian C-in-C feared that his cruisers were drawn to far into waters controlled by British aircraft. Vice-Admiral Pridham-Whippell decided to follow the enemy and altered course accordingly. At 0936 hours he reported that the enemy was still in sight bearing 320°, range 16 nautical miles, speed 28 knots. During this phase of the action HMAS Vendetta developed engine trouble and was detached to Alexandria.
Movements of the Mediterranean Fleet.
When Admiral Cunningham received Vice-Admiral Pridham-Whippell’s contact report at 0827 hours the Fleet increased speed to 22 knots and altered course to 310°. Twenty minutes later HMS Valiant was ordered to proceed at her utmost speed and join Vice-Admiral Pridham-Whippell’s cruiser force. HMS Mohawk and HMS Nubian were ordered to join her.
At 0833 hours HMS Formidable was ordered to ready a torpedo bomber striking force. Also the aircraft at Maleme, Crete were ordered to attack the enemy cruisers.
Aircraft reports then came in regarding another enemy force further to the northward, though their presence was by no means certain. Aircraft reports continued to come in but the situation was very unclear. It was therefore decided to hold back the torpedo bomber striking force of HMS Formidable until the situation had cleared.
Striking force of HMS Formidable finally takes off.
At 0939 hours the C-in-C finally orders HMS Formidable to lauch her torpedo bomber strike force to attack the enemy and relieve the pressure on the cruiser force.
At 0956 hours Formidable therefore launches six Albacore torpedo aircraft and two Fulmar fighters as escort. Also a Swordfish was launched for observation duty.
Meanwhile the cruiser force was still in pursuit of the enemy cruisers. They were barely visible from the director of HMS Orion when at 1058 hours the enemy motive for breaking off the action and turning to the north-west became evident when HMS Orion sighted an enemy battleship bearing 002°. The battleship quickly opened fire and Vice-Admiral Pridham-Whippell at once altered course to the southward in order to disengage. Also speed was increased to 30 knots which all cruisers fortunately could make despite some machinery problems in HMS Gloucester. For ten minutes the enemy battleship concentrated her fire on HMS Orion which suffered some minor damage from a near miss. Smoke was made and the cruiser force then became invisible to the enemy except for HMS Gloucester. Fire was then shifted to this ship and she was repeatedly straddled until HMS Hasty was able to cover her in smoke. Meanwhile the Italian 8” cruisers that had been encountered first tried to cut off the retreat of our cruisers but fortunately right at this moment the air striking force from HMS Formidable intervened.
The air attack on the Vittorio Veneto.
While flying at 9000 feet the air striking force from HMS Formidable sighted the Vittorio Veneto at 1058 hours. Her salvoes were seen to straddle our cruisers. The planes proceeded to manoeuvre to reach a position off her starboard bow on the opposite site of the battleships destroyer escort.
They attacked at 1127 hours, in two waves, each plane being able to act independently. The enemy destroyers began to move over to starboard when our planes commenced their dive and the battleship altered course more then 180° to starboard when the first wave was at 1000 feet. Two aircraft (‘4 A’ and ‘4 F’) were already committed to the attack released their torpedoes on the starboard side. The third aircraft (‘4 C’) attacked from fine on the starboard bow.
The second sub-flight (aircraft ‘5 A’, ‘4 P’ and ‘4 K’) was able to take advantage of Vittorio Veneto’s turn and dropped their torpedoes from good positions on the battleships port bow. Although the striking force reported a possible hit all torpedoes passed clear astern of the target.
The enemy battleship then broke off the action with our cruiser force and retired on a north-westerly course at 25 knots. This was fortunate for the cruiser force but the C-in-C was not at all happy because this lessened his chance to bring his battleships into action against the enemy battleship.
At 1230 hours, Vice-Admiral Pridham-Whippell made contact with the Fleet.
Attack by FAA aircraft from Maleme on the Italian 3rd Cruiser Division.
The aircraft from Maleme also took part in this phase of the action. Three Swordfish had been flow off at 1050 hours. Flying at 9000 feet they sighted enemy cruisers in position 34°22’N, 23°02’E at 1200 hours. The enemy force was steering 300° at 28 to 30 knots. The aircraft then attacked out of the sun. Their target was the rear cruiser, Bolzano. The two leading aircraft dropped their torpedoes from the port bow and beam. The third aircraft came in too high, turned to port and then dropped it’s torpedo on the bow of the target. The enemy cruiser took avoiding action and all torpedoes missed. AA fire was opened but none of the aircraft was damaged.
Movements of the battlefleet 1100 – 1305 hours.
At 0918 hours, the C-in-C ordered HMS Valiant, HMS Mohawk and HMS Nubian to rejoin him. This was done after it was heard by the C-in-C that the Italian cruisers had broken off the action with the British cruiser force.
At 1112 hours, the C-in-C asked Rear-Admiral Boyd on board HMS Formidable when a second air strike force could be ready. The reply was ‘in about half an hour’. At 1153 hours, HMS Formidable reported this second strike force to be ready for takeoff. They were however told to wait for a moment.
At 1225 hours the battleships were ordered to launch spotter aircraft as action might be near. Shortly afterwards the C-in-C realised that the speed of the enemy battleship had to be reduced if his battleships were to see action against it. Meanwhile the cruiser force had been retiring towards the battlefleet and at 1228 hours HMS Orion had been sighted by HMS Jervis from the destroyer screen.
At 1305 hours, the cruiser force was ordered to proceed ahead of the battlefleet on a bearing of 290° at maximum visual signalling distance. They remained near the battlefleet until 1644 hours when they were ordered to press on and gain touch with the retreating enemy.
The Formidable’s second strike force awaits orders.
The first air strike force returned to HMS Formidable between 1200 and 1215 hours after attacking the Vittorio Veneto. This necessitated the second air strike force to be flown off in order to have the first one to land on. The two operations were completed by 1244 hours and HMS Formidable set course to rejoin the battlefleet she had to split off from during flight operations.
The second striking force consisted of three Albacore’s and two Swordfish accompanied by two Fulmar’s. After flying of it was ordered to wait overhead until the battlefleet engaged the enemy which was hoped to be around 1330 hours.
Whilst proceeding to rejoin the battleships, HMS Formidable was attacked by two Italian S-79 torpedo bombers but the torpedo tracks could be easily combed and both torpedoes missed astern. At 1400 hours Formidable was back in position and the Fleet was still proceeding westwards in pursuit of the enemy.
As touch with the enemy had been lost due to lack of shadowing aircraft three Albacores from the first strike group were launched again at 1400 hours to search for the enemy. One of them (aircraft ‘4 F’) sighted the Vittorio Veneto at 1459 hours in position 34°45’N, 22°14’E. The report was received at 1515 hours. This aircraft was able to remain in touch with the enemy until being relieved at 1920 hours.
The second striking force sighted the enemy battleship at 1510 hours. The squadron leader worked into the sun and succeeded in getting down to 5000 feet unobserved. The leading destroyer on the battleships bow then opened fire but turned away when shot up by the fighter escort. As the three Albacores (‘5 F’, ‘5 G’ and ‘5 H’) attacked on the Vittorio Veneto’s port bow she turned 180° to starboard and splashes were seen on her port bow and amidships. The two Swordfish (‘4 B’ and ‘5 K’) had worked round ‘up sun’ to attack separately. But as the Vittorio Veneto in turning presented her starboard side clear of the screen they decided to attack together diving from 8000 feet. By that time the enemy battleship was doing only 14 knots thus providing an easy shot. A large splash was seen on her starboard quarter and another on her starboard side. In fact only one hit was obtained which caused a reduction in the battleships speed.
Activities from R.A.F. bombers from Greece.
During the afternoon of the 28th R.A.F. bombers from Greece made a series of attacks on the enemy. When an enemy report was received from an R.A.F. Sunderland ay 1235/28 six Blenheim aircraft from 84 Squadron were ordered to take off from Menidi airfield (some 20 miles north of Athens) and attack the contact. These aircraft made an attack at 1420 hours. The target appears to have been the Vittorio Veneto but no hits were obtained.
Then at 1520 hours four more Blenheims from 84 Squadron attacked the Italian 3rd Cruiser Division. Two hits were claimed on a cruiser with 250 lb. bombs and two more on another cruiser with 500 lb. bombs. Unfortunately these were only near misses on the Trento and Bolzano.
Between 1515 and 1645 hours, several attacks were made by a total of 11 Blenheims on the Italian 1st and 8th Cruiser Divisions and near misses were obtained on the Zara and Garibaldi.
The pursuit, 1330 to 1810 hours.
At 1600 hours, the C-in-C ordered HMS Formidable to make strong as possible torpedo bomber attack on the damaged battleship.
At 1618 hours, the destroyers were organized into divisions for a possible night attack.
At 1644 hours, the cruiser force was ordered to press on to gain touch with the damaged battleship. They made off at 30 knots.
Shortly afterwards HMS Mohawk and HMS Nubian were ordered to proceed ahead of the battlefleet as a visual link between the battleships and the cruisers.
When evening was beginning to fall at 1720 hours, the destroyers were organized for night attack.
At 1810 hours, the C-in-C signalled that if the cruisers were to gain touch most of the destroyers would be sent to join them for a night torpedo attack on the damaged battleship. The situation was however not very clear due to lack of enemy reports.
At 1831 hours, the observer aircraft from HMS Warspite, which had been catapulted at 1745 hours, made a report that the damaged Vittorio Veneto was in company with three cruisers and seven destroyers and about 50 nautical miles bearing 292°, speed 12 knots, from the C-in-C’s position.
The British battleships then formed in line ahead and were doing 20 knots. Shortly afterwards the observer aircraft from Warspite reported that enemy forces were concentrating and at 1912 the aircraft reported that the enemy forces had formed five columns.
Situation at 1915 hours on 28 March 1941.
The sun had set at 1840 hours. By 1915 hours it appeared that the damaged enemy battleship was about 45 nautical miles to the westward steering 290° at 15 knots. Another cruiser force had joined the enemy fleet which was formed in five columns. The battleship was apparently in the centre with four destroyers screening ahead and two astern. On her port side were thee 8” cruisers and outside of them were three destroyers. On her starboard side were also three 8” cruisers with what appeared to be two 6” cruisers but were in fact destroyers. Both the 6” cruisers had by that time gone on to the westward.
Third torpedo attack on the Vittorio Veneto by aircraft from HMS Formidable and Maleme.
It was 1925 hours when aircraft from HMS Formidable made their third and last attack. They had flown off at 1735 hours when Formidable was in position 34°42’N, 22°44’E. Composition of this third strike force was; six Albacore’s and two Swordfish aircraft.
The sun was sinking when the force sighted the enemy and took up a waiting position astern and well out of range at low height. It was joined by two aircraft (Swordfish) from Maleme. These had sighted the enemy at 1810 hours when they were 25 miles off. On closing them they identified the enemy as four ships screened by six destroyers steering 320° at about 14 knots. At 1835 hours they saw the strike force from Formidable coming up from the eastward and took station in its rear.
Dusk had fallen at 1925 hours when the aircraft swept in to attack. During the approach the enemy was steering 230°. On closing the enemy put up barrage fire. The aircraft were forced to turn away to starboard and lost their formation after which they had to attack independently from very different angles.
Most of the pilots reported to have fired their torpedoes at the Vittorio Veneto but it was extremely difficult to observe anything with precision. Several observers of the attacking aircraft however reported a hit on a cruiser. Indeed a torpedo hit the Pola during this attack. Most likely it was fired by aircraft ‘5 A’ which dropped it’s torpedo at 1945 hours and Pola was hit one minute later. Following the attack the aircraft from Formidable proceeded to Suda Bay. Aircraft ‘5 A’ was out of petrol and had to made a forced landing on the water near destroyer HMS Juno, which then picked up the crew.
Also the two aircraft from Maleme attacked independently. They both dropped their torpedoes but obtained no hits. Both aircraft then returned to Maleme although one was damaged by enemy AA fire.
The attack by the aircraft had important results. The Pola was hit on the starboard side between the engine and the boiler room, causing her main engines to stop and putting out of action all her electric power and with it all her turrets. The attack was observed by a shadowing aircraft from HMS Formidable which had relieved the aircraft from HMS Warspite. At 1950 hours the aircraft reported that the enemy force had divided, the major portion going off on a course of 220° while the ‘battleship’ (which was in fact the Pola) remained stopped with smoke rising from her. This report however was never received which was just as well as the reported course of 220° was incorrect (300° was correct).
Movements of the British Fleet, 1920 to 2040 hours.
By 1920 hours the C-in-C was aware of the position and formation of the enemy fleet and knew that Vice-Admiral Pridham-Whippell’s cruiser force was in touch with it. The report of the dusk air attack was received at 2008 hours. It mentioned only probable hits. It was in light of this information that the C-in-C had to decide if it would be justified to take the fleet closer to the enemy.
At 2040 hours he decided that the destroyers were to attack. Capt. Mack with his eight destroyers then drew ahead making 28 knots with the intention of passing up the starboard side of the Vittorio Veneto and then attack from ahead.
The cruiser force.
Meanwhile the cruiser force had been pressing on at 30 knots to the westward to get in touch and at 1832 hours had seen the aircraft from HMS Formidable going up to attack the enemy.
At 1907 the Vice-Admiral ordered his ships to spread on a line of 20° apart, seven nautical miles apart. They were still opening out when at 1914 hours three or four enemy ships were sighted on the starboard bow. The Vice-Admiral then decided to keep his ships concentrated and they reformed in line ahead.
By 1930 hours the air attack had begun an was clearly visible on the horizon bearing 303°, distance about 15 nautical miles. Two minutes later the cruisers altered course to 320°. At 1949 hours speed was reduced to 20 knots in order to ‘reduce bow waves’. The last stage of the air attack was at that moment still in progress. Searchlights and gunfire was visible bearing 278°. At 195 hours course was changed to 290° to close the enemy. Visibility to the westward was then about four nautical miles and no ships were in sight.
At 2014 hours, HMS Orion altered course to 310°. A minute later a vessel was plotted and followed for 18 minutes. It became clear that the contact was either stopped or moving very slowly. At 2017 hours, the force had reduced speed to 15 knots. At 2029 hours HMS Ajax reported an enemy vessel in position 35°16’N, 21°04’E. This was 275°, 5 nautical miles from Ajax. The enemy was stationary.
Vice-Admiral Pridham-Whippell then decided to lead clear of this ship to the northward and try to regain touch with the retreating enemy. Accordingly at 2033 hours, the cruiser force turned to 60° and at 2036 hours to 110°. At 2040 hours the stationary Italian ship was reported to the C-in-C. It was thought the destroyers would be ordered to deal with this ship. At 2048 hours, course was altered to 310° and at 2115 hours to 300°. Speed was increased to 20 knots at 2119 hours.
The cruisers had been proceeding for some time on this course and the Vice-Admiral considered spreading them again when he realised that Capt. Mack and his destroyers might have gone further west and would almost certainly encounter his cruisers. At 2155 hours HMS Ajax reported three unknown vessels being picked up by radar 5 nautical miles to the southward. Though rather far to the westward these were thought to be some of our own destroyers. The Vice-Admiral then decided to keep concentrated and steer more to the northward as to keep clear of them. According at 2204 hours course was altered to 340°.
At 2229 hours, gun flashes from the battlefleet were seen astern bearing 150° to 160°. Then at 2243 hours, a red light was sighted by HMS Orion and HMS Gloucester bearing 320° on the port bow. The general alarm was made and the cruisers formed single line ahead. Course was altered to 000° at 2255 hours.
At 2314 hours a heavy explosion bearing 150° to 160° lit up the horizon to the southward. Shortly afterwards the Vice-Admiral received a signal from the C-in-C of 2312 hours ordering all forces not in action at that moment to withdraw to the north. At 2332 hours course was altered to 60°. Then at 0018/29 HMS Gloucester sighted an object to the south-west but lost it out of sight at 0030 hours. No other ship sighted this ‘object’. Nothing more was seen until 0635/29 when the smoke of the battlefleet was sighted to the eastward.
The destroyer striking force 2037 to 0200 hours.
After leaving the battlefleet at 2043 hours, the eight destroyers; 14th Destroyer Flotilla: HMS Jervis, HMS Janus, HMS Mohawk, HMS Nubian and the 2nd Destroyer Flottilla: HMS Ilex, HMS Hasty, HMS Hereward, HMS Hotspur, drew ahead on course 300° while making 28 knots. The 14th Destroyer Flotilla was in line ahead with the 2nd Destroyer Flotilla six cables on it’s starboard beam. It was Capt. Mack’s (who was in overall command) intention to pass up the starboard side of the damaged battleship outside visible range and then attack from ahead.
Capt. Mack did not receive the 2029 signal from HMS Ajax nor the 2040 signal from HMS Orion. It was very unfortunate that the destroyers proceeded northwards as did the cruisers leaving the south flank open for the enemy to escape.
Around 2200 hours, he received Ajax’s 2155 report of the three unknown ships. They were thought to be three miles ahead but due to a navigational error were in fact about ten miles on his port bow. As the destroyers proceeded westwards on course 285° the gunflashes of the battleships were seen at 2230 hours. Ten minutes later HMS Hardy sighted a red light bearing 010°. This was evidently the same red light that was seen to the north-westward by HMS Orion and HMS Gloucester.
The destroyers continued to proceed westwards on course 285° until 2320 hours when a signal came from the C-in-C to forces not engaging enemy ships at that moment to retire to the north-east. Capt. Mack did so and quickly sent a signal if this included his forces. He was told ‘after your attack’. This reply was received at 2337 hours and the destroyers then turned westwards again proceeding on course 270° for 20 minutes.
At midnight it was thought that the destroyers had drawn sufficiently ahead course was altered to 200° and speed reduced to 20 knots. Then at 0030 hours, just as Capt. Mack thought to have reached a position just ahead of the enemy, a signal was received from HMS Havock, which was with the disabled Italian cruisers about 50 miles further to the east, that she was in touch with a Littorio-class battleship and that she had expended all her torpedoes. Course was then altered to 110° and speed increased to 28 knots. A full hour passed before a signal was received from Havock that the contact was an Italian 8” cruiser and not a battleship.
In these circumstances Capt. Mack decided it was best to continue on to the east and at 0200 hours the destroyers sighted searchlights ahead and, steaming through a number of survivors, arrived on the scene of the battlefleet’s action and they then sighted the Italian cruiser Zara.
The British battlefleet. Night action 2213 to 2312 hours.
At 2043 hours, when the destroyer striking force proceeded on its quest, the battlefleet was left with a screen of only four destroyers; HMAS Stuart, HMS Havock, HMS Greyhound and HMS Griffin.
At 2111 hours, Vice-Admiral Pridham-Whippell’s report of a ‘stopped ship’ came in. The C-in-C at once turned to 280° and made for the reported position at 20 knots. The Warspite, Valiant, Formidable and Barham were in single line ahead at three cables distance. HMAS Stuart and HMS Havock were stationed one mile off to starboard and HMS Greyhound and HMS Griffin to port. Visibility was about 2.5 miles.
Nearly an hour had passed when at 2203 hours HMS Valiant’s radar detected a ‘stopped ship’ on the port bow bearing 244°, range 8 to 9 nautical miles. At 2213 hours course was altered to 240°, towards the ‘stopped ship’. At 2220 hours, the ‘stopped ship’ was reported 191°, range 4.5 nautical miles. The destroyers on the port side were ordered to move over to the starboard side but the order had hardly been given when HMAS Stuart sighted a ship 4 miles off, fine on the starboard bow bearing 250° and gave the night alarm. This however had not reached the C-in-C when two minutes later the massive outlines of ships were seen by the Chief of Staff and the C-in-C himself looming through the night. Two large cruisers could be made out on the starboard bow with a smaller vessel ahead of them.
These cruisers were the Zara and Fiume which had turned back to help the disabled Pola. They were in single line with a destroyer ahead and three destroyers astern. They were steering approximately 130° and were some 4000 yards from HMS Warspite. Almost at the same time HMS Greyhound which was drawing ahead opened her searchlight, its beam fell right across the water, most valuably illuminating a cruiser without revealing the position of our battleships.
HMS Formidable, being of no use in a gun battle hauled out of line to starboard. HMS Warspite then opened fire followed seven seconds later by HMS Valiant. A salvo of 15” shells crashed into Fiume. Her after turret was blown overboard, she started to list heavily to starboard and burst into a sea of flames. She was driven out of the line and apparently sank about 30 minutes later. Fire was then shifted to the Zara which was now illuminated by searchlights.
Just before the enemy cruisers were sighted HMS Barham, in the rear of the line, had sighted the disabled Pola on the port quarter making identification signals and had trained her turrets on her. When the Greyhound’s searchlight shone out, the Barham trained forward at once, opening fire on the leading ship which was the destroyer Vittorio Alfieri but was at that moment thought to be a 6” cruiser. A brilliant orange flash shot up under the bridge and bursts were seen along the whole length of the ship which turned to starboard and made off to the westward making smoke. The Barham then shifed fire to the Zara which was soon being heavily hit. A big explosion forward hurled one of her turrets overboard. The action lasted barely five minutes, shell after shell crashing into the helpless Italian ships which were caught unprepared with their gun turrets trained forward and aft.
At 2231 hours the remaining Italian destroyer turned towards the British battleships and one of them was seen to fire torpedoes. To avoid them the battlefleet made an emergency turn of 90° to starboard. The Warspire’s 6” guns then shifted fire to a destroyer that was illuminated by a searchlight but having difficulty in finding the target after the turn had been completed fired only one salvo at it which was fortunate as the target turned out to be HMS Havock.
By now the Italian cruisers were completely crippled and burning. At 2238 hours the C-in-C ordered the destroyers to finish them off.
The destroyers that were escorting the battlefleet, 2240 to 0140 hours.
As the battlefleet turned north after their action the Stuart was about to attack the enemy cruisers when three enemy destroyers were sighted steering to the westward. HMS Greyhound and HMS Griffin went off in pursuit while HMAS Stuart and HMS Havock proceeded south in search of the enemy cruisers. It was then 2240 hours. A minute later came the signal from the C-in-C to finish off the enemy bearing 165° and both destroyers proceeded on this mission.
at 2259 hours a burning and apparently stationary Italian cruiser could be seen about two nautical miles to the southward with what appeared to be another large cruiser circling slowly around her. HMAS Stuart then fired her whole outfit of eight torpedoes against this pair of cruisers and observed a ‘dim explosion’ low down on the ‘non burning’ one. HMS Havock did not fire torpedoes for the moment, being unable to make out a suitable target. It was then 2301 hours. HMAS Stuart then opened fire on the burning ship and then went after the other and found her at 2305 hours, about 1.5 miles off, with a heavy list and stopped. Fire was opened and two salvoes caused a big explosion and fires. She was seen to be of the Zara-class. A ship then suddenly loomed up on the port bow passing very close and Stuart had to turn to port to avoid collision. This was seen to be a Grecale class destroyer, apparently undamaged. Stuart then fired two salvoes at her. Havock which was following up Stuart lost touch with her but did sighted the Italian destroyer. She fired four torpedoes at it, one of which hit.
HMAS Stuart then sighted what was thought to be another cruiser but this could not have been the case, probably it was an enemy destroyer. She followed this ship to the south-west. HMS Havock meanwhile continued to engage the Italian destroyer for about 20 minutes until this ship had her decks awash and was blazing from fore to aft. This destroyer blew up and sank around 2330 hours.
HMS Havock still had half her torpedoes left. She sighted a cruiser which was heavily on fire and about to blow up. It was decided not to engage this cruiser as another one was sighted with a single fire abreast the bridge. Havock fired her remaining torpedoes at this ship but all missed. Havock then turned to the north and made off at high speed towards the cruiser that was heavily burning, fired star shell and then a few more salvoes in her. The star shell illuminated a large ship thought to be a battleship (this was in fact the disabled Pola) laying stopped. It was then 2345 hours. Havock then opened fire on this ship while retiring to the north-east. A signal was then sent reporting this ‘battleship’.
This was the signal received by Capt. Mack which then returned eastwards with his eight destroyers (D. 2 and D.14). At 0005 hours the Commanding Officer of the Havock realised his mistake and a signal was sent at 0030 stating that the reported ‘battleship’ was in fact a heavy (8”) cruiser. This signal was received by Capt. Mack at 0134 hours who decided (as stated earlier) to continue on to the eastward.
Meanwhile HMS Greyhound and HMS Griffin had been pursuing the enemy destroyers. The Greyhound, after her opportune searchlight display, sighted three destroyers in the rear of the Italian cruisers making off to the westward and gave chase together with Griffin. Fire was opened and hits were observed, but the enemy, lost in the smoke, turned southwards, was lost in the smoke around 2320 hours. Just then the C-in-C’s sigbal to retired to the north came in and both destroyers than proceeded accordingly until 0050 hours when HMS Havock’s signal was received, then then turned southwards.
At 0140 hours HMS Greyhound encountered the Pola, laying stopped on an even keel with ensigns flying and guns trained fore and aft. It was then that a challenge was seen and Capt. Mack and his destroyers arrived at the scene.
Captain D.14, the sinking of the Zara and Pola.
Capt. Mack in HMS Jervis had sighted searchlights ahead, and, steaming through a number of survivors, sighted what turned out to be the Zara, with a few small fires burning on the upper deck. As he passed her he fired four torpedoes, two of which appeared to hit and she blew up and sank. It was then 0240 hours. He ordered his destroyers to pick up survivors but not to lower their boats. Nine survivors were picked up by HMS Jervis.
Then at 0250 hours a red and white recognition signal was observed from the direction of the Pola which was about two miles away. The rescue of survivors was then stopped and the destroyers moved off in that direction. As they were closing they were met by HMS Havock which reported that the enemy cruiser seemed to be on an even keel with a large number of her crew on the forecastle and in the water around her. HMS Jervis then passed close to the Italian cruiser. No visible damage could be seen except for a small fire on the tarboard side abreast her after turret. He ordered his destroyers to pick up survivors from the water while HMS Jervis went alongside. To take of the rest of the ships company. They seemed thoroughly demoralised, many half drunk. The upper deck was an mess. The Jervis was alongside for about a quarter of an hour. At 0322 hours she had embarked 22 officers (including the ships Commanding Officer), 26 petty officers and 202 ratings. HMS Jervis then casted off and fired a torpedo into the stricken cruiser. As she appeared to settle very slowly Capt. Mack ordered HMS Nubian to fire another torpedo into her which completed the destruction of the Pola. At 0403 hours she blew up and sank.
Capt. Mack then reformed his flotilla’s in single line ahead, with the 2nd Flotilla on his starboard beam. Course was set to 055° at 20 knots to rejoin the C-in-C. Rendezvous was made at 0648/29.
Proceedings of the Battle Fleet, 2330 – 0800 hours.
At 2330/28, the Battle Fleet, leaving the Italian cruisers on fire and out of action, proceeded on a course of 070°, reducing speed to 18 knots. At 0006/29, the C-in-C signalled his course and speed and the position of a rendezvous at 0700/29. Light cruiser HMS Bonaventure (Capt. H.G. Egerton, RN) which had left Alexandria at 1300/28 together with the destroyers HMS Decoy (Cdr. E.G. McGregor, DSO, RN) and HMAS Waterhen (Lt.Cdr. J.H. Swain, RN) were ordered to stay east of the C-in-C until 0430 hours. As were the destroyers HMS Juno (Cdr. St.J.R.J. Tyrwhitt, RN), HMS Jaguar (Lt.Cdr. J.F.W. Hine, RN) and HMS Defender (Lt.Cdr. G.L. Farnfield, RN) which had sailed from Piraeus, Greece in the morning of the 28th and made for the Kithera Channel. Patrol there was discontinued on the 29th, HMS Juno and HMS Jaguar were ordered to join the fleet while HMS Defender was ordered to proceed to Suda Bay for escort duties. HMS Bonaventure and HMS Decoy were ordered to proceed to join convoy's GA 8 and AN 23 respectively. HMS Watherhen returned to Alexandria with the fleet.
At 0430 hours, HMS Formidable flew off three aircraft for a morning search between 160° and 305° while another was sent to the south-east for 30 miles and then to proceed to Maleme with orders for the aircraft that had landed there after their air strike the day before.
Between 0600 and 0700 hours all units of the Fleet joined the Flag. None had any damage or casualties to report except for one Swordfish aircraft that was missing. The searching aircraft returned at 0830 hours. They reported having sighted only a number of rafts and survivors. At 0800 hours the Fleet was in position 35°43’N, 21°40’E and course was now set to search the scene of the action. Between 0950 and 1100 hours many boats and rafts were seen and destroyers picked up a number of survivors, a work that was interrupted by the appearance of German aircraft. The total number of survivors picked up by the British ships had now risen to 55 officers and 850 men. Further to that Greek destroyers picked up 110 survivors on the 29th.
The return to Alexandria.
While the Fleet was on the way back to Alexandria a continuous air patrol was maintained by HMS Formidable for the remainder of the voyage. Fighters dealt effectively with a dive bombing attack made by 12 Ju.88’s at 1530/29 which was directed mainly against Formidable. No damage was caused although she was shaken by two near misses. One Ju.88 was shot down, another one was damaged and four had been forced to jettison their bombs early. At 0834/30 an S.79 that was shadowing the fleet was shot down by Fulmar fighters.
The Fleet arrived at Alexandria around 1730/30. A submarine was reported while the Fleet was entering the harbour. Destroyers cleared the area by dropping depth charges but all ships arrived in harbour safely.
(28)29 Mar 1941
Around 1000 hours, HMS Bonaventure (Capt. H.G. Egerton, RN), HMS Decoy (Cdr. E.G. McGregor, DSO, RN) and HMAS Waterhen (Lt.Cdr. J.H. Swain, RN), joined 'Force A' of the Mediterreanean Fleet at sea.
Around 1930 hours, HMS Bonaventure was detached again to join the escort of convoy GA 8 at dawn the next day. (27)
29 Mar 1941
Convoy GA 8.
This convoy departed Piraeus P.M. on 29 March 1941.
It was made up of the transports HMS Breconshire (9776 GRT, built 1939) and Cameronia (British, 16297 GRT, built 1920).
They were escorted by the destroyers HMAS Stuart (Capt. H.M.L. Waller, DSO, RAN), HMS Griffin (Lt.Cdr. J. Lee-Barber, DSO, RN) and HMS Hereward (Lt. W.J. Munn, RN).
A.M. on 30 March 1941, the light cruiser HMS Bonaventure (Capt. H.G. Egerton, RN) joined.
Around 2030B/30, the Italian submarine Dagabur made an unsuccesful torpedo attack on HMS Bonaventure.
Around 0250B/30, Ambra torpedoed and sank HMS Bonaventure in position 33°20'N, 26°35'E. She sank very quickly having been hit by two out of the three torpedoes fired by the Italian submarine. HMAS Stuart was missed by the third torpedo. She then proceeded to counter attack the attacker while HMS Hereward started picking up survivors. HMS Griffin remained with the convoy. Seven depth charge attacks were made by HMAS Stuart and two by HMS Hereward after she had picked up the survivors. After the second attack by HMS Hereward the submarine was briefly seen to break surface. Contact could not be regained afterwards.
The convoy arrived at Alexandria P.M. on 31 March 1941.
HMS Hereward arrived a few hours earlier having gone ahead with the survivors from HMS Bonaventure. (29)
30 Mar 1941
HMS Bonaventure (Capt. H.G. Egerton, RN) joined the escort of convoy GA 8 A.M, on the 30th. This convoy had departed Piraeus for Alexandria the previous day and was made up of the transports HMS Breconshire (9776 GRT, built 1939) and Cameronia (16297 GRT, built 1920). They were escorted by the destroyers HMAS Stuart (Capt. H.M.L. Waller, DSO, RAN), HMS Griffin (Lt.Cdr. J. Lee-Barber, DSO, RN) and HMS Hereward (Lt. W.J. Munn, RN).
Around 2030 hours, the Italian submarine Dagabur made an unsuccesful torpedo attack on HMS Bonaventure. (16)
31 Mar 1941
Around 0245 / 0300 hours, HMS Bonaventure (Capt. H.G. Egerton, RN), while escorting convoy GA 8, was hit amidships by two torpedoes fired by the Italian submarine Ambra in position 33°20'N, 26°35'E. Bonaventure sank in a few minutes taking 23 officers and 115 ratings with her. 310 survivors were picked up by HMAS Stuart (Capt. H.M.L. Waller, DSO, RAN) and HMS Hereward (Lt. W.J. Munn, RN).
HMAS Stuart heavily depth charged the Italian submarine but she managed to escape. (16)
Sources
- ADM 53/111585
- ADM 53/111586 + ADM 53/113121
- ADM 53/111586
- ADM 53/111587
- ADM 199/379
- ADM 53/111588
- ADM 53/113140 + ADM 199/379
- ADM 53/111591
- ADM 53/111592 + Rosyth Dockyard docking register
- ADM 199/1136
- ADM 199/392
- ADM 53/111592
- ADM 199/656
- ADM 53/113720
- ADM 199/414 + ADM 199/656 + ADM 223/679 + ADM 234/335
- ADM 199/414
- ADM 199/414 + ADM 53/113720
- ADM 53/113721
- ADM 199/414 + ADM 53/113721
- ADM 53/113721 + ADM 53/115234
- ADM 53/113721 + ADM 53/115234 + Report of proceedings of the 10th Destroyer Flotilla
- ADM 53/113721 + ADM 53/114820
- ADM 53/113721 + Report of proceedings of HMAS Perth for February 1941
- ADM 53/114343
- ADM 199/414 + ADM 53/114343
- ADM 199/414 + ADM 53/114343 + ADM 53/115235
- ADM 199/414 + ADM 53/115181
- ADM 186/795 + ADM 199/414
- Report of proceedings of the 10th Destroyer Flotilla for March 1941
ADM numbers indicate documents at the British National Archives at Kew, London.