
| Navy | The Royal Navy |
| Type | Monitor |
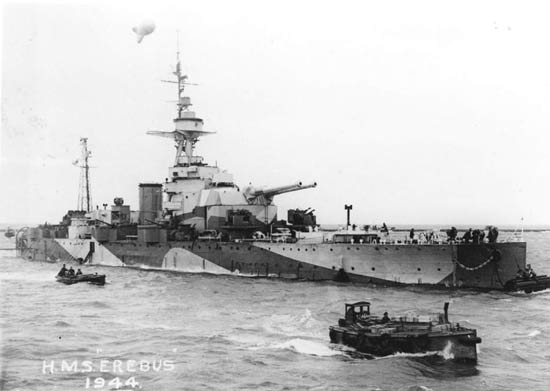
| Class | Erebus |
| Pennant | I 02 |
| Built by | Harland & Wolff Ltd. (Govan, Scotland) |
| Ordered | 29 Jul 1915 |
| Laid down | 12 Oct 1915 |
| Launched | 19 Jun 1916 |
| Commissioned | 2 Sep 1916 |
| End service | |
| History | Scrapped in July 1946. |
Commands listed for HMS Erebus (I 02)
Please note that we're still working on this section
and that we only list Commanding Officers for the duration of the Second World War.
| Commander | From | To | |
| 1 | Cdr. Ivan Walter Whitehorn, RN | 24 Aug 1939 | 12 Oct 1939 |
| 2 | Lt.Cdr. Noel Hughes Whatley, RN | 12 Oct 1939 | 11 Nov 1939 |
| 3 | Capt. Richard Shelley, RN | 11 Nov 1939 | 3 Feb 1940 |
| 4 | Lt.Cdr. Noel Hughes Whatley, RN | 3 Feb 1940 | 1 Jul 1940 |
| 5 | Capt. Harold Fielding Nalder, RN | 1 Jul 1940 | 2 Jun 1942 |
| 6 | A/Cdr. Hardress Waller D'Arcy-Evans, RN | 2 Jun 1942 | 16 Oct 1943 |
| 7 | A/Capt. (retired) John Sydney Plumptre Colquhoun, RN | 16 Oct 1943 | 17 Jul 1945 |
| 8 | Lt.Cdr. Francis Alexander Linley Heron Watson, RN | mid 1945 | mid 1946 |
You can help improve our commands section
Click here to Submit events/comments/updates for this vessel.
Please use this if you spot mistakes or want to improve this ships page.
Notable events involving Erebus include:
28 Oct 1917
While engaged in the shelling of Zeebrugge, she was struck amidships by a German "Linsen" explosive motor boat, packing a charge of between 135-225 kg explosive. The detonation occurred against the outer bulge and damage was not severe.
29 Mar 1942
Operations by the Eastern Fleet from 29 March to 13 April 1942. Enemy air attacks on Colombo and later Trincomalee and the loss of HMS Dorsetshire and HMS Cornwall on 5 April 1942 and HMS Hermes, HMAS Vampire on 9 April 1942.
Dispositions of the Eastern Fleet on 29 March 1942.
On 29 March 1942 the disposition of the Eastern Fleet was as follows; At Colombo: Aircraft carrier HMS Formidable (Capt. A.W.LaT. Bisset, RN), heavy cruisers HMS Dorsetshire (Capt. A.W.S. Agar, VC, DSO, RN) (refitting) and HMS Cornwall (Capt. P.C.W. Manwaring, RN), light cruisers HMS Enterprise (Capt. J.C.A. Annesley, DSO, RN), HMS Dragon (Capt. R.J. Shaw, MBE, RN) and HMS Caledon (A/Capt. H.J. Haynes, DSO, DSC, RN), the destroyers HMS Paladin (Cdr. A.D. Pugsley, RN), HMS Panther (Lt.Cdr. R.W. Jocelyn, RN), HMAS Nestor (Cdr. A.S. Rosenthal, DSO and Bar, RAN), HMS Hotspur (Lt. T.D. Herrick, DSC, RN), HMS Arrow (Cdr. A.M. McKillop, RN) and HMS Express (Lt.Cdr. F.J. Cartwright, RN).
At Trincomalee: The flagship of the Eastern Fleet, the battleship HMS Warspite (Capt. F.E.P. Hutton, RN, flying the flag of Vice-Admiral J.F. Somerville, KCB, KBE, DSO, RN), the aircraft carrier HMS Hermes (Capt. R.F.J. Onslow, DSC, MVO, RN), light cruisers HMS Emerald (Capt. F.C. Flynn, RN) and HrMs Jacob van Heemskerck (Cdr. E.J. van Holte, RNN), the destroyer HMAS Vampire (Cdr. W.T.A. Moran, RAN). HMS Warspite departed Trincomalee this day and arrived at Colombo in the evening. HMS Hermes and HMAS Vampire also departed Trincomalee on the 29th.
At Addu Atoll; The battleships HMS Resolution (Capt. A.R. Halfhide, CBE, RN , flying the flag of A/Vice-Admiral A.U. Willis, DSO, RN, second in command Eastern Fleet), HMS Ramillies (Capt. D.N.C. Tufnell, DSC, RN), HMS Royal Sovereign (Capt. R.H. Portal, DSC, RN), HMS Revenge (Capt. L.V. Morgan, CBE, MVO, DSC, RN) the aircraft carrier HMS Indomitable (Capt. T.H. Troubridge, RN, flying the flag of Rear-Admiral D.W. Boyd, CBE, DSC, RN) and the destroyers HMAS Napier (Capt. S.H.T. Arliss, DSO, RN), HMAS Norman (Cdr. H.M. Burrell, RAN), HMAS Nizam (Lt.Cdr. M.J. Clark, DSC, RAN), HMS Fortune (Lt.Cdr. R.D.H.S. Pankhurst, RN), HMS Foxhound (Cdr. G.H. Peters, DSC, RN), HMS Griffin (Capt. H.St.L. Nicolson, DSO, RN), HMS Decoy (Lt.Cdr. G.I.M. Balfour, RN) and HrMs Isaac Sweers (Cdr. W. Harmsen, RNN).
The Japanese had been operating in the Indian Ocean in early March and more attacks were expected in this area by the Allies. The most likely target would be the island of Ceylon and the harbours of Colombo and Trincomalee.
30 and 31 March 1942.
Planning
Admiral Somerville therefore planned to concentrate the Eastern Fleet on the late afternoon / early evening of 31 March 1942 in position 04°40’N, 81°00’E. The fleet would then be divided in two groups; Force A (the fast division) was made up of the flagships, battleship HMS Warspite, both fleet carriers, HMS Indomitable and HMS Formidable. They were escorted by the cruisers HMS Cornwall, HMS Enterprise, HMS Emerald and six destroyers; HMAS Napier, HMAS Nestor, HMS Paladin, HMS Panther, HMS Hotspur and HMS Foxhound. This force would try to intercept the enemy and deliver a night air attack on the enemy with their carriers as the main target.
Force A would be covered by the slower Force B which was made up of the battleships HMS Resolution, HMS Ramillies, HMS Royal Sovereign and the light carrier HMS Hermes. Escort to these ships was proviced by the cruisers HMS Dragon, HMS Caledon, HrMs Jacob van Heemskerck and a total of eight destroyers HMS Griffin, HMS Decoy, HMAS Norman, HMS Fortune, HrMs Isaac Sweers, HMS Arrow and one of the old destroyers that had managed to escape from the China station also joined, this was HMS Scout (Lt.Cdr.(Retd.) H. Lambton, RN). They were to remain about 20 nautical miles to the west of Force A. If Force A encountered a superior enemy force the would withdraw towards Force B.
At 1400/30 the ships mentioned earlier at the top of this article departed Colombo. HMS Hotspur and HMAS Nestor carried out an A/S sweep of the searched channel before Force A sailed.
By 1600/31 the fleet had made the pre-arranged rendez-vous and formed up. It then proceeded northwards. After dark, to avoid detection from the air by the enemy, Force A altered course to 080° and proceeded at 15 knots until about 0230 hours when it was thought they would be in the estimated position from where the enemy would fly off their aircraft for the expected attack on Ceylon. If nothing was sighted or located by 0230/1, Force A was to turn back to the south-west and to withdraw outside the enemy’s air search area. Force B was to act as a supporting force for Force A, keeping 20 miles to the west of it and confirming to the movements of Force A through the night. This procedure was carried out as planned during the night of 31 March / 1 April but nothing was seen or located.
In the late afternoon / early evening of 31 March HMS Indomitable briefly separated from the fleet for flying operations during which she was escorted by HMS Emerald. From 2100/31 to 0600/1 a search was carried out, to a depth of 120 miles from 050° to 110°, by three A.S.V. fitted Albacores from HMS Formidable. Also two Albacores fitted with long-range tanks were kept standing by for shadowing purposes if required. One of the Albacores crash landed on HMS Formidable upon return at 0340/1.
1 April 1942.
At 0940 hours HMS Decoy reported the breakdown of her main feed pumps. She was detached to Colombo to effect repairs.
Around noon several of the destroyers reported submerged contacts. HMS Scout reported sighting a periscope. The fleet took avoiding action in each case, but nothing further transpired from these contact which are now considered to be non-sub.
At 1400 hours, HMS Scout, one of the oldest destroyers of the Royal Navy with a short enducance, was detached to oil at sea from RFA Appleleaf (5892 GRT, built 1917, Master E. Mills) in position 04°00’N, 80°00’E. Upon completion of oiling HMS Scout was to proceed to position 05°40’N, 81°08’E by 0800/2. RFA Appleleaf and her escort, HMS Shoreham (Cdr. E. Hewitt, RD, RNR), were to proceed towards a new waiting position 05°00’N, 80°30’E.
In the afternoon, around 1420 hours, HMS Dorsetshire joined Force A. This cruiser had been refitting at Colombo but this refit was cut short to enable her to take part in this operation. Air searches were carried out from Ceylon as the days before but they sighted nothing of the enemy. Also from 1430/1800 hours a search was carried out by aircraft from HMS Indomitable between 142° to 207° to a depth of 215 miles. Admiral Somerville decided to carry out the same sweep to the north-east as had been done the previous night. Again nothing was seen and Force A made rendez-vous with Force B at daybreak on 2 April 1942.
2 April 1942.
At 0800 hours the destroyers HMS Fortune and HMAS Vampire were detached to fuel from RFA Appleleaf in position 05°00’N, 80°30’E. and an Albacore was ordered to search for HMS Scout and order her to rejoin the fleet. Shortly after noon the fleet sighted RFA Appleleaf, HMS Shoreham, HMS Fortune and HMAS Vampire. The last two ships then rejoined the fleet while the tanker and it’s escort were ordered to proceed towards Colombo at 1200/3.
During the day the Eastern Fleet cruised in an area about 50 miles further to the west then the previous day to avoid being detected by enemy submarines that had been reported. Throughout the day several of the escorting destroyers obtained unconfirmed echoes. Two more destroyers fuelled during the afternoon, HMAS Napier and HMS Arrow took in fuel from HMS Dorsetshire and HMS Cornwall.
As the enemy had not shown herself by 2100 hours, Admiral Somerville decided to proceed to Addu Atoll to fuel and to take on fresh water as the R-class battleships were running out of this as they had been unable to top up at Addu Atoll before they sailed.
3 April 1942.
At 0520 hours, the destroyer HMS Fortune was detached to search for survivors from the merchant vessel Glensheil (9415 GRT, built 1924) that had been torpedoed by the Japanese submarine I-7 in position 00°48’S, 78°35’E at 0230 hours. HMS Fortune picked up 88 survivors and then proceeded to Addu Atoll where she arrived at 1130/4.
As at this time Admiral Somerville felt confident that something must have held up the Japanese or that their intentions were incorrectly appreciated. At 0940 hours, he sent HMS Dorsetshire and HMS Cornwall to Colombo. The former to continue her refit and the latter to act as escort for the Australian troop convoy SU 4. HMS Hermes and the destroyer HMAS Vampire were also detached but to Trincomalee as HMS Hermes was to prepare for the upcoming operation ‘Ironclad’, the attack on Madagascar. HMS Hermes and HMAS Vampire arrived at Trincomalee on the 4th.
Late in the morning three of the destroyers of the screen oiled from the battleships; HMAS Norman from HMS Warspite, HMS Griffin from HMS Revenge and HMS Foxhound from HMS Royal Sovereign.
At 1820 hours Force A proceeded ahead to Addu Atoll at 19 knots followed by Force B at 15 knots. Force A arrived at Addu Atoll at 1200/4. Force B at 1500/4.
4 April 1942.
In the early morning hours, and while approaching Addu Atoll, a simulated air strike was carried out on Force B by aircraft from HMS Indomitable and HMS Formidable. One aircraft crashed into the sea, it’s crew was picked up by the Dutch AA-cruiser Jacob van Heemskerck. A second simulated air attack was made on Force A later in the morning.
At 1630 hours, Admiral Somerville received a report that a large enemy force was in position 00°40’N, 83°10’E at 1605/F. Enemy course was 315°. Shortly afterwards this report was confirmed by another report in which they gave an enemy course of 330°. This positioned the enemy in a position 155° from Dondra Head, 360 miles, the distance from Addu Atoll being 085°, 600 miles. There was no indication about the composition of this force.
The condition of the Eastern Fleet at Addu Atoll at that time was as follows; Owning to the limited number of oilers available, the vessels comprising Force A had taken about half their fuel and Force B had not yet commenced fuelling. In addition the ‘R’-class battleships were very short of water which had to be taken in before they could sail. This meant that Force A could sail immediately, minus HMS Emerald and HMS Enterprise. These cruisers could sail shortly after midnight. Force B could not leave until 0700 hours the following morning at the earliest.
It appeared that the enemy’s probable plan was as follows. All the evidence supported Admiral Somerville’s original appreciation that the enemy would attack Colombo (and possibly Trincomalee) with carrier borne aircraft either before dawn or shortly afterwards and would return to the carriers in a position about 150 miles south-east of Ceylon. On completion the whole force would then withdraw to the east. The enemy’s reported position made it apparent that this attack was to be made on the morning of 5 April 1942.
Admiral Somerville considered his possible courses of action were as follows: 1) Force A, less HMS Emerald and HMS Enterprise to proceed immediately at best speed to the area to the south of Ceylon and to be joined there by HMS Dorsetshire and HMS Cornwall coming from Colombo and attack any enemy force located. 2) Delay the sailing of Force A until HMS Emerald and HMS Enterprise, valuable units with their strong torpedo armament, had completed refuelling and sail about midnight. Force B could sail in the morning of the 5th and follow astern to act as a supporting force. 3) Delay the sailing of Force A until both force could leave together on the morning of the 5th. 4) Force A and Force B would remain at Addu Atoll and leave the RAF to deal with the enemy attack.
The choise Admiral Somerville made was governed by the following considerations: 1) First and foremost the total defence of the Indian Ocean and it’s vital lines of communication depend on the existence of the Eastern Fleet. The longer this fleet remained ‘in being’ the longer it would limit and check the enemy’s advances against Ceylon and further west. This major policy of retaining ‘a fleet in being’, already approved by Their Lordships, was, in Admiral Somerville’s opinion, paramount. 2) The only hope of dealing the enemy an affective blow was by means of a carrier borne air striking force preferably at night. To operate both carriers escorted by HMS Warspite out of supporting distance of the ‘R’-class battleships would offer the enemy an opportunity to cripple our only offensive weapon. Admiral Somerville considered it a cardinal point in any operation the Force A should not proceed out of the supporting distance from Force B unless it could be presumed that that enemy capital ships would not be encountered. 3) No matter what course of action Admiral Somerville would take the enemy force could not be intercepted either before or during the attack on Ceylon on the morning of the 5th. The only hope was that the air striking force from Ceylon might inflict damage to the enemy so that the Eastern Fleet could ‘finish them off’, or that the enemy attack on Ceylon would be delayed 24 hours.
Admiral Somerville therefore decided to adopt ‘plan 2’. So he sailed Force A including both E-class cruisers at midnight and ordered Force B to proceed as early as possible the following morning.
Admiral Somerville therefore instructed HMS Dorsetshire and HMS Cornwall to sail from Colombo and to make rendez-vous with Force A at 1600/5 in position 00°58’N, 77°36’E. The position of this rendez-vous was based on their expected time of departure from Colombo and estimated as being the earliest possible time at which they could cross the track of Force A, taking into consideration that HMS Dorsetshire had resumed her refit and was at extended notice. Admiral Somerville considered that the course to be steered should take them well clear of any enemy forces operating in the vicinity. Actually these instructions had been anticipated by the Deputy Commander-in-Chief, Eastern Fleet and these two cruisers, at his discretion, sailed at 2300/4 for Addu Atoll. On receipt of the signal from Admiral Somerville the Deputy Commander-in-Chief amended his instructions accordingly at 0409/5.
5 April 1942.
Force A sailed from Addu Atoll at 0015 hours and proceeded 070° at 18 knots towards a position which would bring it 250 miles south of Ceylon by dawn on the 6th. Shortly before departure the destroyer HMS Hotspur conducted an A/S search of the entrance to Addu Atoll.
During the night Admiral Somerville received reports from the Catalina reconnaissance aircraft on patrol from Ceylon of an enemy destroyer in position 01°59’N, 82°20’E, course 315°, speed 20 knots; six enemy destroyers in position 02°54’N, 82°10’E, course 325°, speed 21 knots; and at 0701 hours a report of one battleship, two cruisers an four other ships in position 195°, Dondra Head, 110 miles. Later this message was subsequently amplified to the effect that the vessels previously reported were definitely hostile and consisted of two battleships, two cruisers and destroyers.
At about 0825 hours an air raid on shipping and harbour facilities at Colombo was commenced in which some 75 aircraft were taking part. These were later reported to be mainly Navy ‘O’ fighters, armed with one bomb each. This enemy force withdrew from Colombo before 0900 hours and was seen by several merchant ships to the south-west of Ceylon probably returning to the carriers. In several cases these merchant were machine gunned.
From 0645 hours an air A/S patrol was maintained ahead of the fleet. HMS Indomitable also sent four Fulmars to commence a search to the eastward. This search covered the area between the arcs 055° to 105° to a depth of 215 miles. It proved negative except for the sighting of an enemy seaplane at 0855 hours, 076°, 150 miles from Force A. This suggested that the enemy was carrying out reconnaissance in a south-westerly direction by means of cruiser aircraft, or a seaplane carrier, in a position 70 miles of the main enemy force. There was no indication that this aircraft sighted any of our surface forces or our air search.
Between 0702 and 1145 hours, Admiral Somerville received reports of battleships in approximate positions 03°55’N, 80°40’E, steering 290° at 0648 hours, steering 120° at 0730 hours, and at 1004 hours in position 04°00’N, 80°25’E steering 282°. This suggested that the battleships were making time while the carriers recovered their aircraft. The estimated position of HMS Dorsetshire and HMS Cornwall at this time was 150 miles from the enemy and opening.
At 1327 hours a mutilated ‘Shad’ signal was received from what was thought to be Colombo but was identified half an hour later as coming from HMS Dorsetshire whose position was estimated as being 037°, 90 miles from Force A at 1400 hours. No contact could be established.
At 1344 hours an enemy air formation was detected by RD/F, 030°, 84 miles from Force A. This had faded after five minutes and it later it became clear that this was the enemy attacking the Dorsetshire and Cornwall. At 1552 hours, a reconnaissance aircraft from Force A, reported wreckage in position 02°08’N, 78°08’E.
The destroyer HMS Panther was then detached to search but was recalled about one hour later when a reconnaissance aircraft from Force A reported a force of 5 ‘unknown’ ships in position 03°38’N, 78°18’E at 100 hours. There was no indication of the course or speed of the enemy but it could be either a force previously unreported or the force previously and last reported 1004 hours.
No relief shadowers were however sent off by the Rear-Admiral aircraft carriers as soon s the report was received and Admiral Somerville omitted to obtain confirmation that this had been done. At 1700 hours, Admiral Somerville, received a report from Ceylon that there were indications of enemy aircraft carriers steering 230° at 24 knots from an unknown position at 1400 hours. This was thought to be subsequent to the attack on our 8” cruisers and Admiral Somerville’s deductions from this enemy moves were as follows. If the enemy held on this course they would at 0400 be in a position to deliver a night attack on Addu Atoll. This seemed quite a possible course of action. In any case it was necessary for Force A to keep clear to the southward and for Force B (estimated to be 135 miles astern of Force A) to steer to the southward so that Force A and B could close for supporting action at daylight the following morning (April 6th). It was also necessary for Force B to steer to the southward to keep clear of the enemy carrier force should it be proceeding to attack Addu Atoll.
At 1726 hours, therefore, Force A altered course to 210° at 18 knots and a signal was made to Vice-Admiral second-in-Command and to HMS Dorsetshire to steer south, although at this time Admiral Somerville feared about the fate of the two heavy cruisers. As he had received no signal from them that they had been attacked he thought it possible they had escaped and maintained W/T silence.
At 1800 hours Admiral Somerville received a signal from the Rear-Admiral Aircraft Carriers, stating that a reconnaissance aircraft reported the estimated enemy position as 020°, 120 miles at 1710 hours. This position was very close to the previous position reported at 1600 hours. The course of the enemy had not been given in either of these reports but the positions fitted in well with the course received earlier (230°).
At 1817 hours, a further signal was received from the Rear-Admiral Aircraft Carriers, adjusting the 1600 hours position of the enemy’s force, amplifying it to include two carriers and three unknown vessels and giving the course north-west. This was the first indication Admiral Somerville had of the enemy now proceeding to the north-west. He immediately ordered force A to alter course to 315° and instructed the Vice-Admiral, second-in-Command to conform. These movements had to object of keeping Force A within night air striking distance of the enemy force, trusting to an A.S.V. (airborne surface vessel radar) search to locate the enemy and to bring Force B within supporting distance should it be necessary to retire in that direction. A dawn rendez-vous was arranged with Force B in approximate position 03°00’N, 75°00’E.
As no news had been received of HMS Dorsetshire and HMS Cornwall it was assumed they had been sunk.
At 1930 hours a night search with A.S.V. aircraft was commenced to cover the sector 345° to 030° to a depth of 180 nautical miles. Northing was located on this search.
6 April 1942.
From 2100/5 to 0600/6 further A.S.V. searches were carried out to cover the sector 020° to 080° to a depth of 200 miles. These searches also failed to make any contact with the enemy but reported that Force B was 220°, 25 miles from Force A at 0400 hours.
At 0615 hours, Force A altered course to 135° and sighted Force B ten minutes later. By 0720 hours the Fleet was formed up and course was altered to 090°.
Whilst no furher information had been received regarding the enemy’s movements nothing had occurred to diminish the possibility of the enemy’s being in the vicinity of Addu Atoll, either to attack it by air this morning or to await the return of the Eastern Fleet.
Admiral Somerville intended to keep clear of the superior enemy forces by day. It was still his intention to get into a position to attack them with a night air striking force on their possible return from at Addu Atoll area, and also rescue the possible survivors from HMS Dorsetshire and HMS Cornwall. He therefore steered east and at 1115 hours course was altered to south-east in the direction of the wreckage that had been reported the previous evening. During the morning reports came in from merchant ships being attacked in the Bay of Bengal. There must be a second Japanese force operating there.
At 1300 hours HMS Enterprise, HMS Paladin and HMS Panther were detached to search for survivors in the vicinity of the wreckage position. Air search was provided to assist and fighter escort was sent to cover the operation. These ships were successful in picking up a total of 1122 survivors from both heavy cruisers. They rejoined the fleet at noon the following day. At 1800/6, when about 50 miles from the wreckage position course was reversed and the fleet retired to the north-west. All-round air searches were carried out to a depth of 200 miles but again nothing was seen.
At about 1400 hours a signal was received from the C-in-C, Ceylon estimating that a strong Japanese force was still somewhere between Addu Atoll and Colombo. Admiral Somerville therefore decided to keep clear of the Addu area until daylight on the 7th.
7 April 1942.
At 0200 hours the Eastern Fleet altered course to the west, 270°.
At 0427 hours, an A.S.V. aircraft located two submarines in position 02°08’N, 75°16’E and 02°46’N, 75°10’E, to the southward of the course of the Eastern Fleet. This indicated that the possibility of an enemy submarine patrol having been established to cover the eastern approaches to Addu Atoll. Admiral Somerville therefore decided to pass through Veimandu Channel to the west of the Maldives and make an unexpected approach to Addu Atoll from the west. At 0700 hours the course of the fleet was altered to 210°.
At 1335 hours, HMS Fortune was detached to investigate a ship contact made by HMS Emerald but no ship was sighted. Fortune only rejoined the fleet at about 0600/8.
At 1600 hours, HMS Enterprise, HMS Paladin and HMS Panther rejoined with the survivors they had picked up and medical stores were transferred from HMS Warspite to HMS Paladin for treatment of the wounded. Enterprise and Paladin were then detached to proceed immediately to Addu Atoll.
At 2100 hours, the Eastern Fleet altered course to 160°.
8 April 1942.
At 0700 hours aircraft were flown off from the carriers to carry out an all-round search to a depth of 175 miles. Again nothing was seen and at 1100 hours the Eastern Fleet entered Addu Atoll. Refuelling commenced immediately, Force B being refuelled first.
Admiral Somerville held a conference on board HMS Warspite with Flag and Commanding Officers in the afternoon.
Having discussed the situation Admiral Somerville decided to sent Force B to Kilindini and to proceed to Bombay with Force A. This later decision coincided with Their Lordships views as later in the day he received Their Lordships instructions that Force A was not to be sent to Colombo for the time being. Further by proceeding to Bombay the could arrange a meeting with the Commander-in-Chief, India and discuss the situation in the Far East with him.
At 1800 hours HMAS Nestor departed Addu Atoll to maintain an A/S patrol in the sector between 090° to 150° to a depth of 35 miles from the Port War Signal Station. One hour earlier HMS Resolution launched her Walrus aircraft for a ‘round the island’ A/S patrol. It returned at dusk.
9 April 1942.
Force B (less HMS Dragon sailed for Kilindini at 0200 hours where it was due to arrive on April 15th. Force A sailed at 0600 hours for Bombay shaping course to pass to the westward of the Maldives.
During the morning Admiral Somerville was informed of further Japanese attacks in the Bay of Bengal and on Trincomalee and the sinking of several ships, including HMS Hermes and HMAS Vampire but nothing could be done about this.
10 April 1942.
At 1000 hours HMS Paladin closed HMS Warspite to transfer Staff Officers for passage to Colombo where they were to inform the Deputy Commander-in-Chief, Eastern Fleet of Admiral Somerville’s views and make preliminary arrangements to transfer Admiral Somerville’s administrative staff and secretariat to Kilindini.
11 April 1942.
At 0705 hours, HMS Paladin rejoined Force A bringing back the Staff Officers who had been transferred to her on 10 April and also Rear-Admiral Danckwerts, Admiral Somerville’s Chief of Staff ashore.
Force A arrived at Bombay in the morning of the 13th (1040 hours) and commenced oiling.
Japanese operation in the Indian Ocean in late March 1942 and April 1942.
On 26 March 1942, the 1st Japanese Carrier Fleet departed Staring Bay, Celebes, Netherlands East Indies for a raid on Ceylon. This Fleet was made up of the aircraft carriers Akagi, Hiryu, Soryu, Zuikaku, Shokaku, battlecruisers Kongo, Haruna, Hiei, Kirishima, heavy cruisers Tone, Chikuma and the destroyers Urakaze, Tanikaze, Isokaze, Hamakaze, Kasumi, Arare, Kagero, Shiranuhi and Akigumo. This force then proceeded west of Timor and to a position to the south of Java where they fuelled from oilers on April 1st.
On 27 March the Japanese submarines I-2, I-3, I-4, I-5, I-6 and I-7 departed Penang to take up positions in the Indian Ocean for the upcoming operation.
On 1 April the Japanese Mayala Force departed Mergui for operations in the Bay of Bengal. This force was made up of the heavy cruisers Chokai, Kumano, Mikuma, Mogami, Suzuya, aircraft carrier Ryujo, light cruiser Yura, and the destroyers Fubuki, Shirayuki, Hatsuyuki and Murakumo. On 4 April the estroyers were substituted for four other destroyers; Amagiri, Asagiri, Shirakumo and Yugiri.
On 5 April the Japanse 1st Carrier Fleet launched their air attack on Colombo. 53 bombers, 38 dive bombers and 36 fighters were launched. They destroyed 19 Hurricane fighters, 1 Fulmar fighter and 6 Swordfish torpedo bombers. At Colombo the harbour facilities were heavily damaged and the armed merchant cruiser HMS Hector and destroyer HMS Tenedos were sunk.
Then around noon a reconnaissance aircraft from the Tone sighted the heavy cruisers HMS Dorsetshire and HMS Cornwall. The 1st Carrier Fleet immediately launched an attack force of 53 dive bombers that sank both cruisers with the loss of 424 members of their crews (Dorsetshire 234 and Cornwall 190). The Japanese then retired to the south-east.
In the evening of 5 April the Japanese Malaya-Force was ordered to commence attacking Allied shipping along the Indian east coast. On 6 April the northern group (Kumano, Suzuya and Shirakumo destroyed 9 ships off Puri (Orissa). The central group (Chokai, Yura, Asagiri and Yugiri) sank 4 ships. The southern group (Mikuma, Mogami and Amagiri sank 3 ships and damaged 2 more. Meanwhile aircraft from the carrier Ryuju, which operated with the central group, sank 4 more ships and damaged 1 more. In all about 92000 GRT of shipping was sunk.
On 8 April 1942 a Catalina aircraft spotted the Japanese 1st Carrier Fleet proceeding for an attack on Trincomalee but the Eastern Fleet was approaching Addu Atoll to refuel and could do nothing. Shipping at Trincomalee was ordered to leave port and proceed to the southward. In the morning of the following day 91 Japanese bombers and 41 fighters attacked Trincomalee. They destoyed 9 Hurricane and Fulmar fighters and 14 aircraft on the ground. The harbour most mostly empty but they sank a merchant vessel and 4 aircraft it had on board and not unloaded yet. Also the British monitor HMS Erebus (Capt. H.F. Nalder, RN) was damged. The Japanese 1st Carrier Fleet was then attacked by 9 Blenheim bombers but they inflicted no damage for 5 of their own lost to Japanese fighter cover. Then Japanese reconnaissance aircraft from the Haruna sighted ships escaping southwards. 85 Dive bombers and 3 fighters were then launched which sank HMS Hermes and HMAS Vampire as well as the corvette HMS Hollyhock (Lt.Cdr. T.E. Davies, OBE, RNR), two tankers and a merchant ship.
By mid-April 1942 all Japanese forces had returned to their bases. (1)
31 Jul 1942
During 31 July / 1 August 1942, HMS Devonshire (Capt. R.D. Oliver, CBE, DSC, RN) and HMS Dauntless (A/Capt. J.G. Hewitt, DSO, RN) conducted exercises off Kilindini / Mombasa. These included night encounter exercises. During 31 July only HMS Erebus (A/Cdr. H.W. D'Arcy-Evans, RN) was also with them for exercises. (2)
Jul 1943
Damaged by an Axis air attack while deployed in support of the Sicilian landings (Operation Husky).
10 Jul 1943
At 0640B/10, HMS Uganda (Capt. W.G. Andrewes, RN) opened fire on a shore battery in the Acid landing zone. The results of the bombardment are not known.
At 0813B/10, HMS Uganda opened fire on a shore battery in the Acid landing zone which was believed to be engaging shipping to the northward of the beaches. The battery ceased fire temporarily.
At 0945B/10, HMS Uganda was engaged by a shore battery to the north of her. No shells landed nearer then 600 yards.
At 1045B/10, HMS Uganda opened fire on the same shore battery then had been engaged at 0813B/10. It was reported that under cover of the shoot infantry had reached a position close to this battery.
At 1550B/10, enemy aircraft conducted an air raid on the ' Acid beaches '.
At 1739B/10, HMS Uganda opened fire on enemy barracks and a shore battery. Contact with the forward observer was lost and the result of the bombardment is not known. Shorty afterwards another enemy air attack on the ' Acid area ' commenced.
At 1909B/10, HMS Uganda was narrowly missed by an enemy fighter bomber attack. Three of her crew sustained (minor) injuries due to splinters.
The air attacks continued and at 1930B/10, HMS Uganda was again near missed as was HMS Erebus (Cdr.(Retd.) H.W. D'Arcy-Evans, RN).
Around 2200B/10, during another enemy air attack the hospital ship Talamba (British, 8018 GRT, built 1924) was bombed and sunk. HMS Tartar (Cdr. St.J.R.J. Tyrwhitt, DSC, RN), HMS Carlisle (Capt. H.F. Nalder, RN) and HMS Uganda picked up survivors. (3)
12 Jul 1943
HMS Uganda (Capt. W.G. Andrewes, RN) is still operating in the ' Acid area ' off Sicily.
Around 0430B/12, an enemy air attack took place on the convoy anchorage and the beaches. HMS Eskimo (Capt. J.W.M. Eaton, DSO, DSC, RN) was damaged off Capo Murro di Porco. HMS Tartar (Cdr. St.J.R.J. Tyrwhitt, DSC, RN) later towed the damaged ship to Malta.
At 0802B/12, HMS Uganda opened fire on an enemy position with obeservation from a forward observer but efore results came in fire was shifted to the town of Mellini.
At 1205B/12, HMS Uganda opened fire on enemy infantry under observation of a forward observer who later reported that an enemy tank was also present. No final report on the damage done was received but at least five salvoes had been reported to be within at least 10 yards from the target.
Around 1300B/12, an Italian submarine was seen to surface which was immediately engaged by minesweepers which were patrolling to the seaward of HMS Uganda and HMS Orion (Capt. G.C.P. Menzies, RN). The submarine in question was the Bronzo and the minesweepers were the HMS Seaham (Lt.Cdr. R.E. Brett, RNR), HMS Boston (Lt. D.H.G. Coughlan, RNR), HMS Poole (Lt. W.L.G. Dutton, RNR) and HMS Cromarty (Lt.Cdr. C.G. Palmer, DSC, RNZNVR). After a short battle the submarine surrendered to HMS Seaham which then towed the submarine to Syracuse.
Between 1343B/12 and 1415B/12, first HMS Erebus (Cdr.(Retd.) H.W. D'Arcy-Evans, RN) and then HMS Orion bombarded Mellini.
At 1420B/12, HMS Erebus reported seeing a white flag being hoisted near the lighthouse at Augusta. RHS Kanaris was then ordered to close and ascertain the situation.
At 1425B/12, the minesweepers were ordered to start sweeping an approach channel towards Augusta.
At 1440B/12, RHS Kanaris lowered a boat to pass the boom and find out the situation. HMS Uganda and HMS Orion stood by to bombard if necessary.
At 1503B/12, RHS Kanaris passed the boom at Augusta being the first Allied ship to do so.
At 1515B/12, RHS Kanaris was being fired upon. HMS Uganda and HMS Orion immediately opened fire and carried out a short bombardment of the town.
At 1528B/12, HMS Orion reported that a shore battery was continuing to fire at RHS Kanaris but that she kept it quiet with a round every half minute.
At 1546B/12, HMS Exmoor (Lt. D.T. McBarnet, RN) was ordered to support RHS Kanaris.
At 1630B/12, a small gun was reported to be still active in the town and was now being engaged by the two escort destroyers.
Around 1730B/12, HMS Brocklesby (Lt. K.R.S. Leadlay, RN) approached and then entered Augusta harbour.
At 1750B/12, the three escort destroyers departed the harbour and started laying smoke when they were engaged by a light shore battery.
At 1850B/12, the landing ship HMS Ulster Monarch (Lt.Cdr. N.A.F. Kingscote, RNR) arrived off Augusta but was advised not to enter. HMS Nubian (Cdr. D.E. Holland-Martin, DSC, RN), HMS Tetcott (Lt.Cdr. H.R. Rycroft, RN) and RHS Kanaris were ordered to give close support.
Around 1930B/12, HMS Ulster Monarch commenced to land Commandoes outside the harbour. Ten minutes later the destroyers engaged shore targets followed another ten minutes later by HMS Uganda.
At 2020B/12, HMS Ulster Monarch reported she had landed around 300 troops.'
At 2030B/13, the bombarding forces of the Acid and Bark area were ordered to join company. (3)
13 Jul 1943
The bombardment force of the Acid area; made up of the light cruisers HMS Mauritius (Capt. W.W. Davis, RN), HMS Uganda (Capt. W.G. Andrewes, RN) and the destroyer HMS Nubian (Cdr. D.E. Holland-Martin, DSC, RN) [the damaged destroyer HMS Eskimo (Capt. J.W.M. Eaton, DSO, DSC, RN) had been towed to Malta by her sister ship HMS Tartar (Cdr. St.J.R.J. Tyrwhitt, DSC, RN)] and the bombardment force of the Bark area; the light cruisers HMS Newfoundland (Capt. W.R. Slayter, DSC, RN, flying the flag of Rear-Admiral C.H.J. Harcourt, CBE, RN), HMS Orion (Capt. G.C.P. Menzies, RN) and the destroyers HMS Laforey (Capt. R.M.J. Hutton, DSO, RN), HMS Lookout (Lt.Cdr. A.G. Forman, DSC, RN) and HMS Loyal (Lt.Cdr. H.E.F. Tweedie, DSC, RN) joined company [' Force K '].
Around 0500B/13, several enemy aircraft attacked ' Force K '. Bombs were dropped close to HMS Laforey but she sustained no damage.
During the day several bombardments were carried out. Around 0900B/13, HMS Mauritius commenced a bombardment of the towns of Lentini and Carlentini. She had to break off this bombardment at 0923B/13, when a heavy shore battery opened fire on her. This battery was then taken under fire between 0940B/13 and 1007B/13.
At 1000B/13 another coastal battery near Brucoli was then being fired upon briefly by HMS Newfoundland and all destroyers.
Also around this time HMS Orion, HMS Uganda and HMS Nubian parted company to proceed to Malta to load ammunition and fuel. They arrived at Malta around 1430B/13.
Around noon both HMS Loyal and HMS Mauritius reported being attacked by aircraft.
Around 1630B/13, HMS Loyal was detached to Malta.
Between 1700B/13 and 1724B/13, HMS Mauritius bombarded a target to the south of Catania. Coastal batteries opened fire on her and at 1724B/13 she was straddled and then withdrew out of range of the heavy coastal battery.
At 1705B/13, HMS Newfoundland briefly bombarded Lentini (only for 2 minutes).
Between 1745B/13 and 1800B/13, HMS Mauritius bombarded Lentini.
At 1950B/13, HMS Newfoundland, HMS Mauritius, HMS Laforey and HMS Lookout formed formation and retired to seaward for the night.
HMS Newfoundland had carried out two bombardments on this day and HMS Mauritius seven. The monitor HMS Erebus (Cdr.(Retd.) H.W. D'Arcy-Evans, RN) was also operating in the area. (4)
3 Sep 1943
Operation Baytown.
Allied landing between Catona and Reggio Calabria.
The 5th Division, 13 Corps and the 1st Canadian Division were landed on three beaches between Catona and Reggio Calabria during the early hours of the morning. Troops and stores were ferried across the Straits of Messina in 22 LST's, 65 LCI(L)'s, 38 LCT's, 100 LCM's and 70 LCA's.
Support for the landing was provided by the light cruisers HMS Mauritius (Capt. W.W. Davis, RN, flying the flag of Rear-Admiral C.H.J. Harcourt, CBE, RN), HMS Orion (Capt. G.C.P. Menzies, RN), monitors HMS Abercrombie (A/Capt. G.V.B. Faulkner, RN), HMS Roberts (A/Capt.(Retd.) R.E.C. Dunbar, RN), HMS Erebus (Cdr.(Retd.) H.W. D'Arcy-Evans, RN), destroyers HMS Quilliam (Capt. S.H. Carlill, DSO, RN), HMS Quail (Lt.Cdr. R.F. Jenks, RN), HMS Queenborough (Cdr. E.P. Hinton, DSO and Bar, MVO, RN), HMS Offa (Lt.Cdr. R.F. Leonard, RN), Loyal, HMS Loyal (Lt.Cdr. H.E.F. Tweedie, DSC, RN),ORP Piorun (Kmdr.por. (Cdr.) S.T. Dzienisiewicz), monitors HMS Abercrombie (A/Capt. G.V.B. Faulkner, RN), HMS Roberts (A/Capt.(Retd.) R.E.C. Dunbar, RN), HMS Erebus (Cdr.(Retd.) H.W. D'Arcy-Evans, RN) and the (river) gunboats HMS Aphis (Lt.Cdr. F.Y. Bethell, RN) and HMS Scarab (T/Lt. E. Cameron, RNZNVR).
A heavy barrage by 8th Army artillery sited on Sicily preceded the landing and the first assault wave touched down at 0430B/3 and found very little opposition. By 0730B/19 advance elements of the Canadian Division were on the outskirts of Reggio Calabria and the aerodrome was captured during the morning. The 8th Army reached Cannitello during the day.
The population was reported as friendly. 2500 Prisoners were taken the majority being Italians.
By 1400B/3, a second flight was well under way, all first flights loads having been cleared well ahead of the planned programme.
The naval port party had entered Reggio Calabria at 0945B/3. In the harbour the outer breakwater was found to be undamaged, with bollards intactand wholly clear of underwater obstructions. Other quays have suffered damage through bombing but should be quickly repairable.
During the day the C-in-C, Mediterranean, Admiral of the Fleet Sir A.B. Cunningham, GCB, DSO and 2 Bars, RN, inspected the landing beaches from the destroyer HMS Tartar (Cdr. St.J.R.J. Tyrwhitt, DSC, RN).
During the night three of the destroyers, HMS Quilliam, HMS Quail and HMS Queenborough (Cdr. E.P. Hinton, DSO and Bar, MVO, RN), patrolled south-east of the Straits of Messina and coastal forces north of Messina and off the south Calabrian coast to guard against interference with enemy surface forces. The two cruisers and the remaining destroyers patrolled north of Cape Santa Groce (near Augusta) and east of 16°E. The monitors and gunboats anchored south of Taormina during the night.
HMS Quilliam, HMS Quail and HMS Queenborough (Cdr. E.P. Hinton, DSO and Bar, MVO, RN) had been ordered to leave patrol around 0600B/4 and then proceed to Malta arriving there around 1030B/4.
HMS Mauritius, HMS Orion, HMS Offa, HMS Loyal and ORP Piorun returned to Augusta around 0800B/4.
HMS Erebus, HMS Aphis and HMS Scarab remained off the landing beaches to give fire support if required.
[The movements of HMS Abercrombie and HMS Robets are not clear and will have to be further reseached. It appears though that thy had already returned to Augusta on 3 September.] (5)
25 Sep 1943
Convoy MKS 25G.
This convoy departed Gibraltar for the U.K. on 25 September 1942.
It was made up of the following merchant vessels; Arlesford (British, 2472 GRT, built 1922), Baron Fairlie (British, 6706 GRT, built 1925), Benrinnes (British, 5410 GRT, built 1921), Bridgepool (British, 4845 GRT, built 1924), Bur (Swedish, 1956 GRT, built 1919), City of Lancaster (British, 3041 GRT, built 1924), Clan MacBean (British, 5000 GRT, built 1918), Clan MacNair (British, 6096 GRT, built 1921), Dimitrios Inglessis (Greek, 5275 GRT, built 1918), Elizabeth Massey (British, 4323 GRT, built 1929), Empire Pennant (British, 7043 GRT, built 1942), Empire Prince (British, 7030 GRT, built 1942), Empire Shearwater (British, 4970 GRT, built 1920), Empire Summer (British, 6949 GRT, built 1941), Empire Wolfe (British, 2888 GRT, built 1941), Flaminian (British, 2711 GRT, built 1917), Fort Chipewyan (British, 7136 GRT, built 1942), Fort McMurray (British, 7133 GRT, built 1942), Glenfinlas (British, 7479 GRT, built 1917), Inventor (British, 6210 GRT, built 1935), Kindat (British, 4358 GRT, built 1938), Lech (Polish, 1568 GRT, built 1934), Linge (Dutch, 2114 GRT, built 1928), Nailsea Moor (British, 4926 GRT, built 1937), Nairung (British, 5414 GRT, built 1942), Ocean Strength (British, 7173 GRT, built 1942), P.L.M. 13 (British, 3754 GRT, built 1921), Rajput (British, 5497 GRT, built 1925), Skeldergate (British, 4251 GRT, built 1930) and Trevorian (British, 4599 GRT, built 1920).
The rescue ship Copeland (British, 1526 GRT, built 1923) was also with the convoy.
The RFA escort oiler Fortol (2629 GRT, built 1917) was also with convoy.
The monitor HMS Erebus (Cdr.(Retd.) H.W. D'Arcy-Evans, RN) also took passage in the convoy.
On departure from Gibraltar the convoy was escorted by the destroyers HMS Highlander (Cdr. C.W. McMullen, DSC, RN), HMS Walker (Lt.Cdr. A.N. Rowell, RN), HMS Westcott (Lt.Cdr.(Retd.) H. Lambton, RN), HMS Witch (Lt.Cdr. S.R.J. Woods, RNR), sloop HMS Redpole (Lt.Cdr. I.M. Carrs, RN) and the corvettes HMS Abelia (Lt. R.I. Floris, RNZNR), HMS Asphodel (Lt.Cdr. H.P. Carse, DSC, RNVR), HMS Clover (Lt. P.H. Grieves, RNR) and HMS Pennywort (A/Lt.Cdr. O.G. Stuart, RCNVR).
On 26 September the light (AA) cruiser HMS Scylla (Capt. I.A.P. Macintyre, CBE, DSO, RN) departed Gibraltar to overtake and join the convoy which she did in the afternoon.
Around 2355A/1, HMS Redpole parted company with the convoy.
Around 1930A/2, the light cruiser HMS Spartan (Capt. P.V. McLaughlin, RN) joined. She parted company with the convoy around 1430A/3.
Around 2030A/3, HMS Scylla parted company with the convoy to proceed to Plymouth.
Around 0800A/4, HMS Erebus parted company with the convoy to proceed to Plymouth escorted by HMS Witch.
The convoy arrived in U.K. waters on 8 October 1943.
Sources
- ADM 199/1389
- ADM 53/115731 + ADM 53/115732 + ADM 53/115783 + ADM 53/115784 + ADM 199/429
- ADM 53/118642 + ADM 199/943
- ADM 53/117900 + ADM 53/118277 + ADM 53/118314 + ADM 53/118642 + ADM 234/356
- ADM 199/461
ADM numbers indicate documents at the British National Archives at Kew, London.