
Allied Warships
HMCS Haida (G 63)
Destroyer of the Tribal class
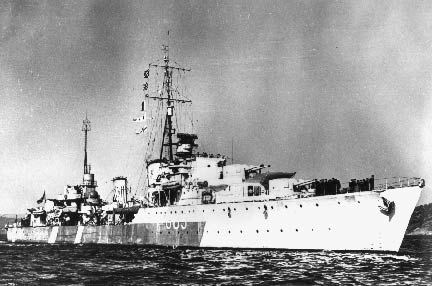
HMCS Haida as seen during the Second World War.
| Navy | The Royal Canadian Navy |
| Type | Destroyer |
| Class | Tribal |
| Pennant | G 63 |
| Built by | Vickers Armstrong (Newcastle-on-Tyne, U.K.) : Parsons |
| Ordered | 5 Apr 1940 |
| Laid down | 29 Sep 1941 |
| Launched | 25 Aug 1942 |
| Commissioned | 30 Aug 1943 |
| End service | 11 Oct 1963 |
| History | Pennant numbers: G63 July 1943 - January 1952; DDE215 February 1952 - August 1964; G63 September 1964 to date. [The following story was written by Thomas G. Lynch and appeared in the February 1982 issue of Model Boats Magazine. Mr. Lynch reviews the lucky career of Canada's famous Tribal Class destroyer]. The story of Canada's most beloved wartime ship began in 1940 with future requirements in Royal Canadian Navy (R.C.N.) ships being assessed by the Canadian Government. Canada had acquired surplus 'C' and 'V' class destroyers to supplement her minuscule fleet of modified Acastas over the four years preceding and the first year of the war. With the loss of two of these and projected waiting times for space in a British yard, it was thought that future requirements be confirmed and ships ordered. At this time, the Royal Navy (R.N.) had large numbers of Tribal Class destroyers in service and it was reasoned that this large destroyer type was the next logical ship for the R.C.N. Modified ventilation and heating systems were deemed necessary for North Atlantic service and were so specified. IROQUOIS was the first order and HAIDA was ordered from the Vickers-Armstrong Yards on the Tyne in April 1941. The keel was laid on September 29th, 1941, after plans were approved and materials became available. However, with the commissioning of IROQUOIS and subsequent deficiencies in her design, HAIDA acquired additional stiffening of the keel, fore plates, stringers and ribs, as well as additional bracing of the forward magazine areas. No folded bows for HAIDA! HAIDA was launched on the 25th of August 1942 by Lady Laurie and was commissioned into the R.C.N. the 30th August 1943. She underwent workups under command of Cdr. H.G. 'Hard-Over-Harry' DeWolf and reported to the Home Fleet, Scapa Flow, Scotland in October 1943. She worked in conjunction with R.N. units between the 14th-22nd for the relief of the Spitsbergen garrison and the passage of Soviet minesweepers into Kola. Between October 25, 1943 and January 7, 1944, HAIDA and two other Canadian Tribals worked with Spitsbergen resupply to relieve the monotony. January 10, 1944 found HAIDA transferred to Plymouth, England and the 10th Destroyer Flotilla, which immediately undertook 'Operation Tunnel' sweeps, the destruction and interdiction of the Bay of Biscay ports to Kriegsmarine units (German navy). HAIDA was damaged in action with the German Elbing, T-29 on the 25/26th of April, but still pressed home her attack and shared the sinking of the same German ship. This was HAIDA'S first successful engagement and Cdr. DeWolf carved a notch into the bridge rail, to be joined by seven more by September of the same year. 'Operation Hostile' sweeps were started on the 28/29th of April by HAIDA, in company with ATHABASKAN, another Canadian Tribal. Mixing it up with a group of German destroyers, the Flotilla rapidly became separated into small groups in hot pursuit of individual ships. As ATHABASKAN steadied unto an intercept bearing with a fleeing Elbing, she was struck by a German torpedo and numerous fires broke out, defying the best efforts of fire control parties. She was eventually abandoned and sank. 44 survivors were recovered; 128, including Lt.-Cdr. J.H. Stubbs, the C.O. were missing and 83 became P.O.W.'s. HAIDA Avenged her sister ship moments later by hammering T-27 until she elected to ram herself hard aground on the reefs of Ile de Vierge, where HAIDA shelled her further until she turned into a blazing hulk. Later the next day, rocket-firing Beaufighters finished the job and T-27 was written off. HAIDA and HMCS HURON continued in 'Operation Hostile' sorties with the 10th Destroyer Flotilla (10th DF) throughout the remaining months before the Normandy invasion. June 8/9th had HAIDA, part of Force 26, in the happy hunting grounds once more. The German destroyers ZH1 and Z32 paid the price this trip. June 24th had HAIDA sinking U-971 which with her previous victories, caused significant envy and admiration within the 10th D.F. However, Cdr. DeWolf demurred, claiming to have been on a lark, while HMS ESKIMO had done most of the work. HAIDA was then relieved for a well overdue boiler-cleaning and general repairs for ten days, then returning on the 15th of July. This date, HAIDA and two other ships of the 10th DF intercepted a medium body of enemy ships off the mouth of the Lorient. In the ensuing battle, two A/S trawlers UJ1420 and UJ1421 were pounded to flinders, one merchant ship sunk and two others left in a sinking condition and hopelessly on fire. HAIDA expended numerous rounds again a silhouetted target that, although dead in the water was able to absorb tremendous punishment with little ill effect. Finally the target was identified for what it was; just that, a target barge! Imagine the red faces of the Gunner Officers! August 5/6 was the last of HAIDA'S famous luck. While engaged in an 'Operation Kenetic' sweep and exchanging salvoes with enemy units, a shell exploded in 'Y' turret and ignited the paintwork. Two ratings were badly burnt, six injured and two killed. Adding insult to injury, 'A' turret was disabled by a near miss a short while later that evening. The rest of the month was spent in transporting supplies to resistance groups, but HAIDA'S first commission was drawing to a close. September 22nd was her date of departure; destination Halifax, Nova Scotia, arriving on the 29th to one of the most tumultuous welcomes ever recorded a unit of the R.C.N.! HAIDA returned to Scapa Flow in mid-January 1945, sporting new radar fits. She worked up until March 19th, when she was declared operational. She helped escort carriers in a FAA minelaying operation off Granesund in Norway and again from the 24th to the 28th with carriers attacking shipping in the Trondheim area. On the 7th April, HAIDA sailed from Greenock, Scotland with seven subchasers destined for Soviet use. These joined convoy JW66 after a severe storm, on the 19th, arriving at Vaenga on the 25/26th. The fall of Berlin was celebrated while there, with celebrations both ashore, courtesy of the Soviets and aboard HURON, courtesy of the R.C.N. April 9th saw the convoy depart for United Kingdom (UK) waters, but someone had forgotten to inform the U-boats that the war was over! 19th Escort Group had just sunk two U-boats and lost the frigate GOODALL. Both HAIDA and HMCS IROQUOIS were near-missed by torpedoes and the reprieve only came when a snowstorm descended upon the convoy, making contact on both sides difficult. HURON, IROQUOIS and HAIDA arrived back in Scapa Flow on 6th May, after what was to prove to be the last of the Russian convoys. Germany surrendered two days later. After relief operations in the Trondheimfiord (Norway) on the 17th, HAIDA was prepared for the return to Canada to refit for the Pacific war. She left for Halifax on 4th June, with HURON and IROQUOIS who were packed to the gills with R.C.N. personnel returning home. They arrived on the 10th and HAIDA immediately started a tropicalization refit, but Japan surrendered and the rest of the refit was suspended. Finally, HAIDA was paid off on 20th March 1946 as part of the general demobilization of the fleet. By 1947, however, HAIDA was being prepared for duty once more. A lattice mast replaced the tripod foremast and her anti-aircraft armament (A.A.) consisted of four 20mm Oerlikons and four 40mm Bofors/L60 guns. However, the HAIDA luck once again deserted her, when fire gutted the wheelhouse and later when burst boiler tubes occurred during full-speed trials. Finally in May 1947, she returned to the fleet. For the next three years, HAIDA and NOOTKA took part in joint exercises off the East Coast of North America with United States Navy (U.S.N) units and in the North Atlantic with R.N. ships during the summer months. The West Coast Flotilla would come through the Panama Canal to join their East Coast sister ships in winter exercises in the West Indies sunshine, with R.N. ships as well. Few events occurred at were unusual. The first was going to the aid of HMCS MICMAC after a collision with the SS Yarmouth County. Another was Operation Scuppered, where U-190 was to be sunk by combined attacks from rocket-firing Firefly aircraft, 4.7 inch salvoes from HMCS NOOTKA and HAIDA and the frigate NEW LISKEARD would attack the sinking wreck with hedgehog. The Fireflies attacked and NOOTKA hurriedly fired a few rounds into the rapidly sinking wreck, while NEW LISKEARD launched a rapid hedgehog attack over the rapidly sinking hulk. Other events were the cruises in Northern waters in September 1948 and the grounding of the aircraft carrier HMCS MAGNIFICENT off Port Mouton on the 4th June 1949. Another incident involved the rescue of the crew of a downed B-29 several hundred miles off Bermuda, in which HAIDA out-raced a U.S.N. unit through Force 6 winds and seas to pick up 15 survivors. In December 1949, HAIDA became a Depot and Accommodation Ship in Halifax. By July 1950, conversion to an escort carrier had begun. When completed, she had lost ''X and 'Y' mounts aft, getting two triple barrelled Squid anti-submarines (A/S) furthest aft and a paired 3in/50 cal mount in 'Y' turret's position. An aluminum lattice foremast was in place and four 40mm/L40-60's served as A.A. defence. Four new torpedoes in a single mount were added and a vast improvement in radar fits was apparent. Whip antennas were first used on HAIDA for radio communication, mainly for the TBS radios (60 to 80 MHz) and rough weather catwalks and rough weather catwalks extend aft over the torpedo tubes to the aft deckhouse. She re-commissioned March 15, 1952. While HAIDA was undergoing refit, and shakedown, the Korean conflict had been coming to a boil and by this time the United Nations (UN) forces were fully involved. HAIDA had made a trip to Plymouth, England with MAGNIFICENT in June and when she returned, she was to be prepared for overseas action. She sailed for Sasebo Japan from Halifax on 27th September 1952, arriving there on the 12th November, after passing through the Panama Canal. Here, final foodstuffs and repairs were made and she relieved NOOTKA as planned guard on the West Coast of Korea on the 18th. HAIDA had an uneventful tour, being twice detached for coastal patrols, but still without action. She returned to Sasebo on 29th November, 1953 for replenishment. Back on patrol, but on the East Coast this time on December 4th, HAIDA did the complete rounds of differing patrols, taking part in the shelling of the Songjin marshalling yards with USS Moore on the 6th. A 76mm battery returned their fire, but a U.N. FAC aircraft soon directed HAIDA'S 3in/50 fire onto the battery position, effectively silencing it. HAIDA took part in other bombardment duties in the Sonjin area, largely against encroaching North Korean waterborne troops. Her Sperry HDWS radar, with its high definition, allowed her gunners to observe the fall of shot and to detect the small sampans the Reds were using to try the mud-flat crossings. On the 18/19 of December HAIDA surprised a train in the same area, illuminated it and proceeded to pound ten boxcars to rubble. However, the engine managed to uncouple and escaped into one of the numerous tunnels, eliminating her chances of entrance into the exclusive Trainbusters Club. Christmas was spent in Sasebo, with other Canadian destroyers, the first time that all of Canada's UN commitment were together as a Flotilla. HAIDA was back on station as 'wind chaser' for two more carrier escort patrols on 3rd January 1953 and minor bombardments in the Haejuman area proved the worth of the Sperry HDWS radar with objects as small as men standing out on the low-tide mudflats. March saw HAIDA admitted to the Trainbusters Club after she tackled another train on the 29th, north of Iwon, Korea. To cap her night, HAIDA detected and blew up a drifting mine on her way back to Yang- do. She returned to Sasebo on the 12th June and thence through the Suez Canal and Mediterranean, arriving in Halifax on 22nd July 1953. The Tribal departed Halifax on her second Korean tour on 14th December 1953, passing through the Panama Canal. The cease-fire had been signed, and although infractions were still occurring, it was strictly an Army/Air Force show. Plane guard and patrols proved monotonous and finally she headed for home via the Suez Canal once more, arriving on 1st November 1954. HAIDA and the other Tribals embarked on purely anti-submarine exercises during the mid-1950's, as Canada's specialized more and more in this field. They worked with newly formed NATO units in the North Atlantic during the summer and with carrier/destroyer elements of the R.C.N in the West Indies during the winter months. High points of these years included assisting HMCS ALGONQUIN after she was damaged by Hurricane Carla in September 1956 and escorting LAUZON and PORTAGE into Halifax in March 1957 after they collided. 1958 saw the superb rescue of a Banshee pilot from HMCS BONAVENTURE, but unfortunately, the pilot could not be revived. On 15th July 1960, HAIDA escorted HMCS KOOTENAY with her cargo of an Indian totem pole, 'Hosaqami' to HMS EXCELLENT to mark the end of R.C.N. Gunnery Courses at Whale Island. The last few years had a trying effect upon HAIDA'S ageing hull and troubles began to manifest themselves. In January 1958, funnel caps were fitted to protect electronic equipment and extensive hull repairs were carried out. March, saw her lattice mast carry away after bombardment exercises, necessitating a repair in Miami. December 12, 1958 had the steering fail on the way back from Europe and when corrected, the foremast promptly attempted to carry away once more! Excellent seamanship and massive lashing saved the mast from a watery grave. Shortly thereafter, the forward magazine became alarming with its moans and groans, which required additional shoring to correct. HAIDA started 1959 in drydock while repairs were made. She returned on 28th January with sprung seams in the starboard Squid magazine which were temporarily corrected and deferred until regular refit time in April. February heralded the third collapse of the foremast and once again it was save my lashing. Refit was completed in January 1960 and she immediately sailed for the West Indies, developing 'condenseritis' on the first exercise followed by equipment failures, which forced her to retire. April 3rd was the last straw when the steering gear broke while leaving Ireland Island Dockyard, fortunately without incident. In May, a hull survey found extensive corrosion of welds on the starboard side. Plates and stringers were replaced, but cracks were discovered in other plates in an underwater, self-survey in November. She finished the year in drydock. Next, repairs were necessary in June-July 1961, after HAIDA tackled heavy seas and ice conditions in March. Marine Industries of Sorel, Quebec were the contractors. March 1962 saw further cracks develop on the port bow plates and full power trials showed defective main engine bearings and electrical defects in the boiler room fans. Clearly, the handwriting was on the wall this time for all to see! Refit took until February 1963. HAIDA began her last commission on 25th April 1963, with a Great Lakes tour. A ten ton mobile TV studio was positioned on the port side of the torpedo tubes and extensive filming was done of all aspects of shipboard life as well, as main armament drill and firing. Thousands toured her; among them being a civilian pilot, Neil Bruce. He had the half-formed idea of trying to save HAIDA from the breakers yard and HAIDA Inc. resulted. Upon completion of the tour, HAIDA was placed in Category 'C' reserve and her fate seemed sealed. In 1964, as part of Navy cutbacks, Crown Assets Disposal announced HAIDA would be scrapped. HAIDA Inc., entered a bid of $20,000 and won. The R.C.N. bent over backwards, stuffing as much gear as could be fitted aboard her for restorative purposes and towing her first from Sydney, N.S. to Halifax for cleanup, then to Sorel, Quebec where she became civilian property. Reservists from HMCS York, Toronto acted as skeleton crew and she was towed to Toronto by two tugs. She arrived on August 25, 1964 with the guest of honour being Vice-Admiral Harry DeWolf, her first Captain. HAIDA was cleaned up, painted and the original 'G63' pennant numbers were painted back on by Ken MacPherson of Ontario Archives, a keen naval historian in his own right. The ship remains at Ontario Place, Toronto and is visited by thousands every year. After all, she is the last Tribal and makes a great and lasting reminder of what sacrifice and achievements Canadians gained while at war. More info on HMCS Haida is available at this website (offsite link). |
Commands listed for HMCS Haida (G 63)
Please note that we're still working on this section
and that we only list Commanding Officers for the duration of the Second World War.
| Commander | From | To | |
| 1 | Cdr. Harry George De Wolf, RCN | 30 Aug 1943 | 18 Dec 1944 |
| 2 | A/Lt.Cdr. Robert Philip Welland, DSC, RCN | 19 Dec 1944 | 2 Sep 1945 |
You can help improve our commands section
Click here to Submit events/comments/updates for this vessel.
Please use this if you spot mistakes or want to improve this ships page.
Notable events involving Haida include:
24 Sep 1943
HMS Viking (Lt. R. Bannar-Martin, DSC, RN) conducted A/S exercises at/off Scapa Flow with HMS Teazer (Lt.Cdr. A.A.F. Talbot, DSO and Bar, RN) and HMCS Haida (Cdr. H.G. De Wolf, RCN). (1)
27 Sep 1943
In the morning HMS Viking (Lt. R. Bannar-Martin, DSC, RN) conducted A/S exercises at Scapa Flow with HMCS Haida (Cdr. H.G. De Wolf, RCN) and HMS Vigilant (Lt.Cdr. L.W.L. Argles, RN) and later HMCS Iroquois (Cdr. J.C. Hibbard, DSC, RCN) joined as well. In the afternoon, HMS Viking carried out A/S exercises with HMS Fraserburgh (Cdr.(Retd.) C. Plumer, RN) and HMS Bootle (Lt.Cdr. A. Ecclestone, RN). (1)
27 Sep 1943
HMS Viking (Lt. R. Bannar-Martin, DSC, RN) conducted A/S exercises at/off Scapa Flow with HMCS Haida (Cdr. H.G. De Wolf, RCN), HMS Vigilant (Lt.Cdr. L.W.L. Argles, RN), HMS Fraserburgh (Cdr.(Retd.) C. Plumer, RN) and HMS Bootle (Lt.Cdr. A. Ecclestone, RN). (1)
28 Sep 1943
HMS Viking (Lt. R. Bannar-Martin, DSC, RN) conducted A/S exercises at/off Scapa Flow with HMS Venus (Cdr. J.S.M. Richardson DSO, RN), HMIS Kistna (A/Cdr.(Emgy.) R.R. Caws, RIN) and HMCS Haida (Cdr. H.G. De Wolf, RCN). (1)
28 Sep 1943
HMS Birmingham (Capt. H.W. Williams, RN) conducted AA gunnery exercises at Scapa Flow. Also a refuelling at sea exercise was carried out in which HMCS Haida (Cdr. H.G. De Wolf, RCN) was fuelled. (2)
29 Sep 1943
HMS Viking (Lt. R. Bannar-Martin, DSC, RN) conducted A/S exercises at/off Scapa Flow with HMS Teazer (Lt.Cdr. A.A.F. Talbot, DSO and Bar, RN), HMCS Haida (Cdr. H.G. De Wolf, RCN), HMS Worthing (Lt.Cdr. P.F. Cammiade, RNVR) and HNoMS Stord (Lt.Cdr. S.V. Storheill). (1)
30 Sep 1943
HMS Viking (Lt. R. Bannar-Martin, DSC, RN) conducted A/S exercises at/off Scapa Flow with HMS Teazer (Lt.Cdr. A.A.F. Talbot, DSO and Bar, RN), HMCS Haida (Cdr. H.G. De Wolf, RCN) and HMS Vigilant (Lt.Cdr. L.W.L. Argles, RN). (1)
1 Oct 1943
HMS Viking (Lt. R. Bannar-Martin, DSC, RN) conducted A/S exercises at/off Scapa Flow with HMCS Haida (Cdr. H.G. De Wolf, RCN), HMS Janus (Lt.Cdr. W.B.R. Morrison, RN), HMS Fraserburgh (Cdr.(Retd.) C. Plumer, RN) and HNoMS Stord (Lt.Cdr. S.V. Storheill). (3)
2 Oct 1943
HMS Viking (Lt. R. Bannar-Martin, DSC, RN) conducted A/S exercises at/off Scapa Flow with HMCS Haida (Cdr. H.G. De Wolf, RCN), HMS Janus (Lt.Cdr. W.B.R. Morrison, RN), HMS Magpie (Lt.Cdr. R.S. Abram, RN) and HMIS Kistna (A/Cdr.(Emgy.) R.R. Caws, RIN). (3)
4 Oct 1943
HMS Viking (Lt. R. Bannar-Martin, DSC, RN) conducted A/S exercises at/off Scapa Flow with HMS Birmingham (Capt. H.W. Williams, RN), HMCS Haida (Cdr. H.G. De Wolf, RCN), HMS Speedwell (Lt.Cdr. T.E. Williams, RD, RNR) and HMS Seagull (T/A/Lt.Cdr. R.W. Ellis, DSC, RNR).
On completion of the A/S exercises, HMS Birmingham conducted gunnery exercises at Scapa Flow. (4)
5 Oct 1943
HMS Viking (Lt. R. Bannar-Martin, DSC, RN) conducted A/S exercises at/off Scapa Flow with HMS Speedwell (Lt.Cdr. T.E. Williams, RD, RNR), HMS Seagull (T/A/Lt.Cdr. R.W. Ellis, DSC, RNR), HMCS Haida (Cdr. H.G. De Wolf, RCN) and HMS Magpie (Lt.Cdr. R.S. Abram, RN). (3)
11 Oct 1943
HMS Storm (T/Lt. E.P. Young, DSC, RNVR) conducted A/S exercises with HMS Vigilant (Lt.Cdr. L.W.L. Argles, RN) and HMCS Haida (Cdr. H.G. De Wolf, RCN). (5)
14 Oct 1943
Around 2045A/14, the battleship HMS Anson (Capt. E.D.B. McCarthy, DSO and Bar, RN, flying the flag of Vice-Admiral H.R. Moore, KCB, DSO, CVO, RN), aircraft carrier USS Ranger (Capt. G. Rowe, USN, flying the flag of Rear-Admiral O.M. Hustvedt, USN), heavy cruiser HMS Norfolk (Capt. D.K. Bain, RN) and the destroyers HMCS Iroquois (Cdr. J.C. Hibbard, DSC, RCN), HMCS Haida (Cdr. H.G. De Wolf, RCN), HMS Hardy (Lt.Cdr. R. Horncastle, RN), HMS Vigilant (Lt.Cdr. L.W.L. Argles, RN), HMS Janus (Lt.Cdr. W.B.R. Morrison, RN) and USS Corry (T/Cdr. L.B. Ensey, USN) departed Scapa Flow for Akureyri (6)
16 Oct 1943
Around 1530A/16, the battleship HMS Anson (Capt. E.D.B. McCarthy, DSO and Bar, RN, flying the flag of Vice-Admiral H.R. Moore, KCB, DSO, CVO, RN), aircraft carrier USS Ranger (Capt. G. Rowe, USN, flying the flag of Rear-Admiral O.M. Hustvedt, USN), heavy cruiser HMS Norfolk (Capt. D.K. Bain, RN) and the destroyers HMCS Iroquois (Cdr. J.C. Hibbard, DSC, RCN), HMCS Haida (Cdr. H.G. De Wolf, RCN), HMS Hardy (Lt.Cdr. R. Horncastle, RN), HMS Vigilant (Lt.Cdr. L.W.L. Argles, RN), HMS Janus (Lt.Cdr. W.B.R. Morrison, RN) and USS Corry (T/Cdr. L.B. Ensey, USN) arrived at Akureyri from Scapa Flow. (7)
17 Oct 1943
Operation FQ.
The object of this operation was to carry relief personnel and stores to the Norwegian garrison at Spitzbergen and to evacuate survivors of the original garrison which was attacked by a German force the previous month.
Two Forces were deployed for this operation; Around 0200A/17, ' Force 1 ', made up of the heavy cruiser USS Tuscaloosa (Capt. J.B.W. Waller, USN) and the destroyers HMS Onslaught (Cdr. W.H. Selby, DSC, RN), HMS Oribi (Lt.Cdr. J.C.A. Ingram, DSC and Bar, RN), HMS Orwell (Lt.Cdr. J.M. Hodges, DSO, RN) and USS Fitch (T/Cdr. K.C. Walpole, USN) departed Seidisfjord for Hiorthamm, Advent Fiord, Spitzbergen where they arrived on the 19th. USS Tuscaloosa then commenced unloading while the destroyers conducted A/S patrols during which HMS Onslaught rammed and damaged the German submarine U-737. HMS Onslaught also sustained damage which reduced her speed. Force 1 left Spitsbergen late on the 19th and arrived at Seidisfjord around 1000A/22.
Cover for ' Force 1 ' was provided by ' Force 2 ', which was made up of the battleship HMS Anson (Capt. E.D.B. McCarthy, DSO and Bar, RN, flying the flag of Vice-Admiral H.R. Moore, KCB, DSO, CVO, RN), aircraft carrier USS Ranger (Capt. G. Rowe, USN, flying the flag of Rear-Admiral O.M. Hustvedt, USN), heavy cruiser HMS Norfolk (Capt. D.K. Bain, RN) and the destroyers HMCS Iroquois (Cdr. J.C. Hibbard, DSC, RCN), HMCS Haida (Cdr. H.G. De Wolf, RCN), HMS Hardy (Lt.Cdr. R. Horncastle, RN), HMS Vigilant (Lt.Cdr. L.W.L. Argles, RN), HMS Janus (Lt.Cdr. W.B.R. Morrison, RN) and USS Corry (T/Cdr. L.B. Ensey, USN). ' Force 2 ' departed Akureyri around 1500A/17.
' Force 2 ' arrived at Scapa Flow around 1915A/22. Around 0600A/22, ' Force 2 ' had been joined by the destroyer HMS Impulsive (Lt.Cdr. P. Bekenn, RN) which came from Skaalefjord, Faeroer Islands. (8)
25 Oct 1943
HMS Tuna (Lt.Cdr.(Retd.) J.R.G. Harvey, RN) conducted A/S exercises off Scapa Flow together with HMCS Iroquois (Cdr. J.C. Hibbard, DSC, RCN), HMS Impulsive (Lt.Cdr. P. Bekenn, RN) and later with HMCS Haida (Cdr. H.G. De Wolf, RCN) and HMS Vigilant (Lt.Cdr. L.W.L. Argles, RN). (9)
29 Oct 1943
Around 1300A/29, the battleship HMS Anson (Capt. E.D.B. McCarthy, DSO and Bar, RN, flying the flag of Vice-Admiral H.R. Moore, KCB, DSO, CVO, RN), aircraft carrier HMS Formidable (Capt. P. Ruck-Keene, CBE, RN), light cruiser HMS Jamaica (Capt. J.L. Storey, DSO, RN) and the destroyers HMS Onslow (Capt. J.A. McCoy, DSO, RN), HMS Venus (Cdr. J.S.M. Richardson DSO, RN), HNoMS Stord (Lt.Cdr. S.V. Storheill), HMCS Haida (Cdr. H.G. De Wolf, RCN), USS Hobson (T/Lt.Cdr. K. Loveland, USN) and USS Capps (T/Cdr. B.E.S. Trippensee, USN) departed Scapa Flow for Akureyri, Iceland. (10)
31 Oct 1943
Around 1030Z/31, the battleship HMS Anson (Capt. E.D.B. McCarthy, DSO and Bar, RN, flying the flag of Vice-Admiral H.R. Moore, KCB, DSO, CVO, RN), aircraft carrier HMS Formidable (Capt. P. Ruck-Keene, CBE, RN), light cruiser HMS Jamaica (Capt. J.L. Storey, DSO, RN) and the destroyers HMS Onslow (Capt. J.A. McCoy, DSO, RN), HMS Venus (Cdr. J.S.M. Richardson DSO, RN), HNoMS Stord (Lt.Cdr. S.V. Storheill), HMCS Haida (Cdr. H.G. De Wolf, RCN), USS Hobson (T/Lt.Cdr. K. Loveland, USN) and USS Capps (T/Cdr. B.E.S. Trippensee, USN) arrived at Akureyri from Scapa Flow. (10)
1 Nov 1943
Operation FS, passage of convoy RA 54A.
Convoy RA 54A
.This convoy departed Archangelsk on 1 November 1943 for the U.K.
On departure from Archanglesk the convoy was made up of the following merchant vessels; Beaconhill (American, 6941 GRT, built 1919), British Governor (British (tanker), 6840 GRT, built 1926), City of Omaha (American, 6124 GRT, built 1920), Empire Fortune (British, 6140 GRT, built 1943), Empire Gaillard (British, 7170 GRT, built 1942), Empire Kinsman (British, 6744 GRT, built 1942), Empire Portia (British, 7058 GRT, built 1942), Francis Scott Key (American, 7191 GRT, built 1942), Israel Putnam (American, 7176 GRT, built 1942), Mobile City (American, 6157 GRT, built 1920), Pontfield (British, 8319 GRT, built 1940), Thomas Hartley (American, 7176 GRT, built 1942) and Tobruk (Polish, 7048 GRT, built 1942).
On departure from Archangelsk the convoy was escorted by the destroyer HMS Westcott (Lt.Cdr.(Retd.) H. Lambton, RN), minesweepers HMS Britomart (Lt.Cdr. S.S. Stammwitz, RN), HMS Harrier (Cdr. H.E.H. Nicholls, RN), HMS Jason (Cdr. H.G.A. Lewis, RN), HMS Seagull (T/A/Lt.Cdr. R.W Ellis, DSC, RNR) and the corvette HNoMS Eglantine (?). The Russian destroyers Gromkiy and Valerian Kyubishev were also with the convoy.
On 2 November 1943, ' Force 3 ', made up of the destroyers HMS Milne (Capt. I.M.R. Campbell, DSO, RN), HMS Mahratta (Lt.Cdr. E.A.F. Drought, DSC, RN), HMS Matchless (Lt.Cdr. J. Mowlam, DSO, RN), HMS Musketeer (Cdr. R.L. Fisher, OBE, RN), HMS Saumarez (Lt.Cdr. E.N. Walmsley, DSC, RN), HMS Savage (Cdr. R.C. Gordon, DSO, RN), HMS Scorpion (Lt.Cdr. W.S. Clouston, RN) and HMS Scourge (Lt.Cdr. G.I.M. Balfour, RN) departed the Kola Inlet to join the convoy which they did the following day. HMS Harrier, HMS Seagull and the two Russian destroyers were then detached.
On 8 November 1943, HMS Matchless and HMS Musketeer were detached to Seidisfjord where they were to fuel.
On 9 November 1943, HMS Savage and HMS Westcott were also detached to fuel at Seidisfjord.
On completion of fuelling HMS Westcott departed Seidisfjord to rejoin the convoy. She departed Seidisfjord together with ' Force 4 ', made up of the escort destroyers HMS Brissenden (Lt. D.D.E. Vivian, RN), HMS Middleton (Lt. C.S. Battersby, RN) and the minesweepers HMS Halcyon (T/A/Lt.Cdr. L.J. Martin, RNVR) and HMS Speedwell (Lt.Cdr. T.E. Williams, RD, RNR). They joined the convoy on the 10th, the destroyers HMS Milne, HMS Mahratta, HMS Saumarez, HMS Scorpion and HMS Scorpion then parted company with the convoy to proceed to Seidisfjord.
On the 13th, HMS Middleton detached to proceed to the Clyde.
Also on the 13th the convoy split into several parts to proceed their individual destinations with local escorts.
From the escorts, HMS Brissenden proceeded to Loch Ewe. HMS Britomart, HMS Halcyon, HMS Jason and HMS Speedwell proceeded to Scapa Flow. HMS Westcott and HMS Eglantine proceeded to Liverpool. All ships arrived on the 13th except for HMS Westcott and HMS Eglantine arrived on the 14th.
------------------------------------------------------------------------------------------------------
For close cover, ' Force 1 ' of the light cruiser HMS Belfast (Capt. F.R. Parham, RN, flying the flag of Rear-Admiral R.L. Burnett, CB, DSO, OBE, RN) and the heavy cruiser HMS Kent (Capt. G.A.B. Hawkins, DSC, MVO, RN) and HMS Norfolk (Capt. D.K. Bain, RN) was deployed. This force departed Seidisfjord on 2 November to provide cover for the convoy between positions 73°58'N, 31°32'E and 71°19'N, 00°58'W
On the 8th, ' Force 1 ' split up with HMS Kent and HMS Norfolk set course for Scapa Flow arriving there on the 9th. HMS Belfast set course for Hvalfjord also arriving on the 9th.
------------------------------------------------------------------------------------------------------
' Force 2 ' was the distant cover force, it was made up of the battleship HMS Anson (Capt. E.D.B. McCarthy, DSO and Bar, RN, flying the flag of Vice-Admiral H.R. Moore, KCB, DSO, CVO, RN), aircraft carrier HMS Formidable (Capt. P. Ruck-Keene, CBE, RN), light cruiser HMS Jamaica (Capt. J.L. Storey, DSO, RN) and the destroyers HMS Onslow (Capt. J.A. McCoy, DSO, RN), HMS Venus (Cdr. J.S.M. Richardson DSO, RN), HNoMS Stord (Lt.Cdr. S.V. Storheill), HMCS Haida (Cdr. H.G. De Wolf, RCN), USS Hobson (T/Lt.Cdr. K. Loveland, USN) and USS Capps (T/Cdr. B.E.S. Trippensee, USN). ' Force 2 ' departed Akureyri on 2 November to proceed to a patrol area near position 72°27'N, 09°30'E.
' Force 2 ' arrived at Scapa Flow on 8 November 1943. (11)
2 Nov 1943
Around 0930Z/2, ' Force 2 ', made up of the battleship HMS Anson (Capt. E.D.B. McCarthy, DSO and Bar, RN, flying the flag of Vice-Admiral H.R. Moore, KCB, DSO, CVO, RN), aircraft carrier HMS Formidable (Capt. P. Ruck-Keene, CBE, RN), light cruiser HMS Jamaica (Capt. J.L. Storey, DSO, RN) and the destroyers HMS Onslow (Capt. J.A. McCoy, DSO, RN), HMS Venus (Cdr. J.S.M. Richardson DSO, RN), HNoMS Stord (Lt.Cdr. S.V. Storheill), HMCS Haida (Cdr. H.G. De Wolf, RCN), USS Hobson (T/Lt.Cdr. K. Loveland, USN) and USS Capps (T/Cdr. B.E.S. Trippensee, USN) departed Akureyri for operation FS, to provide distant cover for convoy RA 54A from Archangelsk to the U.K.
[For more info on this convoy see the event ' Operation FS, passage of convoy RA 54A ' for 1 November 1943.] (12)
8 Nov 1943
Around 1115A/8, ' Force 2 ', made up of the battleship HMS Anson (Capt. E.D.B. McCarthy, DSO and Bar, RN, flying the flag of Vice-Admiral H.R. Moore, KCB, DSO, CVO, RN), aircraft carrier HMS Formidable (Capt. P. Ruck-Keene, CBE, RN), light cruiser HMS Jamaica (Capt. J.L. Storey, DSO, RN) and the destroyers HMS Onslow (Capt. J.A. McCoy, DSO, RN), HMS Venus (Cdr. J.S.M. Richardson DSO, RN), HNoMS Stord (Lt.Cdr. S.V. Storheill), HMCS Haida (Cdr. H.G. De Wolf, RCN), USS Hobson (T/Lt.Cdr. K. Loveland, USN) and USS Capps (T/Cdr. B.E.S. Trippensee, USN) arrived at Scapa Flow from operations. (12)
15 Nov 1943
Operation FT, passage of convoys JW 54A and JW 54B from the U.K. to Northern Russia as well as convoy RA 54B from Northern Russia to the U.K.
Convoy JW 54A
.This convoy departed Loch Ewe in the afternoon of 15 November 1943.
It was made up of the following merchant vessels; Daniel Drake (American, 7176 GRT, built 1943), Edmund Fanning (American, 7176 GRT, built 1943), Empire Carpenter (British, 7025 GRT, built 1943), Empire Celia (American, 7025 GRT, built 1943), Empire Nigel (British, 7067 GRT, built 1943), Fort Yukon (British, 7153 GRT, built 1943), Gilbert Stuart (American, 7176 GRT, built 1943), Henry Villard (American, 7176 GRT, built 1942), James Gordon Bennett (American, 7176 GRT, built 1942), James Smith (American, 7181 GRT, built 1942), Junecrest (British, 6945 GRT, built 1942), Mijdrecht (Dutch (tanker), 7493 GRT, built 1931), Norlys (Panamanian (tanker), 9892 GRT, built 1936), Ocean Vanity (British, 7174 GRT, built 1942), Ocean Verity (British, 7174 GRT, built 1942), Park Holland (American, 7176 GRT, built 1943), Thomas Sim Lee (American, 7191 GRT, built 1942) and William Windon (American, 7194 GRT, built 1943).
The rescue vessel Copeland (British, 1526 GRT, built 1923) was also with the convoy.
On departure from Loch Ewe the convoy was escorted by the destroyers HMS Inconstant (Lt.Cdr J.H. Eaden, DSC, RN), HMS Whitehall (Lt.Cdr. P.J. Cowell, DSC, RN), HMS Termagant (Lt.Cdr. J.P. Scatchard, DSC, RN), ORP Burza (Kmdr.ppor. (Cdr.) F. Pitulko), escort destroyer HMS Brissenden (Lt. D.D.E. Vivian, RN), minesweeper HMS Hussar (Lt.Cdr. R.C. Biggs, DSO, DSC, RN) and the corvette HMS Heather (T/Lt. W.L. Turner, RNR).
Around 1800A/17, the destroyer HMS Onslaught (Cdr. W.H. Selby, DSC, RN) departed Seidisfjord, Iceland to join the convoy. She was escorting the Russian minesweepers T 116, T 117 and patrol vessels BO 205, BO 207 and BO 212 which were to join the convoy for passage to Northern Russia. [These were the former American minesweepers AM 143 / Arcade, AM 144 / Arch and patrol vessels SC 1287, SC 1074 and SC 721 respectively.]
Around 2300A/17, the destroyers HMS Onslow (Capt. J.A. McCoy, DSO, RN), HMS Obedient (Lt.Cdr. H. Unwin, DSC and Bar, RN), HMS Orwell (Lt.Cdr. J.M. Hodges, DSO, RN), HMCS Iroquois (Cdr. J.C. Hibbard, DSC, RCN), HMCS Haida (Cdr. H.G. De Wolf, RCN), HMCS Huron (Lt.Cdr. H.S. Rayner, DSC, RCN) and HMS Impulsive (Lt.Cdr. P. Bekenn, RN) also sailed from Seidisfjord to join the convoy.
Around 1000A/18, all ships that had departed Seidisfjord the day before joined the convoy. HMS Termagant, ORP Burza and HMS Brissenden then parted company with the convoy. The British ships proceeded to Seidisfjord arriving on the 19th, ORP Burza set course to return to Loch Ewe also arriving on the 19th.
Around 2100A/18, HMS Obedient developed serious rudder defects and she returned to Seidisfjord arriving on the 19th.
On 20 November, HMS Inconstant and HMS Whitehall were able to fuel at sea.
On 22 November, HMCS Huron fuelled at sea.
Around 1900A/23, the Kola Inlet section parted company with the convoy. It was made up of the following merchant vessels; Daniel Drake, Edmund Fanning, Empire Carpenter, Empire Celia, James Gordon Bennett, Norlys and Park Holland. The Copeland was also part of this section. They were escorted by HMS Onslow, HMS Onslaught, HMS Obedient, HMS Orwell, HMCS Iroquois, HMCS Haida, HMCS Huron and HMS Impulsive. The Kola Inlet section arrived at it's detinattion on 24 November. The five small Russian craft that had been with the convoy arrived in the Kola Inlet on the 25th.
The remaining ships proceeded to Archangelsk escorted by HMS Inconstant, HMS Whitehall, HMS Hussar and HMS Heather. These were later replaced by the minesweeper HMS Seagull (T/A/Lt.Cdr. R.W. Ellis, DSC, RNR), two Russian destroyers and three Russian minesweepers. On the joining of these ships HMS Inconstant, HMS Whitehall and HMS Heather parted company and proceeded to Iokanka. The remainder of the convoy arrived in the Archangelsk area on the 26th.
------------------------------------------------------------------------------------------------------------------------------------------
Convoy JW 54B
.This convoy departed Loch Ewe in the afternoon of 22 November 1943 for Northern Russia.
It was made up of the following merchant vessels; Arthur L. Perry (American, 7176 GRT, built 1943), Daldorch (British, 5571 GRT, built 1930), Empire Lionel (British, 7030 GRT, built 1942), Empire Stalwart (British, 7045 GRT, built 1943), Eugene Field (American, 7176 GRT, built 1943), Fort Columbia (British, 7155 GRT, built 1942), Fort McMurray (British, 7133 GRT, built 1942), Fort Poplar (American, 7134 GRT, built 1942), Horace Gray (American, 7200 GRT, built 1943), John Fitch (American, 7181 GRT, built 1942), Ocean Strength (British, 7173 GRT, built 1942), San Adolfo (British (tanker), 7365 GRT, built 1935), Thomas Kearns (American, 7194 GRT, built 1943) and William L. Marcy (American, 7176 GRT, built 1942).
The rescue ship Rathlin (British, 1600 GRT, built 1936) was also part of the convoy.
On departure from Loch Ewe the convoy was escorted by the destroyers HMS Beagle (Lt.Cdr. N.R. Murch, RN), HMS Saladin (T/A/Lt.Cdr. P.G.C. King, RNVR), HMS Skate (Lt. J.C. Rushbrooke, DSC, RN), escort destroyer HMS Middleton (Lt. C.S. Battersby, RN), minesweepers HMS Halcyon (T/A/Lt.Cdr. L.J. Martin, RNVR), HMS Speedwell (Lt.Cdr. T.E. Williams, RD, RNR) and the corvettes HMS Poppy (T/Lt. D.R.C. Onslow, RNR) and HMS Rhododendron (T/Lt. O.B. Medley, RNVR).
On 23 November the corvette HMS Dianella (T/Lt. J.F. Tognola, RNR) joined the convoy.
Around 1000A/25, in position 66°24'N, 09°25'W, the destroyers HMS Saumarez (Lt.Cdr. E.N. Walmsley, DSC, RN), HMS Savage (Cdr. R.C. Gordon, DSO, RN), HMS Scorpion (Lt.Cdr. W.S. Clouston, RN), HMS Scourge (Lt.Cdr. G.I.M. Balfour, RN), HNoMS Stord (Lt.Cdr. S.V. Storheill), HMS Hardy (Lt.Cdr. R. Horncastle, RN), HMS Venus (Cdr. J.S.M. Richardson DSO, RN) and HMS Vigilant (Lt.Cdr. L.W.L. Argles, RN) departed Seidisfjord, Iceland and joined the convoy the following morning around 0700A/26.
On the above ships joining, HMS Saladin, HMS Skate, HMS Middleton and HMS Speedwell then parted company and proceeded to Seidisfjord where they arrived around 2100A/26 except for HMS Speedwell which went to Scapa Flow arriving there on the 29th.
Around 1200A/1, in position 71°37'N, 39°48'E, some of the merchant vessels detached from the convoy, this was the Kola Inlet section and was made up of the following merchant vessels; Arthur L. Perry, San Adolfo, Thomas Kearns and William L. Marcy. The rescue vessel Rathlin was also part of the Kola Inlet section. They were escorted by HMS Saumarez, HMS Savage, HMS Scorpion, HMS Scourge, HNoMS Stord, HMS Hardy, HMS Venus and HMS Vigilant. They proceeded to the Kola Inlet arriving there in the morning of 2 December.
Around 1900A/1, in position 70°35'N, 41°02'E, the Fort McMurray and Ocean Stenght parted company with the convoy to proceed to the Kola Inlet escorted by HMS Halcyon.
At the same time the Empire Stalwart, Fort Columbia and Fort Poplar also parted company to proceed to Port Ekonomiya.
The remaining merchant ships made up the White Sea section and continued on to Archangelsk escorted by HMS Beagle, HMS Dianella, HMS Poppy and HMS Rhododendron.
Around 0700B/2, in position 68°36'N, 40°58'E, the Russian destroyers Razumniy, Valerian Kyubishev and three Russian minesweepers joined the White Sea section.
The remaining ships of the White Sea section arrived at Archangelsk on 3 December.
------------------------------------------------------------------------------------------------------------------------------------------
Convoy RA 54B
.This convoy departed Archangelsk on 26 November 1943 for the U.K.
It was made up of the following merchant vessels; Aritgas (Panamanian, 5613 GRT, built 1920), Atlantic (British, 5414 GRT, built 1939), Bering (American, 7631 GRT, built 1920), Dover Hill (British, 5815 GRT, built 1918), Empire Scott (British, 6150 GRT, built 1941), Llandaff (British, 4825 GRT, built 1927), Marathon (Norwegian, 7208 GRT, built 1930) and Pieter de Hoogh (Dutch, 7168 GRT, built 1941).
On departure from Archangelsk the convoy was escorted by the minesweepers HMS Hussar, HMS Seagull and the A/S trawler HMS Lord Austin (T/Lt. E.L. Wathen, RNR). Also three Russian minesweepers were with the convoy escort.
On 27 November the destroyers HMS Inconstant, HMS Whitehall, minesweeper HMS Harrier (Cdr. H.E.H. Nicholls, RN) and corvette HMS Heather departed Iokanka and joined the convoy. The three Russian minesweepers were then detached.
The rescue ship Copeland (British, 1526 GRT, built 1923) and Norlys (Panamanian (tanker), 9892 GRT, built 1936) sailed from the Kola Inlet on 27 November to join the convoy. They were escorted by the destroyers HMS Onslow, HMS Onslaught, HMS Orwell, HMCS Iroquois, HMCS Haida, HMCS Huron and HMS Impulsive. They joined the convoy shortly before noon on the 28th.
HMS Hussar and HMS Seagull were then detached to the Kola Inlet where they arrived the following day.
On 3 December (1700A/3) HMCS Iroquois was detached to Seidisfjord to fuel. She arrived there the following day.
On 5 December the destroyers HMS Saladin, HMS Skate and escort destroyers HMS Middleton and HMS Brissenden departed Seidisfjord to join the convoy which they did later the same day. Also on 5 December, first HMS Onslaught and HMCS Huron detached from the convoy and arrived at Seidisfiord to fuel. Then HMCS Haida and HMS Impulslive detached and arrived Seidisfiord to fuel and finally HMS Onslow and HMS Orwell also arrived Seidisfiord to fuel.
On 8 December the convoy split in two and proceeded to east and west coast harbour with local escorts (trawlers).
HMS Inconstant and HMS Whitehall proceeded to the Clyde arriving on 9 December.
HMS Saladin and HMS Skate proceeded to Londonderry arriving on 9 December.
HMS Heather and HMS Lord Austin proceeded to Liverpool arriving there also on 9 December.
HMS Middelton, HMS Brissenden and HMS Harrier proceeded to Scapa Flow arriving there later on the 8th.
------------------------------------------------------------------------------------------------------------------------------------------
A close cover force was deployed. This was ' Force 1 ', made up of the heavy cruiser HMS Kent (Capt. G.A.B. Hawkins, DSC, MVO, RN, flying the flag of Rear Admiral A.F.E. Palliser, CB, DSC, RN) and the light cruisers HMS Bermuda (Capt. T.H. Back, RN) and HMS Jamaica (Capt. J.L. Storey, DSO, RN) departed Seidisfjord on 19 November to provide cover for convoy JW 54A between 15°00'E and 41°00'E.
' Force 1 ' arrived in the Kola Inlet on 24 November.
' Force 1 ' departed the Kola Inlet on 27 November to provide cover for convoy JW 54B between 15°00'E and 41°00'E and RA 54B between 41°00'E and 05°00'E.
On 3 December, HMS Jamaica was detached to Hvalfjord where she arrived on 5 December.
On 4 December, HMS Kent and HMS Bermuda arrived at Scapa Flow.
------------------------------------------------------------------------------------------------------------------------------------------
Also a distant cover force was deployed. This was ' Force 2 ', the battle force, which was made up the battleship HMS Anson (Capt. E.D.B. McCarthy, DSO and Bar, RN, flying the flag of Vice-Admiral H.R. Moore, KCB, DSO, CVO, RN), heavy cruiser USS Tuscaloosa (Capt. J.B.W. Waller, USN) and the destroyers USS Forrest (T/Cdr. K.P. Letts, USN, with COMDESDIV 20, T/Capt. C.M. Jensen, USN on board), USS Fitch (T/Cdr. K.C. Walpole, USN), USS Corry (T/Cdr. L.B. Ensey, USN) and USS Hobson (T/Lt.Cdr. K. Loveland, USN) departed Akureyri on 19 November to cover convoy JW 54A from approximate position 73°00'N, 11°00'E.
On 24 November, while on passage back to Akureyri, USS Tuscaloosa was detached to Hvalfiord where she arriving later on the same day.
HMS Anson arrived at Akureyri also on 24 November escorted by the American destroyers which then went on to Hvalfjord.
On 28 November ' Force 2 ', now made up of the battleship HMS Anson, light cruiser HMS Belfast (Capt. F.R. Parham, RN, flying the flag of Rear-Admiral R.L. Burnett, CB, DSO, OBE, RN) and the destroyers HMS Musketeer (Cdr. R.L. Fisher, OBE, RN), HMS Matchless (Lt.Cdr. J. Mowlam, DSO, RN), HMS Ashanti (Lt.Cdr. J.R. Barnes, RN) and HMS Obdurate (Lt.Cdr. C.E.L. Sclater, DSO, RN) departed Akureyri to provide cover for convoy JW 54B and RA 54B from approximate position 73°00'N, 11°00'E.
On 29 November the destroyers had to be detached due to heavy weather as they were unable to keep up without sustaining damage. In fact, HMS Matchless had sustained damage and proceeded to Seidisfjord with defects. The destroyers rejoined on 1 December.
On 4 December ' Force 2 ' arrived at Scapa Flow. HMS Matchless also arrived there on the same day. (13)
15 Nov 1943
Around 1800A/15, HMS Onslaught (Cdr. W.H. Selby, DSC, RN), HMS Obedient (Lt.Cdr. H. Unwin, DSC and Bar, RN), HMS Orwell (Lt.Cdr. J.M. Hodges, DSO, RN), HMCS Haida (Cdr. H.G. De Wolf, RCN), HMCS Huron (Lt.Cdr. H.S. Rayner, DSC, RCN), HMCS Iroquois (Cdr. J.C. Hibbard, DSC, RCN) and HMS Impulsive (Lt.Cdr. P. Bekenn, RN) departed Scapa Flow for Seidisfjord, Iceland. (14)
17 Nov 1943
Around 1000A/17, HMS Onslaught (Cdr. W.H. Selby, DSC, RN), HMS Obedient (Lt.Cdr. H. Unwin, DSC and Bar, RN), HMS Orwell (Lt.Cdr. J.M. Hodges, DSO, RN), HMCS Haida (Cdr. H.G. De Wolf, RCN), HMCS Huron (Lt.Cdr. H.S. Rayner, DSC, RCN), HMCS Iroquois (Cdr. J.C. Hibbard, DSC, RCN) and HMS Impulsive (Lt.Cdr. P. Bekenn, RN) arrived at Seidisfjord from Scapa Flow.
Around 1800A/17, HMS Onslaught departed Seidisfjord together with the Russian minesweepers T 116, T 117 and the patrol vessels BO 205, BO 207 and BO 212. They were to join convoy JW 54A.
Around 2300A/17, HMS Onslow (Capt. J.A. McCoy, DSO, RN), HMS Obedient, HMS Orwell, HMCS Haida, HMCS Huron, HMCS Iroquois and HMS Impulsive departed Seidisfjord also to join convoy JW 54A.
[For more info see the event ' Operation FT, passage of convoys JW 54A and JW 54B from the U.K. to Northern Russia as well as convoy RA 54B from Northern Russia to the U.K. ' for 15 November 1943.] (14)
24 Nov 1943
HMS Onslow (Capt. J.A. McCoy, DSO, RN), HMS Onslaught (Cdr. W.H. Selby, DSC, RN), HMS Orwell (Lt.Cdr. J.M. Hodges, DSO, RN), HMCS Haida (Cdr. H.G. De Wolf, RCN), HMCS Huron (Lt.Cdr. H.S. Rayner, DSC, RCN), HMCS Iroquois (Cdr. J.C. Hibbard, DSC, RCN) and HMS Impulsive (Lt.Cdr. P. Bekenn, RN) arrived in the Kola Inlet with the Murmansk section of convoy JW 54A. (14)
28 Nov 1943
HMS Onslow (Capt. J.A. McCoy, DSO, RN), HMS Onslaught (Cdr. W.H. Selby, DSC, RN), HMS Orwell (Lt.Cdr. J.M. Hodges, DSO, RN), HMCS Haida (Cdr. H.G. De Wolf, RCN), HMCS Huron (Lt.Cdr. H.S. Rayner, DSC, RCN), HMCS Iroquois (Cdr. J.C. Hibbard, DSC, RCN) and HMS Impulsive (Lt.Cdr. P. Bekenn, RN) departed the Kola Inlet to join convoy RA 54B.
[For more info on this convoy see the event ' Operation FT, passage of convoys JW 54A and JW 54B from the U.K. to Northern Russia as well as convoy RA 54B from Northern Russia to the U.K. ' for 15 November 1943.] (14)
6 Dec 1943
Around 0245A/6, HMS Onslow (Capt. J.A. McCoy, DSO, RN), HMS Onslaught (Cdr. W.H. Selby, DSC, RN), HMS Orwell (Lt.Cdr. J.M. Hodges, DSO, RN), HMCS Haida (Cdr. H.G. De Wolf, RCN), HMCS Huron (Lt.Cdr. H.S. Rayner, DSC, RCN), HMCS Iroquois (Cdr. J.C. Hibbard, DSC, RCN) and HMS Impulsive (Lt.Cdr. P. Bekenn, RN) departed Seidisfjord for Scapa Flow. (14)
7 Dec 1943
Around 1030A/7, HMS Onslow (Capt. J.A. McCoy, DSO, RN), HMS Onslaught (Cdr. W.H. Selby, DSC, RN), HMS Orwell (Lt.Cdr. J.M. Hodges, DSO, RN), HMCS Haida (Cdr. H.G. De Wolf, RCN), HMCS Huron (Lt.Cdr. H.S. Rayner, DSC, RCN), HMCS Iroquois (Cdr. J.C. Hibbard, DSC, RCN) and HMS Impulsive (Lt.Cdr. P. Bekenn, RN) arrived at Scapa Flow from Seidisfjord. (14)
12 Dec 1943
Operation FV, passage of convoys JW 55A and JW 55B to Northern Russia and RA 55A and RA 55B from Northern Russia and the sinking of the German battleship Scharnhorst.
Convoy JW 55A
.This convoy departed Loch Ewe in the afternoon of 12 December 1943 for Northern Russia.
It was made up of the following merchant vessels; Collis P. Huntington (American, 7177 GRT, built 1942), Daniel Willard (American, 7200 GRT, built 1942), Empire Archer (British, 7031 GRT, built 1942), Empire Pickwick (British, 7068 GRT, built 1943), Fort Astoria (British, 7189 GRT, built 1943), Fort Hall (British, 7157 GRT, built 1943), Fort Missanabie (British, 7147 GRT, built 1943), Fort Thompson (British, 7134 GRT, built 1942), George Weems (American, 7191 GRT, built 1942), James A. Farrell (American, 7176 GRT, built 1943), James Woodrow (American, 7200 GRT, built 1942), Lapland (British, 2897 GRT, built 1942), Lewis Emery Jr. (American, 7176 GRT, built 1943), Lucerna (British (tanker), 6556 GRT, built 1930), Philip Livingston (American, 7176 GRT, built 1941), San Ambrosio (British (tanker), 7410 GRT, built 1935), Stage Door Canteen (American, 7176 GRT, built 1943), Thistledale (British, 7241 GRT, built 1942) and Thomas Scott (American, 7176 GRT, built 1942).
On departure from Loch Ewe the convoy was escorted by the destroyer HMS Westcott (Lt.Cdr.(Retd.) H. Lambton, RN), minesweepers HMS Harrier (Cdr. H.E.H. Nicholls, RN), HMS Speedwell (Lt.Cdr. T.E. Williams, RD, RNR), HMS Cockatrice (A/Lt.Cdr. C.W. Armstrong, RNR) and the corvette HNoMS Acanthus (?).
Around 1430A/15, the destroyers HMS Milne (Capt. I.M.R. Campbell, DSO, RN), HMS Matchless (Lt. W.D. Shaw, RN), HMS Meteor (Lt.Cdr. D.J.B. Jewitt, RN), HMS Musketeer (Cdr. R.L. Fisher, OBE, RN), HMS Opportune (Cdr. J. Lee-Barber, DSO and Bar, RN), HMS Virago (Lt.Cdr. A.J.R. White, RN), HMS Ashanti (Lt.Cdr. J.R. Barnes, RN) and HMCS Athabaskan (Lt.Cdr. J.H. Stubbs, RCN) joined the convoy coming from Skaalefjord, Faeroer Islands. HMS Harrier and HMS Cockatrice were then detached with orders to proceed to Skaalefjord.
During 16/17 attempts were made to refuel destroyers from the San Ambrosio but the weather conditions were unsuitable.
On 18 December, HMS Musketeer was able to take on board 70 tons of fuel before the hose parted.
At 1605A/18, HMCS Athabaskan obtained a radar contact ahead of the convoy. She proceeded to investigate firing star shell. The radar contact then faded and nothing was disclosed by the illumination.
At 1610A/18, HMCS Athabaskan obtained an A/S contact and attacked it with a full pattern of depth charges. Contact was subsequently lost and not regained. This was indeed a German submarine, the U-354 but she managed to slip away without being damaged.
Around 1100A/20, in position 69°34'N, 35°20'E, and in thick snow, the local escort for the White Sea section joined. This was made up of the minesweepers HMS Hussar (Lt.Cdr. R.C. Biggs, DSO, DSC, RN), HMS Halcyon (T/A/Lt.Cdr. L.J. Martin, RNVR), the Russian destroyers Gromkiy, Grozniy, Valerian Kyubishev as well as three Russian minesweepers.
The White Sea section was made up of the following merchant vessels; Empire Archer (destination Molotovsk), Fort Astoria (destination Port Ekonomiya), Fort Missanabie (destination Molotovsk), Fort Thompson (destination Port Ekonomiya), George Weems (destination Molotovsk), James A. Farrell (destination Molotovsk), James Woodrow (destination Molotovsk) and Lucerna (destination Molotovsk). The White Sea section arrived at it's destination on 22 December.
The Murmansk section, made up of the remaining merchant vessels and escorts arrived at its destination during the night of 20/21 December. HMS Milne and HMS Westcot had detached shortly before arrival and had entered port ahead of the convoy.
------------------------------------------------------------------------------------------------------------------------------------------
Convoy JW 55B
.This convoy departed Loch Ewe in the afternoon of 20 December 1943 for Northern Russia.
It was made up of the following merchant vessels; Bernard N. Baker (American, 7191 GRT, built 1943), British Statesman (British (tanker), 6991 GRT, built 1923), Brockhorst Livingston (American, 7176 GRT, built 1942), Cardinal Gibbons (American, 7191 GRT, built 1942), Fort Kullyspell (British, 7190 GRT, built 1943), Fort Nakasley (British, 7132 GRT, built 1943), Fort Verscheres (British, 7128 GRT, built 1942), Harold L. Winslow (American, 7176 GRT, built 1943), John J. Abel (American, 7191 GRT, built 1943), John Vining (American, 7191 GRT, built 1942), John Wanamaker (British, 7176 GRT, built 1943), Norlys (Panamanian (tanker), 9892 GRT, built 1936), Ocean Messenger (British, 7178 GRT, built 1942), Ocean Pride (British, 7173 GRT, built 1942), Ocean Valour (British, 7174 GRT, built 1942), Ocean Viceroy (British, 7174 GRT, built 1942), Thomas U. Walter (American, 7176 GRT, built 1943) and Will Rogers (American, 7200 GRT, built 1942).
On departure from Loch Ewe the convoy was escorted by the destroyers HMS Whitehall (Lt.Cdr. P.J. Cowell, DSC, RN), HMS Wrestler (Lt. R.W.B. Lacon, DSC, RN), minesweepers HMS Gleaner (Lt.Cdr. F.J.G. Hewitt, DSC and Bar, RN), Hound (A/Cdr.(Retd.) A.H. Wynne-Edwards, RN), Hydra (T/A/Lt.Cdr. C.T.J. Wellard, RNR) and the corvettes HMS Borage (Lt. W.S. MacDonald, DSC, RNVR), HMS Honeysuckle (Lt. H.H.D. MacKillican, DSC, RNR), HMS Oxlip (Lt. C.W. Leadbetter, RNR) and HMS Wallflower (Lt. G.R. Greaves, RNR).
Around 1515A/22, in position 64°28'N, 03°55'W, the destroyers HMS Onslow (Capt. J.A. McCoy, DSO, RN), HMS Onslaught (Cdr. W.H. Selby, DSC, RN), HMS Orwell (Lt.Cdr. J.M. Hodges, DSO, RN), HMS Impulsive (Lt.Cdr. P. Bekenn, RN), HMS Scourge (Lt.Cdr. G.I.M. Balfour, RN), HMCS Iroquois (Cdr. J.C. Hibbard, DSC, RCN), HMCS Haida (Cdr. H.G. De Wolf, RCN) and HMCS Huron (Lt.Cdr. H.S. Rayner, DSC, RCN) joined the convoy coming from Skaalefjord, Faeroer Islands. HMS Hound, HMS Hydra, HMS Borage and HMS Wallflower were detached to Skaalefjord shortly afterwards.
Around 1600A/22, the merchant vessel Ocean Gipsy (British, 7178 GRT, built 1942), which had sailed late, overtook and joined the convoy P.M. on 22 December.
On 23 December, HMS Wrestler was fuelled.
From 23 December onwards the convoy was shadowed by enemy aircraft, U-boats joined them the following day.
On 24 December, HMCS Haida was fuelled.
On 24 December, the convoy reversed it's course for a few hours in order to have the battle cover force ' Force 2 ' close the distance due to the threat to the convoy of the German battlecruiser Scharnhorst [see below for more info in the resulting ' Battle of the North Cape '.]
Around 1250A/25, in position 72°20'N, 08°00'E, the destroyers HMS Musketeer, HMS Matchless, HMS Opportune and HMS Virago joined the convoy having detached from convoy RA 55A. They took position ahead of the convoy. They were detached around 0445A/26 to conduct a sweep from which they returned around 0815A/26.
On 26 December the convoy was diverted to the north to evade the Scharnhorst. A signal to do so was received around 0605A/26 (C-in-C, Home Fleet's signal timed 0401A/26). At 0705A/26 (C-in-C, Home Fleet's signal timed 0628A/26), the convoy was ordered to proceed to the north-east.
Around 0930A/26, a brisk gun action developed to the south-eastwards. The majority of the destroyers immediately proceeded in that direction at full speed to engage the enemy but they returned to the convoy around 1330A/26 as the enemy was retiring. The convoy meanwhile was ordered to proceed northwards. Around 0951A/26, HMS Musketeer, HMS Matchless, HMS Opportune and HMS Virago were ordered to join ' Force 1 '.
Later in the day, following the sinking of the German ship the convoy resumed its normal course.
Around 1200A/28, HMCS Iroquois, HMCS Haida and HMCS Huron, having the least fuel remaining, were detached to proceed ahead of the convoy to the Kola Inlet.
Around 1830Z/28, in position 70°38'N, 38°30'W, the convoy split into two sections, one for the Kola Inlet with the original escort and one for the White Sea for which the minesweepers HMS Hussar, HMS Halcyon, HMS Speedwell, the Russian destroyers Razyarenniy, Razumniy, Valerian Kyubishev as well as four Russian minesweepers had just joined. The White Sea section was made up of following merchant vessels; British Statesman (destination Molotovsk), Fort Nakasley (destination Port Ekonomiya), Harold L. Winslow (destination Molotovsk), John J. Abel (destination Molotovsk), Ocean Messenger (destination Molotovsk), Ocean Pride (destination Port Ekonomiya), Ocean Valour (destination Molotovsk) and Thomas U. Walter (destination Molotovsk).
The Ocean Gipsy was no longer with the convoy as she had straggled. her destination was Molotovsk, and she later arrived safely.
The Kola Inlet section arrived at its destination late in the morning of 29 December 1943.
The White Sea section arrived at it's destination a day later.
------------------------------------------------------------------------------------------------------------------------------------------
Convoy RA 55A
.This convoy departed the Kola Inlet (Murmansk) in the morning of 22 December 1943.
It was made up of the following merchant vessels; Arthur L. Perry (American, 7176 GRT, built 1943), Daniel Drake (American, 7176 GRT, built 1943), Edmund Fanning (American, 7176 GRT, built 1943), Empire Carpenter (British, 7025 GRT, built 1943), Empire Celia (British, 7025 GRT, built 1943), Empire Nigel (British, 7067 GRT, built 1943), Fort McMurray (British, 7133 GRT, built 1942), Fort Yukon (British, 7153 GRT, built 1943), Gilbert Stuart (American, 7176 GRT, built 1943), Henry Villard (American, 7176 GRT, built 1942), James Smith (American, 7181 GRT, built 1942), Junecrest (British, 6945 GRT, built 1942), Mijdrecht (Dutch (tanker), 7493 GRT, built 1931), Ocean Strength (British, 7173 GRT, built 1942), Ocean Vanity (British, 7174 GRT, built 1942), Ocean Verity (British, 7174 GRT, built 1942), Park Holland (American, 7176 GRT, built 1943), San Adolfo (British (tanker), 7365 GRT, built 1935), Thomas Kearns (American, 7194 GRT, built 1943), Thomas Sim Lee (American, 7191 GRT, built 1942), William L. Marcy (American, 7176 GRT, built 1942) and William Windom (American, 7194 GRT, built 1943).
The rescue vessel Rathlin (British, 1600 GRT, built 1936) was also with the convoy.
On departure from the Kola Inlet the convoy was escorted by the destroyers HMS Milne, HMS Matchless, HMS Meteor, HMS Musketeer, HMS Opportune, HMS Virago, HMS Ashanti, HMCS Athabaskan, HMS Westcott, HMS Beagle (Lt.Cdr. N.R. Murch, RN), minesweeper HMS Jason (Cdr. H.G.A. Lewis, RN) and the corvettes HMS Dianella (T/Lt. J.F. Tognola, RNR) and HMS Poppy (T/Lt. D.R.C. Onslow, RNR).
Around 1830A/22, in position 69°29'N, 34°42'E, the merchant vessel Thomas Kearns had to return to the Kola Inlet with engine defects.
Around 0100A/25, south of Bear Island, in position 73°57'N, 19°04'E, HMS Musketeer, HMS Matchless, HMS Opportune and HMS Virago were detached to join JW 55B. Shortly afterwards the convoy was ordered to proceed to the north-west.
On 26 December the convoy got partially scattered during a gale but later reassembled.
Around 1140A/26, in position 74°00'N, 09°05'E, HMCS Athabaskan (with condenser defects) and HMS Beagle were detached to Skaalefjord, Faeroer Islands to fuel where they arrived on the 29th. It had been impossible to fuel at sea.
On the 27th, attempts to fuel escorts were still unsuccesful.
Around 1200A/28, in position 69°18'N, 00°35'E, HMS Ashanti was detached to the Faeroer Islands to fuel.
In the early afternoon of the 29th, HMS Milne and HMS Meteor were detached to Scapa Flow.
Around 1941A/31, the minesweepers HMS Hound, HMS Hydra and the corvettes HMS Borage and HMS Wallflower finally joined the convoy. They had departed Skaalefjord around 1900A/29. They had been unable to make rendezvous with the convoy earlier due to the bad weather conditions.
On 31 December HMS Westcott rejoined the convoy after fuelling at Skaalefiord.
After HMS Hound took over as Senior Officer of the escort in the evening of 31 December, HMS Seagull was detached for Scapa Flow.
The convoy arrived at Loch Ewe on 1 January 1944, escorted by HMS Acanthus, HMS Borage and HMS Wallflower.
HMS Hound and HMS Hydra had been detached to return to Skaalefiord where they arrived on 2 January 1944.
HMS Westcott, HMS Dianella and HMS Poppy had been detached to proceed to east coast ports to rejoin the Western Approaches Command. They arrived at their destinations on 2 January 1944.
Convoy RA 55B
.This convoy departed the Kola Inlet (Murmansk) on 31 December 1943 for the U.K.
It was made up of the following merchant vessels; Empire Stalwart (British, 7045 GRT, built 1943), Fort Columbia (British, 7155 GRT, built 1942), Fort Poplar (British, 7134 GRT, built 1942), James Gordon Bennett (American, 7176 GRT, built 1942), San Ambrosio (British (tanker), 7410 GRT, built 1935) and Thomas Kearns (American, 7194 GRT, built 1943).
On departure from the Kola Inlet the convoy was escorted by the destroyers HMS Onslow, HMS Onslaught, HMS Orwell, HMS Impulsive, HMCS Iroquois, HMCS Haida, HMCS Huron, HMS Whitehall, HMS Wrestler and the corvettes HMS Honeysuckle, HMS Oxlip and HMS Rhododendron (T/Lt. O.B. Medley, RNVR).
Around 1100A/1, in position 70°40'N, 38°42'E, the merchant vessels Daldorch (British, 5571 GRT, built 1930) and Lucerna (British (tanker), 6556 GRT, built 1930) joined coming from the White Sea. They were escorted by the minesweepers HMS Halcyon, HMS Hussar, HMS Speedwell which did not join the convoy but proceeded to the Kola Inlet where they arrived the following day.
Around 1100A/6, in position 65°44'N, 03°37'W, HMCS Huron, HMS Honeysuckle, HMS Oxlip and HMS Rhododendron fuelled at Skaalefjord and then departed to rejoin the convoy, except HMCS Huron which joined the destroyers listed below that parted company with the convoy on 7 January to proceed direct to Scapa Flow.
Around 0830A/7, the minesweepers Ready (Cdr. A.V. Walker, RN) and Orestes (Lt.Cdr. A.W.R. Adams, RN) joined the convoy coming from Skaalefjord, Faeroer Islands.
Around 0830A/7, the minesweepers Ready (Cdr. A.V. Walker, RN) and Orestes (Lt.Cdr. A.W.R. Adams, RN) joined the convoy coming from Skaalefjord, Faeroer Islands which they had departed around 0400A/7.
Around 1215A/7, HMS Onslow, HMS Onslaught, HMS Orwell, HMS Impulsive, HMCS Iroquois and HMCS Haida parted company with the convoy to proceed to Scapa Flow where they arrived later the same day. HMCS Huron had joined them around 1430A/7 after having fuelled at the Faeroer Islands.
Around 1920A/7, HMS Honeysuckle, HMS Oxlip and HMS Rhododendron rejoined the convoy after fuelling at the Faeroer Islands.
In the early afternoon of 8 January 1944, the convoy arrived at Loch Ewe escorted by HMS Ready and HMS Orestes.
HMS Whitehall, HMS Wrestler, HMS Honeysuckle, HMS Oxlip and HMS Rhododendron had parted company shortly before arrival to proceed to East coast ports to rejoin the Western Approaches Command.
------------------------------------------------------------------------------------------------------------------------------------------
' Force 1 '
.' Force 1 ' was the cruiser cover force for these convoy's. It was made up of the light cruisers HMS Belfast (Capt. F.R. Parham, RN, flying the flag of Vice-Admiral R.L. Burnett, CB, DSO, OBE, RN), HMS Sheffield (Capt. C.T. Addis, RN) and the heavy cruiser HMS Norfolk (Capt. D.K. Bain, RN).
Around 2100A/15, ' Force 1 ', departed Seidisfjord, Iceland to provide cover for Convoy JW 55A.
Around 0010C/20, ' Force 1 ', arrived in the Kola Inlet.
Around 0330C/23, ' Force 1 ', departed the Kola Inlet to provide cover for convoys RA 55A and JW 55B.
Around 1230C/26, ' Force 1 ', was joined by the destroyers HMS Musketeer, HMS Matchless, HMS Opportune and HMS Virago and ' Force 1 ' was in action with the German battlecruiser Scharnhorst during which HMS Sheffield and HMS Norfolk were damaged [see below for more info.]
Around 1700C/27, ' Force 1 ' arrived in the Kola Inlet to fuel and make temporary repairs to the damaged ships.
Around 2300C/29, ' Force 1 ' (HMS Belfast, HMS Sheffield and HMS Norfolk) departed the Kola Inlet for Scapa Flow where they arrived around 2315A/1.
------------------------------------------------------------------------------------------------------------------------------------------
' Force 2 '
.' Force 2 ' was the battle cover force for these convoy's. It was made up of the battleship HMS Duke of York (Capt. G.H.E. Russell, CBE, RN, flying the flag of A/Admiral B.A. Fraser, KCB, KBE, RN), light cruiser HMS Jamaica (Capt. J. Hugh-Hallett, DSO, RN) and the destroyers HMS Savage (Cdr. R.C. Gordon, DSO, RN), HMS Saumarez (Lt.Cdr. E.N. Walmsley, DSC, RN), HMS Scorpion (Lt.Cdr. W.S. Clouston, RN) and HNoMS Stord (Lt.Cdr. S.V. Storheill).
Around 1300A/12, ' Force 2 ' had departed Scapa Flow for the Kola Inlet where it arrived around 1300C/16.
Around 0900C/18, ' Force 2 ', departed the Kola Inlet to provide cover from convoy JW 55A.
Around 1145Z/21, ' Force 2 ', arrived at Akureyri, Iceland. ' Force 2 ' was swept in by the minesweepers HMS Loyalty (Lt.Cdr. James Edward Maltby, RNR).
Around 2145Z/23, ' Force 2 ', departed Akureyri to provide cover for convoys JW 55B and RA 55A.
On 26 December 1943, ' Force 2 ' was in action with the German battlecruiser Scharnhorst [see below for more info.]
Around 1245C/27, ' Force 2 ' arrived in the Kola Inlet to fuel and to make some repairs.
Around 1700C/28, ' Force 4 ', made up of HMS Duke of York, HMS Jamaica, HMS Musketeer, HMS Matchless, HMS Opportune, HMS Virago, HMS Savage, HMS Scorpion and HNoMS Stord departed the Kola Inlet for Scapa Flow. HMS Saumarez was unable to sail, her action damage some more repairs.
Around 0930A/1, ' Force 4 ' arrived at Scapa Flow.
------------------------------------------------------------------------------------------------------------------------------------------
Action with and sinking of the German battlecruiser Scharnhorst, 26 December 1943.
.Dispositions at 0400A/26.
At 0400A/26, the situation in the Bear Island area was as follows;
Westbound convoy RA 55A was about 220 nautical miles to the westward of Bear Island in approximate position 74°42'N, 05°27'E, steering 267°, speed 8 knots. This convoy was apparently still not detected by the enemy.
Eastbound convoy JW 55B was about 50 miles south of Bear Island in approximate position 73°31'N, 18°54'E, steering 070°, speed 8 knots.
' Force 1 ', the cruiser force, was in position 73°52'N, 27°12'E (some 150 nautical miles to the eastward of convoy JW 55B. They were steering 235° at 18 knots.
' Force 2 ', the battle force, was in position 71°07'N, 10°48'E, some 350 miles to the south-west of the cruisers. They were proceeding on course 080° at 24 knots. In the weather conditions the destroyers had difficulty keeping up and the bow of HMS Duke of York was almost constantly under water.
Convoy JW 55B had been sighted and shadowed by aircraft for a while and when flying conditions deteriorated U-boats had been in contact with the convoy. Admiral Fraser had no doubt that this convoy would be the target for the German battlecruiser Scharnhorst and the destroyers Z 29, Z 30, Z 33, Z 34 and Z 38 which were known to be at sea. He therefore decided to divert the convoy to the northward in order to increase the enemy's difficulties in finding it. This would entail breaking wireless silence and revealing the presence of covering forces but the decided that the safety of the convoy must be the primery object. At 0628A/26, Convoy JW 55B was ordered to steer 045° and ' Force 1 ' was ordered to close it for support.
' Force 1 ' altered course to 270° at 0712A/26 in order to approach the convoy from the southward and thus, in the event of action, to avoid steaming into the strong south-westerly wind and heavy seas. Course was held for an hour, and after receiving the position, course and speed of the convoy, course was altered to 300° at 0815A/26. Speed was increased to 24 knots.
Meanwhile the German battlegroup had continued to proceed northwards and at 0730 hours was in estimated position 73°52'N, 23°10'E. Soon afterwards the destroyers were detached to form a reconnaissance line 10 miles ahead of the Scharnhorst. Some of the destroyers did not receive this order and as a result they moved ahead but the area of their search was not the one intended. At 0800 hours the German battlegroup altered course to 230°, probably on account of a submarine report on the position of the convoy. At this time the destroyers were some 10 miles ahead of the battlecruiser, spread approximately in line abreast but it seems that soon afterwards the Scharnhorst turned to the north-eastward, and all communication between her and the destroyers broke down. Communication was restored two hours later but the destroyers never rejoined the battlecruiser.
First contact with the enemy.
At 0840A/26, HMS Belfast picked up a radar contact at 35000 yards, bearing 295°. The Belfast's estimasted position was then 73°35'N, 23°21'E and Vice-Admiral Burnett reckoned the convoy was bearing 287°, 48 nautical miles from him. At the same time Capt. McCoy in HMS Onslow placed the enemy about 36 nautical miles, bearing 125°, from the convoy.
In the Belfast the range of the main echo decreased rapidly, and twenty minutes later - at 0900A/26 - a second echo was obtained, bearing 299°, 24500 yards. This second echo remained on a steady bearing till 0930A/26, when, from its estimated speed of 8-10 knots, the Vice-Admiral considered that it was probably a merchant ship from the convoy, and disregarded it. It may well have been, however, one of the enemy destroyers, detached to shadow the convoy.
At 0915A/26 the main echo bore 250°, 13000 yards, speed approximately 18 knots. At this time ' Force 1 ' was formed on a line of bearing 180°, in the order HMS Belfast, HMS Sheffield and HMS Norfolk, HMS Belfast being the northern ship. The line of bearing had just been altered to 160°, when at 0921A/26, HMS Sheffield reported ' enemy in sight ' bearing 222°, 13000 yards. At 0924A/26, HMS Belfast opened fire with starshell and at 0929A/26, ' Force 1 ' was ordered to engage with main armament, course being altered 40° towards the enemy, to 265°. HMS Norfolk opened fire at a range of 9800 yards, but had to drop back to clear the Belfast's range. She continued firing till 0940 and obtained one git, with her second or third salvo, either on the crow's nest of the bridge port director, which caused several casualties, and possible a hit on the forecastle. The 6" cruisers did not fire during this phase of the action, nor did the enemy, whole altered course to about 150°, steaming at 30 knots. ' Force 1 ' altered to 105° at 0938A/26 and to 170° at 0946A/26 by which time the range had opened to 24000 yards and chased to the southward, but the enemy drew away and the range continued to increase.
At 0955A/26, the Scharnhorst altered course to the north-east, and Vice-Admiral Burnett at once appreciated that she was trying to work round to the northward of the convoy for a second attempt to attack it. Possibly this was the result of an exhortation from Admiral Dönitz which appears to have been received and read to her ship's company around this time. In the prevailing weather conditions - wind force 7 to 8 from the southwest - ' Force 1's ' maximimum speed was 24 knots, and as that of the enemy appeared to be 4 to 6 knots faster the Vice-Admiral decided that he must get between the Scharnhorst and the convoy. He therefore altered course to 305° at 1000A/26, and to 325° at 1014A/26, with result that six minutes later contact was lost with the enemy bearing 078°, 36000 yards, and steering to the north-east at about 28 knots.
Meanwhile the Commander-in-Chief had ordered Capt. McCoy, the escort commander, to turn the convoy to the northward at 0930A/26, and to send four destroyers to join ' Force 1 ' at 0937A/26. HMS Musketeer, HMS Matchless, HMS Opportune and HMS Virago were detached at 0951A/26. They joined Vice-Admiral Burnett at 1024A/26. By 1030A/26, when it was clear to the Commander-in-Chief that ' Force 1 ' had lost touch with the enemy, and he was again closing the convoy, he ordered convoy JW 55B to resume course 045°.
Second engagement of ' Force 1 '.
Half an hour after losing touch with the enemy ' Force 1 ' made radar contact with the convoy, bearing 324°, 28000 yards, at 1050A/1, and the cruisers commenced zigzagging 10 miles ahead of it, with the four destroyers disposed ahead as a screen.
At 1058A/1, the Commander-in-Chief informed Vice-Admiral Burnett that ' Force 2 ' wound have little chance of finding the enemy unless some unit regained touch with him and shadowed, but in view of the enemy's advantage in speed under the prevailing weather conditions, the Vice-Admiral ' rightly considered it undesirable to split his force by detaching one or more ships to search, feeling confident that the enemy would return to the convoy from the north or north-east '. An hour went by, and the Commander-in-Chief found himself faced with the difficult question of the destroyers fuel situation. He had ' either to turn back or go to the Kola Inlet, and if the Scharnhorst had already turned for home, these was obviously no chance of catching him. This latter contingency was by no means improbable, for ' Force 2 ' had been shadowed from the starboard quarter by three enemy aircraft since about 1000A/26, and their reports had presumably been passed to the Scharnhorst. Then, at 1205A/26, came a signal from HMS Belfast reporting radar contact again with the enemy, and he knew that there was every prospect of cutting him off.
The convoy had remained on a course of 045° till just before noon, when Capt. McCoy, who had been ordered by the Commander-in-Chief at 1122 hours to use his discretion as to its course, altered to 125° in order to keep ' Force 1 ' between the convoy and the probable direction of the enemy. HMS Norfolk had reported a radar contact at 27000 yards at 1137A/26, but had lost it a few minutes later, and by noon, when the convoy was turning to 125°, ' Force 1 ' was in position 74°11'N, 22°18'E, steering 045°, 18 knots, with the convoy about 9 miles on the port quarter. Five minutes later (1205A/26), HMS Belfast radar picked up the enemy bearing 075°, 30500 yards. Vice-Admiral Burnett concentrated his four destroyers on his starboard bow, and at 1219A/26, altered course to 100°. The enemy course and speed was estimated at 240°, 20 knots. A minute later the Scharnhorst appeared to alter course slightly to the westward and at 1221A/26, HMS Sheffield reported ' enemy in sight '. ' Force 1 ' immediately opened fire, and the destroyers were ordered to attack with torpedoes, but were unable to reach a firing position owing to the weather conditions, and the enemy's hurried retirement.
This second action, fought by the cruisers at ranges from 9000 to 16000 yards, lasted about 20 minute, and again the Scharnhorst was ' most effectively driven off the convoy by Force 1's determined attack '. The enemy altered course from west round to south-east, increasing speed to 28 knots, and the range soon began to open. Several hits were claimed by the cruisers, but only one, which struck the port side aft and apparently failed to explode, was subsequently confirmed by prisoners. HMS Musketeer, however, which was herself engaging the enemy at a range of 4500 yards, consided there were others, and the prisoners agreed that the cruisers fire was unpleasantly accurate and filled the air with fragments.
At 1233A/26, 12 minutes after the action started, HMS Norfolk received two hits, one through the barbette of 'X' turret, which was put out of action, and one amidships. All radar, except Type 284, became unsericeable and these were several casualties. One officer and six ratings were killed and five seriously wounded. At the same time an 11" salvo straddled HMS Sheffield, and several pieces of shell, came inboard, fragments penetrated the ship at various points.
By 1241A/26, the enemy was on a course of 110° steaming 28 knots, and the range had opened to 12400 yards. Vice-Admiral Burnett decided to check fire, and to shadow with his whole force until the Scharnhorst could be engaged by ' Force 2 '. He therefore increased speed to 28 knots, and at 1250A/26, the enemy range and bearing were steady at 13400 yards, 138°. The destroyers, to the westward of the cruisers, continued to pursue the enemy in line ahead, their range opeing to 20000 yards and then remaining steady.
Shadowing operations.
The Scharnhorst had by this time given up all idea of attacking the convoy and for the next three hours her course was to the south-east and south. As she was retiring on a course so favourable for interception by ' Force 2 ', Vice-Admiral Burnett did not re-engage, and kept his cruisers concentrated, shadowing by radar from just outside visual range, about 7.5 nautical miles and slightly to the eastward of the enemy's course. The four destroyers of ' Force 1 ', which owing to the heavy sea had been unable to close the enemy sufficiently to attack with torpedoes, was stationed to the westward by the Commander-in-Chief at about 1600A/26 to guard against the Scharnhorst breaking back in that direction towards the convoy or Alten Fjord.
Despite her damage HMS Norfolk kept up with ' Force 1 ' throughout the afternoon, but at 1603A/26, she was obliged to reduce speed to fight a fire and a few minutes later, at 1607A/26, HMS Sheffield dropped back, reporting her port inner shaft out of action and speed reduced to 10 knots. By 1621A/26, she was able to proceed at 23 knots, but the delay and reduction of speed prevented her from rejoining HMS Belfast until about 2100A/26. For the rest of the action she remained some 10 miles astern. HMS Norfolk was able to rejoin HMS Belfast around 1700A/26.
Movements of the German destroyers.
All this time, while the Scharnhorst was being gradually haunded to her doom, the German destroyers had played a singularly ineffective part. After losting contact soon after 0800A/26, they continued on the south-westerly course (230°) to which the force had just turned, spread approximately five miles apart. No orders were received from the Flag Officer, Battle Group, until 1009A/26 - just after the close of the first action with Vice-Admiral Burnett's cruisers - when a signal was received directing the destroyers ' to advance into the immediate vicinity of the convoy '. To this Z 29, the Flotilla Leader, replied that they were advancing according to plan, course 230°, speed 12 knots. Twenty minutes later, Admiral Bey had apparently come to the conclusion that the convoy was further to the north then that he had previously supposed, and at 1027 he ordered the Flotilla to alter course to 070° and to increase speed to 25 knots, an hour later (1135A/26) he ordered a further change of course to 030°.
At 0945A/26, a report from the submarine U-277 had been received in the Scharnhorst placing the convoy in position 73°58'N, 19°30'E, but this seems to have been disregarded by Admiral Bey and it was not until two-and-a-half hours later (1218A/26), that he ordered the destroyers to operate in this area. Course was accordingly altered to 280° and the flotilla concentrated on the northern ship but it was too late and the convoy was well to the north-eastward of the position reported by the U-boat, though the destroyers must have passed within 10 miles of it at about 1300A/26 on passage to the new area, owing to Capt. McCoy's turn to the south-eastward at noon. On this Admiral Bey was unaware, and at 1418A/26, he ordered the destroyers to break off the operation and make for the Norwegian coast. With the excetion of Z 33, which had become separated in the bad weather, the Flotilla - then some 16 nautical miles south-east of Bear Island - at once altered course to 180° and eventually entered Norwegian coastal waters at about 0200A/27.
Z 33 made her own way back, at 1810A/26, she sighted what was believed to be a straggler from the convoy. At this target she fired four torpedoes, which missed, and continued on her way to her base.
Movements of the Commander-in-Chief, Home Fleet ' Force 2 '.
Meanwhile ' Force 2 ', acting on reports of Vice-Admiral Burnett's cruisers, had been steering throughout the day to intercept. During the first two cruiser engagements the composition of the enemy's force was not clear to the Commander-in-Chief, but on confirmation by the Vice-Admiral that only one heavy unit was present, he decided to engage on similar courses, with HMS Jamaica in support, opening fire at about 13000 yards and detaching his destroyers to make a torpedo attack. At 1400A/26 he estimated that if the enemy maintained his course and speed, ' Force 2 ' would engage him at about 1715A/26, but the Scharnhorst altered to the south soon afterwards, and at 1617A/26 the Duke of York's Type 273 radar picked her up at 45500 yards bearing 020°. The range closed rapidly, and soon HMS Belfast was picked up astern of the target. At 1632A/26, a quarter of an hour after the first contact, the Duke of York's Type 284 found the enemy at 29700 yards, apparently zig-zagging on a mean course of 160°. Five minutes later, the destroyers, which had formed sub-divisions on either bow of the flagship shortly after first contact, were ordered to take up most advantageous position for torpedo attack, but not to attack until ordered to do so. The destroyers had formed sub-divisions as follows, HMS Savage with HMS Saumarez and HMS Scorpion with HNoMS Stord.
At 1642A/26, the enemy seemed to alter course slightly to port and two minutes later ' Force 2 ' altered to 080° in order to open 'A' arcs. At 1647A/26, HMS Belfast opened fire with starshell, followed at 1648A/26 by HMS Duke of York. Those from the latter illuminated the enemy at 1650A/26. The Commander-in-Chief then made an enemy report and ' Force 2 ' opened fire with their main armament.
' Force 2 ' engages, 1650-1844 hours, 26 December 1943.
When HMS Duke of York and HMS Jamaica opened fire at 12000 yards. There was every indication that the Scharnhorst was completely unaware of their presence, her turrets were reported trained fore and aft, she did not immediately reply to the fire of ' Force 2 ' and when she did her fire was erratic. Prisoners subsequently confirmed that she had made no radar contact during the approach of ' Force 2 '. They had been told they would not have to engage anything larger then a cruiser and were badly shaken when informed that a capital ship to the southward was engaging them.
The Scharnhorst altered round at once to the northward, and the Duke of York to 360° to follow and also to avoid torpedoes which the enemy, had he been on the alert, might have been fired. On this, HMS Belfast prepared to fire torpedoes, but the Scharnhorst altered away to the eastward, probably with the double object of avoiding ' Force 1 ' and opening 'A' arcs, and HMS Belfast and HMS Norfolk then engaged her with their main armamant, steering northerly and north-easterly courses in order to prevent her breaking back to the north-westward, until 1712A/26, when she ran out of range, after firing two ineffective salvoes at the cruisers. Vice-Admiral Burnett continued to the north-north-west until 1720A/26, and it was then apparent that the enemy meant to escape to the eastward, gradually altered round to follow. Just then orders were received from the Commander-in-Chief to ' steer 140° ' and join him, and the cruisers steadied on a south-easterly course at 1727A/26.
The hunt was up, and for the next hour there was a chase to the eastward, HMS Duke of York and HMS Jamaica engaging at ranges which gradually increased, as the enemy's superior speed began to tell. By 1708A/26, the Scharnhorst was steadily on an easterly course and engaging HMS Duke of York and HMS Jamaica with her main armamant. Her tactics were to turn to the southward, fire a broadside, and then turn on end-on away to the east till ready to fire the next salvo, making the Duke of York's gunners a problem.
By 1730A/26, the situation was as follows. To the south-west of the enemy HMS Duke of York and HMS Jamaica were engaging him and pursuing similar tactics. ' Force 2's ' destroyers - still well astern of him - were endeavouring to gain bearing to attack with torpedoes, taking individual avoiding action when fired on, HMS Savage and HMS Saumarez edging over to get on his port side while HMS Scorpion and HNoMS Stord remained on the starbord side. To the north-west, HMS Musketeer, HMS Matchless, HMS Opportune and HMS Virago, which had turned at 1700A/26, was creeping up on a easterly course roughly parallel to that of the enemy and some miles to the northward. Further to the north-west HMS Belfast and HMS Norfolk were steering to the south-eastward to join the Commander-in-Chief, with HMS Sheffield some distance astern, and dropping owing to her reduced speed. What the German Admiral though of the situation may be judged from his signal to the German War Staff (timed 1724 hours); ' Am surrounded by heavy units '.
HMS Duke of York probably obtained hits with her first and third salvoes, which, accordingly to prisoners, were on the quarter deck close to ' C ' turret, and low down forward. This latter may have put ' A ' turret out of action as it did not fire again. Little is known about other hits during this first engagement, but it seems certain that HMS Duke of York had obtained hits which may have caused some underwater damage that eventually reduced the Scharnhorst speed. HMS Jamaica claimed on hit.
The Scharnhorst's gunfire was erratic to begin with but later improved as the range increased. Between ranges of 17000 - 20000 yards HMS Duke of York was straddled several times. Her hull was not hit but both masts were shot through by 11" shells which fortunately did not explode.
By 1742A/26, the range had opened to 18000 yards and HMS Jamaica then ceased fire, her blind fire at this range considered of doubtful value and liable to confuse the Duke of York's radar spotting. At this time all the cruisers were out of range, and the destroyers had not yet been seriously engaged by the enemy. The gun duel between HMS Duke of York and the Scharnhorst continued till 1820A/26 when the enemy ceased firing at 20000 yards, and reduced speed, though this was not immediately apparent. At the same time the Commander-in-Chief decided to turn south-eastward towards the Norwegian coast, in the hope she would also lead round and so to give his destroyers a chance to attack. At 1824A/26, the range having opened to 21400 yards, HMS Duke of York checked fire. She had fired 52 broadsides, of which 31 have been reported as straddles and 16 as within 200 yards of the enemy.
Just at this moment the Scharnhorst was sending her final signal - a message from Admiral Bey to the Führer - ' We shall fight to the last shell '. This was the last report the German Naval Staff received from her as to her fate, though no doubt they were able to draw their conclusions three-quarters of an hour later (1919A/26) when they intercepted a British signal ' Finish her off with torpedoes '.
First destroyer attack, 1850 hours, 26 December 1943.
At 1824A/26, the Commander-in-Chief was of the opinion that the Scharnhorst might escape and much depended on the four 'S-class' destroyers to damage of sink her. Since 1713A/26, when they had been ordered to attack, they had been gradually gaining bearing on the Scharnhorst, but their progress was very slow and their chances of attack depended on a radical alteration of course by their quarry. Then, at 1820A/26, when they had closed to 12000 yards they started to forge ahead. The enemy had reduced speed. By 1840A/26, the first sub-division (HMS Savage and HMS Saumarez), astern of the enemy, and the second sub-division (HMS Scorpion and HNoMS Stord), on his starboard beam, had each closed to about 10000 yards. Some three minutes earlier, the Commander-in-Chief, observing on his radar plot the enemy's reduction of speed, had altered course directly towards her, and was beginning to close rapidly.
The Scharnhorst opened a fairly heavy, though ineffective, fire on HMS Savage and HMS Saumarez, which they returned when the range closed to 7000 yards. As these two approached from the north-westward, drawing the enemy's fire, HMS Scorpion and HNoMS Stord were closing in apparently unseen, and certainly unengaged from the south-eastward. At 1849A/26, starshells from HMS Savage illuminated the enemy, and she was seen to be turning to the southward. The Scorpion and Stord immediately swung to starboard, each firing eight torpedoes at 2100 and 1800 yards respectively. HMS Scorpion claimed one hit, HNoMS Stord none, probably due to the Scharnhorst combing the latter's tracks. Both destroyers were engaged by the enemy's secondary and light armament while retiring, the the firing was wild and inflicted no damage. They returned the fire and scored several hits on the superstructure. The Scharnhorst continued to alter round to starboar after this attack till on a south-westerly course, thus placing HMS Savage and HMS Saumarez in an excellent position on her starboard bow. Her movements could be followed clearly in the light of their starshell, and HMS Savage with HMS Saumarez on her starboard quarter, hastily training their torpedo tubes to starboard, turned in to attack at 1855A/26, coming under heavy fire from the enemy's entire armament as they did so. HMS Savage fired eight torpedoes from 3500 yards, but HMS Saumarez received damage which prevented her training one set of tubes, and got off only four from 1800 yards. Subsequent analysis credited there attacks with three hits altogether. The destroyers then withdrew to the northward, engaging the Scharnhorst as they did so. Fortunately damage to HMS Saumarez was all above the waterline. Shells had passed through her director and rengefinders without exploding, but she had suffered considerably from splinters which reduced her speed to 10 knots on one engine only. One officer and ten ratings were killed and eleven ratings were wounded.
Second engagement of ' Force 2 '.
As the destroyers withdrew to the northward, HMS Duke of York and HMS Jamaica coming up from the south-west, re-engaged at a range of 10400 yards, opening fire at 1901A/26. Hits were immediately scored, while the enemy continued to fire at the retiring destroyers. HMS Norfolk, too joined in from the northward, but had difficulty in finding the right target, and checked fire after a couple of salvoes. After five minutes, when the Scharnhorst had been repeatedly hit and fires and flashes from exploding ammunition were flaring up, she shifted her secondary armament fire to HMS Duke of York at a range of about 8000 yards. During this second action she apparently engaged HMS Duke of York and HMS Jamaica with only part of her main armament, and that intermittently.
The battle was then approaching its end. Between 1901A/26 and 1926A/26 the enemy's speed fell drastically from 20 to about 5 knots. At 1915A/26, HMS Belfast opened fire on her at a range of 17000 yards, and a few minutes later she steadied on a northerly course. About this time (1919A/26) the Commander-in-Chief ordered HMS Jamaica and HMS Belfast to close the enemy, who was then almost stationary, and to sink her with torpedoes. HMS Duke of York continued firing - getting of 25 broadsides, of which 21 were straddles - till 1928A/26, when she checked fire to enable the cruisers, which had altered course towards the enemy to diliver their torpedo attacks. According to prisoners HMS Duke of York had obtained at least 10 hits.
Torpedo attacks by HMS Belfast and HMS Jamaica.
In the Scharnhorst - battered by gunfire and crippled by four torpedoes - resistance was pracically at an end as the cruisers closed in from north and south. Prisoners subsequently stated that after sending their final signal to Hitler, assuring him that the Scharnhorst would fight to the last shell, the Admiral and Captain had shot themselves on the bridge but this could not be confirmed.
HMS Jamaica fired three torpedoes to port (one of which misfired) at 1925A/26 from 3500 yards but claimed no hits as the enemy's speed appeared to have been underestimated. Two minutes later HMS Belfast also fired three torpedoes, one of which may have git, though this was subsequently considered unlikely. Both cruisers then hauled round to fire their remaining tubes. Meanwhile HMS Jamaica scored several hits with her main and secondary armamant. The Scharnhorst replied with wild fire from her secondary armamant and light weapons which did no damage and had ceased firing altogether when at 1937A/26, at a range of 3750 yards, HMS Jamaica fired three torpedoes to starboard at the enemy, broadside on and almost stopped. The result could not be seenm as the target was completely hidden by smoke, but underwater explosions were heard after the correct time interval, and it is probable that two torpedoes took effect. Two minutes earlier (1935A/26), HMS Belfast had turned to fire her port torpedoes but then HMS Musketeer, HMS Matchless, HMS Opportune and HMS Virago arrived at the scene and HMS Belfast retired to the south to await developments.
Torpedo attacks by the 36th Destroyer Division.
The 36th Division, made up of HMS Musketeer, HMS Matchless, HMS Opportune and HMS Virago, starting the chase well to the westward of the other forces, had been tracking the enemy by radar and slowly gaining bearing on a parallel course to the northward throughout the action. The destroyers now closed in sub-divisions (HMS Musketeer with HMS Matchless and HMS Opportune with HMS Virago) from the north and astern. At 1930A/27 they commenced their attacks, HMS Musketeer and HMS Matchless from the port side and HMS Opportune and HMS Virago from the starboard side. HMS Opportune fired two salvoes of four torpedoes each at 1931A/26 and 1933A/26 from range of 2100 and 2500 yards. She claimed two hits. HMS Virago followed her in, and at 1934A/26 fired seven torpedoes from 2800 yards. Two hits were observed and the sub-division then retired to the westward with HMS Virago firing on the enemy as long as possible.
On the port side, HMS Musketeer fired four torpedoes from 1000 yards at 1933A/26 and observed two and possibly three hits and then withdrew to the westward. HMS Matchless could not fire as her torpedo tubes training had been effected by a heavy sea. She therefore hauled round without firing and then came in to attack again from the enemy's port bow, but before she could fire the Scharnhorst had sunk. She then joined HMS Scorpion in picking up survivors. The German ship was last seen around 1938A/26 though no ship saw her actually sinking. This most probably occured at 1945A/26 when a large underwater explosion was felt.
For the next hour, HMS Belfast, HMS Norfolk and most of the destroyers searched the area for survivors. In all only thirty were picked up in the heavy weather from the icy waters by HMS Scorpion and six by HMS Matchless. No officer was among them. The most senior was the equivalant rating of Acting Petty Officer.
Conclusion.
Around 2100A/26, HMS Sheffield rejoined ' Force 1 ' and all forces in the area were ordered to proceed independently to the Kola Inlet where they all arrived unmolested the next day.
(15)
13 Dec 1943
HMS Telemachus (Cdr. W.D.A. King, DSO, DSC, RN) conducted A/S exercises off Scapa Flow together with HMS Tenacious (Lt.Cdr. D.F. Townsend, RN), HMCS Iroquois (Cdr. J.C. Hibbard, DSC, RCN), HMCS Haida (Cdr. H.G. De Wolf, RCN) and HMS Gleaner (Lt.Cdr. F.J.G. Hewitt, DSC and Bar, RN). (16)
17 Dec 1943
HMS Valiant (Capt. G.E.M. O’Donnell, DSO, RN), HMS Bellona (Capt. C.F.W. Norris, RN) and HMCS Haida (Cdr. H.G. De Wolf, RCN) conducted exercises off Scapa Flow. (17)
20 Dec 1943
Around 1700A/20, the destroyers HMS Onslaught (Cdr. W.H. Selby, DSC, RN), HMS Orwell (Lt.Cdr. J.M. Hodges, DSO, RN), HMS Scourge (Lt.Cdr. G.I.M. Balfour, RN), HMS Impulsive (Lt.Cdr. P. Bekenn, RN), HMCS Iroquois (Cdr. J.C. Hibbard, DSC, RCN), HMCS Haida (Cdr. H.G. De Wolf, RCN) and HMCS Huron (Lt.Cdr. H.S. Rayner, DSC, RCN) departed Scapa Flow for Skaalefjord, Faroer Islands where they arrived around 1000A/21. (14)
22 Dec 1943
Around 0001A/22, the destroyers HMS Onslow (Capt. J.A. McCoy, DSO, RN), HMS Onslaught (Cdr. W.H. Selby, DSC, RN), HMS Orwell (Lt.Cdr. J.M. Hodges, DSO, RN), HMS Scourge (Lt.Cdr. G.I.M. Balfour, RN), HMS Impulsive (Lt.Cdr. P. Bekenn, RN), HMCS Iroquois (Cdr. J.C. Hibbard, DSC, RCN), HMCS Haida (Cdr. H.G. De Wolf, RCN) and HMCS Huron (Lt.Cdr. H.S. Rayner, DSC, RCN) departed Skaalefjord to join convoy JW 55B.
[For more information, see the event ' Operation FV, passage of convoys JW 55A and JW 55B to Northern Russia and RA 55A and RA 55B from Northern Russia and the sinking of the German battleship Scharnhorst ' for 12 December 1943.] (14)
28 Dec 1943
Around 1200A/28, HMCS Iroquois (Cdr. J.C. Hibbard, DSC, RCN), HMCS Haida (Cdr. H.G. De Wolf, RCN) and HMCS Huron (Lt.Cdr. H.S. Rayner, DSC, RCN) parted company with convoy JW 55B to proceed ahead of it to the Kola Inlet where they arrived around 2330A/28. (18)
31 Dec 1943
The destroyers HMS Onslow (Capt. J.A. McCoy, DSO, RN), HMS Onslaught (Cdr. W.H. Selby, DSC, RN), HMS Orwell (Lt.Cdr. J.M. Hodges, DSO, RN), HMS Impulsive (Lt.Cdr. P. Bekenn, RN), HMCS Iroquois (Cdr. J.C. Hibbard, DSC, RCN), HMCS Haida (Cdr. H.G. De Wolf, RCN) and HMCS Huron (Lt.Cdr. H.S. Rayner, DSC, RCN), HMS Whitehall (Lt.Cdr. P.J. Cowell, DSC, RN), HMS Wrestler (Lt. R.W.B. Lacon, DSC, RN), minesweepers HMS Halcyon (T/A/Lt.Cdr. L.J. Martin, RNVR), HMS Hussar (Lt.Cdr. R.C. Biggs, DSO, DSC, RN), HMS Speedwell (Lt.Cdr. T.E. Williams, RD, RNR) and the corvettes HMS Honeysuckle (Lt. H.H.D. MacKillican, DSC, RNR), HMS Oxlip (Lt. C.W. Leadbetter, RNR) and HMS Rhododendron (T/Lt. O.B. Medley, RNVR) departed the Kola Inlet as escorts for convoy RA 55B.
[For more information, see the event ' Operation FV, passage of convoys JW 55A and JW 55B to Northern Russia and RA 55A and RA 55B from Northern Russia and the sinking of the German battleship Scharnhorst ' for 12 December 1943.] (14)
7 Jan 1944
Around 1215A/7, HMS Onslow (Capt. J.A. McCoy, DSO, RN), HMS Onslaught (Cdr. W.H. Selby, DSC, RN), HMS Orwell (Lt.Cdr. J.M. Hodges, DSO, RN), HMS Impulsive (Lt.Cdr. P. Bekenn, RN), HMCS Iroquois (Cdr. J.C. Hibbard, DSC, RCN) and HMCS Haida (Cdr. H.G. De Wolf, RCN) parted company with convoy RA 55B to proceed direct to Scapa Flow.
Around 1430A/7, HMCS Huron (Lt.Cdr. H.S. Rayner, DSC, RCN) joined after having fuelled at Skaalefjord, Faeroer Islands.
Around 2250A/7, These destroyers arrived at Scapa Flow. (19)
10 Jan 1944
Around 1700A/10, HMCS Haida (Cdr. H.G. De Wolf, RCN) and HMCS Iroquois (Cdr. J.C. Hibbard, DSC, RCN) departed Scapa Flow for Plymouth. But first, the Vice Admiral destroyers, Vice Admiral I.G. Glennie, CB, RN, which had embarked in HMCS Haida, was transported to Scrabster. (18)
12 Jan 1944
Around 1345A/12, HMCS Haida (Cdr. H.G. De Wolf, RCN) and HMCS Iroquois (Cdr. J.C. Hibbard, DSC, RCN) arrived at Plymouth from Scapa Flow. (18)
17 Jan 1944
Around 1145A/17, HMCS Haida (Cdr. H.G. De Wolf, RCN) and HMCS Iroquois (Cdr. J.C. Hibbard, DSC, RCN) departed Plymouth to patrol off the south-east coast of the U.K. / western part of the English Channel.
They returned to Plymouth around 0200A/18. (18)
18 Jan 1944
Around 1420A/18, HMCS Haida (Cdr. H.G. De Wolf, RCN) and HMCS Iroquois (Cdr. J.C. Hibbard, DSC, RCN) departed Plymouth to patrol off the south-east coast of the U.K. / western part of the English Channel.
They returned to Plymouth around 0050A/19. (18)
19 Jan 1944
Around 1530A/19, HMCS Haida (Cdr. H.G. De Wolf, RCN), HMCS Iroquois (Cdr. J.C. Hibbard, DSC, RCN), HMCS Athabaskan (Lt.Cdr. J.H. Stubbs, RCN) and HMS Ashanti (Lt.Cdr. J.R. Barnes, RN) departed Plymouth to patrol off the south-east coast of the U.K. / western part of the English Channel.
They returned to Plymouth around 0530A/20. (18)
2 Feb 1944
Around 1815A/2, HMCS Haida (Cdr. H.G. De Wolf, RCN), HMCS Iroquois (Cdr. J.C. Hibbard, DSC, RCN) and HMS Ashanti (Lt.Cdr. J.R. Barnes, RN) departed Plymouth to patrol off the south-east coast of the U.K. / western part of the English Channel.
They returned to Plymouth late in the morning of the 3rd. (18)
4 Feb 1944
Around 0900A/4, HMCS Haida (Cdr. H.G. De Wolf, RCN), HMCS Iroquois (Cdr. J.C. Hibbard, DSC, RCN) and HMCS Athabaskan (Lt.Cdr. J.H. Stubbs, RCN) departed Plymouth for Scapa Flow. (20)
5 Feb 1944
Around 2300A/5, HMCS Haida (Cdr. H.G. De Wolf, RCN), HMCS Iroquois (Cdr. J.C. Hibbard, DSC, RCN) and HMCS Athabaskan (Lt.Cdr. J.H. Stubbs, RCN) arrived at Scapa Flow from Plymouth. (20)
8 Feb 1944
The battleships HMS Anson (Capt. E.D.B. McCarthy, DSO and Bar, RN flying the flag of Vice-Admiral H.R. Moore, KCB, DSO, CVO, RN), Richelieu (Capt. R.G. Lambert) and the light cruiser HMS Nigeria (Capt. S.H. Paton, RN) conducted exercises off Scapa Flow. Destroyers were also present to escort the battleships, HMCS Haida (Cdr. H.G. De Wolf, RCN), HMCS Iroquois (Cdr. J.C. Hibbard, DSC, RCN) and HMS Urania (Lt.Cdr. D.H.P. Gardiner, DSC, RN) seems to have been among them. (21)
10 Feb 1944
Operation Posthorn.
The object of this operation was to attack shipping on the Norwegian coast in the Stadlandet area with carrier borne aircraft.
A force made up of the battleships HMS Anson (Capt. E.D.B. McCarthy, DSO and Bar, RN flying the flag of Vice-Admiral H.R. Moore, KCB, DSO, CVO, RN), Richelieu (Capt. R.G. Lambert), aircraft carrier HMS Furious (Capt. G.T. Philip, DSO, DSC, RN), light cruisers HMS Belfast (Capt. F.R. Parham, DSO, RN, flying the flag of Vice-Admiral R.L. Burnett, CB, KBE, DSO, RN), HMS Nigeria and the destroyers HMCS Iroquois (Cdr. J.C. Hibbard, DSC, RCN), HMCS Haida (Cdr. H.G. De Wolf, RCN), HMCS Athabaskan (Lt.Cdr. J.H. Stubbs, RCN), HMS Serapis (Lt.Cdr. E.L. Jones, DSC, RN), HMS Onslaught (Cdr. the Hon. A. Pleydell-Bouverie, RN), HMS Oribi (Lt.Cdr. J.C.A. Ingram, DSC and Bar, RN) and HMS Impulsive (Lt.Cdr. P. Bekenn, RN) left Scapa Flow around 1000A/10 and poceeded to the north-east, arriving in the flying off position around 0900A/11 the following day.
Ten Barracudas, escorted by Twelve Seafires were flown off from HMS Furious. The weather was suitable to flying but cloud conditions were poor for dive bombing. No shipping targets were found under way and attacks were therefore directed at a ship found beached in two halves in Ervik Bay. This ship, which had been hit earlier by airborne and submarine torpedoes, was the Emsland (5180 GRT, built 1901) was seen to have been prepared for towing and at least 4 bomb hits on each part of the vessel were confirmed and the wreck was now thoroughly destroyed.
Enemy fighters were encounted, at least two FW-190's and 3 ME-109's were airborne before the arrival of the striking group. They were engaged by Seafires who claim one of the enemy shot down, one probably shot down and two enemy were claimed to have been damaged. One Seafire was lost. Only light anti-aircraft fire was experienced and the remainder of the striking force returned safely.
The Force was reported by enemy aircraft, but was not shadowed for any length of time. It arrived back at Scapa shortly before noon on the 12th. (22)
13 Feb 1944
HMCS Haida (Cdr. H.G. De Wolf, RCN), HMCS Iroquois (Cdr. J.C. Hibbard, DSC, RCN) and HMCS Athabaskan (Lt.Cdr. J.H. Stubbs, RCN) conducted exercises off Scapa Flow on completion of which they fuelled and then left Scapa Flow for Plymouth around 1800A/13. (20)
15 Feb 1944
Around 0950A/15, HMCS Haida (Cdr. H.G. De Wolf, RCN), HMCS Iroquois (Cdr. J.C. Hibbard, DSC, RCN) and HMCS Athabaskan (Lt.Cdr. J.H. Stubbs, RCN) arrived at Plymouth from Scapa Flow. (20)
19 Feb 1944
During 19/20 February 1944, the light cruiser HMS Bellona (Capt. C.F.W. Norris, RN), destroyers HMS Tartar (Cdr. St.J.R.J. Tyrwhitt, DSC, RN), HMCS Athabaskan (Lt.Cdr. J.H. Stubbs, RCN), HMCS Haida (Cdr. H.G. De Wolf, RCN), HMCS Huron (Lt.Cdr. H.S. Rayner, DSC, RCN) and the escort destroyers HMS Talybont (Lt.Cdr. E.F. Baines, DSO, RN) and HMS Tanatside (Cdr. B.J. de St. Croix, RN) conducted exercises near Lands End and the Scilly Islands. (23)
25 Feb 1944
During the night of 25/26 February 1944, the light cruiser HMS Bellona (Capt. C.F.W. Norris, RN) and the destroyers HMS Tartar (Cdr. St.J.R.J. Tyrwhitt, DSC, RN), HMCS Athabaskan (Lt.Cdr. J.H. Stubbs, RCN), HMCS Haida (Cdr. H.G. De Wolf, RCN) and HMCS Huron (Lt.Cdr. H.S. Rayner, DSC, RCN) patrolled off the French coast near Île-de-Batz but no contact was made with the enemy. (24)
27 Feb 1944
The light cruiser HMS Bellona (Capt. C.F.W. Norris, RN) and the destroyers HMS Tartar (Cdr. St.J.R.J. Tyrwhitt, DSC, RN), HMCS Athabaskan (Lt.Cdr. J.H. Stubbs, RCN), HMCS Haida (Cdr. H.G. De Wolf, RCN) and HMCS Huron (Lt.Cdr. H.S. Rayner, DSC, RCN) conducted exercises off Plymouth. (23)
29 Feb 1944
HMS United (Lt. N.R. Wood, RN) conducted A/S exercises off Plymouth together with HMS Tartar (Cdr. St. J.R.J. Tyrwhitt, DSC, RN), HMCS Haida (Cdr. H.G. De Wolf, RCN) and HMCS Huron (Lt.Cdr. H.S. Rayner, DSC, RCN). (25)
1 Mar 1944
Around 2040A/1, 'Force 28', made up of the destroyers HMS Tartar (Cdr. St.J.R.J. Tyrwhitt, DSC, RN), HMS Ashanti (Lt.Cdr. J.R. Barnes, RN), HMCS Athabaskan (Lt.Cdr. J.H. Stubbs, RCN), HMCS Haida (Cdr. H.G. De Wolf, RCN) and HMCS Huron (Lt.Cdr. H.S. Rayner, DSC, RCN) departed Plymouth to patrol near Ushant but no contact was made with the enemy. They returned to Plymouth around 0740A/2. (26)
3 Mar 1944
The light cruiser HMS Bellona (Capt. C.F.W. Norris, RN) and, most likely, the destroyers HMS Tartar (Cdr. St.J.R.J. Tyrwhitt, DSC, RN), HMS Tartar (Cdr. St.J.R.J. Tyrwhitt, DSC, RN), HMCS Athabaskan (Lt.Cdr. J.H. Stubbs, RCN), HMCS Haida (Cdr. H.G. De Wolf, RCN) and HMCS Huron (Lt.Cdr. H.S. Rayner, DSC, RCN) conducted exercises off Plymouth. (27)
7 Mar 1944
During the night of 7/8 March 1944, The light cruiser HMS Bellona (Capt. C.F.W. Norris, RN) and, most likely, the destroyers HMS Ashanti (Lt.Cdr. J.R. Barnes, RN), HMS Tartar (Cdr. St.J.R.J. Tyrwhitt, DSC, RN), HMCS Athabaskan (Lt.Cdr. J.H. Stubbs, RCN), HMCS Haida (Cdr. H.G. De Wolf, RCN) and HMCS Huron (Lt.Cdr. H.S. Rayner, DSC, RCN) conducted exercises off Plymouth together with coastal forces. (27)
10 Mar 1944
Operation Specimen.
Around 0945A/10, ' Force 26 ' made up of the light cruiser HMS Bellona (Capt. C.F.W. Norris, RN) and the destroyers HMS Tartar (Cdr. St.J.R.J. Tyrwhitt, DSC, RN), HMS Ashanti (Lt.Cdr. J.R. Barnes, RN), HMCS Athabaskan (Lt.Cdr. J.H. Stubbs, RCN), HMCS Haida (Cdr. H.G. De Wolf, RCN) and HMCS Huron (Lt.Cdr. H.S. Rayner, DSC, RCN) departed Plymouth to intercept German destroyers / torpedo boats reported in the Bay of Biscay. The destroyers / torpedo boats in question were the Z 23, ZH 1, T 27 und T 29 which made rendezvous with the Japanese submarine I-29 [offsite link] and then escorted her to Lorient.
After departure ' Force 26 ' was to proceed through positions (AA) 180° - Bishop Rock - 10 nautical miles, (BB) 49°22'N, 08°02'W to reach (CC) 46°55'N, 05°11'W at 0145A/11. Speed of advance after passing (BB) was 26 knots. On reaching (CC) they were to sweep on course 180° until 0215A/11 and then turn back towards (CC). If nothing had been sighted they were to retire with all despatch on course 310° until west of 08°00'W and thence though positions (BB) and (AA) to Plymouth.
In case contact would be made with the enemy ' Force 26 ' was to endeavour to withdraw outside a distance of 120 miles from the enemy coast as soon after daylight as possible. They were then to proceed to position (BB) while keeping out the limit of 120 miles from the enemy coast.
Shortly before 2200A/10 ' Force 26 ' were recalled as it would be impossible to intercept the enemy ships which were hugging the Spanish / French coast.
Around 1000A/11, ' Force 26 ' arrived back at Plymouth. (28)
13 Mar 1944
Around 1830A/13, HMS Tartar (Cdr. St.J.R.J. Tyrwhitt, DSC, RN), HMS Ashanti (Lt.Cdr. J.R. Barnes, RN), HMCS Athabaskan (Lt.Cdr. J.H. Stubbs, RCN) and HMCS Haida (Cdr. H.G. De Wolf, RCN) departed Plymouth to patrol between positions (AA) 190° - the Lizard - 25 nautical miles and (BB) 270° - position (AA) - 20 nautical miles.
HMCS Haida returned to Plymouth around 0915A/14.
The remaining three destroyers remained on patrol and returned P.M. on the 14th. It looks like HMCS Athabaskan proceeded to Falmouth instead of Plymouth. No contact had been made with the enemy. (26)
14 Mar 1944
Around 1835A/14, ' Force 27 ', made up of the destroyers HMCS Haida (Cdr. H.G. De Wolf, RCN) and HMCS Huron (Lt.Cdr. H.S. Rayner, DSC, RCN) departed Plymouth for a patrol along a 25 mile line about 29 nautical miles to the south of Land's End to protect the convoy route from possible attack by enemy destroyers or torpedo boats from Brest.
The destroyers of ' Force 27 ' were reinforced around 2030A/14, in position 130° - the Lizard - 18 nautical miles , by their sister ship, HMCS Athabaskan (Lt.Cdr. J.H. Stubbs, RCN), which came from Falmouth.
No contact was made with the enemy and they arrived at Plymouth around 0900A/15. (26)
15 Mar 1944
The light cruiser HMS Bellona (Capt. C.F.W. Norris, RN), destroyers HMS Tartar (Cdr. St.J.R.J. Tyrwhitt, DSC, RN), HMS Ashanti (Lt.Cdr. J.R. Barnes, RN), HMCS Athabaskan (Lt.Cdr. J.H. Stubbs, RCN), HMCS Haida (Cdr. H.G. De Wolf, RCN), HMCS Huron (Lt.Cdr. H.S. Rayner, DSC, RCN) and the escort destroyers HMS Melbreak (Lt. G.J. Kirkby, DSC and Bar, RN) and HMS Brissenden (Lt. D.D.E. Vivian, RN) conducted exercises off Plymouth. (27)
16 Mar 1944
Around 1800A/16, ' Force 27 ' made up of the destroyers HMCS Haida (Cdr. H.G. De Wolf, RCN), HMCS Athabaskan (Lt.Cdr. J.H. Stubbs, RCN) and HMS Ashanti (Lt.Cdr. J.R. Barnes, RN) departed Plymouth to patrol between positions (CC) 150° - Bishop Rock - 8 nautical miles and (DD) 125° - Position CC - 20 nautical miles.
At 2200A/16, aircraft 512Sq./C, a Halifax, which was on patrol between the Scillies and Brest reported the position of a possible enemy motor torpedo boat as 49°06'N, 06°02'W.
' Force 113 ', made up of the (French) motor torpedo boats MTB 96 (?), MTB 98 (?) and MTB 91 (?) were ordered to proceed to position 130° - the Lizard - 10 nautical miles. ' Force 113 ', which had been patrolling off Eddystone was at that moment already en-route towards the Lizard.
At 2240A/16, ' Force 27 ' was in contact with the aircraft that had made the report.
At 0130A/17, a group of two possible enemy motor torpedo boats were plotted in position 095° - the Lizard - 8 nautical miles and at 0214A/17 ' Force 113 ' was sent to investigate. Subsequently two more groups of enemy motor torpedo boats were plotted intermittently south-east of Dodman point and the Falmouth shore batteries opened fire on the southernmost group which then moved eastwards.
At 0240A/17, all groups moved to the south-east at high speed.
' Force 27 ' proceeded at high speed on an easterly course to attempt to intercept the enemy should they double back to Brest. ' Force 113 ' endeavoured to intercept the northernmost group but both forces were too far to the west to make contact.
Minelaying was suspected off Dodman Point and at first light minesweeping trawlers searched the convoy routes between Plymouth and Falmouth.
' Force 113 ' returned to Dartmouth around 0755A/17. MTB 91, which had engine defects, had already returned around 0335A/17.
' Force 27 ' arrived at Plymouth around 0800A/17.
The enemy motor torpedo boats must have been part of the 5th and 9th S-boat flotillas which had been operating in the area during this night. This were S 84, S 112, S 139, S 140, S 141, S 143, S 144, S 145, S 146 and S 150. They had departed Brest around 2000B/16 and arrived at Cherbourg around 0630A/17 - 0700A/17. (29)
21 Mar 1944
The light cruiser HMS Bellona (Capt. C.F.W. Norris, RN) conducted radar calibration trial off Plymouth which were followed by throw off gunnery exercises during which the destroyer HMS Saladin (T/A/Lt.Cdr. P.G.C. King, RNVR) acted as target. Also HA gunnery exercises were carried out.
In the evening night encounter exercises were carried out with the destroyers of the 10th Destroyer Flotilla; HMS Tartar (Cdr. St.J.R.J. Tyrwhitt, DSC, RN), HMS Ashanti (Lt.Cdr. J.R. Barnes, RN), HMCS Athabaskan (Lt.Cdr. J.H. Stubbs, RCN), HMCS Haida (Cdr. H.G. De Wolf, RCN) and HMCS Huron (Lt.Cdr. H.S. Rayner, DSC, RCN). (27)
24 Mar 1944
Around 2045A/24, ' Force 27 ', made up of the destroyers HMCS Haida (Cdr. H.G. De Wolf, RCN), HMCS Huron (Lt.Cdr. H.S. Rayner, DSC, RCN) and HMCS Athabaskan (Lt.Cdr. J.H. Stubbs, RCN) departed Plymouth for a patrol to the south of Start Point to cover forces participating in exercise ' Muskrat II '.
' Force 27 ' returned to Plymouth around 0900A/25. (26)
27 Mar 1944
The light cruiser HMS Bellona (Capt. C.F.W. Norris, RN) conducted radar calibration trials and gunnery exercises off Plymouth.
These were followed by exercises with the destroyers HMS Tartar (Cdr. St.J.R.J. Tyrwhitt, DSC, RN), HMS Ashanti (Lt.Cdr. J.R. Barnes, RN), HMCS Athabaskan (Lt.Cdr. J.H. Stubbs, RCN) and HMCS Haida (Cdr. H.G. De Wolf, RCN). (27)
28 Mar 1944
Around 2200A/28, the light cruiser HMS Bellona (Capt. C.F.W. Norris, RN) and the destroyers HMS Tartar (Cdr. St.J.R.J. Tyrwhitt, DSC, RN), HMS Ashanti (Lt.Cdr. J.R. Barnes, RN), HMCS Athabaskan (Lt.Cdr. J.H. Stubbs, RCN) and HMCS Haida (Cdr. H.G. De Wolf, RCN) departed Plymouth for an anti-shipping sweep of the French coast near Île Vierge.
They returned to Plymouth around 1330A/28 having been unable to enter earlier due to thick fog. No contact was made with the enemy. (30)
30 Mar 1944
Around 1530A/26, HMS Glasgow (Capt. C.P. Clarke, DSO, RN), HMS Black Prince (Capt. D.M. Lees, DSO, RN), HMCS Haida (Cdr. H.G. De Wolf, RCN) and HMCS Huron (Lt.Cdr. H.S. Rayner, DSC, RCN) conducted exercises off Plymouth. (31)
11 Apr 1944
HMS Glasgow (Capt. C.P. Clarke, DSO, RN), HMCS Haida (Cdr. H.G. De Wolf, RCN) and HMCS Huron (Lt.Cdr. H.S. Rayner, DSC, RCN) conducted A/S and torpedo trials trials off Plymouth. (32)
22 Apr 1944
Minelaying operation Hostile 30.
The object of this minelaying operation was to lay a minefield off Ile Vierge.
Around 1515B/22, the fast minelayer HMS Apollo (Capt. J.A. Grindle, CBE, RN) departed Milford Haven to lay this minefield.
Around 2245B/22, she was joined off Longships by the destroyers HMCS Haida (Cdr. H.G. De Wolf, RCN), HMCS Athabaskan (Lt.Cdr. J.H. Stubbs, RCN) and HMS Ashanti (Lt.Cdr. J.R. Barnes, RN) coming from Plymouth.
The destroyers were detached around 0145B/23 and between 0201B/23 and 0227B/23, HMS Apollo laid 100 MK XVII (49/50) / MK XVIII units, 40 MK 1 / XVII units and 16 MK 1 obstructors in three lines on headings of 125°, 185° and 305° within an area enclosed by lines joining positions; A) 48°45'7"N, 04°38'5"W, B) 48°41'1"N, 04°35'4"W, C) 48°40'0"N, 04°39'5"W, D) 48°44'4"N, 04°42'7"W.
Mines were set at a depth of 20 feet, with flooders to operate by 10 June 1944. Delay release was arranged for 22nd, 27th and 31st May.
On completion, HMS Apollo returned to Milford Haven. The destroyers returned to Plymouth arriving around 0730B/23. (33)
24 Apr 1944
Around 1930B/24, ' Force 26 ', made up of the light cruiser HMS Black Prince (Capt. D.M. Lees, DSO, RN) and the destroyers HMCS Haida (Cdr. H.G. De Wolf, RCN), HMCS Athabaskan (Lt.Cdr. J.H. Stubbs, RCN) and HMS Ashanti (Lt.Cdr. J.R. Barnes, RN) departed Plymouth to proceed to position (SS) 49°30'N, 04°27'W so as to arrive in that position around 0130B/25 and then patrol eastward as far as 03°30'W after which they were to return to Plymouth.
No contact was made with the enemy and ' Force 26 ' returned to Plymouth around 0830B/25. (34)
25 Apr 1944
Around 2105B/24, ' Force 26 ', made up of the light cruiser HMS Black Prince (Capt. D.M. Lees, DSO, RN) and the destroyers HMCS Haida (Cdr. H.G. De Wolf, RCN), HMCS Athabaskan (Lt.Cdr. J.H. Stubbs, RCN), HMCS Huron (Lt.Cdr. H.S. Rayner, DSC, RCN) and HMS Ashanti (Lt.Cdr. J.R. Barnes, RN) departed Plymouth.
They were to proceed to position (SS) 48°49'5"N, 04°27'W and then sweep eastwards.
At 0200B/26, in position 312° - Ile de Batz - 10 nautical miles, ' Force 26 ' made contact with an enemy force which was believed to be made up of three or four Elbing-class torpedo boats. The enemy was on a westerly course but immediately endeavoured to alter course away and escape under the cover of smoke.
At 0219B/26, HMS Black Prince opened fire with star shell at a range of 13000 yards. The remainder of ' Force 26 ' then also opened fire on the enemy as they became visible through the smoke, claiming several hits.
About half an hour later, torpedoes were sighted by HMS Black Prince approaching from starboard. HMS Black Prince immediately altered course away but the result was that the enemy was no longer within star shell range. HMS Black Prince then dropped out of the action as she was unable to overtake the destroyers.
The destroyers meanwhile continued to engage the enemy providing their own illumination. At 0325B/26, HMCS Haida sighted and Elbing-class torpedo boat trying to double back to the westward. This Elbing, thought to have been damaged earlier in the action, was at once engaged by both HMCS Haida and HMCS Athabaskan followed shortly afterwards by HMCS Huron and HMS Ashanti. At 0341B/26, HMCS Haida reported that the enemy was on fire and she subsequently sank at 0421B/26 in position 267° - Les Heaux - 7 nautical miles. It was thought one Elbing-class torpedo boat escaped to the west and one Elbing-class torpedo boat escaped to the east.
Whilst forming up to return to Plymouth, HMS Ashanti collided with HMCS Huron resulting in hull damage to both ships. During the action with the enemy one rating was killed on board HMCS Huron while two were wounded. In HMCS Haida one officer was killed and one rating slightly wound. In HMCS Athabaskan one ratting was slightly wounded.
' Force 26 ', off which all ships except HMS Black Prince all had suffered some minor action damage, returned to Plymouth around 0825B/26.
The enemy that had been encountered were the German torpedo boats T 29, T 27 and T 24 which had just completed laying a minefield north-west of Les Sept Isles. They had departed Saint Malo around 2130B/25. During the action T 29 was sunk, T 27 was detached to Morlaix around 0300B/26 after having been damaged early in the action reducing her speed to only 12 knots. T 24 managed to escape to the westwards and returned to Saint Malo around 0715B/26. (35)
26 Apr 1944
In the evening, ' Force 27 ', made up of the destroyers HMCS Haida (Cdr. H.G. De Wolf, RCN) and HMCS Athabaskan (Lt.Cdr. J.H. Stubbs, RCN), departed Plymouth to patrol between positions (B) 50°18'N, 02°35'W and 50°06'N, 02°50' to provide cover for bombardment exercises of other ships.
They returned to Plymouth around 0850B/27. (36)
28 Apr 1944
Minelaying operation Hostile 26.
The object of this minelaying operation was to lay a minefield to the north-east of Ile de Batz.
Around 1945B/28, eight ML's of the 10th ML flotilla left Plymouth for this operation. They had a close escort of two MTB's.
The group was formed into two divisions. The first division was made up of ML 157 (T/Lt. T.B. Gwenlan, DSC, RNVR), ML 180 (T/Lt. R.J. McCullagh, RNVR), ML 184 (T/Lt. R.W.A. Winter, RNVR) and HMS ML 186 (T/Lt. F.O.S. Man, RNVR). HMS MTB 677 (T/Lt. A.H. Clayton, RNVR) was the close escort. The second division was made up of ML 159 (T/Lt. B.D. Gerrans, RNVR), HMS ML 181 (T/A/Lt.Cdr. H.T. Kemsley, RNVR, S.O. 10th ML Flotilla), HMS ML 259 (T/Lt. H.W.E. Johnson, RNVR) and HMS ML 488 (T/Lt. I.H.L. King, RNVR). HMS MTB 717 (T/Lt. B.H.C. Robinson, RNVR) was the close escort.
Cover was provided by the destroyers HMCS Haida (Cdr. H.G. De Wolf, RCN) and HMCS Athabaskan (Lt.Cdr. J.H. Stubbs, RCN). They departed Plymouth around 2300B/28 and were to patrol 6 nautical miles to the west and east of position (XX) 49°00'N, 04°10'W with the intention to leave around 0345B/29 for the return passage.
The outward passage was uneventful and completed in fine weather.
Between 0314B/29 and 0326B/29, each division laid a line of 14 mines and 2 MK I obstructors within an area enclosed by lines joining the following positions; A) 48°55'03"N, 03°52'00"W, B) 48°52'18"N, 03°52'36"W, C) 48°51'00"N, 03°57'36"W, D) 48°52'57"N, 04°00'09"W.
The total of 28 mines consisted of 20 MK XVII (49/50) / XVIII set at 20 feet and 8 MK 1/XVII set at 12 feet.
Sinker clocks were set to release on 21 May and flooders were set to operate on 10 June 1944.
Just after the lay had commenced, two signals were received from the C-in-C, Plymouth reporting the presence of an enemy plot to the southward and HMCS Haida and HMCS Athabaskan were ordered to intercept and they then left to proceed to do so at full speed.
On completion of the lay the minelaying force retired to the northward at 14 knots and at 0405B/29 an enemy report was received from HMCS Haida and continuous star shell was seen from that moment to the south-westward.
At 0416B/29 a very heavy explosion was heard and a burst of flame was seen of which it was later found out that this was HMCS Athabaskan being hit. At 0427B/29, another heavy explosion was heard and a large white mushroom shape cloud of smoke was seen which was HMCS Athabaskan blowing up.
At 0505B/29 the MTB's were detached with orders to search for survivors on orders of the C-in-C, Plymouth. This order was cancelled at 0537B/29 and the MTB's rejoined the force at 0838B/29 and they then entered Plymouth at 0955B/29. The destroyers HMS Offa (Lt.Cdr. R.F. Leonard, RN) and HMS Orwell (Lt.Cdr. J.M. Hodges, DSO, RN), which were covering an exercise in Lyme Bay, were withdrawn and sent to cover the minelaying force on their return passage. (37)
29 Apr 1944
At 0322B/29, the C-in-C, Plymouth's signal timed 0307B/29 was received on board HMCS Haida (Cdr. H.G. De Wolf, RCN) and HMCS Athabaskan (Lt.Cdr. J.H. Stubbs, RCN). This signal stated that enemy vessels had been detected to the south proceeding westwards.
Speed was increased to full and course was changed to 225°. At 0332B/29, course was altered to 205° and at 0343B/29 to 180°. It was estimated that the enemy could be intercepted to the east of Ile de Vierge.
At 0359B/29, radar contact was obtained by HMCS Athabaskan bearing 133° at a range of 14 nautical miles. This was confirmed by HMCS Haida at 0402B/29 and an enemy report was made.
At 0400B/29, course was altered to 160° and at 0408B/29 to 170°. The bearing of the enemy remained steady at about 125°. At 0402B/29, the plot on board HMCS Haida showed an estimated course of the enemy of 280° at 24 knots and this was confirmed by HMCS Athabaskan which reported 278° at 23 knots.
At 0407B/29, the enemy bore 127°, range 13000 yards, enemy course 260° at 24 knots.
At 0412B/29, HMCS Haida gave the order to engage the enemy and opened fire with star shell. The range at moment being 7300 yards. At 0414B/29, two destroyers were in sight bearing 115° and they were identified as Elbing-class (torpedo boats).
The enemy laid smoke and retired to the southward. At 0417B/29, course was altered 30° to port, still keeping ' A ' arcs open and at that moment HMCS Athabaskan was hit aft and a large fire was started. She was observed to slow down and turning to port. HMCS Haida obtained her first hit on the enemy at 0418B/29.
At 0419B/29, HMCS Haida altered course 090° to port to lay a smoke screen for HMCS Athabaskan who appeared to be stopped and badly on fire. ' A ' arcs were opened to starboard. At 0420B/29, HMCS Haida obtained another hit on the enemy.
At 0422B/29, the plot reported the enemy proceeding on course 160° in line abreast. At that moment target was shifted as the first enemy destroyer was disappearing in smoke to the eastward.
At 0427B/29, ' X ' gun reported that all star shell had been expended and at the same time HMCS Athabaskan appeared to blow up. Fortunately at this black moment the engaged enemy was on fire and though hidden by smoke, the glow of the fire was bright enough to provide a point of aim.
During the next five minutes frequent hits were observed but when the smoke cleared at about 0435B/29 the enemy was seen to be aground and half hidden by a ledge of rock and it was obvious that many of the observed ' hits ' must have been on this rock. The enemy was clearly visible in the light of her own fire.
Course was altered to the north and west to clear the ledges and the line of fire, but on reviewing the situation at about 0442B/29 Cdr. de Wolf decided to retire. Contact with the second enemy destroyer had been lost around 0433B/29 at a range of 14000 yards. Course was set to pass through the position where HMCS Athabaskan blew up and preparations were made to pick up survivors.
At 0457B/29, HMCS Haida was stopped amidst a large group of survivors, possibly around 100 in number. All boats and floats were then lowered and were ordered to be left without crews at 0515B/29 which was the latest time HMCS Haida wanted to leave the area. When HMCS Haida left three of her ratings were left in the motor boat and two of her ratings were in the water assisting at the scramble nets. It was communicated to the remaining survivors that motor torpedo boats had been ordered to proceed to the area to continue the rescue operations. This were HMS MTB 677 (T/Lt. A.H. Clayton, RNVR) and HMS MTB 717 (T/Lt. B.H.C. Robinson, RNVR) but these were recalled when it became clear they could not reach the area before daybreak. 38 survivors had been picked up by HMCS Haida. 85 were picked up by the Germans an made POW', 127 men had lost their lives.
At 0517B/29, course was set for Plymouth at 31 knots to clear the area before daylight.
The fire in the grounded enemy destroyer was visible until 0530B/29 and occasional small explosions were observed.
Around 0635B/29, the destroyer HMS Offa (Lt.Cdr. R.F. Leonard, RN) joined followed at 0650B/29 by HMS Orwell (Lt.Cdr. J.M. Hodges, DSO, RN). They remained in company until the vicinity of Eddystone.
HMCS Haida arrived at Plymouth around 0840B/29.
At 1905B/29, the RAF rescue launch HSL 2554 was sent to position 49°35'N, 05°00'W where a small boat with several men had been reported by aircraft. This proved to be the motor boat of HMCS Haida containing the five ratings that had been left behind with the survivors of HMCS Athabaskan. With them were also six survivors from this destroyer. HSL 2554 took the boat in tow and landed the men in Newlyn.
The enemy ships encountered were the German torpedo boats T 27 and T 24 which were on passage from Saint Malo, which they had departed around 2130B/29, to Brest. T 27 was driven ashore and her wreck was finally destroyed on 7 May.
Following the action T 24 proceeded to Morlaix and later returned to the place where T 27 was grounded with boats of the 24th Minesweeper Flotilla. Attempts by a ship from this flotilla to tow off the badly damaged torpedo boat failed. T 24 then proceeded to Brest where she arrived around 1530B/29.
It was a torpedo fired by T 24 which had hit HMCS Athabaskan. (38)
4 May 1944
USS Augusta (Capt. E.H. Jones, USN, flying the flag of Admiral H.R. Stark, USN. COMTASKFOR 122, T/R.Adm. A.G. Kirk, USN was also on board), HMS Glasgow (Capt. C.P. Clarke, DSO, RN), HMCS Haida (Cdr. H.G. De Wolf, RCN), HMS Tanatside (Cdr. B.J. de St. Croix, RN) and HMS Melbreak (Lt. G.J. Kirkby, DSC and Bar, RN) conducted exercises in the Plymouth - Start Point area. (32)
10 May 1944
HMS Glasgow (Capt. C.P. Clarke, DSO, RN), HMS Tartar (Cdr. St.J.R.J. Tyrwhitt, DSC, RN) and HMCS Haida (Cdr. H.G. De Wolf, RCN) conducted exercises off Plymouth. (39)
15 May 1944
Minelaying operation Hostile 32, first attempt.
The object of this minelaying operation was to lay a minefield to the west of Ushant.
Around 1600B/15, the fast minelayer HMS Apollo (Capt. J.A. Grindle, CBE, RN) departed Milford Haven to lay this minefield.
Around 2000B/15, the light cruiser HMS Bellona (Capt. C.F.W. Norris, RN) and the destroyers HMS Tartar (Cdr. B. Jones, DSO and Bar, DSC, RN), HMCS Haida (Cdr. H.G. De Wolf, RCN) and HMCS Haida (Cdr. H.G. De Wolf, RCN) departed Plymouth to provide cover for the operation.
At 0030B/16, the radar set of HMS Apollo burst into flames and was put out of action.
At 0104B/16, HMS Apollo sighted a number of lights, apparently from fishing vessels, coming into sight on the horizon stretching from the port bow to the starboard beam. An alteration of course to the westward only led to more lights. One or two of these lights were seen to move faster then was to be expected from fishing vessels.
At 0125B/16, unable to retired to the north-west due to the presence of the covering force, HMS Apollo turned to the eastward in the hope of being able to lay her mines but then in the position of the upcoming minelaying operation 'Hostile 33'. An enemy report was sent to HMS Bellona that nine unidentified vessels had been sighted in the area of the fishing fleet.
At 0132B/16, the Commanding Officer of HMS Apollo decided to abandon the operation and made a signal to HMS Bellona to that effect, but its transmission was delayed due to poor internal organisation.
At 0140B/16, while on a retiring course, HMS Apollo was illuminated by star shell from the covering force and hotly engaged by one of the destroyers. She switched on IFF, ordered 'cease firing' on VH/F R/T and zig-zagged to avoid damage but it was not until 0210B/16 that HMS Bellona suspected that all was not well and ordered HMS Apollo to report her course and speed, thus ending the 'engagement'. The blame for this incident was accepted by the Commanding Officer of HMS Apollo, for his enemy report gave no indication the HMS Bellona of a change of plan.
Around 0620B/16, HMS Apollo arrived at Plymouth followed by the cover force around 1230B/16. (40)
17 May 1944
Minelaying operation Hostile 32, second attempt.
The object of this minelaying operation was to lay a minefield to the west of Ushant.
Around 2010B/17, the fast minelayer HMS Apollo (Capt. J.A. Grindle, CBE, RN) departed Plymouth to lay this minefield.
At the same time, the light cruiser HMS Bellona (Capt. C.F.W. Norris, RN) and the destroyers HMS Tartar (Cdr. B. Jones, DSO and Bar, DSC, RN), HMCS Haida (Cdr. H.G. De Wolf, RCN) and HMCS Haida (Cdr. H.G. De Wolf, RCN) also Plymouth to provide cover for the operation.
During the approach, in fine weather, three enemy destroyers were reported to be operating to the westward, this may have been the cover force though. Also fishing vessels were again encountered in the same position as two days before but HMS Apollo now ignored them.
Between 0201B/18 and 0239B/18, a total of 150 mines and 6 minesweeping obstructors were laid in four lines within an area bounded by lines joining positions; 48°26'7"N, 05°26'2"W, 48°26'7"N, 05°14'3"W, 48°22'7"N, 05°14'3"W and 48°22'7"N, 05°26'2"W. Mines were set to a depth of 20 feet, with delayed release sinkers to operate in groups on 27 May, 30 May and 3 June. Flooders were set to operate on 21 June.
Following the operation HMS Apollo proceeded to Milford Haven where she arrived around 1000B/18 and the cover force returned to Plymouth arriving around 0900B/18. (40)
24 Jun 1944
German U-boat U-971 was sunk in the English Channel north of Brest, in position 49°01'N, 05°35'W, by depth charges from the British destroyer HMS Eskimo (Lt.Cdr. E.N. Sinclair, DSC, RN), the Canadian Destroyer HMCS Haida (Cdr. H.G. De Wolf, DSO, RCN) and depth charges from a Czech Liberator aircraft (Sqdn. 311/O).
30 Jul 1944
Operation Kinetic.
This operation was an anti-shipping sweep off the French west coast against enemy shipping / convoys.
Around 1830B/30, 'Force 26' departed Plymouth for this operation. It was made up of the light cruisers HMS Diadem (Capt. E.G.A. Clifford, RN, flying the flag of flying the flag of Rear-Admiral F.H.G. Dalrymple-Hamilton, CB, RN), HMS Bellona (Capt. C.F.W. Norris, RN) and the destroyers HMS Tartar (Cdr. B. Jones, DSO, DSC, RN), HMS Ashanti (Lt.Cdr. J.R. Barnes, RN), HMCS Haida (Capt. H.G. De Wolf, DSO, RCN), HMCS Huron (Cdr. H.S. Rayner, DSC, RCN), ORP Blyscawica (Kmdr.por. (Cdr.) K.F. Namiesniowski) and ORP Piorun (Kmdr.ppor. (Cdr.) T. Gorazdowski).
Air cover for the operation was provided by the escort carrier HMS Striker (Capt. W.P. Carne, RN) which was escorted by the destroyers HMCS St. Laurent (Lt.Cdr. A.G. Boulton, RCNVR), HMCS Chaudiere (A/Lt.Cdr. C.P. Nixon, RCN) and HMCS Kootenay (A/Lt.Cdr. W.H. Willson, RCN). These ships departed Plymouth at the same time as Force 26.
Further air cover was provided by RAF Beaufighters and Mosquitos from 10 Group.
Around 2200B/31, Force 26 and the air cover group reached position 46°35'N, 04°30'W. Force 26 then proceeded towards position 46°45'N, 02°42'W, thence carrying out sweeps northwest and southwest along the enemy shipping route.
HMS Striker and her three escorting destroyers remained to the westward of position 46°13'N, 04°00'W. Force 26 rejoined them around 0730B/1.
Late in the morning / early in the afternoon ORP Blyscawica fuelled from HMS Striker. She then set course to proceed to Plymouth where she arrived around 1100B/2.
Around 2100B/1, Force 26 parted company with the air cover force to conduct another night sweep along the enemy shipping routes. They rejoined the cover force again around 0650B/2.
Around 1245B/2, HMS Bellona parted company with the remained of the force which then set course to return to Plymouth where they arrived the following morning around 0715B/3.
HMS Bellona proceeded to patrol to the north-north-east of Cape Finisterre. She returned to Plymouth around 0030B/4. (41)
4 Aug 1944
Around 1030B/4, ' Force 26 ', made up of the light cruiser HMS Diadem (Capt. E.G.A. Clifford, RN, flying the flag of flying the flag of Rear-Admiral F.H.G. Dalrymple-Hamilton, CB, RN) and the destroyers HMS Tartar (Cdr. B. Jones, DSO, DSC, RN), HMS Ashanti (Lt.Cdr. J.R. Barnes, RN), HMCS Haida (Capt. H.G. De Wolf, DSO, RCN) and HMCS Iroquois (Cdr. J.C. Hibbard, DSC, RCN) departed Plymouth for an offensive patrol between Belle Ile and Chausses de Seine.
At 1818B/4, the orders for ' Force 26 ' were cancelled. HMS Diadem, HMCS Haida and HMCS Iroquois set course to return to Plymouth where they arrived around 0345B/5.
HMS Tartar and HMS Ashanti patrolled near position 48°30'N, 06°45'W until 1954B/4. They then proceeded as ' Force 28 ' to patrol within 5 miles each side of a line joining positions 47°13'N, 05°03'W and 47°23'N, 04°32'W as a support to the 2nd and 11h Escort Groups which were on an A/S hunt. ' Force 28 ' was to give support in case of an enemy surface attack.
' Force 28 ' joined ' Force 26 ' for operations around 2130B/5 in position 47°18'N, 04°47'W. (42)
5 Aug 1944
Around 1230B/5, Force 26, made up of the light cruiser HMS Bellona (Capt. C.F.W. Norris, RN) and the destroyers HMCS Haida (Capt. H.G. De Wolf, DSO, RCN) and HMCS Iroquois (Cdr. J.C. Hibbard, DSC, RCN) departed Plymouth to make rendezvous at 2130B/5, with Force 28, made up of the destroyers HMS Tartar (Cdr. B. Jones, DSO, DSC, RN) and HMS Ashanti (Lt.Cdr. J.R. Barnes, RN), in position 47°18'N, 04°47'W. They were then to operate as one force and patrol between Ile d'Yeu and Belle Ile.
At 0001B/6, they made contact with an enemy convoy to the north-west of Ile d'Yeu. The convoy was thought to be made up of at least 3 to 4 merchant vessels and 3 to 4 escorts. The action continued until 0240B/6 when the entire convoy with the possible exception of one vessel had been destroyed.
Force 26 then continued its patrol towards Belle Ile and at 0630B/6, contact was made with with another enemy force of 4 or 5 ships, 12 miles to the south-east of Belle Ile proceeding towards St. Nazaire. Owing to the proximity of minefields, and that the ememy was close inshore, the enemy could not be prevented from escaping into harbour. Two ships had probably been hit. HMCS Haida sustained superficial damage as well as 2 killed and 2 wounded.
Force 26, minus HMCS Iroquois, arrived at Plymouth around 1900B/6. HMCS Iroquois had joined the 2nd Escort Group around 1145B/6 to provide extra support to this group. She arrived at Plymouth around 0900B/8 together with ships of the 2nd, 14th and 15th Escort Groups.
During the attack on the first German convoy (convoy nr. 4121) the minesweepers M 263, M 486, patrol vessel V 414 and small transport Otto (217 GRT) were sunk. (43)
22 Aug 1944
Around 1600B/22, Force 26, made up of the light cruiser HMS Bellona (Capt. C.F.W. Norris, RN) and the destroyer HMCS Haida (Capt. H.G. De Wolf, DSO, RCN) departed Plymouth to patrol between Ile d'Yeu and the Gironde.
At 0815B/23, Force 26 reported having patrolled the area between Ile d'Yeu and Les Sables-d'Olonne and that there had been no sign of the enemy. They swept the coast between Arcachon and the Gironde during the day, again without event. The force then proceeded for a patrol during the night close south of Ile d'Yeu.
Around 1000B/24, the destroyer ORP Blyscawica (Kmdr.por. (Cdr.) K.F. Namiesniowski) joined Force 26 which then patrolled to the south of Belle Ile until 1500B/24 when they set course to position 47°38N, 04°32'W (south-west of Penmarch) and then to patrol close inshore in Audierne Bay during the night.
During the night of 24/25 August, there had been no sign of the enemy. Force 26 then set course for Plymouth where they arrived around 1630B/25. (43)
27 Aug 1944
HMS Malaya (Capt. E.W. Bush, DSO and Bar, DSC, RN) departed Greenock for Portsmouth.
At 1500/28, she was joined by the destroyers HMCS Haida (Capt. H.G. De Wolf, DSO, RCN) and ORP Blyscawica (Cdr. K.F. Namiesniowski).
These destroyers were relieved at 0250/9 by the destroyers HMS Ulysses (Lt.Cdr. R.J. Hanson, DSO and Bar, DSC, RN) and HMS Vimy (Lt.Cdr. K.H.J.L. Phibbs, RN).
HMS Malaya arrived at Portmouth in the afternoon of August, 29th. (44)
30 Aug 1944
Around 1130B/30, the destroyers HMCS Haida (Capt. H.G. De Wolf, DSO, DSC, RCN) and HMCS Iroquois (Cdr. J.C. Hibbard, DSC, RCN) departed Plymouth to make rendezvous with the cruiser Jeanne d'Arc (Capt. J.E.C. Hourcade) in position (C); 46°00'N, 11°30'W around 1100B/31.
The Jeanne d'Arc, which had members of the French Provisional Government on board, had departed Algiers for Cherbourg on 28 August.
The Jeanne d'Arc was routed trough positions (B); 40°00'N, 11°30'W, (C); [see above], (D); 49°00'N, 06°00'W, (E) 180° - Start Point - 4 nautical miles. From there they were to proceed trough swept channels to Cherbourg.
The two Canadian destroyers indeed joined the French cruiser around 1100B/31. They arrived of Cherbourg around 1350B/1 and the cruiser then entered the harbour. Around 1430B/1, the two destroyers left Cherbourg roads for Plymouth where they arrived around 1945B/1. (45)
12 Sep 1944
Around 1800B/12, Force 26, made up of the light cruiser HMS Bellona (Capt. C.F.W. Norris, RN) and the destroyer HMCS Haida (Capt. H.G. De Wolf, DSO, RCN) departed Plymouth to patrol between 48°00'N and Bayonne.
At 0835B/13, Force 26 reported having sighted nothing of the enemy near Penmarch. They then set course to proceed towards Ile d'Yeu, Saint-Gilles-Croix-de-Vie and Les Sables-d'Olonne. Some ammunition was landed at Ile d'Yeu and Les Sables-d'Olonne.
On the 14th, Force 26 patrolled between St.Jean de Luz and Arcachon. During the night of 14/15 September 1944, Force 26 patrolled off the coast between 44°00'N and 46°00'N.
Around 0750A/15, the destroyer HMS Urania (Lt.Cdr. D.H.P. Gardiner, DSC, RN) joined and Force 26 patrolled along the French coast southwards until 1800B/15, when reaching 44°50'N. During the night of 15/16 September, Force 26 patrolled in Audierne Bay and then set course for Plymouth.
At 1235B/16, HMS Urania was detached to return towards the vicinty of Ushant so as to escort the seized German hospital ship Rostock to Plymouth where they arrived around 2300B/17.
Force 26 arrived at Plymouth around 1400B/16. (43)
3 Mar 1945
HMS Taurus (A/Lt.Cdr. P.E. Newstead, DSC, RN) conducted A/S exercises at/off Scapa Flow with HMS Ulysses (Lt.Cdr. B.G.B. Bordes, DSC, RN) and later with HMCS Haida (A/Lt.Cdr. R.P. Welland, DSC, RCN). (46)
5 Mar 1945
HMS Taurus (A/Lt.Cdr. P.E. Newstead, DSC, RN) participated in A/S exercises at/off Scapa Flow.
(46)
6 Mar 1945
HMS Taurus (A/Lt.Cdr. P.E. Newstead, DSC, RN) conducted A/S exercises at/off Scapa Flow with HMCS Haida (A/Lt.Cdr. R.P. Welland, DSC, RCN) and later with HMS Ulysses (Lt.Cdr. B.G.B. Bordes, DSC, RN). (46)
8 Mar 1945
During 8/9 March 1945, ships from the Home Fleet conducted exercises off Scapa Flow. These included night exercises. The ships that participated in the exercises were the battleship HMS Rodney (Capt. R.O. Fitzroy, RN, flying the flag of Vice-Admiral H.R. Moore, KCB, CVO, DSO, RN, Commander-in-Chief Home Fleet), heavy cruisers HMS Berwick (Capt. S.H.T. Arliss, DSO, RN), HMS Devonshire (Capt. G.M.B. Langley, OBE, RN), HMS Norfolk (Capt. J.G.Y. Loveband, RN, flying the flag of Rear-Admiral R.R. McGrigor, CB, DSO, RN), light cruisers HMS Birmingham (Capt. H.W. Williams, RN), HMS Dido (Capt. R.F. Elkins, OBE, RN), ORP Conrad (Capt. S.T. Dzienisiewicz) and the destroyers HMS Tartar (Capt. B. Jones, DSO and Bar, DSC, RN), HMCS Haida (A/Lt.Cdr. R.P. Welland, DSC, RCN), HMS Savage (Lt.Cdr. C.W. Malins, DSO, DSC and Bar, RN), HMS Scourge (Lt.Cdr. C.G.H. Brown, DSC, RN), HMS Serapis (Lt.Cdr. E.L. Jones, DSC, RN), HNoMS Stord (Lt.Cdr. H. Øi) and HMS Carysfort (Lt.Cdr. L. St.G. Rich, DSO and Bar, RN). [It is possible more ships participated.] (47)
9 Mar 1945
HMS Trusty (Lt. H.S. May, RN) was conducting exercises with ships from the Home Fleet on this day.
During the exercises one of the destroyers, HMCS Haida (A/Lt.Cdr. R.P. Welland, DSC, RCN), dropped five depth charges in error.
Trusty immediately surfaced and was briefly taken under fire by Haida and two cruisers. Fire was soon ceased. No damage was caused.
The next day a board of inquiry was held on board HMS Bellona (Capt. G.S. Tuck, DSO, RN). (48)
12 Mar 1945
HMS Scotsman (Lt. A.H.B. Anderson, DSC, RNR) conducted A/S exercises at Scapa Flow with HMCS Haida (A/Lt.Cdr. R.P. Welland, DSC, RCN) and ORP Krakowiak (Lt. W. Loskoczynski, ORP). (49)
16 Mar 1945
HMS Birmingham (Capt. H.W. Williams, RN) conducted a refuelling at sea exercises at Scapa Flow with HMCS Haida (A/Lt.Cdr. R.P. Welland, DSC, RCN). These were followed by gunnery exercises. On completion of the exercises HMS Birmingham made several runs over the D/G range. (50)
19 Mar 1945
Operation Cupola.
The object of this operation was to lay air laid mines in the southern entrance to the Askenvold anchorage (61°19'5"N, 05°04'E).
Around 1100A/19, the escort carriers HMS Searcher (Capt. J.W. Grant, DSO, RN), HMS Premier (A/Capt. R.J. Gardner, RN), HMS Queen (A/Capt. K.J. D'Arcy, DSO, RN), light cruiser ana (Capt. V.N. Surtees, DSO, RN), light cruiser HMS Bellona (Capt. G.S. Tuck, DSO, RN, Senior Officer for the operation) and the destroyers HMS Onslow (Capt. H.W.S. Browning, OBE, RN), HMS Zest (Lt.Cdr. R.B.N. Hicks, DSO, RN), HMS Serapis (Lt.Cdr. E.L. Jones, DSC, RN), HMCS Haida (A/Lt.Cdr. R.P. Welland, DSC, RCN) and HMCS Iroquois (Capt. K.F. Adams, RCN) departed Scapa Flow for the operation.
They were to arrive in position 'AA' (61°52'N, 01°45'E) at 0700A/20 but bad weather was encountered on the way and the operation had to be postponed to the afternoon.
Around 1325A/20, the strike, composed of eight Avengers of 856 Squadron from HMS Premier and twenty Wildcats from HMS Searcher commenced flying off. They took departure at 1353A/20 from position 61°52'N, 01°54'E. Landfall was made at the correct location at 1420A/20, with the weather just beginning to lift on the coast and good visibility in the Leads. The Avengers turned north when over Bygdefeld, a conspicuous hill to the south of Askevold. The approach was made to the laying position unopposed, and at 1429A/20 seven mines were laid in the shipping channel, close south of Prestoy Island. One aircraft was unable to release its mine due to material failure and returned with it to the carrier.
The fighters, in close support, also experienced little resistance to their stafing of shore targets. All aircraft returnend safely to the carriers in rapidly deteriorating weather conditions.
The force returned to Scapa Flow around 1350A/21.
Result of this operation was that the enemy had to divert shipping to pass to the west of Atloy Island resulting in an attack on a convoy by MTB's on March 26th. (51)
24 Mar 1945
Operations Muscular and Prefix.
Object of these operations was to destroy enemy shipping on the Norwegian coast.
Operation Prefix was a daylight strike in the Leads between Trondheim Fjord and Kristiansund North.
Operation Muscular was a night strike in the Leads between Stadlandet and Bredsund.
Operation Prefix 2 was a daylight strike in an area which was to be decided upon while the operations were ongoing.
The force taking part in these operations was made up of the following ships; escort carriers HMS Searcher (Capt. J.W. Grant, DSO, RN, flying the flag of Rear-Admiral R.R. McGrigor, CB, DSO, RN), HMS Puncher (Capt. R.E.S. Bidwell, RCN), HMS Queen (A/Capt. K.J. D'Arcy, DSO, RN), HMS Nairana (Capt. V.N. Surtees, DSO, RN), light cruisers HMS Dido (Capt. R.F. Elkins, OBE, RN), HMS Bellona (Capt. G.S. Tuck, DSO, RN) and the destroyers HMS Onslow (Capt. H.W.S. Browning, OBE, RN), HMS Serapis (Lt.Cdr. E.L. Jones, DSC, RN), HMS Zealous (Cdr. R.F. Jessel, DSO, DSC and Bar, RN), HMS Zest (Lt.Cdr. R.B.N. Hicks, DSO, RN), HMS Carysfort (Lt.Cdr. L.St.G. Rich, DSO and Bar, RN), HMCS Haida (A/Lt.Cdr. R.P. Welland, DSC, RCN) and HMCS Iroquois (Capt. K.F. Adams, RCN). This force departed Scapa Flow around 2000A/24.
No sizeable shipping was encountered during these operations. Two fighters attacks some merchant vessels and minesweepers. An attack by six to nine ME 109's was prevented and three were shot down by Wildcats and two more were damaged. During operation Prefix 2, two ships and flak position at Alesund and a W/T station at Vigra were attacked.
The force returned to Scapa Flow around 1015A/29. (52)
4 Apr 1945
With her refit completed, HMS Duke of York (Capt. A.D. Nicholl, CBE, DSO, RN), departed Liverpool for Scapa Flow. She is escorted by the destroyers HMS Cavendish (Cdr. R.H. Maurice, DSO, RN) and HMCS Haida (A/Lt.Cdr. R.P. Welland, DSC, RCN). They arrived at Scapa Flow the following day.
[HMS Duke of York then commenced a post-refit work-up period but as no log for the month of April is available no details can be given.]
16 Apr 1945
Operation Roundel, the passage of convoys JW 66 and RA 66 between the U.K. and Northern Russia vice versa.
Convoy JW 66.
This convoy departed the Clyde around midnight during the night of 16/17 April 1945.
It was made up of the following merchant vessels; Albert C. Ritchie (American, 7176 GRT, built 1943), August Belmont (American, 7240 GRT, built 1944), Benjamin H. Hill (American, 7198 GRT, built 1944), British Respect (British (tanker), 8479 GRT, built 1943), Cecil N. Bean (American, 7176 GRT, built 1944), David B. Johnson (American, 7198 GRT, built 1944), Empire Garrick (British (tanker), 8128 GRT, built 1942), John Gibbon (American, 7247 GRT, built 1944), Joshua Thomas (American, 7176 GRT, built 1943), Keith Palmer (American, 7244 GRT, built 1944), Kong Haakon VII (Norwegian, 7073 GRT, built 1942), Kronprinsen (Norwegian, 7073 GRT, built 1942), Laurelwood (British (tanker), 7347 GRT, built 1929), Linn Boyd (American, 7176 GRT, built 1944), Lord Delaware (American, 7200 GRT, built 1942), Nelson W. Aldrich (American, 7176 GRT, built 1944), Owen Wister (American, 7240 GRT, built 1943), Park Benjamin (American, 7176 GRT, built 1944), Renald Fernald (American, 7176 GRT, built 1944), Samaritan (American, 7219 GRT, built 1943), Stevenson Taylor (American, 7176 GRT, built 1943), William D. Byron (American, 7210 GRT, built 1944), William Tyler Page (American, 7176 GRT, built 1943) and Woodbridge N. Ferris (American, 7200 GRT, built 1943).
The RFA tankers Black Ranger (3417 GRT, built 1941) was also with the convoy.
The rescue vessel Copeland (British, 1526 GRT, built 1923) was also with the convoy.
On departure from the Clyde the convoy was escorted by three groups; Group I was made up of the corvettes HMS Honeysuckle (T/Lt. J.A. Wright, RNR), HMS Lotus (T/Lt. T.S. Cox, RNVR), HMS Oxlip (T/A/Lt.Cdr. J.K. Craig, RNVR) and HMS Rhododendron (T/Lt. R.S. Mortimer, RNR).
Group II was made up of the destroyer HMS Zephyr (Capt. J.H. Allison, DSO and Bar, RN) and the corvettes HMS Allington Castle (A/Lt.Cdr. P.A. Read, RNR), HMS Alnwick Castle (A/Lt.Cdr. H.A. Stonehouse, DSC, RNR), HMS Bamborough Castle (T/A/Lt.Cdr. H. Vernon, RNR) and HMS Farnham Castle (Lt. W.E. Warwick, RNR).
Group III was made up of the sloop HMS Cygnet (Lt.Cdr. P.J. Cowell, DSC, RN) and the destroyers HMCS Huron (Lt.Cdr. H.V.W. Groos, RCN) and HNoMS Stord (Lt.Cdr. H. Øi).
Around 1000B/17, the Flower-class corvettes of Group I proceeded ahead to the Faeroer Islands to fuel.
Around 1915B/17, HMS Allington Castle parted company with the convoy to proceed to Scapa Flow with steering defects. It was hoped that temporary repairs could be made quickly and that she could rejoin the convoy later but in the end this did not materialise.
Around 1130B/18, the escort carriers HMS Vindex (A/Cdr. J.D.L. Williams, DSC, RN, flying the flag of Rear-Admiral A.E.M.B. Cunninghame-Graham, CBE, RN), HMS Premier (A/Capt. R.J. Gardner, RN) and destroyers HMS Zealous (Cdr. R.F. Jessel, DSO, DSC and Bar, RN), HMS Zest (Lt.Cdr. R.B.N. Hicks, DSO, RN), HMS Zodiac (Lt.Cdr. H.R. Rycroft, DSC, RN) and HMS Offa (Lt.Cdr. E.M. Thorpe, DSO, RN) joined coming from Greenock which they had departed around 1500B/17
Around 0745B/19, HMCS Huron and HMS Offa were was detached to the Faeroer Islands to refuel as the weather conditions was considered unsuitable to refuel at sea.
Around 2040B/19, the light cruiser HMS Bellona (Capt. G.S. Tuck, DSO, RN) joined coming from Scapa Flow which she had departed around 1200B/18. On departure from Scapa Flow she had carried out exercises first on completion of which course was set to join the convoy.
Around 1310B/19, HMS Honeysuckle, HMS Lotus, HMS Oxlip and HMS Rhododendron rejoined having completed fuelling at the Faeroer Islands.
Also joining around the same time, coming from the Faeroer Islands, the destroyers HMCS Iroquois (Capt. K.F. Adams, RCN) and HMCS Haida (A/Lt.Cdr. R.P. Welland, DSC, RCN) with them were sixteen Russian submarine chasers which now joined the convoy as well.
Around 2230B/19, HMCS Huron and HMS Offa rejoined on completion of fuelling at the Faeroer Islands.
In the early afternoon of 20 April, HNoMS Stord and HMS Zealous fuelled at sea from the Laurelwood and Black Ranger.
Around 0950B/21, the refuelling of the Russian submarine chasers by the Laurelwood and Black Ranger began. This was completed, except for two remaining, by 0100B/22. During refuelling operations HMCS Haida provided a lee.
Between 0500B/22 and 1300B/22, the two remaining Russian submarine chaser were refuelled by the Black Ranger.
During 22 April, HMS Zephyr, HMS Oxlip and HMCS Huron fuelled from the Laurelwood and HMCS Haida and HMCS Iroquois from the Black Ranger.
Around 0515B/25, the Russian local escort was detected ahead by radar and around 0640B/25, the White Sea (Archangelsk) section of the convoy parted company. This section was made up of the following merchant vessels; British Respect, Cecil N. Bean, David B. Johnson, Empire Garrick, John Gibbon, Keith Palmer, Lord Delaware, Nelson W. Aldrich, Relald Fernald, William D. Byron and William Tyler Page. This section was joined by the Russian destroyers Uritsky, Karl Libknekht, Valerian Kyubishev, Zarkij, Zostkij, Derzkij, Dostojnyj and a number of small craft. The White sea section arrived at Archangelsk on the 28th.
Around 0605B/25, the two Norwegian ships, Kong Haakon VII and Kronprinsen were detached to Kirkenes under the escort of the corvette HNoMS Eglantine which had just joined. They arrived at Kirkenes the following day.
Around 0655B/25, HMS Vindex, HMS Premier, HMS Bellona, HMS Zealous, HMS Zest and HMS Zealous parted company to proceed to the ' flying off area ' in position 70°10'N, 36°10'E.
Meanwhile the 19th Escort Group, made up of the HMS Loch Shin (Cdr. J.P. de W. Kitcat, RN), HMS Loch Insh (T/A/Lt.Cdr. E.W.C. Dempster, RNVR), HMS Cotton (Lt.Cdr. I.W.T. Beloe, RN), HMS Goodall (Lt.Cdr. J.V. Fulton, RNVR) and HMS Anguilla (T/A/Lt.Cdr. C. Morrison-Payne, RNVR) were also sweeping in the approaches to the Kola Inlet to support the convoy. They had departed Scapa Flow around 2000B/17 and had proceeded direct to entrance of the Kola Inlet to patrol there in advance of the arrival of the convoy. They arrived in their patrol area around 1530B/22 and commenced patrolling.
The Murmansk section of the convoy, made up of the remaining merchant vessels, commenced entering the Kola Inlet in the afternoon of the 25th. The last ships of the escort entered the Kola Inlet in the second half of the evening of the 25th.
------------------------------------------------------------------------------------------------------
Convoy RA 66.
This convoy departed the Kola Inlet around 2300B/29.
It was made up of the following merchant vessels; Benjamin Schlesinger (American, 7176 GRT, built 1944), Byron Darnton (American, 7176 GRT, built 1943), Charles A. McAllister (American, 7176 GRT, built 1943), Dolabella (British (tanker), 8142 GRT, built 1939), Eleazar Lord (American, 7247 GRT, built 1944), Eloy Alfaro (American, 7176 GRT, built 1944), Empire Stalwart (British, 7045 GRT, built 1943), Fort Boise (British, 7151 GRT, built 1943), Fort Massac (British, 7157 GRT, built 1943), Fort Yukon (British, 7131 GRT, built 1943), Grace Abbott (American, 7191 GRT, built 1942), Henry Lomb (American, 7176 GRT, built 1943), James M. Gillis (American, 7176 GRT, built 1943), John McDonough (American, 7176 GRT, built 1943), Lawrence J. Brengle (American, 7209 GRT, built 1944), Leo J. Duster (American, 7176 GRT, built 1943), Nicholas Biddle (American, 7191 GRT, built 1942), San Venancio (British (tanker), 8152 GRT, built 1942), Stage Door Canteen (American, 7176 GRT, built 1943), W.R. Grace (American, 7176 GRT, built 1943), Willard Hall (American, 7200 GRT, built 1943), William Pepper (American, 7176 GRT, built 1943), William Wheelwright (American, 7176 GRT, built 1944) and Windfred L. Smith (American, 7191 GRT, built 1943).
The RFA tanker Black Ranger (3417 GRT, built 1941) was also with the convoy.
The rescue vessel Copeland (British, 1526 GRT, built 1923) was also with the convoy.
On departure from the Kola Inlet the convoy was escorted by the destroyers HMS Zephyr, HMS Zealous, HMS Zest, HMS Zodiac, HNoMS Stord, HMS Offa, HMCS Iroquois, HMCS Haida and HMCS Huron.
The 19th Escort Group, HMS Loch Shin, HMS Loch Insh, HMS Cotton, HMS Goodall and HMS Anguilla had departed the Kola Inlet around 1900B/29 to sweep ahead of the convoy.
The 7th Escort Group, HMS Cygnet and the corvettes HMS Alnwick Castle, HMS Bamborough Castle, HMS Farnwick Castle, HMS Honeysuckle, HMS Oxlip, HMS Rhododendron and HMS Lotus (this last one was temporary attached to the 7th Escort Group) departed around 1815B/29 also to sweep ahead of the convoy and then join it around 2300B/29 on leaving the Kola Inlet.
A 1856B/29, in position 065° - Syet Navalok - 3.7 nautical miles, HMS Loch Insh obtained a contact and two minutes later she attacked with Squid. An enemy submarine then surfaced which was engaged with gunfire by HMS Loch Insh, HMS Loch Shin, HMS Cotton and HMS Cygnet until it sank at 1904B/29. HMS Loch Insh then picked up 14 survivors from U-307 while being covered by HMS Cygnet and HMS Lotus. The remainder of the 19th Escort Group meanwhile proceeded to continue the A/S patrol ahead of the convoy.
At 1926B/29, in position 015° - Syet Navalok - 4 nautical miles, HMS Goodall obtained a good contact and three minutes later, while adjusting speed to attack with Hedgehog, she was hit by a torpedo abreast the bridge. HMS Loch Shin immediately turned towards, obtained a contact and attacked with Squid at 1943B/29 followed immediately by HMS Anguilla which attacked with depth charges. HMS Cotton then obtained contact and attacked with depth charges forcing the enemy submarine to bottom. Diesel oil and wreckage were then observed and another pattern of depth charges were dropped on the oil slick. It is considered that this U-boat was destroyed. This was indeed the case as U-287 is considered to have been sunk in these attacks. It is thought that this U-boat had attacked and sunk HMS Goodall.
HMS Honeysuckle and HMS Farnham Castle meanwhile took off the survivors of HMS Goodall and landed then at Vaenga. Some of them, which were fit to travel, were then embarked in HMS Vindex before departure.
At 2056B/29, in position 69°32'N, 34°00'E, a torpedo was seen to miss HMS Alnwick Castle which subsequently obtained a definite submarine contact and carried out two Squid attacks before contact was lost. This was most likely an attack by U-968 which reported attacking an escort vessel with two torpedoes around this time. HMS Alnwick Castle and HMS Rhodondendron remained patrolling in the area but contact was not regained. It is not considered this U-boat was destroyed.
The convoy, escorted by the destroyers listed above, passed Toros Island around midnight during the night of 29/30 April having been delayed for an hour. The 7th Escort Group, less HMS Honeysuckle and HMS Farnham Castle joined the screen around 0023B/30. The 19th escort group joined the screen around 0241B/30.
At 0148B/30, HMS Zealous and HMS Zodiac were detached to follow up on a U-boat sighting by a Russian aircraft about 6 nautical miles to the north-eastward of the convoy and at 0253B/30, HMS Zodiac sighted the enemy which dived and was immdiately attacked. Contact was not regained following the attack but HMS Cotton and HMS Loch Shin were ordered to remain in the vicinity until HMS Vindex, HMS Premier and HMS Bellona had passed.
Around 0300B/30, HMS Vindex, HMS Premier and HMS Bellona proceeded to overtake and join the convoy. They were met around 0440B/30 off Toros Island by all eight destroyers which had doubled back at high speed to escort them to the convoy.
Around 0800B/30, the convoy was detected by the radar on board HMS Vindex bearing 015° at a range of 32 miles. HMS Zest and HMCS Iroquois were then detached to proceed ahead and join the convoy which they did around 0935B/30. The other ships joined the convoy around 1345B/30.
On 1 May, HMS Oxlip, HMS Rhododendron, HMS Honeysuckle, HMS Lotus and HMS Offa fuelled from the Black Ranger.
Around 1700B/2, in position 73°57'N, 12°39'E, the 19th Escort Group, HMS Loch Shin, HMS Loch Insh, HMS Cotton and HMS Anguilla were detached with instructions to search for the destroyers HMS Obedient (Lt.Cdr. H. Kirkwood, DSC and Bar, RN) and HMS Orwell (Lt.Cdr. J.R. Gower, DSC, RN) which were escorting the RFA tanker Blue Ranger (3417 GRT, built 1941).
Also on 2 May, HMCS Iroquois, HMCS Haida and HMCS Huron fuelled from the Black Ranger.
While refuelling HMCS Huron, the Black Ranger switched over tanks and passed over 20 tons of water which put out the boiler fires on board HMCS Huron which then came to a halt at 2140B/2. HNoMS Stord and HMS Offa went to her assistance and carried out an A/S patrol around the stricken destroyer until she was able to get underway around 2214B/2.
Around 1755B/3, when in position 72°22'N, 01°27'E, HMS Bellona reported an unidenified aircraft bearing 165° at a range of 18 nautical miles. Fighters were scrambled and the aircraft turned out to be a JU 88 which was heavily damaged before it was able to retire into the clouds at 1845B/3.
Also on 3 May, HNoMS Stord, HMS Zealous, HMS Rhododendron and HMS Oxlip fuelled from the Black Ranger.
Around 0900B/4, in position 69°48'N, 00°12'W, HMS Obedient, HMS Orwell and the Blue Ranger joined the convoy.
At 1347B/4, HMS Bellona, HMS Zephyr, HMS Zealous, HMS Zest, HMS Zodiac, HNoMS Stord, HMS Offa and HMS Obedient were ordered to proceed to Scapa Flow at best speed. They arrived at Scapa Flow around 1600B/5. Due to a decyphering error HMS Bellona was not detached but she followed at 1724B/4. She arrived at Scapa Flow, actually just ahead of the destroyers, around 1545B/5.
Also during 4 May, HMCS Huron fuelled from the Blue Ranger.
Around 1500B/6, HMS Vindex, HMS Premier, HMCS Iroquois, HMCS Haida, HMCS Huron and HMS Orwell parted company with the convoy to proceed to Scapa Flow where they (except for HMS Orwell, see below) arrived around 2330B/6. Around 1945B/6, HMS Orwell was detached to rejoin the convoy and then escort the Black Ranger and Blue Ranger to Scapa Flow together with the A/S trawler HMS Preston North End (T/Lt. E. Winebloom, RNVR). These ships parted company with the convoy around 2030B/6.
Around 0650B/7, the Loch Ewe section of the convoy was detached. This was made up of the following merchant vessels; Empire Stalwart, Fort Boise, Fort Massac and Fort Yukon. They were escorted by HMS Lotus.
Around 1240B/7, HMS Lotus rejoined the convoy.
Around 1855B/7, the 30th Escort Group joined. This Escort Group was made up of the frigate HMS Byron (Lt. J. Burfield, RN) and the corvettes HMS Caistor Castle (A/Lt.Cdr. B.J. Bowick, RNVR), HMS Kenilworth Castle (A/Lt.Cdr. J.O. Williams, RNR), HMS Launceston Castle (Lt. R.M. Roberts, RNR) and HMS Pevensey Castle (Cdr. E. Hewitt, RD, RNR).
Around 2125B/7, HMS Lotus was detached to Londonderry where she arrived on the 8th.
Around 0340B/8, the 30th Escort Group parted company.
Around 1130B/8, the convoy arrived in the Clyde.
The convoy arrived in the Clyde on 8 May 1945. (53)
30 Aug 2003
On this date a big celebration was held to welcome HMCS Haida to her new home in Hamilton. Thousands attended as the Haida was towed into Hamilton, flanked by two modern Canadian minesweepers. A flypast of WWII vintage aircraft, including the AVRO Lancaster- one of only two left flying in the world was included. (54)
Media links
|
|
Sources
- ADM 173/18453
- ADM 53/117055
- ADM 173/18454
- ADM 53/117056 + ADM 173/18454
- ADM 173/18123
- ADM 53/116905 + ADM 53/118305 + ADM 199/632 + ADM 199/766 + File RG24-D-2 / Vol. 7418 (Library and Archives Canada)+ File RG24-D-2 / Vol. 7418 (Library and Archives Canada)
- ADM 53/116905 + ADM 53/118305 + ADM 199/632 + ADM 199/766 + File RG24-D-2 / Vol. 7418 (Library and Archives Canada)
- ADM 53/116905 + ADM 53/118305 + ADM 199/644 + log of USS Tuscaloosa for October 1943
- ADM 173/18313
- ADM 53/116905 + ADM 53/117522 + ADM 53/117683 + ADM 199/632
- ADM 199/632
- ADM 53/116906 + ADM 53/117523 + ADM 53/117684 + ADM 199/632
- ADM 199/77 + ADM 199/632
- ADM 199/632 + File RG24-D-2 / Vol. 7418 (Library and Archives Canada)
- ADM 199/77 + ADM 199/632 + ADM 234/343
- ADM 173/18214
- ADM 53/118679
- File RG24-D-2 / Vol. 7418 (Library and Archives Canada)
- ADM 199/77
- ADM 199/1426 + File RG24-D-2 / Vol. 7418 (Library and Archives Canada)
- ADM 53/118817 + ADM 53/120161
- ADM 53/118817 + ADM 53/118964 + ADM 53/119469 + ADM 53/120161 + ADM 199/1426 + ADM 199/1427
- ADM 53/118971
- ADM 53/118971 + ADM 199/1393
- ADM 173/19216
- ADM 199/1393
- ADM 53/118972
- ADM 53/118972 + ADM 199/1393 + ADM 199/2291
- ADM 199/1393 + KTB Fuhrer der Schnellboote 16 to 31 March 1944 (NARA, T 1022, roll 3146, PG 71029)
- ADM 53/118972 + ADM 199/1393
- ADM 53/119026 + ADM 53/119489
- ADM 53/119490
- ADM 199/1393 + ADM 234/560 + ADM 234/561
- ADM 53/119028 + ADM 199/1393 + ADM 199/2293
- ADM 53/119028 + ADM 199/263 + ADM 199/1393 + ADM 199/2293 + KTB 4th Torpedo boat flotilla from 16 to 30 April 1944 (NARA, T 1022, roll 2876, PG 70209)
- ADM 53/119490 + ADM 199/1393
- ADM 199/263 + ADM 199/1393 + ADM 234/560 + ADM 234/561
- ADM 199/263 + ADM 199/1393 + ADM 199/2293 + KTB 4th Torpedo boat flotilla from 16 to 30 April 1944 (NARA, T 1022, roll 2876, PG 70209)
- ADM 53/119491
- ADM 234/560 + ADM 234/561
- ADM 53/118976 + ADM 53/118977 + ADM 53/119264 + ADM 53/119265 + ADM 53/120561 + ADM 53/120562 + ADM 199/1394
- ADM 53/119265 + ADM 199/1394
- ADM 199/1394
- ADM 53/119847
- ADM 199/2300 + File RG24-D-2 / Vol. 7419 (Library and Archives Canada)
- ADM 173/19865
- ADM 53/120995 + ADM 53/121004 + ADM 53/121217 + ADM 53/121240 + ADM 53/121930 + ADM 53/122156
- ADM 173/20039
- ADM 173/19580
- ADM 53/121004
- ADM 53/120969 + ADM 53/122004 + ADM 53/122058 + ADM 53/122203 + ADM 199/1440 + ADM 234/560
- ADM 199/1440
- ADM 199/1339 + ADM 199/1440
- Personal communication
ADM numbers indicate documents at the British National Archives at Kew, London.
As an Amazon Associate uboat.net earns a commission from qualifying purchases.